# [Angular] Angular Lifecycle hook ###### tags: `Angular` `前端筆記` 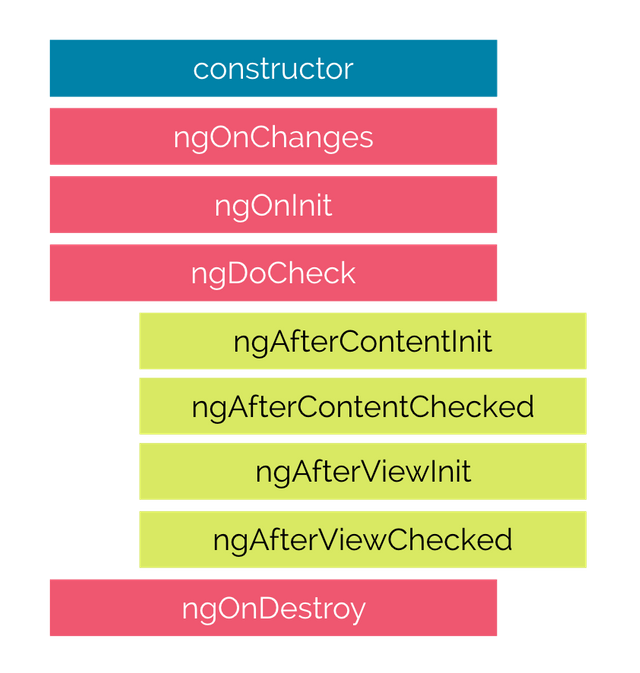 (*[ref.: Lifecycle Hooks](https://codecraft.tv/courses/angular/components/lifecycle-hooks/)*) Angular 建立 component 其實有一連串的順序:建立 -> 偵測綁定的 property 更新 -> component 從 DOM 銷毀(可能因為綁定 data 被刪除等因素),以上流程就被稱之為 lifecylce(生命週期)。 > 1. lifecycle 的單個流程就是一個函式,有需要再 `import` 到 component 使用即可 > 2. 每個流程的順序 Angular 都有嚴格管控叫用的時機 ## 生命週期的執行順序 ### 0. constructor Angular 真正的生命週期是在執行 `constructor` 之後才開始,因為每個 component 都是透過 `class` + `new` 建構出來的。 #### 什麼是 `class`? 什麼是 `constructor`? 可以把 `class` 想成一個藍圖,之後用 `new` 就可以建立數個擁有相同 property 的物件實例(instance),而 `constructor` 則是會負責初始化該藍圖(`class`)的 property。以藍圖建立新的物件時,用 `new` + parameter 可以讓每個 instance 的 property 都有不同的 value。 ```typescript= class Car { //field engine:string; //constructor constructor(engine:string) { this.engine = engine } } const carA = new Car('hello'); const carB = new Car('bye'); console.log(carA.engine); // 'hello' console.log(carB.engine); // 'bye' ``` 根據 Angular 的官方文件,component 的 `constructor` 應該保持簡單,只做 property 初始化,不要做其他事情。(比方來說打 API,就不要放在 `constructor` 內執行)。 另外,只有在結束 `constructor` Angular 才會設定該 component 從 parent component `@Input` 的資料,所以在 `constructor` 也拿不到 `@Input` 從 parent 取得的資料。 > Constructors should do no more than set the initial local variables to simple values. Keep in mind that a directive's data-bound input properties are not set until after construction.  ### 1. `ngOnChanges` - 第一個會觸發的流程(比 `ngOnInit` 還快) - 但是如果該 component 沒有綁定 `@Input` 時並不會叫用 - render 後會偵測 `@Input` 的值有無改變,如果有改變就會再次叫用,藉此知道資料有改變 #### `ngOnChanges` 可以得知 `@Input` 變換的資訊 - 記得在 component 內先引用 `SimpleChanges` - 把 `SimpleChanges` 當作 `ngOnChanges` 的 paramter,之後叫用 `ngOnChanges` 就有更新 `@Input` 值的資訊 - `currentValue`: 更新後的值為何(也就是這次呼叫後的值變成什麼) - `firstChange`: 該值是否為第一次更動 `boolean` - `previousValue`: 更新之前的值(也就是上次呼叫時的值是什麼) - 也可以在這邊先判斷 value 是否有改動(透過 `currentValue` 及 `previousValue` 比對) ### 2. `ngOnInit` - 第二個會觸發的流程 - 只會呼叫一次(就在第一次叫用 `ngOnChanges` 之後,如果沒有 `ngOnChanges`,`ngOnInit` 還是會叫用) - component 的初始化放在這邊執行(e.g. 打 API 等等) - 初始化頁面內容、負責 data 綁定 - DOM 會出現 HTML tag,如果 tags 沒有 `@Input` 綁定值的話,就會直接出現在 DOM - 如 HTML tag 有綁定 `@Iinput` 值的話,那麼此時 DOM 只會有 `@Input` binding 的 HTML tag,但是沒有實際的值(只有 tag)  (用 dev tool 把運行停在 `ngOnInit`)  (非 `@Input` data binding 綁定的 HTMl tag 已經出現,但是不會把值渲染在裡面,只有 tag 而已) - `ngOnInit` 負責綁定 data,換句話來說就是在這個流程 data 正在「綁定中」,所以可以在這邊再次「初始化」從 parent 綁定的 value 是沒問題的(但除非有特別的理由,要不然不用沒事接到綁定的 data 後又洗掉) ### 3. `ngDoCheck` - 在 `ngOnInit` 呼叫後馬上被呼叫 - 之後如果 `ngOnChanges` 被呼叫也會呼叫 - 用途:如果 Angular 無法順利地自行探測改動,開發者可以在這個步驟自己寫 checker,用來確認是否真的有改動 - component 內的 data 有改動也會觸發,所以這邊的程式碼盡量別寫需要大量效能的運算 ### 4. `ngAfterContentInit` - 第一次 `ngDoCheck` 之後會觸發(所以第一次 render 就一定會觸發) - template 有用 `<ng-content>` 將 `<ng-content>` 插入 child component 的 template ### 5. `ngAfterContentChecked` - `ngAfterContentInit` 之後,以及每次 `ngDoCheck` 之後 ### 6. `ngAfterViewInit` - component 完成第一次 render 後才會叫用 > `ngAfterViewInit()` is called after the view is initially rendered. > *ref.: [What's the difference between ngOnInit and ngAfterViewInit of Angular2?](https://stackoverflow.com/questions/40817336/whats-the-difference-between-ngoninit-and-ngafterviewinit-of-angular2)* - 因為已經 render 了,所以 DOM 就會有完全的畫面(不會有只有 tag 但缺少 value) - 可以安全地抓 DOM - 如果子層有用 `<ng-content>` 接受父層插入的 template,在這個步驟才可以抓取,除非多給 `{ static: true }`  (透過 dev tool 把運行停在 `ngAfterViewInit`)  (結果原本在 `ngOnInit` 缺 value 的 tag 都有 value 了) - 如果在子層用 `<ng-content></ng-content>` 由父層插入 template 的話,想要在子層抓取父層插入的 template 可以用 template reference + `@ContentChild` 抓取 > 如果有多給 `{ static: true }` 的話在子層的 `ngOnInit` 就可以抓到,如果沒有的話就要等到畫面 render 完(也就是 `ngAfterViewInit`)才可以抓到 ```htmlmixed= <!-- app/app.component.html --> <app-parent-component></app-parent-component> ``` ```htmlmixed= <!-- app/parent-component/parent-component.html --> <h1>Parent</h1> <app-child-component> <h2 #childNgContent>In Parent ng-content</h2> </app-child-component> ``` ```htmlmixed= <!-- app/parent-component/child-component/child-component.html --> <h1>Child</h1> <ng-content></ng-content> <p>child-component works!</p> ``` ```typescript= // app/parent-component/child-component/child-component.ts import { Component, OnInit, ContentChild, ElementRef, AfterViewInit } from '@angular/core'; @Component({ selector: 'app-child-component', templateUrl: './child-component.component.html', styleUrls: ['./child-component.component.css'] }) export class ChildComponentComponent implements OnInit, AfterViewInit { @ContentChild('childNgContent') ngContentChild!: ElementRef; // 多給 { static: true } -> 子層 Init 也拿的到 // @ContentChild('childNgContent', { static: true }) ngContentChild!: ElementRef; constructor() { } ngOnInit(): void { console.log(this.ngContentChild); // undefined } ngAfterViewInit(): void { console.log(this.ngContentChild.nativeElement); } } ```  (因為沒有給 `{ static: true }` 的話就要等到 `ngAfterViewInit` 才可以抓到 `<ng-content>` 中的 template)  (有給 `{ static: true }` 所以 `ngOnInit` 的時候就可以抓取由父層插入 `<ng-content>` 內的 template) ### 7. `ngAfterViewChecked` - 在 `ngAfterViewInit` 及「每次」 `ngAfterContentChecked` 叫用後觸發 ### 8. `ngOnDestroy` - component 被清除前執行 ## Angular lifecycle 在巢狀的 component 該怎麼執行?  1. Angular 雖然是 typescript,但是 typescript 是 javascript 的型別加強版,所以把東西都想成 javascript 就好 2. template 中也是按照順序編譯(雖然寫起來就跟一般的 HTML 一樣,但是要記得它們也是 javascript) 3. 在 template 中遇到 child component 的 template 就會開始執行 child component 的 lifecycle(在 `ngAfterContentChecked` 之後就進入 child component 的 lifecycle) ## 可以補強的知識 [Enterprise Angular Data Grid A gentle introduction into change detection in Angular](https://indepth.dev/posts/1058/a-gentle-introduction-into-change-detection-in-angular) -> 更仔細說明在不同生命週期的流程改變 `@Input` 有時候會報錯,關鍵字(automatic change detection) [Everything you need to know about change detection in Angular](https://indepth.dev/posts/1053/everything-you-need-to-know-about-change-detection-in-angular) -> 上一篇主題的詳細版本 ## 參考資料 1. [Lifecycle hooks](https://angular.io/guide/lifecycle-hooks) 2. [Angular - The Complete Guide (2022 Edition)](https://www.udemy.com/course/the-complete-guide-to-angular-2/) lec. 78 - 79 3. [[Angular 大師之路] Day 04 - 認識 Angular 的生命週期](https://ithelp.ithome.com.tw/articles/10203203) 4. [Angular Lifecycle Execution flow from parent to child component](https://chauhansawatantra.medium.com/angular-lifecycle-execution-flow-from-parent-to-child-component-f6303c42478)
×
Sign in
Email
Password
Forgot password
or
Sign in via Google
Sign in via Facebook
Sign in via X(Twitter)
Sign in via GitHub
Sign in via Dropbox
Sign in with Wallet
Wallet (
)
Connect another wallet
Continue with a different method
New to HackMD?
Sign up
By signing in, you agree to our
terms of service
.