# [Udemy - Vue] Vue - The Complete Guide (incl. Router & Composition API)
###### tags: `Udemy 課程筆記` `前端筆記` `Vue`
## 27. Data Binding + Event Binding = Two-Way Binding
### 為什麼在 02:50 的時候,在 input 中打字會一直重複 lastName?
==問題出在 HTML 跟 Vue 中的連結==
HTML:
```htmlembedded=
...
<input
type="text"
v-bind:value="name"
v-on:input="setName($event, 'Schwarzmüller')"
/>
<p>Your Name: {{ name }}</p>
```
Vue.js:
```javascript=
...
methods: {
setName(event, lastName) {
this.name = event.target.value + ' ' + lastName;
},
```
HTML `<input>` 有綁定 state `v-bind:value="name"`,也有觸發事件更改 state `v-on:input="setName($event, 'Schwarzmuelle')"`。
在這個情況下,當 `<input>` 有輸入文字 -> 觸發 event(input)-> 更改 state -> 這個時機點後畫面(也就是有綁定 state 的元件)會 re-render -> 所以這時 `<input>` 的 value attritbute 就是 state `name`,出現 input + lastName 的情況 -> 又繼續輸入 -> 觸發 `<input>` 的事件 -> state 更改,`<input>` value attritube 又會改 -> 馬上 re-render,造成我們輸入會一直重複出現 lastName。
## 61. Vue Reactivity: A Deep Dive
Vue 的 state(也就是 data)是靠著 JavaScript 內建的 `proxy` 物件實現的。
### `proxy` 到底是什麼東東?
簡單來說 `proxy` 物件是一個非常靈活的物件容器,需要以建構式(constructor)的方式建立,接受兩個參數叫用,第一個參數為被包裹地物件,第二個參數需為物件的形式(常被命名為 `handler`),==第二個參數決定 `proxy` 的靈活度==。
### `handler` 為什麼決定 `proxy` 的靈活性?
因為 handler 可以有三個重要的屬性(property)的讀取權:
1. target -> `proxy` 包裹的物件
2. key -> 取用包裹物件的 `key`
3. value -> 取用包裹物件的 `value`
除此之外,只要有取用 `proxy` 物件的 `key`,就會自動叫用 handler:
```javascript=
const obj = {x : 12345};
const a = new Proxy(x, { get(target, key, value) {console.log(target, key, value)}});
a.x;
// {x: 12345}
```
其餘範例:
**1. [設定預設值](https://pjchender.dev/javascript/js-proxy/)**
```javascript=
const withDefaultValue = (target, defaultValue) =>
new Proxy(target, {
get: (obj, prop) => (prop in obj ? obj[prop] : defaultValue),
});
let coordination = {
x: 4,
y: 19,
};
console.log(coordination.x, coordination.y, coordination.z); // 4, 19, undefined
// set default value with 0
coordination = withDefaultValue(coordination, 0);
console.log(coordination.x, coordination.y, coordination.z); // 4, 19, 0
```
### 小心,`proxy` 是包覆著目標物件,所以對 `proxy` 更動也會更動到原本的物件(即被包覆的目標物件)
```javascript=
const obj = {x: 1234};
const b = new Proxy(obj, {});
b.y = '1234';
console.log(obj);
// {x: 1234, y: '1234'}
```
乍看之下 `proxy` 可以就和一般兩物件指向單個物件時相等,==但是其實不是,是不一樣的==。
```javascript=
// 物件指向另一個物件的值
const obj = {x: 1234};
const a = obj;
a.y = '1234';
console.log(obj);
// {x: 1234, y: '1234'}
obj === a;
// true
```
```javascript=
const obj = {x: 1234};
const a = new Proxy(obj, {});
a.y = '1234';
console.log(obj);
// {x: 1234, y: '1234'}
obj === a;
// false
```
這也是為什麼 [Vue 官方文件中提及的這個例子](https://vuejs.org/guide/essentials/reactivity-fundamentals.html#script-setup),答案為 `false`:
```javascript=
export default {
data() {
return {
someObject: {}
}
},
mounted() {
const newObject = {}
this.someObject = newObject
console.log(newObject === this.someObject) // false
}
}
```
> When you access `this.someObject` after assigning it, the value is a reactive proxy of the original newObject.
> 因為 `this.someObject` 是 `proxy` 包覆的物件,所以它們本質不相等。
`proxy` 其實是一個很深的概念,這邊只是先大略提 Vue 有用 `proxy` 管理 state的,等到變強後再認真看 Vue 的文件說明。
資源:
1. [Reactivity Fundamentals](https://vuejs.org/guide/essentials/reactivity-fundamentals.html)
2. [[JS] JavaScript 代理(Proxy)](https://pjchender.dev/javascript/js-proxy/)
3. [Proxy](https://developer.mozilla.org/zh-TW/docs/Web/JavaScript/Reference/Global_Objects/Proxy)
4. [JavaScript Proxies](https://www.youtube.com/watch?v=WsdueBVzkTg)
## 65. How Vue Updates the DOM
只要 state 更動,Vue 會透過 **Virtual DOM** 比對目前的 DOM,透過 **diff algorithms** 得到最有效更新 DOM 的方法。
### 什麼是 Virtual DOM?
可以把 Virtual DOM 想成 DOM 的藍圖(該藍圖以 JavaScript Object 的方式儲存 DOM html tags)。
### 為什麼不直接操控 DOM,而是要使用 Virtual DOM?
因為直接操控 DOM 需要花費更多的資源成本,所以框架的開發者寫了很多厲害的**函式**,確保只會更新需要的部分 DOM,不會整個 DOM re-render。
==因為 DOM 才是使用者看到的畫面。==
> 厲害的函式:比方來說 the diff algorithm,用來比對 DOM 及 Virtual DOM 不同的部分,並且只更新不同的部分。
### Virtual DOM 至 DOM 的旅程
透過 Vue 並不是「直接地更新」DOM。
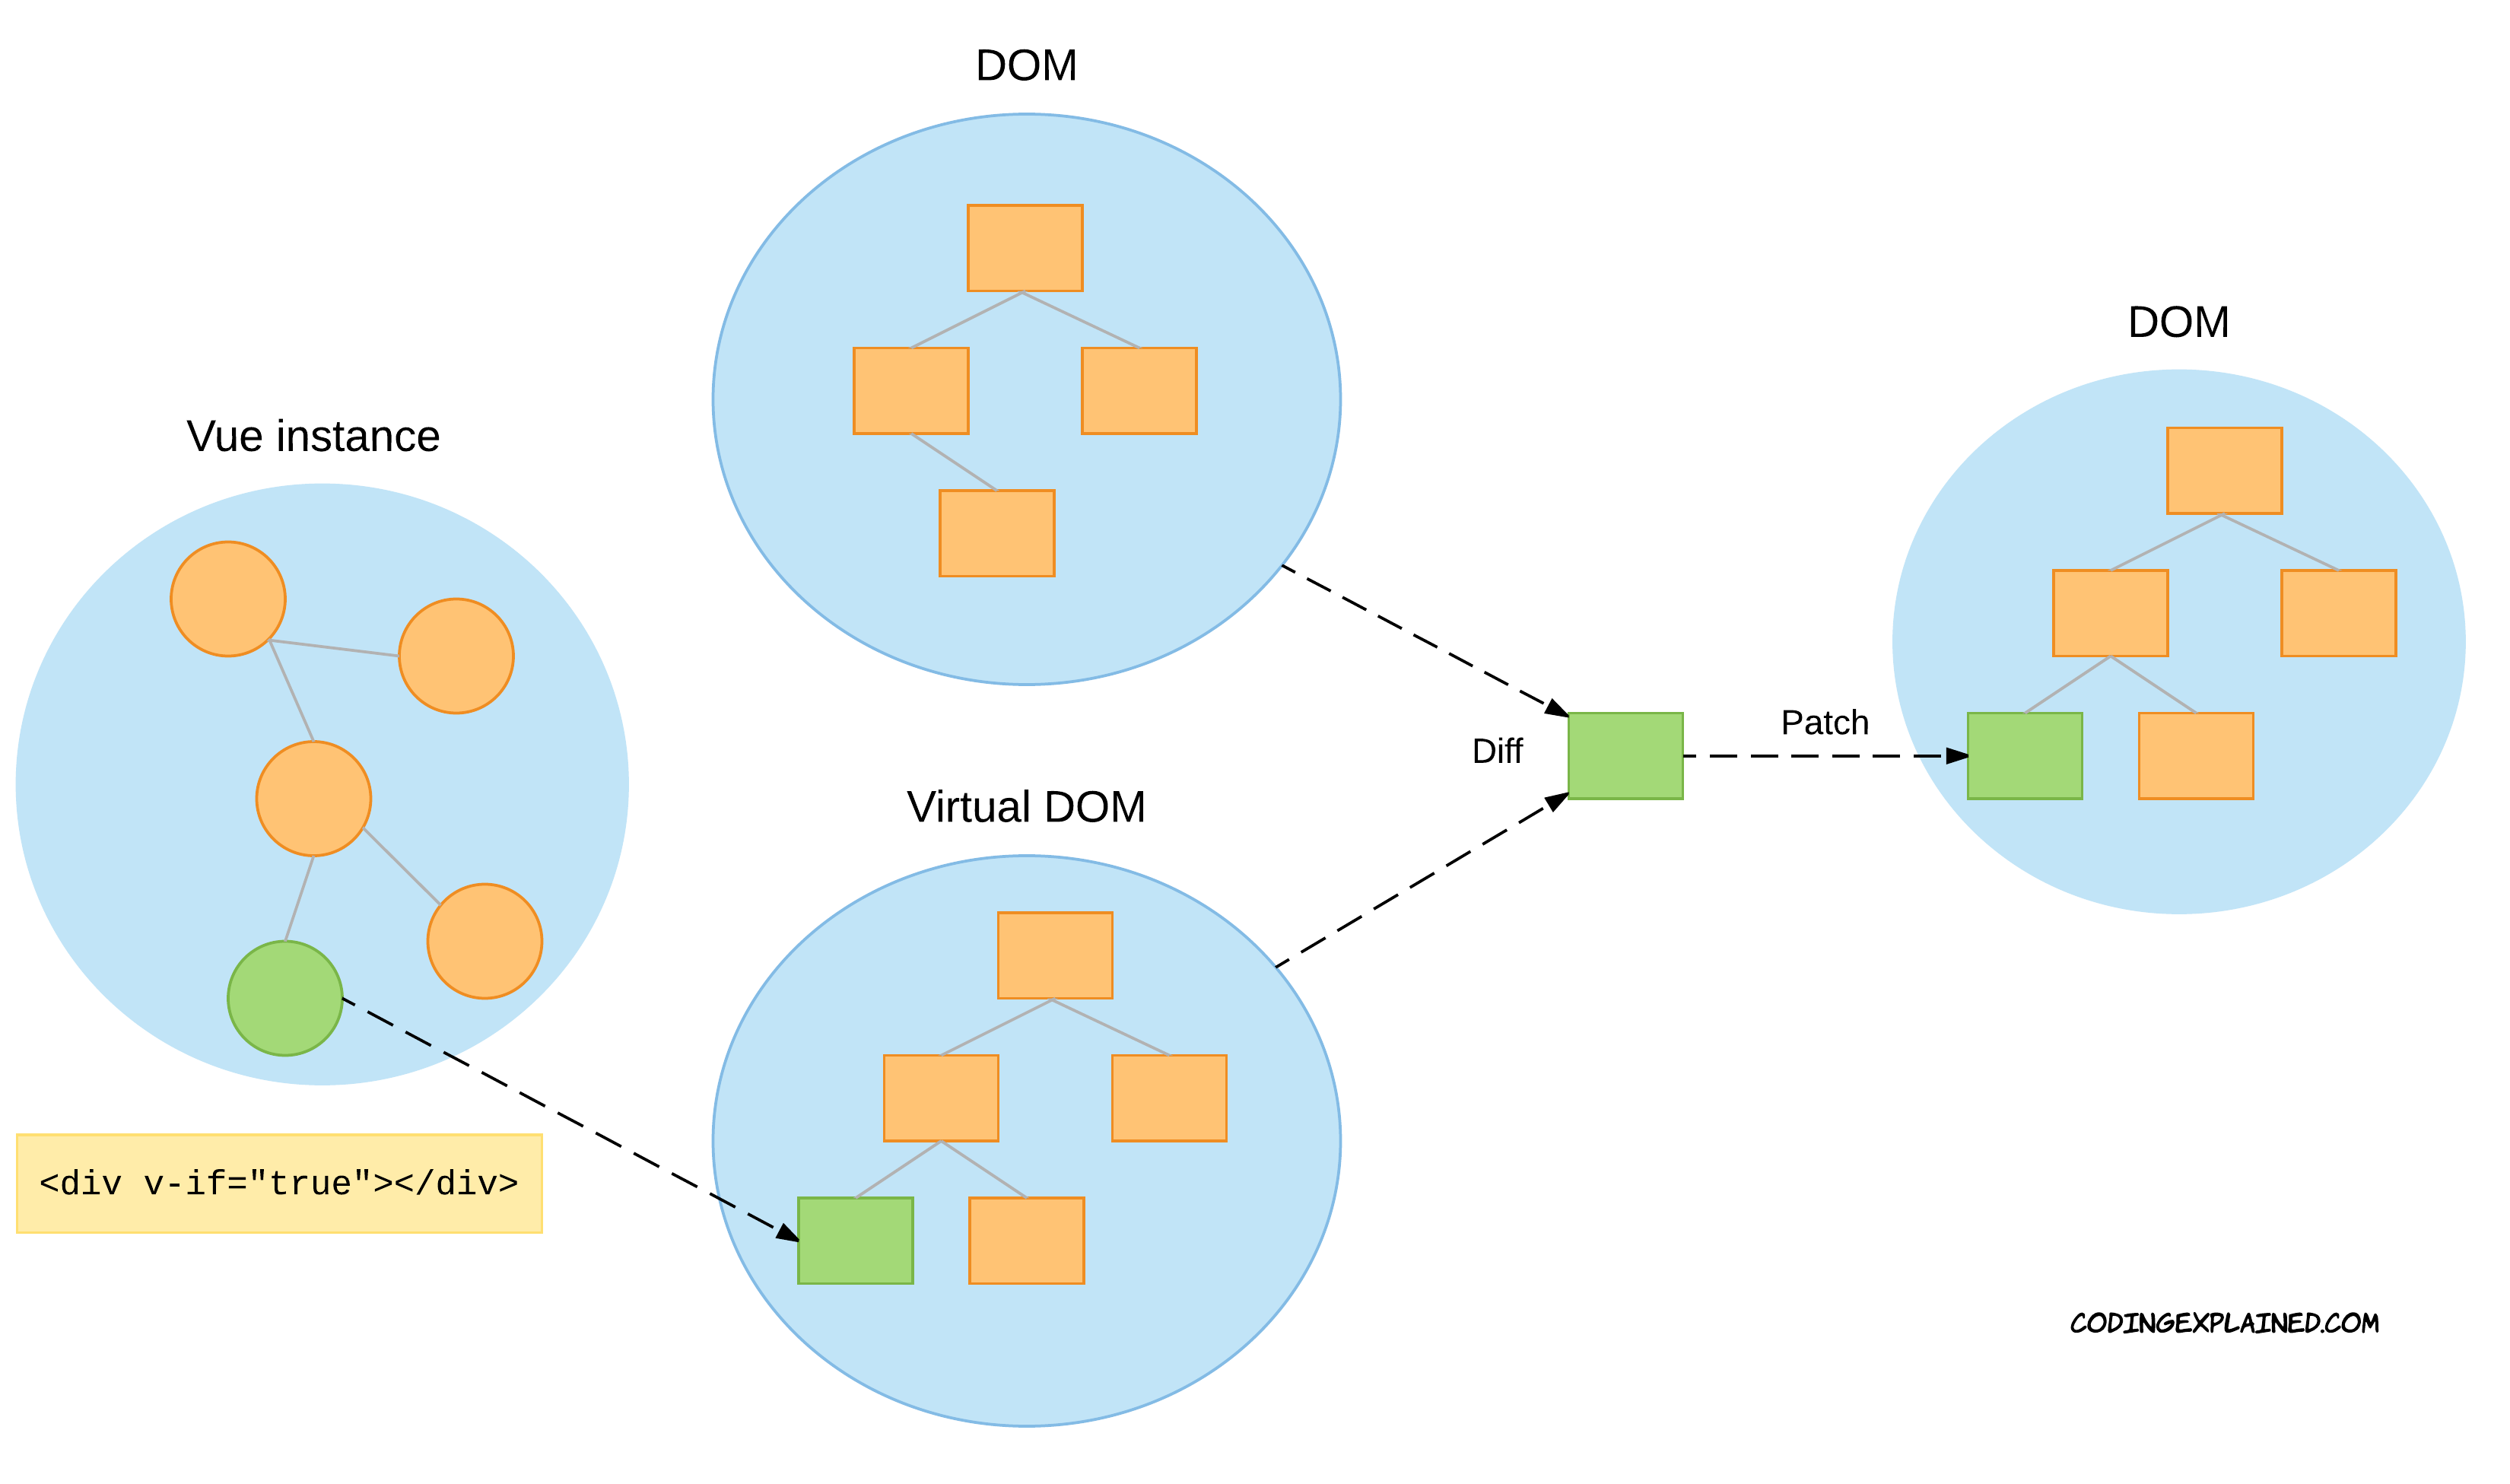
*[Understanding the Virtual DOM](https://codingexplained.com/coding/front-end/vue-js/understanding-virtual-dom)*
1. 在 Vue app 的實例中更新 state,所以 Virtual DOM 對此更新 View(建立了新的元素)
2. 透過演算法 the diff algorithm 找出 DOM 與 Virtual DOM 不同的地方
3. 在 DOM 中只更新需要改動的部分
4. 每次 state 更新都會開始相同的旅程
**順序是 Virtual DOM -> DOM,所以 Virtual DOM 也不用重新拷貝全部的 DOM,每次旅程完 Virtual DOM 都會與 DOM 同步。**
### 之後對 Vue 更熟悉後可以花點時間理解 diff algorithm
[JS Daily Question: The diff algorithm in Vue?](https://developpaper.com/js-daily-question-the-diff-algorithm-in-vue/)
[解析vue2.0的diff算法](https://github.com/aooy/blog/issues/2)
## 67. Vue App Lifecycle - Practice
Vue 的生命週期可分成三個面向:
1. 初始化(Initialization)
2. 插入 DOM (DOM Insertion)
3. 更新(Diff and Re-render)
4. 刪除(Teardown)

### 初始化(Initialization)
初始化在建立 Vue app 後執行(`Vue.createApp({...})`),依照以下順序:`beforeCreate()`-> `created()`。
#### `beforeCreate()`
1. data 中的 state 建立了,但沒有互動性
2. event 也沒有被連結
#### `created()`
1. data 的 state 已經有互動性
2. event 已經連結
3. 畫面還沒 re-render
### 插入 DOM(DOM Insertion)
隨後依照 `beforeMount()`-> `mounted()` 的順序執行。
#### `beforeMount()`
1. components 插入 DOM 的前一個步驟,所以還不會有畫面(在 DOM 還沒有 Vue 的 components)
2. components 在這個時期就會編譯完成
#### `mounted()`
這個時期 DOM 就會有編譯完成的 components(即 html)
==這個時候才有畫面。==
==在這個時候才有辦法取得 DOM。==
### 更新(Diff and Re-render)
當 state 更新後,再 Virtual DOM 與 DOM 比對完後要更新 DOM 之前會先執行兩個時期:`beforeUpdate()` -> `updated()`
#### `beforeUpdate()`
1. 開始更新 DOM 的第一個時期
2. 這個時期可以取得更新 state 的值
3. 在 DOM re-render 之前
#### `updated()`
在 DOM re-render 之後
### 刪除(Teardown)
這個流程結束後 components 就死亡,所以 DOM 便不會有 components。
此流程含兩個時期:`beforeDestroy() / beforeUnmount()` -> `unmounted()`。
### 注意 `mounted` 的小眉角:
根據官方的文件的說法
> For example, the mounted hook can be used to run code after the component has finished the initial rendering and created the DOM nodes.
以及官方的生命週期的流程圖:

可以發現 `mounted()` 其實是會在 component 第一次渲染 + 建立 DOM 節點後才會觸發,那麼如果我們將 state 寫入 template 時, Vue 還是會先觸發寫入 template 中的 state 函式,待整個 component 的初次渲染 + DOM 節點建立完畢後才會叫用 `mounted()`。
```javascript=
// MyComponent.vue
<template>
<p>{{ getTest }}</p>
</template>
<script>
export default {
name: 'MyComponent',
data () {
return {
test: 123,
}
},
computed: {
getTest () {
console.log('in computed');
return this.test;
}
},
mounted () {
console.log('in mounted');
this.test = 111;
}
}
</script>
```
這時打開 Dev Tool 會發現叫用的順序為: `computed` -> `mounted` -> `computed`。


### 在 `mounted` 使用 fetch(或者接收 API)要注意的地方
如上方筆記內容,`mounted` 必須要等到第一次 render + DOM 節點創建後才會執行。如果 `mounted` 內打 API 取得資料後才更動 state,處理不好就會造成錯誤。
程式碼參照 [Vue JS 3 Tutorial for Beginners #9 - Fetching Data](https://www.youtube.com/watch?v=7iDGJolHFmU&list=PL4cUxeGkcC9hYYGbV60Vq3IXYNfDk8At1&index=10)
```javascript=
// MyComponent.vue
<template>
<h1>{{ job.title }}</h1>
<p>{{ job.description }}</p>
<p>{{ job.details }}</p>
</template>
<script>
export default {
name: 'MyComponent',
data () {
return {
job: null
}
},
mounted () {
// 使用套件模仿打 API
fetch('...Url...')
.then((response) => response.json())
.then((data) => this.job === data)
.catch((err) => console.log(err))
}
}
</script>
```
結果會報錯 `TypeError: Cannot read property 'title' of null`,因為在第一次 render 的時候 `job` 指向的記憶體保存的值是 `null`,所以第一次 render 的時候沒有發現 `titile`。換句話說,必須等到第一次 render 後才會打 API,如果有取得值才會更新 `job` 的記憶體指向。
解決的辦法就是在 template 使用 `v-if`,藉由 `v-if` 的判斷決定 template 是否要顯示使用 `job`。
那為什麼 `job` 取得新的記憶體指向就會更新畫面呢?這個就是 Vue 幫助開發者的地方,Vue 會偵測 state,如果 state 有變更就渲染畫面!
```javascript=
// MyComponent.vue
<template>
// 如果 job 轉換型別為 true 才會 render 這塊 div,避免 component 第一次 render 時因為找不到 job.title 所以報錯
<div v-if="job">
<h1>{{ job.title }}</h1>
<p>{{ job.description }}</p>
<p>{{ job.details }}</p>
</div>
</template>
<script>
export default {
name: 'MyComponent',
data () {
return {
job: null
}
},
mounted () {
// 使用套件模仿打 API
fetch('...Url...')
.then((response) => response.json())
.then((data) => this.job === data)
.catch((err) => console.log(err))
}
}
</script>
```
[Vue JS 3 Tutorial for Beginners #9 - Fetching Data](https://www.youtube.com/watch?v=7iDGJolHFmU&list=PL4cUxeGkcC9hYYGbV60Vq3IXYNfDk8At1&index=11)(07:09 開始有講解為什麼需要 `v-if`)
## 110. Global vs Local Components
Component 的註冊方式分成兩種:
1. Global:註冊在 main.js,整個 Vue 都可以使用
2. Local:註冊在想要使用該 component 的 parent component 中。此時該 component 無法被其他 parent components 使用,除非它們也把該 child component local 註冊。
### 該怎麼 local 註冊 component 呢?
1. 在 parent component 中的 script `import` 寫正確的路徑引入該 component
2. 在 script 中新增 `components:{}` 物件,物件的 key 就是之後在 parent component 使用 child component 的 template name。value 則是 `import` child component 用的變數名稱。
```javascript=
// parent compoent
<template>
<div>
<child-component></child-component>
</div>
<template>
<script>
import childComponent from './src/components/ChildComponent.vue';
export default {
// keyName => 在 template 叫用 component 的名字
components: {
'child-component': childComponent
}
}
</script>
```
## 112. Introducing Slots
`slot` 是 Vue 提供的 template 標籤,透過 `slot` 可以讓該 component `<slot></slot>` 標籤中插入外部內層元件的 template(含 state)。
> `slot` 可以保存:
> 1. 文字
> 2. HTML
> 3. component
### 1. 把 component 當作一個包裝紙(wrapper),藉由 `slot` 取得寫在外部的 template 項目
==Parent to child==
```javascript=
// BaseButton.vue
<template>
<button>
<slot></slot>
</button>
</template>
```
```javascript=
// App.vue
<template>
<base-button>
test!
</base-button>
</template>
<script>
import BaseButton from '...';
export default {
component: {
'base-button': BaseButton,
}
}
</script>
```
畫面會顯示如一下 html 解構的結果:
```htmlembedded=
<button>
test!
</button>
```
因為 `BaseButton.vue` 有使用 `slot`,所以 parent component 可以在 `<base-button></base-button>` 中插入文字或者 `<template></template>`,等於告訴 Vue:把 parent 的資料直接插到 child 裡,但是 child 沒有擁有 state 的權利。
**`slot` 只能讀取在 parent component template tag 之間的東西,沒有辦法讀取在 parent component template tag 之上的東西。**
[參考範例](https://v2.vuejs.org/v2/guide/components-slots.html#Compilation-Scope):
```htmlembedded=
<navigation-link url="/profile">
Logged in as {{ user.name }}
</navigation-link>
```
child slot 沒辦法讀取到 paretn component template 上的 `url`。
```htmlembedded=
<navigation-link url="/profile">
Clicking here will send you to: {{ url }}
<!--
The `url` will be undefined, because this content is passed
_to_ <navigation-link>, rather than defined _inside_ the
<navigation-link> component.
-->
</navigation-link>
```
### 2. `slot` 可以設定預設內容(default),如果 parent 沒傳東西就顯示預設內容
```javascript=
// BaseButton.vue
<template>
<button>
<slot>Default</slot>
</button>
</template>
```
```javascript=
// App.vue
<template>
<base-button>
// 沒傳東西給 slot
</base-button>
</template>
<script>
import BaseButton from '...';
export default {
component: {
'base-button': BaseButton,
}
}
</script>
```
畫面會顯示如一下 html 解構的結果:
```htmlembedded=
<button>
Default
</button>
```
因為 parent 沒給 `slot` 東西,所以就會顯示預設值。
### 3. 如果 parent 要傳入多個東西給 child component(wrapper),就需要命名
```javascript=
// BaseButton.vue
<template>
<button>
<slot name="header"></slot>
<slot name="body"></slot>
<slot name="default"></slot>
<slot name="footer"></slot>
</button>
</template>
```
```javascript=
// App.vue
<template>
<base-button>
<template #header>
<h2>I'm header</h2>
<p>寫好要給哪個 slot 就可以傳入多個東西</p>
</template>
<template #footer>
<p>footer</p>
<p>順序不影響</p>
</template>
<template #body>
<p>body</p>
</template>
<template #default>
<p>default</p>
</template>
</base-button>
</template>
<script>
import BaseButton from './components/BaseButton.vue';
export default {
components: {
'base-button': BaseButton,
},
</script>
```
編譯完成後會得到以下 html 結構:
```htmlembedded=
<button>
<!-- header -->
<h2>I'm header</h2>
<p>寫好要給哪個 slot 就可以傳入多個東西</p>
<!-- body -->
<p>body</p>
<!-- default -->
<p>default</p>
<!-- footer -->
<p>footer</p>
<p>順序不影響</p>
</button>
```
1. 即便在 parent 給的順序不一樣,但是 Vue 會依照 child wrapper component 設定的 name 將 parent 給的東西按照順序顯示。
2. parent 需要用 `<template #slotName></template>` 或者 `<template v-slot:slotName></template>` 把東西包起來,這樣子 Vue 才會知道要給哪個 `slot`,而且編譯後也不會顯示 `<template>` 標籤。
## 116. Scoped Slots
`slot` 也可以實現 child to parent 的向上傳遞資料。
==child to parent==
參考資料:
1. [Do Your Vue Components Communicate Correctly?](https://betterprogramming.pub/do-your-vue-components-communicate-correctly-9239c30cc495)
2. [[Vue] Slot 是什麼? 怎麼用?](https://medium.com/itsems-frontend/vue-slot-21e1ec9968f8)
3. [2-4 編譯作用域與 Slot 插槽](https://book.vue.tw/CH2/2-4-slots.html)
```javascript=
// TestSlot.vue
<template>
<ul>
<li v-for="goal in goals" :key="goal">
// 傳給 parent 會變成 Object,:item 就是 Object key
// 一般寫法
// <slot name="default" v-bind:item="goal" v-bind:second="'...'"></slot>
<slot name="default" :item="goal" :second="'....'"></slot>
<!-- <slot></slot> -->
</li>
</ul>
</template>
<script>
export default {
data() {
return {
goals: ['learn vue', 'be a master of vue'],
}
}
}
</script>
```
```javascript=
// App.vue
<template>
<test-slot>
// 一般寫法
// <template #default="Object">
// => Object 就是 child 傳來的資料,如果要使用就是 Object.childComponent 傳來的 keyName
// 可以解構
<template #default="{ item, second }">
<h2>{{ item }}</h2>
<h2>{{ second }}</h2>
</template>
</test-slot>
</template>
<script>
import TestSlot from '....';
export default {
component: {
'test-slot': TestSlot,
}
}
</script>
```
編譯完成會顯示:
```htmlembedded=
<ul>
<li>
<h2>learn vue</h2>
<h2>....</h2>
</li>
<li>
<h2>be a master of vue</h2>
<h2>....</h2>
</li>
</ul>
```
scoped slot 傳 state 給 parent 的時候也要注意有作用域(scope):
[參考範例](https://v2.vuejs.org/v2/guide/components-slots.html#Abbreviated-Syntax-for-Lone-Default-Slots):
`<template #other>` 沒有辦法讀取到 `<template #slotProps>` 的 state。
```htmlembedded=
<!-- INVALID, will result in warning -->
<current-user v-slot="slotProps">
{{ slotProps.user.firstName }}
<template v-slot:other="otherSlotProps">
slotProps is NOT available here
</template>
</current-user>
```
### 所以 `slot` 到底適合用在哪個時候?
根據 Vue 的[官方文件](https://v2.vuejs.org/v2/guide/components-slots.html#Abbreviated-Syntax-for-Lone-Default-Slots):
> Slot props allow us to turn slots into reusable templates that can render different content based on input props. This is most useful when you are designing a reusable component that encapsulates data logic while allowing the consuming parent component to customize part of its layout.
> Slot 可以允許我們建立更好重複利用的 component,
## 136. Adding a Modal Dialog
妥善運用 `slot` 可以創造出重複實用性更高的 component,以 component `Dialog` 為例:
需要注意的點:
> 1. .dialog-backdrop @click="$emit('close-dialog')"
> 2. slot #header {{ title }}
> 3. base-button @click="$emit('close-dialog')"
> 4. ==在 child component 的 state / style 就會被編譯(被認作)於 child component,在 parent component 的則是在 parent component 本身,換言之, child component 如果 style scoped 就不會影響到 parent component 的 style,即便 parent 有使用 child component。==
圖像化:

```javascript=
<template>
// emit 會自動射往叫用這個 component 的 parent component 中的 methods
<div class="dialog-backdrop" @click="$emit('close-dialog')">
</div>
<div class="dialog">
<header>
// 如果 parent 有傳 props,且沒有傳 template 給 slot #name 的話就回出現 slot 預設的 {{ title }}
<slot name="header">{{ title }}</slot>
</header>
<div class="dialog-body">
<slot name="default">
This is default dialog body.
</slot>
</div>
<footer>
<slot name="footer">
// emit 會自動射往叫用這個 component 的 parent component 中的 methods
<base-button @click="$emit('close-dialog')">Close</base-button>
</slot>
</footer>
</div>
</template>
<script>
export default {
name: 'BaseDialog',
props: {
title: {
type: String,
required: false
}
},
emits: ['close-dialog'],
}
</script>
// 這邊的 style 有使用 scoped,所以只屬於這個 component
// 基本的 Dialog 外皮,裡面的 template 藉由 slot 從外面插入!
<style scoped>
.dialog-backdrop {
position: fixed;
top: 0;
right: 0;
bottom: 0;
left: 0;
width: 100%;
height: 100%;
background-color: rgba(0, 0, 0, 0.6);
display: flex;
flex-direction: column;
justify-content: center;
align-items: center;
z-index: 10;
}
.dialog {
width: 70%;
background-color: #FDFDFD;
z-index: 100;
position: fixed;
top: 50%;
left: 50%;
transform: translate(-50%, -50%);
}
.dialog header {
padding: 1.5rem .5rem;
background-color: Purple;
color: White;
}
.dialog footer {
margin: .75rem 0;
display: flex;
justify-content: center;
align-items: center;
gap: 1.5rem;
}
</style>
```