# Clarissa's Notebook Fall 2023
## BIO-LLUFOGRAPHY
#### my lluf catch phrase: "Yes, *and*—"
"catch phrase," *noun*: a well-known sentence or phrase, especially one that is associated with a particular famous person.
you = LL famous!
#### lab:
my-lab
#### tools I can help others with:
* Adobe Premiere
* Adobe Illustrator
* Lighting
#### my personal learning goals for this fall:
I love working in the learning lab and building my skills with as many tools as I can get my hands on! This semester, I'm particularly excited about Blender, DaVinci Resolve, and cameras, all of which I have a beginner's familiarity with (although I'm least familiar with Resolve).
((a brief paragraph or two, a letter to myself, outlining my overarching goals for this term. It might include a tool you are hoping to get better at. If so, include a note about where you are currently at with this tool, if it's totally new to you or if it is one you got a taste of last year, or even if it is one that you know pretty well but want to really become a legendary builder/maker/thinker in that tool.
Or maybe, just maybe, you have an idea for some dreamy pie in the sky, moonshot project that you want to try to work towards. This would be something in the alt-senior-thesis realm, and would eventually require some robust proposal for approval, but this is a cool place to begin thinking and pitching that idea!))
## key links:
* links you may want to reference often!
* [The LLUF Guidebook for Fall 2023](/Hd1PfV98Q3GXuE5gykSvEA)
* [Work Response Form](https://airtable.com/appCm7g0XXkDhNB9v/shr5OaDtqIJCubFGj)
* [Weekly Update Form](https://airtable.com/appCm7g0XXkDhNB9v/shreQhF2GmuXCGpzV)
## dashboard:
a place for you to keep notes that you commonly refer to! For example, maybe a table of shortcut keys you need help remembering and commonly use:
| Shortcut Key | What It Does |
| -------- | -------- |
| command + tab | toggles between apps! |
| command + space | search and open app |
| I & O & E | in FCPX, selects in and out points in footage and adds to end of timeline |
NOTE: do NOT put any "secret" info here like passwords!
## drafting space
## Week 13: Dec 3-9
### Monday
I spent some time working on my Python script, but didn't make much progress. In trying to add the geometry node setup, there was a problem where I was pretty sure I was adding the nodes correctly, but they weren't showing up in the editor (aka not actually being added).
### Thursday
## Week 12: Nov 26-Dec 2
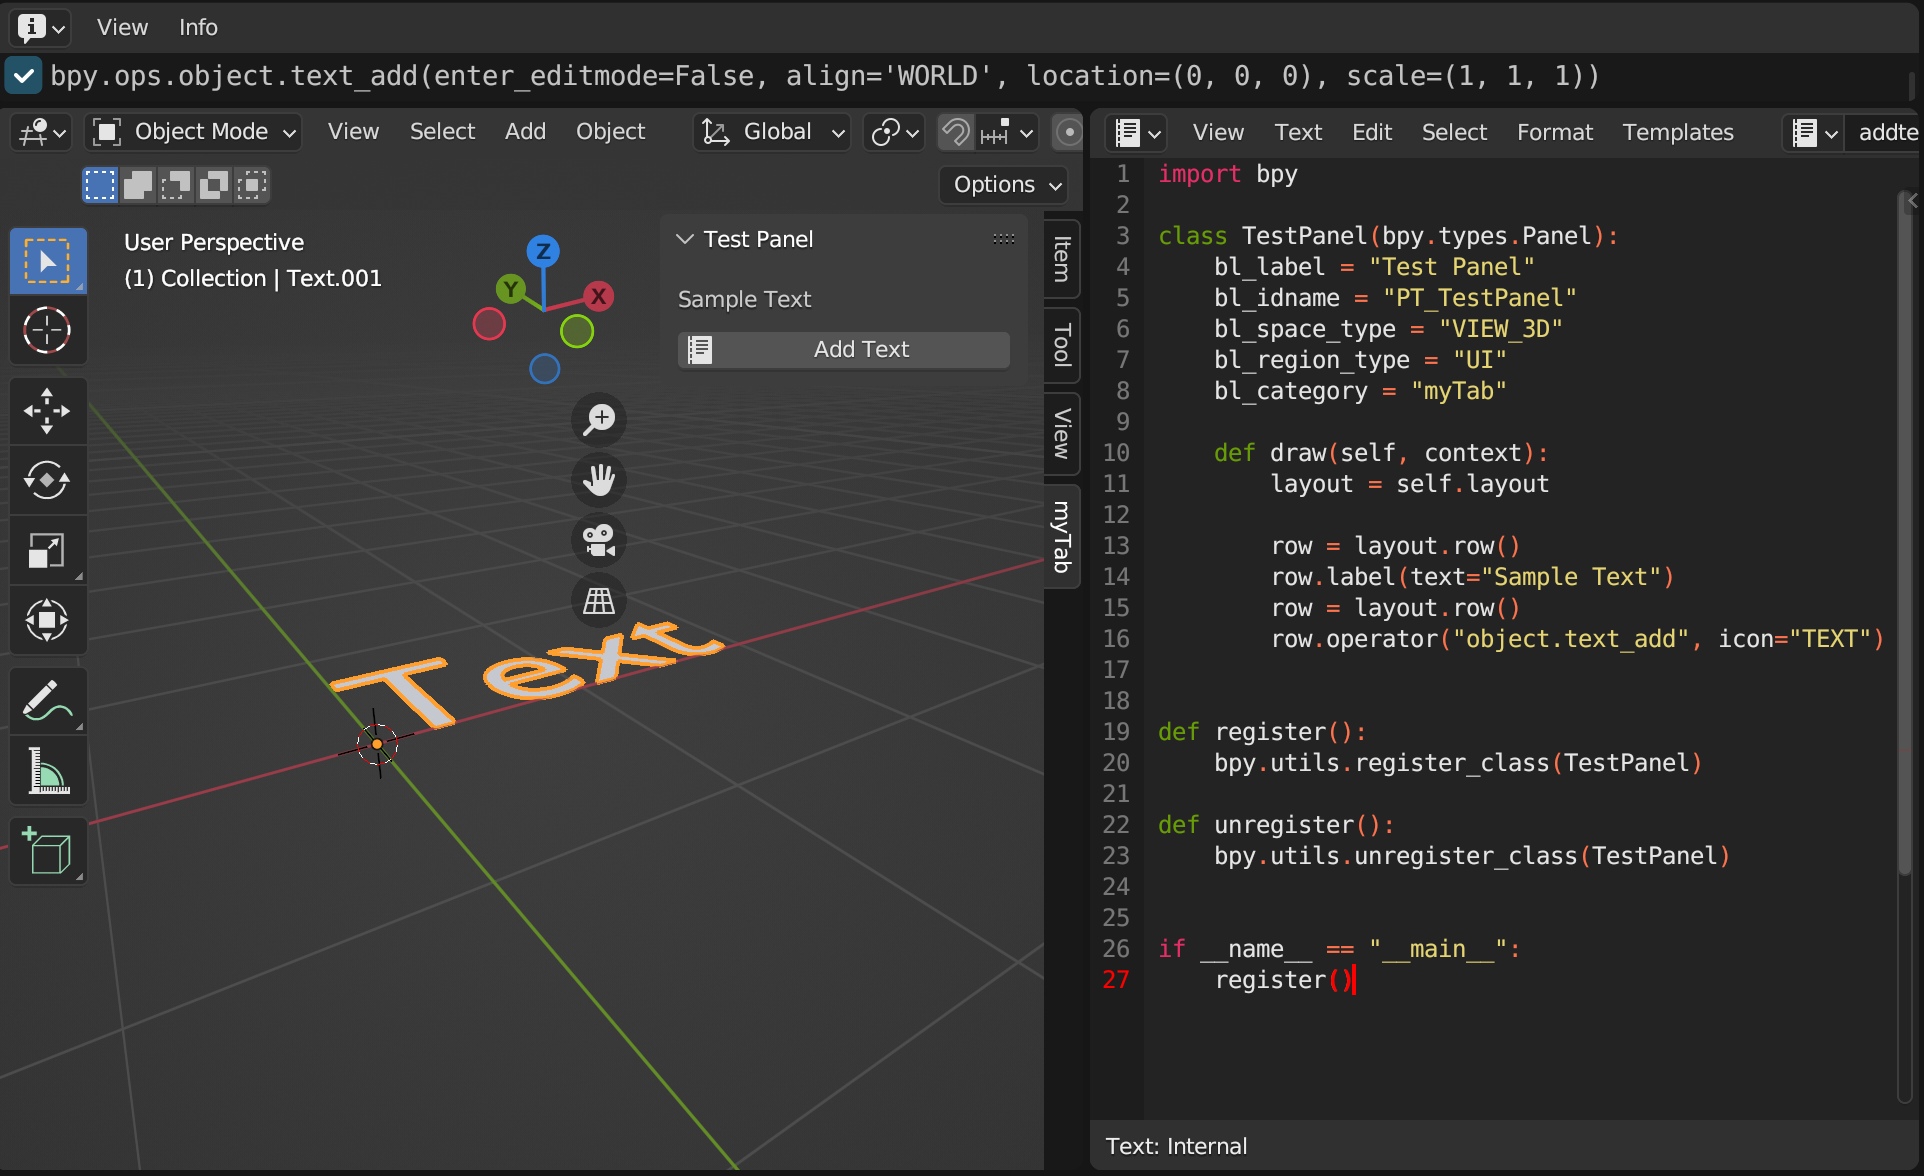
I continued working on my Python script and got to the point where I have a button that creates a text object with custom content. It took a little while to figure out how to get the variable data from the panel's text field to my custom add text operator, but I got it working with a bit of debugging help from ChatGPT. Then I started following [this tutorial](https://youtu.be/Is8Qu7onvzM) on scripting Geometry Nodes to turn the text object into a word cloud.
## Week 11: Nov 19-25
### Monday
Today I continued working with Blender geometry nodes and scripting. Using some of my work from last week, I confirmed my hypothesis that I can get the same falling-text effect by using geometry nodes to generate a static cloud, then animating the camera upwards through the cloud (to make it look like the text is falling). The next thing to do is to try to figure out how to achieve this with a Python script.
I opened up a new Blender file and made a screen recording of the steps to make the falling text effect, with an Information window up in Blender so I could see the underlying operator commands. With that and the scripting tutorial I found last week, I've gotten to the point where I can have a tab with a button to add a text object. However, at this point, I want to learn more about the Blender API before I get too confused / start brute-forcing problems that have simple solutions, so I'll be spending some time reading the documentation.
### Thursday
## Week 10: Nov 12-18

### Monday
The plan for this week was to keep levelling up my realityLab skills by getting familiar with Unity. I started Monday off by helping Texaco make some small buttons for an Expos workshop, then standing downstairs to give the incoming students directions to the Learning Lab. Once the workshop was safely underway, I found myself a [tutorial on the basics of Unity](https://youtu.be/XtQMytORBmM) and started a project on the purple iMac. Following the tutorial, I built a partial clone of Flappy Bird, using a png of a chess piece for the player character. The next steps for this project will be bringing in my models from Blender and writing scripts to make the environment interactive.
### Thursday
On Thursday, Marlon and Jordan talked to me about figuring out how to combine Python scripting and Blender geometry nodes to make a name drop pipeline, such that labs and events could easily make a name drop video. I knew a little bit about geometry nodes but wasn't proficient with them, and I'd never written a Python script for Blender specifically, so my first course of action was (as usual) to look up a tutorial or five.
I found [this video](https://www.youtube.com/watch?v=cyt0O7saU4Q) that gave me a basic introduction to Blender scripts (including tips on how to set up my window for a good workflow, which was very useful), and then I watched most of [this video](https://www.youtube.com/watch?v=V10GBrmYIDM) to remember how to use geometry nodes.
I decided to first figure out how to make a repeatable, customizable name drop in Blender natively, and then figure out how to turn it into a script. It wasn't altogether too hard to make a cloud of duplicated text with the nodes, but then I couldn't figure out how to make them fall. I ended up deciding it was way simpler to make falling text with a particle emitter than with geometry nodes, so I swapped that out, added a basic metallic material, put in some light sources, and rendered a quick animation. While this looks alright, I do want to figure out how to achieve the same effect with geometry nodes; I wonder if it might be possible to use geometry nodes to generate a static cloud of text and then simulate them falling by just animating the camera upwards. I'll probably try that next!
## Week 9: Nov 5-11
### Monday
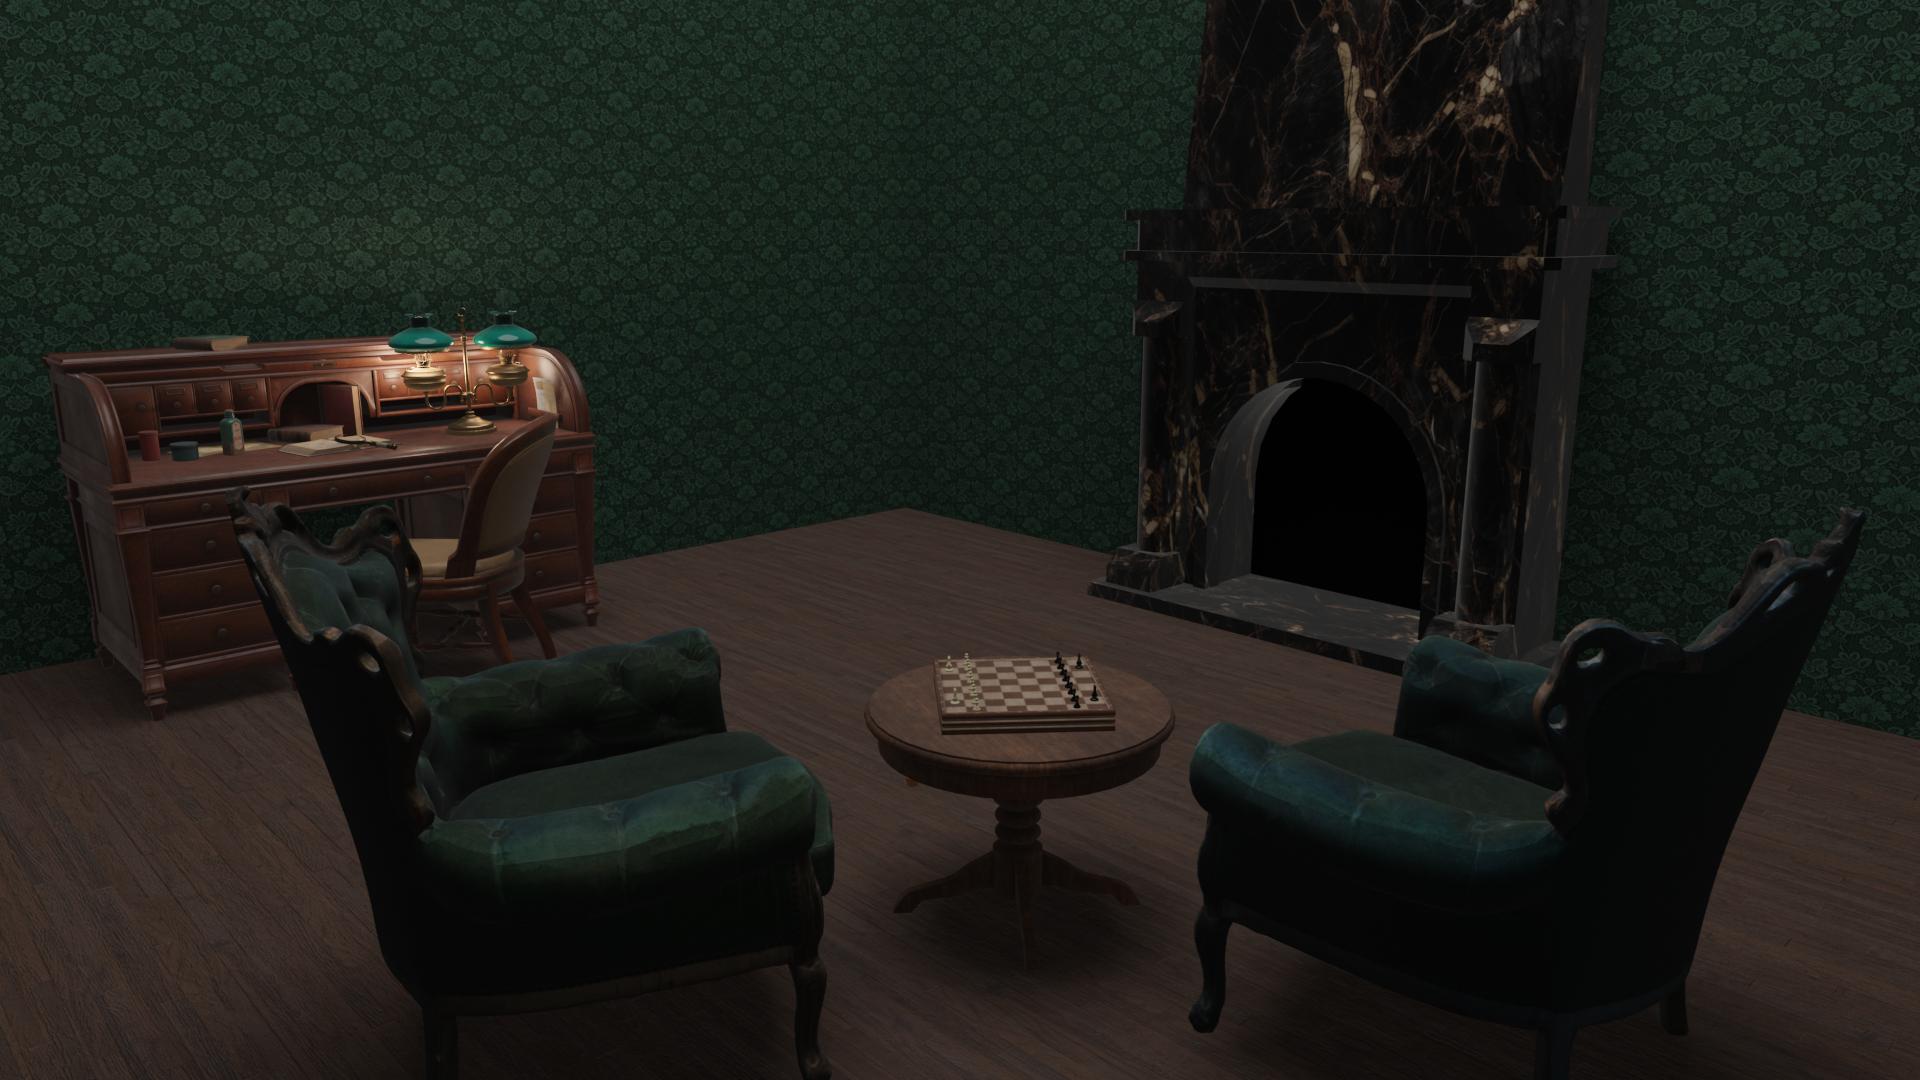
I spent some more time sprucing up my Blender room. I added a marble texture to the fireplace, found more models online of some chairs and a desk, and spent some time lighting the environment to look a little more realistic.
### Thursday
I helped Jordan find and print out some maps of Mexico for an upcoming workshop. I found historical maps by looking through online databases, then also got some more modern maps from Google maps a basic image search.
Then, I checked in with Sophie about my progress on my realityLab ILP. I should talk to Chris too, but for the moment my plan is to keep investigating and learning about Blender and Unity (and maybe Unreal Engine). Sophie advised that I should use one of the Lab computers for game engine work, since it'll probably handle the computational workload better than my poor 5-year old laptop :)
## Week 8: Oct 29-Nov 4
## ILP Update
### Monday
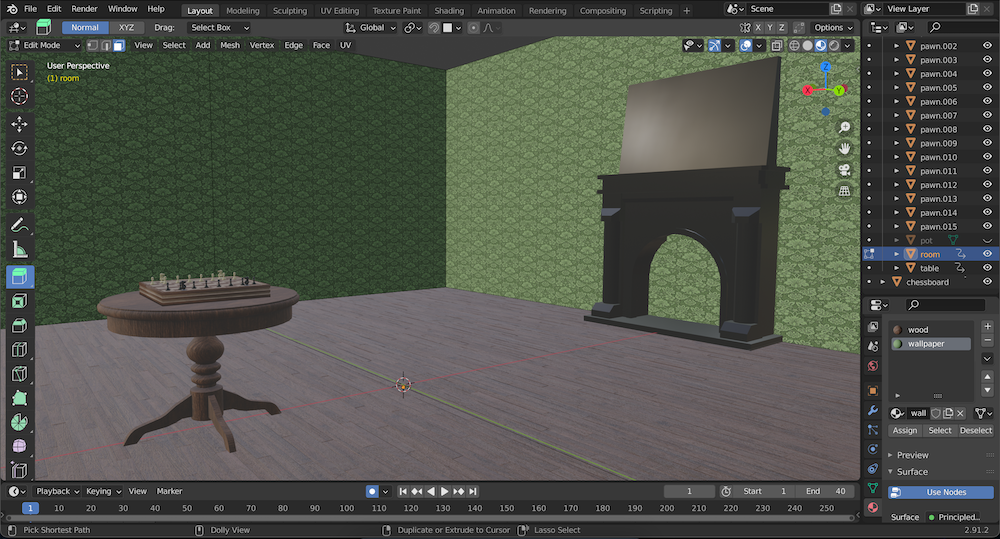
My next step on my ILP was building an environment for my chess models. My plan was to design a kind of quasi-Victorian room, with a dark wood floor, green wallpaper, and various pieces of furniture including a table and some chairs to fill in the space. Because this would involve so many parts, I decided to model the basic geometry of the room myself and then bring in some preexisting models to cut down on the amount I would have to build from scratch.
To start, I found free models online (mostly on [Sketchfab](https://sketchfab.com/3d-models)) of a table, chessboard, and fireplace, and figured out how to duplicate my chess pieces, snap them to the chessboard, and snap the chessboard to the table. I built the room our of a cube by scaling in the borders of the top face and extruding upwards to make walls, then placed the fireplace, table, and chessboard within the room.
### Thursday
The preexisting models had come with textures, but I wasn't happy with the fireplace texture and the room itself still needed materials, so I spent Thursday learning about Blender textures and materials. I found a texture for a wooden floor on [ShareTextures](https://www.sharetextures.com/), because I wanted the wood to have more dimension to it than a flat image. It did take me a while to figure out how to use nodes in the Blender Shader editor to set up the various texture maps, but with the help of some posts on the [Blender Stack Exchange](https://blender.stackexchange.com/questions/220562/properly-setting-up-a-height-map-using-nodes) I eventually figured it out.
The wallpaper was simpler, because I just wanted to find a .png of a wallpaper pattern online and tile it onto my walls. I had to find a seamless texture and play around with the Vector Mapping node, but eventually I got that working too.
### Next Steps
Next up for me is going to be polishing this room design a bit, hopefully by adding some armchairs and other furniture plus some crown molding, then lighting the scene properly for some final render images. At the moment, my chessboard only has knights and pawns on it, but maybe some day I'll add the other chess pieces :)
## Week 7: Oct 22-28
### Monday
I spent Monday catching up on my documentation of what I've been doing in the lab for the past few weeks. I also strategized how to model more chess pieces in Blender: the queen will be relatively simple because it's rotationally symmetrical, so I can use a similar strategy as I did for the pawns (separately modeling the component geometries and then using boolean operations to combine them), but the knight will be trickier since it's a more irregular shape. It should give me a good chance to work on my sculpting skills in Blender! I think I'll be able to sculpt one side of the horse head and then mirror my mesh to get the symmetry right.
### Thursday
I spent my shift on Thursday learning about Blender sculpting and working on my knight chess piece. I had thought I would use the mirror modifier in Edit mode to mirror the geometry of the knight, but I found a [tutorial](https://youtu.be/S9BzW9kTGJA) online about how to use the mirror and symetrize tools in Sculpting mode, which was a lot easier. I also found another [video](https://youtu.be/A6M4GP6WC9k) by the same person that showed me the basics of how to build a mesh suited for sculpting, which was super helpful and taught me about the remesh tool in the Sculpting tab.
I was scared about sculpting the knight, because I feel like it can be hard to conceptualize things in 3D, but I'm pretty proud of how it turned out. I used a bunch of tools from the Sculpting tab, including Inflate, Smooth, Crease, Draw Sharp, and Flatten.
### Next Week
Next week, I'll be building an environment for my chess pieces and continuing my Blender adventure!
## Weeks 5&6: Oct 8-21
### Thursday 10/12
Since I want to join realityLab, I wanted to take a stab at the optional Blender name drop challenge in the Basic Training Package. I figured out how to add text to a Blender scene and split the letters into separate objects, then watched tutorials to learn about applying Physics to make the letters fall. I wanted the letters to crumble into pieces when they hit the base plane, so I looked up tutorials for that and found the built-in add-on "Cell Fracture," which got me the effect I wanted.
(I can't find the Blender file with my name drop anymore -- I'm not sure what happened to it!)
### Monday 10/15
At the end of Thursday, I had turned the parameters too high in Cell Fracture and caused Blender to crash, so Monday was spent retracing my steps. Reducing the number of pieces the Cell Fracture broke each letter into helped the animation run more smoothly. Jordan asked me to make a reversed animation version with "LLUF", so I made a new Blender file for that and added some simple lighting. I exported enough frames for a quick animation, then put them into Blender's video editor to render them into a sequence:
### Thursday 10/19
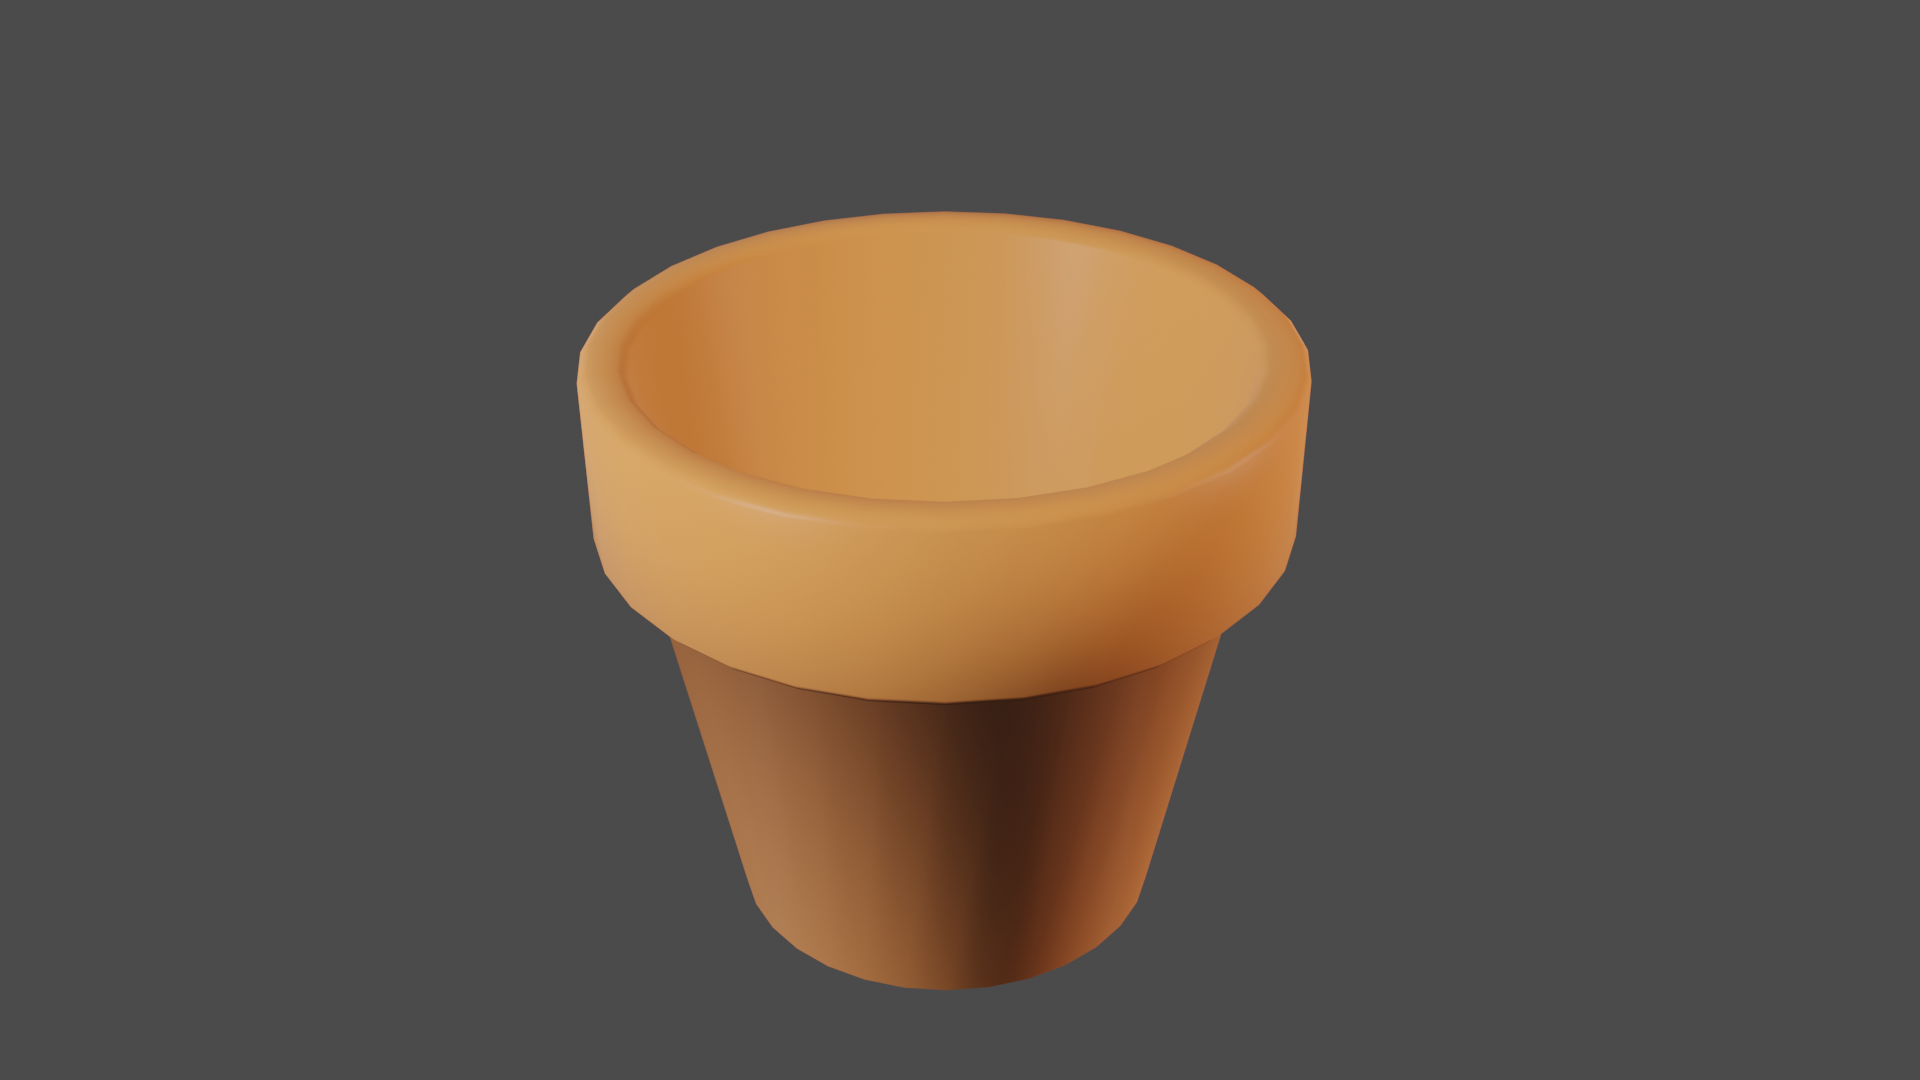
I started working on my realityLab ILP by modeling some small objects I found in the classroom. First was a small ceramic flower pot, because I could tell the geometry was fairly simple and it would be a good starting place for me to be comfortable with the basics of modeling a shape in Blender.
Next, I modeled a slightly more complex shape -- a pawn -- by modeling simpler geometric shapes and then using boolean operations to combine them into one object. I added a material to look like white plastic, then duplicated the pawn to make a matching black piece.
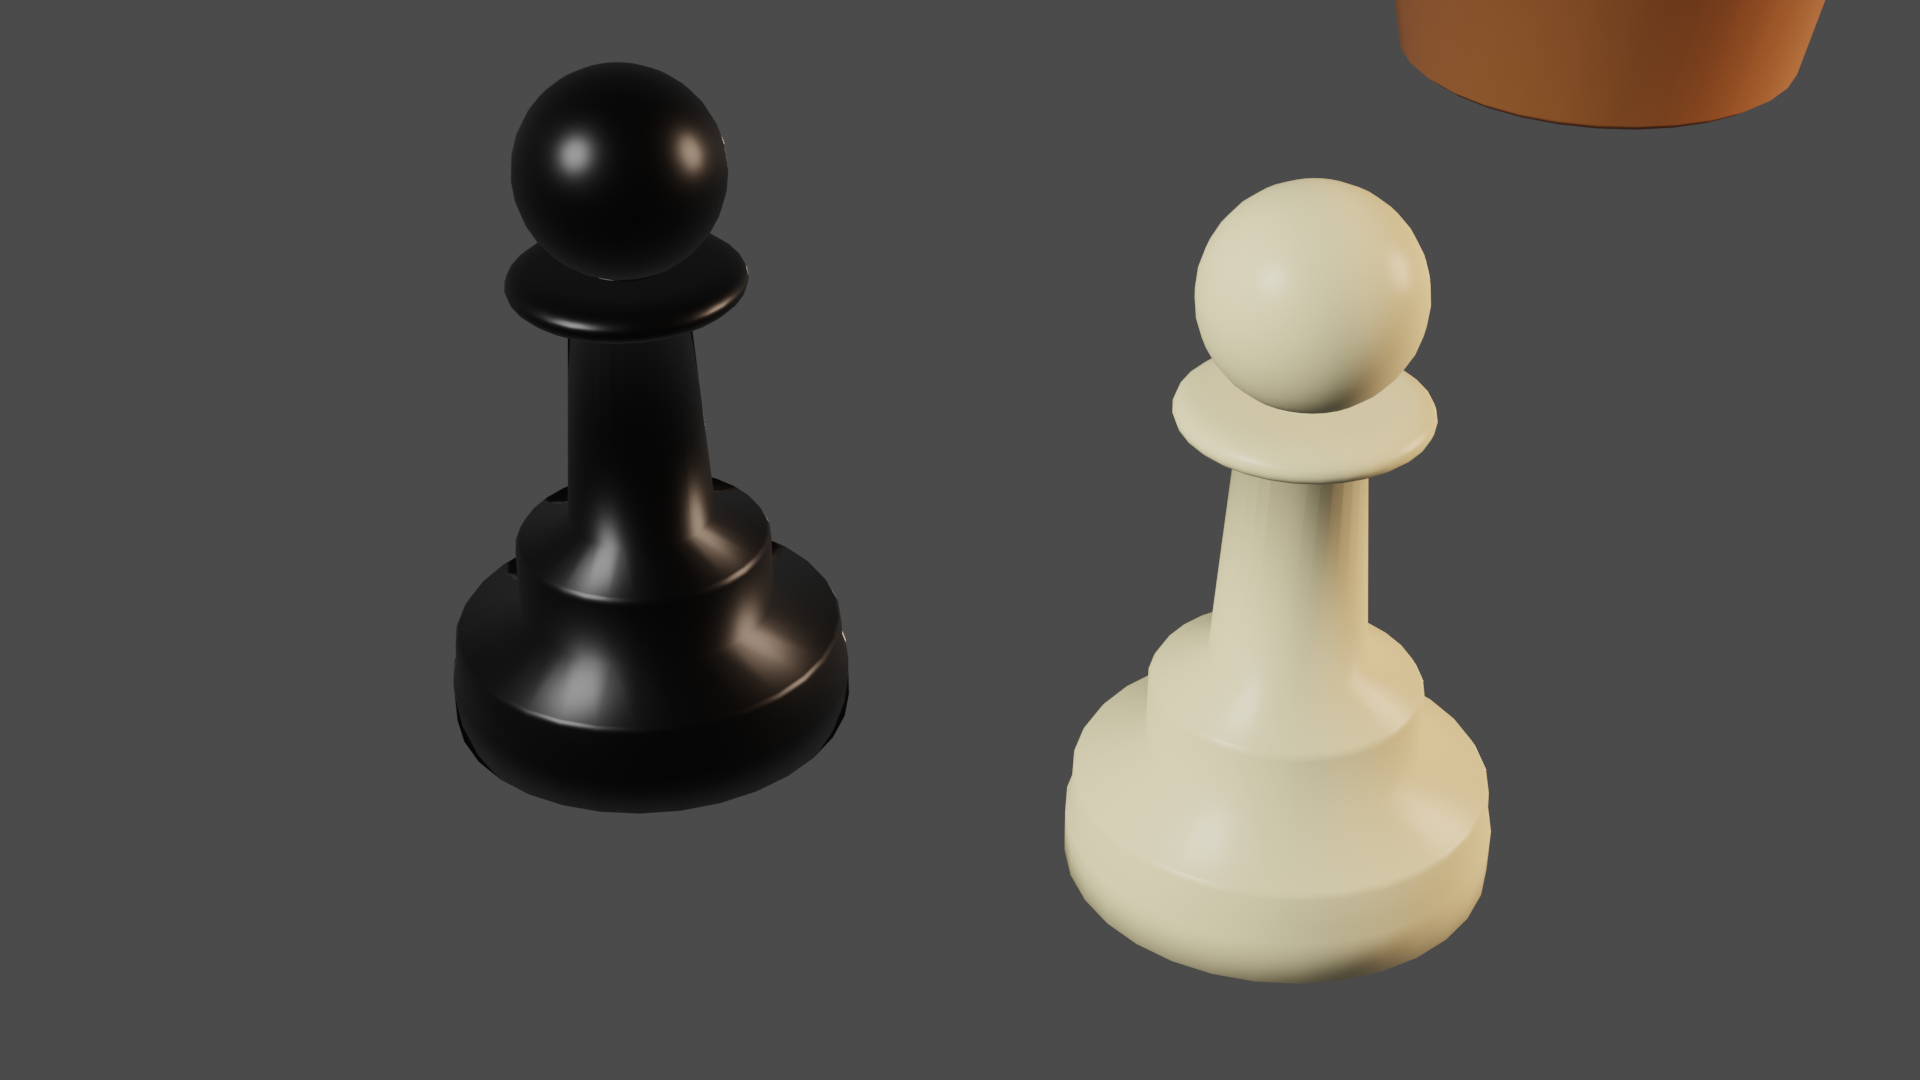
Next up, I'm going to continue my modeling practice with a slightly more complicated shape (I'm thinking more chess pieces, specifically a queen and a knight), then move into the next part of the ILP and start building an environment!
## Week 4: Oct 1-7
Monday: explored the Bok Center's website and read the book chapter posted in the Slack. It was interesting to read a formal writeup of the history, mission, and procedures of the Learning Lab.
### Next steps
## Week 3: Sept 24-30

Monday: I went back and quickly finished up my logo by swapping out the colors for ones with higher contrast! I really like blue and orange as a color combination. Allure helped me remember how to make buttons, since it's been a while. The Slack emoji was surprisingly easy -- I didn't realize custom emojis were that simple!
Thursday: finishing up my basic training!
---
### the breakdown:
If you have an extra 15 minutes or so not spent on higher prioroty tasks, you can totally work on creating a more elaborate and creative data vis of this breakdown, but it would be awesome to get some stats on the following each week at a minimum so we can put together a larger data vis/stats board for storytelling about all of the LLUFs as the year goes on!
| Type of Work | Time Spent | Notes
| -------- | -------- | -------- |
| Learning | 3:00 | Basic training package |
| Testing | HH:MM | this includes any design Labs, and any work request tagged "test" |
| Collecting | HH:MM | this includes any work request tagged "collect" |
| Prepping | HH:MM | this includes any work request tagged "prep" |
| Maintaining | HH:MM | this includes any cleaning or organizing or set up requests. work request tagged "maintain" |
 Sign in with Wallet
Connect another wallet
Sign in with Wallet
Connect another wallet