# JavaScript and Next App basics
## Set up your development environment
1. install [homebrew](https://brew.sh/)
`/bin/bash -c "$(curl -fsSL https://raw.githubusercontent.com/Homebrew/install/HEAD/install.sh)"`
2. install visual studio code (`brew install visual-studio-code`)
3. install node (`brew install node`)
4. install git (`brew install git`)
5. make a `~/Development` folder to put your code in
6. a Github account (optional: needed if you want to use Github to store and share your code and to collaborate with others)
7. a Vercel account (optional: needed if you want the simplest way to put a Next app on the web)
All of this takes a little while to do, so it definitely helps if you go ahead and do this part on your own (preferably when doing something else like watching Netflix, because you'll be spending some time waiting for some of these installs to complete).
## Creating your development folder
Try to get the hang of finding your way around the folder structure of your machine:
* type in ls and hit return. You’ll see a list of all of all the files in your home directory
* now get to the Desktop by entering cd Desktop and then try ls again
* to get back to the home directory you can type cd .. and it will take you “up” one level in your tree.
* try navigating around a little to get the hang of this. If you ever get “lost,” you can use cd ~ to get back to your home directory from wherever you are (and you can use cd ~/Desktop to get to your Desktop from wherever you are, cd ~/Downloads to get to your Downloads, etc)
* in the LL, we are typically going to store our code in a Developer or Development folder. If you don’t have your own, you can create it by navigating to your home folder (cd ~) and then entering mkdir Development
* go ahead and cd Development to get into that folder and you’re done
## Create a Next.js app in Terminal
1. Open Terminal and change directories from your Home folder into your development folder
```
cd development
```
* If you would like to explore what is in your developement folder you can type in the command ```ls``` to list out the contents.
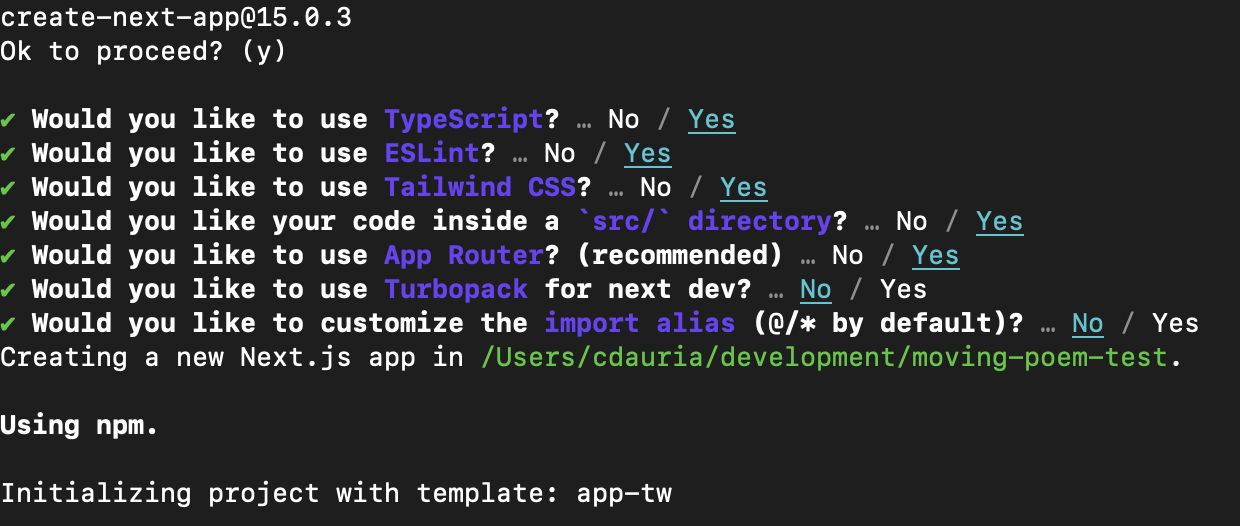
2. Start up a [Next.js](https://nextjs.org/) app by running:
```
npx create-next-app@latest your-app-name
```
**note**: next.js will likely NOT be happy if you try to use capital letters in your app name
You can call it anything you'd like (other than `your-app-name`), but whatever you enter there will show up as a folder containing your starter NextJS app.
This command will also prompt a bunch of follow up questions, select "Yes" for all of them, except for the last question - select "No" for "Would you like to customize the default import alias?".
4. You made a Next app yay! Now you can change directories into it and open it in Visual Studio with the following commands in Terminal:
```cd your-app-name```
```code .```
5. Once it's open, go back to the terminal command and hit `command` and `T` together to open up a new tab in the root of your app. In either of the two tabs, type the following to start the development server.
```
npm run dev
```
6. Once you do this, you should be able to go to [localhost:3000](http://localhost:3000/) in your browser (ex. Google Chrome).
7. (optional) If you would like to connect to Github, type in the following in Terminal and follow the log-in instructions with your Github account:
```
git remote add origin https://github.com/your-github-account-name/your-app-name.git
git branch -M main
git push -u origin main
```
## Exploring your Next app's structure
In Visual Studio, you'll see a folder called src with 3 subfolders: app, components, and utilities. This is where all of your code will live. Let's explore what each of these folders are used for:
### Src / App
There are two things within App, ```page.tsx``` and ```layout.tsx```.
```Page.tsx```, this is your home page. If you would like to make any other pages, they also have to be named page.js for your app to recognize them as pages. It's good practice to make a subfolder in App and create that page.js file within it.
(Ex. if we wanted to make an "about" page as a subpage, we would make a folder called "About" within the App folder and make a page in the "About" folder by making a JS file called page.js.)
```layout.tsx``` contains anything you want to show up accross all pages in your app. This is great for content like headers, footers and navigation bars that you would want to appear throughout the app.
### Src / Components
Components is where you store modular components like `Button`, `Card`, etc. that are used across different pages within your app.
### Src / Utilities
Utilities is where we will store functions that carry out specific tasks that youll use again and again across the app without cluttering your page components.
## Getting page set up:
1. Let's simplify Page.tsx dramatically:
```
import Head from 'next/head'
import Image from 'next/image'
import styles from '../styles/Home.module.css'
export default function Home() {
return (
<div>
<h1>Y/N's app</h1>
</div>
)
}
```
1. Inside the `<title>` tags you can put the title of your site/page, this will show up in the browser tab (among other places) as the title of your page
2. Put a simple title for your project between the `<h1>` tags
3. Ultimately, when we build other pages, we'll put links to them in the footer so it's easy for us to find them.
## We're ready to start coding! Let's go through some JS basics:
## JavaScript basics - variables
Now that we're set up, let's try adding in some variables. **Variables are just a name of a storage location that we assign value to so we can refer to it in our code**. Let's define a variable for your name using the following code in page.tsx:
```
var myName = "Y/N"
```
The variable in this case is **a string** or a collection of alphabets, words or other characters
Once you've defined your name as a variable, you can refer to it by referencing it in return with **curly brackets**:
```
export default function Home() {
return (
<div>
<h1>{myName}'s app</h1>
</div>
)
}
```
## JavaScript basics - integers and floats
We can also store numeric values, such as integers and floating point numbers, in a storage unit type called "const" or constant. Lets define and integer and decimal number of your choice as "myInt" and "myFloat" and have our app perform a simple math operation involving the two values, such as dividing myInt and MyFloat:
```
import Image from 'next/image'
var myName = "Marlon"
const myInt = 7
const myFloat = 13425.13462
export default function Home() {
return (
<div>
<h1>{myName}'s app</h1>
<p>this is a number: {myInt/myFloat}</p>
<p>is this a number? {myInt + myName}</p>
</div>
)
}
```
If we try an operation between a string variable and a constant ({myInt+myName} in the example above), the output will be a string (7Marlon in the example).
## JavaScript basics - arrays
These variables and constants can store singular items, but if want to store a list of items, possible of different data types, in a single variable, we can use arrays. You can even define an array within an array, but there are other ways to organize data on multiple levels we will get to next. Let's start by defining an array:
```
import Image from 'next/image'
var myName = "Marlon"
const myInt = 7
const myFloat = 13425.13462
const myArray =["cat", ["dog", "food"], 43, 56.01, "purple"]
```
We can then index into the array to get, say just "dog" by putting the number of that element . Elements in arrays are zero-indexed, meaning the first item is 0, the second is 1 and so forth. Adding the line below referencing myArray[4] will return just the 4th element from our array, in this case "purple".
```
export default function Home() {
return (
<div>
<h1>{myName}'s app</h1>
<p>this is a number: {myInt/myFloat}</p>
<p>is this a number? {myInt + myName}</p>
<p>this is an element in my array: {myArray[4]}</p>
</div>
)
}
```
## JavaScript basics - objects
Arrays are a type of object, or a collection of data (variables) and methods (functions). If we have data we want to store with more levels to it than a simple list arrays can store, we can define an object to store different levels of information within the same const and index into it. Let's try defining the example object below:
```
const myPopStar = {
name: "Taylor",
age: 33,
albums: [
{
title: "1989",
released: 2014
},
{
title: "Red",
released: 2012
}
]
}
```
We define levels of information with curly brackets and indents. In this case, name, age and album are on the first "level" and properties of those albums are on the second "level"
We can then index into this object to return just one of these entries by using brackets and dot notation. In the example below, just the title "1989" is returned:
```
export default function Home() {
return (
<div>
<h1>{myPopStar.albums[0].title}</h1>
</div>
)
}
```
## brackets, braces, and parentheses
### Curly Braces {}
Curly braces {} are used to define blocks of code, encapsulating a sequence of statements into a single unit. They are essential for various control structures, such as loops, conditional statements, and function definitions.
For example, to define a function named greet that displays a greeting message:
```
function greet(name) {
console.log("Hello, " + name + "!");
}
```
### Square Brackets []
Square brackets [] are integral to working with arrays, which are ordered collections of values. They are used to both create arrays and access elements within them.
For instance, to define an array of colors and access its first element:
```
var colors = ["red", "green", "blue"];
console.log(colors[0]); // Outputs "red"
```
### Parentheses ()
Parentheses () serve several purposes in JavaScript, including function calls, grouping expressions, and controlling the order of operations.
To call a function with arguments:
```
function add(a, b) {
return a + b;
}
var result = add(5, 3);
```
To group expressions and control the order of operations:
```
var total = (2 + 3) * 4; // Parentheses control multiplication order
```
 Sign in with Wallet
Connect another wallet
Sign in with Wallet
Connect another wallet