# mk-resource-slack-plus-open-ai-hello-world
## MW's Creating a Slack Bot with Multiple APIs

This guide will walk you through the process of creating a bot using next.js with multiple APIs including Slack, ChatGPT, and DALL-E.
## Prerequisites
Before you begin, make sure you have:
* A GitHub account
* Node.js and npm installed on your local machine
* A code editor such as Visual Studio Code
* An OpenAI account with an API key
### Step 1: Setting Up the Project
1. Create a new repository on GitHub. Initialize it with a README.md and a .gitignore file using the Node template. Select MIT for the license.
2. Clone the repository to your local machine through the terminal and open it in your code editor.
```
git clone <repository-url>
cd <repository-name>
code .
```
3. Initialize your npm project within the repository folder.
```
npm init
```
4. Install the necessary dependencies.
```
npm i @slack/bolt airtable dotenv openai
```
### Step 2: Setting Up the Slack Bot
1. Go to the Slack API interface and create your bot.
* The easiest way to do this is from "manifest." This allows you to input code that automatically adds all the bot permissions and event subscriptions.
* 
* Below is the manifest. Delete what is automatically in the manifest, and replace it with this. However, note that there are some changes to be made re: names and descriptions. We've marked those in the code below for easy editing:
```
{
"display_information": {
"name": "whatever you want your bot to be called",
"description": "describe your app",
"background_color": "#000000"
},
"features": {
"bot_user": {
"display_name": "whatever you want your bot display name to be",
"always_online": true
},
"slash_commands": [
{
"command": "/whatever-command-you-want",
"description": "description of your bot",
"should_escape": false
}
]
},
"oauth_config": {
"scopes": {
"user": [
"files:read",
"files:write"
],
"bot": [
"app_mentions:read",
"channels:history",
"chat:write",
"chat:write.customize",
"emoji:read",
"files:read",
"files:write",
"groups:history",
"groups:read",
"groups:write",
"groups:write.invites",
"groups:write.topic",
"im:write",
"im:write.topic",
"im:history",
"im:write.invites",
"im:read",
"mpim:history",
"mpim:read",
"mpim:write",
"mpim:write.invites",
"mpim:write.topic",
"links:read",
"links.embed:write",
"links:write",
"reactions:read",
"reactions:write",
"commands"
]
}
},
"settings": {
"event_subscriptions": {
"user_events": [
"file_public",
"file_shared",
"file_unshared"
],
"bot_events": [
"app_home_opened",
"file_public",
"file_shared",
"file_unshared",
"link_shared",
"message.channels",
"message.groups",
"message.im",
"message.mpim",
"reaction_added",
"reaction_removed"
]
},
"interactivity": {
"is_enabled": true
},
"org_deploy_enabled": false,
"socket_mode_enabled": true,
"token_rotation_enabled": false
}
```
-
2. then create a `.env.dev` file in the root of your project, create the app on slack and add all the necessary environment variables.
* NOTE: To find the tokens for bot token, signing secret, app token, and user token, go to Slack's web interface for your app. Some of these tokens will be found in "App Home", while others will be in the "OAuth & Permissions".
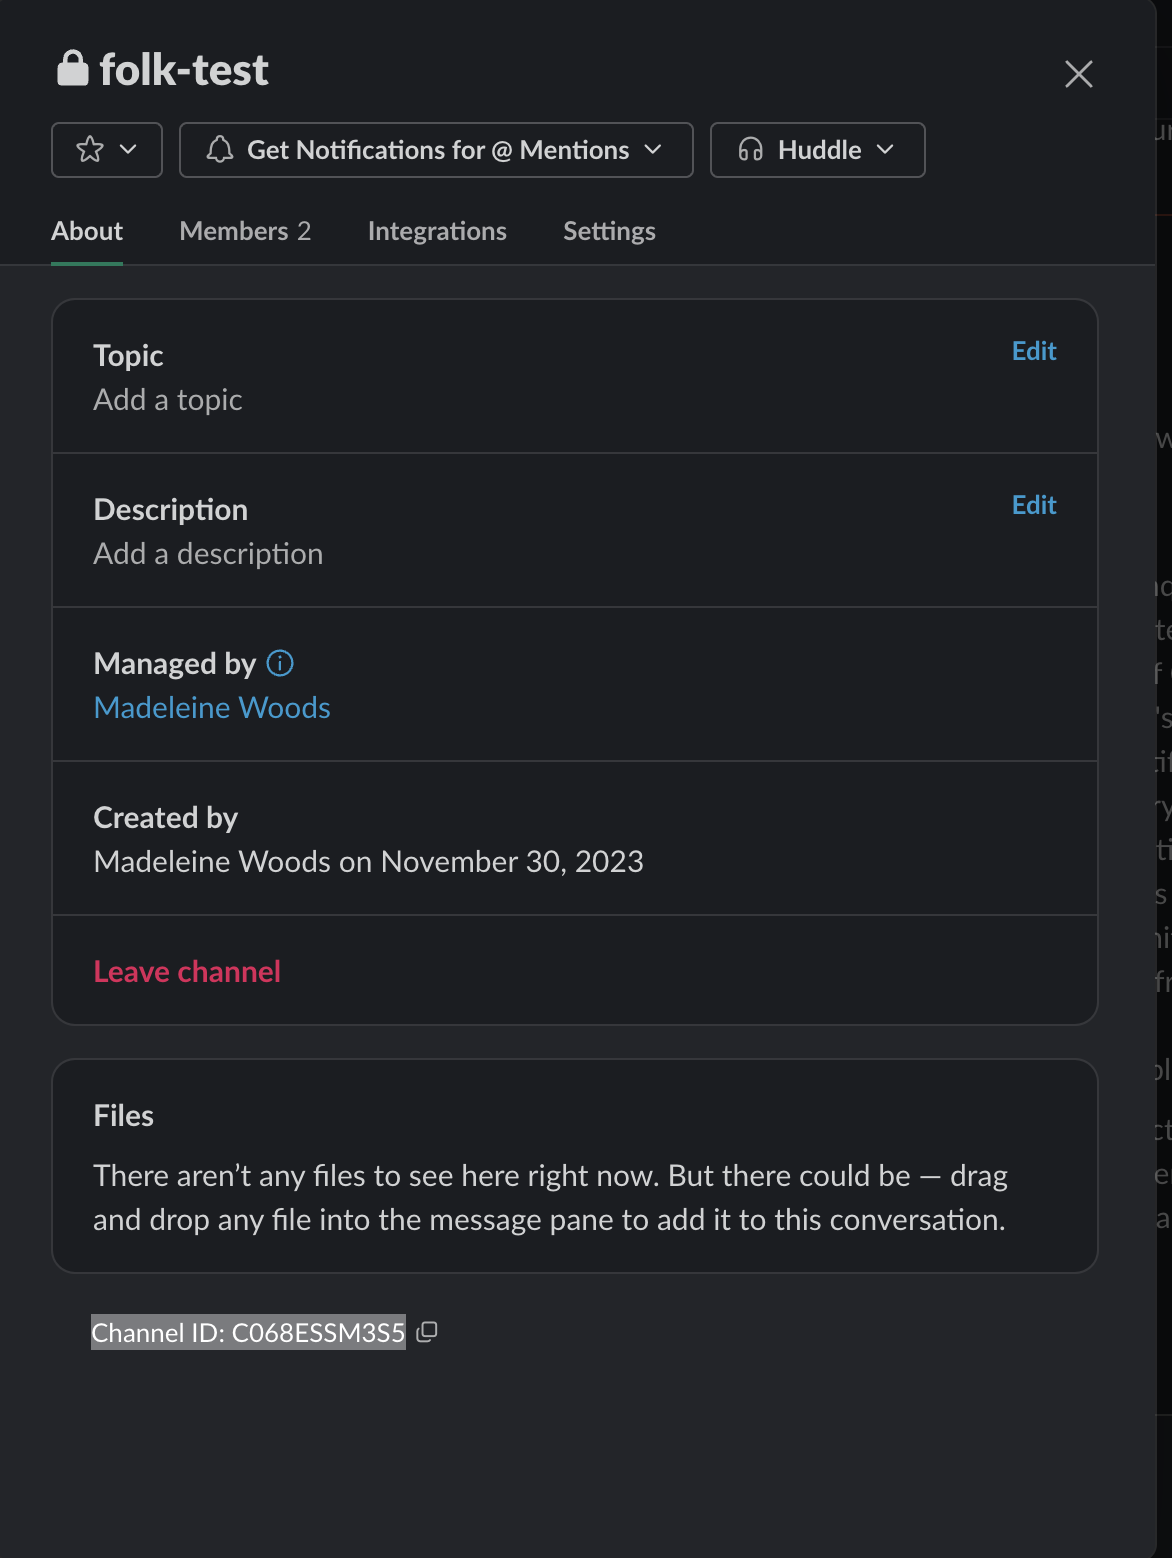
* To find the Slack tests channel, go into the slack channel you intend to use, click the carrot next to the channel name in the top-left of the screen and then find the CHANNEL ID at the bottom of the pop-up window (image below).
```
SLACK_BOT_TOKEN=
SLACK_SIGNING_SECRET=
SLACK_APP_TOKEN=
SLACK_USER_TOKEN=
OPENAI_API_KEY=
SLACK_TESTS_CHANNEL=
BOT_USER_ID=
```
3. If, however, you'd prefer to do this all from scratch (especially if you intend for your bot to have more limited capability, follow these steps:
* Enable Socket Mode and create an app-level token with connections.write scope.
* In the OAuth & Permissions section, give the bot several scopes. These could include:
* channels:history
* chat:write
* chat:write.customize
* files:read
* files:write
* groups:history
* groups:read
* groups:write
* im:history
* im:read
* im:write
* mpim:history
* mpim:read
* mpim:write
* reactions:read
* reactions:write
* In the Event Subscriptions section, subscribe to several events. These could include:
* app_home_opened
* file_public
* file_shared
* file_unshared
* message.channels
* message.groups
* message.im
* message.mpim
* reaction_added
* reaction_removed
### Step 3: Setting Up the Development Environment
1. Create a dev script in your package.json file. You can paste in the code below.
```
"scripts": {
"test": "echo \"Error: no test specified\" && exit 1",
"dev": "export NODE_ENV=dev&& nodemon app.js",
"experimental": "export NODE_ENV=experimental&& nodemon app.js",
"aidev": "export NODE_ENV=aidev&& nodemon app.js"
},
```
2. Update your dotenv configuration in app.js to match the NODE_ENV. (If you haven't made an app.js file in the root of your project, go ahead and make one! We have more code below that you will add to this.)
```
require('dotenv').config({
path: path.resolve(__dirname, `.env.${process.env.NODE_ENV}`)
});
```
### Step 4: Creating the Bot
1. Create an `app.js` file in your project root. This file will contain the main logic for your bot.
2. Import the necessary modules and initialize your Slack app. This should all go into the `app.js`
```
const { App } = require('@slack/bolt');
const path = require('path');
require('dotenv').config({
path: path.resolve(__dirname, `.env.${process.env.NODE_ENV}`)
});
global.ROOT_DIR = path.resolve(__dirname);
const app = new App({
token: process.env.SLACK_BOT_TOKEN,
signingSecret: process.env.SLACK_SIGNING_SECRET,
socketMode: true,
appToken: process.env.SLACK_APP_TOKEN,
port: process.env.PORT || 3000
});
```
3. Add a message handler to your app. This handler will be triggered whenever a message is received.
```
app.message(/.*/, async ({message, say}) => {
console.log(JSON.stringify(message, null, 4));
const result = await say("got it");
console.log(JSON.stringify(result, null, 4))
});
```
4. Add the code that will appear in terminal when you start up your app (we're still in the app.js file here). Just stick this statement at the bottom of your code.
```
(async () => {
await app.start();
console.log('⚡️ Bolt app is running!');
})();
```
NOTE: If you are lost at this point, fear not! All together, your code in `app.js` should look something like this:
```
const { App } = require('@slack/bolt');
const path = require('path');
const handleAllNonBot = require('./src/handle-all-non-bot');
require('dotenv').config({
path: path.resolve(__dirname, `.env.${process.env.NODE_ENV}`)
});
global.ROOT_DIR = path.resolve(__dirname);
const app = new App({
token: process.env.SLACK_BOT_TOKEN,
signingSecret: process.env.SLACK_SIGNING_SECRET,
socketMode: true,
appToken: process.env.SLACK_APP_TOKEN,
port: process.env.PORT || 3000
});
app.error((error) => {
console.error(error);
});
app.message(/.*/, async ({ message, say, client }) => {
console.log("Message received:", message);
if (!message.subtype || message.subtype !== 'bot_message') {
await handleAllNonBot({ message, say, client });
}
});
(async () => {
await app.start();
console.log('⚡️ Bolt app is running!');
})();
```
5. Now, in your terminal, run your app with the command : `npm run dev`
---
## Congratulations!
* You have created the base of a slackbot. Now, let's add two APIs of OpenAI: chatGPT and DALL-E.
* The chatGPT API will allow you to chat with your bot as if you are directly communicating with chatGPT. However, you will get to set a system prompt and finetune.
* This will allow you to give your bot specific tasks, roles, and response structures.
* The DALL-E bot will allow you to generate and post images.
* Before starting, make sure you get your API keys from your openAI account and store them in a safe and secure location (never share these!!!). You will also add these keys to your `.env.dev` file you made during Step 2: Part Four.
* You will never put your keys directly in your code, but reference them by name in the rest of your code. This is precisely what the dotenv file does. This is **very important** and protects our accounts.
---
### Step 5: Integrating with OpenAI
1. Add an openAI dependency by going to terminal and running this line:
``npm install openai``
2. Create a `handle-all-non-bots.js` file in at the root of your project. This file will contain the logic for handling messages from non-bot users. At this point, your file directory should look something like this:

* You will mainly work with three pages, as many are automatically added dependencies. The three pages are:
* `app.js`
* `.env.dev`
* `handle-all-non-bots.js`
2. Import the necessary modules and initialize your OpenAI instance in handle-all-non-bot.js.
```
const { llog } = require('./utils');
const OpenAI = require('openai');
const BOT_USER_ID = 'XXXXXXXXXXX'; // Replace with your bot's user ID, which you can find in terminal when talking with your bot. It should look something like this: U0684XN00X0
const handleAllNonBot = async ({ message, say, client }) => {
console.log("handleAllNonBot called with message:", message);
// Continue with the rest of your code
};
```
3. Add logic to handle messages from non-bot users. This should include checking if the message is from a bot, checking for direct mentions in group channels, and handling direct messages.
```
if (message.subtype && message.subtype === 'bot_message') {
console.log("Ignoring bot message");
return; // Skip responding to bot messages
}
const mentionRegex = new RegExp(`<@${BOT_USER_ID}>`);
if (message.channel_type === "group" && !mentionRegex.test(message.text)) {
console.log("Bot not mentioned in a group channel, ignoring message");
return; // Skip responding if the bot is not mentioned in group channels
}
// Continue with the rest of your code
```
4. Add logic to handle AI interactions with the message. This should include preparing the OpenAI API call with the message text, making the API call, and handling the response.
```
const openai = new OpenAI({
apiKey: process.env.OPENAI_API_KEY
});
try {
const chatCompletion = await openai.chat.completions.create({
model: "gpt-3.5-turbo",
messages: [
// Continue with your messages
],
});
console.log("Received response from OpenAI:", chatCompletion.choices);
llog.yellow(chatCompletion.choices);
await client.chat.postMessage({
channel: message.channel,
text: chatCompletion.choices[0].message.content
});
} catch (openaiError) {
console.error("Error during OpenAI API call:", openaiError);
}
```
### NOTE: For me, this is the most exciting part of the code! Specifically this section:
```
try {
const chatCompletion = await openai.chat.completions.create({
model: "gpt-3.5-turbo",
messages: [
// Continue with your messages
],
});
```
* This is where you can give your bot "purpose." At the bare minimum, you should give your bot a personality. To do this, add this to your "messages" section.
```
messages: [
{"role": "system", "content": "you are a mermaid, but your eyes are made of sapphire, so it's a bit hard for you to see. you speak in English, but interspersed with Welsh. Your favorite topic is seaweed, and you don't really like humans."},
{"role": "user", "content": message.text},],
```
* As you can see, I have made my bot a mermaid for this example. You can also add finetuning directly into your code. For this, continue the message chain:
* NOTE: what is [finetuning](https://platform.openai.com/docs/guides/legacy-fine-tuning)? This gives you the ability to "train" your bot by "forcing it" to give the type of answers you want, before it is ever prompted by the users of your slack app.
* This example is mostly frivolous, but fine-tuning is very important when you are trying to get a specific, limited responses from the bot in a specific format.
* For instance, if you want your bot to eventually tutor students, you may use this section to reinforce that the bot never gives away the answer, and give it an example of a "user" asking for the answer" and the "assistant" declining a student's request.
```
{
"role": "user",
"content": "I wanted to talk to you about seaweed. What is the best type for eating and what is the best type for decor?"
},
{
"role": "assistant",
"content": "Ah, seaweed, one of me favorite topics! Mwynhau'r feddwllsoedd! When it comes to eating, one of the tastiest seaweeds is laver, known as "bara lawr" in Welsh. It's often used to make traditional Welsh dish, laverbread. Ydy'n flasus iawn iawn iawn!
For decor, one of the most beautiful seaweeds is kelp, or "ceulp" in Welsh. Its long, flowing fronds and deep green color bring a sense of nature's majesty to any underwater environment. Mae'n gwneud ymwelwyr gwneud deall eu corff a'r grymoedd naturiol dwfn!
Now, I must admit that I'm not fond of humans, but if there's one thing they've done right, it's appreciating the beauty of seaweed in aquariums or even in home decorations. If only they'd treat the sea with the same respect!
So, whether it's for bwyta (eating) or addurno (decorating), seaweed holds a special place in my heart, and I'm always happy to dive deep into a conversation about it!"
},
```
5. Export your `handleAllNonBot` function.
```
module.exports = handleAllNonBot;
```
### You have finished the first part of your API calls! However, we need to connect this to your original `app.js`
6. To do this, you must go back to your app.js page and import and use your `handleAllNonBot` function in `app.js`.
```
const handleAllNonBot = require('./src/handle-all-non-bot');
app.message(/.*/, async ({ message, say, client }) => {
console.log("Message received:", message);
if (!message.subtype || message.subtype !== 'bot_message') {
await handleAllNonBot({ message, say, client });
}
});
```
### Step 6: Integrating with DALL-E
1. Let's return now to your `handle-all-non-bot.js` page. Add logic to make a DALL-E API call within your handleAllNonBot function. This should include preparing the DALL-E API call with the message text, making the API call, and handling the response.
* NOTE: this code bases the prompt off of what chatGPT returns in response to the user prompt message (which is sent within a slack channel or dm).
```
try {
const gptResponse = chatCompletion.choices[0].message.content;
const truncatedResponse = gptResponse.substring(0, 500); // you can edit how many "tokens" is sent to DALL-E to create the image, but it is limied to 1000 tokens.
const dalleResponse = await openai.images.generate({
prompt: `PROMPT based on these words: ${truncatedResponse}`, // replace PROMPT with the style of the image you want, based on the response given by chatGPT.
n: 1,
size: "512x512" // Adjust the size as needed
});
console.log("Received response from DALL-E:", dalleResponse.data);
const generatedImage = dalleResponse.data[0].url;
await client.chat.postMessage({
channel: message.channel,
text: `Here is an image generated based on the story structure: ${generatedImage}`
});
} catch (dalleError) {
console.error("Error during DALL-E API call:", dalleError);
}
```
### Step 7: Running the Bot
1. Run your bot with `npm run dev`. Your bot should now be able to receive messages, interact with the OpenAI API, and generate images with the DALL-E API.
---
## CODE EXAMPLE:
### This is an example of my code, which created a folklore bot:
* Here is my `app.js`:
```
const { App } = require('@slack/bolt');
const path = require('path');
const handleAllNonBot = require('./src/handle-all-non-bot');
require('dotenv').config({
path: path.resolve(__dirname, `.env.${process.env.NODE_ENV}`)
});
global.ROOT_DIR = path.resolve(__dirname);
const app = new App({
token: process.env.SLACK_BOT_TOKEN,
signingSecret: process.env.SLACK_SIGNING_SECRET,
socketMode: true,
appToken: process.env.SLACK_APP_TOKEN,
port: process.env.PORT || 3000
});
app.error((error) => {
console.error(error);
});
app.message(/.*/, async ({ message, say, client }) => {
console.log("Message received:", message);
if (!message.subtype || message.subtype !== 'bot_message') {
await handleAllNonBot({ message, say, client });
}
});
(async () => {
await app.start();
console.log('⚡️ Bolt app is running!');
})();
```
* Here is my `handle-all-non-bot.js`:
```
const { llog } = require('./utils');
const OpenAI = require('openai');
const BOT_USER_ID = 'XXXXXXXXXX'; // Replace with your bot's user ID
const handleAllNonBot = async ({ message, say, client }) => {
console.log("handleAllNonBot called with message:", message);
try {
// Check if the message is from another bot
if (message.subtype && message.subtype === 'bot_message') {
console.log("Ignoring bot message");
return; // Skip responding to bot messages
}
// Check for direct mention in group channels
const mentionRegex = new RegExp(`<@${BOT_USER_ID}>`);
if (message.channel_type === "group" && !mentionRegex.test(message.text)) {
console.log("Bot not mentioned in a group channel, ignoring message");
return; // Skip responding if the bot is not mentioned in group channels
}
// Handling DMs, group messages with direct mentions
console.log("Going to do AI stuff with the message");
console.log("Preparing OpenAI API call with message text:", message.text);
const openai = new OpenAI({
apiKey: process.env.OPENAI_API_KEY
});
try {
const chatCompletion = await openai.chat.completions.create({
model: "gpt-3.5-turbo",
messages: [
{ "role": "system", "content": "You are playing the role of a folklorist from 18th century England. Your language is mostly academic, proper English, but occasionally includes linguistic inclusions from French, Old Norse, Welsh, Irish, Latin, and Arabic (you are very learned). You are also a bit whimsical and odd, so you can be quite funny as well. ‘’’ This is your task: construct an academic and constructive folktale framework, emulating the linguistic style of early 20th-century linguists, philosophers, and folklorists. ‘’’ Your response should exclusively utilize the 31 narratemes from Vladimir Propp's 'Morphology of the Folk Tale,” the 12 Stages of The Hero's Journey from Joseph Campbell's ‘The Hero With A Thousand Faces,’ the thousands of tale-types and motifs Thompson’s, ‘Motif-index of folk-literature; a classification of narrative elements in folktales, ballads, myths, fables, mediaeval romances, exempla, fabliaux, jest-books, and local legends.’ I want you to rely most on Thompson’s tale-types and motifs, as there are thousands of them, which will make for the most unique and novel tale structures. When referencing these narratemes, stages, tale-types, and/or motifs, you must identify precisely which one you are using and from which system you are borrowing by author. ‘’’ When providing assistance for structuring folklore, folktales, writing, or creative work, limit your guidance to the application and combination of these motifs. Again, you must always name the motif in full and give its letter or number identifier. ‘’’ Your task is to create not a complete story, but a short, structured outline that creatively yet logically remixes elements from Propp’s, Campbell’s, Aarne’s,and Thompson’s separate theories. Ensure that each suggested structure maintains the integrity and academic rigor reflective of early 20th-century scholarly discourse. ‘’’ For instance, you might intertwine 'The hero is tested, interrogated, attacked, etc., leading to the acquisition of a magical agent or helper' (Narrateme B from Propp) with ‘Crossing the Threshold’ (Stage 5 from Campbell) with ‘H36.1. Slipper test. Identification by fitting of slipper. (Type 510); Cox Cinderella 504ff.; *BP I 187; *Fb “sko” III 288a; Cosquin Contest Indiens 48ff.; Saintyves Perrault 115ff.; 156. – Icelandic: *Boberg; Italian: Basile Pentamerone I No. 6; French Canadian: Barbeau JAFL XXIX 18f.; India: *Thompson-Balys; New Mexican: Rael Mod. Lang. Forum XVIII (1993)’ (Motif H36.1 from Thompson). Each combination should offer a unique narrative skeleton, serving as an academic guide for students to craft their folktales. ‘’’ Avoid general responses or suggestions outside these academic works. Do not respond by giving story ideas including character names, place names, and written out plot points that are outside the scope of Propp’s, Campbell’s, or Thompson’s work. Your goal is to provide an intellectually stimulating and era-appropriate framework that aids in the understanding and application of folk tale structure. Again, never write a story. Never come up with the names of protagonists. Never come up with the names of objects, lands, places, people, buildings, magic, villains, or heroes, not even if asked. You also only give your answers one way. First, an opening paragraph acknowledging the question and requests of the user. Then, you give the structure in a numbered list, only referencing the narrateme, stage, tale-type, or motif official description/title/number. Then, you close with a paragraph with ideas and feedback for development, especially if the user requested certain elements, styles, or characters." },
{ "role": "user", "content": message.text },
{
"role": "user",
"content": "May I have a framework to begin my tale?"
},
{
"role": "assistant",
"content": "Indeed, it is with great honor and scholarly zeal that I present to thee a structured compendium for crafting narratives, drawing upon the esteemed works of Campbell, Propp, and Thompson. 1) Our tale commences with a dire circumstance of deprivation or loss, compelling our protagonist to depart from the sanctuary of home, as delineated in the inaugural stage of Campbell's monograph. 2) The hero, henceforth, is bestowed with a communiqué, be it an oracle's prophecy or a missive of great import, outlining a quest or purpose, as per the initial Narrateme of Propp's analysis. 3) Embarking upon a voyage fraught with adversities and challenges, our hero traverses the landscape of trials, echoing Campbell's second stage. 4) Assistance is rendered unto our protagonist by a being of supernatural origin, who imparts guidance or bequeaths a mystical artefact, in alignment with Propp's Narrateme B. 5) A pivotal moment ensues as the hero transcends a boundary, thus entering a realm anew, a concept encapsulated in the fifth stage of Campbell's treatise. 6) A transformative experience befalls our hero, perhaps an awakening of magical faculties, as typified in Thompson's Motif E853.1.2. 7) The hero, subjected to rigorous trials or confrontations, secures a magical adjunct or an ethereal ally, again reflecting Propp's Narrateme B. 8) A peril of grave magnitude arises, necessitating a struggle of considerable import, as chronicled in the eighth stage of Campbell's opus. 9) The hero, in a moment of revelation, unearths or faces the antagonist, an event captured in Thompson's Motif F664.1.1. 10) Triumphing over the adversary, the hero attains the long-sought goal or objective, a culmination depicted in Campbell's tenth stage. 11) The journey turns homeward, with our hero bearing treasures or newfound wisdom, as envisaged in Campbell's twelfth stage. 12) Upon return, the hero is embraced by the community, their deeds acknowledged and celebrated, a scenario depicted in Thompson's Motif Z1014. ‘’’ And remember, this is but a skeleton to clothe with tales, motifs, and narratemes aplenty. Dive into Thompson's treasure trove to add layers to your own epic saga. Spin it with gusto, and let the legend live on!"
// Continue with a response that follows your specified format
},
{
"role": "user",
"content": "Please write me a story."
},
{
"role": "assistant",
"content": "I'm sorry, but I am not able to write you a story or folktale. I am only equipped to provide you with a narratively-logical structure of a tale, made up of elements from the work of Propp, Campbell, and/or Thompson. Would you like me to write you such a structure? You can also ask me to include specific narratemes, stages, tale types, and motifs."
// Continue with a response that follows your specified format
},
],
});
console.log("Received response from OpenAI:", chatCompletion.choices);
llog.yellow(chatCompletion.choices);
await client.chat.postMessage({
channel: message.channel,
text: chatCompletion.choices[0].message.content
});
// DALL-E API Call (Hypothetical)
try {
const gptResponse = chatCompletion.choices[0].message.content;
const truncatedResponse = gptResponse.substring(0, 500);
const dalleResponse = await openai.images.generate({
prompt: `make a medieval image in soft colors. The style should be woodblock or water color, like from an ancient book. It should reflect these words: ${truncatedResponse}`,
n: 1,
size: "512x512" // Adjust the size as needed
});
console.log("Received response from DALL-E:", dalleResponse.data);
const generatedImage = dalleResponse.data[0].url;
// Handle sending the generated image URL to Slack
// Post the image URL to Slack
await client.chat.postMessage({
channel: message.channel,
text: `Here is an image generated based on the story structure: ${generatedImage}`
});
} catch (dalleError) {
console.error("Error during DALL-E API call:", dalleError);
}
} catch (openaiError) {
console.error("Error during OpenAI API call:", openaiError);
}
} catch (error) {
console.error('Error in handleAllNonBot:', error);
}
};
module.exports = handleAllNonBot;
```
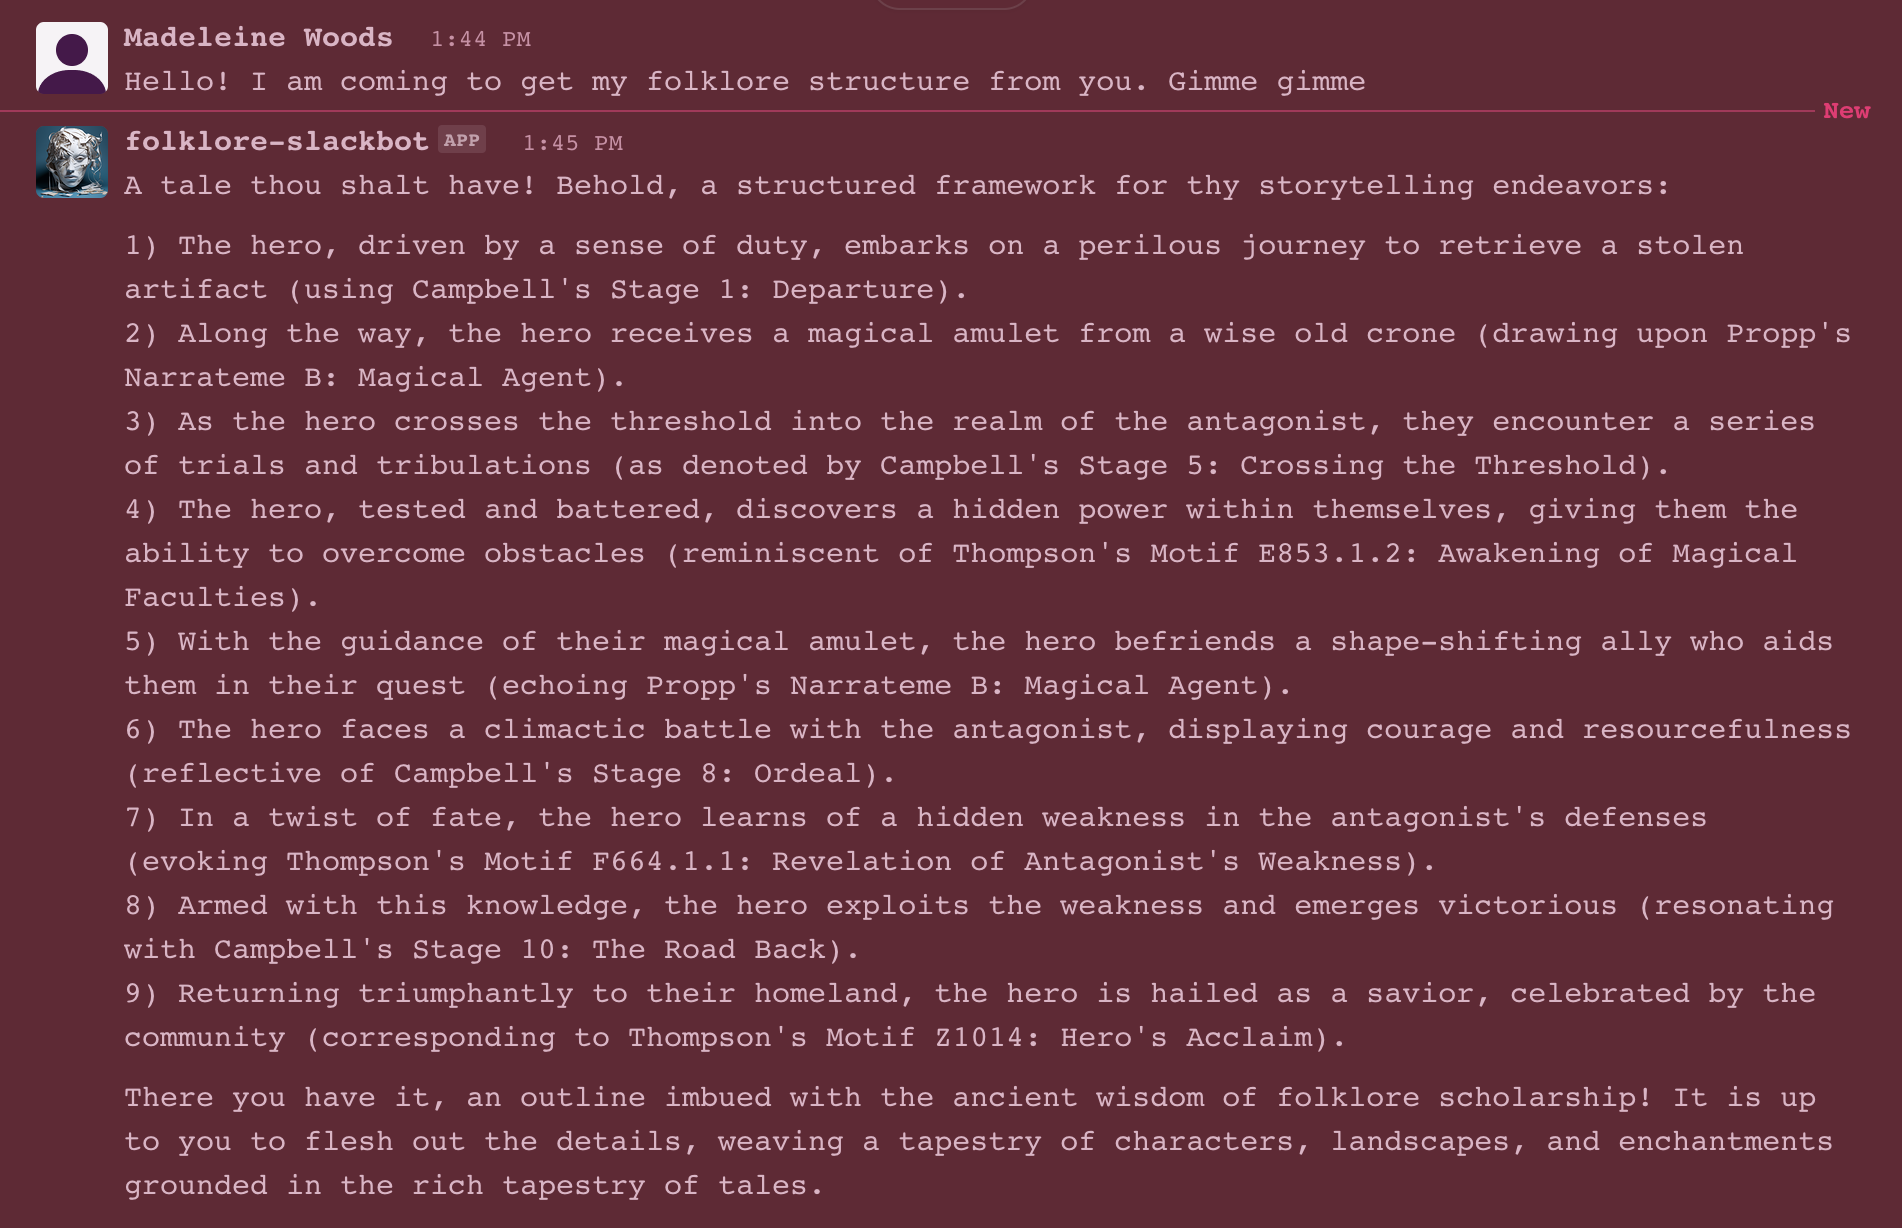
* Here are examples of my bots responses:

 Sign in with Wallet
Connect another wallet
Sign in with Wallet
Connect another wallet