# How to Run Stable Diffusion in Google Colab
## the steps
### 1. Log into Google Colab as the LL
Open [this Google Colab notebook](https://colab.research.google.com/drive/1gSk-ap_Y9EAPAjDf7vlGvqZFOioCJohD#scrollTo=pAVpv903OEoW) **while logged in as studio@learninglab.xyz on Chrome**
What is this Colab notebook running? [This github repo](https://github.com/AUTOMATIC1111/stable-diffusion-webui.git)! It's one of the most up to date and popular Stable Diffusion Web UI repos. [This resource](https://hackmd.io/zQNE3y3uRfOJRg2JMkBboA?view) has more information about both Stable Diffusion and Control Net.
### 2. Make sure you have certain models and extensions selected.
On the right-hand side, you'll see a ton of different models and extensions you can check off so they're included in your Stable Diffusion UI once you run the code in Colab.
Here are some **models** you'll want to have checked off.
* v1_5_model
* This refers to a version of the Stable Diffusion model (version 1.5) that has been optimized or updated from previous versions. Each version of Stable Diffusion aims to improve upon the quality, efficiency, or diversity of the generated images.
* Why Use It: Including this model in your project means you have access to the latest advancements in text-to-image generation capabilities, potentially offering better image quality, faster generation times, or more accurate text-to-image translations.
* Realistic_Vision_model
* This model variant is designed to produce more realistic and high-quality images. This model emphasizes photorealism, accuracy in rendering textures, lighting, and materials, or improvements in the depiction of realistic scenarios.
* Why Use It: For projects requiring high fidelity to real-world appearances or when generating images that need to blend seamlessly with actual photographs, this model could provide superior results.
* DreamShaper_model
* DreamShaper is a model trained or fine-tuned to generate more imaginative, artistic, or abstract images. The name suggests a focus on creativity and the ability to shape dreams into visual representations.
* Why Use It: When aiming to create unique, artistic, or fantastical imagery that goes beyond straightforward representations, DreamShaper could offer the creative flexibility and innovation needed for your project.
* OpenJourney_model
* OpenJourney designs images that look like Midjourney images.
Why Use It: If your project could benefit from dream-like images like those produced by Midjourney.
Here are some **extensions** you should have checked off:
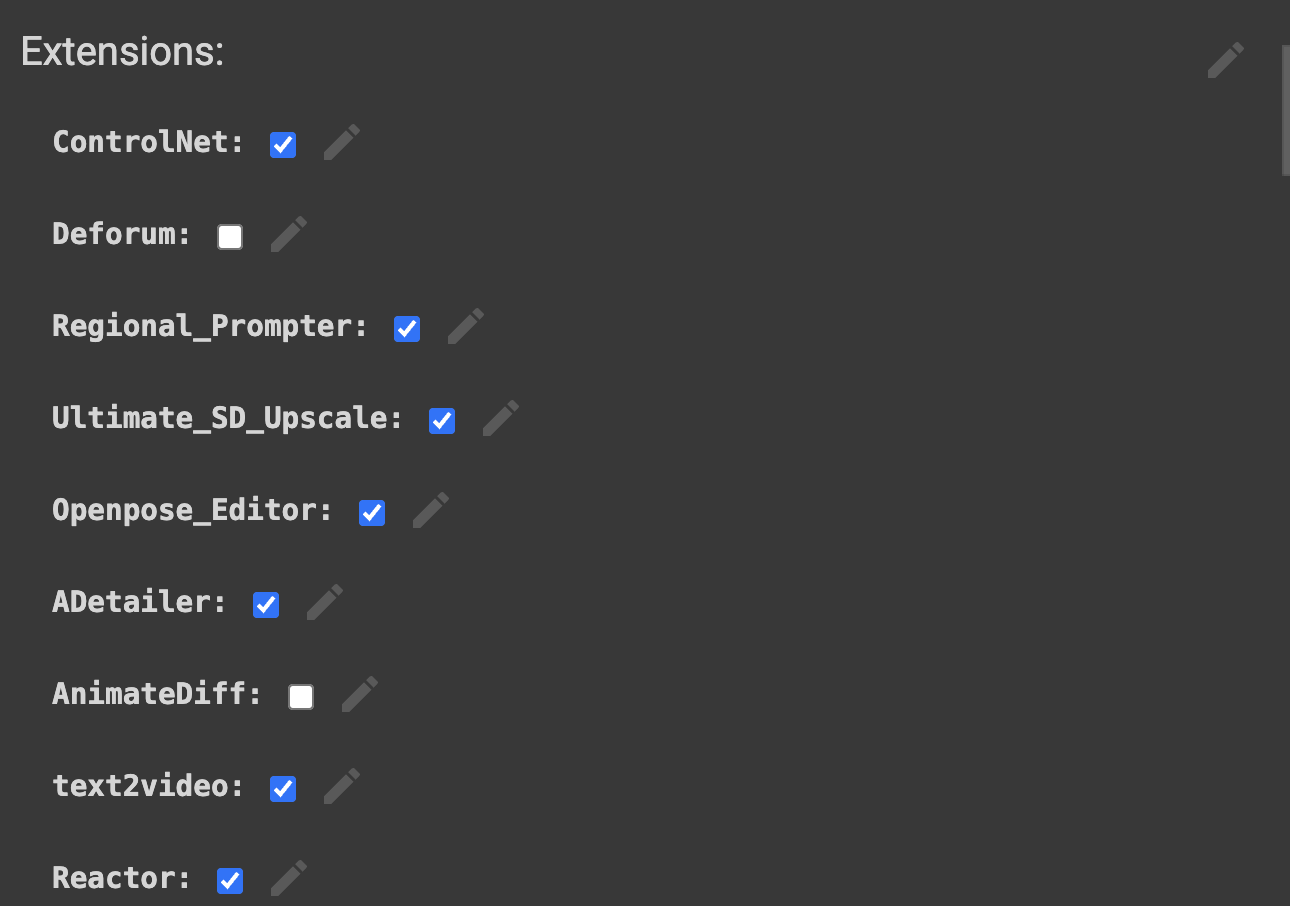
* ControlNet
* ControlNet is an extension designed to enhance control over the image generation process. It typically allows for more precise manipulation of specific aspects of the generated images, such as style, structure, or content placement, through the use of additional inputs or more detailed prompts.
* Why Use It: It's beneficial for projects requiring high degrees of customization or specificity in the generated images, where standard text prompts alone might not achieve the desired level of detail or control.
* Regional Prompter
* This extension provides the ability to apply different prompts to specific regions of an image. It allows for localized control over the generation process, enabling users to specify what content should appear in different parts of the image.
* Why Use It: For projects needing composite images with varied content across different areas, Regional Prompter enables more complex and detailed image compositions than would be possible with a single, global prompt.
* Ultimate_SD_Upscale
* Ultimate_SD_Upscale is an upscaling extension designed to enhance the resolution and quality of images generated by Stable Diffusion. It employs advanced upscaling techniques to improve image clarity, detail, and overall visual quality without significantly increasing generation time.
* Why Use It: This extension is ideal for projects where high-resolution images are necessary, such as print media or high-definition digital displays, providing a clearer and more detailed final product.
* Openpose_Editor
* Openpose_Editor leverages the OpenPose library for human pose estimation to edit or manipulate the poses of human figures within generated images. It allows for precise adjustments to the positioning and orientation of people in the images.
* Why Use It: When your project involves generating images with human subjects and requires specific poses or interactions, Openpose_Editor can help achieve more accurate and realistic representations.
* ADetailer
* ADetailer focuses on adding or enhancing details within generated images, often through post-processing techniques. It aims to increase the visual richness and texture detail, making images appear more intricate and polished.
* Why Use It: For projects where visual detail and texture richness are paramount, ADetailer can enhance the perceptual quality and aesthetic appeal of the images.
* text2video
* This extension extends the capabilities of Stable Diffusion from generating static images to creating short video clips based on text prompts. It generates a sequence of images that are coherent and connected, simulating motion or narrative progression.
* Why Use It: When your project requires dynamic content or you want to explore storytelling through moving images, text2video enables the creation of narrative or thematic video content directly from textual descriptions.
* Reactor
* Reactor will blend a reference photo with another face
* It can be used for face-swapping
### 3. Run the Colab Code
Press the play button on the left-hand side at the top of the code block to execute the code

### 4. Grab the username and password for the Gradio account
Once you're logged in to the Colab notebook, scroll down until you see the code that runs Stable Diffusion (on the left-hand side of the screen) and the URL to go to gradio and the username and password on the right-hand side. You'll need this to log into Gradio so just know it's there since you'll have to reference it!
### 5. Log into the Stable Diffusion Web UI via Gradio
Once the code is done executing, go to the gradio URL: https://xxxxxxx.gradio.live
Gradio is a Python library that simplifies creating customizable UIs for machine learning models. It allows you to use models through web interfaces.
Log in with the username and password you can see in the Colab notebook on that right-hand side toward the top of the code block.
## Using ControlNet for Image Generation in the Stable Diffusion Web UI
Once you've logged in to gradio.live, you can try out the ControlNet extension in the Stable Diffusion Web UI!
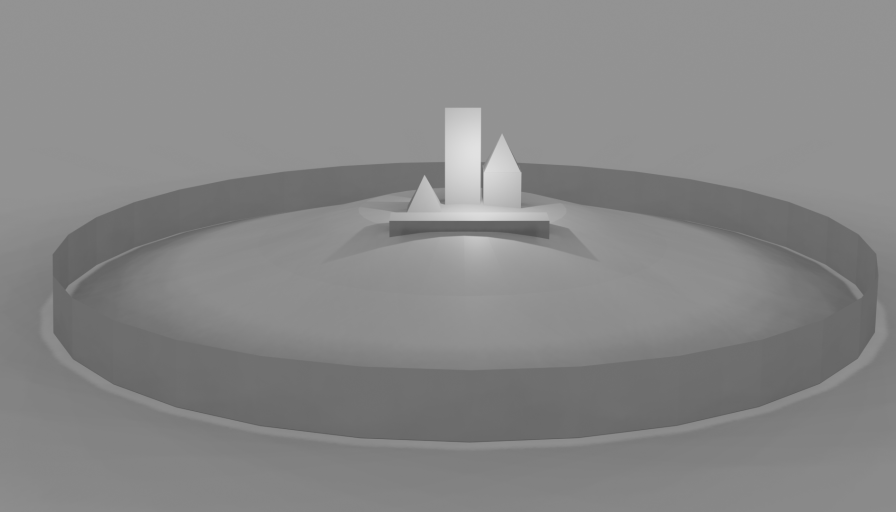
### 1. Draw or 3D model some simple shapes
To start, we can draw a few simple shapes -- for bonus points, you can use Blender to place 3D objects roughly within a scene. But taking a clean photo of a drawing on white paper would work basically just as well.
### 2. Bring the image into Stable Diffusion
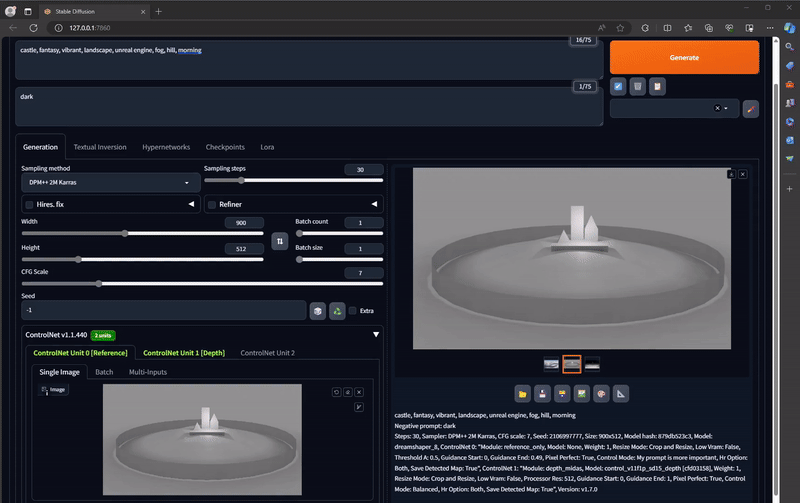
Next, we'll put a screenshot into Stable Diffusion, in the Controlnet drop down interface:
### 3. Settings to Select
There are different settings you'll want to select to achieve particular qualities, level of detail/precision, three-dimensionality, etc. We'll outline below both the settings we suggest choosing when you generate and image and what each of those settings mean. **Make sure to add your image to each of the ControlNet Unit tabs!**
**ControlNet Unit 0**
Upload your image here by dragging and dropping or by selecting the Click to Upload text. In the ControlNet Unit 0 window (where you should automatically be when you open up the ControlNet dropdown menu), we recommend selecting:
* Enable
* MLSD
* Pixel Perfect
* Allow Preview
**ControlNet Unit 1**
Upload the same image as ControlNet Unit 0 here by dragging and dropping or by selecting the Click to Upload text. In the ControlNet Unit 1 window (the tab to the right of ControlNet Unit 0), we recommend selecting:
* Enable
* Depth
* Pixel Perfect
* Allow Preview
**ControlNet Unit 2**
Upload the same image here by dragging and dropping or by selecting the Click to Upload text. In the ControlNet Unit 2 window (the tab to the right of ControlNet Unit 1), we recommend selecting:
* Enable
* Reference
* Pixel Perfect
* Allow Preview
### Glossary of Selection Options in ControlNet
**Enable**
* This activates the ControlNet extension for the current operation, whether it's MLSD (Multi-Level Semantic Descriptors for precise control over the image generation), Depth (for manipulating the perceived depth in images), or Reference (using reference images to guide the generation process).
* Why use it: Activating ControlNet allows you to leverage additional control layers over the standard Stable Diffusion process, enhancing the capability to generate images that closely match your requirements.
**MLSD/Depth/Reference**
* MLSD: Provides semantic control at multiple levels, allowing detailed manipulation of the generated image.
* Depth: Adjusts or manipulates the depth perception within the image, creating a more 3D-like effect or altering the focus.
* eference: Uses a reference image to guide the generation process, aiming to replicate certain styles, colors, or themes from the reference.
* Why use them: These settings enable specific types of control over the image generation process, each catering to different needs or artistic goals. MLSD for semantic details, Depth for 3D effects, and Reference for style replication.
**Pixel Perfect**
* Ensures that each pixel in the generated image aligns perfectly with the intended resolution and detail level, avoiding any mismatch or blurriness.
* Why use it: This setting is crucial for achieving the highest quality images, especially when fine details or precise control over the image composition is desired.
**Allow Preview**
* Enables you to see a preview of the generated image before finalizing it.
* Why use it: Previewing allows for adjustments and refinements to be made based on the visual feedback, ensuring the final image meets your expectations without needing to fully generate the image multiple times.
### 5. Prompt and Generate!
We'll craft a written prompt to tell Stable Diffusion what this scene should look like, and enter this into the **Prompt** field at the top of the interface.
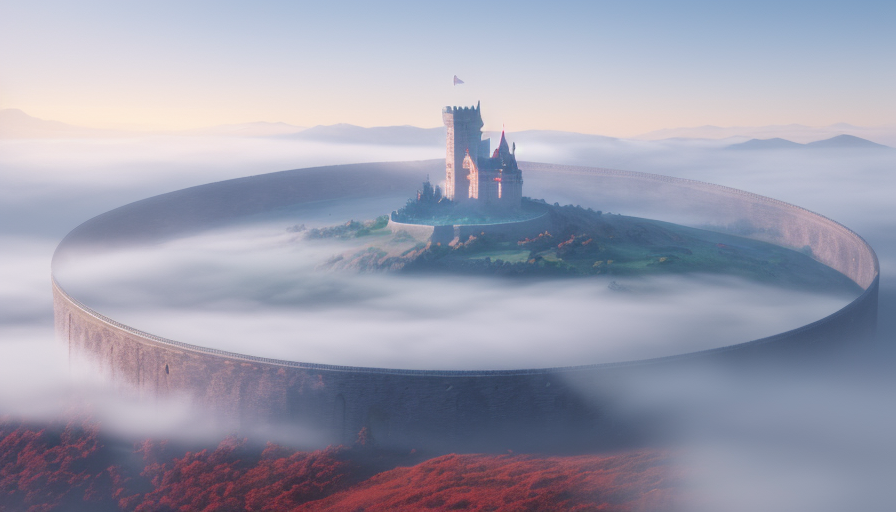
Hit **Generate** and wait for your image to generate! It might look like nothing is happening, but if you look in your terminal window, you should see a percentage indicating how far along the generation process is.
Then, you should get a super cool image!