# Music207 Image Workshop
| Split into 2 groups | 20-25 Minutes Each |
|----|---|
| Group 1 | Exposure triangle |
| Group 2 | Lens comparison |
| Break | 5-10 minutes |
| Full Group | 3 shot story |
| Full Group | The perfect portrait |
## Exposure Triangle
These are the variables that are required for a camera to properly accept light. They're also the variables you can balance between to change the way an image looks.
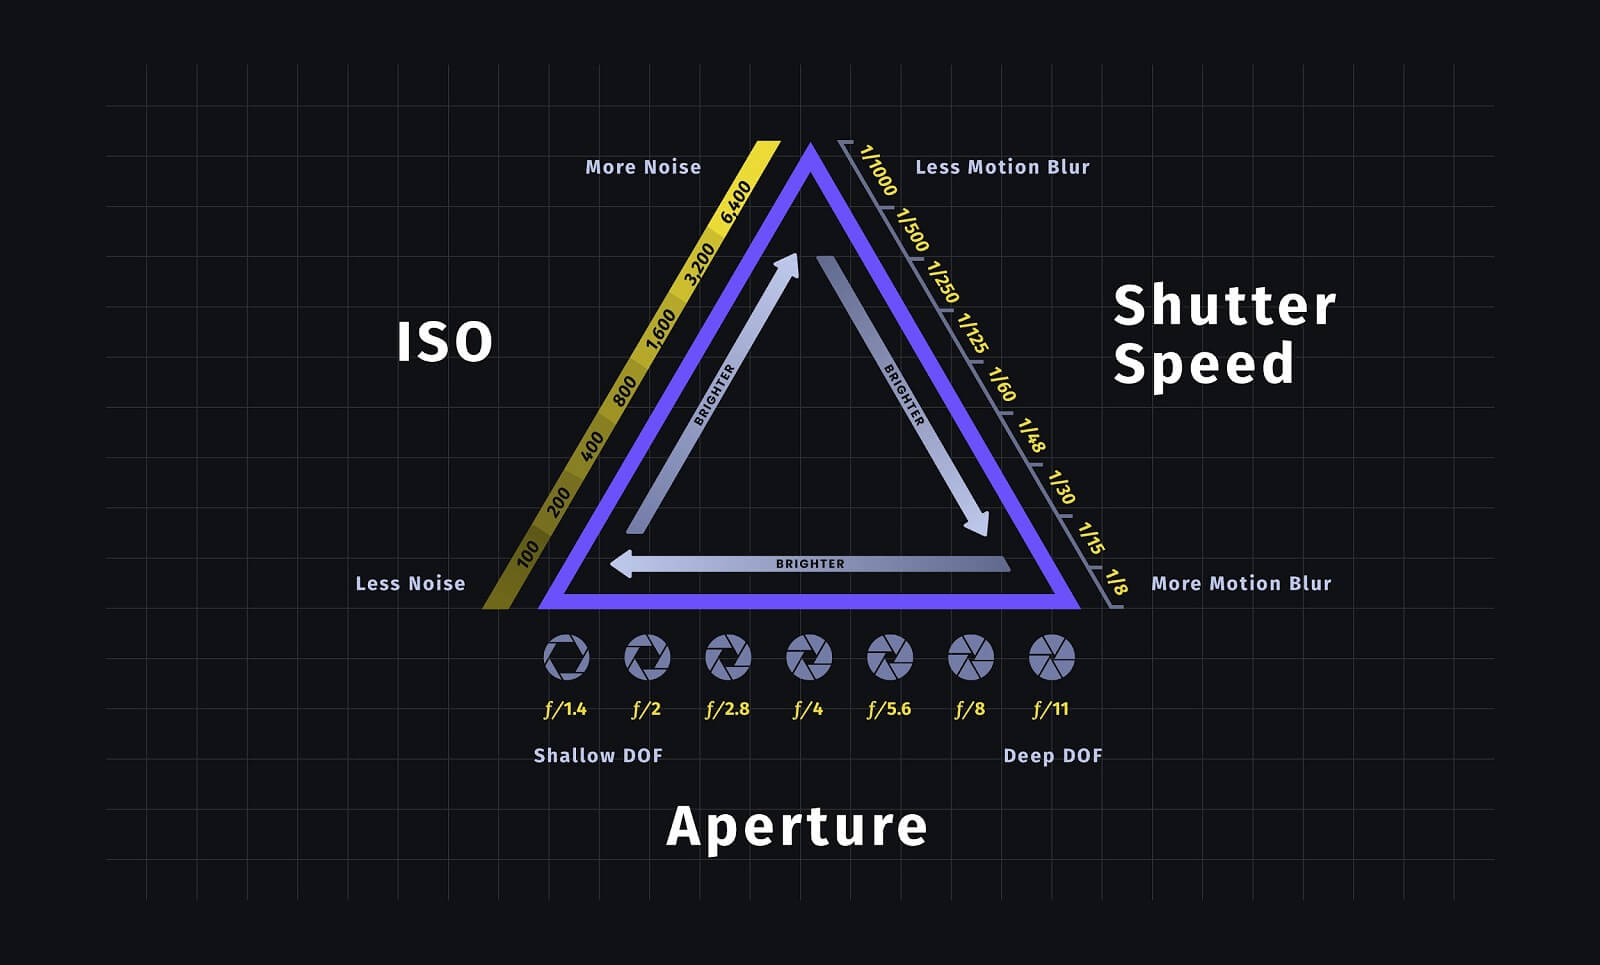
The triangle is made up of 3 variables:
* Aperture - The iris of the lens, that accepts or limits light from reaching the sensor. This is notated as f/##, indicating a fraction of the lens length -- an equation for how wide the iris is open.
* Shutter speed - How much time the shutter spends open, again a method of allowing or preventing light to enter the sensor. This is notated as a fraction of a second.
* When shooting on video/film, you almost always want this to be locked at half of your frames per second.
* In photography, if you're shooting handheld, you want it to be the same as your lens length(100mm = 1/100, or 50mm = 1/50)
* ISO is how much or little electronic signal is required to bring your image "up" to its exposure. In audio, this is a direct comparison to the way Gain functions. The general guidance is the higher this is, the more grainy or "noisy" the image is.

## Lens Comparison
### What is a Prime Lens?
Prime lenses have fixed focal-lengths, with all optical components optimized for a this single focal length. This means that they tend to produce higher quality images than zoom lenses. If you want to get a closer or more distanced view on what you're filming, you'll need to physically move the camera when shooting with a prime lens.
They have smaller f-stops (which means a larger maxiumum aperture - meaning that the lens can let in more light). (a smaller number f-stop = shallower depth of field/less in focus but what's in focus is very sharp).
With f-stops like 1.4, 1.8, 2, you can shoot in low-light environments and obtain very shallow depths of field (which can be great for portraits, as we'll see!).
### Lenses we'll explore
We'll set the aperature to 1.2 or 1.4 (ISO 600 or 400) on each of these lenses and then reflect on how the composition changes. We've picked the aperture and ISO that makes sense given the lighting environment in the LL studio.
* 24 mm: wide-angle lens
* 35 mm: wide standard lens
* 50 mm: standard lens
* 85 mm: short telephoto lens
* 100 mm: medium telephoto lens
## Three Shot Story
Every story follows an arc, simple ones can be built in as little as 2 shots. You're always looking for a tension and resolution. Because of the way that film (and film narrative) has historically developed, we expect there to be some kind of relationship between the sequences of shots in a film.
Your challenge for this exercise is to
* capture three distinct shots, each with a unique shot length and composition (so, each shot is different from the others)
* these shots, when viewed together and arranged in a particular sequence, should tell some kind of a story
* what mystery/tension/question will your opening shot establish?
* and how will your second and third shot add to/complicate/or maybe even resolve that tension?
You can experiment with lighting, framing, shot length, and any other formal elements that add to your film's story.
## Perfect Portrait
Portraiture is an art of its own, but there are some tricks that can be utilized to capture a gorgeous shot with relatively little need.
* First, you'll want to open your aperture as wide as it'll go, this is going to narrow the focus to its shortest depth of field.
* Next, find a big, soft source of lighting. This is going to soften the features of the subject you're photographing. Harder sources can be slightly more difficult to work with, as it casts more rigid shadows.
* Align this light 45 degrees from your subject, so that it's filling in the majority of your subject's features.
* Finally, adjust your shutter speed until your exposure meter is centered.

 Sign in with Wallet
Connect another wallet
Sign in with Wallet
Connect another wallet