# Inkscape Tutorial
## What is Inkscape?
Inkscape is a software used for creating and editing vector graphics.
## What are vector graphics?
There are two common file types you might encounter when working in graphic design: raster and vector. It is important to understand the features and uses of each.
| | Raster | Vector |
| -------- | -------- | -------- |
| What is it? | Built from pixels | Uses equations, lines, and curves with fixed points on a grid |
| Quality |Variable: more pixels for higher resolution and fewer pixels for lower resolution; resolution described in DPI (dots per inch) or PPI (pixels per inch) | Can scale in size without effect on quality |
| Uses | Digital photographs | Digital illustrations, graphics and logos |
| File sizes | Generally larger (can be compressed) | Smaller |
| Compatibility | Can be opened in many apps | Might require specialized software |
| File ext. |JPG, TIFF, PNG, GIF, BMP, PSD | SVG, EPS, AI, DAE, PS, EMF |
## Inkscape vs. Illustrator
Adobe Illustrator and Inkscape are both vector graphics software. Why would someone choose to use one over the other?
### Features
Both Inkscape and Illustrator offer many useful features! You can check out the comprehensive lists of features offered by [Inkscape](https://inkscape.org/about/features/) and [Illustrator](https://helpx.adobe.com/au/illustrator/using/tools-in-illustrator.html) on their websites.
There are a few features Illustrator offers that Inkscape does not.
* Illustrator offers the use of the Creative Cloud for file storage.
* Illustrator offers convenient integration across other Adobe software like Photoshop and InDesign.
* Illustrator supports both CMYK and RGB color modes. Inkscape only uses RGB. It is possible to save your Inkscape work in CMYK but not choose this color mode while you work. Since CMYK is usually used for work that is going to be printed and RGB is used for digital graphics, Illustrator may be the better choice for printed graphic projects.
### Cost and Accessibility
Inkscape is free, open-source software. There are also free extensions available for added functionality. You can create an extension yourself if you like!
Illustrator requires a license to use. We have access to the Adobe Creative Suite while at Harvard but will need to pay to continue using Illustrator in the future.
### Learning curve and ease of use
Many users, especially beginners to vector graphics, find the Inkscape interface less intimidating and easier to use than the highly feature-rich Illustrator workspace. However, more tutorials, templates, etc. have been created to teach Illustrator than Inkscape. So, Inkscape is easier to learn than Illustrator, but Illustrator has more resources available to get you over the learning curve! I have found that Inkscape is very easy to use if you have already learned how to use Illustrator.
### Compatibility
Inkscape is compatible with Windows, Mac, and Linux. Adobe Illustrator is compatible with Windows, Mac, Linux, and iPad.
### File formats
Inkscape's native format is SVG, but you can import and export many other formats (e.g., PDF, EPS, PNG). You can open AI files in Inkscape, but you cannot save SVG to AI. In addition, not all AI data will be completely transferrable in Inkscape.
Illustrator's native format is AI, and it can open all of the formats that Inkscape does.
### Industry standard
Adobe Illustrator has been around since 1987 and is considered the industry standard vector graphic creation software. Employers may specifically require expertise in Illustrator. Inkscape, first released in 2003, has been steadily improving with time but is less commonly used by professional graphic artists.
### Are there other open-source alternatives to the Adobe graphic design software?
Yes!
* [GIMP](https://www.gimp.org/) is an image editor that can be used for many of the applications achieved in Photoshop.
* [Scribus](https://www.scribus.net/) is a desktop publishing software that has some of the features of InDesign.
## Download Inkscape
Visit the [Downloads page](https://inkscape.org/release/inkscape-1.3.2/) on the Inkscape website and choose the correct format for your operating system.
## Navigate the Inkscape Interface

1. **Toolbox** = suite of tools that allow you to draw, select, navigate, paint, modify, or create text. Check out the Toolbox and hover your mouse over them to learn about what they do.
2. **Docking area** = area where dialogs for specific functionality will appear by default
3. **Layers** = the folders of things. Find the Layers in the docking area and poke around. As you build more complex projects it becomes very important to utilize this organizational structure.
4. **Canvas** = your workspace. You can add multiple **pages** to the canvas.
5. **Tool controls** = the settings and control panel for the selected tool. It will show you controls that are relevant to your current task.
## Activities
### Speech bubbles
Here are two ways to make a speech bubble in Inkscape. Try creating your own on the page labeled "speech bubbles" in the workspace. Remember to organize any objects you create in layers using the "Layers and Objects" control panel.
**Method 1**
1. Use the "Ellipse Tool" (E) to create an ellipse.
2. Remove the fill and add a stroke of the desired thickness in the "Fill and Stroke" controls.
3. Use the "Pen Tool" (B) to draw a triangle in the bottom corner of the ellipse.
4. Give the triangle a black fill and remove the stroke.
5. Select both the ellipse and the triangle. Click on "Path" > "Union."
**Method 2**
1. Use the "Ellipse Tool" to create an ellipse.
2. Select the ellipse and click on "Path" > "Object to Path"
3. Select the "Node Tool" (N). Double-click three times on the bottom edge of the ellipse to add three new nodes to the ellipse.
4. Select the middle of the three new nodes and drag outwards.
**Method 3**
1. Click on "Object" > "Symbols."
2. In the dropdown menu, select "Word Balloons."
3. Drag your favorite balloon into the workspace.
### Comic-style name

1. Find the wordart_pieces layer and peruse the objects, paths, and groups within the layer.
2. Find the "blurry circle", "white rectangle", and "tiny circle" in wordart_pieces and then duplicate them (select (S) and then press Command+D). Drag the new objects/paths onto the open page for your new word art. Also, organize your layers by moving the new objects/paths into the wordart_new layer.
3. Arrange the "blurry circle", "white rectangle", and "tiny circle" so that the "rectangle" is at the bottom, the "blurry circle" in the middle, and the "tiny circle" on top (in tool controls, you can find buttons to raise and lower selections on the page).

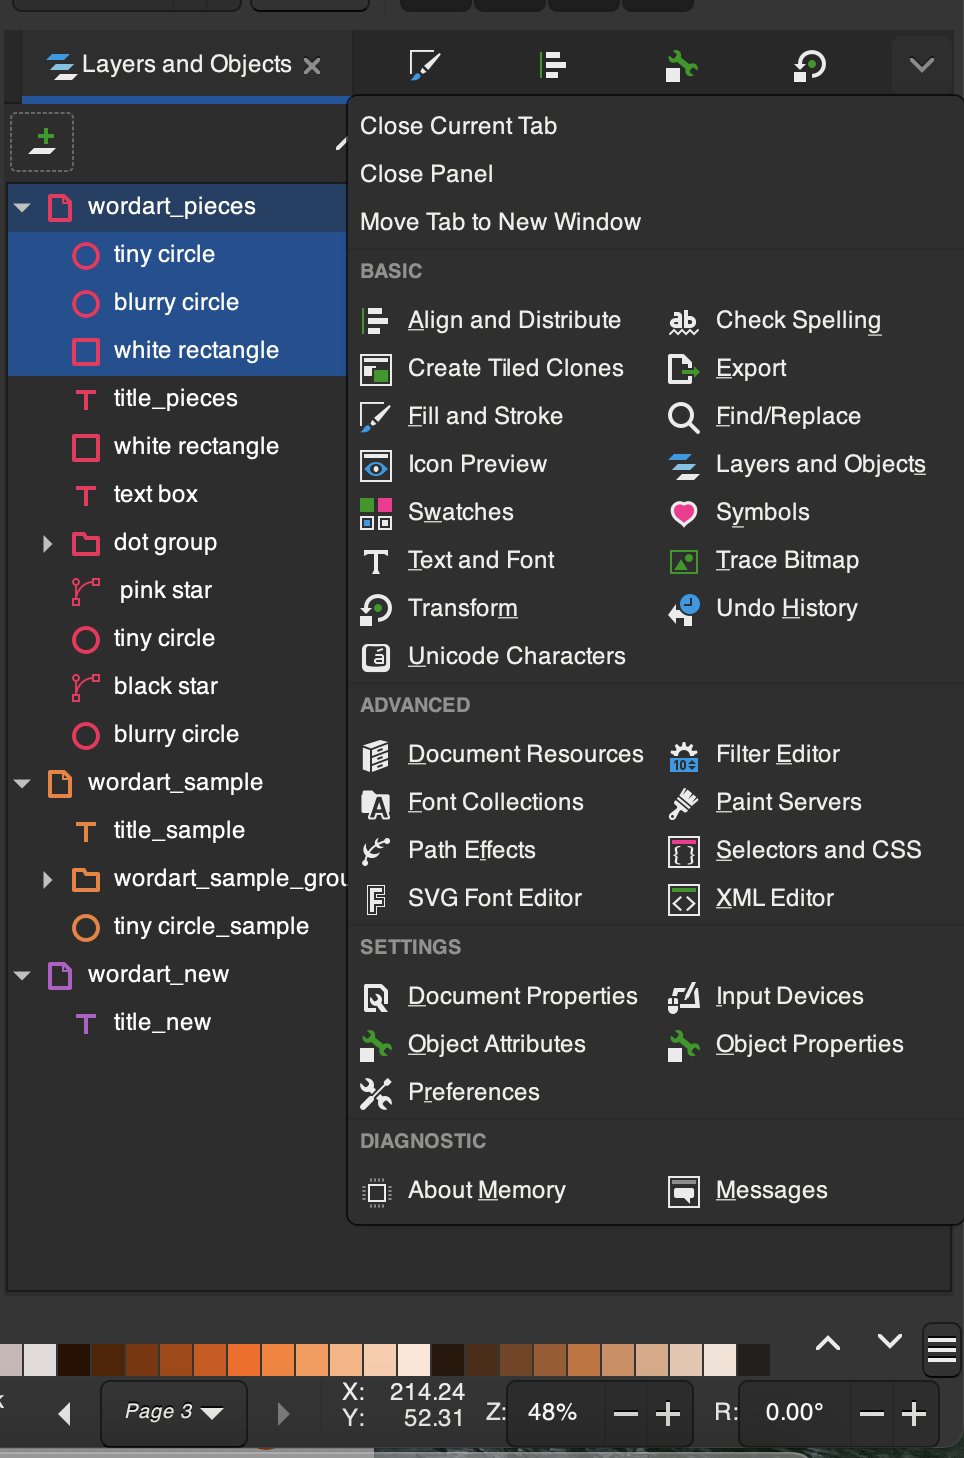
4. Press the dropdown button above the docking area to see various setting controls. Click on "Align and Distribute."
5. Select all three objects. Click on "Align left edges" and then "Align top edges" in the "Align and Distribute" controls.
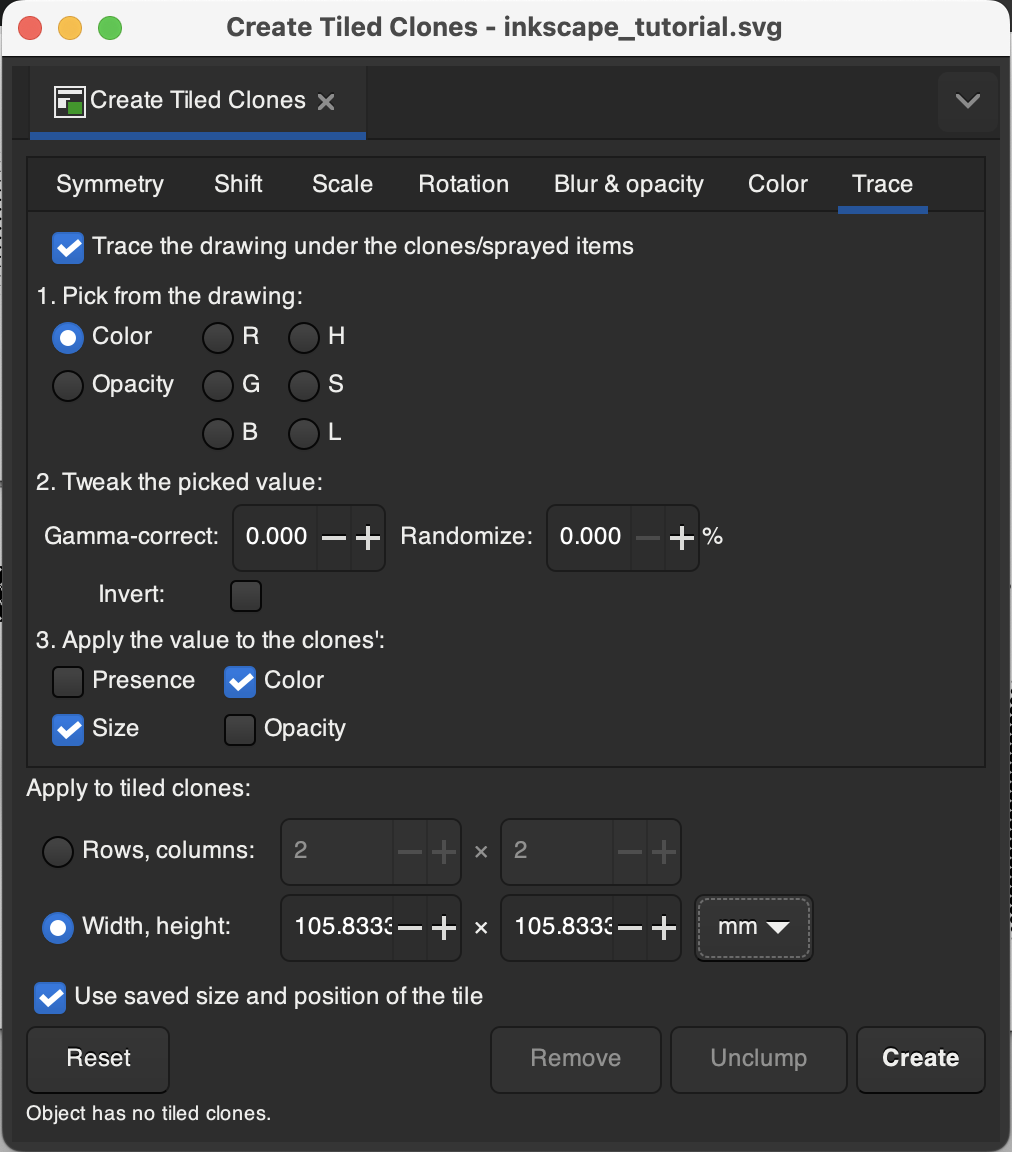
7. Select just the tiny circle. Click on "Edit" > "Clone" > "Create tiled clones." In the pop-up menu, choose the settings in the image below. Click "Create."
6. Select and delete the "blurry circle" and "white rectangle" (easiest to do from the layers panel).
7. Select "tiny circle" and slightly increase it's size. You can see how this changes the size of the circles in your new cloud of circles. Adjust until the circles in the cloud are slightly overlapping.
8. Select the cloud of circles and group them (see group and ungroup in tool controls).

9. Find and duplicate the "star" in wordart_pieces. Click on the "Node tool" in the toolbox or press N. Choose the inner nodes of the star (select multiple nodes by holding onto Shift while clicking). Click "Make selected nodes auto-smooth" in the tool controls.

11. Duplicate the star and choose a new color for it. You can change color with the palette at the bottom of the screen or with "Fill and Stroke" settings in the docking area.
12. Slightly decrease the size of the new star (hold onto the Shift key while adjusting to maintain proportions).
13. Arrange the smaller star over the larger star and center both over the cloud of dots.
14. Find and duplicate the textbox in the wordart_pieces. Choose a font for the text (it's currently in Bangers).
15. Select the textbox and then click "Path" > "Object to Path." Next, click "Path" > "Split Path" to separate the letters.
16. Select the letters and in "Fill and Stroke" add an outline to the letters. I made my letters white with a black outline.
17. Rearrange the letters as desired. I moved the letters closer together so they overlapped.
18. Select the letters and group them. Duplicate the grouped letters.
19. Choose a black fill and stroke for the new grouped letters and move them slightly left and down relative to the position of the original letters. Rearrange so the black letters are behind the original letters, creating a 3D effect. Group both sets of letters together.
20. Arrange the grouped letters over the center of the star. Select the letters and then press on the middle of the selected object to show arrows for rotation. Slightly rotate the letters to be on a diagonal angle.
### Free time!
Have some fun creating art with Inkscape!

## Resource List
* [Inkscape manual](https://inkscape-manuals.readthedocs.io/en/latest/interface.html)
* [Inkscape tutorials](https://inkscape.org/learn/tutorials/)
* [Inkscape LinkedIn Learning](https://www.linkedin.com/learning/inkscape-essential-training-9975138?trk=learning-serp_learning-search-card_search-card&upsellOrderOrigin=default_guest_learning)
* [Inkscape master class](https://logosbynick.com/inkscape/)
* [Inkscape keyboard shortcuts](https://inkscape.org/doc/keys.html)
* [Inkscape for scientists video series](https://www.youtube.com/watch?v=eyqH0IrzYLc&list=PLxtauMB7RON_2tg-mRQTuieFUr29IOKzW)
* [Inkscape extensions](https://inkscape.org/gallery/=extension/)
 Sign in with Wallet
Connect another wallet
Sign in with Wallet
Connect another wallet