How to create Wordpress theme
===
Theme in Wordpress is a the way to format your posts and pages the way you want with options that you need. When using a theme on the market, you'll need some time to adjust yourself to get use to the layout and the options that theme allows you. Creating a theme is contrary to that, it means you have in mind what the pages and the posts look like and you want to add edit options only when you need.
## 1. Create local environment
Here, i'll use "Local" https://localwp.com/.
There're many other ways, but this seems to be the easiest. No matter which approach you use, make sure to sign up for a wordpress account first.
After installed "Local" and create your project, you'll see something like this.
Now you can run wordpress locally. As you can see, in Wordpress, there're 2 sites (green box), one is your web interface, the other is admin interface (which someone might call it wordpress backend 😊) where you manage your posts and pages, themes, plugins and all setting for your wordpress.
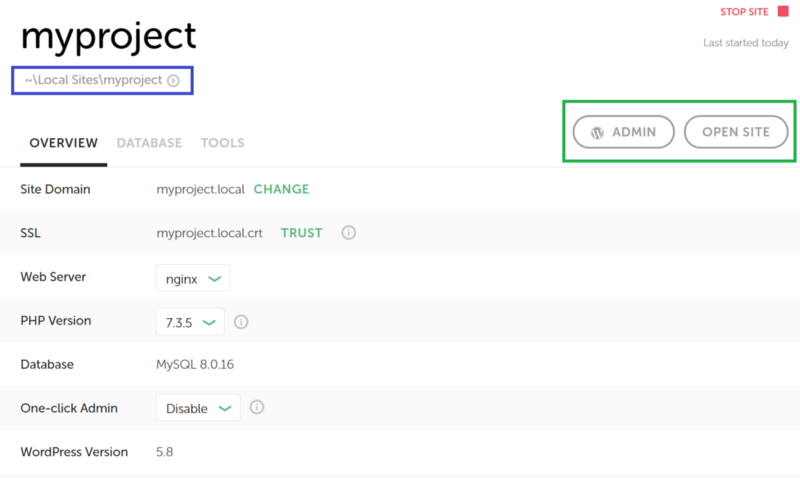
So where the coding happens, you may ask. Do you see the blue box, open your project with any IDEA and we can start creating our theme.
## 2. Few concepts to keep in mind
Before we go futher, there're a few core things to help you get the basic idea of Wordpress, to have better understanding of what we'll do next.
**- Wordpress is all about pages and posts.**
It's originally made for blog writer. Athough, it has been evolved to a whole new level (you might see an e-commerce page built with wordpress), it's core is still just a blog, where posts are pages that show the product details, and pages are the pages where you list all your products.
**- Worpress template hierarchy**
From left to right, it's how wordpress read the file in you theme folder and display pages and posts as your templates.
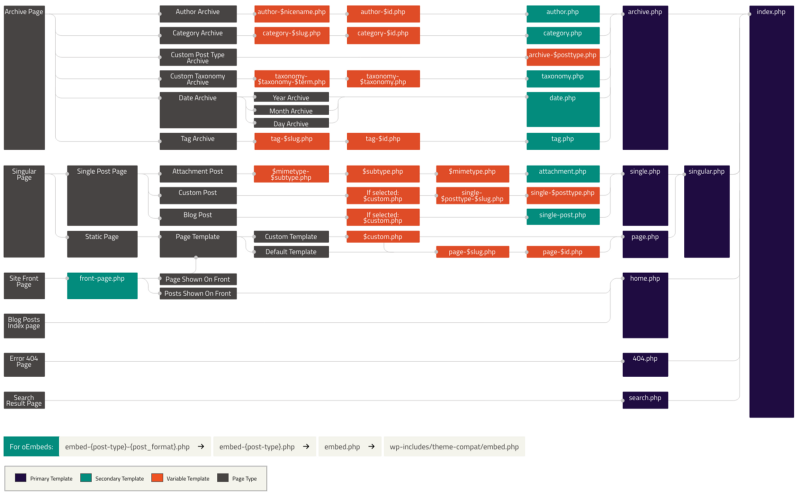
Which means, if your theme includes only `index.php`, all pages and posts will have the same UI (depend on the html that you build inside index.php). `index.php` and `style.css` are minimum requirement for creating a theme.
If you decided that your site has a landing page, then, create a `home.php`. When wordpress is looking from left to right, it will see that you have a home page and will display the home page as written in home.php, remaining pages will follow `index.php`.
If you want user to have a pretty experience when they go to a wrong route, create a `404.php` .
If you want your post to look different from pages, create `single.php` this will handled how the post be displayed.
If you want to have different pages with different layouts, create page-$slug so when you create a page on admin site that has same slug with this, it will have the UI you build in this file.
And it goes on, the complexity of the site depends on you.
**- The flow**
In the php files above you just define the templates.
The content of the pages/posts is added from admin site.
The php file get the content from posts/pages created on admin site and arrange them as you wish. That's why we need php, to get the page/post content, title, adding side bar, posts, …
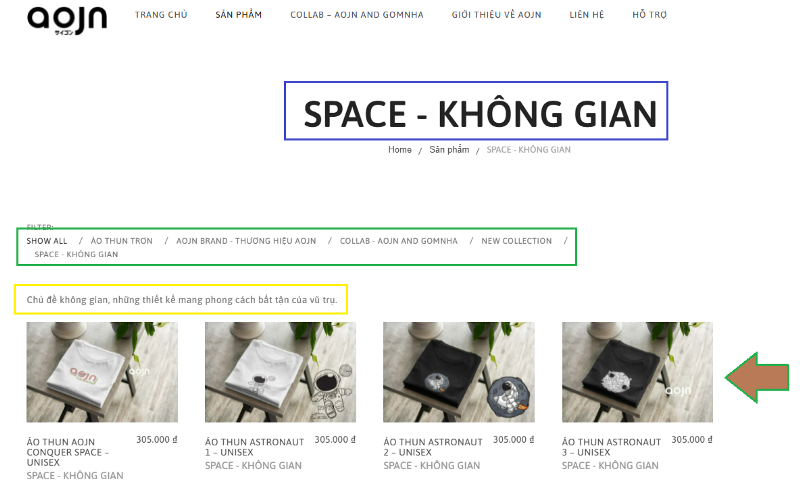
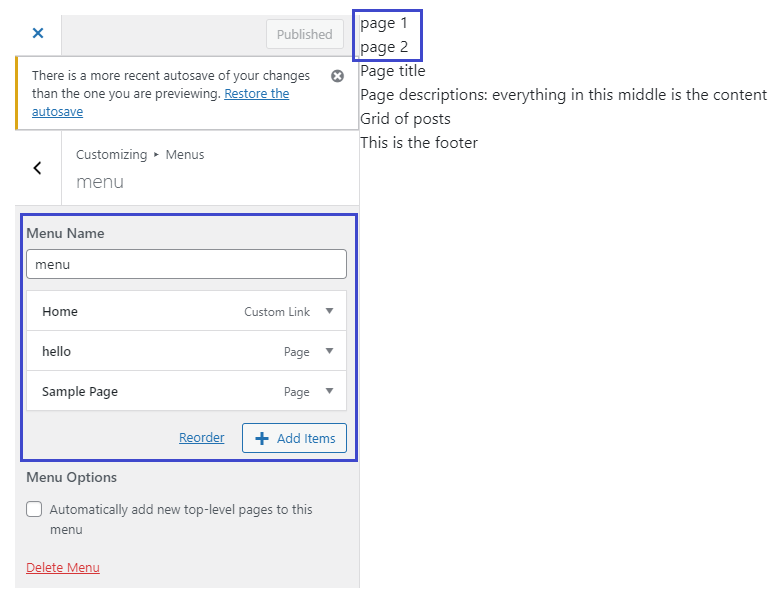
Ex: Below is a page example, where the page title (blue box) is centered-top, the tags (green box) is displayed right above the content (yellow box), and below is the grid of posts. You can filter the posts to be display on the page by it categories or tags or post type. If you have only index file with below format, all other pages will have the same arrangement.
## 3. Create theme file
In the project directory, you'll see a bunch of files and we're not going to do anything with the root files. The only thing we can modify/add are plugins and themes.
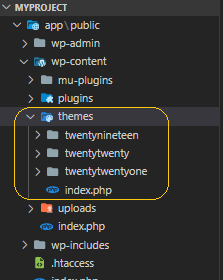
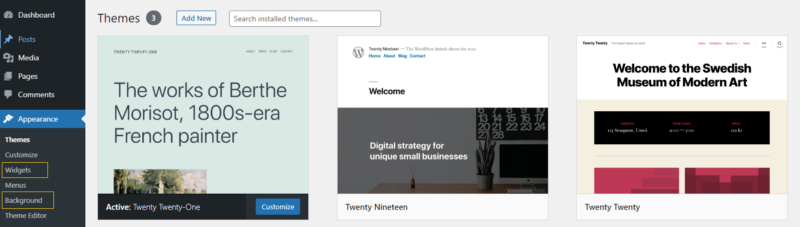
In the theme folder, there are 3 default themes which can be seen from your admin page. This mean, the code control admin page, and a theme gives you ability to add different options to modify your page.
For example, later when we included our custom theme in the admin page and activated it, you won't see widgets or background options (yellow box below) but we can totally add them, and even more.
Now, go ahead and create a theme folder, folder name will be theme name.
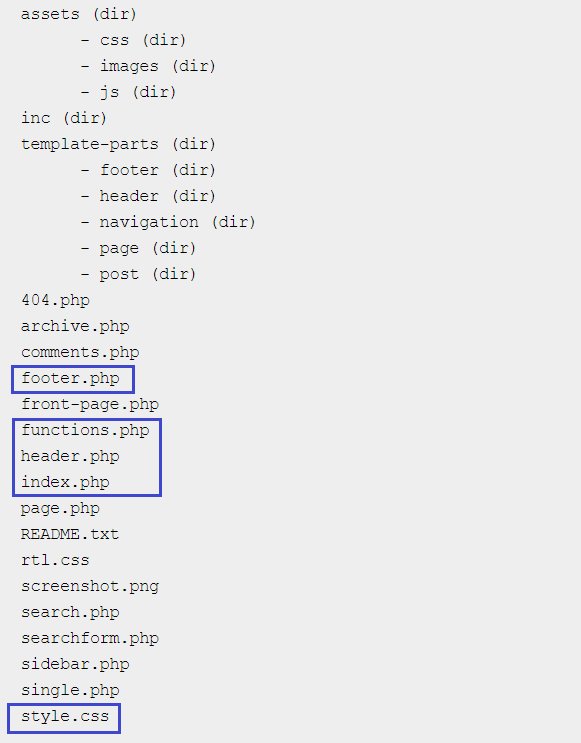
Below is standard theme structure, but first, you'll need files in the blue box only.
In `style.css` add below code:
```
/*
Theme Name: Mytheme
Theme URI:
Author: Me
Description: Wordpress Theme
Version: 1.0.0
*/
```
Now check your admin page, you'll see your theme there. Activate it and your site is now a blank 😆 Of course it's blank, remember when i said you have an idea of how pages and posts look like. Let's create that idea in plain html, css, js. This is why the standard theme structure has assets folder to keep your html, css and js. When your theme is getting more complicated or bigger, that's when you need template-parts folder, to break down the html into parts for better management and adjustment.
## 4. Moving from html to your wordpress file
Let's assume your html template looks like below and only 1 format for pages and posts (means that there's only `index.php` file)
```
<!DOCTYPE html>
<html lang="en">
<head>
<meta charset="UTF-8">
<meta http-equiv="X-UA-Compatible" content="IE=edge">
<meta name="viewport" content="width=device-width, initial-scale=1.0">
<link href="https://cdn.jsdelivr.net/npm/bootstrap@5.0.2/dist/css/bootstrap.min.css" rel="stylesheet" integrity="sha384-EVSTQN3/azprG1Anm3QDgpJLIm9Nao0Yz1ztcQTwFspd3yD65VohhpuuCOmLASjC" crossorigin="anonymous">
<link rel="stylesheet" href="style.css">
<title>Document</title>
</head>
<body>
<header id="header" class="desktop-header">
<img at="logo" src="../images/header_logo.png" />
<div class="menu">
<div>page 1</div>
<div>page 2</div>
</div>
</header>
<!-- Above is page header -->
<div>Page title</div>
<div>Page descriptions: everything in this middle is the content</div>
<div>List of posts</div>
<ul>
<li></li>
</ul>
<div>sidebar</div>
<!-- Below is page footer -->
<footer>
This is the footer
</footer>
<script src="https://cdn.jsdelivr.net/npm/bootstrap@5.0.2/dist/js/bootstrap.bundle.min.js" integrity="sha384-MrcW6ZMFYlzcLA8Nl+NtUVF0sA7MsXsP1UyJoMp4YLEuNSfAP+JcXn/tWtIaxVXM" crossorigin="anonymous"></script>
<script src="../js/scripts.js"></script>
</body>
</html>
```
**header.php & footer.php**
Move all the part that belong to the header to `header.php`
And all the part that belong to the footer to `footer.php`
The reason we're doing this is to a void copying these parts over and over again when you have serveral templates.
**functions.php**
While other files in your theme are mainly handle the template or appearance of what pages and posts look like, functions.php has all the power to manipulate, to add options to your admin site.
**First,**
the <link> won't work if you leave it as is in the `header.php`, you have to register all style sheets in `functions.php` . Include belode code to your `functions.php` .
```
function myproject_register_styles() {
wp_enqueue_style( 'myproject-main-style', get_template_directory_uri()."/style.css", array('myproject-bootstrap'), '1.0.0', 'all' );
wp_enqueue_style( 'myproject-bootstrap', 'https://cdn.jsdelivr.net/npm/bootstrap@5.0.2/dist/css/bootstrap.min.css', array(), '5.0.2', 'all' );
}
add_action('wp_enqueue_scripts', 'myproject_register_styles');
```
`add_action()` is the function we use to register options such as option to display dynamic menu, option to add widgets to side bar, option to display dynamic logo, etc in admin page.
`wp_enqueue_style( string $handle, string $src = '', string[] $deps = array(), string|bool|null $ver = false, string $media = 'all' )` is used to replace the <link> tag in your html. It takes some parameters like name of the stylesheet, source, an array of dependencies (which means if you have some stylesheets that need to be loaded first, the other style sheets need to add those stylesheet's name in the array), the version of style sheet and media type.
If the file is coming from your directory, use `get_template_directory_uri()` to point to it because when you host this project, the domain will be change.
**Second,**
the `<script>` also need to be register in `functions.php` with below code.
```
function myproject_register_scripts() {
wp_enqueue_script( 'myproject-bootstrap-js', 'https://cdn.jsdelivr.net/npm/bootstrap@5.0.2/dist/js/bootstrap.bundle.min.js', array(), '5.0.2', true );
wp_enqueue_script( 'myproject-main-script', get_template_directory_uri()."/assets/js/scripts.js", array(), '1.0.0', true );
}
add_action('wp_enqueue_scripts', 'myproject_register_scripts');
```
Similar with `wp_enqueue_style` the `wp_enqueue_script` also has parameters
After register stylesheets and scripts, remove all `<link>` tag and add `wp_head()`, remove all `<script>` tag and add `wp_footer()`.
**header.php**
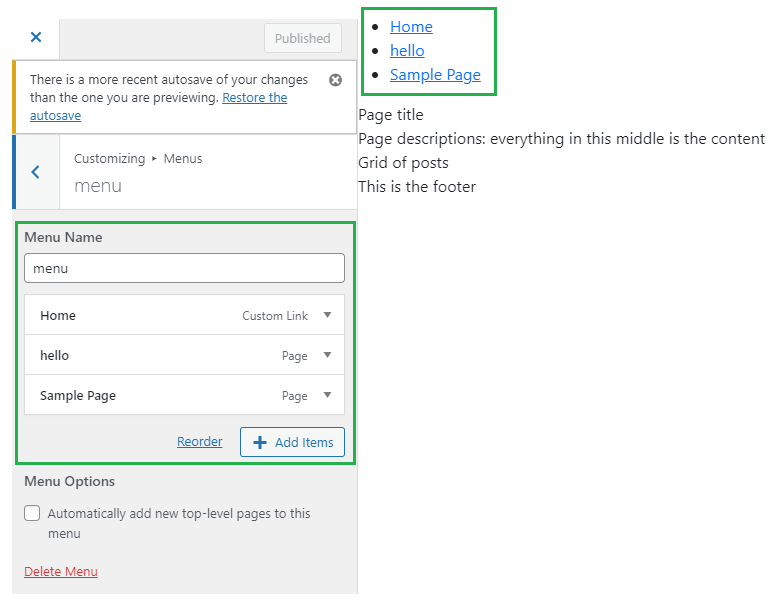
Go back to header, there's a section that we want to display our pages as menu item:
```
<div class="menu">
<div>page 1</div>
<div>page 2</div>
</div>
```
Something like this:

f you keep you code as is, there'll always be 2 menu items: page 1 and page 2. Options to add and remove item from menu is default in admin page but if you don't allow it to be dynamic, it will have no effects.
To allow dynamic menu items, replace your menu item with this:
```
<?php
wp_nav_menu(
array(
'menu' => 'primary',
)
)
?>
```
**index.php**
Now, it's time to handle the template.
Template acts as a skeleton to keep the content of posts and pages in place and those contents need to be dynamic, too.
Remember that we have moved all our header and footer part in separate files? I told you the reason but haven't mentioned the way to add those back to our template. It's by using `get_header()` and `get_footer()` .
Your template now look like this.
```
<?php get_header() ?>
<!-- Above is page header -->
<div>Page title</div>
<div>Page descriptions: everything in this middle is the content</div>
<div>List of posts</div>
<ul>
<li></li>
</ul>
<div>sidebar</div>
<!-- Below is page footer -->
<?php get_footer() ?>
```
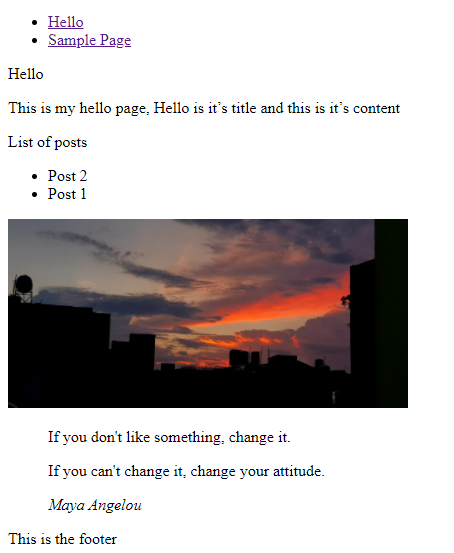
Then, to make the content dynamic, use `the_title()` and `the_content()`, very straight forward, right? 😎 And for the list of posts, using the function to loop through the posts and display them, like below
```
<?php get_header() ?>
<!-- Above is page header -->
<div><?php the_title(); ?></div>
<div><?php the_content() ?></div>
<div>List of posts</div>
<ul>
<?php
$the_query = new WP_Query(array('post_type' => 'post'));
if ( $the_query->have_posts() ) {
while ( $the_query->have_posts() ) {
$the_query->the_post();
?>
<li><?php the_title() ?></li>
<?php
}}
?>
</ul>
<li>get_the_title()</li>
<?php
}wp_reset_postdata();
?>
</ul>
<div>sidebar</div>
<!-- Below is page footer -->
<?php get_footer() ?>
```
WP_Query is a wordpress class that allows us to find the post with many filter options. A a result, we'll have an array of posts, and we can display all the post by looping through this array. In case you want to be able to click on the post to go to it's details, wrap your post with
`<a href=<?php the_permalink() ?> ></a>`
The final thing, i'd like to mention is the sidebar. Sidebar is the place where you can display widget's content. To see what is widget, let register this option first. Go to functions.php file and add:
```
function myproject_sidebar() {
register_sidebar(array(
'name' => "mySidebar",
'before_widget' => '<div>',
'after_widget' => "</div>",
));
}
add_action( 'widgets_init', 'myproject_sidebar' );
```
After registered, you'll have options to add widget to sidebar. "mySidebar" is the one you have registered above.
Now , widgets are content parts that you can add to sidebar, it would be image, video, paragraph, calendar, or even an album from spotify, … You can also create you custom widget, beside default ones.
To display this sidebar, we need to modify our template, to make it dynamic. Change `<div>sidebar</div> to <?php dynamic_sidebar('mySidebar'); ?>`
and you can see the sidebar with widgets you have added to it appear on your page.
That's a wrap, everyone!
## >> Good to know <<
- After adding a bunch of CSS, at some point you might need to change your `style.css` version and the version number in functions.php or clear the browser cache to make it affective.
- To split the css file into multiple files, in the main `style.css`, import
`@import url("path to your other css files");`
- If an image is from your theme, make src dynamic likethis
`<img alt="" src=<?php print get_theme_file_uri("assets/images/abc.jpg")?> />`
- Adding screenshot.png to the theme to give give it a nice screenshot of how the theme looks like.
***Conclusion***
Like i said earlier, Wordpress has been around for quiet long now. It's is impossible to cover every aspects of it. As long as you understand the basic concept and flow, you'll be able to create much more complex stuffs.
In conclusion, to create a wordpress theme, you just need to make basic setup, the remaining thing is trying to replace static contents on your template with functions provided by wordpress to be able to get the contents from admin page.
There're plenty of functions and supports you can find in https://developer.wordpress.org/reference/
<small>
Published date: 2021-08-02<br/>
Also published <a href="https://medium.com/goalist-blog/how-to-create-wordpress-theme-7e211e645674">here</a>
</small>
 Sign in with Wallet
Connect another wallet
Sign in with Wallet
Connect another wallet