# POSIX Thread 介紹
POSIX Threads 是一套符合 [POSIX 標準](https://zh.wikipedia.org/zh-tw/%E5%8F%AF%E7%A7%BB%E6%A4%8D%E6%93%8D%E4%BD%9C%E7%B3%BB%E7%BB%9F%E6%8E%A5%E5%8F%A3)的 API ,方便開發者設計出 User-level 的多執行緒程式。
## 開始之前
先了解執行緒的記憶體分配有助於多執行緒程式的開發。
### thread 空間分配
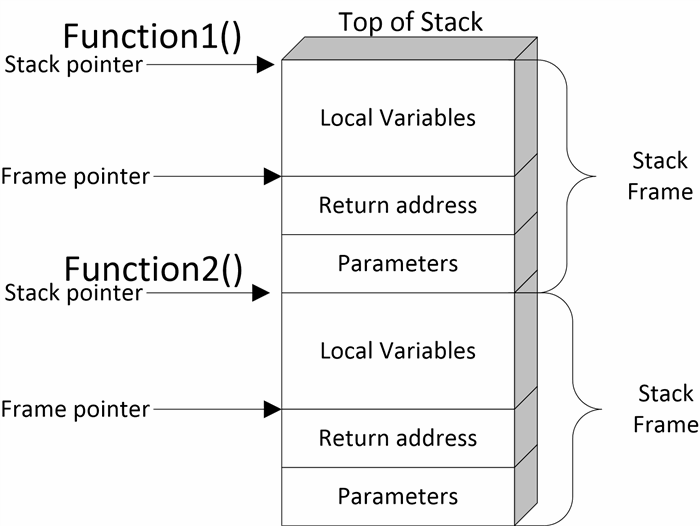
在同一個 Program 中,多個 Thread 會共用同一個位址空間,每個 Thread 都會分配到一塊空間作為自己的 Stack ,而指向這些空間起始點的指標就被稱為 `Stack pointer` 。
> 呼叫函式和一般的跳躍不同,在呼叫結束後必須回到原本呼叫的地方,原本執行中的位址被叫做「回傳位址」(return address)。如果說呼叫只會發生一次的話,隨便找一個暫存器存回傳位址就好了;但是函式呼叫可以一層一層呼叫下去,所以必須把回傳位址存在記憶體裡。實務上,回傳位址被存在記憶體中的堆疊(stack)裡。
堆疊,被實作成只能使用堆疊空間最上方位址所存的一個變數。而這個紀錄堆疊最上方的紀錄空間被稱為「堆疊指標」(stack pointer)。x86-64 中,為了方便寫呼叫函式的程式,提供了堆疊指標專用的暫存器,和使用這個暫存器的指令。往堆疊上堆資料的操作是「push」,而取出堆疊資料的操作是「pop」。
-- [C編譯器入門~想懂低階系統從自幹編譯器開始~](https://koshizuow.gitbook.io/compilerbook/machine_code_assembler/c_assembly/kansuu_yobidashi)
當執行緒呼叫其他函式時, stack pointer 便會向下移動,這讓我們可以有更多空間去存放參數以及局部變數。
當函式執行完畢並返回時, stack pointer 便會移動到原先的位址。
> 舊的 stack pointer 紀錄的地址也會被存放在 Stack 中,這也是函式可以快速返回的原因。

> [ref](https://www.codeproject.com/Articles/5256936/Pointers)
對於函式的流程控制,這部[The Call Stack](https://www.youtube.com/watch?v=Q2sFmqvpBe0)影片有詳細的解說。
## 進入正題
Pthreads API 中大致共有 100 個函數調用,全都以 **pthread_** 開頭,並可以分為四類:
- 執行緒管理,例如創建執行緒,等待 ( join ) 執行緒,查詢執行緒狀態等。
- 互斥鎖(Mutex):創建、摧毀、鎖定、解鎖、設置屬性等操作
- 條件變量(Condition Variable):創建、摧毀、等待、通知、設置與查詢屬性等操作
- 使用了互斥鎖的執行緒間的同步管理
> POSIX 的 Semaphore API 可以和 Pthreads 協同工作,但這並不是 Pthreads 的標準。因而這部分API是以 **sem_** 打頭,而非 **pthread_**。
> -- [wikipedia](https://zh.wikipedia.org/wiki/POSIX%E7%BA%BF%E7%A8%8B)
而本篇文章要介紹的是第一項: 執行緒管理的部分。
### 創建新的執行緒
我們可以利用 POSIX Thread 創建具有一個執行緒以上的 Process ,第一個 Thread 會負責運行 `main()` 中的程式碼。若要創建一個以上的執行緒,我們可以使用 `pthread_create` :
```c=
int pthread_create(pthread_t *thread, const pthread_attr_t *attr,
void *(*start_routine) (void *), void *arg);
```
其中 `void *(*start_routine) (void *)` 用語言表達的話,可以解釋成:
> 一個指標它帶有一個指向 void 型態資料的指標,並且,它會返回指向 void 型態資料的指標。
> 如果仍無法理解上述的程式碼,建議讀者可以去複習[重拾 C 語言::函式指標](https://hackmd.io/@learnc/B1E2HEmz_)。
看完 `posix_create` 的定義以後,可以看看以下範例:
```c=
#include <stdio.h>
#include <pthread.h>
void *busy(void *ptr) {
// ptr will point to "Hi"
puts("Hello World");
return NULL;
}
int main() {
pthread_t id;
pthread_create(&id, NULL, busy, "Hi");
while (1) {} // Loop forever
}
```
### 等待執行緒完成工作
如果要等待我們創建的執行緒完成工作,需要使用 `pthread_join` :
```c=
int pthread_join(pthread_t thread, void **retval);
```
查看定義後,進一步改寫原本的程式碼:
```c=
#include <stdio.h>
#include <pthread.h>
void *busy(void *ptr) {
// ptr will point to "Hi"
puts("Hello World");
return NULL;
}
int main() {
void *result;
pthread_t id;
pthread_create(&id, NULL, busy, "Hi");
pthread_join(id, &result);
}
```
除了上面的範例,我們可以用 `pthread_exit()` 再做一次改寫:
```c=
#include <stdio.h>
#include <pthread.h>
void *busy(void *ptr) {
// ptr will point to "Hi"
puts("Hello World");
pthread_exit(NULL);
}
int main() {
pthread_t id;
pthread_create(&id, NULL, busy, "Hi");
pthread_join(id, NULL);
}
```
若工作流程用圖表呈現,大概是這樣:
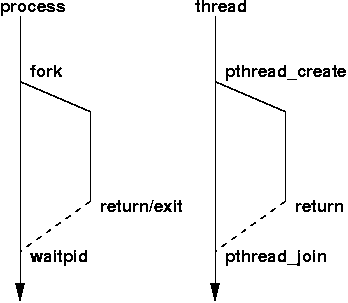
> 上圖取自該[網站](https://www.cs.fsu.edu/~baker/opsys/notes/pthreads.html)。
### Compile your code!
本系列都是採用 gcc 作為 C 語言的編譯器,若使用到 Pthread 必須在編譯時添加參數: `-lpthread` 。
```
gcc source.c -lpthread -o source
```
編譯完成後,便可以啟動可執行檔。
```
./source
```
### 取消執行緒
PThread 提供了 API ,讓我們可以取消已建立的 POSIX Thread 。
```c=
int pthread_cancel(pthread_t thread);
```
> 想知道更多細節可以參考[該連結](https://blog.csdn.net/gswjj1/article/details/23302919)。
### exit 和 pthread_exit 的差異
`pthread_exit()` 如果放在 `main()` 函式,是用來確保所有用 POSIX Thread API 創建的執行緒已經完成。
```c=
int main() {
pthread_t tid1, tid2;
pthread_create(&tid1, NULL, myfunc, "Jabberwocky");
pthread_create(&tid2, NULL, myfunc, "Vorpel");
pthread_exit(NULL);
// No code is run after pthread_exit
// However process will continue to exist until both threads have finished
}
```
如果不使用 `pthread_exit()` 或是 `pthread_join()` 而直接使用 `exit()` ,你的 Process 會在一派發完執行緒後結束(也就是執行緒根本還沒開始處理任務):
```c=
int main() {
pthread_t tid1, tid2;
pthread_create(&tid1, NULL, myfunc, "Jabberwocky");
pthread_create(&tid2, NULL, myfunc, "Vorpel");
exit(42); //or return 42;
// No code is run after exit
}
```
> 如果還有疑問,也可以參考 [stackoverflow](https://stackoverflow.com/questions/3559463/is-it-ok-to-call-pthread-exit-from-main) 上的問答串。
## 總結
最後,筆者統整一下本篇介紹的 POSIX Thread API 的重要知識點:
### 如何終止 Thread
終止 Thread 有 4 個方法:
- 等到 Thread 指派的任務 Return 。
- 用 `pthread_cancel` 呼叫指定的執行緒。
- 使用 `pthread_exit()` 。
- 終止 Process 。
### 如果不使用 `pthread_join` 會有什麼後果呢?
空閒的執行緒會繼續占用資源,直到 Process 結束為止。
換言之,如果是在長期不會結束的應用(像是伺服器),那錯誤的設計便會造成多餘的資源浪費。
### 我該用 `pthread_join()` 還是 `pthread_exit()` 阿?
答案是都可以,只是差在 `pthread_exit()` 會在執行緒完成任務後退出,讓你沒有機會執行其他程式。
### 我可以在執行緒中傳送 Stack pointer 到另一個執行緒嗎?
可以,但要注意函式的生命週期,考慮以下程式碼:
```c=
pthread_t start_threads() {
int start = 42;
pthread_t tid;
pthread_create(&tid, 0, myfunc, &start); // ERROR!
return tid;
}
```
等到 `myfunc` 開始執行時, `start_threads()` 的生命早就走到盡頭了!這樣一來,我們根本無法確定原先存放 start 變數內容的記憶體現在存放什麼東西。
為了避免這個情況發生,我們可以用 `pthread_join` 改寫範例程式:
```c=
void start_threads() {
int start = 42;
void *result;
pthread_t tid;
pthread_create(&tid, 0, myfunc, &start); // OK - start will be valid!
pthread_join(tid, &result);
}
```
這樣一來, `start_thread()` 的生命週期就會被延後到 `myfunc()` 執行完成才結束。
## Reference
- [C 語言 pthread 多執行緒平行化程式設計入門教學與範例](https://blog.gtwang.org/programming/pthread-multithreading-programming-in-c-tutorial/)
- [SystemProgramming](https://github.com/angrave/SystemProgramming/wiki/Pthreads%2C-Part-1%3A-Introduction)
- 維基百科