VRChat Avatar Ultimate Optimize Notes (Modular Avatar Supported)
===
I made this thing with ChatGPT based on my [Traditional Chinese](https://hackmd.io/@kurikotw/AvatarOptimize_CHT) version.
You can refer that, or just let me know if something is weird.
---
:::success
:bulb: **TL;DR**
Duplicate these from your avatar:
* FX Layer
* Expression Menu
* Expression Parameter
Remove all the things about object toggles. (You can preserve face expressions which only use blend shapes.)
Duplicate your avatar.
Remove PhysBones as much as you can, unnecessary objects since you just removed your toggles, AND ALL LIGHTS AND PARTICLE SYSTEMS.
Import [AAO](#anatawa12-AvatarOptimizer-AAO) and [lilNDMFMeshSimplifier](#lilNDMFMeshSimplifier).
Do an [Auto Optimize](#Blast-an-Auto-Optimize). Optionally [Remove meshes with elegance](#Remove-Mesh-By-BlendShape) and [Remove meshes with BRUTE FORCE](#lilmesh2) or **STRIP** if you're still messing up with polygons.
Bring your modified FX Layer, Expression Menu, Expression Parameter back to that Avatar, and voilà.
If you need more. [Read them all the way down.](#Table-of-Contents)
:::
Just poofed your friend's computer?
Got kicked because your "Very, Very Poor" avatar?
Other players sees you in Imposter by dafault?
Don't want to mess up your original files while optimizing?
### **HERE'S THE PLACE!**
###
This tutorial will provide detailed explanations of the tools and methods required for optimization.
The goal is to move away from Very Poor or better, and help your Avatar slim down!
> [!Note]
> If the update cames up, I'll trying catch up too!
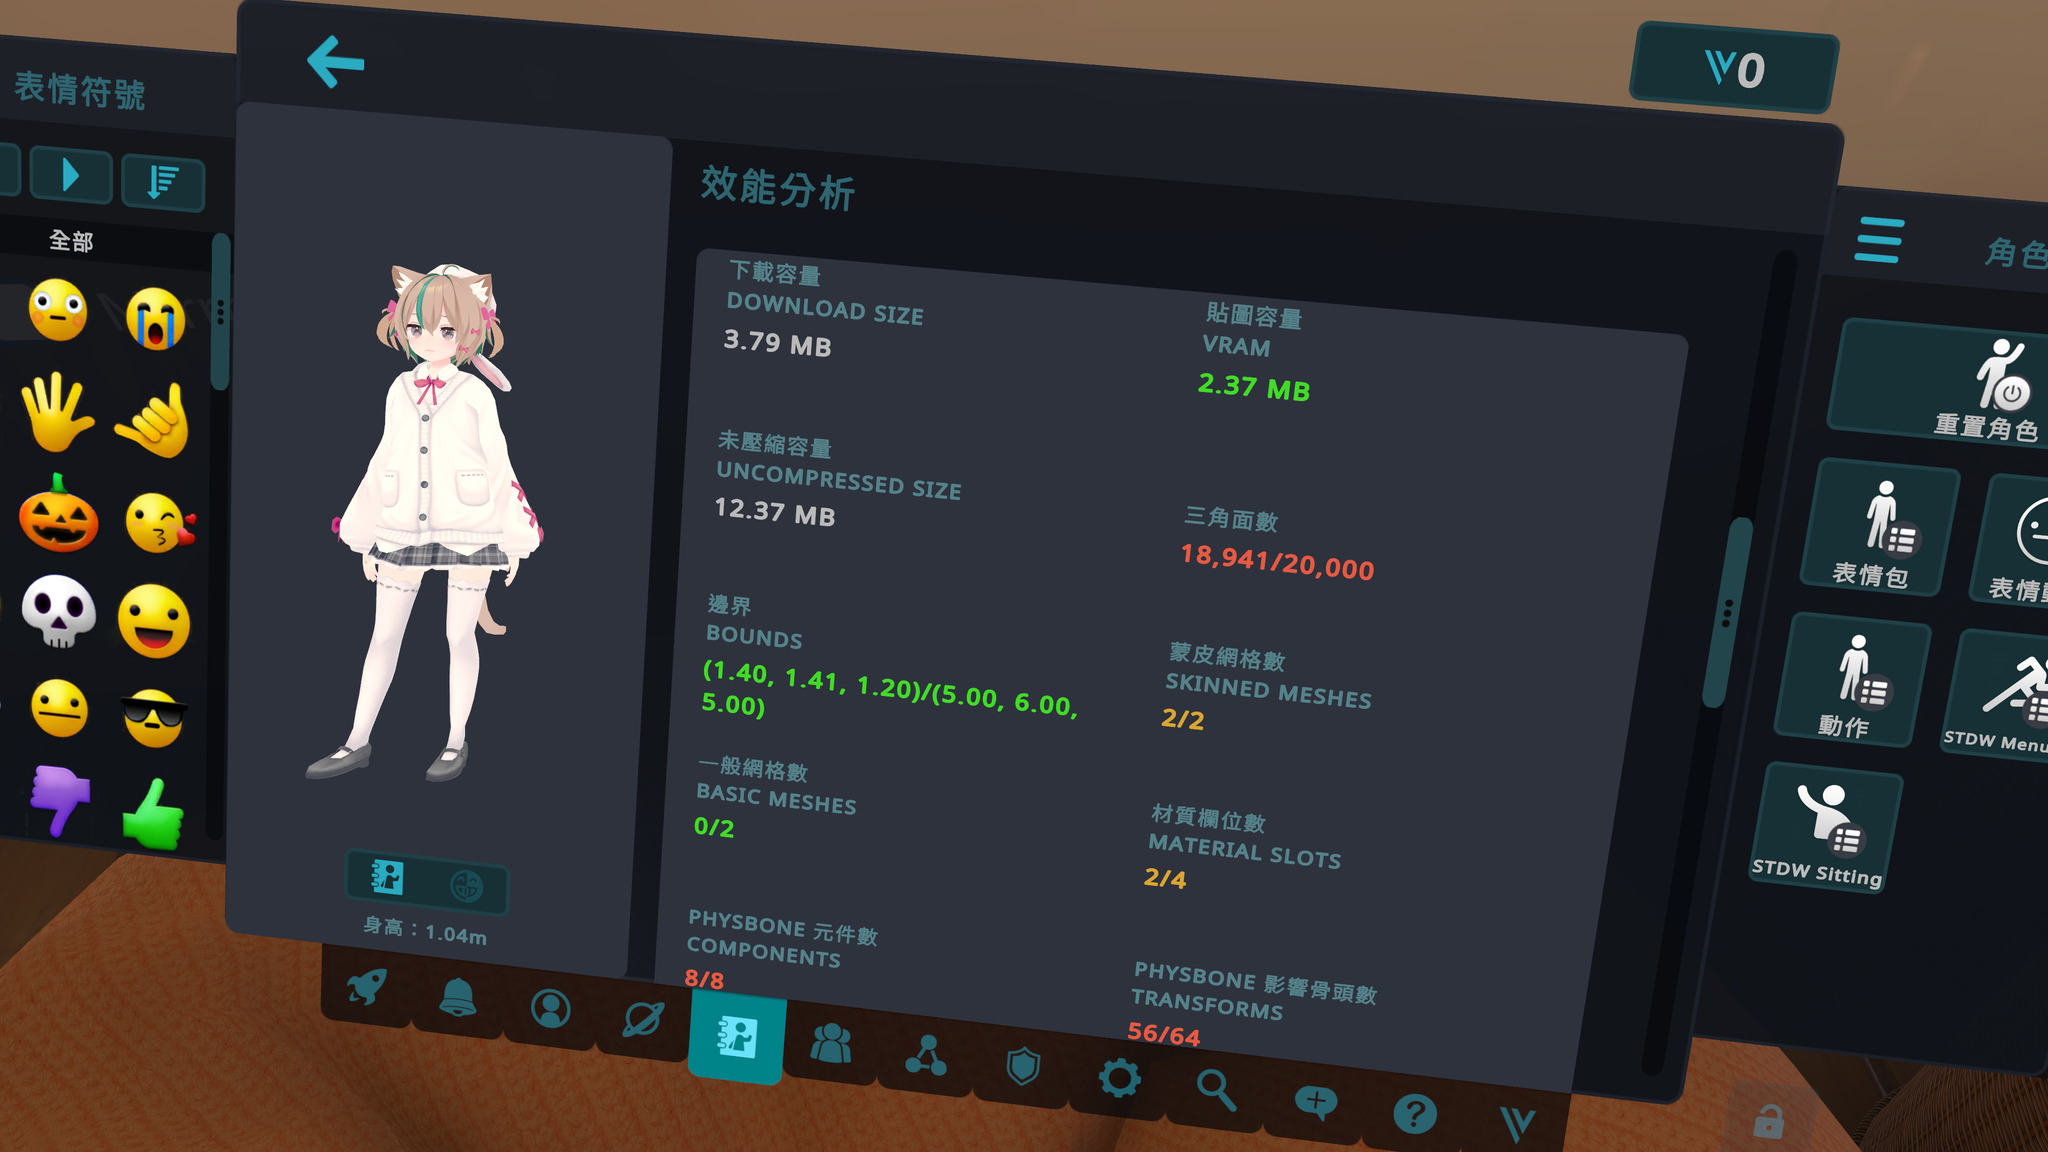
Here’s the proof that I’m not bragging.
The base model is Chiffon with higher polygons by the way!
[](https://hackmd.io/_uploads/B1kPoHmQyl.png)
## Table of Contents
* [Preface](#Preface)
* [Tools you need](#Tools-you-need)
* [Modular Avatar (MA)](#Modular-Avatar-MA)
* [anatawa12 AvatarOptimizer (AAO)](#anatawa12-AvatarOptimizer-AAO)
* [Mantis LOD Editor - Professional Edition](#Mantis-LOD-Editor---Professional-Edition)
* [Mantis LOD Editor NDMF version](#Mantis-LOD-Editor-NDMF-version)
* [lilNDMFMeshSimplifier](#lilNDMFMeshSimplifier)
* [lilAvatarUtils](#lilAvatarUtils)
* [TexTransTool](#TexTransTool)
* [Avatar bulk uploader](#Avatar-bulk-uploader)
* [Before we start](#Before-we-start)
* [Import packages via VCC](#Import-packages-via-VCC)
* [Enable actual performance window](#啟用-anatawa12-工具包)
* [Bring up AvatarUtils window](#Bring-up-AvatarUtils-window)
* [Play ball!](#Play-ball)
* [Blast an Auto Optimize!](#Blast-an-Auto-Optimize)
* [Light](#Light)
* [Particle System](#Particle-System)
* [Texture Memory](#Texture-Memory)
* [Skinned Mesh Renderer](#Skinned-Mesh-Renderer)
* [Material Slots](#Material-Slots)
* [PhysBones](#PhysBones)
* [PhysBone Components](#PhysBone-Components)
* [PhysBone Affected Transforms](#PhysBone-Affected-Transforms)
* [PhysBone Collider](#PhysBone-Collider)
* [PhysBone Collosion Checks](#Physbone-Collosion-Checks)
* [Polygons](#Polygons)
* [Remove Mesh By BlendShape](#Remove-Mesh-By-BlendShape)
* [Remove Mesh By Mask](#Remove-Mesh-By-Mask)
* [Remove Mesh By Box](#Remove-Mesh-By-Box)
* [Remove Mesh By UV Tile](#Remove-Mesh-By-UV-Tile)
* [Mantis LOD Editor NDMF version](#mantis2)
* [lilNDMFMeshSimplifier](#lilmesh2)
* [Avatar bulk upload](#Avatar-bulk-upload)
* [Peroration](#Peroration)
## Preface
Typically, an avatar wearing more than two toggleable outfits is almost to be ranked as "Very Poor."
Of course, if you manage to wear more than two outfits without hitting "Very Poor", kudos to you!
Based on my experience, here’s a simple list of the most common issues that cause avatars hits "Very Poor."
1. Skinned Mesh Renderers so numerous they overwhelm the CPU
2. Too many material slots that aren't being used
4. Massive PhysBones components that slap you in the face
5. High polygon counts that disappoint Porygons
6. Extremely THICC textures
These issues can be resolved directly in Unity—you don’t need to learn Blender.
By the way, most of the tools introduced in this article are part of the NDMF (Non-Destructive Modular Framework) system. They allow you to optimize without modifying the original files and even supported Modular Avatar (MA)! Optimizing your avatar may not as hard as you think!
Here is VRChat's offical performance rank standards:
> [!Important]
> The factors listed below are those mentioned in this article and are known to exceed limits more easily.
> For detailed information, please refer to the [official website](https://creators.vrchat.com/avatars/avatar-performance-ranking-system/#pc-limits).
| Avatar Rank | Excellent | Good | Medium | Poor
| -------- | -------- | -------- | -------- | -------- |
| Triangles | 32,000 | 70,000 |70,000 |70,000 |
|Texture Memory | 40 MB | 75 MB | 110 MB |150 MB|
|Skinned Meshes | 1 | 2 | 8 | 16 |
| Material Slots | 4 | 8 | 16 | 32 |
| PhysBones Components (PB) | 4 | 8 | 16 | 32 |
| PhysBones Affected Transforms | 16 | 64 | 128 | 256 |
| PhysBones Colliders | 4 | 8 | 16 | 32 |
| PhysBones Collision Check Count | 32 | 128 | 256 | 512 |
| Lights | 0 | 0 | 0 | 1 |
| Particle Systems | 0 | 4 | 8 | 16 |
| Total Particles Active | 0 | 300 | 1,000 | 2,500 |
| Mesh Particle Active Polys | 0 |1,000 | 2,000 | 5,000 |
| Particle Trails Enabled | False | False | True |True |
| Particle Collision Enabled | False | False | True |True |
:::warning
💪 **For Challangers**
[The limits for Quest avatars](https://creators.vrchat.com/avatars/avatar-performance-ranking-system/#mobile-limits) are so strict for God's sake.
Any "Very Poor" avatars are not showing in Mobile platforms anymore.
If you manage to meet the challenge (at least "Poor"), it means PC avatars will be a breeze for you!
Here’s the proof I’m not bluffing—this Rusk was modified from a PC avatar!
Not the Quest one came from Komado!
[](https://images.plurk.com/5QVtFDPf5ZR02ywEkt1ba2.png)
:::
LET'S GO!!!\!!!!\!!!!\!!!!\!!!! ~~(Unwelcome School.mp3)~~
## Tools you need
Here are the VCC Repos and Packages we’ll need to use.
You only need to import them once, and they’ll be ready to use every time you open Unity!
*If you're importing through VCC, I recommend keeping things updated regularly!*
> [!Important]
Each tool's title in this section links to its official website for more information.
---
### [Modular Avatar (MA)](https://modular-avatar.nadena.dev/)
A famous tool created by bd_.
Some of the tools in this article rely on MA to function, so please install it first.
:::info
💡**To work with VRCFury (For advanced users)**
Due to Fury and MA are not knowing what are they doing each other, errors often occurs.
I’ve bringed some methods to prevent these issues, based on [きくじん’s article](https://note.com/kikjin/n/naee552e57a45#132ca880-dc0f-4ec6-87fa-ec35718a6060)
⚠️<font color=Orange>I haven’t tested them by myself, so if anything goes wrong or you know the correct solution, please let me know.</font>⚠️
Ensure the following execution order for the tools:
1. MA and other NDMF system tools that adding thuings.
(I think Mantis and MeshSimplifier should also go here, as they handle objects that haven’t been integrated yet.)
2. Fury
3. All other NDMF optimization tools (including everything else introduced in this article, such as integration, deletion tools, etc.)
Anyway, you need to fully understand what MA and Fury are doing individually to avoid having them process the same things. Otherwise, errors may pops up in your Unity console.
:::
[VCC Import link](vcc://vpm/addRepo?url=https://vpm.nadena.dev/vpm.json)
---
### [anatawa12 AvatarOptimizer (AAO)](https://booth.pm/ja/items/4885109)
This is an optimization toolkit created by anatawa12.
Most of the optimization tasks can be completed here.
It's my favorite optimizing tools!
==This repo is updated frequently. If there are any new features I haven’t mentioned, please let me know.==
[VCC Import link](https://vpm.anatawa12.com/add-repo)
---
### [Mantis LOD Editor - Professional Edition](https://assetstore.unity.com/packages/tools/modeling/mantis-lod-editor-professional-edition-37086)
A tool for reducing polygons.
It allows you to view the current and original polygon counts during the reduction process for more precise control.
++==This is the only paid tool in this article, originally priced at $50.==++
However, it seems to go on sale quite frequently, it’s worth for waiting if you're on a budget.
...Or just try the free solution: [lilNDMFMeshSimplifier](#lilNDMFMeshSimplifier).
wut? u know how to use Blender? Get out of here and see other sections!*
This is a package sold in the Unity Asset Store, and it can be imported directly through Unity’s Package Manager.
---
### [Mantis LOD Editor NDMF version](https://booth.pm/ja/items/5409262)
Since the tool mentioned above are not part of the NDMF system, even not a part of the VRChat system (as the SDK would block them before uploading), ひつぶ created this tool to adapt the Mantis LOD Editor into the NDMF system.
:::info
💦 **My Bad**
I forgot to update this tool. The latest one works pretty well!
:::
This tool cannot be imported through VCC. Please use the link above to visit Booth, download it, and import it into Unity.
---
### [lilNDMFMeshSimplifier](https://github.com/lilxyzw/lilNDMFMeshSimplifier)
We’re not slaves to capitalism! Here’s the free solution!
This tool is created by lil, makes it easy to reduce polygons.
[VCC Import link](https://lilxyzw.github.io/vpm-repos/redirect.html)
---
### [lilAvatarUtils](https://github.com/lilxyzw/lilAvatarUtils)
This toolkit also created by lil, allows you to check various performance factors for your avatar’s textures, materials, animations, skinned mesh, PhysBones, PhysBone colliders, lights, and more.
It makes it easy to identify which mo\**er fu**ers is dropping your performance, and you can check these factors before and after compilation.
This tool is included in lil’s repository. Simply import the package along with the one from the repository mentioned above.
---
### [TexTransTool](https://ttt.rs64.net/en/)
A tool created by Reina_Sakiria for merging material slots. As long as the shader properties of the materials are similar, it can naturally atlas your textures.
In some cases, you can even bring your avatar into just **ONE** material slot!
[VCC Import link](vcc://vpm/addRepo?url=https%3A%2F%2Fvpm.rs64.net%2Fvpm.json)
---
### [Avatar bulk uploader](https://github.com/anatawa12/ContinuousAvatarUploader)
You can't just wear A BUNCH OF CLOTHES on a single avatar for optimization.
If you have many outfits, they’ll need to be split into multiple avatars for individual uploads.
However, as of the time this article was written, the VRChat SDK doesn’t have a bulk upload feature for avatars.
If something changes or needs to be updated across all avatars, uploading them one by one could be a suffering process.
*For example, I already have nearly 50 avatars...*
This tool is also created by anatawa12, the author of AAO, and is a bulk upload tool.
It allows you to create different assets and set up groups of avatars for bulk uploading.
You can still freely switch between avatars with different outfits in VRChat!
This tool is included in the [AAO](#anatawa12-AvatarOptimizer-AAO) repository. Simply import the package along with the repository to use it.
> [!Important]A little call to action
This feature really should be native to the SDK, so [LET’S VOTE THIS FEEDBACK UP FOR GOD'S SAKE](https://feedback.vrchat.com/feature-requests/p/add-bulk-or-batch-avatar-upload-option-to-sdk).
Another feature to request is the ability to [manage your uploaded avatars using folders in VRChat](https://feedback.vrchat.com/feature-requests/p/folders-for-uploaded-avatars)←whitch is posted by anatawa12.
This request is tracked by VRChat team, and if it succeeds, the final piece of your wardrobe puzzle will be complete!
## Before we start
### Import packages via VCC
Some beginners may not be familiar with the VCC, so it’s safer to mention this.
By default, the repositories imported from VCC are disabled.
Go to `Settings > Packages` and enable all the repositories mentioned above.
This way, you'll be able to find the necessary packages in the Manage Project page.
Here's the Packages you need to import:
* AAO: Avatar Optimizer
* anatawa12's gists pack
* Continuous Avatar Uploader
* lilNDMFMeshSimplifier
* lilAvatarUtils
* Modular Avatar
* Non-Destructive Modular Framework
* TexTransTool
---
### Enable actual performance window
The Actual Performance window can let you check the actual performance after compilation.
Since NDMF is a non-destructive optimization, the VRChat SDK will only show the pre-compilation state (usually "Very Poor"). Therefore, you need to rely on this window to see the actual performance after compilation, and the avatar you upload to VRChat will reflect on this one.
1. Menu bar `Tools > anatawa12's gist selector`
2. Toggle the `ActualPerformanceWindow`, and click `Apply Changes` below.
[](https://hackmd.io/_uploads/B1gFjuQmye.png)
3. Check the menu bar `Tools > anatawa12's gist`,`Compute actual Performance on Play` is been toggled. As soon as you enter Play-mode, this tool will display the actual performance factors after compilation (the final status that will be uploaded to VRChat).
[](https://hackmd.io/_uploads/rJQzhdmmke.png)
[](https://hackmd.io/_uploads/S1s5n_XXJl.png)
---
### Bring up AvatarUtils window
TL;DR:
Menu bar `Tools > AvatarUtils`
Before v2.0 `Window > _lil > AvatarUtils`
Drag the avatar you want to check into the top of this window, and you'll be able to see the statis for each part of the avatar.
[](https://hackmd.io/_uploads/H1GKMYmm1l.png)
---
### ⭐️ AS ALWAYS, MAKE YOUR BACKUPS! ⭐️

---
## Play ball!
Now, let's get to the main point.
Optimization isn't something that can be done with a single click; identifying ==ඞwho is messing upඞ== is crucial.
Since VRChat's performance rank is determined by various factors of the avatar,
let's start by looking at the [PC limits](https://creators.vrchat.com/avatars/avatar-performance-ranking-system/#pc-limits) and tackle them one by one, from the simplest to the most challenging!
>[!Tip]
The following section titles will be linked to the documentation pages as I could. Feel free to click on them if you'd like to learn more.
> [!Note]
> You can select the section you want to work on from the [Table of Contents](#Table-of-Contents) and jump directly to that chapter.
> However, it's recommended to add the `AAO Trace and Optimize` component first—it can save you a lot of hassle.
---
### [Blast an Auto Optimize!](https://vpm.anatawa12.com/avatar-optimizer/en/docs/reference/trace-and-optimize/)
~~Immediately eat my own words.~~
This automatic optimization component, can help you resolve many basic issues by default like:
* Merge Skinned Meshes
* Optimize BlendShape
* Remove unused objects (included PhysBones)
* Optimize Animator
==Make a great first move in your optimization journey!==
1. Select your avatar object in Hierarchy, Click `Add Component` under the Inspector.
2. Find and select `AAO Trace And Optimize`.
3. Done.
> [!Note]
> The component will check the avatar's animator first.
> If your animator has toggleable animation inside, it may cause some objects unable to optimize.
Enter Play-mode to check the results.
If you've achieved your goal at this stage, congratulations!
If not, or if you want to challenge even further, let's move on the next chapter!
There are some options you can modify here, but I’ll bring them up later if there's needed.
If you can’t wait, feel free to refer to the official documentation (↑link in the title↑).
---
### [Light](https://creators.vrchat.com/avatars/avatar-optimizing-tips/#limit-the-number-of-lights-your-avatar-uses)
TL;DR: **DON'T ADD IT**
Unless you're afraid of a horror worlds, just a single light of hope is all you need.
If your avatar is too dark, adjust your shader instead of adding more lights.
~~I’ve heard that DPS, SPS might need a lot of lights for **SOME BODY PART CONNECTIONS**, but I have no idea...~~
| Avatar Rank | Excellent | Good | Medium | Poor
| -------- | -------- | -------- | -------- | -------- |
| Lights | 0 | 0 | 0 | 1 |
---
### [Particle System](https://creators.vrchat.com/avatars/avatar-optimizing-tips/#reduce-the-emission-amountamount-of-particle-systems)
This can't be optimized with tools, so please chek your particle syatem limit settings and adjust them appropriately.
*This one is pretty laggy, so plase use it gentlely...*
(Got a lot updates from my Chinese version. I'll catch up here ASAP.)
| Avatar Rank | Excellent | Good | Medium | Poor
| -------- | -------- | -------- | -------- | -------- |
| Particle Systems | 0 | 4 | 8 | 16 |
| Total Particles Active | 0 | 300 | 1,000 | 2,500 |
| Mesh Particle Active Polys | 0 |1,000 | 2,000 | 5,000 |
| Particle Trails Enabled | False | False | True |True |
| Particle Collision Enabled | False | False | True |True |
---
### Texture Memory
Here's our VRAM killer――**Textures**。
:::warning
⚠️ **Warning**
VRChat has enabled [Mipmap Streaming](https://docs.vrchat.com/docs/vrchat-202442#changes--fixes) feature for avatars since version 2024.4.2.
The texture resolution will automatically be reduced based on the available VRAM on the user's computer.
To prevent your beautiful high-resolution textures from being downgraded too early, start by lowering the resolution of less important textures in the first place, sounds better right?
Maybe it could hold for um...10 secounds?
~~*Hold up, no Starburst Stream here!*~~
:::
> [!tip]
Regardless of whether the original file is PNG, JPG, or PSD, etc. No matter how high or low the resolution is,
==The final VRAM usage will only depends on your settings in Unity.==
Find the textures used in the material slots and select them. In the inspector, you can adjust the following:
---
#### Max Size
1. Open the drop-down menu, lower the resolution, click `Apply` check the result.
※It's recommended to start with textures above 4k, as they tend to be a huge VRAM usage.
2. Repeat the steps mentioned above and adjust all textures to the lowest resolution you can accept.
Once again, ==LOWER IS BETTER!==
> [!Note]Adjustment technics
> Based on [lil's experience](https://qiita.com/lilxyzw/items/9aab99f976295971b8b0#%E8%A7%A3%E5%83%8F%E5%BA%A6%E3%82%92%E4%B8%8B%E3%81%92%E3%82%8B)
> Here's the translation of it's recommendations of resolutions:
> * Basically, The resolution should below 2048.
> * For less noticeable objects like shoes, you can reduce the resolution to around 512.
> * In most cases, even reducing the resolution of mask textures to 128 is not easily noticeable.
> * For specific using cases like MatCap, textures can even go down to a resolution of 32.
> * If you're concerned about noise after lowering the resolution, try setting the texture to High Quality.
#### Compression
1. Open the drop-down menu, select your compression level, click `Apply` check the result.
2. Depending on the situation, toggle `Use Crunch Compression` and adjust the quality that you can accept.
> [!Note]Adjustment technics
> Again, Based on [lil's experience](https://qiita.com/lilxyzw/items/9aab99f976295971b8b0#%E3%82%A4%E3%83%B3%E3%83%9D%E3%83%BC%E3%83%88%E8%A8%AD%E5%AE%9A%E3%82%92high-quality%E3%81%AB%E3%81%97%E3%81%A6%E3%81%BF%E3%82%8B)。
> Normal compression has a significant impact on the red channel, so for skin and other textures, it's recommended to use High. However, increasing the quality may also increase the download size.
> Please note the following:
> * If the texture doesn't contain alpha channel, the VRAM usage will be doubled for that texture.
> * If the texture includes an alpha channel, the size will not be affected (this is common for facial textures, clothing, etc.).
> * If the size of the Normal and the High is the same, the Normal one will compress better during compilation.
>
> Although Crunch Compression can reduce download size, it has three drawbacks:
> * Damage the texture quality.
> * Requires extra resources for decompression.
> * VRAM usage remains unchanged.
>
> Therefore, Crunch Compression is generally not recommended.
> Kuriko's note: If you messed up your download size, just use it a little bit...
---
I understand that having more texture details on an Avatar is desirable. However, a single 4k texture can consume around 21MB of VRAM (and if a material uses two 4k textures, the usage will double). It's not just the textures; the avatar model itself also requires VRAM, and it's easy to exceed the limit.
Each time you reduce the texture resolution, the VRAM usage will be reduced to a quarter of its original size—this is a guaranteed win. On the other hand, increasing the resolution by one level will multiply the VRAM usage by four.
Additionally, most players don't have a lot of VRAM. According to [Steam statistics](https://store.steampowered.com/hwsurvey/Steam-Hardware-Software-Survey-Welcome-to-Steam), the majority of players' graphics cards have 8GB of VRAM.
I recommend aiming to keep the VRAM usage for a single Avatar under 75MB (Good). It's not that difficult, especially for models used in events. If you can keep it under 40MB (Excellent), it will run smoothly for everyone, didn't we?
| Avatar Rank | Excellent | Good | Medium | Poor
| -------- | -------- | -------- | -------- | -------- |
|Texture Memory | 40 MB | 75 MB | 110 MB |150 MB|
---
### [Skinned Mesh Renderer](https://vpm.anatawa12.com/avatar-optimizer/en/docs/reference/merge-skinned-mesh/)
Although `AAO Trace And Optimize` will do the job by default, it checks your Animator first. If there are animations with toggleable objects in the Animator, it will skip the process and not perform the optimization.
It’s probably frustrating to hit a roadblock here, right?
Keep going and read on!
As long as the model is compatible with body skeleton deformation, each visible model object is considered a Skinned Mesh.
The benefit of merging them is that, in addition to reducing the CPU load, some Material Slots will also be merged simultaneously. For example: if object A, object B, and object C use the same material, without merging, they will be counted as three separate Material Slots; but after merging, they will count as one.
The only trade-off is that you won't be able to toggle individual objects (i.e., you won’t be able to toggle on or off specific clothing).
If you still want to keep some clothes toggleable or wish to merge everything, follow the steps below:
1. Go to `AAO Trace And Optimize` in avatar object's inspector, untoggle `Merge Skinned Mesh`.
[](https://hackmd.io/_uploads/Hkwad9Qmyl.png)
2. In the Hierarchy, right-click on the Avatar object, select "Create Empty" to add an empty object. Name it as you like; for this example, let's use `MergeMesh`.
3. Select `MergeMesh` object, and click the `Add Component` button in the inspector.
4. Find and select `AAO Merge Skinned Mesh`.
5. The above action will also add a Skinned Mesh Renderer. Remember to link the Root Transform (usually the Hips) and the Anchor Override object for lighting information. It is recommended to bind it to the same setting of `Body` (head object). Otherwise, lighting issues may occur (such as a dark face and bright body).
[](https://hackmd.io/_uploads/SyMFPoE7Jx.png)
6. In the top-right corner of the Inspector, click the lock icon to temporarily lock the Inspector, keeping it displayed for the selected object.
[](https://hackmd.io/_uploads/ryMy8qXmJx.png)
7. According to [anatawa12's words](https://vpm.anatawa12.com/avatar-optimizer/ja/docs/reference/merge-skinned-mesh/#notes), since the number of Blend Shapes on the face is usually the highest, merging everything could actually increase the processing load on your computer. Therefore, in the Hierarchy, select the Skinned Mesh objects you want to merge (except for the `Body` object), and drag them into the component you created earlier, under the Skinned Renderers section. Typically, items like hair and body parts that won't toggle can be merged, and the more you can merge, is better ranks you may reach.
Throwing everything in it is the best! But don't throw the `Body` object in there! (unless you're aiming for Excellent rank. lol)

8. There you go! (Don't forget to unlock the inspector!)
9. (Extra) As mentioned earlier, `AAO Trace And Optimize` will delete the Blend Shapes in merged Skinned Meshes. If you want to keep them, just uncheck the `Optimize BlendShape` option. but...

> [!Caution]
> After merging Skinned Meshes, the paths of the Blend Shapes will change, which may break your Animations.
> Please think carefully before unchecking this option.
I strongly recommend keeping it fixed. Rewriting Blend Shape paths and creating Animations from scratch is really time-consuming and tedious. Alternatively, you can choose not to merge the Skinned Mesh, which will prevent any changes to the Blend Shape paths.
Well, just simply another trade-off here.
:::warning
💪 **For Chanllgers**
If you're aiming for Excellent rank, change `MergeMesh` to `Body` and throw the original `Body` object into it as well to fully integrate everything. However, as mentioned earlier, if there are too many Blend Shapes, it may cause slight performance degradation (though it won't affect the Performance Rank). Since all Skinned Meshes is merged, and these Blend Shape's path just changed and become become unnecessary.
So it’s recommended to add the `Freeze BlendShape` component to objects that don’t require Blend Shapes anymore, toggle all Blend Shapes in this component, and during compilation, it will fix the current appearance and remove their Blend Shapes.
:::
| Avatar Rank | Excellent | Good | Medium | Poor
| -------- | -------- | -------- | -------- | -------- |
|Skinned Meshes | 1 | 2 | 8 | 16 |
---
### [Material Slots](https://ttt.rs64.net/en/docs/Tutorial/AtlasTexture-Tutorial)
As mentioned earlier, textures are important, but it's the responsibility of Material Slots to incorporate these textures into the Avatar.
As we mentioned textures earlier, but let textures sticks on our avatar, we need Material Slots to do the work.
> [!tip]A little fact
> Material Slots and Materials is the same thing.
> [!Tip]Another little fact
> The textures displayed in the material slots, are controlled by the Shader.
To reduce the amount of material slots, there are 2 methods:
1. Merge Skinned Mesh
2. Merge Material Slots (Texture altas)
We've been mentioned `Merge Skinned Mesh` component before.
Read it again if you didn't → [Poral here](#Skinned-Mesh-Renderer)
To merge material slots, we need to call upon another tool: [TexTransTool](https://ttt.rs64.net/)
This tool can rearrange various different material slots into a single one, essentially creating a texture atlas.
Since it also supports the NDMF system, the merging process only occurs during compilation. So there's no need to worry about damaging the original textures and models.
By the way, for Quest avatars, due to the limited shaders available (for example, Toon Lit shader for Anime-ish avatar), which has very few configurable parameters (it doesn't even support transparency in Toon Lit!), this tool can merge them perfectly.
1. Right-click on the avatar object, select `TexTransTool > TTT Atlas Texture`.
2. An `AtlasTexture` object will be added in your avatar's hierarchy. All the material slots will be shown in you avatar's inspector.
3. In the `SelectedMaterial` section, toggle the material slots you want to merge.
[](https://hackmd.io/_uploads/S1cgBzJEee.png)
4. In the `MergeMaterialGroups` section, make your groups to merge similar material slots such as body skin, hair, cloth, transparent shaders, glass, metal, etc.
[](https://hackmd.io/_uploads/rJkcrz1Vel.png)
The first `Element` section is for the group to make.
The innder `Group` section is for the material slots to merge.
Assign the `Reference` material slot below, make sure material slots can share the same settings on the reference one, if there is a quite differences settings between material slots in this group.
5. Hit the <KBD>(NDMF) Enable Optimizing-Phase Preview</KBD> button to preview your work.
6. There you go!
:::warning
⚠️ **Eyes over here!**
After merging, the textures will share the same material slot because it made a texture atlas.
So remember, Group your material slots!
Here's the f**ked up example I merged material slots with normal shader and transparency shader in the same group (And the reference is the normal one):
[](https://images.plurk.com/4O27Ikpp0bWJToxsm5qcez.png)
:::
:::warning
💪 **For Challengers**
Due to ToonLit, Toon Standard shader for mobile platforms doesn't support transparency.
You will also f**k up even you didn't atlas them,
Trying to use [AAO Remove Mesh By Mask](#Remove-Mesh-By-Mask) or [AAO Remove Mesh By UV Tile](#Remove-Mesh-By-UV-Tile).
It could remove unuseable material slots, and may reduce some texture and polygons!
:::
| Avatar Rank | Excellent | Good | Medium | Poor
| -------- | -------- | -------- | -------- | -------- |
| Material Slots | 4 | 8 | 16 | 32 |
#### And...let's talk about a little bit of Shaders...
Well, this thing dosen't affect performance rank but...
In some special cases. It will make a huge performance impact.
If you've heard of, or met **Shader Crasher** before, that counts as one too.
So choose and set it up wisely. **DON'T BE EVIL.**
Additionally, VRChat’s Safety Fallback System include an option to block custom shaders.
If other players blocked your shader, it will appear in fallback shader to them.
This fallback can pre-configured in Unity. You can refer to the [official documentation](https://creators.vrchat.com/avatars/shader-fallback-system/) for more details.
(As I know so far, [liltoon](https://booth.pm/en/items/3087170) can [set the fallback shader on its incpector settings](https://lilxyzw.github.io/lilToon/ja_JP/base/vrchat.html). Come check it out if you're interested!)
---
### PhysBones
Making your hair, clothes flutter in the wind, giving that satisfying feeling of soft animal ears, pinching that smooth cheek, or even making your chest "Boing Boing" is our PhysBone component's excellent work!
> [!note]
> PhysBone is abbreviated as PB.
This section is a little complicated, and will explain the four factors that impact Performance Rank:
1. [PhysBone Components](#PhysBone-Components)
2. [PhysBone Transforms](#PhysBone-Transforms)
3. [PhysBone Colliders](#PhysBone-Colliders)
4. [PhysBone Collision Checks](#Physbone-Collision-Checks)
---
#### PhysBone Components
Before we starting optimize these things, let me explain 2 methods to implement PB:
1. Implement in transform itself.
This is the simplest implementation method. Place the component directly on the transform that you want to make it move, and its child transforms will move along with it.
[](https://hackmd.io/_uploads/B1aTXoBmJl.png)
The advantage is that it’s easy to install (no need to set up a Root Transform), but the downside is that this implementation method scatters the components throughout the Armature, making it harder to manage.
2. Implement in empty object and manually specifying the Root Transform
[](https://hackmd.io/_uploads/ryPLEoSQJg.png)
The pros and cons are essentially reversed. By creating a folder-like structure, managing, enabling/disabling, and deleting PBs becomes very convenient. The downside is that during implementation, you need to manually specify the Root Transform to make it move.
We all love this feature, but if there are too many, "Very Poor" will still come. To reduce them, there are two approaches: merge them or remove them.
**Yes, only 2 of them.**
Before we resort to deleting PBs, we can try merging them first.
---
##### [Merge PhysBone](https://vpm.anatawa12.com/avatar-optimizer/en/docs/reference/merge-physbone/)
Here are the conditions under which PBs can be merged:
1. The PBs to be merged must have a common root transform at their parent level; merging is not possible if the hierarchy exceeds two levels (so don't expect to handle everything with `Hips`!).
2. The PBs to be merged must have **EXACTLY THE SAME** settings.
The merging process for PBs follows similar principles across different implementation methods, but I'll explain each individually for clarity.
:::info
:information_source: Important
Since PBs are limited to handling only one side at a time, it means that if you try to grab merged ears, only one side will respond at a time—grabbing both sides simultaneously will leave one unresponsive.
However, shaking and collision effects remain unaffected!
Just a little wiggle for the ears is plenty satisfying, right?
Please don't grab them—<font color=Pink>it hurts! >△< </font>
:::
---
###### PhysBone implemented in transform itself
Here’s an example using Rusk, her PBs are implemented in this way:
1. Expand the Armature and locate the Transforms that contain PBs.
2. Identify PBs with identical settings. In this case, take `Hair_Side_L` and `Hair_Side_R` as examples.
[](https://hackmd.io/_uploads/r1VbXhH7kx.png)
3. Identify the PB objects that meet the merging criteria. Here, we’ll use `Hair_side_L` and `Hair_side_R` as examples. (Their settings are identical, and they share the same parent transform, which is `Head`.)
4. Right-click on the shared root transform `Head`, select `Create Empty`, and add a new empty object. You can name it whatever you like—for convenience, let’s call it `Hair_Side`.
5. Move `Hair_Side_L` and `Hair_Side_R` into the `Hair_Side` object, creating an additional transform between these PBs and the Root Transform. (Don’t worry—this won’t mess up the armature!)
6. On the `Hair_Side` object, go to the inspector, click `Add Component`, and add the `AAO Merge PhysBone` component. (Remember to click the lock icon in the top-right corner of the inspector to keep it displayed this object for easy access!)
7. Drag and drop `Hair_Side_L` and `Hair_Side_R` into the `Elements to add` section of the `AAO Merge PhysBone` component.
At this point, you should see a setup resembling this.
[](https://hackmd.io/_uploads/r1bjB2Sm1l.png)
8. Done! For any other PBs that meet the same conditions, repeat the above steps to merge them as well!
---
###### PhysBone implemented in empty object and manually specifying the Root Transform
As an example, let's take Chiffon. All of her PBs are implemented using this method.
1. Expand the objects with PBs and check the position of the Root Transform for each PBs inside.
2. Identify the PB objects that meet the merging criteria. Here, we’ll use `Ear_L` and `Ear_R` as examples. (Their settings are identical, and they share the same parent transform, which is `Head`.)
[](https://hackmd.io/_uploads/HyFBaeLm1e.png)
3. Create a new empty object and name it as you like; here, we’ll name it `Ear`. (Since it’s not constrained by the armature, you can place it anywhere. However, for better organization, I usually place it inside the PB object.)
4. Move `Ear_L` and `Ear_Side_R` into the `Ear` object.
5. On the `Ear` object, go to the inspector, click `Add Component`, and add the `AAO Merge PhysBone` component. (Remember to click the lock icon in the top-right corner of the inspector to keep it displayed this object for easy access!)
6. Drag and drop `Ear_L` and `Ear_R` into the `Elements to add` section of the `AAO Merge PhysBone`
At this point, you should see a setup resembling this.
[](https://hackmd.io/_uploads/HJKjfvLQJg.png)
6. Done! For any other PBs that meet the same conditions, repeat the above steps to merge them as well!
---
##### Disable PhysBones
The brutal moment has arrived.
If, after merging, your PhysBone counts still exceeds the limits, start identifying less important PBs and disable them.
Here are two suggested approaches for disabling PBs:
1. PBs meant for grabbing or pulling, such as the cheeks. Honestly, not many people will use this feature—just turn it off.
2. PBs on very small objects with minimal movement that are barely noticeable—disable them too.
There’s also an ultimate solution: if disabling the object affected by a PB doesn’t make the overall avatar look too bad, just delete / disable the object entirely. This has multiple benefits: it reduces both the polygon count and the number of PBs.
After deleting the object, `AAO Trace And Optimize` component will automatically handle PBs if it detects that the PB’s Transform no longer corresponds to a Skinned Mesh during compilation. (Told you it’s brilliant!)
| Avatar Rank | Excellent | Good | Medium | Poor
| -------- | -------- | -------- | -------- | -------- |
| PhysBones Components (PB) | 4 | 8 | 16 | 32 |
---
#### [PhysBone Affected Transforms](https://creators.vrchat.com/avatars/avatar-dynamics/physbones/#transforms)
If you’ve finished handling the PBs, this issue may be less likely to occur.
However, there’s always a chance— for example, if a PB is affecting a large number of transforms, you could run into the problem of exceeding the limit for the number of affected bones.
After solving this issue, there’s an unavoidable trade-off: some of the more distal bones might not move.
So, how to reduce the number of affected bones really depends on the individual.
* Check the actual number of affected bones:
1. Remember how to [open the AvatarUtils window](#顯示-AvatarUtils-視窗)? Bring it up!
2. Drag your Avatar onto the window to view various factors to the Avatar.
3. Switch to the PhysBone tab, and you’ll see a list of all the PB components.
4. To avoid unused PB components interfering with your analysis, first enter Play-Mode so that `AAO Trace And Optimize` can remove unused PBs from the list, then exit Play-Mode.
The window will only display the PBs that are actively affecting the transforms, making it easier to identify your target. (Don't refresh the factors for now, or it will revert to the previous one.)
* Identify the less noticeable end bones and add them to the PB's Ignore transforms.
1. Using the example of the right string of Rusk's cloth, first select the PB object `String_R`.
2. In the Inspector, under the `Ignore Transforms` section, you'll see a `Size` field. This defines how many child transform to ignore. Since this PhysBone has only one child bone, set the `Size` to `1`, and a blank field, `Element 0`, will appear.
(If you set it to `2`, `Element 1` will appear, and so on. This applies when a PB component has multiple child transforms.)
[](https://hackmd.io/_uploads/ry5m8ZPQJx.png)
3. Expand all child transforms of `String_R`. Hold down the Alt key and Left-click to expand `String_R`, All child bones will expand at once.
4. Drag the end bone `String_R.003_end` to the right of `Element 0` under `None (Transform)`. In the Scene section, you will also notice that the PB's transform has disappeared by 1. It should be look like this.
[](https://hackmd.io/_uploads/HJ3VPbvQJe.png)
5. That's it!
By ignoring this end bone, the number of transforms affected by the PB will be reduced by one.
>[!tip]
If you place the parent transform `String_R.003` into `Element 0`, it will also ignore `String_R.003_end` along with it. The number of affected bones will be reduced by two!
But as mentioned earlier, the trade-off is that during gameplay, the ignored Transform will only move along with its parent Transform and won’t move on its own. Visually, it will appear stiff. (At least it won’t stay fixed in place lol)
This feature is great for objects under a PB with too many child transforms, like the skirt shown below.
Although it may seem like a lot has been removed, the ignored transforms are mostly ebd bones, so the skirt still moves cutely in practice!
[」](https://hackmd.io/_uploads/HJZkh-DmJl.png)
> [!note]
At the bottom of the `Ignore Transforms` section, there’s a `Multi Child Type` option, which corresponds to two other handling modes.
You can refer to the [VRChat team’s documentation](https://vrc.school/docs/Avatars/PhysBones/#multi-child-type), which includes a video explaining how different modes handle child bones, so I won’t go into further detail here.
---
| Avatar Rank | Excellent | Good | Medium | Poor
| -------- | -------- | -------- | -------- | -------- |
| PhysBones Affected Transforms | 16 | 64 | 128 | 256 |
---
#### [PhysBone Collider](https://creators.vrchat.com/avatars/avatar-dynamics/physbones/#vrcphysbonecollider)
Breaking through "Very Poor" on this one should not too easy though...
The collider here, is only interacts with the PB that specifies it.
Not the world's common one.
For example, when lifting the leg, as long as the skirt has specified a collider for the thigh, the skirt will float up when it touches. Or when the arm is pressed inward, as long as the chest has a collider specified for the arm, it can compress the chest, etc.
The main cause of issues is usually when the clothes you're wearing also come with their own colliders, but in most cases, the Avatar itself already comes with many built-in colliders for you to use. Naturally, there’s no need to have two colliders at nearly the same location at the same time. (Of course, if the clothes have a special design and require their own colliders, that’s an exception.)
Taking this cloth as an example, it uses the built-in collider for the thigh.
[](https://hackmd.io/_uploads/HyL5sGPm1e.png)
But Chiffon’s body already has a well-built collider.
[](https://hackmd.io/_uploads/Hy0yhzvX1l.png)
Improving this is very simple:
1. Lock the PB’s Inspector.
2. Find the colliders attached to the Avatar with the almost same position.
4. Replace the original colliders from the clothing one by one with Chiffon’s colliders.
5. Delete the clothing's built-in collider components.
6. Done.
See? Super easy, right?
| Avatar Rank | Excellent | Good | Medium | Poor
| -------- | -------- | -------- | -------- | -------- |
| PhysBones Colliders | 4 | 8 | 16 | 32 |
---
#### PhysBone Collosion Checks
The optimization here needs to combine adjustments to the number of affected bones in PBs and the number of colliders.
This factor is simply the total number of affected bones across all PBs, along with the colliders they are assigned to.
* Let’s do a math!
Assume a PB has 32 affected bones and 2 colliders.
The collision detection count would be 32 × 2 = 64.
This is how collision detection counts are calculated for all PBs.
Simply sum up the collision detection counts of all the PB components that will be used to get the final result.
This number, like the collider count, is actually quite hard to exceed lol
| Avatar Rank | Excellent | Good | Medium | Poor
| -------- | -------- | -------- | -------- | -------- |
| PhysBones Collision Check Count | 32 | 128 | 256 | 512 |
---
### Polygons
Final Boss: Polygons (I read it in Costco. You read it in IKEA? You got me bro!)
Facing this s**t always make your avatar blast into "Very Poor" rank, the developers have put a lot of effort into coming up with solutions.
There are many methods, so the content is a bit longer. Let’s get started!
> [!tip]Good News!
> The tools I'm talking about here, it's all in NDMF system. So you can make your own combo skills!
---
* AAO family
1. [Remove Mesh By BlendShape](#Remove-Mesh-By-BlendShape)
2. [Remove Mesh By Mask](#Remove-Mesh-By-Mask)
3. [Remove Mesh By Box](#Remove-Mesh-By-Box)
4. [Remove Mesh By UV Tile](#Remove-Mesh-By-UV-Tile)
* Mantis LOD Editor
* [Mantis LOD Editor NDMF tool](#mantis2)
* lil family
* [lilNDMFMeshSimplifier](#lilmesh2)
---
#### [Remove Mesh By BlendShape](https://vpm.anatawa12.com/avatar-optimizer/en/docs/reference/remove-mesh-by-blendshape/)
For those who have dressed an Avatar, you’ve probably encountered the issue where clothing authors ask you to use Blend Shapes to hide parts of the body to prevent clipping.
However, while Blend Shapes hide the body, the polygons within them don’t disappear. They’re just compressed into a small, invisible form. But these still count towards the Avatar’s polygon count. So, you need to use this tool to directly remove the polygons hidden by the Blend Shapes.
Let’s take Rusk, wearing the original outfit as an example:
1. Select the object with the Blend Shape, and at the bottom of the inspector, click `Add Component`.
2. Find and select `Remove Mesh By BlendShape`.
3. In the new component, it will list all the Blend Shapes in the Skinned Mesh.
4. Based on Rusk’s outfit, we need to hide `kisekae_Upper Arm`, `kisekae_Lower Arm`, `kisekae_Chest`, `kisekae_Spine`, `kisekae_Lower Leg`, and `kisekae_Foot`.
In `Remove Mesh By BlendShape`, toggle all these Blend Shapes up.
[](https://hackmd.io/_uploads/SJpUkODXkg.png)
5. There you go!
For high-polygon base models, this can save a plenty of polygons!
---
#### [Remove Mesh By Mask](https://vpm.anatawa12.com/avatar-optimizer/en/docs/reference/remove-mesh-by-mask/)
Using mask textures to remove polygons.
This is usually applied when multiple parts but made within the same Skinned Mesh.
You can create a mask texture based on the original UV of the object, painting the areas to be removed white or black.
Alternatively, if the object already uses different materials, you can directly use an all-white or all-black texture to cut away the unnecessary parts.
>[!tip]Update!
>AAO family just update a new component: Remove Mesh By UV Tile.
> In addition to handling actual UV Tiles, it can also remove the polygons of an entire material, making the process even simpler → [Poral here](#Remove-Mesh-By-UV-Tile)
Let’s take my twin tails as an example. It uses two material slots to handle the ribbons and the hair.
[](https://hackmd.io/_uploads/Sky3-Ow7yg.png)
1. Select the object to be processed, and at the bottom of the inspector, click `Add Component`.
2. Find and select `Remove Mesh By Mask`.
3. Locate the material sphere that contains the mesh you want to remove. In this case, I want to remove the ribbons, which correspond to the first material sphere, `twin 1`.
4. In `Remove Mesh By Mask`, check `Apply to Material Slot 1`.
[](https://hackmd.io/_uploads/Byt1VOD7kl.png)
5. Select your mask texture. In my case, I can choose to add a new all-white or all-black texture on the right side.
6. For removal mode, choose either "Remove Black" or "Remove White." Since I’m using an all-black texture, I select "Remove Black."
7. Once the ribbons disappear, you’re done!
[](https://hackmd.io/_uploads/BkRTNdvmkx.png)
Unused materials slots will be automatically removed during compilation. It’s fine to leave them there.
---
#### [Remove Mesh By Box](https://vpm.anatawa12.com/avatar-optimizer/en/docs/reference/remove-mesh-by-box/)
If some meshes can’t be removed using Blend Shapes and you can’t find the corresponding areas in the textures, you can take a more brute-force approach and use a box to cut the polygons out.
Let’s use this outfit as an example, where I want to remove the ribbons as much as possible:
[](https://hackmd.io/_uploads/rJlyudwXyg.png)
1. Select the clothing object and click `Add Component` at the bottom of the Inspector.
2. Find and select `Remove Mesh in Box`.
3. You may see the following curious screen.
[](https://hackmd.io/_uploads/HkF_d_wX1l.png)
This is because it provides a default box, and any polygons within this box will be removed for now.
4. This is definitely not the result we want, so we’ll need to adjusting the size, position, and number of boxes.
5. In the `Remove Mesh in Box` component, on the right side of the `Boxes`, you can set the number of boxes. Since I want to remove the ribbons but not affect the clothing itself, I’ll need to use two boxes.
6. Adjust the size and position.
[](https://hackmd.io/_uploads/SJwNqOw71e.png)
7. Done!
In addition to clothing, any objects you want to delete can be removed by this tool.
Sometimes, if you want the polygon removal to be cleaner, you can use both "Remove Mesh By Mask" and "Remove Mesh in Box" together to achieve more precise polygon removal!
[](https://hackmd.io/_uploads/Bk1Uiuv7yx.png)
---
#### [Remove Mesh By UV Tile](https://vpm.anatawa12.com/avatar-optimizer/en/docs/reference/remove-mesh-by-uv-tile/)
:::info
💬 Need Your Help!
When I just finnished this article, this feature had just been released, and I’m not very familiar with it yet. If anyone knows the detailed usage, please let me know.
As of now, it’s known that UV Tile uses a grid-like texture, which corresponds to different objects. This tool seems to allow for mesh removal...?
:::
It's similar to `Remove Mesh By Mask`, but this is more brute-force.
Let’s remove the ribbons from my twin tails again as an example:
1. Select the object to be processed, and at the bottom of the inspector, click `Add Component`.
2. Find and select `Remove Mesh By UV Tile`.
3. Locate the material sphere that contains the mesh you want to remove. In this case, I want to remove the ribbons, which correspond to the first material sphere, `twin 1`.
4. Expand `Material Slot 1` and check `Tile 0`.
5. The ribbons will disappear, and you're done!
[](https://hackmd.io/_uploads/Bk184BdXJg.png)
Unused material slots will be automatically removed during compilation. It's fine to leave them there.
---
#### Reducing polygons on the model itself
The following tools both can reduce the model's polygon count.
One is the paid Mantis LOD Editor, and the other is the free lilNDMFMeshSimplifier.
Below is a comparison video where you can see the polygon reduction effect of both tools.
{%youtube gyP-33mmpkQ %}
---
#### [Mantis LOD Editor NDMF tool](https://booth.pm/ja/items/5409262) <a id="mantis2"></a>
If you've reduced polygons to the extreme and still exceed the limit,
you can bring out our money-making power—Mantis LOD Editor... US$50⋰^💸^
Before you commit wallet homicide.→There's a [FREE OPTION](#lilmesh2) available.
:::info
💦 **My Bad**
I forgot to update this tool. The latest one works pretty well!
:::
1. Select the object you want to reduce the polygon count for, and at the bottom of the inspector, click "Add Component."
2. Find and select `NDMF Mantis LOD Editor`.
3. Click the `Preview` button at the bottom to preview the polygon reduction in real time.
4. Hold the slider on the right of `Quality` and start dragging it to the left.
The `Triangles` section below the component will show the original polygon count and the current polygon count.
5. Reduce the polygon count as much as you can within an acceptable range.
The checkboxes above the component control different polygon reduction modes.
You can try with different combinations based on your needs to get the best result.
6. That’s it!
Repeat the above steps for different objects, try to trim any objects you can deal with.
If you want to quickly find objects with a lot of polygons, you can bring [AvatarUtils](#Bring-up-AvatarUtils-window) window up, and use the `Renderers` tab to list the polygon count for each object.
Trimming the larger ones first for better efficiency.
[](https://hackmd.io/_uploads/ByTDkYwQJx.png)
---
#### [lilNDMFMeshSimplifier](https://github.com/Whinarn/UnityMeshSimplifier/wiki/Mesh-Simplifier-API#simplificationoptions) <a id="lilmesh2"></a>
Who says reducing polygons has to cost money? We got the free one for ya!
Polygon reduction is very intuitive, and the quality is not too bad to Mantis.
The only downside is that you can’t see the current polygon count.
However, you can still compile and adjust based on the total polygon count!
1. Select the object you want to reduce the polygon count for, and at the bottom of the inspector, click `Add Component`.
2. Find and select `NDMF Mesh Simplifier`.
3. Hold the slider on the right of `Quality` and start adjusting.
0 is the lowest quality, and 1 means no reduction.
4. Reduce the polygon count as much as you can within an acceptable range.
The checkboxes below the component control different polygon reduction modes.
You can try with different combinations based on your needs to get the best result.
5. That's it!
Repeat the above steps for different objects, try to trim any objects you can deal with.
You can also use [AvatarUtils](#Bring-up-AvatarUtils-window), and the `Renderers` tab to list the polygon count for each object. Start trimming from the largest ones!
[](https://hackmd.io/_uploads/ryRYyViQyg.png)
| Avatar Rank | Excellent | Good | Medium | Poor
| -------- | -------- | -------- | -------- | -------- |
| Triangles | 32,000 | 70,000 |70,000 |70,000 |
Just lower then 70,000 polygons can reach the Good ranking.
Sounds great, right?
---
Wut? You say that after all these steps, the polygon count still too much?
<font color=#FF28FF>~~Have you heard of Just H Party?~~</font>
Just take your cloth off <font color=Orange>**HAIYAA**</font>, and choose wisely before buying them. Some creators will mention the polygon counts on their page, which can be used as a reference when making a purchase. If there's no mention, um...Good Luck!🍀
## [Avatar bulk upload](https://github.com/anatawa12/ContinuousAvatarUploader/blob/master/README.ja.md)
After working hard to slim down your Avatars, you realize you have a whole bunch of Avatars wearing different clothes. Clicking `Build & Upload` one by one in the VRChat SDK can be a painful process, right? (Unless you have the mental fortitude of steel!)
The last tool I want to introduce in this article is the [Continuous Avatar Uploader](https://github.com/anatawa12/ContinuousAvatarUploader).
By setting up an Asset, it allows you to upload a bunch of Avatars all at once.
1. In the Hierarchy, select the Avatars you want to upload. For this example, I'll choose these Avatars.
[](https://hackmd.io/_uploads/S11Hy8_Q1x.png)
2. Right-click on them, and select `Continuous Avatar Uploader > Group from Selection`.
3. Choose a location to save the file. The location and naming are up to you, so I’ll create a folder called `Closet` and name the file `Rusk_Closet_A`.
4. In the Project window, locate the folder, and click on the `Rusk_Closet_A` file.
5. In the Inspector, you can see all the Avatars we just added.
6. Check the platform that you want each Avatar to be uploaded to. For this case, since all of our Avatars are for PC, I'll check `PC Windows` for each one.
> [!Important]
> Due to SDK restrictions, it is recommended not to set up Avatars for different platforms within the same Asset. Please manually switch to the desired platform in the SDK first, and then upload the Asset containing the Avatars for that platform.
7. Go to VRChat SDK > Show Control Panel to open the SDK window.
8. Bring up the previous window, click `Upload All`, and the bulk upload, begins!
[](https://hackmd.io/_uploads/ryWJMIOmkg.png)
Since each Avatar needs to be compiled and uploaded individually, it may take some time. Go grab a coke and relax while it's uploading!
> [!tip]
> To add an avatar to the asset, simply drag your avatar object into the `Avatars to Add` section at the bottom. And you're done!
:::info
:information_source: **Personal Experience**
Click on the menu bar `Tools > Continuous Avatar Uploader` can bring up the upload window from step 8 and upload different Assets at once. Personally, I like to manage Avatars with multiple Assets.
It's recommended to place 5-10 Avatars per Asset. If an error occurs during the upload, you can start re-uploading from the specific Asset that caused the error. It’s somewhat like the concept of a save point.
For example, if I have 48 outfits and an error happens on the 32th one, it would be pretty frustrating to re-upload everything from the beginning

:::
## Peroration
Well, that's all I can share!
Let's make VRChat a performance-friendly place!
If you have any other questions, feel free to reach me out on [Twitter](https://twitter.com/kuriko_tw).
I'll try my best to answer within my capabilities.
Lastly, let me show you my ultimate optimized Rusk!
[](https://hackmd.io/_uploads/By3FESDmke.png)
[](https://hackmd.io/_uploads/Syxm7LuXJg.jpg)
## Thanks for stopping by!
Flat is justice.
[](https://www.nicovideo.jp/watch/sm18945433)
***(<font color=red>STOP SHOWING OFF</font> YOUR BOOBS!)***
***(<font color=red>NO MORE</font> MEGA OPPAI!)***