# **Updating to a new dojo-env**
___
- [Click here]( https://hackmd.io/@jirvingphd/update-dojo-env) for a web version of these instructions, with a table of contents sidebar.
- [Click here](https://hackmd.io/@jirvingphd/dojo-env-overview) for the web version of the Installation Overview.
___
>- **[Click here](https://chastityb.github.io/dojo-env-setup-instructions/troubleshooting/) for the Troubleshooting lessons/docs.**
___
> **If you just installedd your dojo-env for the first time, skip this step!**
If you already have dojo-env installed on your computer, you must first rename it or remove it.
Note: these instructions are intended non-OS-specific. Your terminal may not look exactly like the examples in the screenshots (for example, the file paths for the environments will be very different). However, the steps are the same across all platforms.
## Step 1: Rename or Remove Your Current dojo-env
To install the new dojo-env, you will need to remove your old dojo-env. However, depending on how long you've been using your current dojo-env, you may have installed additional packages that were not in the original dojo-env.
> Note: if you are re-installing dojo-env as part of troubleshooting, you most likely will want to just Remove dojo-env, instead of renaming it.
### Step 1.1) Confirm Which Conda Envs are Installed
- To display the currently installed environments, use the following conda env list command
```bash
conda env list
```
<img src="https://assets.codingdojo.com/boomyeah2015/codingdojo/curriculum/content/chapter/1691687306__01condaenvlist.png">
- If you see `dojo-env` in the list, you must either remove it or rename it before you can install the updated env.
>
### Step 1.2) Deactivate dojo-env
In order to remove/rename an environment, it must be deactivated.
- Run the following command to deactivate the environment:
```bash
conda deactivate
```
- If this command doesn't work correctly, use the following alternative command:
```bash
conda activate base
```
<img src="https://assets.codingdojo.com/boomyeah2015/codingdojo/curriculum/content/chapter/1691687365__02condadeactivate.png">
## Step 1.3: Remove or rename your old dojo-env
You must remove your old dojo-env to install the new one. You may follow the next optional step if you'd like to keep a backup copy of your old env.
> Note: if you are re-installing dojo-env as part of troubleshooting, you most likely will want to just Remove dojo-env, instead of renaming it.
### Option A - Rename Your Old Dojo-env
#### Step 1.3.A.1) Run the conda rename command
If you want to keep a copy of your old dojo-env, you can rename it using the following `conda rename` command:
```bash
conda rename -n dojo-env dojo-env-old
```
<img src="https://assets.codingdojo.com/boomyeah2015/codingdojo/curriculum/content/chapter/1691687508__03renameexecuting.png">
This command may take a few minutes to finish. It clones your old dojo-env and create a new clone of it called dojo-env-old, so it must go through the same installation steps.
<img src="https://assets.codingdojo.com/boomyeah2015/codingdojo/curriculum/content/chapter/1691687619__04postrename.png">
- Once the process has finished, run the `conda env list` command again to confirm that your env has been renamed and dojo-env no longer exists.
<img src="https://assets.codingdojo.com/boomyeah2015/codingdojo/curriculum/content/chapter/1691687624__05condaenvlistagain.png">
#### Step 1.3.A.2) Add The Renamed Env to Jupyter Notebook's Kernels
After the process has been completed, you will need to run the commands to activate the cloned environment and add it as a kernel in Jupyter Notebook.
```bash
conda activate dojo-env-old
python -m ipykernel install --user --name dojo-env-old --display-name "Python (dojo-env-old)"
```
<img src="https://assets.codingdojo.com/boomyeah2015/codingdojo/curriculum/content/chapter/1691687894__06ipykernel.png">
You're ready to install the new dojo-env!
#### **Note: on how to use your renamed environment:**
- To use your renamed old dojo-env:
- First, you must run the `conda activate dojo-env-old` command manually after starting your Terminal before starting jupyter notebook.
- Second, from within your Jupyter Notebook, you must click on Kernel > Change Kernel> and select "Python (dojo-env-old)"
### Option B) Remove Your Old dojo-env
**Alternatively, you could simply remove the environment instead of renaming it.** This will delete all of the files associated with JUST our `dojo-env`, it will not uninstall the Python distribution (Anaconda/miniforge).
#### Step 1.3.B.1) Run the conda remove command
- Remove old `dojo-env` using the command:
```
conda remove --name dojo-env --all
```
<img src="https://assets.codingdojo.com/boomyeah2015/codingdojo/curriculum/content/chapter/1691689962__10condaenvremovea.png">
- Enter `y` to approve the removal of the environment.
- Wait for the env to be removed.
<img src="https://assets.codingdojo.com/boomyeah2015/codingdojo/curriculum/content/chapter/1691689962__10condaenvremoveb.png">
- **Note: if you see the following message, you forgot to deactivate dojo-env (Step 12)**<img src="https://assets.codingdojo.com/boomyeah2015/codingdojo/curriculum/content/chapter/1691689719__09cannotremovecurrentenv.png">
- **Confirm the environment has been deleted using `conda env list`**
<img src="https://assets.codingdojo.com/boomyeah2015/codingdojo/curriculum/content/chapter/1691690201__11condaenvlistempty.png">
#### Step 1.3.B.2) Remove the old dojo-env kernel from Jupyter *(Optional)*
*Note: if you are installing the new dojo-env you do not need to perform this step, as the new dojo-env will be installed in the same place as the old one.*
- To check the list of Python kernels available in Jupyter Notebook, run the following comand:
```bash
jupyter kernelspec list
```
<img src="https://assets.codingdojo.com/boomyeah2015/codingdojo/curriculum/content/chapter/1691688144__07jupyterkernelspeclist.png">
- To remove a kernel from the list, run the following remove command to remove the dojo-env kernel, since that actual environment has been deleted:
```bash
jupyter kernelspec remove dojo-env
```
<img src="https://assets.codingdojo.com/boomyeah2015/codingdojo/curriculum/content/chapter/1691688375__08jupyterkernelspecremove.png">
## Step 2: Get the updated dojo-env environment file
To install the new dojo-env, you will need to download the updated environment.yml file from the dojo-env-setup repository.
### Step 2.1 Open the dojo-env-setup repo in GitHub Desktop.
- Open the [dojo-env-setup](https://github.com/coding-dojo-data-science/dojo-env-setup) repo in GitHub Desktop again.

### Step 2.2) Discard any changes to the dojo-env-setup repo
To avoid git conflicts when pulling the updated repository, you must first discard any changes you've made to files in the dojo-env-setup repo.
- **Discard any changes to files that appear on the left sidebar**
- Make sure all changed files are checked.
- Right-click on the top of the changes view (see screenshot below)
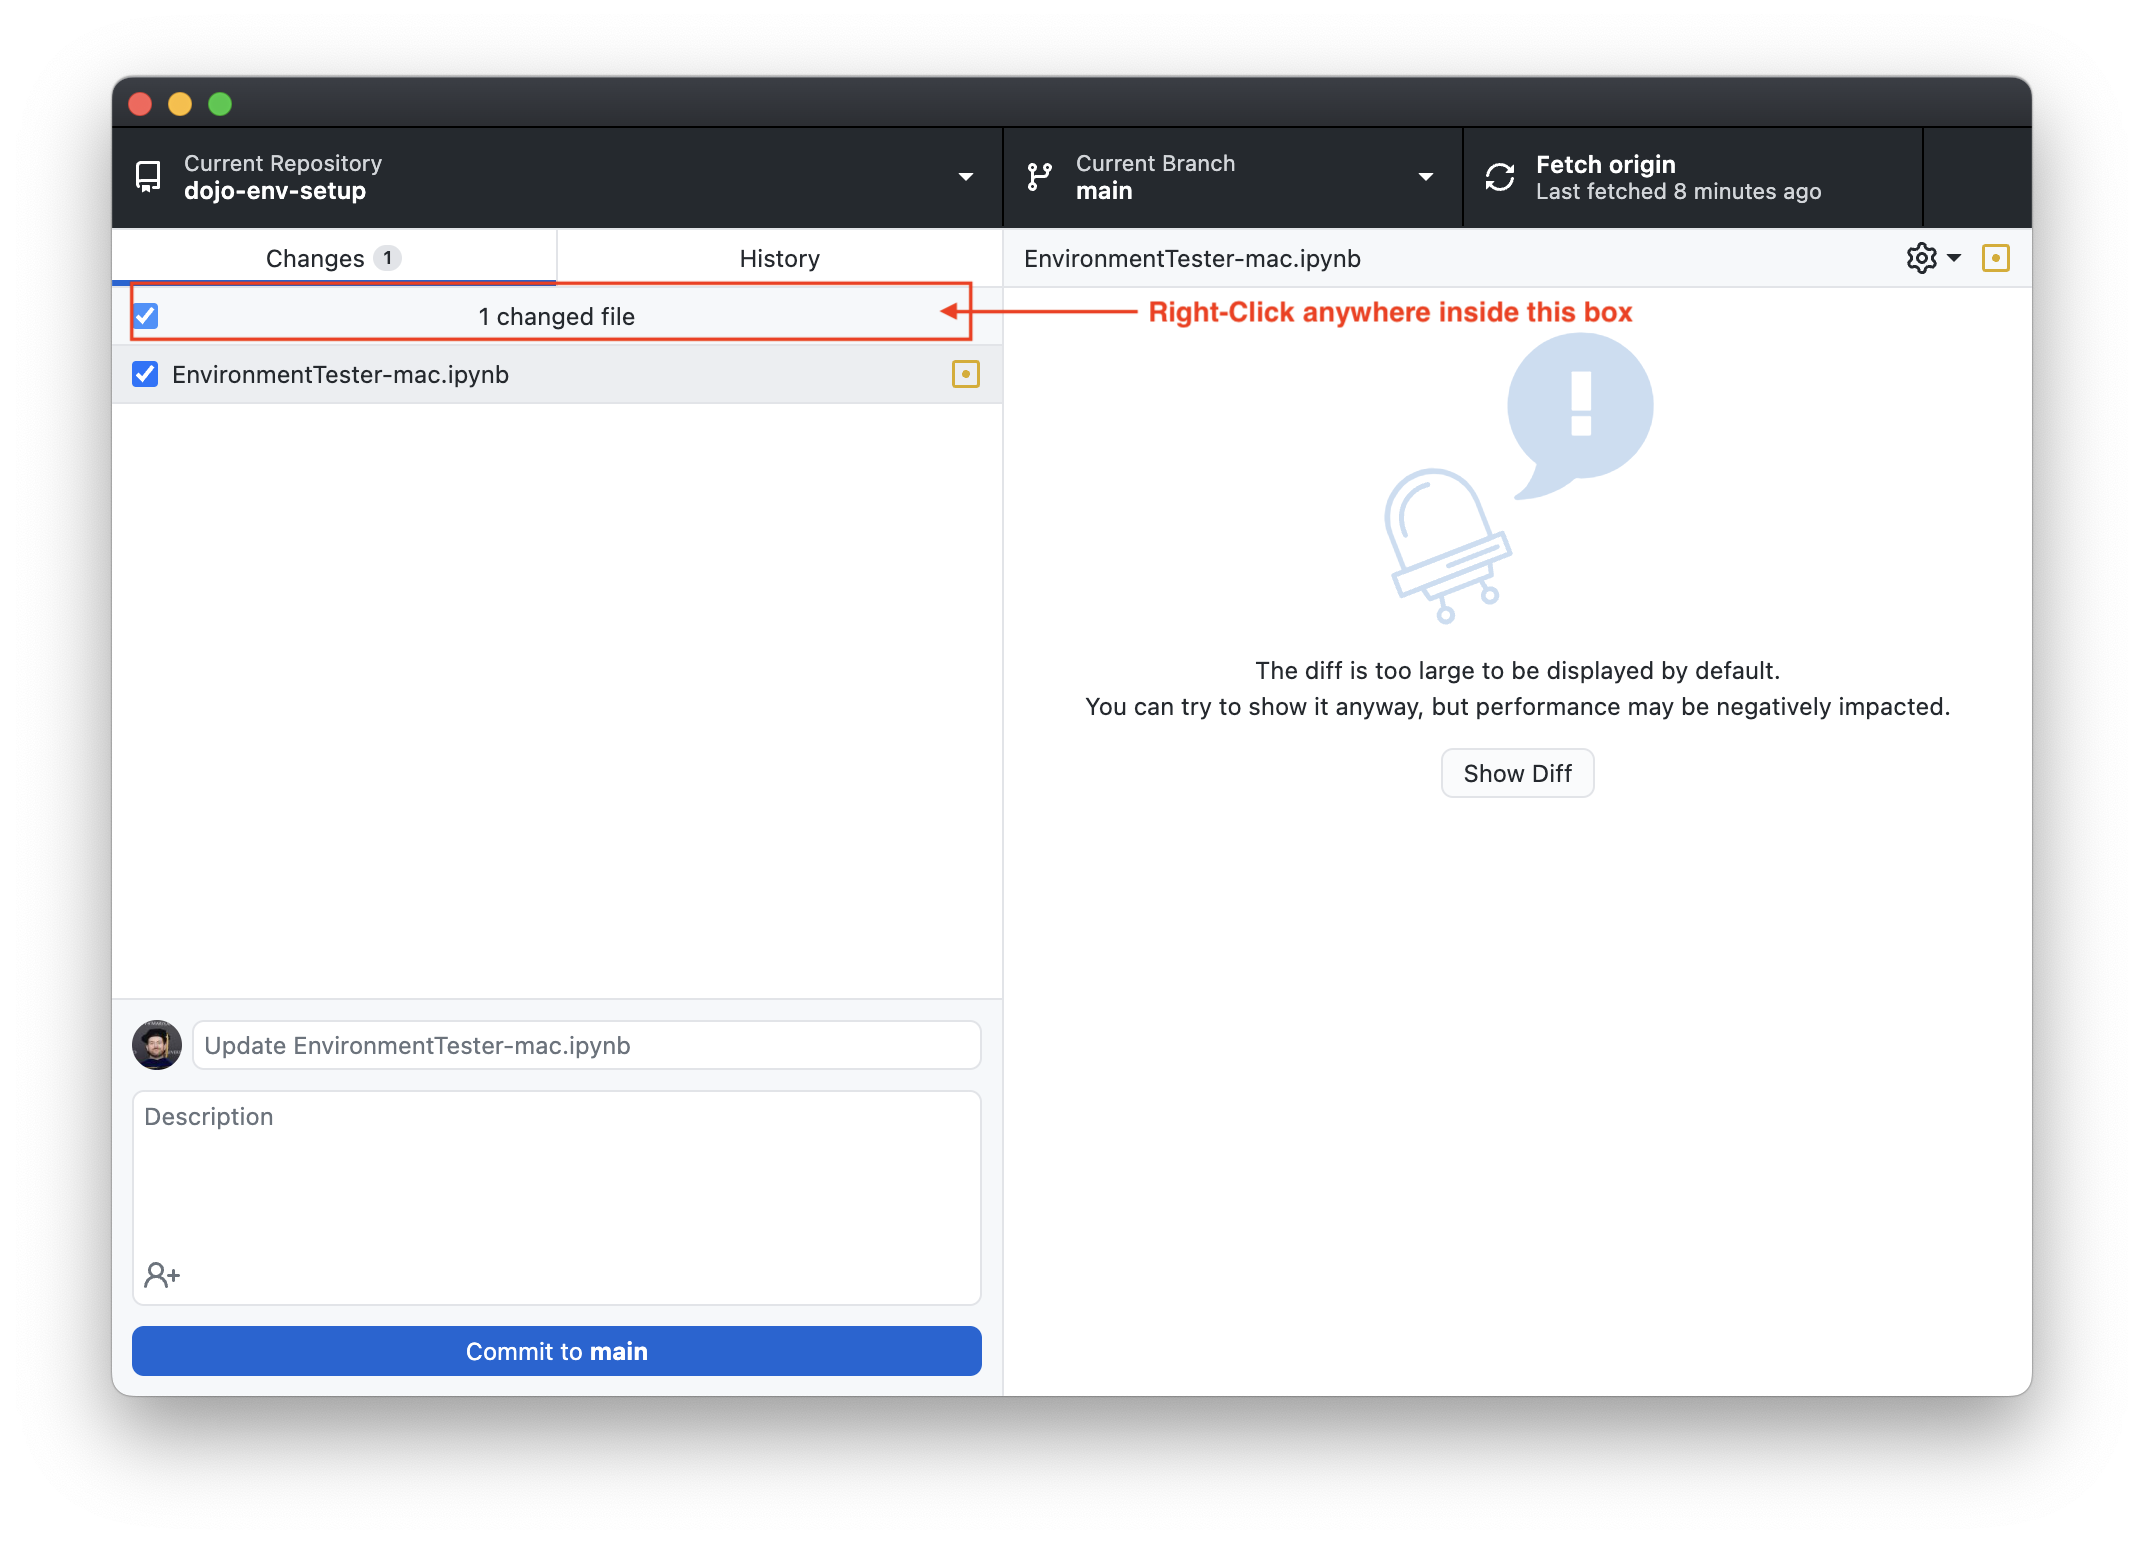
- **Then select "Discard All Changes"**

### Step 2.3) Update your local copy of the repo
- **Click on the "Fetch Origin" button in the top right corner of GitHub Desktp**
- GitHub Desktop will check for new commits to the repository.
If there are any, an arrow will appear, and the button will change to "Pull Origin".

- **Click the "Pull Origin" button to get the updated repo/environment.**
You're ready to re-create the dojo-env!
## Step 3) Recreate dojo-env with conda env create
- Open the dojo-env-setup repo in your Terminal.
### Repeat the steps from the original instructions in Step 2.3:
- **Run the correct command for your OS:**
**Windows:**
```bash
#Windows command
conda env create -f environment-ds_windows.yml
```
**Macs with Intel Processors:**
```bash
## Mac - Intel Processor
conda env create -f environment-ds_mac_intel.yml
```
**Macs with Appel Chips:**
```bash
## Mac - Apple Chip
conda env create -f environment-ds_mac_mchip.yml
```
- **Wait for the process to finish and for the message with instructions on how to activate your environment to appear**

- Activate your dojo-env environment and add the dojo-env kernel to Jupyter Notebook:
```bash
conda activate dojo-env
python -m ipykernel install --user --name dojo-env --display-name "Python (dojo-env)"
```
## Troubleshooting conda env create: "Prefix already exists"
**Problem**:
- You receive an error when you attempt to re-create the dojo-env that says `"CondaValueError: previx already exists {filepath to env}"` like the screenshot below
<img src="https://assets.codingdojo.com/boomyeah2015/codingdojo/curriculum/content/chapter/1691700179__prefixalreadyexists.png">
**Cause**:
- The folder for the old dojo-env was not fully deleted by `conda remove` or `conda rename` your old dojo-env's folder was not fully deleted.
**Solutions:**
- **Check the `conda env list` command again to determine which solution to use.**
<img src="https://assets.codingdojo.com/boomyeah2015/codingdojo/curriculum/content/chapter/1692724550__condaenvlist.png">
- **Solution A): If you see `dojo-env` in the env list:**
- You may have skipped Step 1.3: rename or remove your dojo-env or something went wrong during step 1.3
- **Return to step 1.3 and perform the rename/remove option again.**
- **Solution B): If you do *not* see `dojo-env` in the list**
- Conda deleted the environment, but for some reason it finish deleting the dojo-env folder.
- **Delete the old dojo-env folder.:**
- To delete the dojo-env folder and all of the contents within it, run the `rm -rf {env-folder}` command AFTER READING THE FOLLOWING WARNINGS:
- **Warning: the `rm -rf` command, if executed incorrectly, could accidentally delete data from your computer!!!**
- It is very important that you use the correct folder path (`{env-folder}`):
- `{env-folder}`should be replaced with the filepath from the "Prefix already exists" error message."
- **Note: for windows computers, you must replace any backslashes** `\` with a forward slash`/` and must remove the `:`and add a `/` at the beginning of the folder path. Examine the example below:
- Error message path: `Prefix already exists C:\Users\brend\anaconda3\envs\dojo-env`
- Corrected path for the remove command:
`/c/Users/brend/anaconda3/envs/doj-env`
- **And the final command would be:**
- `rm -rf /c/Users/brend/anaconda3/envs/doj-env`
```bash
rm -rf <ENVIRONMENT_FPATH>
```
## Confirm the New dojo-env Works
- Start Jupyter Notebook and run the environment tester notebook for your operating system to confirm your installation was a success!
___
# Appendix
### Activating dojo-env is still the default, but it no longer exists
<img src="https://assets.codingdojo.com/boomyeah2015/codingdojo/curriculum/content/chapter/1691688537__00envnamenotfound.png">
- The command to `conda activate dojo-env` is still in terminal's settings file.
- Manually open the correct file for your Terminal and remove the conda activate command.
- Windows:
- `/c/Users/<your-username/.bash_profile`
- Mac (bash):
- `/Users/<your-username>/.bash_profile`
- Mac (zsh):
- `/Users/<your-username>/.zshrc`
- After removing the conda activate command, save the file and close it.
- Open a new terminal window. You should no longer see that message.
## Backup Your Env/Export Your Env to a .yml file
Instead of renaming your old env, you could export your current dojo-env to a new .yml file, just like the original `dojo-env` environment file.
- To export your environment to a file called "my-old-environment.yml" in your User folder, run the command:
```
conda env export > ~/my-old-environment.yml --no-builds
```
- To re-create the environment, you would run:
```bash
conda env create -f ~/my-old-environment.yml
```
### Step 2.1) Delete your old dojo-env-setup repo (if git has merge conflicts)
To avoid merge conflicts when pulling the updated repository, you should remove your old clone of the dojo-env-setup repo and then clone it again.
1. In GitHubDesktop, switch to the dojo-env-setup repository in the Current Repo drop down menu (top left). Once you're in dojo-env-setup, click on the "Repository" menu and select "Remove" > check Move to Trash/Recycle Bin.
1. Navigate to the dojo-env-setup repo: https://github.com/coding-dojo-data-science/dojo-env-setup
2. Clone the Repository to Your Computer:
1. Click the green Code button and select "Open in GitHub Desktop. "
2. If you still have your previously cloned copy, GitHub Desktop should show a # and down arrow on the top right corner where it should say "Fetch Origin".
1. Press the button to "Fetch Origin", which will download the updated environment files.
2. You may need to press it again if it changes to "Pull Origin"
3. If you've updated the repo successfully there should be no remaining #'s or arrows on the top right corner.
1. If so, click on the Repository menu > Open in Terminal (or Open in GitBash).