參考:[openXR for mobile VR官方教學](https://developer.vive.com/resources/openxr/openxr-mobile/overview/)
**----------------目錄----------------**[toc]
>檔案都放在 Unity專案:**`passthrough_test_Teacher`** 裡的不同場景
> :triangular_flag_on_post: 代表測試不成功,需再研究
# OpenXR SDK(VIVE OpenXR Plugin Support)
## 一、openXR & passthrough 環境設定
使用 unity2021.3.17f 並下載andriod Support

1. 下載最新的openXR套件 OpenXR for Mobile for Unity ( **1.0.5** )
* menu > edit > projet settings > package manager > input vive registry 導入VIVE資源包

* menu > windows > package manager > install vive openxr plugin-andriod 下載套件,裝完後unity會重啟

2. 開專案,更改專案的設置
* file > build setting > Andriod > switch platform 把運行平台切換成安卓
* Edit > Project Settings > Player > Resolution and Presentation > Orientation中,Default Orientation 設置為 Landscape Left

* 承上,Palyer > other settings > graphics APIs > auto graphics api不要打勾 > **去除Vulkan** 只留下OpenGLES(為了縮短unity專案建置的時間,只用一個算圖api?)

* project setting > XR Plug-in Manager > 在插件管理中,在安卓平台上啟用OpenXR和VIVE XR(就可以在頭盔上創建app了) > 跳出錯誤問題 > 修復所有的錯誤問題

3. 創建場景
* 在Hierachy中右鍵 > XR > Convert Main Camera To ==XR Rig== 將主相機轉換為 XR 裝備 [使用 XR Interaction Toolkit 配置 XR Rig](https://learn.unity.com/tutorial/configuring-an-xr-rig-with-the-xr-interaction-toolkit#60341084edbc2a50f84840c0)

建好之後就有一個相機的偏移量了(camera offset),我多放一個cube測試( **場景:Sample Sence** )

4. 輸出在頭盔上執行
* 頭盔串流接usb線,確認有連到電腦後 > Build settings > Android > Run Device選HTC VIVE XR > Build And Run 等待一段時間,輸出承apk檔,可單獨在頭盔上執行(變成app了!)
5. 跳過[增加控制器(手把、按鈕)](https://learn.unity.com/tutorial/configuring-an-xr-rig-with-the-xr-interaction-toolkit#)
## 二、輸入Input System & controller
### 移動版的基礎輸入Input system
6. [OpenXR for Mobile 的基本輸入](https://developer.vive.com/resources/openxr/openxr-mobile/tutorials/unity/basic-input-openxr-mobile/original-basic-input-openxr-mobile/):
* Unity使用 **新的input system** 取代舊的input manager來處理XR中的輸入,輸入綁訂到動作而不是code(input of devices is bound to actions instead of the code.)
* **只需處理玩家觸發的動作而不需要知道動作綁定到哪個設備或哪個按鈕**
1. ==**創建動作資產Create an Action Asset**==
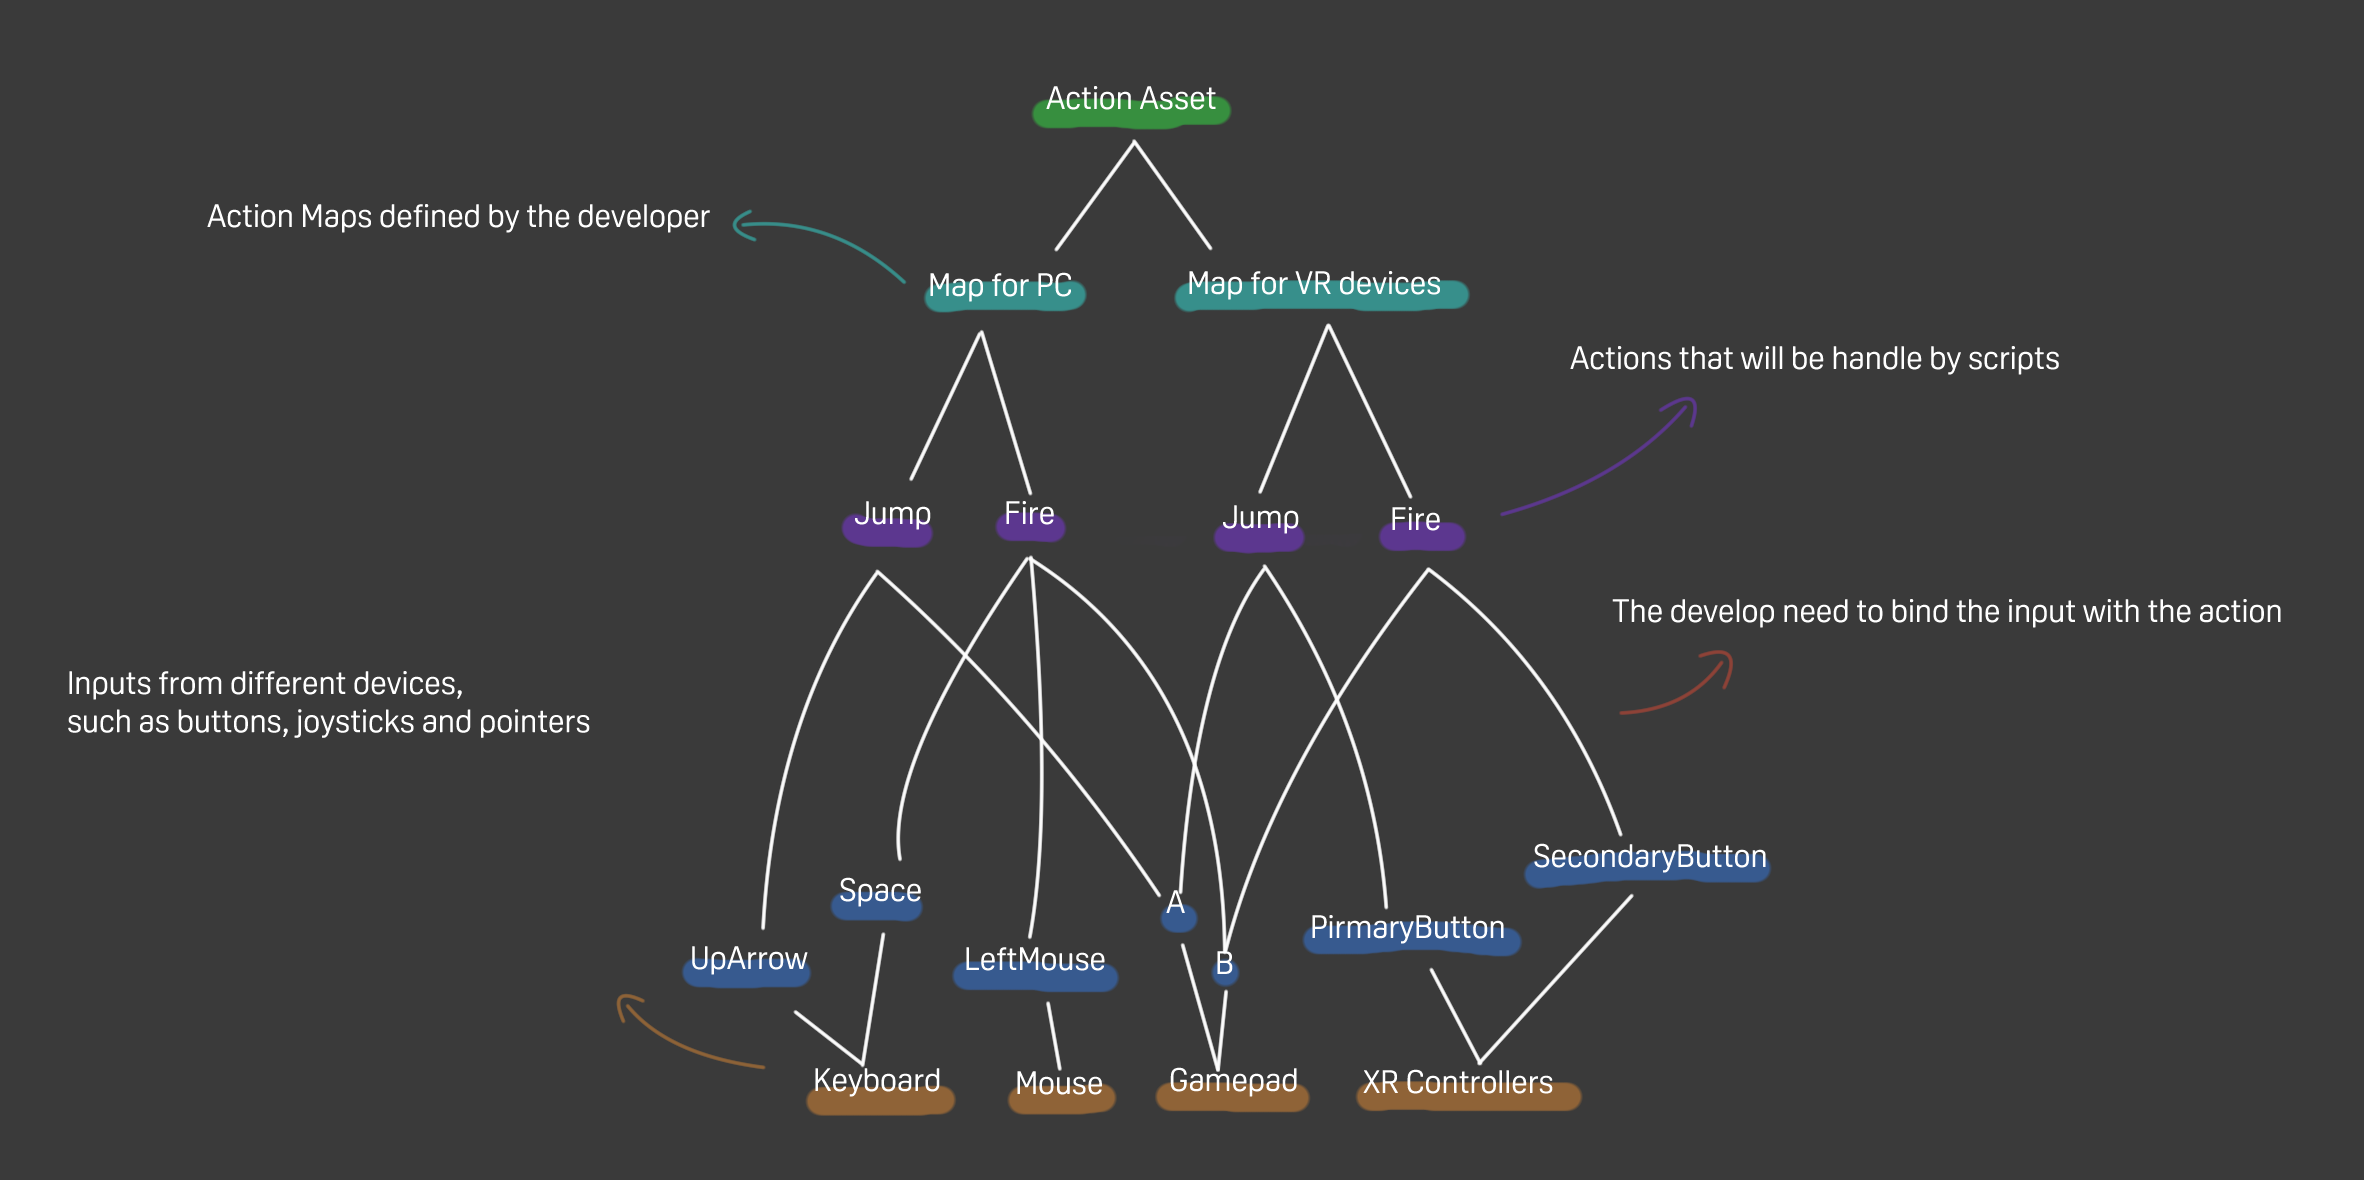
2. create > input Actions
3. 創造動作地圖Create an action map and an action > 綁定動作(右邊是下載的範例)
4. 寫程式申明ActionAsset 與InputActionReference,並把程式add到要作用的控制器上面
```c#
//
[SerializeField] private InputActionReference JoyStitckR;
//宣告要用哪個動作地圖
[SerializeField] private InputActionAsset ActionAsset;
private void OnEnable()
{
if (ActionAsset != null)
{
ActionAsset.Enable();
}
}
```
5. 拖入對應的物件
6. 可以get不同類型的 return value了
```!
void Update()
{
transform.Translate(JoyStitckR.action.ReadValue<Vector2>() * Time.deltaTime);
}
```
7. 手把的瞄準與抓握姿勢(未完待續,感覺不太會用到,工具包已經有基本設定了,如果需要個人化設定再回來看)
### XR Interaction Toolkit - OpenXR for Mobile 的基本輸入
7. [XR Interaction Toolkit - OpenXR for Mobile 的基本輸入](https://developer.vive.com/resources/openxr/openxr-mobile/tutorials/unity/basic-input-openxr-mobile/xr-interaction-toolkit/)-下載工具包
* package manager下載 **XR 交互工具包** 
* 控制器對應的名字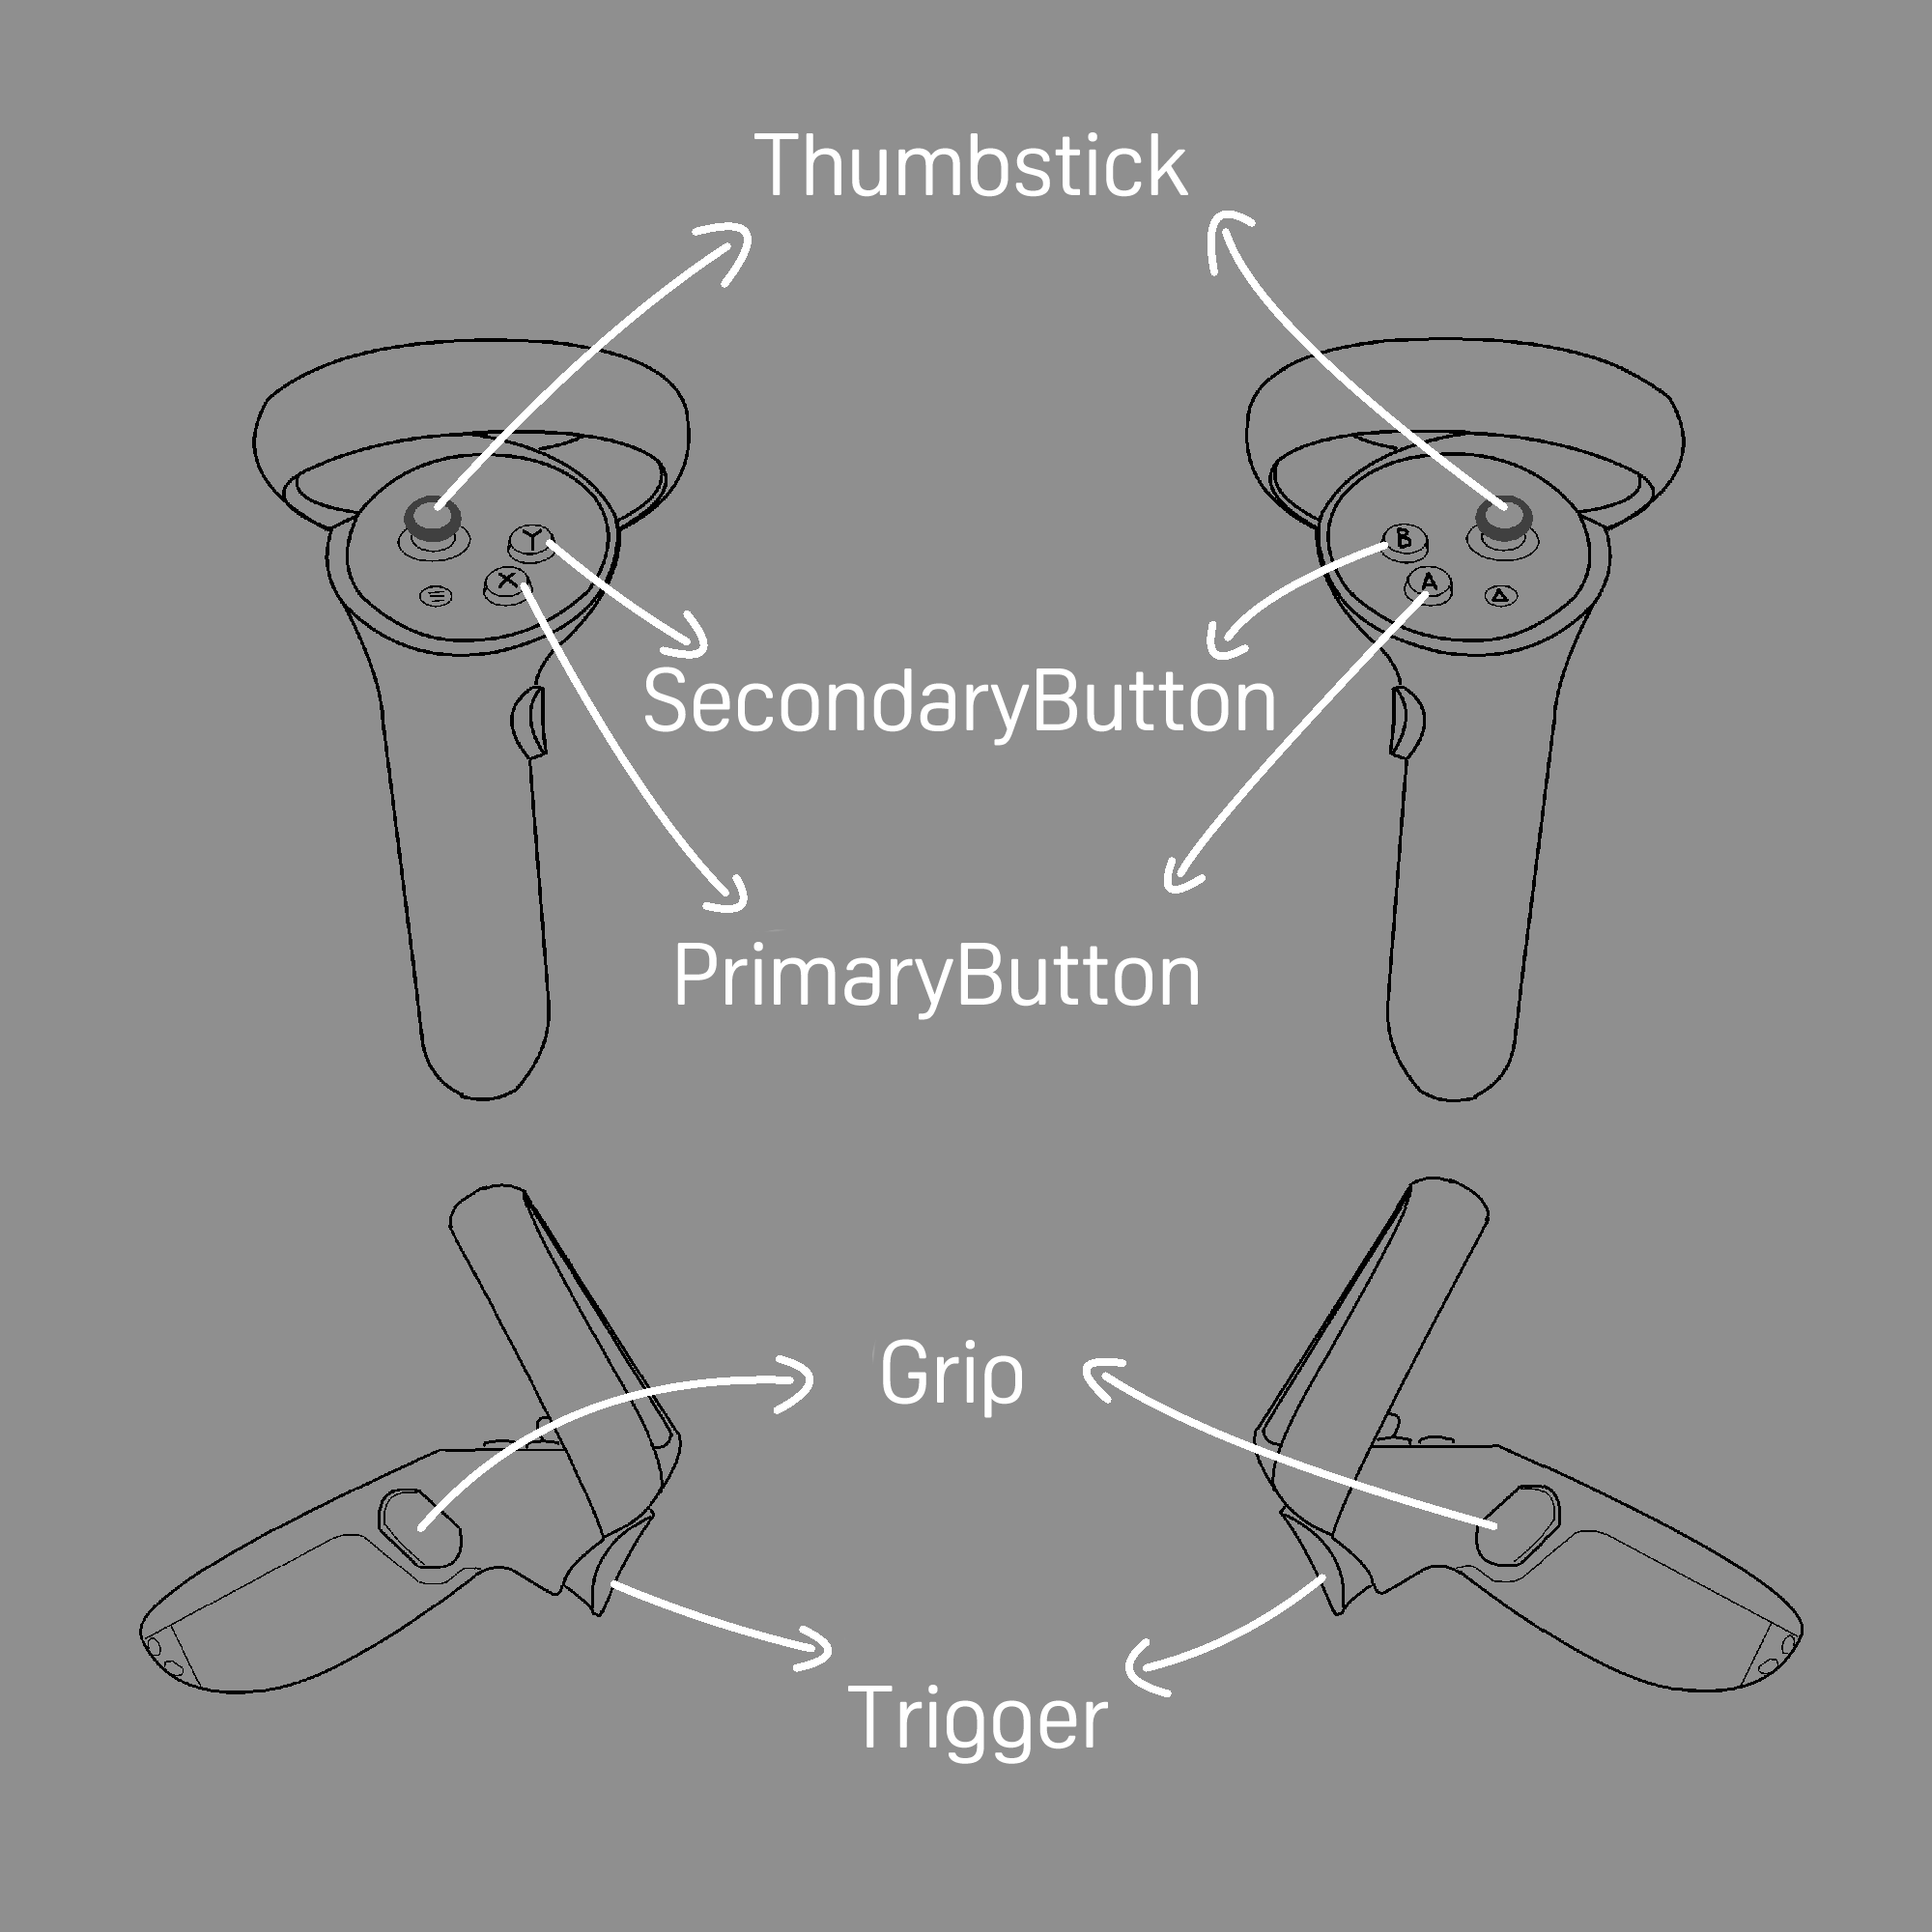
* import Start Assests
* 可以在XRI Default Input Actions中編輯動作並對應到不同的控制器輸入設定
8. 實作
* create a new sence > create GameObject and name as "InputActionManager" > 把工具包的程式(InputActionManager)加到它上面
加入對應的動作地圖(Action aseest)
* 在工具包找到XRI Default Right Controller 和XRI Default Left Controller,按下Add to ActionBasedController default,把他們加入預設值裡
* 在Hierarchy中右鍵 > XR > XR Origin,並把原本的main camera刪掉
* 加入sphere 放在原點,將xyz比例縮小為0.1
寫程式 **讓球隨著右手控制器改變位置**
```c#
using UnityEngine;
using UnityEngine.InputSystem;
public class ChangePosition : MonoBehaviour
{
[SerializeField] private InputActionReference RightControllerPosition;
void Update()
{
Vector3 controllerPosition = RightControllerPosition.action.ReadValue<Vector3>();
transform.position = controllerPosition;
}
}
```
* 套到sphere上,加上XRI RightHand/Position(Input Action Reference:右手位置)
* 球體的位置會隨右手控制器移動(**場景XR_tookit_input system**)
9. 加上planaer passthrough試試會不會扭曲 ==還是會扭曲==
* 在任意物件中加入CreatePlanarPassthrough.cs
* 把主相機背景變成0.0.0、solid color
* 在XR Interaction Manager加入createSphere.cs(修改自打地鼠)
```c
using System.Collections;
using System.Collections.Generic;
using UnityEngine;
using UnityEngine.InputSystem;
public class createSphere : MonoBehaviour
{
[SerializeField] GameObject sphere;
[SerializeField] private InputActionReference RightControllerPosition;
void Update()
{
Instantiate(sphere, RightControllerPosition.action.ReadValue<Vector3>(), sphere.transform.rotation);
}
}
```
## 三、Hand Tracking
手部追蹤:定位各個關節並渲染手部
使用VIVE OpenXR SDK有兩種方式使用手部追蹤的數據
1. Wave.OpenXR基本套件 [API](https://developer.vive.com/resources/openxr/openxr-mobile/tutorials/unity/api-reference/#VIVEFocus3HandTracking)
2. Wave.OpenXR.Toolkit工具包
在VIVE OpenXR Toolkit中,手部追蹤被定義成26個向量(關節)
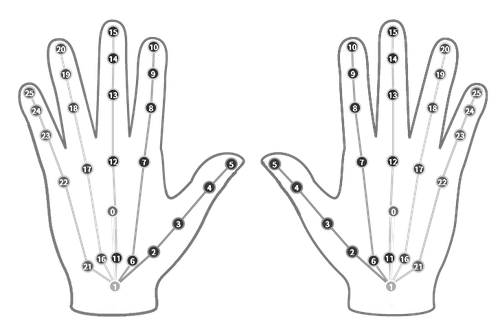
每個關節包含: tracking status狀態, position位置, and rotation旋轉資訊
> 因為官方教學是2022版針對Focus3的,內容不一樣的地方都靠自己摸索QQ
* edit > project > vive xr hand tracking
* 下載vive wave xr plugin(不知道會不會用到 先載)
:::danger
* 官方文件??如何連接到Head??
* 所以我用unity 的XR origin

:::
* 製作關節(cube),並加上Joint_Movement.cs
```c#
using System.Collections;
using System.Collections.Generic;
using UnityEngine;
//使用 VIVE OpenXR 手部跟踪工具包
using Wave.OpenXR.Toolkit;
using Wave.OpenXR.Toolkit.Hand;
namespace Wave.OpenXR.Samples.Hand
{
public class Joint_Movement : MonoBehaviour
{
public int jointNum; //對應關節的號碼
public bool isLeft; //區分左右手
void Update()
{
HandJoint joint = HandTracking.GetHandJointLocations(isLeft ? HandFlag.Left : HandFlag.Right)[jointNum];
if (joint.isValid)
{
transform.localPosition = joint.position;
transform.rotation = joint.rotation;
}
}
}
}
```
* (用一個就可以了)複製產生26個關節,依照joint num 編號


* 讓手show出來,把Show_Hand.cs加到任何一個物件上
```c#
using System.Collections;
using System.Collections.Generic;
using UnityEngine;
namespace Wave.OpenXR.Samples.Hand
{
public class Show_Hand : MonoBehaviour
{
public GameObject jointPrefab;
public Transform leftHand;
public Transform rightHand;
void Start()
{
GameObject temp;
for (int i = 0; i < 26; i++)
{
temp = Instantiate(jointPrefab, leftHand);
temp.GetComponent<Joint_Movement>().isLeft = true;
temp.GetComponent<Joint_Movement>().jointNum = i;
}
for (int i = 0; i < 26; i++)
{
temp = Instantiate(jointPrefab, rightHand);
temp.GetComponent<Joint_Movement>().isLeft = false;
temp.GetComponent<Joint_Movement>().jointNum = i;
}
}
}
}
```
* 拖入對應的物件

* 成功輸出成apk
* 加上passthrough;還是會扭曲[Demo video](https://youtu.be/Z6C7mDx-PrE)
## 四、Hand Interaction
手部互動:根據手指 **捏合程度** 確認是否在選擇某物
Raycasting用雷射與遠端物體互動
>allows you to help the player interact with objects remotely with the aid of Raycasting .
射線的**方向**: the “==**forward**==” of ==**pointerPose.rotation**== .
:::danger
* 勾起openxr hand traction選項就可直接在action map裡使用selectValue了
* 但裡面沒有selectValue的選項==,可能是因為官方是針對focus3做的,原本下載的套件就不一樣
:::
## 五、Foveation
9. 跳過[Foveation](https://developer.vive.com/resources/openxr/openxr-mobile/tutorials/unity/using-foveation-in-your-app/)讓不重要的地方模糊以減少耗能
## 六、Passthrough
### Planer passthrough:triangular_flag_on_post:
10. 設定Passthrough
* package manager > install 下載工具包:vive openxr tookit-andriod、vive openxr plugin-andriod、openxr plugin

* Edit > ProjectSettings > XR Plug-In Management > OpenXR > 打勾

10. **creat planar passthrough** ==覆蓋玩家整個視野== ,讓玩家看到他們周圍的環境
1. 創一個Planner_Passthrough.cs 放到場景中的任何一個遊戲對象
```c#
using System.Collections;
using System.Collections.Generic;
using UnityEngine;
using Wave.OpenXR.Toolkit.CompositionLayer.Passthrough;
using Wave.OpenXR.CompositionLayer;
public class Planner_Passthrough : MonoBehaviour
{
// Start is called before the first frame update
int ID;
void Start()
{
ID = CompositionLayerPassthroughAPI.CreatePlanarPassthrough(LayerType.Underlay);
//設定layer的種類LayerType.Overlay 或 LayerType.Underlay
//LayerType.Overlay 覆蓋(最上面那層):
//the planar passthrough covers the whole field of view,
//if it is set as overlay, the player won't be able to see anything from the content.
//中間層是場景內容,passthrough就是用來切洞的
//LayerType.Underlay 底層:需要戳洞才能被看見
}
//手動銷毀planer passthrough
void Update()
{
if (Time.realtimeSinceStartup > 10)
{
CompositionLayerPassthroughAPI.DestroyPassthrough(ID);
}
}
}
```
2. 目前planer passthrough失敗, ==在頭盔上無法透視== :triangular_flag_on_post:
12. **打地鼠遊戲[sample](https://developer.vive.com/resources/openxr/openxr-mobile/tutorials/unity/passthrough/creating-a-mr-world-using-planar-passthrough/)** :triangular_flag_on_post:
1. 導入範例包
2. 把手把VRSRig_withController、控制器VRSinputManager加到場景裡,在右手放上物件槌子Hammer,調整槌子方向;左手放地鼠洞
3. 按一下產生地鼠洞的程式: (放在VRSRig_withController的左手上)
```C#
using System.Collections;
using System.Collections.Generic;
using UnityEngine;
using Wave.OpenXR.Toolkit.Samples; //使用OpenXR.sample的工具包
public class CreateMoleHole : MonoBehaviour
{
[SerializeField] GameObject Hole_Prefab;
/產生prefab地鼠洞
void Update()
{
//按下左手triiger(食指)時:
if (VRSInputManager.instance.GetButtonDown(VRSButtonReference.TriggerL))
{
Instantiate(Hole_Prefab, VRSInputManager.instance.GetPosition(VRSPositionReference.AimL), Hole_Prefab.transform.rotation);
}
}
}
```
4. 把地鼠洞放進去

5. 增加一個planar under passthrough底層的平面穿透:create a script-CreatePlanarPassthrough,並 **放到場景中的任何一個物件** 上
```c#
using Wave.OpenXR.Toolkit.CompositionLayer.Passthrough;//構圖層的passthrough
using Wave.OpenXR.CompositionLayer;
void Start()
{
CompositionLayerPassthroughAPI.CreatePlanarPassthrough(LayerType.Underlay);
}
```
6. 在場景中切出一個洞讓玩家能看到underlay passthrough:
玩家眼睛>>content layer(unity的虛擬內容)>>underlay passthrough
7. 把主相機的Clear Flags改成Solid Color;把RGBA都改成0

:::success
**解決passthrough會扭曲的問題:**
只有虛擬手把在移動時會透視會扭曲,手在移動時則不會,所以不是因為背景要重算所以才扭曲。那扭曲的原因到底是....?
1. ~~重作3次~~:沒用
* 2_planer_passthrough_sample
* plane_passthrough_sample
3. 看討論區有沒有人有同樣的問題
4. ~~設定頭盔算圖的功率~~:已經開最大了
:::
### Projected passthrough
13. **Open a Window to the reality in VR [[sample](https://developer.vive.com/resources/openxr/openxr-mobile/tutorials/unity/passthrough/partial-passthrough-open-a-window-to-the-reality-in-vr/)]**
1. 加入一個帶有網格(mesh)的物件到場景中,待會讓此物件可透視
2. add VRSRig_withHand(包含頭與左右手)、 **VRSInputManager**
3. 把預設的main camera改成VRSRig_withHand裡面的
4. 寫程式 **CreateProjectedPassthrough** :(放在manager上)
```C#
using System.Collections;
using System.Collections.Generic;
using UnityEngine;
//使用以下3行
using Wave.OpenXR.Toolkit.CompositionLayer.Passthrough;
using Wave.OpenXR.CompositionLayer.Passthrough;
using Wave.OpenXR.CompositionLayer;
public class CreateprojectedPrassthough : MonoBehaviour
{
[SerializeField] Mesh UsingMesh; //Mesh要投影的物件的網格形狀
[SerializeField] Transform Trans; //轉換Trans is the transform of the projected passthrough
[SerializeField] Transform Cam; //相機
int ID; //引用passthrough
void Start()
{
ID = CompositionLayerPassthroughAPI.CreateProjectedPassthrough(LayerType.Underlay); //1.用CreateProjectedPassthrough設置一個underlay的passthrough
int[] indices = new int[UsingMesh.triangles.Length];
for (int i = 0; i < UsingMesh.triangles.Length; i++)
{
indices[i] = UsingMesh.triangles[i];
}//這兩個其實一樣..
CompositionLayerPassthroughAPI.SetProjectedPassthroughMesh(ID, UsingMesh.vertices, UsingMesh.triangles);
//將mesh的頂點和三角形資訊設置到project passthrough中
CompositionLayerPassthroughAPI.SetProjectedPassthroughMeshTransform(ID, ProjectedPassthroughSpaceType.Worldlock, Cam.InverseTransformPoint(Trans.position), Quaternion.Inverse(Cam.transform.rotation) * Trans.rotation, Trans.lossyScale);
//方向、位置、大小的轉換
//如果要動態地移動passthrough 把這行放到Update()中就好的
```
5. 放上對應的物件: 投影對象的網格Mesh(Cube)、投影對象(Cube)、相機(VRSRig_withHand)

6. 創建一個全黑的材質放到投影對象上(like打洞), **create a Unilt Shader** In the fragment part of the shader, return a color of all 0.
把原本的fixed4改掉,改成
```
fixed4 frag (v2f i) : SV_Target
{
fixed4 col;
col.r = 0;
col.g = 0;
col.b = 0;
col.a = 0;
return col;
}
```


7. 可以在cube的範圍看到現實環境了(**場景 Project_passthrough_sample**)
8. :triangular_flag_on_post: 存在3個error(但還是能跑喔..)

:::success
**6/15 S205測試_補充_改aok的檔名_頭盔上也會改變**
* 頭盔上的apk可被覆蓋
* 電腦的優先權較大
* 更改package name [[老師搜尋到的方法](https://stackoverflow.com/questions/51580599/changing-the-android-apk-package-name-from-script-in-unity3d)]

* 更改Product name

2. 把VIVE streaming Hub更新至beta測試版
多了一個混何實境的選項

:::
-----
# WaveXR SDK
## 一、安裝與基礎設定
使用Wave SDK 5.3.1
1. 下載,並導入專案
2. 在unity視窗中選VIVE > Wave Installer > Install
3. restar project ;成功
4. ==不用[XR Rig](https://docs.unity3d.com/Manual/configuring-project-for-xr.html)== (跟openxr有點不一樣),使用VIVE Wave XR Plugin - Essence > Runtime > Prefabs中提供Wave Rig預製件

* 相機偏移
* 渲染場景的相機(wave rig的頭部)
* 原點(世界中心)
* 相機Y方向的偏移(高度m)
* **InteractionModeManager提供 VIVE Wave™ XR 插件定義的 UGUI:注視指示器、控制器組件和手部組件**
5. 設定AndroidManifest.xml(HTC有GUI、打勾就好)
project settings > wave XRSettings
6. [更多wave xr settings](https://hub.vive.com/storage/docs/en-us/UnityXR/UnityXRSettings.html)渲染、效能...
7. Post Processing:使用URP時不支援多通道muti-pass,using the Single Pass stereo render mode。以下用安卓平台的測試結果。
:::warning
##### [Sample](https://hub.vive.com/storage/docs/en-us/UnityXR/UnityXRPackageSamples.html)
* 所有的場景都放在VRTestApp裡,照著做卻出現錯誤
:::
---
正式開始選擇性學習 **[Tutorials](https://hub.vive.com/storage/docs/en-us/UnityXR/UnityXRTutorials.html)**
## 二、passthrough
1. 需要VIVE Wave XR Plugin & VIVE Wave XR Plugin - Native
2. 在程式裡增加 **```Wave.Native```** 使用命名空間
### 1. overlay
```c=
bool WVR_ShowPassthroughOverlay(bool show, bool delaySubmit = false, bool showIndicator = false)
//Use this API to show/hide Passthrough Overlay.
//Parameters
//bool show: Set this to true for showing and false for hiding passthrough overlay. The system passthrough(surrounding or out-of-boundary) would be disabled if this parameter is set to true.
//bool delaySubmit: Set this to true for delay the timing for completing frame submission when the passthrough overlay is showing to improve the visual latency. False by default.
//bool showIndicator: Set this to true for showing and false for hiding the controller indicator on passthrough overlay. False by default.
//Return value
//true: Passthrough overlay is supported by the runtime on the current device.
//false: Passthrough overlay is not supported by the runtime on the current device.
```
* bool show:true 顯示overlay的passthrough,會遮擋其他環境中的場景
* bool delaySubmit:true 延遲完成畫面的時間以改善視覺延遲。 **預設是false**
* bool showIndicator:ture 顯示控制器在passthrough overlay層中
* return: T支援passthrough overlay / F不支援
```c=
WVR_Result WVR_SetPassthroughOverlayAlpha(float alpha)
//Use this API to set the transparency (alpha value) of the Passthrough Overlay.
//Parameters
//float alpha: The target alpha value. Should be a float in range [0f, 1f].
//Return value
//WVR_Result.WVR_SUCCESS: Alpha value is set successfully.
//WVR_Result.WVR_Error_RuntimeVersionNotSupport: Passthrough Overlay is not supported by the runtime on the device.
//WVR_Result.WVR_Error_FeatureNotSupport: Passthrough Overlay is not supported on this device.
```
* 設置passthrough overlay(疊加層)的透明度
* aipla範圍[0f,1f]之間的浮點數
* return: WVR_Result.WVR_SUCCESS成功 WVR_Result.WVR_SUCCESS運行時不支援 WVR_Result.WVR_Error_FeatureNotSupport不支援
#### 範例
```c=
//Passthrough Overlay Sample Code
using Wave.Native;
void ShowPassthroughOverlay()
{
Interop.WVR_ShowPassthroughOverlay(true); //Show Passthrough Overlay
}
void SetPassthroughOverlayAlphaValue()
{
Interop.WVR_SetPassthroughOverlayAlpha(0.5f); //Set Alpha of Passthrough Overlay to 0.5f
}
void HidePassthroughOverlay()
{
Interop.WVR_ShowPassthroughOverlay(false); //Hide Passthrough Overlay
}
```
**官方範例sample**
* vive wave xr plugin-essence > 5.3.1-r.2 > essence > passthrough ;輸出apk到頭盔,可執行。比較

#### Demo
實作測試
1. make_overlay_passthrough.cs 加到場景中的任何一個物件
```c=
using System.Collections;
using System.Collections.Generic;
using UnityEngine;
using Wave.Native;
using System;
using System.Threading;
public class make_overlay_passthrough : MonoBehaviour
{
// Start is called before the first frame update
bool flag = true;
void ShowPassthroughOverlay()
{
Interop.WVR_ShowPassthroughOverlay(true,true,true); //Show Passthrough Overlay
}
void SetPassthroughOverlayAlphaValue()
{
Interop.WVR_SetPassthroughOverlayAlpha(0.5f); //Set Alpha of Passthrough Overlay to 0.5f
}
void HidePassthroughOverlay()
{
Interop.WVR_ShowPassthroughOverlay(false); //Hide Passthrough Overlay
}
void Start()
{
ShowPassthroughOverlay();
SetPassthroughOverlayAlphaValue();
}
// Update is called once per frame
void Update()
{
if (flag==false) Interop.WVR_ShowPassthroughOverlay(false);
}
}
```
2. 加入 VIVE Wave XR Plugin - Essence > Runtime > Prefabs中提供Wave Rig預製件

3. 在Interop中找到這行需要修改預設值,避免扭曲。改成WVR_PassthroughImageFocus.View ,在make_overlay_passthrough.cs中 ==增加下面這行:
**```Interop.WVR_SetPassthroughImageFocus(WVR_PassthroughImageFocus.View);```**==
4. 輸出成apk到頭盔 成功(沒扭曲!)
### 2. underlay
底層 會被 unity場景的內容層遮擋


```c=
//Passthrough Underlay APIs
WVR_Result WVR_ShowPassthroughUnderlay(bool show)
//Use this API to show/hide Passthrough Underlay
//Parameters
//bool show: Set this to true for showing and false for hiding passthrough underlay. The system passthrough(surrounding or out-of-boundary) would be disabled if this parameter is set to true.
//Return value
//WVR_Result.WVR_SUCCESS: Parameter is valid.
//WVR_Result.WVR_Error_RuntimeVersionNotSupport: Passthrough Underlay is not supported by the runtime on the device.
//WVR_Result.WVR_Error_FeatureNotSupport: Passthrough Underlay is not supported on this device.
```
#### 範例
```c=
//Passthrough Underlay Sample Code
using Wave.Native;
void ShowPassthroughUnderlay()
{
Interop.WVR_ShowPassthroughUnderlay(true); //Show Passthrough Underlay
}
void HidePassthroughUnderlay()
{
Interop.WVR_ShowPassthroughUnderlay(false); //Hide Passthrough Underlay
}
```
#### Demo
所以我們要做underlay的才能秀出珠子呀!!!
1. 在Wave Rig的camera中找到 environment > background type> 把背景色改成黑的(可以看到現實環境的部分)
### 3. projected(overlay)
覆蓋/部分
只在特定區域覆蓋/顯示(由網格mesh與pose決定)
```c=
//Projected Passthrough APIs
WVR_Result WVR_ShowProjectedPassthrough(bool show)
//Use this API to show/hide Projected Passthrough
//Parameters
//bool show: Set this to true for showing and false for hiding projected passthrough. The system passthrough(surrounding or out-of-boundary) would be disabled if this parameter is set to true.
//Return value
//WVR_Result.WVR_SUCCESS: Parameter is valid.
//WVR_Result.WVR_Error_RuntimeVersionNotSupport: Projected Passthrough is not supported by the runtime on the device.
//WVR_Result.WVR_Error_FeatureNotSupport: Projected Passthrough is not supported on this device.
```
```c=
WVR_SetProjectedPassthroughPose(ref WVR_Pose_t pose)
//Use this API to set the pose of the Projected Passthrough
//Parameter
//ref WVR_Pose_t pose: A WVR_Pose_t struct which is for setting the position and rotation of the Projected Passthrough. Values should be of OpenGL coordinate system convention.
//Return value
//WVR_Result.WVR_SUCCESS: Pose value is set successfully.
//WVR_Result.WVR_Error_RuntimeVersionNotSupport: Projected Passthrough is not supported by the runtime on the device.
//WVR_Result.WVR_Error_FeatureNotSupport: Projected Passthrough is not supported on this device.
```
* ref WVR_Pose_t pose:一個WVR_Pose_t結構,用來設定Projected Passthrough的位置與旋轉,需要符合openGL的座標系統。
```c=
WVR_Result WVR_SetProjectedPassthroughMesh(float[] vertexBuffer, uint vertextCount, uint[] indices, uint indexCount)
//Use this API to set the mesh data of the Projected Passthrough
//Parameter
//float[] vertexBuffer: A float array that contains the vertices of you mesh. Vertex coordinates should be of OpenGL coordinate system convention.
//uint vertextCount: Number of vertex data. Should be the length of the vertexBuffer parameter.
//uint[] indices: A uint array for specifying the indices of the triangles of the mesh. Order should be of OpenGL convention.
//uint indexCount: Number of indices. Should be the length of the indices parameter.
//Return value
//WVR_Result.WVR_SUCCESS: Mesh values are set successfully.
//WVR_Result.WVR_Error_RuntimeVersionNotSupport: Projected Passthrough is not supported by the runtime on the device.
//WVR_Result.WVR_Error_FeatureNotSupport: Projected Passthrough is not supported on this device.
```
* 設置網格資料
* float[] vertexBuffer:浮點數的陣列(存放網格的頂點),要符合openGL的座標系統。
* uint vertextCount:頂點資料的數量the length of the vertexBuffer parameter(參數)
* uint[] indices:一個沒有符號的整數陣列,存放指定的三角形的網格的索引(就是指三角形網格的順序編號)
* uint indexCoun:承上的數量(length)
```c=
WVR_Result WVR_SetProjectedPassthroughAlpha(float alpha)
//Use this API to set the transparency (alpha value) of the Projected Passthrough.
//Parameters
//float alpha: The target alpha value. Should be a float in range [0f, 1f].
//Return value
//WVR_Result.WVR_SUCCESS: Alpha value is set successfully.
//WVR_Result.WVR_Error_RuntimeVersionNotSupport: Projected Passthrough is not supported by the runtime on the device.
//WVR_Result.WVR_Error_FeatureNotSupport: Projected Passthrough is not supported on this device.
```
#### 範例
```c=
//Projected Passthrough Sample Code
using Wave.Native;
void ShowProjectedPassthrough()
{
//Set Pose of Projected Passthrough
WVR_Pose_t pose = new WVR_Pose_t();
pose.position.v0 = 0.0f;
pose.position.v1 = 0.0f;
pose.position.v2 = -2.0f;
pose.rotation.w = 1.0f;
pose.rotation.x = 0.0f;
pose.rotation.y = 0.0f;
pose.rotation.z = 0.0f;
Interop.WVR_SetProjectedPassthroughPose(ref pose);
//Set Mesh of Projected Passthrough
float size = 0.25f;
float[] vertices = { -size, -size, 0.0f,
size, -size, 0.0f,
size, size, 0.0f,
-size, size, 0.0f };
uint[] indices = { 0, 1, 2, 0, 2, 3 };
Interop.WVR_SetProjectedPassthroughMesh(vertices, (uint)vertices.Length, indices, (uint)indices.Length);
Interop.WVR_ShowProjectedPassthrough(true); //Show Projected Passthrough
}
void SetProjectedPassthroughAlphaValue()
{
Interop.WVR_SetProjectedPassthroughAlpha(0.5f); //Set Alpha of Projected Passthrough to 0.5f
}
void HideProjectedPassthrough()
{
Interop.WVR_ShowProjectedPassthrough(false); //Hide Projected Passthrough
}
```
### 4. Quality管理圖像品質
passthrough可以在HMD上開啟環境相機,但會耗能。
>provides quality and performance control APIs for all passthrough feature, overlay, underlay and projected underlay.
1. **```WVR_Result Interop.WVR_SetProjectedPassthroughImageQuality(WVR_PassthroughImageQuality quality)```**
在效能與品質之間選擇
* WVR_PassthroughImageQuality.DefaultMode:預設 中規中矩
* WVR_PassthroughImageQuality.PerformanceMode:低畫質低效能
* WVR_PassthroughImageQuality.QualityMode:高畫質清晰耗能
2. set the target frame rate:
**```WVR_Result Interop.WVR_SetFrameRate(int frameRate)```**
設定幀數(算圖的頻率),較低的frame rate可以讓顯示passthrough的最終的FPS更加穩定,讓VR/MR中的動作更流暢。
3. get the current target frame rate:
**```WVR_Result Interop.WVR_GetFrameRate(ref uint frameRate)```**
得知當前的幀數
4. Get Available Frame Rates:
**```WVR_Result Interop.WVR_GetAvailableFrameRates(out uint[] frameRates)```**
獲得可用的幀數
:::warning
**Set Passthrough Image Focus**
**```WVR_Result Interop.WVR_SetProjectedPassthroughImageFocus(WVR_PassthroughImageFocus focus)```**
passthriugh img由單一個相機拍攝,在passthrough中靠近鏡頭的真實物體無法獲得正確的深度。如果視覺物體(visual object)以正確的深度渲染,則視覺物體和passthrough img之間將發生**不對齊**的情況。
VIVE Wave™可以在passthrough中對齊你的虛擬控制器與真實控制器,若你的視野中沒有多個控制器或手部,這會有更好的沉浸感。
==使用此效果時,你將看到**通過影像在你的手柄周圍變形。**== 你手部周圍的視覺內容不會變形,但背景影像將變形。如果需要背景平滑,可以選擇另一種模式。
* 如果玩家在你的設計中看到更多視覺物體,設置為"View"模式會更好。
* **WVR_PassthroughImageFocus.View** :No controller alignment effect.
* 如果玩家專注於手中的視覺物體,設置為"Scale"模式會更好。
* **WVR_PassthroughImageFocus.Scale** :This is the default mode. Your visual controller will be aligned with the real controller in passthrough image.
:::
#### passthrough sample
>按 A 按鈕打開或關閉“PassThrough Overlay”,
B 更改“PassThrough Overlay”Alpha,
X 按鈕用於打開或關閉“Projected PassThrough”,
Y 更改“Projected PassThrough”Alpha。

```c=
using UnityEngine;
using Wave.Native;
namespace Wave.Essence.Samples.PassThrough
{
public class PassThroughOverlayTest : MonoBehaviour
{
private static string LOG_TAG = "Wave.Essence.Samples.PassThrough.PassThroughOverlayTest";
private bool passThroughOverlayFlag = false;
private bool showPassThroughOverlay = false;
bool delaySubmit = false;
bool showIndicator = false;
float alpha = 1.0f;
float alpha2 = 1.0f;
int steps = 0;
// Start is called before the first frame update
void Start()
{
Log.i(LOG_TAG, "PassThroughOverlay start: " + passThroughOverlayFlag);
showPassThroughOverlay = Interop.WVR_ShowPassthroughOverlay(passThroughOverlayFlag);
Interop.WVR_ShowProjectedPassthrough(false);
Log.i(LOG_TAG, "ShowPassThroughOverlay start: " + showPassThroughOverlay);
}
// Update is called once per frame
void Update()
{
if (WXRDevice.ButtonPress(WVR_DeviceType.WVR_DeviceType_Controller_Right, WVR_InputId.WVR_InputId_Alias1_A))
{
//如果按右手控制器的A按紐
bool visible = !Interop.WVR_IsPassthroughOverlayVisible();
//當前是否顯示passthrough overlay
//true = 有用passthrough overlay = 看到真實場景
if (visible)//如果 沒用passthrough overlay
{
if (steps == 0)
{
delaySubmit = false;
showIndicator = false;
}
else if (steps == 1)
{
delaySubmit = true;
showIndicator = false;
}
else if (steps == 2)
{
delaySubmit = false;
showIndicator = true;
}
else if (steps == 3)
{
delaySubmit = true;
showIndicator = true;
}
Interop.WVR_ShowPassthroughOverlay(visible, delaySubmit, showIndicator);
//不顯示passthrough overlay/延遲完成畫面/show控制器
Log.i(LOG_TAG, "WVR_ShowPassthroughOverlay: visible:" + visible + " ,delaySubmit: " + delaySubmit + " ,showIndicator: " + showIndicator);
alpha = 1.0f;
Interop.WVR_SetPassthroughOverlayAlpha(alpha);
}
else//如果有用passthrough overlay
{
Interop.WVR_ShowPassthroughOverlay(visible);
steps++;
if (steps >= 4)
{
steps = 0;
}
}
}
else if (WXRDevice.ButtonPress(WVR_DeviceType.WVR_DeviceType_Controller_Left, WVR_InputId.WVR_InputId_Alias1_X))
{
//左手X鍵
bool visible = !Interop.WVR_IsPassthroughOverlayVisible();
if (visible)//如果沒用passthrough overlay
{
alpha2 = 1.0f;
WVR_Pose_t pose = new WVR_Pose_t();
pose.position.v0 = 0.0f;
pose.position.v1 = 0.0f;
pose.position.v2 = -2.0f;
pose.rotation.w = 1.0f;
pose.rotation.x = 0.0f;
pose.rotation.y = 0.0f;
pose.rotation.z = 0.0f;
Interop.WVR_SetProjectedPassthroughPose(ref pose);
//用來設定projected passthrough的位置與旋轉
float size = 0.25f;
float[] vertex = { -size, -size, 0.0f,
size, -size, 0.0f,
size, size, 0.0f,
-size, size, 0.0f };
uint[] indices = { 0, 1, 2, 0, 2, 3 };
Interop.WVR_SetProjectedPassthroughMesh(vertex, (uint)vertex.Length, indices, (uint)indices.Length);
Interop.WVR_SetProjectedPassthroughAlpha(alpha2);
Interop.WVR_ShowProjectedPassthrough(visible);
Log.i(LOG_TAG, "WVR_ShowProjectedPassthrough: " + alpha2);
}
else//有透視
{
Interop.WVR_ShowProjectedPassthrough(visible);
}
}
else if (WXRDevice.ButtonPress(WVR_DeviceType.WVR_DeviceType_Controller_Left, WVR_InputId.WVR_InputId_Alias1_Y))
{//Y鍵遞減projected passthrough alpha值
alpha2 -= 0.1f;
if (alpha2 < 0.0f)
{
alpha2 = 1.0f;
}
Interop.WVR_SetProjectedPassthroughAlpha(alpha2);
Log.i(LOG_TAG, "WVR_SetProjectedPassthroughAlpha: " + alpha2);
}
else if (WXRDevice.ButtonPress(WVR_DeviceType.WVR_DeviceType_Controller_Right, WVR_InputId.WVR_InputId_Alias1_B))
{//B鍵遞減passthrough overlay alpha值
alpha -= 0.1f;
if (alpha < 0.0f)
{
alpha = 1.0f;
}
Interop.WVR_SetPassthroughOverlayAlpha(alpha);
Log.i(LOG_TAG, "SetPassthroughOverlayAlpha: " + alpha);
}
}
private void OnApplicationPause()
{//把兩種passthrough都關掉
showPassThroughOverlay = Interop.WVR_ShowPassthroughOverlay(false);
Interop.WVR_ShowProjectedPassthrough(false);
Log.i(LOG_TAG, "ShowPassThroughOverlay Pause: " + showPassThroughOverlay);
}
private void OnApplicationQuit()
{
showPassThroughOverlay = Interop.WVR_ShowPassthroughOverlay(false);
Interop.WVR_ShowProjectedPassthrough(false);
Log.i(LOG_TAG, "ShowPassThroughOverlay Quit: " + showPassThroughOverlay);
}
}
}
```
## 三、Hand
### Vive 輸入實用程序 (VIU)
* 因為光用wave xr內建的手 會出現指尖內凹....,依照[論壇](https://forum.htc.com/topic/12817-utility-vive-input-utility-viu-unity-plugin-for-the-ease-of-designing-xr-interaction/)試試VIU+WaveXR
* 在[Asset store](https://assetstore.unity.com/packages/tools/integration/vive-input-utility-64219)中下載工具包並導入

https://forum.htc.com/topic/12818-unity-hand-tracking-by-wave-sdk/
### feature特徵
在wave SDK & Essence中提供功能包

>unity XR提供手部的數據包含:[Bone](https://docs.unity3d.com/ScriptReference/XR.Bone.html)與[HandFinger](https://docs.unity3d.com/2019.1/Documentation/ScriptReference/XR.HandFinger.html)資訊
可以用XRSDK工具包中的**Wave.OpenXR.InputDeviceHand**介面來使用這些資訊
階層關係:
* **```Wave.OpenXR.InputDeviceHand.ActivateNaturalHand(true);```** ,在程式中加入此行,授權後才可獲得unity xr 的手部資訊。
* (這邊好像是open xr的)**InputDeviceHand API (Hand Tracking Reference Guide教學)**[https://hub.vive.com/storage/docs/en-us/UnityXR/UnityXRHandTracking.html]
* Project Settings > XR Plug-in Management > WaveXRSettings > Enable Natural Hand
#### Wave Hand Manager
* 官方範例Assets > Wave > Essence > Hand > Model
拇指0/食指1...將手指編號可以辨識手指的開闔、特別的動作ex.OK、YA
* Wave > GameObject > **Add Hand Manager添加HandManager**
* 
* Gesture Options:在運行時選擇使用預設的手勢類型來開始手勢識別。
* Initial Start Natural Hand:開啟手勢追蹤(會耗電)
* Use XR Device:HandManager將從Unity XR Hand Interface檢索手部姿勢數據。
* 得知當前預設的手勢資訊:
```c=
using Wave.Essence.Hand;
// Retrieves the right hand default gesture.
HandManager.GestureType defaultType = (
HandManager.Instance != null ?
HandManager.Instance.GetHandGesture(false) : HandManager.GestureType.Invalid
);
```
* **CustomGestureProvider自定義手勢**:增加CustomGestureProvider組件和HandManager來自行定義手勢
* 優先權:預設>自訂手勢
* 取得當前的默認或預設的手勢:
```c=
using Wave.Essence.Hand.StaticGesture;
// Retrieves the right hand DEFAULT or custom gesture.
string customType = WXRGestureHand.GetSingleHandGesture(false); // false: Right, true: Left
// Retrieves the dual hand custom gesture. No DEFAULT dual hand gesture.
string dualhandType = WXRGestureHand.GetDualHandGesture();
```
* 指派一個事件偵聽器 **[unityevents](https://tedliou.com/unity-unityevent-usage/)** 偵聽Custom Gesture Provider 的GestureType

* 在project視窗右鍵點擊定義手部姿勢
* 單手手勢的屬性:
1. name
2. 手指狀態
3. 某一手指尖端/手腕之間的距離:>5cm or <2.5cm
4. 手掌旋轉:yaw偏航、pitch俯仰和row橫滾的偏移量

* 雙手手勢的屬性:
1. name
2. 自行定義的單手屬性
3. 不同手之間的手指尖端距離

* 對應的API
### Model模型
展開後的樣子

要跟相機放在同層(在同一個父物件下)

>The HandMeshRenderer will load the runtime model by default. If runtime model is not supported by the device, the default hand model in this prefab will be used instead.
* 右邊視窗加入component :**HandMeshRenderer**默認加載運行時的模型

可以不打勾 來使用手部模型
* 對應的關節點
#### Wave Hand Tracking
(Hand Tracking Reference Guide)[https://hub.vive.com/storage/docs/en-us/UnityXR/UnityXRHandTracking.html]
可以自己定義手勢
## 四、Input Module
[unity event system](https://docs.unity3d.com/2018.3/Documentation/Manual/EventSystem.html)
* Handling input
* Managing event state
* Sending events to scene objects.
1. 下載工具包 project settings > wave xr > essence >input module
2. **==[注意事項](https://hub.vive.com/storage/docs/en-us/UnityXR/UnityXRInputModuleWarning.html)==**
* 將主相機和控制器對象放置在同的偏移位置
* 不要為事件系統啟用多個輸入模塊
* Pinch Off Threshold < Pinch On Threshold //捏闔觸發的事件
* 請勿將多個HandBeam組件與相同的.Beam Type
* 不要將多個HandSpotPointer組件與相同的.Pointer Type
* hand beam光束 長度可以改
*
3. Game Object > UI > Event System 有三種component可以添加
4. 獲取捏闔的點與方向
```c=
Vector3 pinchOrigin = Vector3.zero, pinchDirection = Vector3.zero;
HandManager.Instance.GetPinchOrigin(ref pinchOrigin, HandManager.HandType.Left); // gets left pinch origin.
HandManager.Instance.GetPinchDirection(ref pinchDirection, HandManager.HandType.Left); // gets left pinch direction.
```
5. 可以點按鈕生成選擇器(生成出來是ray光束),也可以指定一個以HandBeam和HandSpotPointer為選擇器的 GameObject。把之前建好的手放進來
6. 設定pinch strength捏力值,超過閥值時會觸發事件
7. ==指尖內凹== :dart:
#### Gaze Input
#### Controller Input
#### Hand Input
## 五、muti-layer
他說使用passthrough時最好不要太多層(至多1層就好)
所以先跳過

## 六、Scene Perception
* project settings > Wave xr > essence > 下載場僅感知功具包

* project settings >xr plug-in management > wavexrsettings > 打勾
### Scene Planes場景平面
存在於用戶周圍環境中的平面

### Scene Mesh場景網格
### Spatial Anchor空間錨點
可以在頭盔上創造並儲存的錨點,只要與空間錨點相連的追蹤地圖仍然有效,空間錨點可以在同一應用的不同會話中重複使用。
## 七、DirectPreview
**passthrough會沒效果**
https://developer.vive.com/resources/vive-wave/tutorials/direct-preview-unity/
passthrough 不能作用在直接預覽上

## 八、InputManager/InteractionModeManager

### InputManager
在wave xr plugin範例中使用 **```UnityEngine.Input```** 獲取按鈕狀態,ex. ```Input.GetButton("Button8")``` ,
**需要在Project Settings的InputManager中定義的按鈕名稱。在測試我們的示例之前,請幫助定義這些按鈕。** [教學](https://hub.vive.com/storage/docs/en-us/UnityXR/UnityXRPackageSamples.html)


https://hub.vive.com/storage/docs/en-us/UnityXR/UnityXRInteraction.html
## 九、移動 VR 體驗的優化技巧
[快完成再優化](https://hub.vive.com/storage/docs/en-us/MobileVRperformancechecklist.html?_gl=1*sl5bzo*_ga*MTkyMjQ0MzIxMi4xNjY5NTYzNTgw*_ga_68NRVQF2CG*MTY4ODExMzI3MS41NC4xLjE2ODgxMTQ5MDEuNTAuMC4w)
### 1-1. 禁用unity中的日誌
https://forum.htc.com/topic/14041-disable-logging/
讓console裡面不要出現廢文
### 1-2. PC VR不支援Passthrough

----
---
:::danger
垃圾區域
## use passthrough sample
1. 載範例 https://github.com/ViveDeveloperRelations/ScenePerceptionDemo
2. 我用2021.3.17f開啟
3. shift+ctrl+b > Build settings > 下載Andriod > 重開unity
4. 確認有用wavwXR
5. 頭盔有連到streamHub 有成功串連
6.

:::