---
title:
description:
date: 2023-04-21
lang: zh-tw
tags:
- 樹莓派
- Linux
- docker
---
# 樹莓派筆記-CrowdSec
自己的私人網站才使用短短幾天
就有一堆奇怪的人,嘗試攻擊我的網站
雖然有使用cloudflare免費服務,阻擋非台灣ip進入
### Cloudflare 區域流量

而且cloudflare也不是萬能的,開啟Proxy服務後
也只能阻擋那[幾個端口](https://developers.cloudflare.com/fundamentals/get-started/reference/network-ports/)
在這些端口外的就要自己想辦法了
這時候就輪到**Crowdsec**登場了

原理就很像是 whoscall 利用社群的力量建立黑名單
當名單上這些ip來訪問你的時候
就會自動將這些ip加到防火牆規則中,藉此阻擋他們的訪問
另外也有**Fail2ban**功能,即使訪問的ip不在黑名單上
也可以讀取應用的日誌,當登入失敗太多次時
也能將ip列入黑名單中,杜絕暴力破解密碼
只要被有心人知道ip,就會這樣:

## 前置步驟
:::warning
因為有Cloudflare的關係
需要特別做這一步驟!!
詳細可以參考這個
:::spoiler
https://github.com/authelia/website/blob/master/content/en/integration/proxies/fowarded-headers/index.md#cloudflare
:::
在Cloudflare轉換規則中新增兩個規則
### 第一個:
:::spoiler

:::
### 第二個:
:::spoiler

:::
> 那串ip是Cloudflare服務
> https://www.cloudflare.com/zh-tw/ips/
並且更改`Caddyfile`
將這些ip加入trusted_proxies中
`Caddyfile`
```Caddyfile=
{
acme_dns cloudflare {$CLOUDFLARE_API_TOKEN}
}
(trusted_proxy_list) {
## Uncomment & adjust the following line to configure specific ranges which should be considered as trustworthy.
trusted_proxies 103.21.244.0/22 103.22.200.0/22 103.31.4.0/22 104.16.0.0/13 104.24.0.0/14 108.162.192.0/18 131.0.72.0/22 141.101.64.0/18 162.158.0.0/15 172.64.0.0/13 173.245.48.0/20 188.114.96.0/20 190.93.240.0/20 197.234.240.0/22 198.41.128.0/17
trusted_proxies 2400:cb00::/32 2606:4700::/32 2803:f800::/32 2405:b500::/32 2405:8100::/32 2a06:98c0::/29 2c0f:f248::/32
trusted_proxies 10.0.0.0/8 172.16.0.0/16 192.168.0.0/16 fc00::/7
}
```
這樣才能得到使用者的真實ip
如果不做這步驟,那得到的ip都會是Cloudflare的
這樣就沒辦法辨別了
## 安裝 Crowdsec
有個2東西要安裝,分別是Crowdsec, Firewall Bouncer,
Crowdsec可以用docker安裝
Firewall Bouncer需要直接裝在宿主上
### Crowdsec
#### docker compose
`docker-compose.yml`
```yml=
version: '3.3'
networks:
default:
name: ${DOCKER_MY_NETWORK}
external: true
services:
crowdsec:
container_name: crowdsec
image: crowdsecurity/crowdsec:latest
restart: unless-stopped
expose:
- 6060
ports:
- 127.0.0.1:8080:8080
volumes:
- ${HOME_PATH}/crowdsec/data:/var/lib/crowdsec/data
- ${HOME_PATH}/crowdsec/config:/etc/crowdsec
- ${HOME_PATH}/logs:/logs:ro
- ${HOME_PATH}/logs/crowdsec.log:/var/log/crowdsec.log
- /var/log:/log:ro
environment:
COLLECTIONS: "crowdsecurity/linux crowdsecurity/sshd crowdsecurity/caddy LePresidente/authelia"
PARSERS: "crowdsecurity/whitelists"
env_file:
- stack.env
```
> `COLLECTIONS`代表啟用的插件
> 在容器中可使輸入`cscli collections list`查看
#### .env
`stack.env`
```env=
# common.env: Set development environment
DOCKER_MY_NETWORK=caddy_net
MY_DOMAIN=example.com
TZ=Asia/Taipei
HOME_PATH=<your path>
```
### Firewall Bouncer
For Debian/Ubuntu
安裝 存儲庫
```zsh=
curl -s https://packagecloud.io/install/repositories/crowdsec/crowdsec/script.deb.sh | sudo bash
```
安裝 CrowdSec Firewall Bouncer
```zsh=
sudo apt update
sudo apt install crowdsec-firewall-bouncer-iptables
```
## Crowdsec 配置
首先,先到[CrowdSec App.](https://app.crowdsec.net/)註冊帳號
這樣才能收到社群黑名單更新
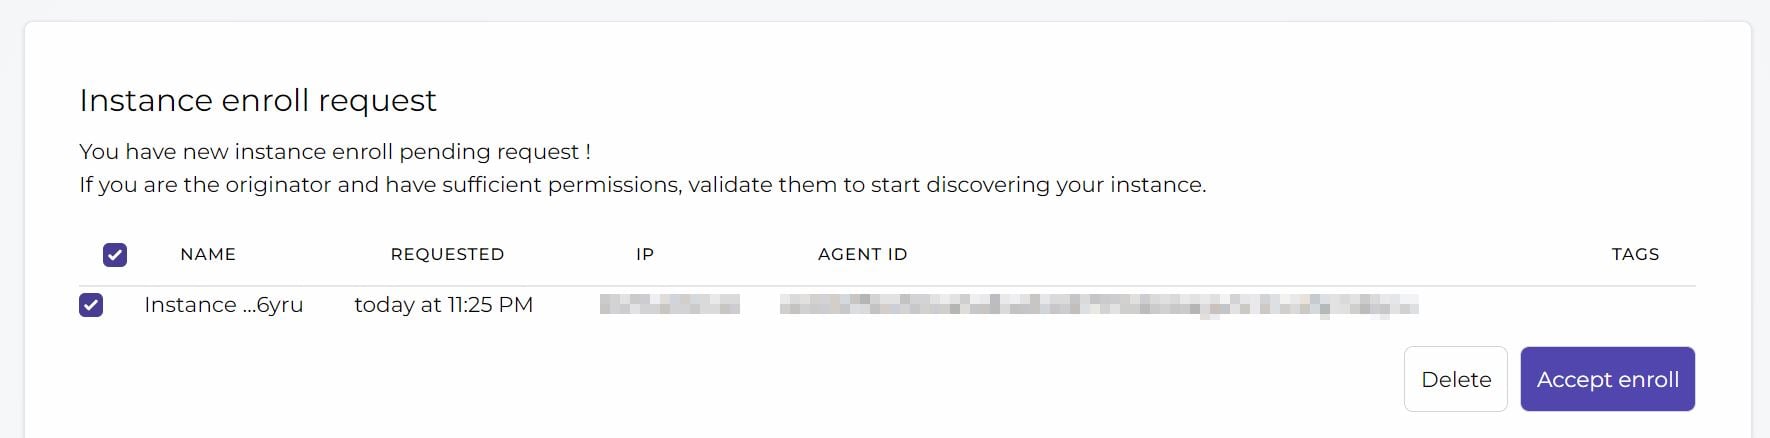
並且需要註冊Instances
在docker 容器中輸入CrowdSec提供的指令

並且到[控制台](https://app.crowdsec.net/)手動批準
### acquis.yaml 更改
這是最重要的,這代表CrowdSec要讀取那些日誌
`acquis.yaml`
```yaml=
#系統日誌
filenames:
- /var/log/auth.log
- /var/log/syslog
- /var/log/kern.log
- /var/log/ufw.log
- /var/log/mail.log
labels:
type: syslog
---
#Caddy日誌
filenames:
- /logs/caddy/*.log
labels:
type: caddy
---
```
:::info
更詳細的可以參考官方教學
:::
### CrowdSec Firewall Bouncer
設定好CrowdSec就來設定保鑣了
首先,在容器中輸入
```zsh=
cscli bouncers add host-firewall-bouncer
```
會生成一串密鑰,等等就要這個跟保鑣驗證
找到
` /etc/crowdsec/bouncers/crowdsec-firewall-bouncer.yaml`
更改一下幾個值
```zsh=
api_key=<YOUR_API_Key>
iptables_chains:
- INPUT
# - FORWARD
- DOCKER-USER
disable_ipv6=true
```
重啟服務
```zsh=
sudo systemctl restart crowdsec-firewall-bouncer
```
檢查是否連上CrowdSec API
進入容器,並輸入
```zsh=
cscli bouncers list
```
有打勾就代表有了

### Dashboard
可以整合Grafana,在上面顯示CrowdSec的資訊

只需要在 Prometheus config 新增:
```yml=
- job_name: 'crowdsec'
static_configs:
- targets: ['crowdsec:6060']
```
然後匯入預先配置的面板就好
:::spoiler
https://github.com/crowdsecurity/grafana-dashboards/tree/master
:::
## Ref
* https://www.crowdsec.net/
* https://github.com/authelia/website/blob/master/content/en/integration/proxies/fowarded-headers/index.md#cloud-proxies
* https://doc.crowdsec.net/docs/getting_started/install_crowdsec/##install-our-repositories
* https://www.smarthomebeginner.com/crowdsec-docker-compose-1-fw-bouncer/#CrowdSec_Firewall_Bouncer
* https://hub.crowdsec.net/author/crowdsecurity/configurations/caddy-logs
* https://github.com/crowdsecurity/grafana-dashboards/tree/master
* https://rdr-it.com/en/crowdsec-secure-your-web-server-network-installation-and-configuration/