###### tags: `大學部專題` `106級專題`
# Git 教學
教材內容大部分整理自 [ Scott Chacon and Ben Straub, Pro Git, APress, 2nd Ed.](https://git-scm.com/book/zh-tw/v2)
## Chapter 1 Getting Start
### What is the “version control” system?
Version control is a system that records changes to a file or set of files over time so that you can recall specific versions later.
版本控制是一個系統,它記錄一個文件或一組文件隨時間的變化,以便以後可以選用特定版本。
Local Version Control:

Centralized Version Control Systems:

Distributed Version Control Systems
- Such as Git, Mercurial, Bazaar or Darcs
- Clients don’t just check out the latest snapshot of the files: **they fully mirror the repository**.
- Every clone is really a full backup of all the data.

### Git Basics
**Property 1: Snapshots, Not Differences**
Centralized VC Systems (like CVS, Subversion, Perforce, Bazaar, and so on) think of the information they keep as a set of files and the changes made to each file over time. See Figure 4:

Figure 4
Git (Distributed VC System) thinks about its data more like a stream of snapshots (Figure 5).

Figure 5
**Property 2: Nearly Every Operation Is Local**
**Property 3: Git Has Integrity**
Everything in Git is check-summed before it is stored and is then referred to by that checksum .
The mechanism that Git uses for this checksumming is called a SHA-1 hash.
**Property 4: Git Generally Only Adds Data**
When you do actions in Git, nearly all of them only add data to the Git database.
**Property 5: The Three States for a file**
Git has three main states that your files can reside in: **committed**, **modified**, and **staged**.
- **Committed** means that the data is safely stored in your local database.
- **Modified** means that you have changed the file but have not committed it to your database yet.
- **Staged** means that you have marked a modified file in its current version to go into your next commit snapshot.
### Three main sections of a Git Project
Three main sections of a Git project: the Git directory (Repository), the working directory, and the staging area.

- .git directory: stores the metadata and object database for your project.
- The working directory is a single checkout of one version of the project.
- The staging area is a file, generally contained in your Git directory, that stores information about what will go into your next commit.
### The basic Git workflow
The basic Git workflow goes something like this:
1. You **modify** files in your working directory.
2. You **stage** the files, adding snapshots of them to your staging area.
3. You do a **commit**, which takes the files as they are in the staging area and stores that snapshot permanently to your Git directory.
### Install Git
### Configure your Git
Set you identity
- Set your user name and e-mail address.
- Every Git commit uses this information, and it’s immutably baked into the commits you start creating.
```
$git config --global user.name your_user_name
$git config --global user.email your_email
```
The above commands set your user.name and user.email to global configuration file. Use `--system` and `--local` options to store to system and local configuration files.

Show your configurations:
```
$ git config --list
$ git config –l
```
Get help

## Chapter 2 Git Basic
### Initialize or Clone a repository
Initialize new repository in the current directory:
```
$git init
```
Clone an existing from the remote repository:
```
$ git clone <repository_url> [<directory>]
```
Practice: Create a repository in the BitBucket
Change to a directory.
Clone the repository from the remote:
```
$ git clone https://hychen39@bitbucket.org/hychen39/gittraining.git git_train
```
Show remote repository:
```
$ cd git_train
$ git remote -v
```

### Lifecycle of the file status (檔案狀態循環週期變化)

Show the file status:
```
$ git status
```
#### 加入新檔案到 Staging Area

建立檔案 `file1.txt` 並此查看檔案狀態:
```
$ echo "my project" > file1.txt
$ git status
```
此時檔案狀態為 untracked:

將新檔案加入 Staging Area:
```
$ git add file1.txt
$ git status
```
此時, 檔案狀態為 Staged:

將檔案由 Staged 狀態退回成 Untracked:
```
$ git restore --staged file1.txt
```
加入另一個檔案:
```
$ echo "Logan Wolverine" > contributors.txt
$ git add contributors.txt
$ git status
```

修改 `contributors.txt`:
```
$ echo "Cindy Lee" >> contributors.txt
$ git status
```

`contributors.txt` 檔案由兩個狀態: modified but not staged 及 modified and staged.
Why? Git stages a file exactly as it is when you run the git add command.
#### 查看檔案的差異
指令: `git diff`, `git diff --staged`
查看 Working directory 和 Staging Area 間的差異:
```
$ git diff [filename]
```

```
$ git diff --staged [filename]
```

#### 提交異動到 Repository
從 Staging Area 到 Repository
```
git commit -a
```
-a, --all
Tell the command to automatically stage files that have been modified and deleted, but new files you have not added to Git Repository about are not affected.


#### Push to remote repository
```
$ git push
```

### 復原
Ref:
- https://git-scm.com/book/en/v2/Git-Basics-Undoing-Things
- https://git-scm.com/book/zh-tw/v2/Git-%E5%9F%BA%E7%A4%8E-%E5%BE%A9%E5%8E%9F
#### 重新提交
想要重新提交,在提交命令上使用 --amend 選項:
```
$ git commit --amend
```
- 會把在 Staging area (預存區)的內容再提交一次。
- 可以再重新撰寫提交訊息
#### 由 Staged 退回到 Modified
從 v2.23.0 開始,使用 `git restore` 執行復原動作
使用 `git restore --staged <file>...` 移出預存區的內容。
例如,`CONTRIBUTING.md` 要從 staging area 移出:
```
git restore --staged CONTRIBUTING.md
```
`CONTRIBUTING.md` 的狀態會由 staged 變成 modified.
v2.23.0 以前
使用 `git reset HEAD <file>...` 修改預存區的內容
```
git reset HEAD CONTRIBUTING.md
```
#### 由 Modified 退回到 Unmodified (復原被修改的檔案)
從 v2.23.0 開始,同樣使用 `git restore` 執行復原動作。
要捨棄目前修改的內容,使用
`git restore <file>...`
例如,要復原 `CONTRIBUTING.md` :
```
git restore CONTRIBUTING.md
```
v2.23.0 以前使用 `git checkout -- <file>...`
```
git checkout -- CONTRIBUTING.md
```
## Chapter 3 分支的建立
### 分支的原理
每次 commit 到 repository 時, Git 會建立一個 commit 物件用來記錄提交時的儲存庫快照。
Commit 物件的內容其中一項, 就是指向前一個版本。若從 init repository 後共提交了 3 次, commit 物件建立的相依關係如下:

從某個 commit 物件, 往前追溯, 便可以知道版本發展的歷史, 區分出不同的版本.
要區分去不同的版本, Git 為各版本的發展歷史的最新的 commit 物件, 分別建立指標:

此外, 因為有多個發展歷史分支, 我們還需要另一個指標, 知道目前是在哪個分支上。
Git 使用 Head 指標指向目前的分支. 若要切換到不同的分支, 只要將 Head 指向該分支的最新的 Commit 物件, 便可以追溯出該分支的所有歷史快照了。
### 版本的合併
版本分支(branching)是從一個 commit 物件上, 發展出不同的快照歷史。所以, 不同的快照歷史, 往回追溯 ,一定會有共同的 commit 物件。

版本的合併(merging)則是將不同的分支合併, 合併後的 commit 物件, 會有多個父親 commit 物件。

合併時, 若同一個檔案的相同地方有不一致時, 表示內容產生衝突(conflict), 開發者必須介入決定採用那個內容。內容衝入解決後, 才能提交到儲存庫。
### 建立分支(本地端)
```
$ git branch <branch_name>
```
```
$ git branch test1
# list all branch
$ git branch
```

```
$ git branch <branch_name>
```
### 切換分支
```
$ git checkout <branch_name>
```
```
$ git checkout test1
```

### Practice: 建立與切換分支
修改 `contributor.txt` 的內容:
```
$ echo "Tom Cruise" >> contributors.txt
$ git commit -a -m 'Add new contributor: Tom'
```

切換到 Master 分支並修檔案:
```
# Checkout the master branch
$ git checkout master
$ echo "Kelly McGillis" >> contributors.txt
$ git commit -a -m 'Add new contributor: Kelly'
```
完成後的快照歷史:

### 切換分支同時建立分支
```
$ git checkout -b <branch_name>
```
### 合併版本
程序:
1. 切換到某一個分支。 指令 `git checkout <branch_name>`
1. 使用指令 `git merge <branch_name>`
1. 如果有內容衝突, 需要手動解決。
### Practice: 合併版本
合併 Master 及 test1 分支:
```
$ git checkout master
$ git merge test1
```

手動解決內容衝突:
- Current Change: 目前版本的異動, 使用 `<<<<<<< HEAD` 表示
- Incoming Change: 要合併版本的異動, 使用 `>>>>>>> test1` 表示
VIM 編輯器:

VSCode 編輯器:

內容衝突解決後:

查看目前的 Git status:

提交至儲存庫:
```
$ git commit -a
```
版本合併後的快照歷史:

### 將異動推至 Remote Repository
Local Repositoy 目前領先 Remote Repository 3 個 commits.
Push to remote:
```
$ git push
```

Remote Repository 上的快照歷史:

### 本地分支推到 Remote Repository
情境: 在本地端建立分支 test2. 之後, 提交 test2 分支的異動到 Remote Repository.
假設目前在 Master 分支:
```
$ git checkout -b test2
$ echo "Val Kilmer" >> contributors.txt
$ git commit -a -m 'Add the contributor: Val'
$ git push --set-upstream origin test2
```

`-u, --set-upstream` 選項設定遠端分支的名稱

push 後 remote repository 的快照歷史:

### 取得 remote repository 上的快照
情境: 其他人已經異動推送到 Remote Repository, 我們要將遠端的異動拉到本地端。
#### Fetch 與 Pull
`git fetch` 抓取從複製儲存庫以來被提交的快照任何的新快照。這些快照直接進到本地端儲存庫中。 Git 不會自動將其和 Working Directory 內容進行合併, Working Directory 內的內容不會受的影響。
`git pull` 除了抓取遠端儲存庫新的快照並拉到本地端儲存庫外, 還會自動合併到目前 Working Directory 的內容。所以 Pull = fetch + merge.
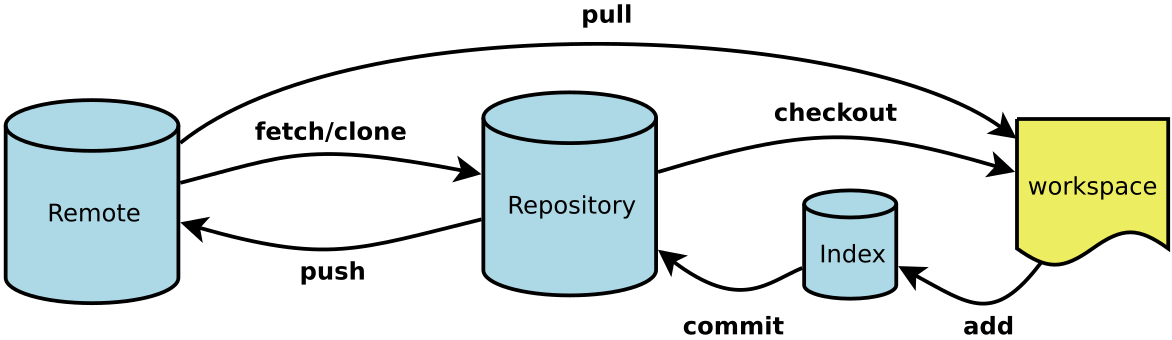
Figure Source: https://dotblogs.com.tw/davidtalk/2019/04/30/180046
#### 練習: 使用 Fetch 取得遠端儲存庫新的快照, 在使用 merge 合併 origin/test2 分支到 test2
在 Bitbucket 切換到 test2 branch 並修改 contributors.txt 的內容:


在本地端輸入指令:
```
$ git fetch
```

列出所有的分支, 本地端及遠端:

切換到 test2 並合併 origin/test2 的內容:


### 取得遠端的分支至本地端
Ref: https://git-scm.com/book/zh-tw/v2/%E4%BD%BF%E7%94%A8-Git-%E5%88%86%E6%94%AF-%E9%81%A0%E7%AB%AF%E5%88%86%E6%94%AF
追踪遠端的本地端分支稱為 Tracking Branch.
程序:
1. 先 Fetch 到本地端的 Repository
2. 從 local repository checkout 到 workspace
Method 1: 若 local 沒有重覆的 branch 名稱,欲使用和 remote 一樣的 branch 名稱
`$ git checkout serverfix`
- Branch serverfix set up to track remote branch serverfix from origin.
- Switched to a new branch 'serverfix'
Method 2: 明確的使用 --track 選項
上述的指令相當於
`$ git checkout --track origin/serverfix`
Method 3: 若 local 的 branch 和 remote 要不相同,使用
`git checkout -b sf origin/serverfix`
- Branch sf set up to track remote branch serverfix from origin.
- Switched to a new branch 'sf'
若已有 local branch, 相要 track remote 的分支:
`git branch -u origin/serverfix`
- Branch serverfix set up to track remote branch serverfix from origin.
- 假設目前在 serverfix local branch 上