# Solana NFTs: Everything you need
**Use new guide linked below**
:::success
:bird: Twitter @HectorNBardales DM if you want to work together!
:::
:::danger
**IMPORTANT**
Candy Machine V1 and V2 are no longer being used. Please use Sugar.
You can use the new [guide](https://hackmd.io/@hnbl/solana_guide) I made.
:::
## What is this guide?
The purpose of this guide to teach anyone, even if you have no knowledge of coding, to create and generate a collection of NFTs and upload them for people to mint them on your own website.
### Important
I did this on **MacOs**, but you can use this guide and follow similar steps if you're on Linux or Windows.
### How to navigate
I will have five main sections here to make navigation easier:
### Quick Navigation
1. Create a Collection:The first one will cover everything from how to make your images all the way to generating thousands of images with their json files.
2. Upload to Website: The second will teach you everything about uploading that collection to the blockchain and be able to mint your NFT.
3. Website Appearance/Creation: Edit the appearance of your website.
4. Host Website: The third will teach you how to host this website.
5. Mainnet-Beta: Info related to using mainnet-beta
6. Presales/Giveaways/Whitelists/Airdrops
7. Marketplace
8. Hash List
9. Cost
10. Resources
11. Common Errors and FAQ
**From this section onwards I will also include things related to mainnet-beta**
6. Custom
: From providers to how to implemment it.
7. Resources: Information about costs, importing wallet to phantom and other resources.
8. Common Errors: Errors I've had or community members have often encountered.
9. FAQ
# Create a Collection
Here you will learn how to make images, json files and generate thousands of them. I will show two methods to do this.
### Artwork
To generate hundreds or thousands of NFTs you will want use layers. You can make these images using any software you like. This includes: Photoshop, Procreate, MSPaint and many more.
A popular type of NFT is the pfp (profile picture) such as the one below.
<p align="center">
<img width="200" height="200" src="https://i.imgur.com/3SayxzM.png">
</p>
To do this you will need to use layers. For a pfp type NFT, you can begin by creating the body of your character and then other things such as clothing and accessories.
I also highly suggest using a square canvas when designing them.
#### Free Pngs for testing
I created a file with examples and you can download them from [here](https://www.deviantart.com/hectornery) to test out NFT generation.(You can also use your own or the owns provided by these programs)
Now that you have your layers ready let's generate a few NFTs.
## Method 1
### Pros of using this method:
1. Works with exclusions: (See NFTChef github for this functionality)
### Saving the files with rarity
1. Create a folder to store your layers
2. Create a folder for each layer
3. To change rarity rename with layer like this:"attributeName#a number from 1-100.png"
The higher the number the more common the attribute.
Ex:
BackgroundYellow#100.png --> This is common
BackgroundGreen#10.png --> This is rare
### Generate NFTs
Here you'll learn how to generate images and their json files.
Install:
1. [Visual Studio Code](https://code.visualstudio.com)
2. [Node.js](http://nodejs.org/)(I suggest the "current" version)
We will now use the [Hashlips NFT Generator](https://github.com/HashLips/hashlips_art_engine).
Open Visual Studio Code. Click Terminal->New Terminal:
```javascript=
git clone https://github.com/HectorNBL/Hector--Solana-NFT-Generator
```
3. Open the hashlips_art_engine folder in Visual studio Code. Then click Termnial->New Terminal:
```javascript=
yarn install
```
In Visual Studio click open folder and open the hashlips art engine folder. Click the config.js folder
Here we will change several things:
1. Name of your NFT
2. Symbol of you NFT
3. Description - The description of your collection.
4. Collection name and symbol: you choose this.
5. growEditionSizeTo - The number of NFTs you want. (For testing I suggest starting with 10-100 max)
6. layerOrders - Here you will choose the properties of you NFT. The name of each property should match the folder created for each one. Like this:
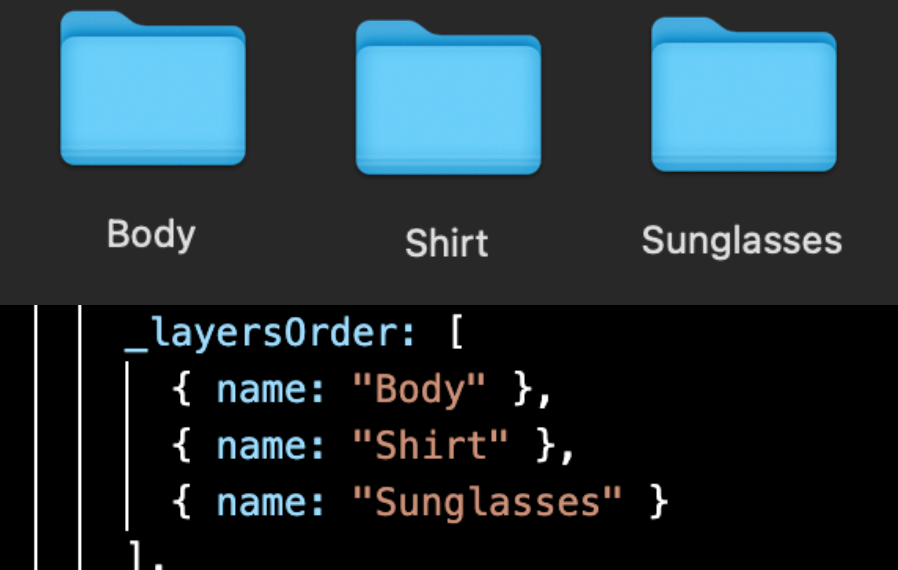
You can always add more layers with this line
```javascript=
{ name: "Name of you layer" }
```
5. Replace the pngs layers folder with your art.
6. Your solana address
Read through [this](https://medium.com/metaplex/metaplex-metadata-standard-45af3d04b541) if you want to add more metadata.
7. Generate them:
```javascript=
node index.js //I use this one, but it shouldn't matter
//or
npm run build
```
#### Check the results
Go to the build folder. Here you will see these two with your pngs and json files:

Your json files will look like this below. Or go [here](https://medium.com/metaplex/metaplex-metadata-standard-45af3d04b541) for more info about Solana Metaplex Metadata Standard.
```javascript=
{
"name": "The Name of your Collection",
"symbol": "",
"description": "The description of your collection",
"seller_fee_basis_points": 0,
"image": "image.png",
"external_url": "You can put the link to your website here",
"attributes": [
{
"trait_type": "attribute#1 ex: Background",
"value": "Simple"
},
{
"trait_type": "attribute#2 ex: Clothes",
"value": "Green"
},
{
"trait_type": "attribute#3 ex: Hair",
"value": "Long Hair"
}
],
"collection": {
"name": "Collection Name",
"family": "Family Name"
},
"properties": {
"files": [
{
"uri": "image.png",
"type": "image/png"
}
],
"category": "image",
"creators": [
{
"address": "Solana address where you'll receive SOL",
"share": 100
}
]
}
}
```
## Method 2
This method will use [Solseum's Generator](https://hackmd.io/@Solseum/HJEfeFDNt)
This pros of this method are:
1. You can generate files displaying the rarities of your attributes.
2. Create NFTs in a random order
3. It requires less coding knowledge than hashlips art engine.
You should visit their website I linked above and use their guide. You can always leave comments here is you run into issues and I will try my best to help and update this part if necessary.
### Possible errors
I used it on MacOs and had issues installing python. Here are two links that might help out:
1. [The recommended method](https://opensource.com/article/19/5/python-3-default-mac): I highly recommend trying this out first.
2. [The method I used](https://dev.to/jqn/learn-to-setup-python-3-as-a-default-on-your-mac-1bd6): I ended up using this.
3. No module named 'PIL': Install the requirements.txt manually by following the instrucitons in the solseum guide.
## Generate GIFS
[Here](https://github.com/MichaPipo/Generative_Gif_Engine/tree/v1.0.1) is a link of a github repository that can be used to generate GIFS. (I have not tested it yet, and the metadata files should be checked to be sure they meet the current standard)
# Upload Assets
## Metaplex Main Branch
:::danger
For the **main branch**
:::
Commands to run:
```javascript=
git clone <link-to-metaplex-main-branch>
cd metaplex/js
yarn install
yarn bootstrap
yarn run build-web
```
## Installing Dependencies
Once you have your collection of images and json files you can now upload them to your own website and mint them for free on the devnet (to test out everything) or the mainnet-beta (to allow others to mint them).
We will begin by installing the following:
### Visual Studio Code
[Visual Studio](https://code.visualstudio.com) (This will facilitate viewing some files.)
### Git
Follow the steps to [install Git](https://git-scm.com/book/en/v2/Getting-Started-Installing-Git) based on your operating system
On a mac you can use:
```javascript=
bew install git //to install
brew upgrade git //to update
//if it sill shows the older version
//run these two below:
export PATH=/usr/local/bin:$PATH //changes path
git --version //to check version
git version 2.34.1//output
```
Common Error:
Git is not recognized: for windows users try [this](https://stackoverflow.com/questions/4492979/git-is-not-recognized-as-an-internal-or-external-command).
### Node.js
[Node.js](https://nodejs.org/en/) (I suggest dowloading the "LTS" version)
To check you did it: open Visual Studio Code and click on Terminal->New Terminal. Type in the following:
```javascript=
node -v
v16.13.1//output
```
### Yarn
[Install yarn](https://classic.yarnpkg.com/lang/en/docs/install/#mac-stable)
Check with
```javascript=
yarn --version
1.22.17//output
```
### Ts-node
```javascript=
ts-node --version
v10.3.1//output
```
### Metaplex
The folowing are the commands shown in the docs.metaplex website:
```javascript=
1. git clone https://github.com/metaplex-foundation/metaplex.git ~/metaplex
2. yarn install --cwd ~/metaplex/js/
//The following command checks that everything is working
3. ts-node ~/metaplex/js/packages/cli/src/candy-machine-v2-cli.ts --version
0.0.2//output
```
### Solana Cli
[Solana Cli] (https://docs.solana.com/cli/install-solana-cli-tools) (If you're not on MacOs click on the link and follow the steps there)
For Mac users type the following into you terminal.
```javascript=
sh -c "$(curl -sSfL https://release.solana.com/v1.8.0/install)"
```
To confirm you did it right type the following:
```javascript=
solana --version
solana-cli 1.9.4 //output
```
To update your cli
```javascript=
solana-install update
```
More info in the [Solana Docs](https://docs.solana.com/cli/install-solana-cli-tools)
### Solana File System Wallet
Open a new terminal. Now we will change to the Solana devnet.
```javascript=
solana config set --url https://api.devnet.solana.com
```
Then make a file system wallet
```javascript=
solana-keygen new --outfile ~/config/solana/devnet.json //--force
//Uncomment "--force" if you need a new wallet
```
Copy and save the pubkey and seedphrase somewhere safe.
Now set a keypair
```javascript=
solana config set --keypair ~/config/solana/devnet.json
```
Check your balance
```javascript=
solana balance
```
It should be 0Sol. Let's add some:
```javascript=
solana airdrop 3
//I don't suggest going over 10
//If you want to, you can confirm your balance again.
```
If the airdrop fails you can also use a [faucet](https://solfaucet.com).
```javascript=
//You can use:
solana address
//to check your wallet address
```
### Adding your new wallet to Phantom
We'll now add the new wallet to phantom. (You can always use your existing one, but here is how to add this new one.)
1. Go to the config/solana folder and open the devenet.json file. Copy everything.
<img width="200" height="200" src="https://i.imgur.com/3IpAsk0.png">
2. In the Phantom click add new wallet.
3. Choose import private key.
4. Paste the key you copied earlier.
5. Choose any name for this wallet.
# CM V2 Config Settings
Official information about the candy machine V2 settings can be found [here](https://docs.metaplex.com/candy-machine-v2/configuration).
1. Create a new .json file.
2. Add the information required for your project. Use the link above to read about the settings.
## Uploading
You can place the assets folder and CM config file inside the metaplex folder and use the following to upload:
```javascript=
ts-node ~/metaplex/js/packages/cli/src/candy-machine-v2-cli.ts upload \
-e devnet \
-k ~/config/solana/devnet.json \
-cp ~/metaplex/config.json \
-c example \
~/metaplex/assets
```
If you're testing on devent change the config storage option to "arweave".
If you succeed you'll see the following message:
```javascript=
Done. Successful = true.
```
# Verify
Follow the steps form docs.metaplex.com or copy this:
```javascript=
ts-node ~/metaplex/js/packages/cli/src/candy-machine-v2-cli.ts verify_upload \
-e devnet \
-k ~/config/solana/devnet.json \
-c example
//output:
wallet public key: xxxxxx
Key size 10
uploaded (10) out of (10)
ready to deploy!
```
Reurun the upload command if necessary.
<!--
## Betterverify
If you ran the OG verify please check youre cache first and make sure that none of the assets have been set to null.
If this happens, try to delete them and reupload. Then try running using betterverify.
[Here](https://github.com/jasonruncie/Candy-Machine-Gun) is the link to Jasonrun's github page.
Steps to use this:
In the Metaplex Repo where you normally run verify
1. Run
```javascript=
git fetch origin pull/985/head:betterverify
```
2. Run
```javascript=
git checkout betterverify
```
2. Rerun verify (the regular verify command)
5. You might see this: **Cached name: "xxx" doesn't match on-chain value:**
6. Rerun upload
You can also clone [this fork](https://github.com/jasonruncie/metaplex) and use it instead of the metaplex repository.
-->
## Update Store (Price/Date)
Set a price
```javascript=
~/metaplex/js/packages/cli/src/candy-machine-cli.ts create_candy_machine --env devnet --keypair ~/config/solana/devnet.json --price 1
//type your price in SOL here I used 1 as example
//if needed use ts-node or npx ts-node
ts-node ~/metaplex/js/packages/cli/src/candy-machine-cli.ts create_candy_machine --env devnet --keypair ~/config/solana/devnet.json --price 1
```
Copy the resulting Candy Machine PubKey
Set a release date
```javascript=
~/metaplex/js/packages/cli/src/candy-machine-cli.ts update_candy_machine --keypair ~/config/solana/devnet.json --date '1 Jan 2020 00:00:00 PST'
//type a date using this format
//if it fails try with double quotes ""
```
If the date already passed, you will be able to mint immediately.
# Website Creation
For this part we will use the [Exiled Apes Candy Machine](https://github.com/exiled-apes/candy-machine-mint)
Open a new terminal type in the following and click enter:
```javascript=
git clone https://github.com/exiled-apes/candy-machine-mint.git
```
You should now have a folder called "candy-machine-mint"
Install yarn:
```javascript=
cd candy-machine-mint
yarn install
```
Open the candy-machine-mint folder with Visual Studio Code. Rename the .env.example folder to .env Inside the .env file you should see this
```javascript=
REACT_APP_CANDY_MACHINE_CONFIG=__PLACEHOLDER__
REACT_APP_CANDY_MACHINE_ID=__PLACEHOLDER__
REACT_APP_TREASURY_ADDRESS=__PLACEHOLDER__
REACT_APP_CANDY_START_DATE=__PLACEHOLDER__
REACT_APP_SOLANA_NETWORK=devnet
REACT_APP_SOLANA_RPC_HOST=https://explorer-api.devnet.solana.com
```
We will replace the four "__PLACEHOLDER__" with the following in this order:
1. candy machine with publickey number
2. candy machine pubkey
3. pubkey (this is the address of the wallet you made)
4. timestamp number(time from setting a mintdate)
You will now click Terminal->New Terminal:
```javascript=
yarn start
```
A website should open here: localhost:3000/
Connect to Phantom, change to devenet in your wallet, and mint your NFT. (If you don't have Sol you can airdrop for free [here](https://solfaucet.com). Just copy/paste your phantom wallet address)
If you succeeded it should show up in your collectibles.
Once you are ready to upload the app run
```javascript=
yarn build
```
## Website for CM V2
Follow the readme for the website by [Andrew](https://github.com/Fulgurus/candy-machine-v2-responsive-ui) on github.
## Mint Many at Once
[Next Candy Machine](https://github.com/maxwellfortney/next-candy-machine)
If you want to mint for yourself you can use:
```javascript=
mint_multiple_tokens
```
or for a single nft you can use:
```javascript=
mint_one_token
```
command
## Custom Domain
There are many places you can get a custom domain from. I have used this:
1. [Namecheap](https://namecheap.pxf.io/0JAVjM)
## Website Appearance
1. Open the Candy Machine Mint folder with Visual Studio Code.
2. Click and open the public folder and open the index.html file.
3. Edit it.
Here is a screnshot of a sample I made:

In the future, I will add some things to help you edit it.
For now I suggest learning basic HTML for content and CSS for styling.
I have found [this video guide](https://www.youtube.com/watch?v=vQWlgd7hV4A&t=8400s) useful.
# Host Website
We are now ready to host the website.
There are many places to do this.
You can try out [Vercel](https://vercel.com/).
If you need a video guide for this, I recommend this one [Freedom Fishies](https://www.youtube.com/watch?v=0_-mP0RjsVI&t=289s).
# Mainnet-BETA
Here I will include information that will help you when you're ready for mainnet-beta
And I suggest reading this: [things to consider before launch](https://medium.com/@elysianft/lets-put-an-end-to-bad-drops-on-solana-c8cfd6d33e69).
## Custom RPC
**What is it?** Remote procedure call. It is used to interact with Solana.
**Why use one?** Speed and being able to mint without issues. You will be rate limited if you use the ones from Solana.
The public ones from Solana are [these](https://docs.solana.com/cluster/rpc-endpoints) : For mainnet it is hihghly recommended to use a custom rpc node.
These are some that are often suggested:
1. [Quicknode](https://www.quicknode.com?tap_a=67226-09396e&tap_s=2286372-341e1b&utm_source=affiliate&utm_campaign=generic&utm_content=affiliate_landing_page&utm_medium=generic) : Starting from $9/month
Keep in mind that with the $9 option you may get rate limited. Currently, starting from $99 you don't get rate limited.
Click the link and create and account. Once inside you can create a node. Make sure to select SOL like this:

**How to use one**
```javascript =
1. solana config set --url "my rpc"
```
2. When you run the upload command:
```javascript=
~/metaplex/js/packages/cli/src/candy-machine-cli.ts upload ~/metaplex/assets --env mainnet-beta --keypair ~/config/solana/devnet.json --rpc-url <custom rpc>
```
3. And for something like price/date:
```javascript=
~/metaplex/js/packages/cli/src/candy-machine-cli.ts create_candy_machine --env mainnet-beta --keypair ~/config/solana/devnet.json --rpc-url <cusotm rpc> --price 1
```
If you run into this error: failed to get info about account, try adding '/' at the end of the url
# Presales/Giveaways/Whitelist/Airdrops
## Presale
The simple answer is that you'll be needing two candy machines. Each candy machine must have assets that start with 0.png, 0.json and so on. This won't affect your collection when listing it secondary marketpacles.
## Giveaway
Remember NEVER make your NFT free or bots will take them. With giveaways you can set a price (ex:1SOL) and you will only loose the gas fees when you mint.
For a giveaway you can use the command mint_one_token regardless of the mint date you've set.
You can then send that NFT to the winner.
## Gumdrop
Use the folllowing commamnd to get a list of all the options with gumdrop:
```javascript=
ts-node ~/metaplex/js/packages/cli/src/gumdrop-cli.ts help create
//modify the command if necessary
```
You can use gumdrop for whitelisting:
[Mark's Guide](https://hackmd.io/@MarkSackerberg/gumdrop) on using Gumdrop.
## Airdrops
You can use this repository to airdrop your NFTs:
[Skeleton Crew Air Support](https://github.innominds.com/theskeletoncrew/air-support)
# Marketplace
Metaplex already allows users to create their own storefront
After doing all the steps above you can run:
```javascript=
yarn start
```
And visit: http://localhost:3000/#/
Your store will be there. Here you can create and sell NFTs.
Others can also do this. Here: http://localhost:3000/#/admin you can choose "whitelist only" and users will only be able to sell NFTs, or public and users will be able to create them as well as sell them.
# Hash list
A list of tools you can use:
https://tools.abstratica.art
https://aiphotos.art/hash-table
The hash list is a list of hashes that is usually required by secondary marketplaces to verify your collection.
Use your Candy Machine ID to search for it.
You will only get a list of the NFTs that have been minted
# Withdraw (Close CM)
You can close the candy machine and withdraw the remaining funds.
For more info on the withdraw command click [here](https://docs.metaplex.com/create-candy/withdraw)
If you use this, remember that you can't use the candy machine anymore.
# Costs
## Costs Calculator
1. To put your NFTs on arweave, which is what we are using, you can calculate the costs in this [calculator](https://www.feecalc.live).
2. Metaplex's Calculator for Arweave costs: [Upload to Arweave costs](https://ardrive.io/pricing/)
**Remember that this is for 2 years rent**
## Rent
**Important**
If you can afford the two years of rent, it is suggested to pay for them and then use the withdraw command to retrieve the remaining Solana once the minting is done. If you decide to change rent the withdraw command might have some issues.
Here is one way to lower the configuration costs of the candy machine.
Once in VsCode(or any ide) go to js/packages/cli/src/helpers
Once in helpers you will see a file called instructions.ts
Open it can scroll down until you see this part

The duration is determined by the following equation:
```javascript=
24/x="the duration of the candy machine"
```
You choose your **x**.
So if I want two months I will write **12**
Here is where you would write it:

You can lower it even more, to about one to two weeks is usually more than enough for most projects.
**Common Rent Concerns**
1. **Does it affects my NFTs?**
No, the rent refers to the duration of the candy machine. In the case of most projects, the candy machine is no longer needed after 1-2 weeks because after this period the mint has already ended.
2. **How much does the cost change?**
The change in cost is proportional to the change in rent period. For example, if 2 years cost 10Sol tjen 1 year would cost 5Sol and so on.
# Holder/Minters Tool
[This tool](https://www.sol-nft.tools/get-mints?mode=holders) is to get a list of minters, token metadata, list of holders and more.
# Resources and More
### Importing Wallets
If you want to use your File System Wallet with phantom you can check out this [link](https://stackoverflow.com/questions/69245982/import-phantom-wallet-private-key-into-solana-cli).
### Resources
#### Github Repos
1. [Update Metadata: Metaboss](https://github.com/samuelvanderwaal/metaboss)
2. [Solseum Generator](https://github.com/Solseum/solseum-nft-generator): This is currently the one I prefer since it provides rarities and more functionalities.
3. [Haslips Solana Generator](https://github.com/HashLips/hashlips_art_engine)(Currently I wouldn't use this since I adds an "edition number" to the Metadata which doesn't seem to be needed for Metaplex) But I must also say that it works for hi, so you can always test it out.
#### Here are some useful videos:
1. Generate 10,000NFTs for Solana: [Tiny Tigerz](https://www.youtube.com/watch?v=6n2KZQcFdtk&list=PLo8gN6wGoc29YsOXczGOAwCVlqosRVDKW&index=1)(A very complete guide)
2. [Mint Website Creation](https://www.youtube.com/watch?v=4LLx7SMAOag&t=611s) (This is a good guide, but it doesn't mention a few things. I suggest watching it as a video guide to accompany this written one)
#### Useful Guides
1. [A website with many useful links](https://sol-links.vercel.app)
2. [Guide by: @archaeopteryx](https://hackmd.io/@archaeopteryx/By4bpbA4F)
3. Spanish guide: [Colección de NFTs](https://dev.to/turupawn/solana-crea-una-coleccion-de-nfts-1kk0)
4. [Levi Cook Metaplex Guide](https://hackmd.io/@levicook/HJcDneEWF)(Some things in this guide will be different for you. If you use it, I suggest reading the comments)
5. [Metadata Standard](https://medium.com/metaplex/metaplex-metadata-standard-45af3d04b541): Everything you need to know about Solana Metadata
6. [Solana and Metaplex FAQ](https://hackmd.io/@archaeopteryx/By4bpbA4F)
7. [How use Infura](https://hackmd.io/@8LSEewFFQ2OwXMjUKZP-pA/BJYh8FU7F#Step-4---Upload-to-IPFS)(Concise explanation about Infura and info about solana nfts)
#### Discord Servers
1. [Metaplex Discord Server](https://discord.gg/Ssj5XWBCDJ)
2. [Solana Discord](https://discord.gg/solana)
3. [Hashlips Discord](https://discord.gg/z2GmvpQrt5)
### Articles
1. [Things to consider before launch](https://medium.com/@elysianft/lets-put-an-end-to-bad-drops-on-solana-c8cfd6d33e69): An article discussing the possible issues of launching a Sol NFT and how to address them.
# Common Errors
List of Errors with hex code: [Samuelvanderwaal](https://github.com/samuelvanderwaal/wtf-is) github
1. **ENETUNREACH**: If you see this, check or change your internet connection. Even if it is working to browse the web, this error can be fixed by changing internet connection.

2. **Metaplex candy machine upload loop error**. If you have this error while uploading your assets, here are things you should try to fix it. First check your json files. Verify them with somenoe else if necessary. Second, check the path of your assets and verify that it is completely correct.
4. **Unexpected token or end of JSON input**: Check your json file with the cli:
```javascript=
verify_token_metadata
```
or use a [json validator](https://jsonlint.com/).
5. **429**: You are being rate limited. You need a custom RPC.
6. **0x139**: Not enough Solana. Fund your wallet.
7. **The term 'git' is not recognized as the name of a cmdlet**: Install git [here](https://git-scm.com/book/en/v2/Getting-Started-Installing-Git)
8. **Invalid subscription ID**: Verify after the upload is done. This shouldn't give you an issue.
9. **The arweave-sol storage option only works on mainnet. For devnet, please use either arweave, aws or ipfs**: Try using the
```javascript=
--storage arweave
```
at the end of the command you are trying to run.
10. **SendTransactionError: failed to send transaction: Node is behind by xxx slots**: If you're using a custom RPC, contact the provider otherwise try uploading again.
11. **TypeError: Cannot read properties of undefined (reading 'digest')...**: Here is a [possible solution](https://stackoverflow.com/questions/57146558/typeerror-digest-of-undefined-in-development-environment/57170494#57170494). In your case you'll probably have to use https.
12. **Error: failed to get info about account (some address here): Error: 404 Not Found: Not Found** If the error happens using a custom RPC try contacting the provider and verifying that it is for Solana and mainnet(if that's what you're using)
# FAQ
I will be adding FAQ found on the discord server or here in this section.
1. **Is there are way to make the upload cheaper?**
A: Yes. To begin with we no longer need to use an external program to upload our files to arweave since upload costs is no longer fixed.
To reduce cost you can reduce the rent of the candy machinem, but keep in mind that it is recommened to leave the rent time as the default.
3. **What are the file size limits?**
Min: 25 kb,
Max: 9 MB for devent and 250mb for mainnet-beta
3. **Can I upload more files to the same candy machine?**
No. This is the reason why you need 2 candy machines to do presale.
4. **Can I do a reveal?**
You can update your metadata with [Metaboss](https://hackmd.io/@archaeopteryx/By4bpbA4F)
5. **What are the differences between "family" and "name" under the collection section in the metadata?**
The family is the broader term that ecompasses multiple collections whereas the name identifies the current collection. If this is confusing, the image below(from the official metaplex docs) might help you understand better.

6. **Can you add more NFTs to a candy machine?**
No. Once created, you cannot add more.
7. **How do I update an NFT that hasn't been minted yet?**
Try using:
``` javascript=
update_existing_nfts_from_latest_cache_file
```