# SwiftUI Tutorials
## Composing Complex Interfaces
https://developer.apple.com/tutorials/swiftui/composing-complex-interfaces
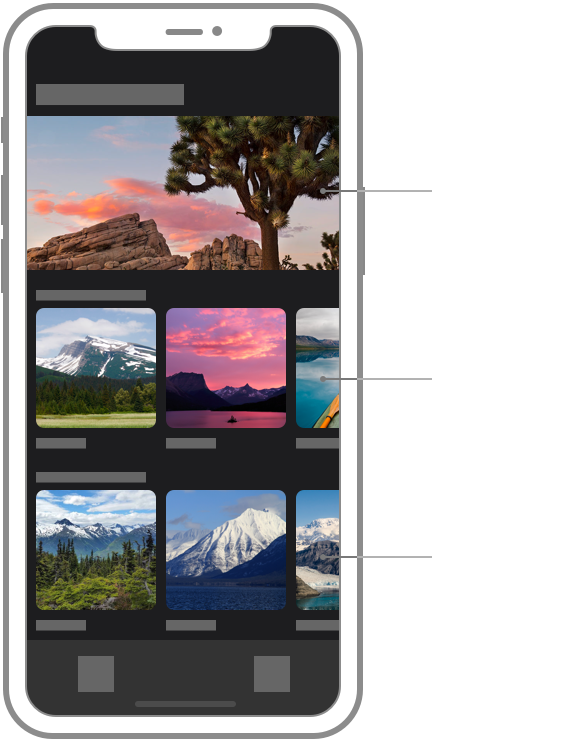
### Section 1 Add a Category View
加入 NavigationView
### Section 2 Create a Categroy
StateObject [Documentation](https://developer.apple.com/documentation/swiftui/stateobject) [SwiftOnTap](https://swiftontap.com/stateobject)
EnvironmentObject [Documentation](https://developer.apple.com/documentation/swiftui/environmentobject) [SwiftOnTap](https://swiftontap.com/environmentobject)
兩者都是用在 ObservableObject 的 property wrapper,當 view 上使用到其中的 Published property 改變的時候 view 也會跟著動
```swift=
class AppModel: ObservableObject {
@Published var flag: Bool = false
}
struct ContentView: View {
@StateObject var appModel = AppModel()
var body: some View {
ChildView()
.environmentObject(appModel)
}
}
struct ChildView: View {
@EnvironmentObject var appModel: AppModel
var body: some View {
Toggle("Flag", isOn: $appModel.flag)
}
}
```
EnvironmentObject 在 view 上設定一次,理論上就可以在所有的 subview 上使用(iOS 13 會有一些問題)
也可以傳遞多個 environmentObject,會依照 type 來區分(相同 type 傳多次只取的到第一個)
可以當作 Global/singleton 物件來使用,也有人當 viewModel 使用
跟 ObservedObject 的比較可以參考 SwiftOnTap
### Section 3 Create a Category Row
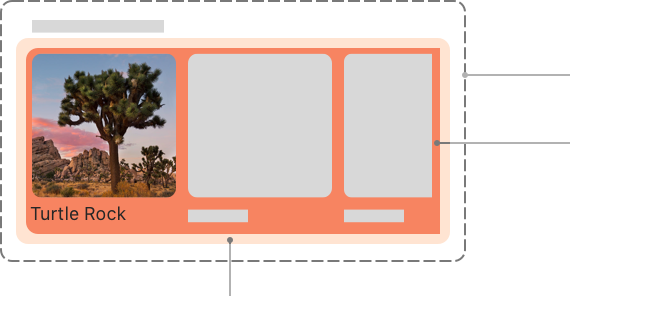
用 ScrollView + HStack 來做到類似 UICollectionView 的效果,HStack 也可以直接改成 LazyHStack 來使用 (iOS14+)
```swift=
// CategoryRow.swift
VStack {
Text
ScrollView {
HStack {
ForEach(items) { landmark in
CategoryItem(landmark: landmark)
}
}
}
}
```
### Section 4 Complete the Category View
List 的效果類似 UITableView
```swift=
// CategoryHome.swift
NavigationView {
List {
modelData.features[0].image
ForEach(modelData.categories.keys.sorted(), id: \.self) { key in
CategoryRow(categoryName: key, items: modelData.categories[key]!)
}
}
.navigationTitle("Featured")
}
```
也可以用 ScrollView + VStack 來實現
```swift=
// CategoryHome.swift
NavigationView {
ScrollView {
VStack {
modelData.features[0].image
ForEach(modelData.categories.keys.sorted(), id: \.self) { key in
CategoryRow(categoryName: key, items: modelData.categories[key]!)
}
.listRowInsets(EdgeInsets())
}
}
.navigationTitle("Featured")
}
```
List 像是 UITableView,只需要 render 顯示的區域就可以顯示了,VStack 需要 render 所有的 view 才會顯示,在資料量大的時候更耗費資源
### Section 5 Add Navigation Between Sections
NavigationLink [Document](https://developer.apple.com/documentation/swiftui/navigationlink/) [SwiftOnTap](https://swiftontap.com/navigationlink)
```swift=
// CategoryRow.swift
VStack {
Text(categoryName)
ScrollView {
HStack {
ForEach(items) { landmark in
NavigationLink {
LandmarkDetail(landmark: landmark)
} label: {
CategoryItem(landmark: landmark)
}
}
}
}
}
```
TabView [Document](https://developer.apple.com/documentation/swiftui/tabview/) [SwiftOnTap](https://swiftontap.com/tabview)
```swift=
// ContentView.swift
@State private var selection: Tab = .featured
enum Tab {
case featured
case list
}
var body: some View {
TabView(selection: $selection) {
CategoryHome()
.tabItem {
Label("Featured", systemImage: "star")
}
.tag(Tab.featured)
LandmarkList()
.tabItem {
Label("List", systemImage: "list.bullet")
}
.tag(Tab.list)
}
}
```
## Wroking with UI Controls
https://developer.apple.com/tutorials/swiftui/working-with-ui-controls
### Section 1 Display a User Profile
加 Toolbar 按鈕、Present 到 ProfileHost
sheet(ispresented:ondismiss:content:) [Document](https://developer.apple.com/documentation/swiftui/emptyview/sheet(ispresented:ondismiss:content:)/) [SwiftOnTap](https://swiftontap.com/view/sheet(ispresented:ondismiss:content:))
fullScreenCover(isPresented:onDismiss:content:) [Document](https://developer.apple.com/documentation/swiftui/button/fullscreencover(item:ondismiss:content:)/) [SwiftOnTap](https://swiftontap.com/view/fullscreencover(ispresented:ondismiss:content:))
```swift=
// CategoryHome.swift
@State private var showingProfile = false
var body: some View {
NavigationView {
List {
modelData.features[0].image
ForEach(modelData.categories.keys.sorted(), id: \.self) { key in
CategoryRow(categoryName: key, items: modelData.categories[key]!)
}
}
.navigationTitle("Featured")
.toolbar {
Button {
showingProfile.toggle()
} label: {
Label("User Profile", systemImage: "person.crop.circle")
}
}
.sheet(isPresented: $showingProfile) {
ProfileHost()
.environmentObject(modelData)
}
}
}
```
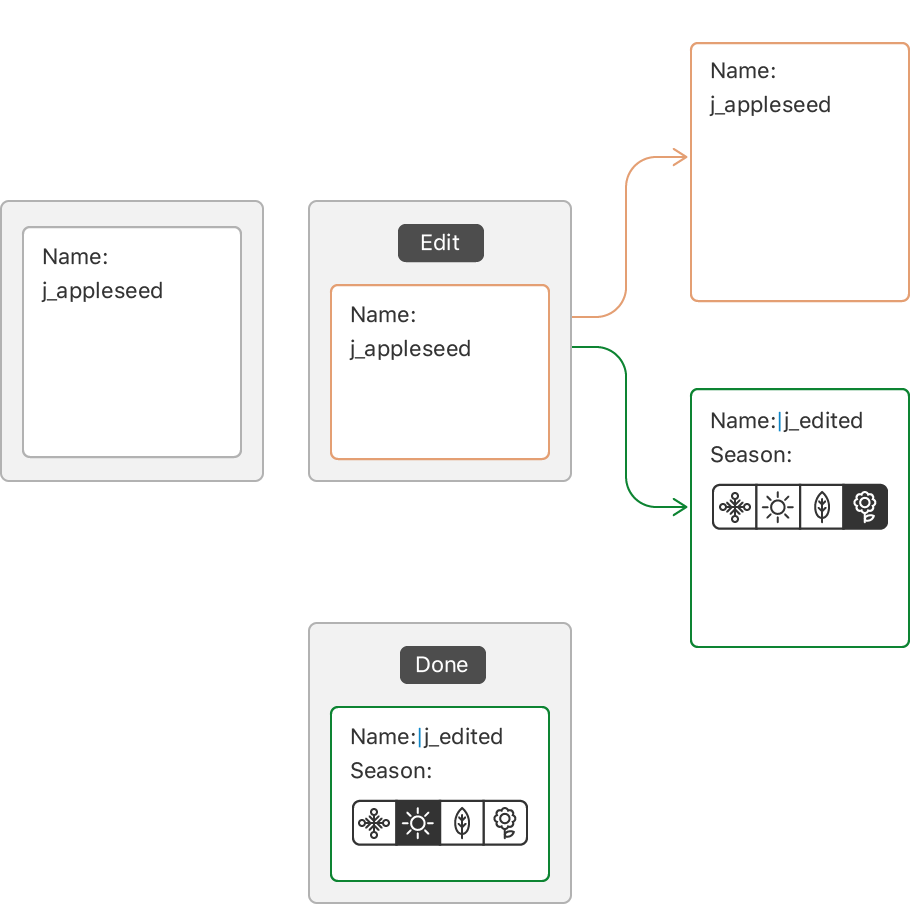
### Section 2 Add an Edit Mode
Environment [Document](https://developer.apple.com/documentation/swiftui/environment/) [SwiftOnTap](https://swiftontap.com/environment)
```swift=
// ProfileHost.swift
@Environment(\.editMode) var editMode
@EnvironmentObject var modelData: ModelData
@State private var draftProfile = Profile.default
var body: some View {
VStack{
HStack {
Spacer()
EditButton()
}
if editMode?.wrappedValue == .inactive {
ProfileSummary(profile: modelData.profile)
} else {
Text("Profile Editor")
}
}
.padding()
}
```
Environment 可以取得 view 的環境變數,如果要在 view 中直接 dismiss 透過 sheet 或 fullScreenCover 顯示出來的畫面也可以用 environment 中的 presentationMode
```swift=
struct FullScreenModalView: View {
@Environment(\.presentationMode) var presentationMode
var body: some View {
ZStack {
Color.primary.edgesIgnoringSafeArea(.all)
Button("Dismiss Modal") {
presentationMode.wrappedValue.dismiss()
}
}
}
}
struct ContentView: View {
@State private var isPresented = false
var body: some View {
Button("Present!") {
isPresented.toggle()
}
.fullScreenCover(isPresented: $isPresented, content: FullScreenModalView.init)
}
}
```
### Section 3 Define the Profile Editor
```swift=
@Binding var profile: Profile
var dateRange: ClosedRange<Date> {
let min = Calendar.current.date(byAdding: .year, value: -1, to: profile.goalDate)!
let max = Calendar.current.date(byAdding: .year, value: 1, to: profile.goalDate)!
return min...max
}
var body: some View {
List {
HStack {
Text("Username").bold()
Divider()
TextField("Username", text: $profile.username)
}
Toggle(isOn: $profile.prefersNotifications) {
Text("Enable Notifications").bold()
}
VStack {
Text("Seasonal Photo").bold()
Picker("Seasonal Photo", selection: $profile.seasonalPhoto) {
ForEach(Profile.Season.allCases) { season in
Text(season.rawValue).tag(season)
}
}
.pickerStyle(.segmented)
}
DatePicker(selection: $profile.goalDate, in: dateRange, displayedComponents: .date) {
Text("Goal Date").bold()
}
}
}
```
Toggle [Document](https://developer.apple.com/documentation/swiftui/toggle/) [SwiftOnTap](https://swiftontap.com/toggle)
文字會顯示在 Switch 的旁邊,也可以寫成 `Toggle("Enable Notifications", isOn: $profile.prefersNotifications)`

Picker [Document](https://developer.apple.com/documentation/swiftui/picker/) [SwiftOnTap](https://swiftontap.com/picker)
有不同的 style (segmented/inline/wheel/automatic/menu),每個選項加上 tag,選擇後就會把 tag 的值存回去

DatePicker [Document](https://developer.apple.com/documentation/swiftui/datepicker/) [SwiftOnTap](https://swiftontap.com/datepicker)
有不同的 style (automatic/graphical/wheel/compact),以及設定顯示的 component

### Section 4 Delay Edit Propagation
Cancel Button 只有在 editMode == .active 的時候才會出現
```swift=
// ProfileHost.swift
@Environment(\.editMode) var editMode
@EnvironmentObject var modelData: ModelData
@State private var draftProfile = Profile.default
var body: some View {
VStack {
HStack {
if editMode?.wrappedValue == .active {
Button("Cancel", role: .cancel) {
draftProfile = modelData.profile
editMode?.animation().wrappedValue = .inactive
}
}
Spacer()
EditButton()
}
if editMode?.wrappedValue == .inactive {
ProfileSummary(profile: modelData.profile)
} else {
ProfileEditor(profile: $draftProfile)
.onAppear {
draftProfile = modelData.profile
}
.onDisappear {
modelData.profile = draftProfile
}
}
}
.padding()
}
```
onAppear(perform:) [Document](https://developer.apple.com/documentation/swiftui/emptyview/onappear(perform:)/) [SwiftOnTap](https://swiftontap.com/view/onappear(perform:))
onDisappear(perform:) [Document](https://developer.apple.com/documentation/swiftui/emptyview/ondisappear(perform:)/) [SwiftOnTap](https://swiftontap.com/view/ondisappear(perform:))
可以當作 viewWillAppear / viewDidDisappear 用
## Interfacing with UIKit
https://developer.apple.com/tutorials/swiftui/interfacing-with-uikit
### Section 1 Create a View To Represent a UIPageViewController

UIViewRepresentable [Document](https://developer.apple.com/documentation/swiftui/uiviewrepresentable/) [SwiftOnTap](https://swiftontap.com/uiviewrepresentable)
UIViewControllerRepresentable [Document](https://developer.apple.com/documentation/swiftui/uiviewcontrollerrepresentable/) [SwiftOnTap](https://swiftontap.com/uiviewcontrollerrepresentable)
UIHostingController [Document](https://developer.apple.com/documentation/swiftui/uihostingcontroller/) [SwiftOnTap](https://swiftontap.com/uihostingcontroller)
在 SwiftUI 中使用 UIKit,要用符合 UIViewRepresentable / UIViewControllerRepresentable protocol 的 custom type 包起來
在 UIKit 中使用 SwiftUI 的 View 要用 UIHostingController 包起來
```swift=
// PageViewController.swift
struct PageViewController<Page: View>: UIViewControllerRepresentable {
var pages: [Page]
func makeUIViewController(context: Context) -> UIPageViewController {
let pageViewController = UIPageViewController(
transitionStyle: .scroll,
navigationOrientation: .horizontal)
return pageViewController
}
func updateUIViewController(_ pageViewController: UIPageViewController, context: Context) {
pageViewController.setViewControllers(
[UIHostingController(rootView: pages[0])], direction: .forward, animated: true)
}
```
符合 UIViewRepresentable / UIViewControllerRepresentable 的 type 就可以直接在 SwiftUI 中使用了
```swift=
struct PageView<Page: View>: View {
var pages: [Page]
var body: some View {
PageViewController(pages: pages)
}
}
struct PageView_Previews: PreviewProvider {
static var previews: some View {
PageView(pages: ModelData().features.map { FeatureCard(landmark: $0) })
.aspectRatio(3 / 2, contentMode: .fit)
}
}
```
### Section 2 Create the View Controller's Data Source
和 UIKit 相關的邏輯,可以放在 Coordinator 中,SwiftUI 在呼叫 makeUIViewController / makeUIView 前會先呼叫 makeCoordinator
```swift=
// PageViewController.swift
struct PageViewController<Page: View>: UIViewControllerRepresentable {
var pages: [Page]
func makeCoordinator() -> Coordinator {
Coordinator(self)
}
func makeUIViewController(context: Context) -> UIPageViewController {
let pageViewController = UIPageViewController(
transitionStyle: .scroll,
navigationOrientation: .horizontal)
pageViewController.dataSource = context.coordinator
return pageViewController
}
func updateUIViewController(_ pageViewController: UIPageViewController, context: Context) {
pageViewController.setViewControllers(
[context.coordinator.controllers[0]], direction: .forward, animated: true)
}
class Coordinator: NSObject, UIPageViewControllerDataSource {
var parent: PageViewController
var controllers = [UIViewController]()
init(_ pageViewController: PageViewController) {
parent = pageViewController
controllers = parent.pages.map { UIHostingController(rootView: $0) }
}
func pageViewController(
_ pageViewController: UIPageViewController,
viewControllerBefore viewController: UIViewController) -> UIViewController?
{
guard let index = controllers.firstIndex(of: viewController) else {
return nil
}
if index == 0 {
return controllers.last
}
return controllers[index - 1]
}
func pageViewController(
_ pageViewController: UIPageViewController,
viewControllerAfter viewController: UIViewController) -> UIViewController?
{
guard let index = controllers.firstIndex(of: viewController) else {
return nil
}
if index + 1 == controllers.count {
return controllers.first
}
return controllers[index + 1]
}
}
}
```
### Section 3 Track the Page in a SwiftUI View's State
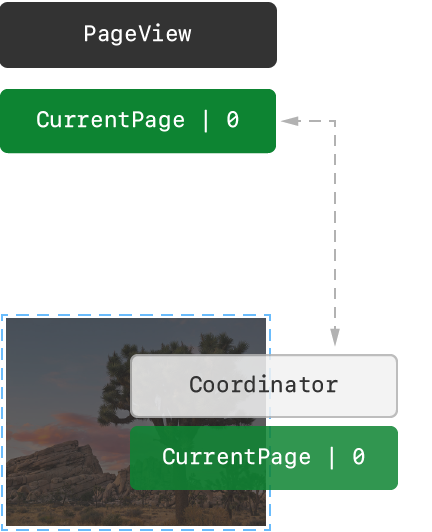
做好 Binding 後,每次滑動完就會呼叫到 UIPageViewControllerDelegate 的 didFinishAnimating,並更新 currentPage,currentPage 被設定後,就會觸發 updateUIViewController
```swift=
// PageView.swift
@State private var currentPage = 0
var body: some View {
VStack {
PageViewController(pages: pages, currentPage: $currentPage)
Text("Current Page: \(currentPage)")
}
}
```
```swift=
// PageViewController.swift
@Binding var currentPage: Int
func makeUIViewController(context: Context) -> UIPageViewController {
let pageViewController = UIPageViewController(
transitionStyle: .scroll,
navigationOrientation: .horizontal)
pageViewController.dataSource = context.coordinator
pageViewController.delegate = context.coordinator
return pageViewController
}
func updateUIViewController(_ pageViewController: UIPageViewController, context: Context) {
pageViewController.setViewControllers(
[context.coordinator.controllers[currentPage]], direction: .forward, animated: true)
}
class Coordinator: NSObject, UIPageViewControllerDataSource, UIPageViewControllerDelegate {
var parent: PageViewController
var controllers = [UIViewController]()
func pageViewController(
_ pageViewController: UIPageViewController,
didFinishAnimating finished: Bool,
previousViewControllers: [UIViewController],
transitionCompleted completed: Bool) {
if completed,
let visibleViewController = pageViewController.viewControllers?.first,
let index = controllers.firstIndex(of: visibleViewController) {
parent.currentPage = index
}
}
}
```
### Section 4 Add a Custom Page Control
這裡示範了 UIViewRepresentable 的用法,基本上跟 UIViewControllerRepresentable 相同。
透過 currentPage 的 Binding,PageView、PageViewController 和 PageControl 的 UI / Action 會同步更新
```swift=
// PageControl.swift
struct PageControl: UIViewRepresentable {
var numberOfPages: Int
@Binding var currentPage: Int
func makeCoordinator() -> Coordinator {
Coordinator(self)
}
func makeUIView(context: Context) -> UIPageControl {
let control = UIPageControl()
control.numberOfPages = numberOfPages
control.addTarget(
context.coordinator,
action: #selector(Coordinator.updateCurrentPage(sender:)),
for: .valueChanged)
return control
}
func updateUIView(_ uiView: UIPageControl, context: Context) {
uiView.currentPage = currentPage
}
class Coordinator: NSObject {
var control: PageControl
init(_ control: PageControl) {
self.control = control
}
@objc
func updateCurrentPage(sender: UIPageControl) {
control.currentPage = sender.currentPage
}
}
}
```
## Recap
- EnvironmentObject/StateObject
- TabView
- toolbar
- sheet/fullScreenCover
- Environment (editMode/presentationMode)
- Toggle
- Picker
- DatePicker
- onAppear/onDisappear
- UIViewControllerRepresentable/UIViewRepresentable
- UIHostingController
- Coordinator
 Sign in with Wallet
Connect another wallet
Sign in with Wallet
Connect another wallet