# CASTIEL Training
### Login to Lumi
```
ssh USERNAME@lumi.csc.fi
```
To simplify the login to LUMI, you can add the following to your `.ssh/config` file.
```
# LUMI
Host lumi
User <USERNAME>
Hostname lumi.csc.fi
IdentityFile <HOME_DIRECTORY>/.ssh/id_rsa
ServerAliveInterval 600
ServerAliveCountMax 30
```
The `ServerAlive*` lines in the config file may be added to avoid timeouts when idle.
Now you can shorten your login command to the following.
```
ssh lumi
```
If you are able to log in with the ssh command, you should be able to use the secure copy command to transfer files. For example, you can
copy the presentation slides from lumi to view them.
```
scp lumi:/project/project_465000380/slides/<file_name> <local_filename>
```
You can also copy all the slides with the . From your local system:
```
mkdir slides
scp -r lumi:/project/project_465000380/slides slides
```
If you don't have the additions to the config file, you would need a longer command:
```
mkdir slides
scp -r -i <HOME_DIRECTORY>/.ssh/<public ssh key file> <username>@lumi.csc.fi:/project/project_465000380/slides slides
```
or for a single file
```
scp -i <HOME_DIRECTORY>/.ssh/<public ssh key file> <username>@lumi.csc.fi:/project/project_465000380/slides/<file_name> <local_filename>
```
## HIP Exercises
We assume that you have already allocated resources with `salloc`
`cp -r /project/project_465000380/exercises/HPCTrainingExamples/ .`
`salloc -N 1 -p small-g --gpus=1 -t 10:00 -A project_465000380`
```
module load craype-accel-amd-gfx90a
module load PrgEnv-amd
module load rocm
```
### Basic examples
`cd HPCTrainingExamples/HIP/vectorAdd `
Examine files here – README, Makefile and vectoradd_hip.cpp Notice that Makefile requires HIP_PATH to be set. Check with module show rocm or echo $HIP_PATH Also, the Makefile builds and runs the code. We’ll do the steps separately. Check also the HIPFLAGS in the Makefile.
```
make vectoradd_hip.exe
srun -n 1 ./vectoradd_hip.exe
```
We can use SLURM submission script, let's call it `hip_batch.sh`:
```
#!/bin/bash
#SBATCH -p small-g
#SBATCH -N 1
#SBATCH --gpus=1
#SBATCH -t 10:00
#SBATCH -A project_465000380
module load craype-accel-amd-gfx90a
module load rocm
cd $HOME/HPCTrainingExamples/HIP/vectorAdd
make vectoradd_hip.exe
srun -n 1 --gpus 1 ./vectoradd_hip.exe
```
Submit the script
`sbatch hip_batch.sh`
Check for output in `slurm-<job-id>.out` or error in `slurm-<job-id>.err`
Compile and run with Cray compiler
```
CC -x hip vectoradd_hip.cpp -o vectoradd_hip.exe
srun -n 1 --gpus 1 ./vectoradd_hip.exe
```
Now let’s try the cuda-stream example. This example is from the original McCalpin code as ported to CUDA by Nvidia. This version has been ported to use HIP. See add4 for another similar stream example.
```
cd HIP-Examples/cuda-stream
make
srun -n 1 ./stream
```
Note that it builds with the hipcc compiler. You should get a report of the Copy, Scale, Add, and Triad cases.
Check that we need to declare target GPU for MI250x, is the `--offload-arch=gfx90a`
Now check the other examples in `HPCTrainingExamples/HIP` like jacobi etc.
## HIPFort
HIPFort is not installed by default, if you want to install it, follow the instructions:
```
git clone https://github.com/ROCmSoftwarePlatform/hipfort hipfort-source
mkdir hipfort-build; cd hipfort-build
export HIPFORT_INSTALL_DIR=$PWD/hipfort
cmake -DHIPFORT_INSTALL_DIR=${HIPFORT_INSTALL_DIR} ../hipfort-source
make install
export PATH=${HIPFORT_INSTALL_DIR}/bin:$PATH
```
Compile and execute HIPFort example:
* `cd hipfort-source/test/f2003/vecadd`
* `hipfc -v --offload-arch=gfx90a hip_implementation.cpp main.f03`
* `srun -n 1 --gpus 1 ./a.out`
## Hipify
We’ll use the same HPCTrainingExamples that were downloaded for the first exercise.
Get a node allocation.
```
salloc -N 1 --ntasks=1 --gpus=1 -p small-g -A project_465000380 –-t 00:10:00`
```
A batch version of the example is also shown.
### Hipify Examples
#### Exercise 1: Manual code conversion from CUDA to HIP (10 min)
Choose one or more of the CUDA samples in `HPCTrainingExamples/HIPIFY/mini-nbody/cuda` directory. Manually convert it to HIP. Tip: for example, the cudaMalloc will be called hipMalloc.
Some code suggestions include `nbody-block.cu, nbody-orig.cu, nbody-soa.cu`
You’ll want to compile on the node you’ve been allocated so that hipcc will choose the correct GPU architecture.
#### Exercise 2: Code conversion from CUDA to HIP using HIPify tools (10 min)
Use the `hipify-perl` script to “hipify” the CUDA samples you used to manually convert to HIP in Exercise 1. hipify-perl is in `$ROCM_PATH/hip/bin` directory and should be in your path.
First test the conversion to see what will be converted
```
hipify-perl -no-output -print-stats nbody-orig.cu
```
You'll see the statistics of HIP APIs that will be generated.
```
[HIPIFY] info: file 'nbody-orig.cu' statistics:
CONVERTED refs count: 7
TOTAL lines of code: 91
WARNINGS: 0
[HIPIFY] info: CONVERTED refs by names:
cudaFree => hipFree: 1
cudaMalloc => hipMalloc: 1
cudaMemcpyDeviceToHost => hipMemcpyDeviceToHost: 1
cudaMemcpyHostToDevice => hipMemcpyHostToDevice: 1
```
`hipify-perl` is in `$ROCM_PATH/hip/bin` directory and should be in your path. In some versions of ROCm, the script is called `hipify-perl`.
Now let's actually do the conversion.
```
hipify-perl nbody-orig.cu > nbody-orig.cpp
```
Compile the HIP programs.
```
hipcc -DSHMOO -I ../ nbody-orig.cpp -o nbody-orig`
```
The `#define SHMOO` fixes some timer printouts. Add `--offload-arch=<gpu_type>` to specify the GPU type and avoid the autodetection issues when running on a single GPU on a node.
* Fix any compiler issues, for example, if there was something that didn’t hipify correctly.
* Be on the lookout for hard-coded Nvidia specific things like warp sizes and PTX.
Run the program
```
srun ./nbody-orig
```
A batch version of Exercise 2 is:
```
#!/bin/bash
#SBATCH -N 1
#SBATCH --ntasks=1
#SBATCH --gpus=1
#SBATCH -p small-g
#SBATCH -A project_465000380
#SBATCH -t 00:10:00
module load craype-accel-amd-gfx90a
module load rocm
cd HPCTrainingExamples/mini-nbody/cuda
hipify-perl -print-stats nbody-orig.cu > nbody-orig.cpp
hipcc -DSHMOO -I ../ nbody-orig.cpp -o nbody-orig
srun ./nbody-orig
cd ../../..
```
Notes:
* Hipify tools do not check correctness
* `hipconvertinplace-perl` is a convenience script that does `hipify-perl -inplace -print-stats` command
## OpenMP Programming
### Getting Started with OpenMP on AMD Accelerators
The goal of this exercise is to offload simple OpenMP codelets onto AMD GPUs.
By default, GNU compilers are used to build these mini-apps that can then be
executed on host (CPU).
There are two examples we’ll work with, one in C and the other in Fortran.
```
~/HPCTrainingExamples/Pragma_Examples/OpenMP_CPU/C/Make/saxpy
~/HPCTrainingExamples/Pragma_Examples/OpenMP_CPU/Fortran/Make/freduce
```
Some results of converting to run on the GPU are shown in
```
~/HPCTrainingExamples/Pragma_Examples/OpenMP/C/Make/saxpy
~/HPCTrainingExamples/Pragma_Examples/OpenMP/Fortran/Make/freduce
```
First get an allocation with a single GPU to work with.
```
salloc -N 1 --ntasks=1 --gpus=1 -p small-g -A project_465000380 --time 00:10:00
```
And load your environment.
```
module load PrgEnv-cray
module load craype-accel-amd-gfx90a
module load rocm
```
To make the changes, you will instruct the compiler to offload certain code
sections (loops) within these mini-apps.
Find the C/C++ codelet (saxpy) example, `codelet.c`
```
cd ~/HPCTrainingExamples/Pragma_Examples/OpenMP_CPU/C/Make/saxpy
vim codelet.c
```
In `codelet.c`, replace
```
#pragma omp parallel for simd
```
with
```
#pragma omp target teams distribute parallel for simd map(to: x[0:n],y[0:n]) map(from: z[0:n])
```
In `Makefile`, replace `gcc` by `cc` in `CC` to use the Cray C compiler to offload to AMD MI200 series GPU. Re-compile.
```
make
```
Try running this on your allocation
```
./saxpy
```
You should get a message like
```
ACC: libcrayacc/acc_hw_amd.c:525 CRAY_ACC_ERROR - hipInit returned hipErrorInvalidDevice: 'hipErrorInvalidDevice'
```
This is a quick way to tell that the compiler generated code for the GPU. To properly run the example, we need to be on a compute node.
Run this codelet on a compute node using an input size of your choice like 123456789.
```
srun ./saxpy 231124421
```
To try the same code with amdclang, in the Makefile, change the `CC` variable to `amdclang`. And set the `LDFLAGS` to `-fopenmp-targets=amdgcn-amd-amdhsa -Xopenmp-target=amdgcn-amd-amdhsa -march=gfx90a`. Recompile and run.
To try the version of the code that is already converted, go to
```
~/HPCTrainingExamples/Pragma_Examples/OpenMP/C/Make/saxpy
```
Then to build and run
```
make
srun ./saxpy
```
Let's run the same problem with the AMD clang compiler.
First set the compiler environment variable to use amdclang. Also set the GPU type to gfx90a.
```
export CC=amdclang
export ROCM_GPU=gfx90a
```
If you compile now, you will get an error because the compile flags are set to a later version of ROCm/amdclang. So edit the Makefile
and uncomment the first line under amdclang and comment out the other version. Now build the executable.
```
make
srun ./saxpy
```
Find the Fortran codelet
```
cd ~/HPCTrainingExamples/Pragma_Examples/OpenMP_CPU/Fortran/Make/freduce
vim freduce.F90
```
Add the following instruction just before the beginning of the innermost loop
```
!$OMP TARGET TEAMS DISTRIBUTE PARALLEL DO SIMD REDUCTION(+:sum2) &
!$OMP MAP(TO:array(1:10))
```
Add the following instruction right after the end of the innermost loop code section
```
!$OMP END TARGET TEAMS DISTRIBUTE PARALLEL DO SIMD
```
In Makefile, replace the compiler `gfortran` with `ftn` and add `-fopenmp` or `-homp`` to `LDFLAGS`.
Then compile again
```
make
```
Run this codelet on a compute node using an input size of your choice like 123456789.
```
srun ./freduce 321421
```
While running one of these codelets, open another terminal and `ssh` to the compute node you are working on. Then, run `watch -n 0.1 rocm-smi` command line from that terminal to visualize GPU activities.
Profile the codelet and then compare output by setting
```
export LIBOMPTARGET_KERNEL_TRACE=1
export LIBOMPTARGET_KERNEL_TRACE=2
```
Note:
rocminfo can be used to get target architecture information.
The new compile flag for OpenMP offload is `--offload-arch=gfx90a`. The old compile flags are: `-fopenmp-targets=amdgcn-amd-amdhsa -Xopenmp-target=amdgcn-amd-amdhsa -march=gfx90a` to enable offloading on AMD GPU MI200.
### Fortran with OpenMP offloading or OpenACC
Note: for this workshop on LUMI, the Siemen's compiler is not available. But you may want to note this
for when you are on a system where the HPE compilers are not available so that you can continue to work on
your OpenMP offloading or OpenACC code.
In this section, we’ll use the new Siemen’s compiler for OpenACC or OpenMP offloading to AMD GPUs.
First, load the Siemen's compiler in the environment
```
module load rocm-5.4.3
module load sourcery/2022-09.7
export FC=$SOURCERY_ROOT/bin/x86_64-none-linux-gnu-gfortran
```
Navigate to the OpenACC vecadd example directory
```
cd ~/HPCTrainingExamples/Pragma_Examples/OpenACC/Fortran/Make/vecadd
```
Compile
```
make
```
Note in the compiler output
```
vecadd.F:50:62: optimized: assigned OpenACC gang vector loop parallelism
```
Run the executable
```
./vecadd
```
Expected output
```
Final result: 1.000000
Runtime is: 0.102539 secs
```
Try setting
```
export GCN_DEBUG=1
```
And rerun. You should get a lot of output which confirms that the code is running on the GPU.
## Kokkos examples
### Stream Triad
#### Step 1: Build a separate Kokkos package
```
git clone https://github.com/kokkos/kokkos Kokkos_build
cd Kokkos_build
```
Build Kokkos with OpenMP backend
```
mkdir build_openmp && cd build_openmp
cmake -DCMAKE_INSTALL_PREFIX=${HOME}/Kokkos_OpenMP -DKokkos_ENABLE_SERIAL=On -DKokkos_ENABLE_OPENMP=On ..
make –j 8
make install
cd ..
```
Build Kokkos with HIP backend
```
mkdir build_hip && cd build_hip
cmake -DCMAKE_INSTALL_PREFIX=${HOME}/Kokkos_HIP -DKokkos_ENABLE_SERIAL=ON -DKokkos_ENABLE_HIP=ON -DKokkos_ARCH_ZEN=ON -DKokkos_ARCH_VEGA90A=ON -DCMAKE_CXX_COMPILER=hipcc ..
make –j 8; make install
cd ..
```
Set Kokkos_DIR to point to external Kokkos package to use
```
export Kokkos_DIR=${HOME}/Kokkos_HIP
```
#### Step 2: Modify Build
Get example
```
git clone –recursive https://github.com/EssentialsOfParallelComputing/Chapter13 Chapter13
cd Chapter13/Kokkos/StreamTriad
cd Orig
```
Test serial version with
```
mkdir build && cd build; cmake ..; make; ./StreamTriad
```
If run fails, try reducing the size of the arrays
Add to CMakeLists.txt
```
find_package(Kokkos REQUIRED)
target_link_libraries(StreamTriad Kokkos::kokkos)
```
Retest with
```
cmake ..; make
```
and run ./StreamTriad again
Check Ver1 for solution. These modifications have already been made in this version.
#### Step 3: Add Kokkos views for memory allocation of arrays
Add include file
```
#include <Kokkos_Core.hpp>
```
Add initialize and finalize
```
Kokkos::initialize(argc, argv); {
} Kokkos::finalize();
```
Replace static array declarations with Kokkos views
```
int nsize=80000000;
Kokkos::View<double *> a( "a", nsize);
Kokkos::View<double *> b( "b", nsize);
Kokkos::View<double *> c( "c", nsize);
```
Rebuild and run
#### Step 4: Add Kokkos execution pattern – parallel_for
Change for loops to Kokkos parallel fors.
At start of loop
```
Kokkos::parallel_for(nsize, KOKKOS_LAMBDA (int i) {
```
At end of loop, replace closing brace with
```
});
```
Rebuild and run. Add environment variables as Kokkos message suggests:
```
export OMP_PROC_BIND=spread
export OMP_PLACES=threads
export OMP_PROC_BIND=true
```
How much speedup do you observe?
#### Step 5: Add Kokkos timers
Add Kokkos calls
```
Kokkos::Timer timer;
timer.reset(); // for timer start
time_sum += timer.seconds();
```
Remove
```
#include <timer.h>
struct timespec tstart;
cpu_timer_start(&tstart);
time_sum += cpu_timer_stop(tstart);
```
#### 6. Run and measure performance with OpenMP
Find out how many virtual cores are on your CPU
```
lscpu
```
First run with a single processor:
Average runtime ___________
Then run the OpenMP version:
Average runtime ___________
#### Portability Exercises
1. Rebuild Stream Triad using Kokkos build with HIP
Set Kokkos_DIR to point to external Kokkos build with HIP
```
export Kokkos_DIR=${HOME}/Kokkos_HIP/lib/cmake/Kokkos_HIP
cmake ..
make
```
2. Run and measure performance with AMD Radeon GPUs
HIP build with ROCm 5.2.0+
Ver4 - Average runtime is ______ msecs
## AMD Node Memory Model
Setup environment
```
module load PrgEnv-cray
module load craype-accel-amd-gfx90a
module load rocm
```
Get a GPU allocation
```
salloc -N 1 --ntasks=1 --gpus=1 -p small-g -A project_465000380 --time 00:10:00
```
Go to `ManagedMemory` Directory
```
cd ~/HPCTrainingExamples/ManagedMemory/vectorAdd
```
Compile
```
export ROCM_GPU=gfx90a
make vectoradd_hip1.exe
```
Run
```
srun ./vectoradd_hip1.exe
```
Change to a managed memory version
- Replace all instances of the word `host` to `vector`
- Replace all instances of the word `device` to `vector`
- Delete Duplicate `vector` Declarations
- Move both allocations (malloc and hipMalloc) above for loop initialization
- Comment out all lines containing hipMemcpy
- Add `hipDeviceSynchronize();` after the kernel launch
First Experiment: Comment out `hipMalloc` and `hipFree` lines and recompile
Note: This is already done for you in the vectoradd_hip2.cpp file
```
make vectoradd_hip1.exe
```
Run ( Test should fail with a Memory Access Fault )
```
srun ./vectoradd_hip1.exe
```
Re-run with `HSA_XNACK=1` ( Test should pass )
```
export HSA_XNACK=1
srun ./vectoradd_hip1.exe
unset HSA_XNACK
```
Second Experiment: Comment out `malloc` and `free` lines instead of `hipMalloc` and `hipFree` lines and recompile
Note: see vectoradd_hip3.cpp for the changes applied for you.
```
make vectoradd_hip1.exe
```
Run with `HSA_XNACK=0` or unset with `unset HSA_XNACK` ( Test should pass )
```
export HSA_XNACK=0
srun ./vectoradd_hip1.exe
unset HSA_XNACK
```
## OpenMP Atomics
The examples for this exercise are in ~/HPCTrainingExamples/atomics_openmp.
Set up your environment
```
module load PrgEnv-cray
module load craype-accel-amd-gfx90a
module load rocm
```
Set C Compiler
```
export CC=amdclang
```
Find the `arraysum1.c` file
```
cd ~/HPCTrainingExamples/atomics_openmp
vim arraysum1.c
```
Key lines
```
#pragma omp target teams distribute parallel for map(tofrom: a[:n]) map(to: b[:n])
for(int i = 0; i < n; i++) {
a[i] += b[i];
}
```
First edit the Makefile and uncomment the line
```
# OPENMP_FLAGS = -fopenmp -target $(ROCM_CPUTARGET) -fopenmp-targets=$(ROCM_GPUTARGET) -Xopenmp-target=$(ROCM_GPUTARGET) -march=$(ROCM_GPU)
```
and comment out the line
```
OPENMP_FLAGS = -fopenmp -target $(ROCM_CPUTARGET) --offload-arch=$(ROCM_GPU)
```
Compile `arraysum1`.
```
make arraysum1
```
Run
```
srun ./arraysum1
```
Remove map clause from the pragma in `arraysum1.c`.
Add the following before `main` function
```
#pragma omp requires unified_shared_memory
```
The code must now look like arraysum2.c.
Compile `arraysum2`
```
make arraysum2
```
Run `arraysum2` it should fail with a Memory Access Fault
```
srun ./arraysum2
```
Running `arraysum2` with `HSA_XNACK=1` ( Test should pass )
```
export HSA_XNACK=1
srun ./arraysum2
```
The memory in the main loop remains coarse-grained even though a map clause is not used. Once the memory is allocated, it stays that type. Note that the initialization loop is not run in parallel on the GPU. How would you fix that?
Skip to `arraysum8.c`
Key loop shown below
```
#pragma omp target teams distribute parallel for
for(int i = 0; i < n; i++) {
#pragma omp atomic hint(AMD_fast_fp_atomics)
ret += b[i];
}
```
Compile `arraysum8`
```
make arraysum8
```
Run `arraysum8`
```
srun ./arraysum8
```
This test should fail because the memory is fine-grained. Add the map clause to the pragma as implemented in arraysum9.c. Note that the ret variable also needs to be mapped.
Map clause in `arraysum9.c`
```
map(to: b[:n]) map(tofrom: ret)
```
Compile `arraysum9`
```
make arraysum9
```
Run `arraysum9` ( It should pass now )
```
export HSA_XNACK=1
./arraysum9
```
Note that if you `unset HSA_XNACK` and run the arraysum9 executable, you may get an incorrect result
Another solution to fix the problem is to change the atomic pragma to a safe version. This is shown in `arraysum10.c`. (This may require a newer version of the AMD clang compiler.)
```
#pragma omp atomic hint(AMD_safe_fp_atomics)
```
The safe atomic will use a compare and swap (CAS) loop instead of an atomic add. This will work, but it will likely be slower.
The examples in `arraysum4.c` to `arraysum7.c` show the same atomic behavior with add the elements of array `b` to array `a` and storing it back to array `a`.
## GPU Aware MPI
### Point-to-point and collective
Allocate at least two GPUs and set up your environment
```
salloc --account=project_XXX --partition XX -N 1 --gres=gpu:8 –ntasks=8 –time=00:15:00
module load CrayEnv
module load craype-accel-amd-gfx90a
module load rocm/5.2.3
module load cray-mpich/8.1.18
```
Find the code and compile
```
cd HPCTrainingExamples/MPI-examples
hipcc -o ./pt2pt ./pt2pt.cpp -I/opt/cray/pe/mpich/8.1.18/ofi/cray/10.0/include/ -L/opt/cray/pe/mpich/8.1.18/ofi/cray/10.0/lib -L/opt/cray/pe/mpich/8.1.18/gtl/lib/ -lmpi -lmpi_gtl_hsa
```
Set the environment variable and run the code
```
export MPICH_GPU_SUPPORT_ENABLED=1
srun -N 1 -n 2 ./pt2pt
```
### OSU Benchmark
Get the OSU micro-benchmark tarball and extract it
```
mkdir OMB
cd OMB
wget https://mvapich.cse.ohio-state.edu/download/mvapich/osu-micro-benchmarks-7.1-1.tar.gz
tar -xvf osu-micro-benchmarks-7.1-1.tar.gz
```
Create a build directory and cd to osu-micro-benchmarks-7.1-1
```
mkdir build
cd osu-micro-benchmarks-7.1-1
```
Build and install OSU micro-benchmarks
```
./configure --prefix=$HOME/OMB/build/ CC=/opt/cray/pe/craype/2.7.19/bin/cc CXX=/opt/cray/pe/craype/2.7.19/bin/CC --enable-rocm --with-rocm=/opt/rocm-5.2.3/ LDFLAGS="-L/opt/cray/pe/mpich/8.1.18/gtl/lib/ /opt/cray/pe/mpich/8.1.18/gtl/lib/libmpi_gtl_hsa.so"
make -j12
make install
```
After make -j12 and make install, you might get some errors related to upc_memcpy. You can ignore these errors.
Check if osu microbenchmark is actually built
```
ls $HOME/OMB/build/libexec/osu-micro-benchmarks/mpi/
```
if you see files collective, one-sided, pt2pt, and startup under $HOME/OMB/build/libexec/osu-micro-benchmarks/mpi/, your build is succesful.
Allocate 2 GPUs, and make those visible
```
export HIP_VISIBLE_DEVICES=0,1
```
Make sure GPU-Aware communication is enabled and run the benchmark
```
export MPICH_GPU_SUPPORT_ENABLED=1
srun -N 1 -n 2 $HOME/OMB/build/libexec/osu-micro-benchmarks/mpi/pt2pt/osu_bw -m $((16*1024*1024)):$((16*1024*1024)) D D
```
Notes:
- Try different pairs of GPUs. How does the bandwidth vary?
- Try different communication options (blit kernel and SDMA) using the env variable HSA_ENABLE_SDMA. How does the bandwidth vary?
## Affinity
### Set up your environment
```
module load PrgEnv-gnu
module load craype-accel-amd-gfx90a
module load rocm
```
### Understanding your system
Try the following commands to learn more about how the system is configured and what cores and GCDs belong to each NUMA domain:
View System Configuration using lstopo from the hwloc package:
```
lstopo -p out.svg
```
Copy the out.svg file to your workstation to view:
```
rsync -avz <USERNAME>@lumi:~/out.svg .
```
Check CPU configuration. Note number of sockets, cores per socket, threads per core, NUMA domains, etc.:
```
lscpu
```
Check NUMA configuration:
```
numactl -H
```
Check how the GPU affinities are set up:
```
rocm-smi --showtoponuma
```
### Allocating and Running with Slurm on LUMI
On LUMI, correct slurm binding is a little tricky to accomplish. It involves a two-step process. First an allocation must be made using `salloc` and then a subsequent `srun` command can be submitted to run on the allocation you have.
#### Step 1: Allocate required resources
This example `salloc` command shows how to allocate the resources you need:
```
export MYPROJ=<your_project>
N=1; salloc -A $MYPROJ -p small-g -N $N --gpus $((N*8)) --threads-per-core 1 --mem 0 --exclusive -t 05:00
```
Each parameter is critical for successful binding when we run jobs later:
`--mem 0` allocates all CPU memory on requested node(s) <br>
`--exclusive` allocates all cores on requested node(s) <br>
`--threads-per-core 1` turns off hyperthreading to have 1 hardware thread per core <br>
`--gpus` allocates the requested number of GPUs <br>
#### Step 2: Run your application
This example `srun` command shows how to run an application:
```
N=1; c=fe; MYMASK="0x${c}000000000000,0x${c}00000000000000,0x${c}0000,0x${c}000000,0x${c},0x${c}00,0x${c}00000000,0x${c}0000000000"; srun -A $MYPROJ -p small-g -N $N --gpus $((N*8)) --threads-per-core 1 -n $((N*8)) --cpu-bind=mask_cpu:$MYMASK ./myapp
```
Here, a few extra options are used:
`-n` specifies number of processes to run <br>
`--cpu-bind=mask_cpu` takes a bitmask that represents the set of cores for each task (and its threads). The mask shown here allocates 7 cores from each CCD for each task. The order of cores chosen is derived from the topology of LUMI. A quick guide to the set of cores closest to each GCD in a LUMI node is shown below:
| GCD ID | CPU Set |
|--------|---------|
| 0 | 48-55 |
| 1 | 56-63 |
| 2 | 16-23 |
| 3 | 24-31 |
| 4 | 00-07 |
| 5 | 08-15 |
| 6 | 32-39 |
| 7 | 40-47 |
We will see a script shortly that helps generate the mask you need.
Note: do not specify `--exclusive` in the `srun` command, this does not work on LUMI
### Verifying Process and Thread Binding
#### Case 1. MPI + OpenMP
Here, we will experiment with a serial program (only one process) that has
OpenMP support and try to pin different hardware threads to each process’
OpenMP threads (`OMP_PLACES`, `OMP_NUM_THREADS`). In addition, we will ensure
that all threads of a given process run on cores that are close to the
primary thread’s core (`OMP_PROC_BIND`).
Set up environment and allocate a node:
```
module load PrgEnv-gnu
export MYPROJ=<your_project>
N=1; salloc -A $MYPROJ -p small-g -N $N --gpus $((N*8)) --threads-per-core 1 --mem 0 --exclusive -t 05:00
```
Download `hello_mpi_omp.c` and `Makefile` from [hello_mpi_omp](https://code.ornl.gov/olcf/hello_mpi_omp) repo:
```
git clone https://code.ornl.gov/olcf/hello_mpi_omp.git
cd hello_mpi_omp/
```
Compile
```
make
```
Run the commands:
##### Run 4 ranks, 2 OpenMP threads per rank
```
export OMP_NUM_THREADS=2
export OMP_PLACES=threads
export OMP_PROC_BIND=close
srun -p small-g -A ${MYPROJ} -n 4 -c ${OMP_NUM_THREADS} ./hello_mpi_omp
```
You should see the two threads of each rank pinned to different hardware threads (HWT),
placed closely and sharing L3 cache:
```
MPI 001 - OMP 000 - HWT 003 - Node nid007564
MPI 001 - OMP 001 - HWT 004 - Node nid007564
MPI 002 - OMP 000 - HWT 005 - Node nid007564
MPI 002 - OMP 001 - HWT 006 - Node nid007564
MPI 003 - OMP 000 - HWT 007 - Node nid007564
MPI 003 - OMP 001 - HWT 008 - Node nid007564
MPI 000 - OMP 000 - HWT 001 - Node nid007564
MPI 000 - OMP 001 - HWT 002 - Node nid007564
```
Note: Core 0 is reserved for system operations, so only cores 1-8 got allocated.
##### Run 2 ranks, 2 OpenMP threads per rank
```
export OMP_NUM_THREADS=2
export OMP_PLACES=threads
export OMP_PROC_BIND=close
srun -p small-g -A ${MYPROJ} -n 2 –c ${OMP_NUM_THREADS} ./hello_mpi_omp
```
You should see the following output, each thread of a process pinned to
a different physical core (HWT), packed closely and sharing L3 cache:
```
MPI 000 - OMP 000 - HWT 001 - Node nid007564
MPI 000 - OMP 001 - HWT 002 - Node nid007564
MPI 001 - OMP 000 - HWT 003 - Node nid007564
MPI 001 - OMP 001 - HWT 004 - Node nid007564
```
#### Case 2. MPI + OpenMP + HIP
Here, we will explore a standalone that has support for MPI, OpenMP and HIP. Our goal is to set up affinity for CPU cores as well as GPU devices such that a given process is assigned cores and GPU devices belonging to the same NUMA domain.
Load necessary modules in the environment:
```
module load PrgEnv-gnu
module load craype-accel-amd-gfx90a
module load rocm
```
Download hello_jobstep.cpp from the [hello_jobstep](https://code.ornl.gov/olcf/hello_jobstep) repo:
```
git clone https://code.ornl.gov/olcf/hello_jobstep.git
cd hello_jobstep/
```
Modify Makefile with the contents below, remember to replace spaces in the beginning of rules with tabs.
```
SOURCES = hello_jobstep.cpp
OBJECTS = $(SOURCES:.cpp=.o)
EXECUTABLE = hello_jobstep
CXX=CC
CXXFLAGS = -fopenmp -I${ROCM_PATH}/include -D__HIP_PLATFORM_AMD__
LDFLAGS = -L${ROCM_PATH}/lib -lhsa-runtime64 -lamdhip64
all: ${EXECUTABLE}
%.o: %.cpp
$(CXX) $(CXXFLAGS) -o $@ -c $<
$(EXECUTABLE): $(OBJECTS)
$(CXX) $(CXXFLAGS) $(OBJECTS) -o $@ $(LDFLAGS)
clean:
rm -f $(EXECUTABLE)
rm -f $(OBJECTS)
```
Compile
```
make
```
Allocate a node:
```
export MYPROJ=<your_project>
N=1; salloc -A $MYPROJ -p small-g -N $N --gpus $((N*8)) --threads-per-core 1 --mem 0 --exclusive -t 05:00
```
Run Commands
##### Run 8 ranks, 1 threads per rank, all GCDs visible to each rank
We use the slurm option `--cpu-bind=mask_cpu` to set up CPU binding with a mask for the set of CPU cores that each process may be scheduled on.
```
export OMP_NUM_THREADS=1
N=1; c=fe; MYMASK="0x${c}000000000000,0x${c}00000000000000,0x${c}0000,0x${c}000000,0x${c},0x${c}00,0x${c}00000000,0x${c}0000000000"; srun -A ${MYPROJ} -p small-g -N $N --gpus $((N*8)) --threads-per-core 1 -n $((N*8)) --cpu-bind=mask_cpu:$MYMASK ./hello_jobstep
```
Output will be similar to this:
```
MPI 000 - OMP 000 - HWT 049 - Node nid007502 - RT_GPU_ID 0,1,2,3,4,5,6,7 - GPU_ID 0,1,2,3,4,5,6,7 - Bus_ID c1,c6,c9,ce,d1,d6,d9,de
MPI 001 - OMP 000 - HWT 057 - Node nid007502 - RT_GPU_ID 0,1,2,3,4,5,6,7 - GPU_ID 0,1,2,3,4,5,6,7 - Bus_ID c1,c6,c9,ce,d1,d6,d9,de
MPI 006 - OMP 000 - HWT 033 - Node nid007502 - RT_GPU_ID 0,1,2,3,4,5,6,7 - GPU_ID 0,1,2,3,4,5,6,7 - Bus_ID c1,c6,c9,ce,d1,d6,d9,de
MPI 007 - OMP 000 - HWT 041 - Node nid007502 - RT_GPU_ID 0,1,2,3,4,5,6,7 - GPU_ID 0,1,2,3,4,5,6,7 - Bus_ID c1,c6,c9,ce,d1,d6,d9,de
MPI 002 - OMP 000 - HWT 017 - Node nid007502 - RT_GPU_ID 0,1,2,3,4,5,6,7 - GPU_ID 0,1,2,3,4,5,6,7 - Bus_ID c1,c6,c9,ce,d1,d6,d9,de
MPI 003 - OMP 000 - HWT 025 - Node nid007502 - RT_GPU_ID 0,1,2,3,4,5,6,7 - GPU_ID 0,1,2,3,4,5,6,7 - Bus_ID c1,c6,c9,ce,d1,d6,d9,de
MPI 004 - OMP 000 - HWT 001 - Node nid007502 - RT_GPU_ID 0,1,2,3,4,5,6,7 - GPU_ID 0,1,2,3,4,5,6,7 - Bus_ID c1,c6,c9,ce,d1,d6,d9,de
MPI 005 - OMP 000 - HWT 009 - Node nid007502 - RT_GPU_ID 0,1,2,3,4,5,6,7 - GPU_ID 0,1,2,3,4,5,6,7 - Bus_ID c1,c6,c9,ce,d1,d6,d9,de
```
You will notice that one hardware thread from each core set has been selected for each task. All GPU devices are available for each task.
##### Run 8 processes on node, 2 threads per rank, 1 GCD per rank
To select a specific GPU device for each task, run your application the following helper script that sets up ROCR_VISIBLE_DEVICES for each task based on its SLURM_LOCALID.
```
$ cat set_gpu_device.sh
#!/bin/bash
export ROCR_VISIBLE_DEVICES=$SLURM_LOCALID
exec $*
```
Now run your application using the helper script, this time with 2 OMP threads per process:
```
export OMP_NUM_THREADS=2
N=1; c=fe; MYMASK="0x${c}000000000000,0x${c}00000000000000,0x${c}0000,0x${c}000000,0x${c},0x${c}00,0x${c}00000000,0x${c}0000000000"; srun -A ${MYPROJ} -p small-g -N $N --gpus $((N*8)) --threads-per-core 1 -n $((N*8)) --cpu-bind=mask_cpu:$MYMASK ./set_gpu_device.sh ./hello_jobstep
```
The output will look similar to this:
```
MPI 001 - OMP 000 - HWT 058 - Node nid007503 - RT_GPU_ID 0 - GPU_ID 1 - Bus_ID c6
MPI 001 - OMP 001 - HWT 059 - Node nid007503 - RT_GPU_ID 0 - GPU_ID 1 - Bus_ID c6
MPI 003 - OMP 000 - HWT 025 - Node nid007503 - RT_GPU_ID 0 - GPU_ID 3 - Bus_ID ce
MPI 003 - OMP 001 - HWT 026 - Node nid007503 - RT_GPU_ID 0 - GPU_ID 3 - Bus_ID ce
MPI 005 - OMP 000 - HWT 009 - Node nid007503 - RT_GPU_ID 0 - GPU_ID 5 - Bus_ID d6
MPI 005 - OMP 001 - HWT 010 - Node nid007503 - RT_GPU_ID 0 - GPU_ID 5 - Bus_ID d6
MPI 004 - OMP 000 - HWT 001 - Node nid007503 - RT_GPU_ID 0 - GPU_ID 4 - Bus_ID d1
MPI 004 - OMP 001 - HWT 002 - Node nid007503 - RT_GPU_ID 0 - GPU_ID 4 - Bus_ID d1
MPI 000 - OMP 000 - HWT 050 - Node nid007503 - RT_GPU_ID 0 - GPU_ID 0 - Bus_ID c1
MPI 000 - OMP 001 - HWT 051 - Node nid007503 - RT_GPU_ID 0 - GPU_ID 0 - Bus_ID c1
MPI 002 - OMP 000 - HWT 018 - Node nid007503 - RT_GPU_ID 0 - GPU_ID 2 - Bus_ID c9
MPI 002 - OMP 001 - HWT 019 - Node nid007503 - RT_GPU_ID 0 - GPU_ID 2 - Bus_ID c9
MPI 006 - OMP 000 - HWT 033 - Node nid007503 - RT_GPU_ID 0 - GPU_ID 6 - Bus_ID d9
MPI 006 - OMP 001 - HWT 034 - Node nid007503 - RT_GPU_ID 0 - GPU_ID 6 - Bus_ID d9
MPI 007 - OMP 000 - HWT 041 - Node nid007503 - RT_GPU_ID 0 - GPU_ID 7 - Bus_ID de
MPI 007 - OMP 001 - HWT 042 - Node nid007503 - RT_GPU_ID 0 - GPU_ID 7 - Bus_ID de
```
###### Generating the CPU Mask
To generate the mask we need, the following helper python script can be used. Let’s say, we want to run with 8 tasks, 7 threads per task and want to skip the first core of each CCD (Core-Complex Die) or core set. The following script is set up to spit out the mask we need:
```
$ cat generate_mask.py
#!/usr/bin/env python3
cpu_of_rank_thread = [ # sparing first core of each 8-core CCD
[49,50,51,52,53,54,55] , # local rank 0
[57,58,59,60,61,62,63] , # local rank 1
[17,18,19,20,21,22,23] , # local rank 2
[25,26,27,28,29,30,31] , # local rank 3
[ 1, 2, 3, 4, 5, 6, 7] , # local rank 4
[ 9,10,11,12,13,14,15] , # local rank 5
[33,34,35,36,37,38,39] , # local rank 6
[41,42,43,44,45,46,47] ] # local rank 7
num_ranks = len(cpu_of_rank_thread)
mask = ""
for rank in range(num_ranks):
sum = 0
num_threads_this_rank = len(cpu_of_rank_thread[rank])
for thread in range( num_threads_this_rank ):
cpu = cpu_of_rank_thread[rank][thread]
two_pow = 2 ** cpu
sum += two_pow
if thread == num_threads_this_rank - 1:
if rank > 0:
mask += ","
mask += hex(sum)
if rank == num_ranks - 1:
print("mask=", mask)
print(mask.replace("0x",""))
```
Running this will spit out the mask we had used in the examples above:
```
$ python3 generate_mask.py
mask= 0xfe000000000000,0xfe00000000000000,0xfe0000,0xfe000000,0xfe,0xfe00,0xfe00000000,0xfe0000000000
```
##### Run fully packed on node with 2 ranks per GCD, 3 threads per rank
In this case, we want to closely pack the ranks on the GCDs also. If there are 16 ranks running on the node, we would like to have ranks 0 and 1 running on GCD 0, ranks 2 and 3 running on GCD 1, and so on. Due to low noise mode, we are limited to having a maximum of 3 threads per rank.
To closely allocate ranks to GCDs, a slight modification to the GPU device selection script is required:
```
$ cat set_gpu_device_multirank.sh
#!/bin/bash
export ranks_per_node=$(($SLURM_NTASKS/$SLURM_NNODES))
let NUM_GPUS=8
let ranks_per_gpu=$(((${ranks_per_node}+${NUM_GPUS}-1)/${NUM_GPUS}))
let my_gpu=$(($SLURM_LOCALID/$ranks_per_gpu))
export ROCR_VISIBLE_DEVICES=$my_gpu
exec $*
```
In addition, a new mask will be needed too so that the three threads of each rank are closely packed together so that they run on the same chiplet and share L3 cache.
```
$ cat generate_mask_lumi_order_16ranks.py
#!/usr/bin/env python3
# Due to low noise mode, we are unable to provide 4 cores to each rank
cpu_of_rank_thread = [ # sparing first and last core of each 8-core CCD
[49,50,51] , # local rank 0
[52,53,54] , # local rank 1
[57,58,59] , # local rank 2
[60,61,62] , # local rank 3
[17,18,19] , # local rank 4
[20,21,22] , # local rank 5
[25,26,27] , # local rank 6
[28,29,30] , # local rank 7
[ 1, 2, 3] , # local rank 8
[ 4, 5, 6] , # local rank 9
[ 9,10,11] , # local rank 10
[12,13,14] , # local rank 11
[33,34,35] , # local rank 12
[36,37,38] , # local rank 13
[41,42,43] , # local rank 14
[44,45,46] ] # local rank 15
num_ranks = len(cpu_of_rank_thread)
mask = ""
for rank in range(num_ranks):
sum = 0
num_threads_this_rank = len(cpu_of_rank_thread[rank])
for thread in range( num_threads_this_rank ):
cpu = cpu_of_rank_thread[rank][thread]
two_pow = 2 ** cpu
sum += two_pow
if thread == num_threads_this_rank - 1:
if rank > 0:
mask += ","
mask += hex(sum)
if rank == num_ranks - 1:
print("mask=", mask)
print(mask.replace("0x",""))
```
To generate the mask, type:
```
$ python3 generate_mask_lumi_order_16ranks.py
mask= 0xe000000000000,0x70000000000000,0xe00000000000000,0x7000000000000000,0xe0000,0x700000,0xe000000,0x70000000,0xe,0x70,0xe00,0x7000,0xe00000000,0x7000000000,0xe0000000000,0x700000000000
```
Now, run the job to test whether the binding is as expected:
```
$ export MYPROJ=<your_project>
$ module load PrgEnv-gnu
$ module load craype-accel-amd-gfx90a
$ module load rocm
$ N=1; salloc -A $MYPROJ -p small-g -N $N --gpus $((N*8)) --threads-per-core 1 --mem 0 --exclusive -t 05:00
$ export OMP_NUM_THREADS=3
$ N=1; MYMASK="0xe000000000000,0x70000000000000,0xe00000000000000,0x7000000000000000,0xe0000,0x700000,0xe000000,0x70000000,0xe,0x70,0xe00,0x7000,0xe00000000,0x7000000000,0xe0000000000,0x700000000000"; srun -A ${MYPROJ} -p small-g -N $N --gpus $((N*8)) --threads-per-core 1 -n $((N*8*2)) --cpu-bind=mask_cpu:$MYMASK ./set_gpu_device_multirank.sh ./hello_jobstep
```
The output will look similar to this:
```
MPI 005 - OMP 000 - HWT 020 - Node nid007415 - RT_GPU_ID 0 - GPU_ID 2 - Bus_ID c9
MPI 005 - OMP 002 - HWT 022 - Node nid007415 - RT_GPU_ID 0 - GPU_ID 2 - Bus_ID c9
MPI 005 - OMP 001 - HWT 021 - Node nid007415 - RT_GPU_ID 0 - GPU_ID 2 - Bus_ID c9
MPI 015 - OMP 000 - HWT 044 - Node nid007415 - RT_GPU_ID 0 - GPU_ID 7 - Bus_ID de
MPI 015 - OMP 002 - HWT 046 - Node nid007415 - RT_GPU_ID 0 - GPU_ID 7 - Bus_ID de
MPI 015 - OMP 001 - HWT 045 - Node nid007415 - RT_GPU_ID 0 - GPU_ID 7 - Bus_ID de
MPI 014 - OMP 000 - HWT 041 - Node nid007415 - RT_GPU_ID 0 - GPU_ID 7 - Bus_ID de
MPI 014 - OMP 002 - HWT 043 - Node nid007415 - RT_GPU_ID 0 - GPU_ID 7 - Bus_ID de
MPI 014 - OMP 001 - HWT 042 - Node nid007415 - RT_GPU_ID 0 - GPU_ID 7 - Bus_ID de
MPI 006 - OMP 000 - HWT 025 - Node nid007415 - RT_GPU_ID 0 - GPU_ID 3 - Bus_ID ce
MPI 006 - OMP 001 - HWT 026 - Node nid007415 - RT_GPU_ID 0 - GPU_ID 3 - Bus_ID ce
MPI 006 - OMP 002 - HWT 027 - Node nid007415 - RT_GPU_ID 0 - GPU_ID 3 - Bus_ID ce
MPI 012 - OMP 000 - HWT 033 - Node nid007415 - RT_GPU_ID 0 - GPU_ID 6 - Bus_ID d9
MPI 012 - OMP 001 - HWT 034 - Node nid007415 - RT_GPU_ID 0 - GPU_ID 6 - Bus_ID d9
MPI 012 - OMP 002 - HWT 035 - Node nid007415 - RT_GPU_ID 0 - GPU_ID 6 - Bus_ID d9
MPI 013 - OMP 000 - HWT 036 - Node nid007415 - RT_GPU_ID 0 - GPU_ID 6 - Bus_ID d9
MPI 013 - OMP 002 - HWT 038 - Node nid007415 - RT_GPU_ID 0 - GPU_ID 6 - Bus_ID d9
MPI 013 - OMP 001 - HWT 037 - Node nid007415 - RT_GPU_ID 0 - GPU_ID 6 - Bus_ID d9
MPI 007 - OMP 000 - HWT 028 - Node nid007415 - RT_GPU_ID 0 - GPU_ID 3 - Bus_ID ce
MPI 007 - OMP 001 - HWT 029 - Node nid007415 - RT_GPU_ID 0 - GPU_ID 3 - Bus_ID ce
MPI 007 - OMP 002 - HWT 030 - Node nid007415 - RT_GPU_ID 0 - GPU_ID 3 - Bus_ID ce
MPI 004 - OMP 000 - HWT 017 - Node nid007415 - RT_GPU_ID 0 - GPU_ID 2 - Bus_ID c9
MPI 004 - OMP 001 - HWT 018 - Node nid007415 - RT_GPU_ID 0 - GPU_ID 2 - Bus_ID c9
MPI 004 - OMP 002 - HWT 019 - Node nid007415 - RT_GPU_ID 0 - GPU_ID 2 - Bus_ID c9
MPI 010 - OMP 000 - HWT 009 - Node nid007415 - RT_GPU_ID 0 - GPU_ID 5 - Bus_ID d6
MPI 010 - OMP 001 - HWT 010 - Node nid007415 - RT_GPU_ID 0 - GPU_ID 5 - Bus_ID d6
MPI 010 - OMP 002 - HWT 011 - Node nid007415 - RT_GPU_ID 0 - GPU_ID 5 - Bus_ID d6
MPI 008 - OMP 000 - HWT 001 - Node nid007415 - RT_GPU_ID 0 - GPU_ID 4 - Bus_ID d1
MPI 008 - OMP 001 - HWT 002 - Node nid007415 - RT_GPU_ID 0 - GPU_ID 4 - Bus_ID d1
MPI 008 - OMP 002 - HWT 003 - Node nid007415 - RT_GPU_ID 0 - GPU_ID 4 - Bus_ID d1
MPI 009 - OMP 000 - HWT 004 - Node nid007415 - RT_GPU_ID 0 - GPU_ID 4 - Bus_ID d1
MPI 009 - OMP 001 - HWT 005 - Node nid007415 - RT_GPU_ID 0 - GPU_ID 4 - Bus_ID d1
MPI 009 - OMP 002 - HWT 006 - Node nid007415 - RT_GPU_ID 0 - GPU_ID 4 - Bus_ID d1
MPI 011 - OMP 000 - HWT 012 - Node nid007415 - RT_GPU_ID 0 - GPU_ID 5 - Bus_ID d6
MPI 011 - OMP 002 - HWT 014 - Node nid007415 - RT_GPU_ID 0 - GPU_ID 5 - Bus_ID d6
MPI 011 - OMP 001 - HWT 013 - Node nid007415 - RT_GPU_ID 0 - GPU_ID 5 - Bus_ID d6
MPI 001 - OMP 000 - HWT 052 - Node nid007415 - RT_GPU_ID 0 - GPU_ID 0 - Bus_ID c1
MPI 001 - OMP 001 - HWT 053 - Node nid007415 - RT_GPU_ID 0 - GPU_ID 0 - Bus_ID c1
MPI 001 - OMP 002 - HWT 054 - Node nid007415 - RT_GPU_ID 0 - GPU_ID 0 - Bus_ID c1
MPI 003 - OMP 000 - HWT 060 - Node nid007415 - RT_GPU_ID 0 - GPU_ID 1 - Bus_ID c6
MPI 003 - OMP 002 - HWT 062 - Node nid007415 - RT_GPU_ID 0 - GPU_ID 1 - Bus_ID c6
MPI 003 - OMP 001 - HWT 061 - Node nid007415 - RT_GPU_ID 0 - GPU_ID 1 - Bus_ID c6
MPI 002 - OMP 000 - HWT 057 - Node nid007415 - RT_GPU_ID 0 - GPU_ID 1 - Bus_ID c6
MPI 002 - OMP 001 - HWT 058 - Node nid007415 - RT_GPU_ID 0 - GPU_ID 1 - Bus_ID c6
MPI 002 - OMP 002 - HWT 059 - Node nid007415 - RT_GPU_ID 0 - GPU_ID 1 - Bus_ID c6
MPI 000 - OMP 000 - HWT 049 - Node nid007415 - RT_GPU_ID 0 - GPU_ID 0 - Bus_ID c1
MPI 000 - OMP 001 - HWT 050 - Node nid007415 - RT_GPU_ID 0 - GPU_ID 0 - Bus_ID c1
MPI 000 - OMP 002 - HWT 051 - Node nid007415 - RT_GPU_ID 0 - GPU_ID 0 - Bus_ID c1
```
## rocprof
Setup environment
```
salloc -N 1 --gpus=8 -p small-g --exclusive -A project_465000380 -t 20:00
module load PrgEnv-cray
module load craype-accel-amd-gfx90a
module load rocm
```
Download examples repo and navigate to the `HIPIFY` exercises
```
cd ~/HPCTrainingExamples/HIPIFY/mini-nbody/hip/
```
Compile and run one case. We are on the front-end node, so we have two ways to compile for the
GPU that we want to run on.
1. The first is to explicitly set the GPU archicture when compiling (We are effectively cross-compiling for a GPU that is present where we are compiling).
```
hipcc -I../ -DSHMOO --offload-arch=gfx90a nbody-orig.cpp -o nbody-orig
```
2. The other option is to compile on the compute node where the compiler will auto-detect which GPU is present. Note that the autodetection may fail if you do not have all the GPUs (depending on the ROCm version). If that occurs, you will need to set `export ROCM_GPU=gfx90a`.
```
srun hipcc -I../ -DSHMOO nbody-orig.cpp -o nbody-orig
```
Now Run `rocprof` on nbody-orig to obtain hotspots list
```
srun rocprof --stats nbody-orig 65536
```
Check Results
```
cat results.csv
```
Check the statistics result file, one line per kernel, sorted in descending order of durations
```
cat results.stats.csv
```
Using `--basenames on` will show only kernel names without their parameters.
```
srun rocprof --stats --basenames on nbody-orig 65536
```
Check the statistics result file, one line per kernel, sorted in descending order of durations
```
cat results.stats.csv
```
Trace HIP calls with `--hip-trace`
```
srun rocprof --stats --hip-trace nbody-orig 65536
```
Check the new file `results.hip_stats.csv`
```
cat results.hip_stats.csv
```
Profile also the HSA API with the `--hsa-trace`
```
srun rocprof --stats --hip-trace --hsa-trace nbody-orig 65536
```
Check the new file `results.hsa_stats.csv`
```
cat results.hsa_stats.csv
```
On your laptop, download `results.json`
```
scp -i <HOME_DIRECTORY>/.ssh/<public ssh key file> <username>@lumi.csc.fi:<path_to_file>/results.json results.json
```
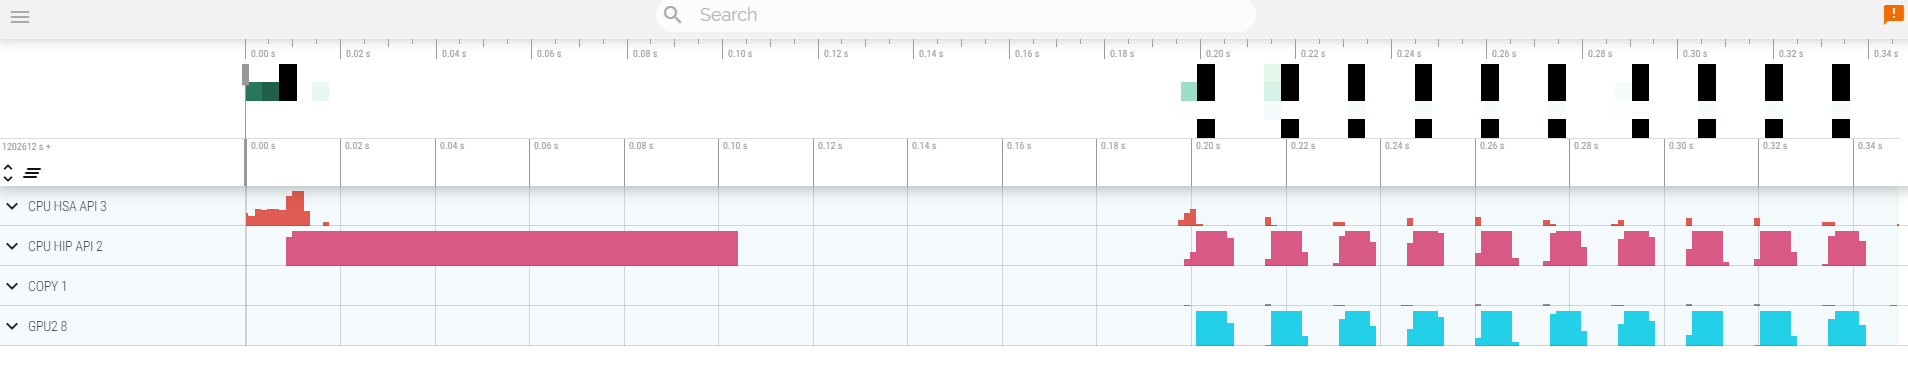
Open a browser and go to [https://ui.perfetto.dev/](https://ui.perfetto.dev/).
Click on `Open trace file` in the top left corner.
Navigate to the `results.json` you just downloaded.
Use the keys WASD to zoom in and move right and left in the GUI
```
Navigation
w/s Zoom in/out
a/d Pan left/right
```
Read about hardware counters available for the GPU on this system (look for gfx90a section)
```
less $ROCM_PATH/lib/rocprofiler/gfx_metrics.xml
```
Create a `rocprof_counters.txt` file with the counters you would like to collect
```
vi rocprof_counters.txt
```
Content for `rocprof_counters.txt`:
```
pmc : Wavefronts VALUInsts
pmc : SALUInsts SFetchInsts GDSInsts
pmc : MemUnitBusy ALUStalledByLDS
```
Execute with the counters we just added:
```
srun rocprof --timestamp on -i rocprof_counters.txt nbody-orig 65536
```
You'll notice that `rocprof` runs 3 passes, one for each set of counters we have in that file.
Contents of `rocprof_counters.csv`
```
cat rocprof_counters.csv
```
## Omnitrace
* Load Omnitrace
```
module load LUMI/22.08 partition/G rocm/5.3.3
module use /project/project_465000380/software/omnitrace_rocm533/share/modulefiles/
module load omnitrace/1.10.0
```
* Allocate resources with `salloc`
`salloc -N 1 --ntasks=1 --partition=small-g --gpus=1 -A project_465000380 --time=00:15:00`
* Check the various options and their values and also a second command for description
`srun -n 1 --gpus 1 omnitrace-avail --categories omnitrace`
`srun -n 1 --gpus 1 omnitrace-avail --categories omnitrace --brief --description`
* Create an Omnitrace configuration file with description per option
`srun -n 1 omnitrace-avail -G omnitrace.cfg --all`
* Declare to use this configuration file:
`export OMNITRACE_CONFIG_FILE=/path/omnitrace.cfg`
* Get the training examples:
`cp -r /project/project_465000380/exercises/HPCTrainingExamples/ .`
* Compile and execute saxpy
* `cd HPCTrainingExamples/HIP/saxpy`
* `hipcc --offload-arch=gfx90a -O3 -o saxpy saxpy.cpp`
* `time srun -n 1 ./saxpy`
* Check the duration
* Compile and execute Jacobi
* `cd HIP/jacobi`
<!--
* Need to make some changes to the makefile
* ``MPICC=$(PREP) `which CC` ``
* `MPICFLAGS+=$(CFLAGS) -I${CRAY_MPICH_PREFIX}/include`
* `MPILDFLAGS+=$(LDFLAGS) -L${CRAY_MPICH_PREFIX}/lib -lmpich`
* comment out
* ``# $(error Unknown MPI version! Currently can detect mpich or open-mpi)``
-->
* Now build the code
* `make`
* `time srun -n 1 --gpus 1 Jacobi_hip -g 1 1`
* Check the duration
#### Dynamic instrumentation
* Execute dynamic instrumentation: `time srun -n 1 --gpus 1 omnitrace-instrument -- ./saxpy` and check the duration
<!-- * Execute dynamic instrumentation: `time srun -n 1 --gpus 1 omnitrace-instrument -- ./Jacobi_hip -g 1 1` and check the duration (may fail?) -->
* About Jacobi example, as the dynamic instrumentation wuld take long time, check what the binary calls and gets instrumented: `nm --demangle Jacobi_hip | egrep -i ' (t|u) '`
* Available functions to instrument: `srun -n 1 --gpus 1 omnitrace-instrument -v 1 --simulate --print-available functions -- ./Jacobi_hip -g 1 1`
* the simulate option means that it will not execute the binary
#### Binary rewriting (to be used with MPI codes and decreases overhead)
* Binary rewriting: `srun -n 1 --gpus 1 omnitrace-instrument -v -1 --print-available functions -o jacobi.inst -- ./Jacobi_hip`
* We created a new instrumented binary called jacobi.inst
* Executing the new instrumented binary: `time srun -n 1 --gpus 1 omnitrace-run -- ./jacobi.inst -g 1 1` and check the duration
* See the list of the instrumented GPU calls: `cat omnitrace-jacobi.inst-output/TIMESTAMP/roctracer.txt`
#### Visualization
* Copy the `perfetto-trace.proto` to your laptop, open the web page https://ui.perfetto.dev/ click to open the trace and select the file
#### Hardware counters
* See a list of all the counters: `srun -n 1 --gpus 1 omnitrace-avail --all`
* Declare in your configuration file: `OMNITRACE_ROCM_EVENTS = GPUBusy,Wavefronts,VALUBusy,L2CacheHit,MemUnitBusy`
* Execute: `srun -n 1 --gpus 1 omnitrace-run -- ./jacobi.inst -g 1 1` and copy the perfetto file and visualize
#### Sampling
Activate in your configuration file `OMNITRACE_USE_SAMPLING = true` and `OMNITRACE_SAMPLING_FREQ = 100`, execute and visualize
#### Kernel timings
* Open the file `omnitrace-binary-output/timestamp/wall_clock.txt` (replace binary and timestamp with your information)
* In order to see the kernels gathered in your configuration file, make sure that `OMNITRACE_USE_TIMEMORY = true` and `OMNITRACE_FLAT_PROFILE = true`, execute the code and open again the file `omnitrace-binary-output/timestamp/wall_clock.txt`
#### Call-stack
Edit your omnitrace.cfg:
```
OMNITRACE_USE_SAMPLING = true;
OMNITRACE_SAMPLING_FREQ = 100
```
Execute again the instrumented binary and now you can see the call-stack when you visualize with perfetto.
## Omniperf
* Load Omniperf:
```
module load cray-python
module load LUMI/22.08 partition/G rocm/5.3.3
module use /project/project_465000380/software/omniperf_rocm533/modulefiles/
module load omniperf/1.0.8
```
* Reserve a GPU, compile the exercise and execute Omniperf, observe how many times the code is executed
```
salloc -N 1 --ntasks=1 --partition=small-g --gpus=1 -A project_465000380 --time=00:30:00
cp -r /project/project_465000380/exercises/HPCTrainingExamples/ .
cd HPCTrainingExamples/HIP/dgemm/
mkdir build
cd build
cmake ..
make
cd bin
srun -n 1 omniperf profile -n dgemm -- ./dgemm -m 8192 -n 8192 -k 8192 -i 1 -r 10 -d 0 -o dgemm.csv
```
* Run `srun -n 1 --gpus 1 omniperf profile -h` to see all the options
* Now is created a workload in the directory workloads with the name dgemm (the argument of the -n). So, we can analyze it
```
srun -n 1 --gpus 1 omniperf analyze -p workloads/dgemm/mi200/ &> dgemm_analyze.txt
```
* If you want to only roofline analysis, then execute: `srun -n 1 omniperf profile -n dgemm --roof-only -- ./dgemm -m 8192 -n 8192 -k 8192 -i 1 -r 10 -d 0 -o dgemm.csv`
There is no need for srun to analyze but we want to avoid everybody to use the login node. Explore the file `dgemm_analyze.txt`
* We can select specific IP Blocks, like:
```
srun -n 1 --gpus 1 omniperf analyze -p workloads/dgemm/mi200/ -b 7.1.2
```
But you need to know the code of the IP Block
* If you have installed Omniperf on your laptop (no ROCm required for analysis) then you can download the data and execute:
```
omniperf analyze -p workloads/dgemm/mi200/ --gui
```
* Open the web page: http://IP:8050/ The IP will be displayed in the output
 Sign in with Wallet
Connect another wallet
Sign in with Wallet
Connect another wallet