# GIF Tutorial!!! #
╰(*´︶`*)╯Oki!! Hi hello!! I’m here to give an easy, descriptive, picture filled gif tutorial!! It’s pretty long, but it’s because I included loads of pictures and versions of gifs so you know exactly where everything is and what the best options are! So I apologize for the length but I hope it helps!
So I’m going to show you how to make gifs both with and without VapourSynth! If you don’t like VS/don't want to learn, you don’t need to use it BUT I really do recommend it because it does a LOT of the work for you!
---
What you'll need:
* **Photoshop** (I use PS CC but it’s pretty much the same with older versions.)
* **4k video downloader** (I recommend [this](https://www.4kdownload.com/products/product-videodownloader) one for youtube videos, as it allows you to download in 4k! If you want links for other sites, like VLive, Instagram, Twitter, just ask me!)
Optional:
* VapourSynth ([Here](https://onedrive.live.com/?authkey=%21APv5oKOsaxUe4uw&cid=73BA3CC91E8CA1EB&id=73BA3CC91E8CA1EB%21498&parId=73BA3CC91E8CA1EB%21497&action=locate) is the zipfile to download it! When you open the link it’ll automatically begin to download!)
> * [This](https://www.youtube.com/watch?v=SpBHhbc_5Fc) is **WINDOWS** tutorial on downloading the program AND how to use it.
> * [This](https://www.youtube.com/watch?v=IjfOHoxCwCo) is a **MAC** tutorial on ONLY downloading the program.
>
> I WILL ALSO EXPLAIN HOW I USE IT, but if you prefer the video explanation that’s there too!
---
## VapourSynth or Not ##
(*•̀ᴗ•́*)و Ok, now that that’s out of the way! I’m going to quickly explain the main difference between using VapourSynth and not using it; if you already know this you can skip over this section.
Basically what VS does is it crops, resizes, denoises, and sharpens the video for you, so you don’t have to do it in photoshop. While photoshop does an adequate job of sharpening and denoising, I find that it’s never the best quality in the end. However, VS is built for this, so it does a really great job! Plus, it also crop and resizes for you, so you don’t have to do that in Photoshop, because you tend to lose a lot of quality when you do it in PS.
> 
>
> *( PS: The third gif is framed differently because I put it through VS and cropped it in there and was to lazy to make it exactly the same as the first two... (⁄ ⁄•⁄ω⁄•⁄ ⁄)⁄ Heh, sorry about that.)*
The real trade off is time. Making gifs takes quite a bit of time as it is, but once you've practiced and gotten the hang of it, it becomes a really fast process. I find that using VS only lengthens this process. Putting the video through the editor does take time, but in my personal opinion, I think it's worth it in the end.
**SIDE NOTE:** Also if you ever want to make stage gifs, you’ll need VapourSynth because it deinterlaces a **.TS FILE**, which is the format that stage files come in. But we’re getting ahead of ourselves here! I’ll explain this a little later! First I’m going to show you how to make a very basic gif using just photoshop and a video we downloaded from youtube.
## Tutorial ##
### STEP ONE: Opening The Video ##
Download whatever video it is you're going to gif. Now, open up photoshop and make sure that the ‘Timeline’ is open! To do this, go up to ‘Window > Timeline’.
> 
Once you click it, it should open up a panel at the bottom that looks like this:
> 
Now, you can open the videos. There’s actually two ways to do this so I’ll show you both.
**First Way:**
Go to ‘File > Import > Video Frames to Layers’. That will open up a window allowing you to browse your device for the video you want.
> 
When you pick the video, a window will open up. It’ll look like this:

This does two steps for you; it cuts the video from where you want it AND it turns it into layers automatically.
> 
Using the sliders (that are circled) you can trim the video to the clip you want it to be. I’d recommend you cut it so that there’s a little of excess video on either side of your desired clip.This is so that you can delete frames and be more accurate later on. Once you have the general area of the the video you want, click ‘Ok’ and photoshop will automatically convert your video into frames.
> 
Now, select the frames that you don’t want from the gif and highlight all the frames by clicking on the first frame and, while holding shift, click on the last undesired frame. Then select the garbage can icon to delete those frames.
> 
**Second Way:**
Go to ‘File > Open’. That will open up the same window where you can scroll through your device and find whatever video you’re going to use. Open it.
> 
> 
Notice the difference in the Timeline and in the layers panel; this is a video, whereas in the first example, those were frames. What you need to do now is cut the video and then turn it into frames.
Here is where you can trim your video:
> 
Using the ‘pause/play’, ‘forward/backward frame by frame’ tools you can clip the video to exactly where you want it. When you’ve found the exact place you want, you hit the scissor icon and it’ll clip your video. Then play through your clip and cut it off when it gets to the end of the desired clip. You should have 3 distinct clips!
> 
You can delete the first and last parts, and keep the desired one.
> 
Okay, now, using the three little lines in the corner of the Timeline:
> 
Go to it and then ‘Convert Frames > Flatten Frames into Clips’.
> 
Photoshop will then flatten each video frame into a clip. The Timeline and layers tab should now look something like this:
> 
At the very bottom left of the Timeline panel, there are three little boxes. Click on those.
> 
The Timeline will change into a Frameviewer:
> 
Now, going back to those three little lines from before (in the top right corner of the Timeline) you’re going to ‘Make Frames from Layers’
> 
After that your Timeline will look pretty much the same as the final step from the first way.
> 
Make sure that the option for how many times your gif is played is set to ‘Forever’ rather than anything else, or the gif will not be on a constant loop.
> 
You can play through the frames and make sure that all the frames that you want are there and that there’s nothing that’s out of place/undesired!
As you can see, the first way is really simple but a little less accurate. The second way, there’s a few more steps but I find it to be way more accurate. Honestly, it doesn’t matter which method you use, they both work. I personally prefer the second method because it allows me to cut the video in multiple places so I can find all the clips I want and then from there, I can save the clips as it’s own .ps file. This allows me to have all the clips presaved! But it really doesn’t matter! It’s whatever your preference is! (*≧▽≦)
### STEP TWO: Delay, Cropping, Resizing ###
**Delay**
Oki dokey! Now we’re going to change the delay f the gif! Different gifmakers have different preferences! Some people like no delay, while some like it!
> 
>
> 
>
> 
Personally, I prefer delay! My gifs all have an 0.07 delay. It doesn’t slow the gif down too much but it makes it feel smooth and there’s enough time to intake what’s going on in the gif! That’s a personal decision, but it’s up to you what you like!
So, every frame has a little timestamp:
> 
Going back to those three little lines, select ‘Select All Frames’ and this will highlight all the frames that are in the timeline.
> 
Once they’re all selected, click on the little downward arrow on any of the individual frames. This will open a little dropdown menu:
> 
Select the ‘Other...’ option, which will open up a dialogue box that looks like this:
> 
You can then set the delay to however long you want and hit ‘Ok’. After this, all the frames should be the same amount of delay.
**Cropping**
Selecting the crop tool, the top bar will change to display this:
> 
> 
In the second drop down menu, you can select the sizing. I recommend going with ‘Ratio’.
> 
Okay, so! Gifsets on Tumblr require very specific sizes! ('Cause fuck Tumblr users thats why! ٩(๑`^´๑)۶ )
* 1 gif = 540p x anything
* 2 gifs = 268p x 350p
* 3 gifs = 177p + 178p + 177p x 250p
The height of gifs can be anything. For example, when I make stage gifs, that have 2 gifs side by side, I do 425p for the height instead of 350p. These are just the most common sizes! The width however HAS to be what’s listed here.
So, back to cropping. Now that you’ve selected ratio, you can enter the ratio of the gifs you’re making. For the example that I’m making, there would be 2 gifs beside each other, therefore I’m going to make the width 268p and the height 350p.
> 
The cropping net will automatically resize as you enter the desired height and width. Now, you can resize it how you’d like. You can get rid of extra spacing, words, or whatever you don’t want in the gif.
> 
Once you’re happy with how the sizing is, you can select the check mark in the corner and it will then, crop the gif to the size you want.
> 
**Resizing**
Now you have to resize your gif. When you set the ratio, that didn’t automatically resize your gif; rather it cropped according to the ratio that you set.
To resize the gif, go to ‘Image > Image Size’. this will open up a dialogue box.
> 
> 
Change the width to whatever you set the ratio to. In this case it’s going to be 268p, and the height will automatically resize so you won’t have to do anything. Then hit 'Ok' and your gif should resize.
### STEP THREE: Sharpening (In Photoshop)
(◍•ᴗ•◍) Oki! Now moving onto sharpening! So, the first step is to select all the frames in the timeline. You can either do the 'Select All' method, or click the first frame and then scroll all the way to the end of the Timeline and, while holding shift, click the last frame. Then do the same with the Layers panel, selecting all the layers. It should look like this:
> 
Now, going back to the three lines, go to ‘Convert to Video Timeline.’
> 
And this will be the result:
> 
The frames will have merged into one clip in the Timeline, while all the layers will be visible now.
Now go up to the top bar and select ‘Filter > Convert for Smart Filters.’
> 
> 
There should only be one clip in the Timeline, and one layer in the Layers panel.
Now, go to ‘Filter > Sharpen > Smart Sharpen’
> 
This will bring up a dialogue box. These are the settings that I used to use. But you can play around with the sharpness based on each specific video, seeing as not all videos will have the same quality.
> 
When you’ve reached the desired sharpness, select ‘Ok’ and these settings will be applied.
**SIDE NOTE:** Sharpening is relative to the quality of the video you use. You can't use a crap quality video and expect to get anything good. When you sharpen crap, it just becomes sharpened crap... (ˊ̥̥̥̥̥ ³ ˋ̥̥̥̥̥)
### STEP FOUR: Colouring ###
(ノ≧∀≦)ノ Ok! Time to colour! I can’t really give too much instruction to you here. Every gifmaker has their own style of colouring and so, I can't really instruct you on what to do. It's down to preference. It’s just something that’ll come to you with lots of time and practice. Don't worry if your first few colourings aren't amazing, you'll soon enough figure out what you like and what you don't, and you’ll learn which colourings look good in which places!
> 
> 
.... (⊙︿⊙✿)
To be honest? I use the ***same*** colouring for pretty much all my gifs. I’ll just adjust a few of the layers based on the video. So I rarely make new colourings these days- unless the video doesn’t look good with any of my pre-existing colourings.
To make a colouring, most people will use the adjustments tab and using the tools at hand you can create pretty diverse colourings.
> 
In the end, it’s really up to you how you colour your gifs! My personal style, and preference, is a little darker. I usually make the reds, blues, and blacks really rich and the whites slightly faded. (In the example below, I'd stick with the middle colouring usually!)
> 
### STEP FIVE: Watermark ###
This is super optional! Some people don’t even use watermarks but in this day and age of Tumblr... (;¬_¬) You can never be too safe... I know some users use a logo as a watermark, while some people, like moi, use text to watermark their gifs.
Select the text tool.
> 
> 
This is the font and settings I use for most of my gifsets. But again, this can be personal to each user, so you can use whatever font/settings you want.
I stick to a neutral colour (white or black) so it doesn’t stand out too much against the gif and then I’ll type out my url on the gif.
> 
After this, in the Layers panel, you double click on the text layer. This will open up a dialogue box.
> 
> 
I put a stroke around the words, with a width of 1 pixel, this is enough to make it stand out.
> 
I’ll move it to a corner where it won't obstruct the flow of the gif. Then I’ll decrease the opacity so it is barely visible. This makes it so it doesn’t stand out too much, but I know that it’s mine if it gets reposted.
> 
Of course, these are my settings and my style of watermark. If you prefer doing it differently that’s more than okay! You don’t even need a watermark. This step is completely optional!
### STEP SIX: Exporting The Gif
(ノ。≧◇≦)ノ Almost there! Now ,it's time to export the gif!
Go to 'File > Export > Save for Web (Legacy)' **OR** hit CRTL+ALT+SHIFT+S on your keyboard.
> 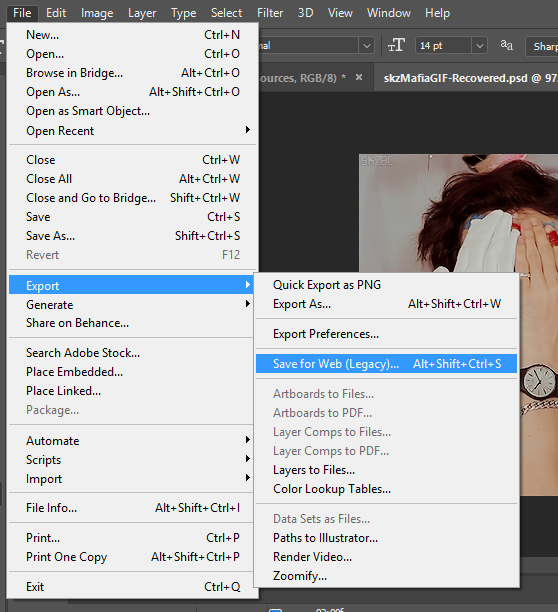
This will open up a window that looks like this:
> 
Now, before you save the gif, double check the settings:
> 
Also, check that the size of your gif doesn't exceed 2.99M, otherwise your gif WILL NOT PLAY ON TUMBLR.
> 
After this, play the gif to make sure everything is oki dokey! If not, go back and fix whatever is not right. (If you have a question feel free to ask!) But if everything is looking good, go ahead and hit the 'Save' button.
At this point another window will open up:
> 
Name the gif whatever you want to name it and then save it!
And, that's it! Congrats you made a gif!!! ☆ヾ(*´・∀・)ノ Good job!!! Here is the final product:
> 
---
## Tutorial Using VapourSynth
( ; ・Д・)ノ As mentioned earlier, I really want to emphasize the usefulness of VS and how much it's helped with the quality of my gifs. It's honestly not necessary, and I originally didn't use VS. But the difference it brings to gifs is really noticable.
You also cannot gif (high quality) stages properly without VS. So it's a fairly useful skill learning how to use it.
I'm going to briefly go over how to use the program. I've linked the tutorial for download so I won't explain that, but I will explain how to use it.
This is taught in one of the videos I linked early on as well, but I'm going to reiterate it!
### STEP ONE: Time Stamps, Cropping and Resizing, Sharpening, Denoise ##
**Time Stamps**
VS works by user imput; you put the video into the processor, then you input the timestamps of where you want the processor to cut the video and for how long. So what I recommend you do is to watch your video the whole way through and write down all the time stamps of the gifs you want to make.
Whether you do this physically or on a word document, it's up to you. I just really suggest you write it down, otherwise you're going to be overwhelmed.
Now, once you have all the timestamps and the video downloaded, open up your devices folders and open the folder in your pc that's called 'vapoursynth.'
> 
In another window, navigate to wherever your videos are saved. and select the video you're going to gif. Drag it an drop it on the program called 'vapourscript'.
> 
When you do this, Command Prompt will open up.
> 
It will ask for the start timestamp and for how long you'd like the clip to be. I recommend adding 1-2 seconds on each end of the clip. So if your clip was from 10:40 to 10:43, then I'd put my initial timestamp as 10:39 and let the clip be encoded for 5 seconds. This will ensure that none of the clip you're aiming for will get excluded.
Hit enter, and Command Prompt will process the information and then open up a resizer in your browser and the VS editor on desktop.
> 
> *RESIZER*
> 
> *VS EDITOR*
**Cropping and Resizing, Sharpening, Denoise**
In the top left corner you will see the below panel:
> 
* GIF Size: Allows you to enter the size of the gif, (width, height), you want. This resizes and crops your gif for you, so that you don't have to do it in photoshop.
* Opacity: Simply refers to the opacity of the viewer and what you can't see. You can either make the cut out parts more or less visible  
* Preprocessor: Is used for videos that are interlaced (such as .ts, .tp, .m2ts). This isn't required for regular videos (such as .mp4, .mkv). The preprocessor gives you code that allows to 'deinterlace' the video. When i am using the preprocessor feature, I use the settings: 
* Denoise Filters: These are the denoiose capabilities that VS has.
* Sharpening: These are the sharpening capabilities that VS has.
> [This](https://hackmd.io/s/HJwtY1WV7#VapourSynth-for-Windows) is a really good explanation of all the possibilities that are offered when using VS. It goes into depth about how to use the sharpening / denoising / deinterlacing features and what sort of codes you can use. If you want more information, I really recommend this thread.
> 
This is what the code for this specific gifset looks like. Most of the time it will look exactly like this except the values that are highlighted. These will change based on the crop, sharpen, and denoise values.
### Step Two: Preview, Encoding ###
**Preview**
Copying the code from the above picture, return to the VS editor. There will be a section in the code that says:
> 
Underthis, paste the code that you just copied from the resizer.
> 
At this point you can preview what the desired clip will look like. By going to: 'Script > Preview' you will get a new window that allows you to watch your clip.
> 
> 
This is probably going to be VERY glitchy, so I don't recommend playing the video. Rather, click through and see how the sharpening and denoise look. If it's too strong, lower it. Likewise, if it's not strong enough, increase it.
You can also clip your video using VS. There will be a section of code that looks like this:
> 
Using the previewer, you can find the very first frame, and the very last frame and this will clip the video for you. But if you don't want to do it here, you can always do it in Photoshop.
**Encoding**
Now, either by hitting 'CTRL+S' or 'File > Save Script', save the script. After this, go to 'Script > Encode Video' or F8.
>
This will open up a window that looks like this:
> 
The only change you have to make here is setting 'Header' to 'YM4'.
> 
After this, you can hit 'Start' and VS will begin to process your video. When it's finished, the window should look like this:
> 
You can close both this window and the VS editor. Going back to the VS folder, there should be a folder called 'Ouput'. In this folder, there will be a video clip. This is clip that you just encoded.
> 
> 
You can move this to your own personal folders and rename it to 'Output1' if you're doing more than one gif using VS. Make sure you remove the file before you encode another clip or VS will simply overwrite the first one.
### Making The Gif ###
Now, you open up photoshop, and using the steps from above, open up the clip. You go about making the gif the exact same way- this time leaving out the cropping, resizing, and sharpening. You apply your colouring and watermarks, and save!
> 
---
## (❁´▽`❁)*✲゚* ##
And, you've done it! Congrats! You can make gifs with photoshop now. You can incorporate these into GFX or just learn to make really cool sets! I hope that this tutorial was in depth, (spelled correctly and made sense grammatically), and explained things well! If you have any other questions you can always send me a message! I would love to help you out! MWAH! ٩(•̤̀ᵕ•̤́๑)ᵎᵎᵎᵎ