# Creating a Design System Website with Strapi, Next.js, and GPT-4 (Part 1)
## Introduction
In recent years, [design systems have risen in popularity](https://marutitech.com/guide-to-design-system/) as essential tools for both user interface (UI) and [product design](https://idsys.com/why-are-product-design-services-so-popular/). While the concept isn't new, the growing complexity of web and mobile applications has made design systems critical for maintaining consistency and streamlining collaboration across teams.
Imagine a scenario where a product team is building a web application without a design system in place. The designers hand off mockups with inconsistent button styles, and the developers interpret those designs differently---one page uses rounded buttons with bold text. In contrast, another uses sharp-edged buttons with lighter fonts. As the project scales, new team members follow the latest code they see, further deviating from the intended design. Marketing materials also clash with the app's interface, creating a disjointed brand experience. This is where design systems come in.
A [well-implemented design system](https://strapi.io/blog/introducing-strapi-ui-kit) bridges the gap between design and development by establishing a shared visual language, along with a reusable set of components and templates cataloged in a [UI library](https://strapi.io/blog/top-5-best-ui-libraries-to-use-in-your-next-project). This approach not only ensures consistent user experiences but also fosters better communication between designers, developers, marketing teams, and end users.
In this three-part blog series, we will explore how to build a fully functional design system website using [Strapi](https://strapi.io/), [Next.js](https://nextjs.org/), and [GPT-4](https://openai.com/index/gpt-4/), I will walk you through the setup of both the backend and frontend and even automating the creation of design guidelines and component documentation.
If you are excited as much as I am writing this article, then let's dive right in. 🚀
## Outline
You can find the outline for this series below:
- Part 1: Setting up the Strapi backend and Next.js frontend
- Part 2: Using GPT-4 to generate design guidelines and component documentation
- Part 3: Building a searchable component library with Strapi and Next.js
## What is a Design System?
[Design Systems](https://strapi.io/blog/4-things-you-might-not-know-about-design-system) are structured collections of reusable components, guidelines, and principles that create a cohesive user experience across digital products.
A design system serves as a single source of truth that aligns your designers, developers, and product teams around a unified visual and functional language. Beyond just a [style guide](https://handbook.strapi.io/user-success-manual/strapi-documentation-style-guide), it provides a methodology for building consistent and scalable interfaces, ensuring that every product or feature adheres to the same design standards. This not only enhances brand consistency but also streamlines the development process, reducing redundancy and improving overall collaboration between team members.

[Strapi Design System](https://design-system.strapi.io/)
In the next section, you will learn how to set up [Strapi 5](https://strapi.io/five) for your backend.
## Setting up [Strapi 5](https://strapi.io/five) for the Backend of Our Design System Website
### Prerequisites
Before starting this tutorial to build your design system website, you must meet a few requirements.
- Ensure [Node.js (v18 or v20)](https://nodejs.org/en) is installed on your machine;
- Choose your preferred Node.js package manager:
- [npm](https://docs.npmjs.com/cli/v6/commands/npm-install) (`v6` or higher)
- [yarn](https://yarnpkg.com/getting-started/install)
- Use a text editor or IDE like [**Visual Studio Code**](https://code.visualstudio.com/download), though alternatives such as [**Sublime Text**](https://www.sublimetext.com/download) are also viable options.
- A good understanding of JavaScript and familiarity with [Next.js](https://nextjs.org/) is recommended;
- Basic knowledge of [Strapi](https://docs.strapi.io/) is essential, and you'll need to have an account with [Strapi Cloud](https://cloud.strapi.io/login);
- Additionally, you should [install `git`](https://github.com/git-guides/install-git) and have a [GitHub](https://github.com/) account to deploy your project to [Strapi Cloud](https://cloud.strapi.io/).
### Technology Overview
Let's look at the key technologies we would use to build our AI-driven design system: Strapi, GPT, and Next.js.
#### What is [Strapi](https://strapi.io/)?
[Strapi](https://strapi.io/) is an open-source headless CMS that enables developers to create custom APIs efficiently. It offers a user-friendly interface for content management, making it ideal for developing scalable, dynamic design systems. In this project, Strapi will handle content management and API services for the design system website, including managing component libraries and style guides, as well as handling user authentication through [Strapi's security features](https://strapi.io/security).
#### What is GPT?
[GPT (Generative Pre-trained Transformer)](https://chat.openai.com/) is an advanced AI model developed by [OpenAI](https://platform.openai.com/docs/overview) that excels in natural language processing. For this project, GPT will be integrated to automate the generation of design guidelines and documentation, enabling smart content generation and enhancing the efficiency of your design system.
#### What is [Next.js](https://nextjs.org/)?
[Next.js](https://nextjs.org/) is a popular React framework for building high-performance web applications. It offers features like server-side rendering, static site generation, and API routing, which we will use to create the front end of the design system website. Next.js will ensure the site is fast, [optimized for SEO](https://forum.strapi.io/t/how-to-seo-a-next-js-website-using-strapis-seo-plugin/28633), and delivers a smooth user experience, while also integrating with Strapi and GPT to streamline workflows and deliver content dynamically.
## Setting up Strapi for the Backend
In this section, I will walk you through setting up Strapi for the backend of your design system website. You'll initialize a new Strapi project locally by running the commands outlined below, and then set up your first local administrator user. Afterward, you will be walked through setting up the Strapi backend for your design system by defining [Collection Types](https://docs.strapi.io/user-docs/content-type-builder) that represent the key aspects of the design system.
Follow these steps to get started:
**Step 1**: First, create a folder named `strapi-design-system` to hold the source code for your Strapi CMS API. Run the following command to create the directory and move into it:
```bash
mkdir strapi-design-system && cd strapi-design-system
```
**Step 2**: Use the installation script to [quickly set up a new Strapi project](https://docs.strapi.io/dev-docs/quick-start#-part-a-create-a-new-project-with-strapi) and create a [Strapi Cloud](https://cloud.strapi.io/) account. Run the following command:
```bash
npx create-strapi@latest strapi-design-system-api
```
Log in or sign up to Strapi Cloud when prompted. Follow the on-screen instructions:
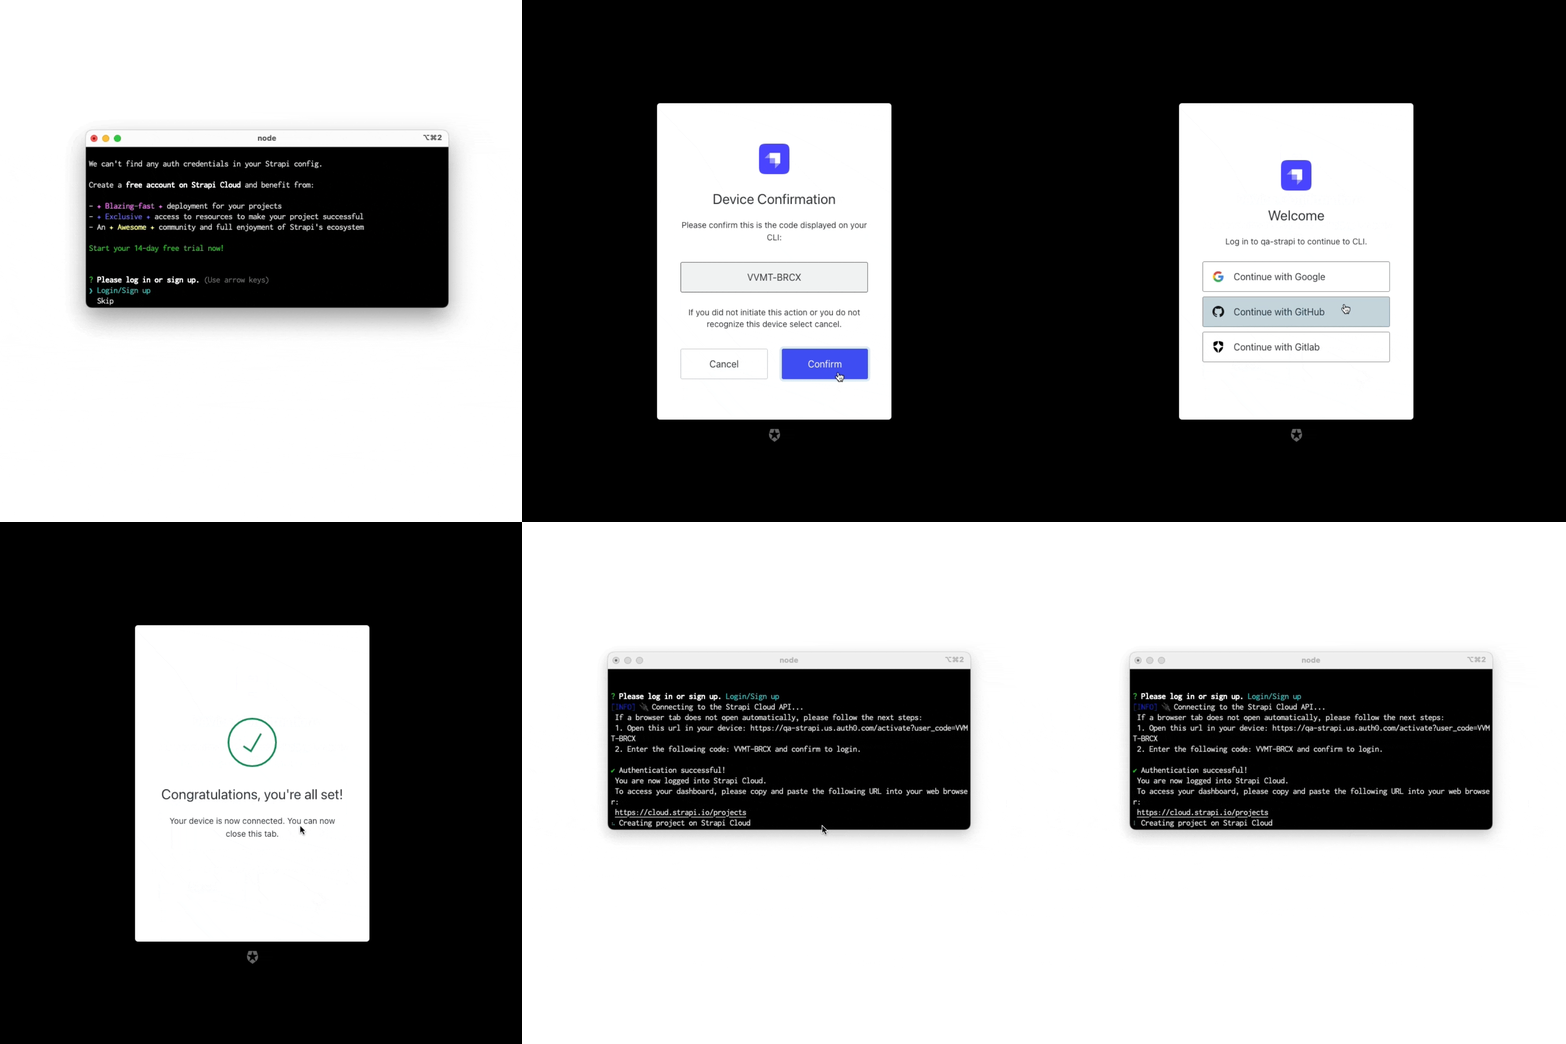
The terminal will ask you a series of questions. Press `Enter` to accept the default answers.

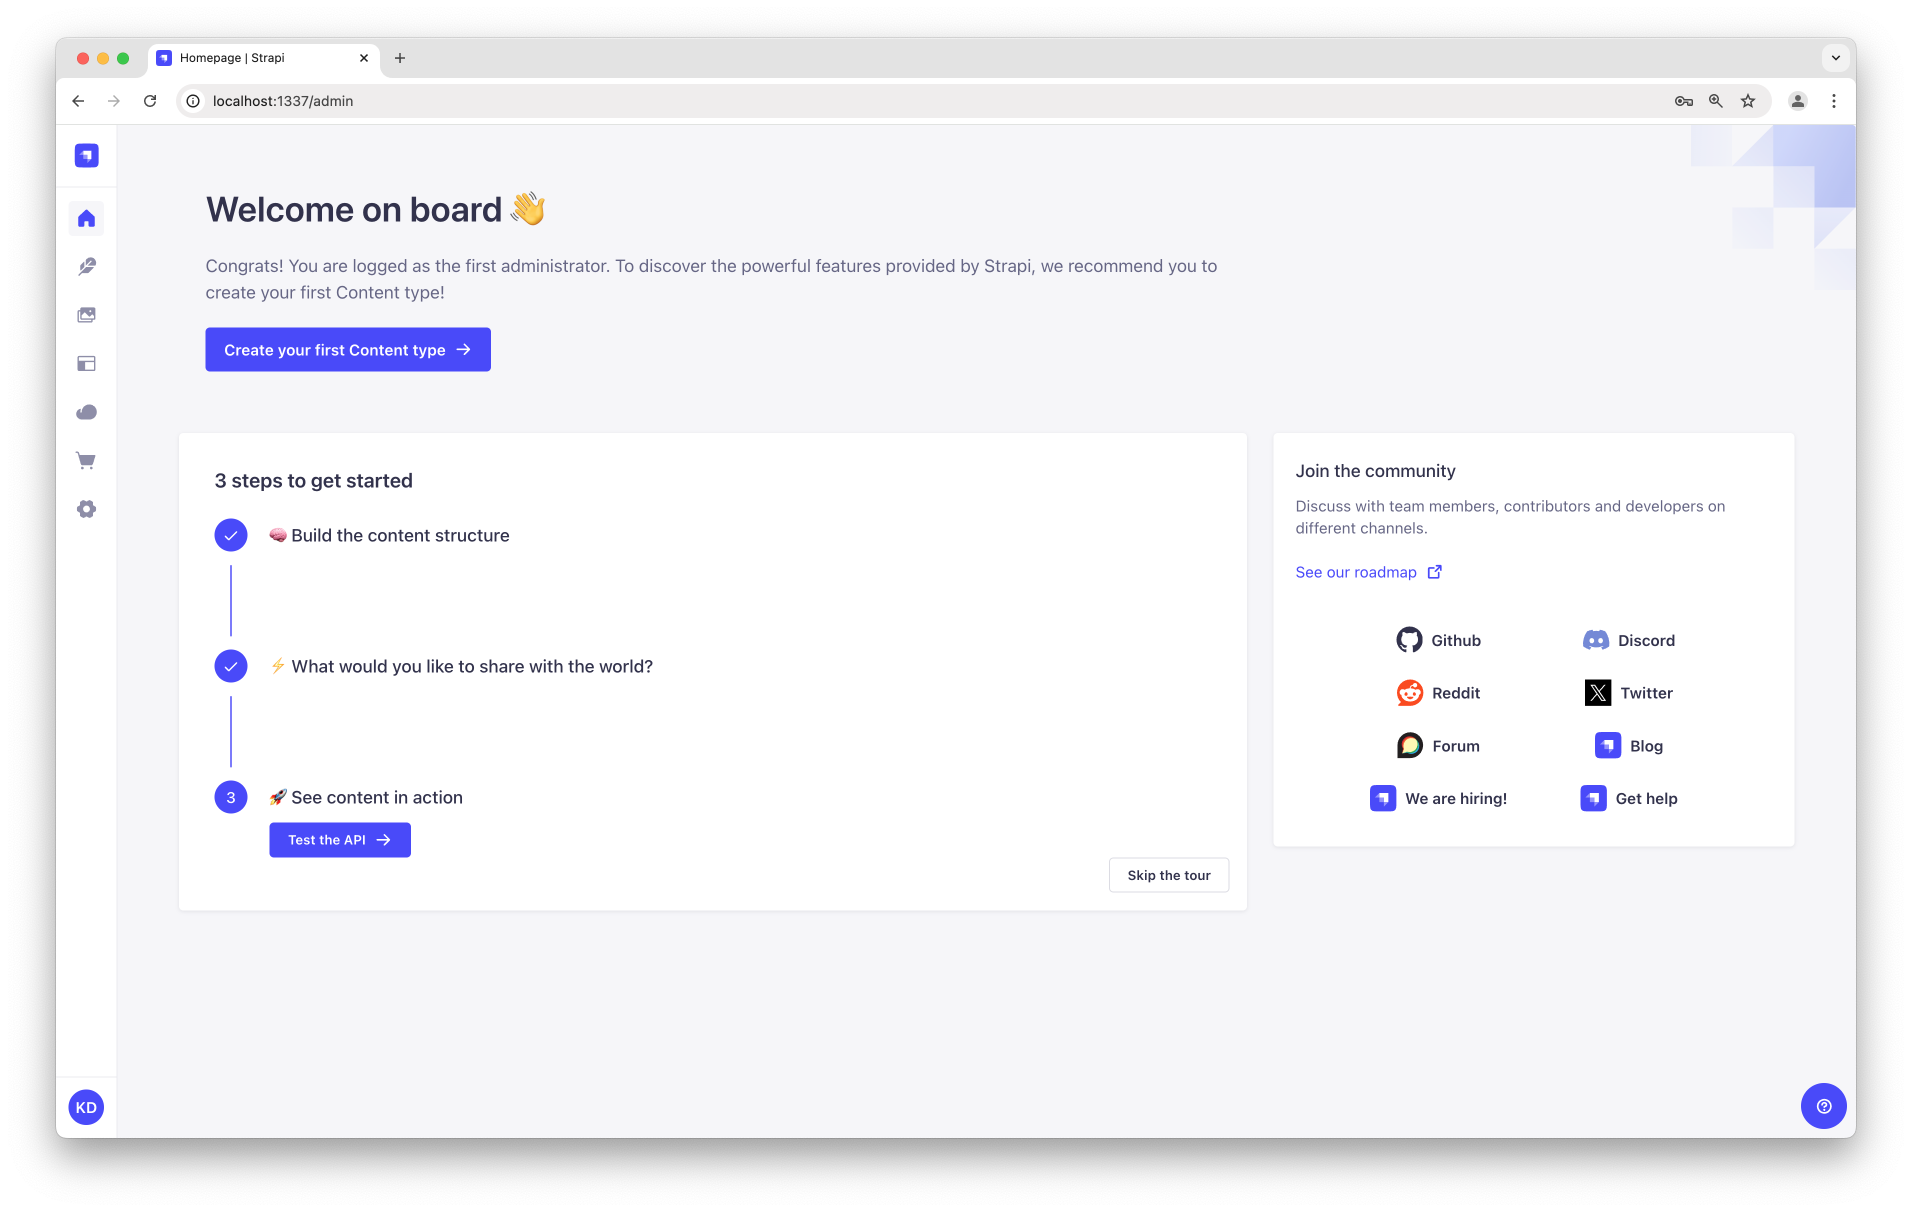
Once the installation is finished, start the server. In the terminal, enter `cd strapi-design-system-api && yarn develop`. This will automatically open a new tab in your browser at [http://localhost:1337/admin](http://localhost:1337/admin).
You will need to complete a registration form to create your account. Then, you'll be the first administrator for this Strapi instance.

Now you can access the [admin panel](http://localhost:1337/admin):
## Create Strapi Collection Types and Fields for Design Components
To store and manage the data for your AI-powered design system, we'll set up relevant [collection types in Strapi](https://docs.strapi.io/user-docs/content-manager#collection-types). This will help you efficiently save, organize, and retrieve design guidelines and component documentation.
Start by navigating to the [Content-Type Builder](https://docs.strapi.io/user-docs/content-type-builder) in the [Strapi admin dashboard](http://localhost:1337/admin). We'll create several [collection types](https://docs.strapi.io/user-docs/content-manager#collection-types) and define their relationships to structure the data for design principles, components, and design documentation.
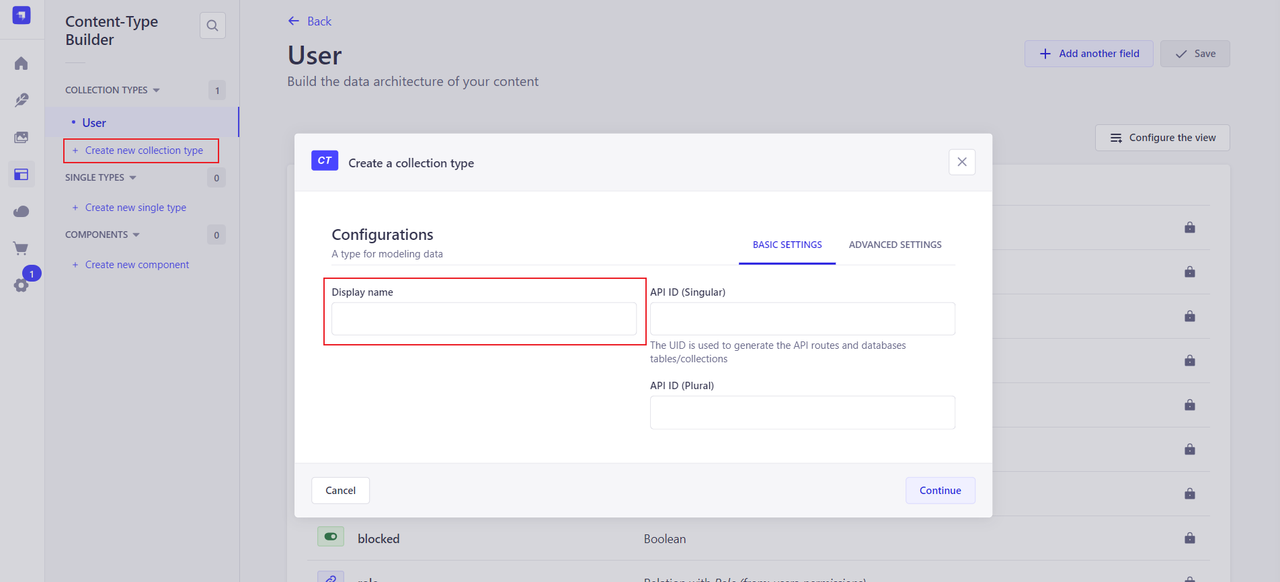
Navigate to the dashboard in your browser, and on the left-hand side menu, select `Content-Type Builder`, which should bring you to the below screen:
### Configuring Strapi for Design System Management
Now that you have set up a local instance of Strapi, it is time to define your collection types in the [Content-Type Builder](https://strapi.io/features/content-types-builder) for your design system. This will allow you to model the content the way you want.
For this section, you will create collection types and fields for the design system components. Here, we will create a `Components` collection. The `Components` will store individual design components, such as buttons, inputs, or navigation bars, along with their associated metadata and usage guidelines.
Below is how the schema for `Components` looks like:
- **Name**: (String)-The component's name.
- **Slug**: (String) - A URL-friendly version of the name, used for routing.
- **Category**: (Enumeration) - Defines the type of component (e.g., Buttons, Forms, Navigation).
- **Description**: (Rich Text)-A detailed description of the component and its purpose.
- **Usage Guidelines**: (Rich Text)-Guidelines for how the component should be used within the design system.
- **Related Styles**: (Relation)-A reference to the **Styles** collection for associating specific styles with the component (e.g., a button's color, font, or padding).
- **Code Snippet**: (Rich Text)-Example HTML/React code developers can use to implement the component.
- **Publication Status**: (Enumeration)-Defines the current status of the component (e.g., Draft, Published, Deprecated).
- **Version**: (String) - The version number of the component.
#### Example JSON Representation
```json
{
"name": "Primary Button",
"slug": "primary-button",
"category": "Buttons",
"description": "A button used for primary actions.",
"usageGuidelines": "<p>Use this button for primary actions, such as submitting forms.</p>",
"relatedStyles": [
{ "id": 1, "name": "Button Styles" }
],
"codeSnippet": "<button class='primary-btn'>Submit</button>",
"publicationStatus": "Published",
"version": "1.0.0"
}
```
When documentation is needed for a particular component, the front end of our application will send a request to GPT-4. The fetched data from Strapi will be used as part of the prompt to GPT-4. In part two of this article series, you will learn how to set this up.
### Create Strapi Collections for `relatedStyles`
First, you will create the `relatedStyles` data structure. The related styles collections will be of collection type `Relation`. It will be a reference to the `Components` collection for associating specific styles with the component (e.g., a button’s color, font, or padding).
On the sidebar, click on `Create a collection type` and type in `RelatedStyles` as the `Display name`, and then click on `Continue`.

Next, click `Text` to add a new text field named `name`. Then click on `Finish` to save. You should have something similar to the screenshot below:

Next, it is time to create the `Component` data structure. This collection will store individual design components, such as buttons, inputs, or navigation bars, along with their associated metadata and usage guidelines.
On the left sidebar again, click on `Create a collection type`, enter `Components` as the `Display name`, and then click on `Continue`.
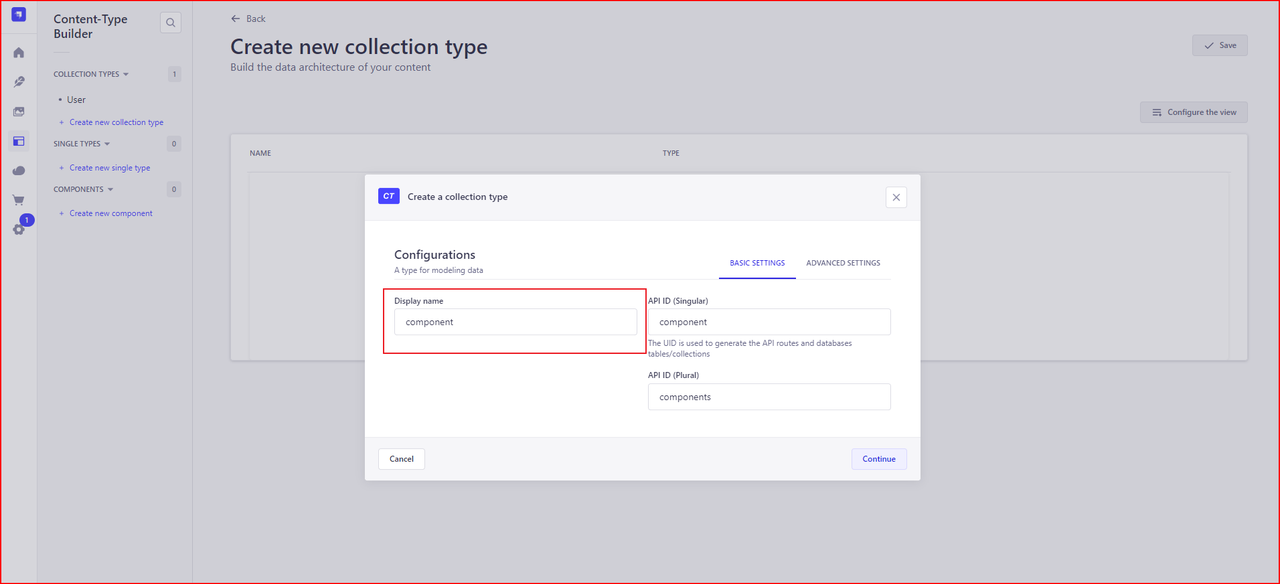
Next, click `Text` to add a new text field named `name`. Then click on `Finish` to save. You should have something similar to the screenshot below:
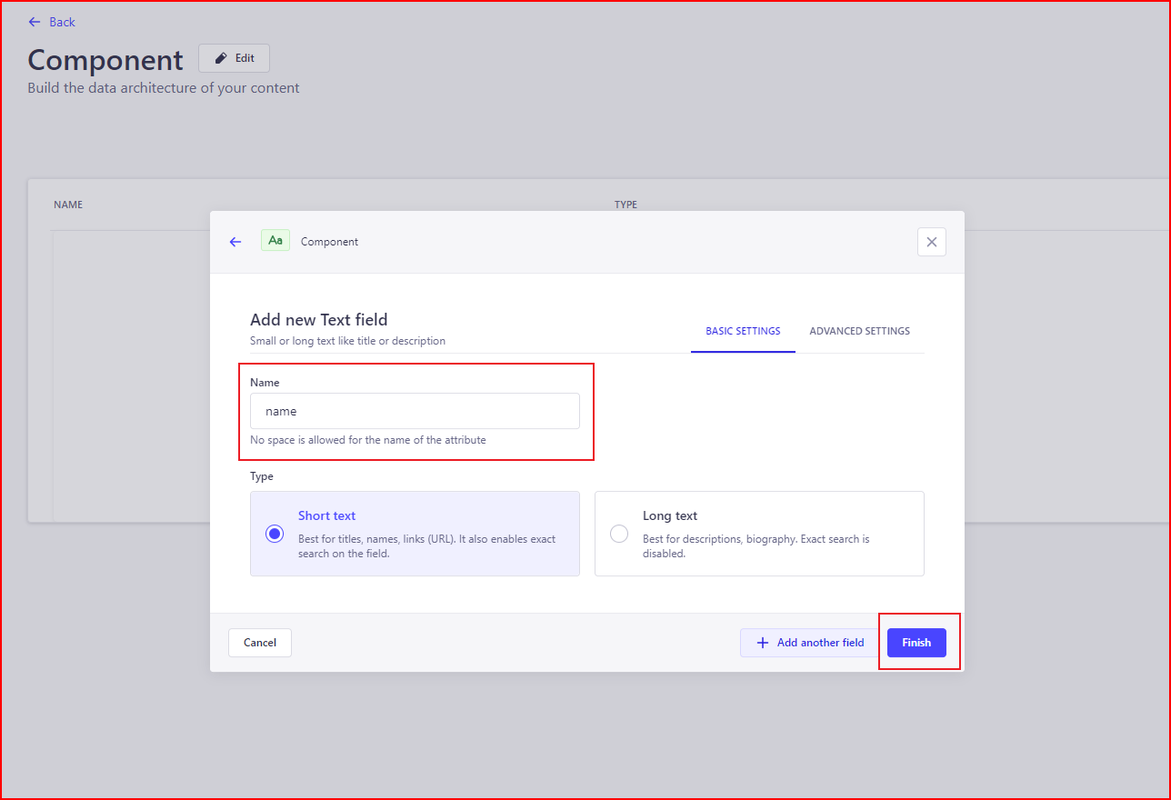
Repeat the same step for the `slug`, and `version` fields and their respective type as `Short text`.

Next, create a `category` field with its type as `Enumeration`. For `category`, paste the following values:
```text
Buttons
Forms
Navigation
Typography
Layout
Media
Data Display
Feedback
Overlays
Loaders
Surfaces
Inputs
Selectors
Breadcrumbs
Pagination
Modals
Accordions
Toolbars
Footers
Headers
```
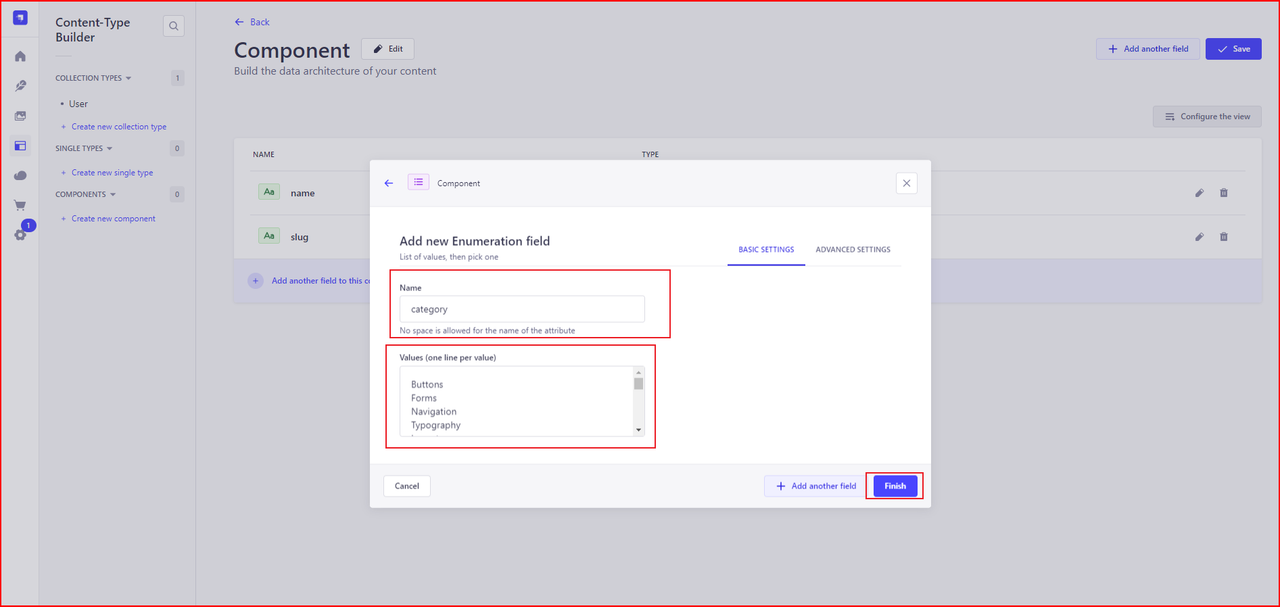
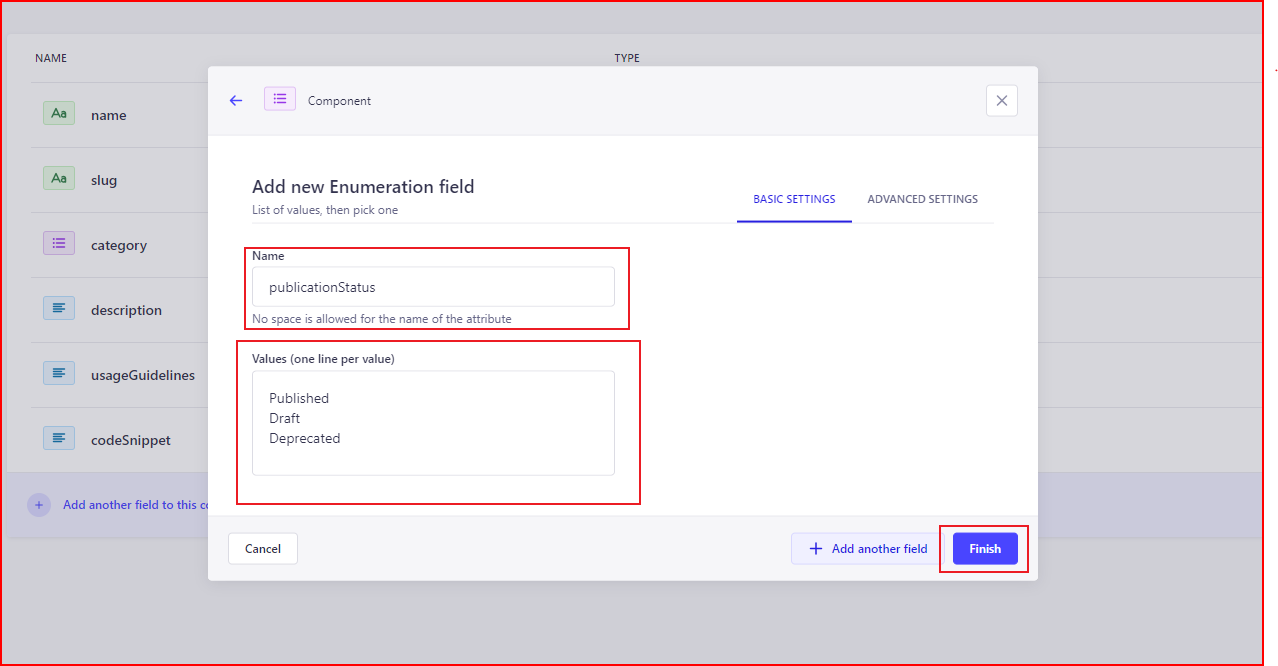
Next, create the `publicationStatus` field with its type as `Enumeration`. For `publicationStatus`, paste the following values:
```text
Published
Draft
Deprecated
```
Next, create `description`, `usageGuidelines`, and `codeSnippet` fields and their respective type as `Rich text (Markdown)`.
Finally, create `relatedStyles` as type [`Relation with RelatedStyles`](https://strapi.io/blog/understanding-and-using-relations-in-strapi)

When done, the `Component` collection type should look like the screenshot below with these fields:

### Enabling Public API Access
By default, Strapi requires authentication to access and retrieve data from the API, but for this tutorial, we will bypass that requirement by making the API publicly accessible. For more information on API authentication, refer to this [guide on authenticating requests with the REST API](https://strapi.io/blog/guide-on-authenticating-requests-with-the-rest-api).
To publicize the API, go to **Settings** on the left sidebar. Under the **USERS & PERMISSIONS PLUGIN**, select **Roles**, then choose **Public** from the list. Scroll down and check **Select all** for **Agent**, **Customer-query**, and **Response**. Finally, save your changes in the top right corner to allow access to these endpoints without authentication.


## Adding Content with the Strapi Content Manager
Navigate to the `Content Manager`, then `Component`, then click `Create new entry`. Then fill in the fields with your entries, then click `Publish`

With these, we are ready to set up the Next.js front end of our design system application.
## Stay Tuned for Part 2
In the next part of this series, we’ll explore how to use GPT-4 to automate the generation of design guidelines and component documentation within a design system. You’ll learn how to configure GPT-4, connect it to Strapi and Next.js, and set up API endpoints to streamline the process.
We'll walk through testing sample guidelines and component documentation, ensuring consistency and accuracy, and reviewing AI-generated content to optimize your design system workflow.