# 112221 Phase1 Notes
# Lecture 1 - JS Variables & Data Types
💡 Why do we use data types in JavaScript, and what do they help us to accomplish as developers?
- Variables are used to store data that we can later retrieve
- saves us time because we don't have to repeat ourselves
- data types allow us to sort through data (numbers, strings)
- We can limit the ways in which we interact with data
- strings
- different tasks related to strings only work with strings
- numbers
- different tasks related to numbers only work with numbers
- boolean
- true/false truthiness
- null
- indicates lack of a value
- structured root primitive
- has to be assigned
- undefined
- indicates lack of a value
- arrays
- reference type
- [] == [] // false
- array.length === 0 // gives us true for an empty array
- list (can handle order)
- objects
- reference type
- bigint
- function
- symbol
## Addition
```js
"hello" + "world"
```
## Comparison
`=` assignment
`==` compares with type coercion
'2' == 2 // true
`===` compares with strict equality (no type coercion)
'2' === 2 // false
strict equality operator (===)
strict inequality operator (!==)
loose equality operator (==)
loose inequality operator (!=)
💡 If we were building a Music Library application, where we can add songs to our library and play them, what information might we want to keep track of? What data types would we use?
💡 If we were building a Todo List application, where we can add tasks to our todo list and mark them as complete, what information might we want to keep track of? What data types would we use?
# Lecture 3 - JS Arrays & Objects
## Topics
- 📌 Creating and Accessing arrays
- 📌 Creating and Accessing objects
- 💡 [Pass by value vs. pass by reference](https://pediaa.com/what-is-the-difference-between-pass-by-value-and-pass-by-reference/)
- 🤓 Prototypal inheritance
- 💡 Modifying objects
- dot notation vs bracket notation
- 💡 Modifying arrays
## Warm Up
```js
const meals = {
breakfast: ['Scrambled Eggs', 'Buttermilk Pancakes', 'Chocolate Protein Shake'],
lunch: ['BLT Sandwich', 'Soup', 'Burrito'],
dinner: ['Indian Curry', 'Grilled Chicken Caesar', 'Fish & Chips']
}
```
What if we want to access all of the breakfasts, lunches or dinners?
- console.log(meals.breakfast)
What about adding a breakfast?
- meals.breakfast.push('waffles')
How about removing a lunch?
- destrutively remove (pop or shift) if it's on one of the ends
- splice if it's somewhere in the middle
- non-destructive updates, 2 slices and a spread
- a filter
If we wanted to remove Soup from lunch:
```js
meals.lunch.filter(mealName => mealName !== "Soup")
```
What if we wanted to build a single array with all the meals in it?
- meals.breakfast.concat(meals.lunch).concat(meals.dinner)
Let's say we wanted to let our user choose which meal they want to eat (between breakfast, lunch and inner) and store their answer in a variable called `choice`. How would we access the meals corresponding to their choice?
- meals['choice'] // meals.choice
- meals[choice]
[Helpful Article on MDN](https://developer.mozilla.org/en-US/docs/Web/JavaScript/Guide/Working_with_Objects#objects_and_properties)
What are the different ways (methods/syntax) that we can access data inside of the `meals` constant?
- dot notation, bracket notation
## 💡 Pass by Value vs Pass by Reference mean? 💡
When we pass information into a function, what does it mean if it is passed by value?
- we're working with a copy of the value (this happens with primitive types in JS numbers, strings, booleans)
When we pass information into a function, what does it mean if it is passed by reference?
- when we pass a reference, we have a live connection to the object in memory (not a copy). If we manipulate that object the changes are persisted.
## 🤓 Prototypal Inheritance 🤓
The methods we discussed
If we add a method to the Array prototype like so:
```js
Array.prototype.sample = function() {
return this[Math.floor(Math.random()*(this.length))]
}
```
Then we can call that method on any arrays in our program.
```js
meals.breakfast.sample() // returns a random element from the breakfast array.
```
The function above is an example of how we're able to access methods like `.pop()` and `.push()` when we interact with arrays. Those methods are both defined on the Array prototype, giving us access to them on all Array objects in our program.
### Bonus Questions (food for thought)
If we structured the same data as an array of objects, what things are easier to access/modify? What things are harder to access/modify?
```js
const meals = [
{
name: 'Scrambled Eggs',
meal: 'breakfast'
},
{
name: 'Buttermilk Pancakes',
meal: 'breakfast'
},
{
name: 'Chocolate Protein Shake',
meal: 'breakfast'
},
{
name: 'BLT Sandwich',
meal: 'lunch'
},
{
name: 'Soup',
meal: 'lunch'
},
{
name: 'Burrito',
meal: 'lunch'
},
{
name: 'Indian Curry',
meal: 'dinner'
},
{
name: 'Grilled Chicken Caesar',
meal: 'dinner'
},
{
name: 'Fish & Chips',
meal: 'dinner'
}
]
```
# Lecture 4 - DOM Manipulation
## What methods can we use to find elements within the DOM?
- `querySelector`
- return first element that matches the CSS `selector` passed as an argument
- `querySelectorAll`
- returns All matching elements as a Nodelist (allows forEach)
- `getElementById` - takes a string with no # up front
- returns first element that has the ID passed as an argument
- `getElementsByTagName` - takes a string
- returns an HTMLCollection with all elements matching the tag name
- `getElementsByClassName` - takes a string with no . up front
- return an HTMLCollection with all elements matching the class name
## What methods can we use to add content to elements
- innerHTML =
- risky because user input will be rendered as HTML so they can be naughty and run their code on your site. XSS (Cross Site Scripting Attack)
- textContent =
- only can add text content, so HTML will show up as the code itself <script></script> it won't be executed
- innerText =
## Removing DOM Nodes
element.parentNode().removeChild(element) // => element.remove()
- element.remove() // doesn't return a value
- parent.removeChild(child) // returns the removed child
# Lecture 5 - DOM Events
## Agenda
- Review DOM Manipulation solution to TodoList exercise from yesterday
- Discuss how event listeners/handlers could be used to make our Music Library Application more dynamic
- Review the current state of our Music Library project
- Apply a couple of Event Listeners/Handlers to make the Music Library Application Dynamic
- Break
- Exercise: Apply a couple of similar event listeners/handlers to the Todo List application to make it more dynamic
- Discuss Solution to TodoList Exercise
## How can we use event listeners/handlers to make our Music Library Application More Dynamic?
- Add/Delete Songs from playlist
- play/pause (youtube embed handles this for us)
- form submit (for creating a new song for the playlist)
- reordering the playlist
- on clicks (what clicks would we want to handle? Clicking on a song should load it into the player)
## Music Library API
- `playlist`
- array of song objects with `name`, `artist`, `duration`, `playCount` and `youtubeLink`
- `formatDuration(duration)`
- takes a `duration` integer as an argument and returns a string formatted version
- `formattedDurationToSeconds(formattedDuration)`
- takes a string formatted duration as an argument and returns a `duration` integer in seconds.
- `copy(obj)`
- takes an object as an argument and returns a deep copy of it.
- `getPlaylistElement()`
- return the playlist element where songs will be added to the sidebar.
- `getSongNameElement()`
- return the element where the name of the song in the player will be displayed.
- `getArtistElement()`
- return the element where the artist of the song in the player will be displayed.
- `getPlayCountElement()`
- return the element where the play count for the song in the player will be displayed.
- `getPlayerElement()`
- return the element where the video player will be rendered.
- `renderSong(song)`
- takes a song object as an argument and returns an `li` element for display within the sidebar. This method also stores the `li` as an `element` property within the `song` object for later use.
- `loadPlaylistToSidebar()`
- takes the contents of the `playlist` variable and renders all of the songs as `li` elements, appending them to the playlist `ul` element in the sidebar.
- `addSongToPlaylist(playlist, song)`
- takes the playlist and a song as arguments. It adds the song to the playlist, passes it to `renderSong` and appends the returned `li` to the playlist `ul` element in the sidebar`.
- `removeSongFromPlaylist(playlist, youtubeLink)`
- takes the `playlist` and a `youtubeLink` as arguments and finds the `song` within the `playlist` that matches the `youtubeLink`, removes it from the `playlist` and removing its `li` element from the DOM.
- `extractVideoID(url)`
- helper method that takes a youtube url from a user and extracts the YouTube VideoID.
- `loadSongIntoPlayer(song)`
- takes a song as an argument and loads its details into the player.
- `songsByArtist(playlist, artist)`
- takes the `playlist` and an `artist` as arguments, populates the playlist in the sidebar with all songs whose artist matches the `artist` argument.
### Today's Changes
- Handle clicks on the Songs in the sidebar playlist by loading the song we clicked on into the player
- we'll need to attach an event listener to each list item in the sidebar.
- when one of them is clicked, we'll invoke `loadSongIntoPlayer` and pass in the appropriate `song` as an argument.
- Handle the New Song form submission - `handleNewSongSubmit(event)`
- we'll need to prevent the default behavior.
- we'll then need to attach an event listener to the newSong form.
- when the form is submitted, we'll pull the form data out of the form, use it to build a new `song` object and pass it to `addSongToPlaylist`.
## Todo List API
After we've reviewed the solution commit, I'll note a couple of changes that have been made below to make our event handlers a bit easier to write.
1. `addTask` now accepts a `dueDate` as an argument as well (allowing us to take user input for the dueDate upon creating the task).
2. `toggleComplete` now accepts a task object as an argument instead of the `todoList` and `taskLabel` (allowing us to always update the correct task by passing it as an argument from `renderTask` when we attach the event listener)
Here's the current state of our Todo List API as of the start of lecture 5
- `todoList`
- array of task objects with `label`, `complete`, and `dueDate` properties.
- `getTodoListElement()`
- returns the `todoList` element where tasks will be added.
- `renderTask(task)`
- takes a `task` object as an argument and returns an `li` element for displaying the task. This method also stores the `li` as an `element` property within the `task` object for later use.
- `loadTodoList(todoList)`
- takes the `todoList` as an argument, renders all of the tasks as `li` elements, appending them to the `todoList`.
- `addTask(todoList, taskLabel, dueDate)`
- takes the `todoList`, `taskLabel` and `dueDate` as arguments. It uses the `taskLabel` and `dueDate` to create a new task, add it to the `todoList` and append it to the `todoList` container.
- `removeTask(todoList, taskLabel)`
- takes the `todoList` and the `taskLabel` as arguments, finds the task that matches the `taskLabel`, removes it from the `todoList` and removes its `li` element from the DOM.
- `toggleComplete(task)`
- takes the `task` as an argument, toggles its `complete` property and invokes `renderTask` again to update the DOM.
## Key Takeaways
- Submit event handlers always have the submitted form as their `event.target`
- Form elements give you getter methods to retrieve their inputs by id. (If you have a form with an input that has an id of "nameInput", you can access the input like so: `event.target.nameInput`)
## Bonus
Event Delegation and Propagation:
```js
function attachListeners() {
document.attachEventListener('submit', (event) => {
if(event.target.matches('#newSong')) {
handleNewSongSubmit(event);
} else if(event.target.matches('#searchByArtist')) {
handleSearchByArtistSubmit(event);
}
})
}
function handleNewSongSubmit(event) {
event.preventDefault();
// grab data from form inputs and
// put it into a song object
// pass it to addSongToPlaylist
}
function handleSearchByArtistSubmit(event) {
event.preventDefault();
// grab data from form input
// pass it to songsByArtist
}
```
### Strengths with above approach
- You only need to define one event listener/handler for each type and you can keep them all together in your code in the same place
- Better for performance as it's easier for the browser to keep track of a single listener than many.
- Because it uses CSS to see if the event that was captured at the document level matches a particular selector, the listener will work even if the element that is its target hasn't been added to the page at the time the listener is created.
### Challenges with above approach.
- While events will propagate up to the document, the target of the event will remain the actual element we interacted with.
- For submit events, this is fine, because the target will be the form we submitted.
- For click events, the target will be the actual element clicked. Since the borders of an element are often not visible to users, this can be tricky to predict.
- If we need information related to the event within the event handler, we need to pull information from the target of the event itself. This is often done via the use of data attributes. We must ensure that the data attributes are accessible to the element that will be the target of the event.
[Read more about this approach](https://gomakethings.com/why-event-delegation-is-a-better-way-to-listen-for-events-in-vanilla-js/)
# Lecture 6 - Async JavaScript and Fetch requests
## Agenda
- Discuss Asynchronous functions in JS
- Discuss Promises and the event queue
- Fetch and .then()
- Add fetching songs to the Music Library App
- Break
- Add fetching tasks to TodoList App
- Solution Review
## Async callbacks (from [MDN article](https://developer.mozilla.org/en-US/docs/Learn/JavaScript/Asynchronous/Introducing))
Async callbacks are functions that are specified as arguments when calling a function which will start executing code in the background. When the background code finishes running, the callback function will be invoked to let you know the work is done, or to let you know that something of interest has happened.
Using callbacks is slightly old-fashioned now, but you'll still see them used in a number of older-but-still-commonly-used APIs.
An example of an async callback is the second parameter of the `addEventListener()` method (as we saw in action above):
```js
btn.addEventListener('click', () => {
alert('You clicked me!');
let pElem = document.createElement('p');
pElem.textContent = 'This is a newly-added paragraph.';
document.body.appendChild(pElem);
});
```
- first parameter is the type of event to be listened for
- second parameter is a callback function that is invoked when the event is fired.
- When we pass a callback function as an argument to another function, we are only passing the function's reference as an argument.
- The function is "called back" to within the enclosing function body, hence the name.
- If the callback function is not executed immediately when its enclosing function is invoked, we refer to it as an asynchronous (or async) callback.
## Not all Callbacks are Async
Note that not all callbacks are async — some run synchronously. An example is when we use [Array.prototype.forEach()](https://developer.mozilla.org/en-US/docs/Web/JavaScript/Reference/Global_Objects/Array/forEach) to loop through the items in an array:
```js
const gods = ['Apollo', 'Artemis', 'Ares', 'Zeus'];
console.log('before forEach')
gods.forEach(function (eachName, index){
console.log(index + '. ' + eachName);
});
console.log('after forEach')
```
In this example we loop through an array of Greek gods and print the index numbers and values to the console. The expected parameter of forEach() is a callback function, which itself takes two parameters, a reference to the array name and index values. However, it doesn't wait for anything — it runs immediately.
## Promises
Promises are the new style of async code that you'll see used in modern Web APIs. A good example is the [fetch()](https://developer.mozilla.org/en-US/docs/Web/API/fetch) API, which is basically like a modern, more efficient version of [XMLHttpRequest](https://developer.mozilla.org/en-US/docs/Web/API/XMLHttpRequest) (which you may still see in legacy code). Let's look at a quick example,
```js
console.log('before fetch')
fetch("https://api.tvmaze.com/singlesearch/shows?q=friends")
.then(function (response) {
console.log(response);
return response.json();
})
.then(function (json) {
console.log(json);
});
console.log('after fetch')
```
- Here we see `fetch()` taking a single parameter — the URL of a resource you want to fetch from the network — and returning a [promise](https://developer.mozilla.org/en-US/docs/Web/JavaScript/Reference/Global_Objects/Promise) for a [`Response`](https://developer.mozilla.org/en-US/docs/Web/API/Response) object.
- The promise is an object representing the evental completion or failure of the async operation.
- The promise is the browser's way of saying "I promise to get back to you with the answer as soon as I can," hence the name "promise."
Neither of the possible outcomes have happened yet, so the fetch operation is currently waiting on the result of the browser trying to complete the operation at some point in the future. We've then got three further code blocks chained onto the end of the fetch():
- Two `then()` blocks. **Both contain a callback function that will run if the previous operation is successful (a fulfilled promise), and each callback receives as input the result (return value) of the previous successful operation**, so you can go forward and do something else to it. Each `.then()` block returns another promise, meaning that you can chain multiple `.then()` blocks onto each other, so multiple asynchronous operations can be made to run in order, one after another.
- The `catch()` block at the end runs if any of the `.then()` blocks fail, receiving the error that caused the problem as an argument.
- 💡💡💡 **IMPORTANT NOTE**: In the case of `fetch`, if we get a response back from the server we sent the request to, that's considered a fulfilled promise.
- This means that even if we get an error response from our API, it's still considered a resolved promise as fetch was able to successfully retrieve a response (even though the response represented an error)
- We can get around this by checking if `response.ok` and throwing an error that we can catch if not.
```js
console.log('before fetch')
fetch("https://api.tvmaze.com/shows/1389478917389479827389474")
.then(function (response) {
console.log(response);
if(!response.ok) {
throw new Error('something went wrong')
}
return response.json();
})
.then(function (json) {
console.log(json);
})
.catch(function(error) {
console.log(error)
})
console.log('after fetch')
```
- 🤓🤓🤓 BONUS NOTE— in a similar way to synchronous [`try...catch`](https://developer.mozilla.org/en-US/docs/Web/JavaScript/Reference/Statements/try...catch) blocks, an error object is made available inside the `catch()`, which can be used to report the kind of error that has occurred. Note however that synchronous `try...catch` won't work with promises, although it will work with the [async/await](https://developer.mozilla.org/en-US/docs/Learn/JavaScript/Asynchronous/Async_await) syntax that you may wish to learn later on.
## The Event Queue
Async operations like promises are put into an **event queue**, which runs after the main thread has finished processing so that they *do not block* subsequent JavaScript code from running. The queued operations will complete as soon as possible then return their results to the JavaScript environment.
## Summary
In its most basic form, JavaScript is a synchronous, blocking, single-threaded language, in which only one operation can be in progress at a time. But web browsers define functions and APIs (like `setTimeout`, `addEventListener`, and `fetch`) that allow us to register functions that should not be executed synchronously, and should instead be invoked asynchronously when some kind of event occurs (the passage of time, the user's interaction with the mouse, or the arrival of data over the network, for example). This means that you can let your code tell the browser to do several things at the same time without stopping or blocking your main thread.
Whether we want to run code synchronously or asynchronously will depend on what we're trying to do.
There are times when we want things to load and happen right away. For example when applying some user-defined styles to a webpage you'll want the styles to be applied as soon as possible.
If we're running an operation that takes time however, like querying a database and using the results to populate templates, it is better to push this off the stack and complete the task asynchronously. Over time, you'll learn when it makes more sense to choose an asynchronous technique over a synchronous one.
## Key Takeaways
### Order of Operations
Sync code runs before Async code.
One of the most important things to take away from this conversation is that asynchronous callbacks will always execute after surrounding synchronous code.
```js
window.setTimeout(() => console.log('async'), 0);
for(let i = 0 ; i < 10000 ; i++) {
console.log('sync');
}
for(let i = 0 ; i < 2000 ; i++) {
console.log('sync');
}
```
### Promises
If a promise is fulfilled, we can attach an async callback that will receive the resolved value via `.then()`. If the promise is rejected, the error can be captured and handled via `.catch()`
Both `.then()` and `.catch()` are called on a `Promise` and return a `Promise`, allowing us to create a chain of asynchronous actions that happen in a particular order.
### Fetch
```js
console.log('before fetch')
fetch("https://api.tvmaze.com/singlesearch/shows?q=friends")
.then(function (response) {
console.log(response);
return response.json();
})
.then(function (show) {
console.log(show);
});
console.log('after fetch')
```
- `fetch` returns a `Promise` that will resolve to a [`Response`](https://developer.mozilla.org/en-US/docs/Web/API/Response#methods) object if the browser is able to connect to the serve rand receive one.
- the first `.then()` callback receives the resolved `response` as an argument.
- The `.json()` method is defined within the `Response` object and it returns a promise that resolves with the result of parsing the response body text as JSON (this converts the string formatted body into the JavaScript data structure that it represents)
- The following `.then()` callback receives the resolved value of hte previous promise. This is the JS data structure represented in the body of the response (an object or an array of objects)
## Integrating Fetch for Post Requests
```
json-server --watch db.json
```
```js
fetch('http://localhost:3000/songs', {
method: 'POST',
headers: {
'Content-Type': 'application/json'
},
body: JSON.stringify(song)
})
.then(response => response.json())
.then(savedSong => {
addSongToPlaylist(playlist, savedSong);
event.target.reset()
})
```
---
- [Fix json-server conflict with Live Server](https://gist.github.com/ihollander/cc5f36c6447d15dea6a16f68d82aacf7)
- [json-server](https://www.npmjs.com/package/json-server)
- [Postman](https://www.postman.com/) (for api testing)
- [JSONView Chrome extension](https://chrome.google.com/webstore/detail/jsonview/chklaanhfefbnpoihckbnefhakgolnmc?hl=en) (for pretty viewing of JSON formatted data in browser)
- [Asynchronous JavaScript Article Series from MDN](https://developer.mozilla.org/en-US/docs/Learn/JavaScript/Asynchronous)
# Phase 1 Lecture 7 - CRUD with Fetch - POST requests
## Agenda
- Review Refactors of the Music Library Application
- The current version of the application relies on `fetch` to retrieve data from db.json rather than storing the songs within `playlist`.
- Build out Create by connecting the three pillars.
- Discuss data attributes and their use within event handlers to interact with key information.
## Three Pillars
- Recognize Events (Behavior)
- DOMContentLoaded to populate the list of songs and load the first into the player
- Clicking on a Song to load it into the player
- Submitting the new song form
- Submitting the new comment form
- Communicate with the Server (Data)
- GET all songs
- POST new song
- GET all comments on a particular song.
- POST new comment
- Manipulate the DOM (Display)
- A function that takes song data as an input and uses it to add the song to the DOM along with its related comments
- A function that takes persisted comment data as an input and uses it to add the comment to the DOM.
- A function that takes an array of songs as an argument and renders each of them as an `li` element in the sidebar.
- A function that takes an array of comments as an argument and renders them to the comments container below the player.
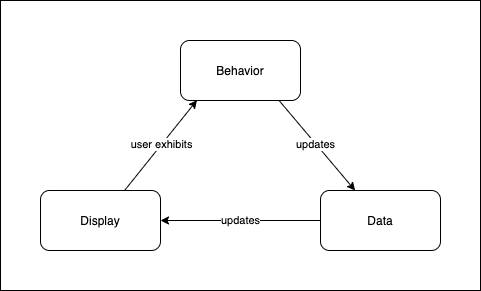
## Behavior
> - Event Listeners to watch for user behaviors we want to respond to (starting with DOMContentLoaded)
> - Event handlers that respond to those behaviors by updating our data and subsequently the DOM.
## Data
> - Variables we define to keep track of the state of our application.
> - Information we retrieve from our server relating to our application.
## Display
> - DOM nodes that serve as containers for displaying our data
> - Functions that take data as an input and update the DOM accordingly.
## Music Library API
### Behavior
- DOMContentLoaded
- load all songs from database and into sidebar
- load first song into player
- Click
- Song => Load the appropriate song into the player
- Submit
- NewSongForm => Add song to Database and then into sidebar
### Data
- Requests
- `getSongs()` => fetches all songs from database. It returns a promise for an array of song objects.
- `createSong(songData)` => takes in song data, stringifies it, and posts it to database. It returns a promise for a single song object.
- Utilities
- `extractVideoId(url)` => takes a youtube video/embed/playlist url and extracts and returns the youtube Video ID. (to be used in the src for the iframe to allow the video embed)
### Display
- `renderSong(song)` takes a song object as an argument and creates an `li` element that will represent it in the DOM, appends it to the sidebar.
- `loadSongIntoPlayer(song)` takes a song object as an argument and loads its details into the player. (After today, this will also load its comments below the video)
### Today's Changes
#### Behavior (Recognizing Events)
- Submit
- New Comment Form => pull data out of form and pass it to `createComment` which will update the database and then the DOM using the `renderComment` method.
- Click
- When a user clicks on a song within the sidebar (this event listener/handler already exists!) load the comments corresponding to that song from DB and then into the DOM.
#### Data (Communicating with the Server)
- `createComment(commentData)` => takes a commentData object (with comment and songId properties) as an argument, adds them to the database and passes the persisted comment to `renderComment`
- `getComments(song)` => fetches all comments from the database that have a songId matching the song's id. Pass the comments to `renderComments`
#### Display (DOM Manipulation)
- changes in `index.html`
- add a container for comments with an id of `comments`.
- Add a form to create a new comment with an id of `newComment`. The form should have:
- a textarea input with an id of `commentInput`
- a data attribute for the `songId` of the song that is currently loaded into the player.
- `renderComment(comment)` => takes a comment object as an argument, creates a DOM element to display it and appends it to the DOM.
- `renderComments(comments)` => takes an array of comment objects as an argument, clears out the DOM container for the comments and appends all of the comments passed each as an argument to `renderComment`.
## Creating Comments
### We know we have 3 pillars of JS to handle, where should we start?
## What additional features could we add to the Music Library API?
For each, use the three pillars model to describe the code we'd need to add or change to support them.
- playing a random song
- a button for playing a random song with click handler
- function that returns random id number to play (we'd need to know the ids)
- fetch all songs and pick random index, pull out song at that index
- persisting play count
- what event would we listen for here?
- Add click event listener to the player element (we'd need access at that point to the id of the song we want to increment the play count for)
- make comments likable and order them by number of likes
- delete comments
- Add genres to songs and an option to filter by genre
- shuffle button
- remove song from playlist
- repeat song (might be able to hit play button again)
Which of the above involve interacting with DB?
- persisting play count (PATCH)
- make comments likable and order them by number of likes (PATCH/POST in more robust & realistic solution)
- delete comments
- remove song from playlist
## Tomorrow we'll focus on Adding PATCH and DELETE requests
# Lecture 8 CRUD with Fetch - PATCH and DELETE requests
## Editing Content
- Edit Form
- Inline inputs to display content
We can have an edit form for a song that is a separate from our displayed song.
Or, we can display our songs using inputs without borders so they don't appear as inputs until clicking on one of them.
Instead of displaying the information within an `h2` element, we can use an `input` tag. This will allow our users to click upon the element and edit its content.
Say we start with this markup:
```html
<h2 id="song-name" class="text-2xl p-2">No Song Selected</h2>
<div class="relative" style="padding-top: 56.25%">
<iframe id="player-frame" class="absolute inset-0 w-full h-full" frameborder="0" /></iframe>
</div>
<div class="flex justify-between mt-2">
<span id="artist"></span>
<span id="play-count"></span>
</div>
```
We can update it to this:
```html
<form id="editSong">
<h2 class="text-2xl p-2">
<input id="song-name" class="w-full" value="No Song Selected" />
</h2>
<div class="relative" style="padding-top: 56.25%">
<iframe id="player-frame" class="absolute inset-0 w-full h-full" frameborder="0" /></iframe>
</div>
<div class="flex justify-between mt-2">
<input id="artist" class="w-3/4" />
<span><input id="play-count" class="w-8" type="number" /> play(s)</span>
</div>
</form>
```
This won't work for the iframe, sadly, but should work for the name, artist and play count. Before we hook things up, though, we need to rework the function that loads the content into these DOM containers. Now that they're inputs, we'll need to use the `value` property instead of `textContent`.
```js
const loadSongIntoPlayer = (song) => {
document.querySelector('#song-name').textContent = song.name;
document.querySelector('#artist').textContent = song.artist;
document.querySelector('#play-count').textContent = song.playCount === 1 ? '1 play' : `${song.playCount} plays`;
document.querySelector('#player-frame').src = `https://www.youtube.com/embed/${extractVideoID(song.youtubeLink)}`;
document.querySelectorAll('#playlist li').forEach(li => {
li.classList.remove('bg-gray-100')
})
document.querySelector('#newComment').dataset.songId = song.id;
// clear out the comments list and load comments for this song into the comments part of the DOM
document.querySelector('#comments').innerHTML = "";
getComments(song)
.then(renderComments)
}
```
We will also want to add the songId as a data attribute of the form when we load the song into the player. The function will become this:
```js
const loadSongIntoPlayer = (song) => {
document.querySelector('#song-name').value = song.name;
document.querySelector('#artist').value = song.artist;
document.querySelector('#play-count').value = song.playCount;
document.querySelector('#player-frame').src = `https://www.youtube.com/embed/${extractVideoID(song.youtubeLink)}`;
document.querySelectorAll('#playlist li').forEach(li => {
li.classList.remove('bg-gray-100')
})
document.querySelector('#editSong').dataset.songId = song.id;
document.querySelector('#newComment').dataset.songId = song.id;
// clear out the comments list and load comments for this song into the comments part of the DOM
document.querySelector('#comments').innerHTML = "";
getComments(song)
.then(renderComments)
}
```
This covers the display portion of our 3 pillars approach, leaving behavior and data remaining. This time we're working backwards, starting with the display logic then moving to the data and finally hooking up the event listeners/handlers to handle behavior.
### Data
```js
const updateSong = (songId, songData) => {
return fetch(`http://localhost:3000/songs/${songId}`, {
method: 'PATCH',
headers: {
'Content-Type': 'application/json'
},
body: JSON.stringify(songData)
})
.then(res => res.json())
}
```
### Behavior
In this case, the behavior we're tracking is users interacting with the inputs within our form.
But, since we're editing inline, and the content doesn't look like a form, it would be better if we could trigger auto-saves so that our changes are persisted without having to press a save button or hit enter to submit the form.
In order to do this, we can add a different kind of event listener to our form: `keyup`. This way, whenever a user types in one of our form inputs, a `patch` request will be sent automatically to update our API with the new value.
```js
const editSongForm = document.querySelector('#editSong')
editSongForm.addEventListener('keyup', (e) => {
triggerSongAutoSave()
})
const triggerSongAutoSave = () => {
const songId = editSongForm.dataset.songId;
const songData = {
name: document.getElementById('song-name').value,
artist: document.getElementById('artist').value,
playCount: parseInt(document.getElementById('play-count').value, 10)
};
updateSong(songId, songData)
.then(renderSong)
}
```
Let's try this out in the browser now, we can see in our network tab that patch requests are triggered every time we update the name or artist of a song, but we've got a couple of bugs:
1. No patch requests are triggered if we click on the up and down errors to update the playCount, but patch reequests are sent if we click on the input and then use the up and down arrows on the keyboard.
2. Every time we change one of the values and the patch goes through, another copy of the song is added to the playlist in the sidebar.
Let's fix the 2nd one first.
### Fixing Duplicate renders upon song update
This one happens because `renderSong` is creating a new list item for the updated song instead of updating the existing list item. We can fix this by changing the first line of the function where we define the `li` constant.
```js
const li = document.createElement('li');
```
Currently, this line of code will always create a new list item. Instead, we want to first check if we have a list item tag for this song already. The way we can do that is by taking a look one line down in the method:
```js
li.dataset.songId = song.id;
```
The `renderSong` function creates the list item and assigns the song's id as a data attribute. This will allow us to query the DOM to see if we've already rendered an `existingLi` for this song before creating a new one. If we assign the `li` constant to the `existingLi` element, then all subsequent lines in the method will update the existing DOM node rather than a brand new one. The `append` method only sets the parent of the appended node to the node upon which we called `append`. So, if the appended node is already a child of the target node, no duplicate is added.
We can use the attribute selector to query the DOM for an existing li.
```js
const existingLi = document.querySelector(
`#playlist li[data-song-id="${song.id}"]`
)
const li = existingLi || document.createElement('li')
```
If we try it now, we'll notice that the edited `li` element gets moved to the bottom of the list. We want it to update, but we don't want it to move!
To fix this, let's try only doing the `target.append(li)` code if we don't already have an `existingLi`.
```js
if (!existingLi) {
const target = document.querySelector('#playlist');
target.append(li);
}
```
After the update, our `renderSong` function looks like this:
```js
const renderSong = (song) => {
const existingLi = document.querySelector(
`#playlist li[data-song-id="${song.id}"]`
)
const li = existingLi || document.createElement('li')
li.dataset.songId = song.id;
li.className = "flex justify-between p-2 pr-4 cursor-pointer";
li.innerHTML = `
<div>
<span class="song font-semibold"></span>
<span class="artist"></span>
</div>
<div class="duration text-gray-400"></div>`;
li.addEventListener('click', (e) => {
loadSongIntoPlayer(song);
li.classList.add('bg-gray-100')
})
const songEl = li.querySelector('.song');
const artistEl = li.querySelector('.artist');
const durationEl = li.querySelector('.duration')
songEl.textContent = song.name;
artistEl.textContent = `by ${song.artist}`;
durationEl.textContent = song.duration;
if (!existingLi) {
const target = document.querySelector('#playlist');
target.append(li);
}
return li;
}
```
Now, if we visit our application in the browser, we can update the name of a song in the main content area and see the song's name update within the sidebar in response!
### Making sure we can update the play count by clicking or using the keyboard
The issue here is coming from the fact that the keyup event isn't as good of a fit for the number type input as we can change it by clicking on the up and down arrows without actually pressing a key. Instead, we can attach a `change` event to this number input that will fire off the update.
```js
document.querySelector('#play-count').addEventListener('change', (e) => {
triggerSongAutoSave()
})
```
Now, if we go over to the browser, we can click on the up and down arrows and it does trigger a PATCH request as expected.
But, if we click on the input and then use the keyboard to change the input, we're getting 2 patch requests every time we press the up or down key.
<details>
<summary>
Why are we seeing 2 PATCH requests here?
</summary>
<hr/>
We have two event listeners that are triggered by the keyboard event that targets the number input. The one attached to the form and the one attached to the input itself.
We can fix this is in two different ways. We can:
- rework the listeners so that we're only applying a 'change' listener to the number input and apply 2 separate listeners to the other two inputs, OR
- introduce debouncing to our `triggerSongAutoSave` function so that if we call it multiple times in quick succession, it waits briefly before going through with the update and only performs the last queued update. (This technique is often used when typing in an input that triggers a search when you pause typing briefly)
<hr/>
</details>
<br/>
I'm going to show you a simple example of debouncing, because I think it's pretty cool. I've also included a couple of links below if you'd like to explore further with a more practical and reusable `debounce` function. For now, we're going to do the least amount possible to get this technique working.
This is how the `triggerSongAutoSave` function currently looks:
```js
const triggerSongAutoSave = () => {
const songId = editSongForm.dataset.songId;
const songData = {
name: document.getElementById('song-name').value,
artist: document.getElementById('artist').value,
playCount: parseInt(document.getElementById('play-count').value, 10)
};
updateSong(songId, songData)
.then(renderSong)
}
```
What we want to do is to declare a timeout variable outside the scope of this function. We'll call it `queuedSongAutoSave`.
These are our steps:
- create `queuedSongAutoSave` outside the function
- clear the previous `queuedSongAutoSave` every time the function is called
- reassign `queuedSongAutoSave` to another timeout to trigger the API/DOM update
The goal is to ensure that a user pauses in their typing briefly before we actually go through with updating the API & the DOM.
```js
let queuedSongAutoSave;
const triggerSongAutoSave = () => {
window.clearTimeout(queuedSongAutoSave);
queuedSongAutoSave = window.setTimeout(() => {
const songId = editSongForm.dataset.songId;
const songData = {
name: document.getElementById('song-name').value,
artist: document.getElementById('artist').value,
playCount: parseInt(document.getElementById('play-count').value, 10)
};
updateSong(songId, songData)
.then(renderSong)
}, 300)
}
```
The way this works in practice is that if we trigger multiple auto saves in quick succession–where each one is within 300 milliseconds of the next–only the last auto save with the most recent info will actually go through updating the API and the DOM. Once somebody triggers a change to the form and does nothing for 300 milliseconds, the update will go through.
- [Debouncing on freecodecamp](https://www.freecodecamp.org/news/javascript-debounce-example/)
- [Debouncing in JS on dev.to](https://dev.to/abhishekjain35/debouncing-in-javascript-276j)
## Deleting Songs from the Playlist
### Display
Add a button with a trash icon inside to the header that will delete the song from the playlist.
```js
<h2 class="text-2xl p-2 flex justify-between">
<input id="song-name" class="w-5/6" value="No Song Selected" />
<button id="deleteSong">
<i class="fas fa-trash-alt"></i>
</button>
</h2>
```
We'll also need to add the fontawesome cdn link within the `head` tag of the `index.html` file so that our trash can icon will work:
```html
<link href="https://cdnjs.cloudflare.com/ajax/libs/font-awesome/5.13.0/css/all.min.css" rel="stylesheet">
```
We'll add the song's id to the button so that when we click on the button, we can retrieve the id of the song we need to delete.
```js
document.querySelector('#deleteSong').dataset.songId = song.id;
```
This button will always be visible and will always delete the selected song from the playlist.
Currently, the background color added to the song that is loaded into the player is added in the event handler within `renderSong` that runs when we click on a song in the sidebar playlist.
```js
li.addEventListener('click', (e) => {
loadSongIntoPlayer(song);
li.classList.add('bg-gray-100')
})
```
This means that it won't be added when we use the `loadSongIntoPlayer` function to load a new song into the player after we've deleted one. We'll want to remove that line from there and add the following line to the `loadSongIntoPlayer` function instead.
```js
document.querySelector(`#playlist li[data-song-id="${song.id}"]`).classList.add('bg-gray-100')
```
### Data
In this case, our delete request does not require a Content-Type header or a body, because deleting a record only requires the id (included in the URL) of the record to be deleted.
```js
const deleteSong = (songId) => {
return fetch(`http://localhost:3000/songs/${songId}`, {
method: 'DELETE'
})
}
```
Since JSON-server sends an empty response body upon deleting a record, we're also going to skip the `.then()` call back where we generally parse the response body as json using `res.json()`.
Again, it's important that this function returns a promise so we can use it within a chain of promises within our event handler.
### Behavior
For this last piece, things get a little trickier. This is because if we remove a song from the playlist and its currently loaded into the player, we need to make sure that the song currently loaded into the player is updated to a new song.
To do this, we need to handle different cases. If we delete the last song in the playlist, the next selected song should be the one before it. If we select any other song in the playlist, the next selected song should be the one after it.
We need to:
- declare an empty variable that will hold the `nextSelectedSong`
- get the id of the song we're trying to delete
- find the index of that song within an array of songs stored in the db
- assign the `nextSelectedSong` to the appropriate song
- then delete the appropriate song
- then remove the deleted song's DOM node from the sidebar
- then load the `nextSelectedSong` into the player.
```js
document.getElementById('deleteSong').addEventListener('click', (e) => {
let nextSelectedSong;
const songIdToDelete = document.querySelector('#deleteSong').dataset.songId;
getSongs()
.then(songs => {
const index = songs.findIndex(song => song.id == songIdToDelete)
if (songs.length - 1 === index) {
nextSelectedSong = songs[index - 1]
} else {
nextSelectedSong = songs[index + 1]
}
})
.then(() => deleteSong(songIdToDelete))
.then(() => {
document.querySelector(`#playlist li[data-song-id="${songIdToDelete}"]`).remove();
loadSongIntoPlayer(nextSelectedSong)
})
console.log('delete button clicked')
})
```
Finally, there's one more edge case here that we haven't considered.
What if there's only one song in the playlist?
In that case, we might want to hide everything in the main container, as it won't make sense to display the player if we have no songs in the playlist. The simplest was to do this is to add a class called `hidden` to the `section#main` if `nextSelectedSong` is falsey.
```js
document.getElementById('deleteSong').addEventListener('click', (e) => {
let nextSelectedSong;
const songIdToDelete = document.querySelector('#deleteSong').dataset.songId;
getSongs()
.then(songs => {
const index = songs.findIndex(song => song.id == songIdToDelete)
if (songs.length === 1) {
nextSelectedSong = null;
} else if (songs.length - 1 === index) {
nextSelectedSong = songs[index - 1]
} else {
nextSelectedSong = songs[index + 1]
}
})
.then(() => deleteSong(songIdToDelete))
.then(() => {
document.querySelector(`#playlist li[data-song-id="${songIdToDelete}"]`).remove();
if (nextSelectedSong) {
loadSongIntoPlayer(nextSelectedSong)
} else {
document.querySelector('#main').classList.add('hidden');
}
})
console.log('delete button clicked')
})
```
If we do this, then the main section of our page will continue to be hidden after we delete the only song in our playlist. If we were to then add a new one, it would be invisible. So, we we need to add a line to `loadSongIntoPlayer` that removes the `hidden` class from the main section when we load another song into the player.
```js
document.querySelector('#main').classList.remove('hidden');
```
We can test this out by making a copy of our db.json file, using it briefly with JSON server and removing all but one song to ensure this works the way we expect. If we're using live-server, we'd also need to make sure that VSCode is ignoring changes to the db-copy.json file as well:
- Use command pallete (Shift + Cmd + P on Mac OR Shift + Ctrl + P on PC) to Open Settings (JSON)
- Add `"**/db-copy.json"` to the `"liveServer.settings.ignoreFiles"` array
mine looks like this:
```json
"liveServer.settings.ignoreFiles": [
".vscode/**",
"**/db.json",
"**/db-copy.json",
"**/README.md",
"**/EXERCISE.md"
]
```
## Exercise
- Within the `renderComment` function, add event listeners to handle updating and deleting comments.
- Add functions called `updateComment` and `deleteComment` that both return promises.
- `updateComment` will accept both its `id` and the commentData (an object with a comment property) as arguments. It sends a PATCH request using the `id` in the url and the comment in the body.
- `deleteComment` will accept a `commentId` as an argument that will send a DELETE request to delete the comment from the database.
- Within the event handler in `renderComment` for clicking on the delete button, chain on a .then to deleteComment and remove the comment node from the DOM.
### Stumbling Blocks
- Lots of code to look at
- Getting your bearings in code that was written by someone else
- Troubleshooting - googling and then not understanding the article you read.
# Lesson 9 - ES6
## Agenda
- Review examples of ES6 Syntax that you're already familiar with
- Introduce a few new ES6 Features you'll be making more use of in React within Phase 2
## [Top 10 ES6 Features](https://www.boardinfinity.com/blog/top-10-features-of-es6/)
- **let and const Keywords**
- **Arrow Functions**
- **Multi-line Strings**
- **Default Parameters**
- **Template Literals**
- Destructuring Assignment
- **Promises**
- Classes
- Modules
Of these 10 above, we've seen and/or made use of over half of them already (highlighted in bold above)
We can see a [more complete list here](http://es6-features.org/). I'm going to hone in on a few that didn't make the top 10 list that will be useful to keep in mind when you move into the next phase.
## Today's Focus
- Arrow function Syntax Review
- Destructuring Assignment
- Object Property shorthand
- Computed Property Names
- The Spread operator (for objects and arrays)
- Review of Pass by Reference vs Pass by Value
## Arrow functions Syntax
<details>
<summary>
When do we need curly braces?
</summary>
<hr/>
When we have a function body containing more than a single expression, the body must be surrounded with curly braces.
<hr/>
</details>
<br/>
<details>
<summary>
When do we need to use the return keyword and when can we skip it?
</summary>
<hr/>
we only need the `return` keyword in an arrow function when we add curly braces after the arrow. If the arrow is followed by a single expression (and no curly braces) the expression's return value will be implicitly returned from the function.
<hr/>
</details>
<br/>
<details>
<summary>
When do we need parentheses around the parameters list?
</summary>
<hr/>
Parentheses are required around the parameters list for all arrow functions except those that accept a single parameter.
<hr/>
</details>
<br/>
### Arrow functions vs function declarations (function keyword functions)
The main differences here that would actually affect our choice of whether to use an arrow function or a regular function declaration have to do with some concepts in JavaScript that we haven't explored at this point.
For now, it's important to know that arrow functions are a shorthand for function declarations. They work well for most of the common use cases like callbacks for event listeners and fetch calls, but they do have some limitations. There are more advanced use cases where the full functionality of the function declaration is required. You can read more about [when you should use arrow functions in javascript](https://stackoverflow.com/questions/22939130/when-should-i-use-arrow-functions-in-ecmascript-6) in this stack overflow thread.
During the course, you likely won't run into a situation where you'd need to use a function declaration instead of an arrow function, so feel free to use them exclusively if you prefer.
## Object Property shorthand
In ES6, we can create an object containing variables we've defined as values corresponding to their variable names as keys without having to repeat ourselves. Say we have these variables:
```js
const name = "Dakota";
const state = "California";
const favoriteFood = "Indian Curry";
```
We want to build up an object containing that information-maybe so we can use `JSON.stringify` to prepare it for inhabiting the `body` of a PSOT request.
Without the shorthand, we could do:
```js
const body = {
name: name,
state: state,
favoriteFood: favoriteFood
}
JSON.stringify(body);
```
with the shorthand, we can skip the values:
```js
const body = {
name,
state,
favoriteFood
}
JSON.stringify(body);
```
Looking at that, we could actually inline this in 1 line:
```js
JSON.stringify({name, state, favoriteFood})
```
## Destructuring Assignment
If we have an object, we can pull multiple properties out of it as variables using destructuring assignment.
```js
const obj = {
name: 'Dakota',
state: 'California',
favoriteFood: 'Indian Curry'
}
const { name, state, favoriteFood } = obj;
console.log(name, state, favoriteFood)
```
This can be especially useful within a parameter list.
Take the following code as an example:
```js
const renderComment = (record) => {
const target = document.querySelector('#comments');
const p = document.createElement('p');
p.className = "flex justify-between";
p.innerHTML = `
<input class="w-5/6" />
<button><i class="fas fa-trash-alt"></i></button>
`
const input = p.querySelector('input');
const deleteBtn = p.querySelector('button');
input.value = record.comment;
// add event listeners for updating or deleting a comment
input.addEventListener('keyup', (e) => {
updateComment(record.id, { comment: e.target.value });
})
deleteBtn.addEventListener('click', (e) => {
deleteComment(record.id)
.then(() => p.remove())
})
target.append(p);
}
```
Inside of this function, we're accessing the `id` and `comment` properties of the `record` passed as an argument. But, we really don't need to access the object as a whole within the function, just its properties.
So, we can destructure those properties directly from the object passed as an argument.
```js
const renderComment = ({id, comment}) => {
const target = document.querySelector('#comments');
const p = document.createElement('p');
p.className = "flex justify-between";
p.innerHTML = `
<input class="w-5/6" />
<button><i class="fas fa-trash-alt"></i></button>
`
const input = p.querySelector('input');
const deleteBtn = p.querySelector('button');
input.value = comment;
// add event listeners for updating or deleting a comment
input.addEventListener('keyup', (e) => {
updateComment(id, { comment: e.target.value });
})
deleteBtn.addEventListener('click', (e) => {
deleteComment(id)
.then(() => p.remove())
})
target.append(p);
}
```
## The Spread Operator (...)
<details>
<summary>
What does the spread operator do?
</summary>
<hr/>
It allows us to spread out the contents of an array or object into another array or object.
This is useful for making shallow copies of an existing array or object.
We say the copy is shallow because if the original object or array has values that are also objects or arrays, those values are passed by reference.
<hr/>
</details>
<br/>
```js
const arr1 = [1,2,3];
const arr2 = [3,4,5];
// how could I use the spread operator to
// get the following array: [1,2,3,4,5,6]
```
## Computed Property Names
If we want to add a property to an object dynamically (where the key is the return value of some expression rather than a literal value) ES6 allows us to surround the property name with `[]` to use the computed value of the expression as the property name. One example of this is the case where we're tracking the current state of a form within an object:
```js
let formState = {};
const inputs = document.querySelectorAll('input')
inputs.forEach(input => input.addEventListener('change', (e) => {
const {name, value} = e.target;
formState[name] = value
})
```
This would be fine for now, but the change will actually mutate the `formState` object.
When we get to React, it will become important not to mutate objects that are keeping track of state, but rather to use them as a starting point to create a modified copy. There are lots of pesky bugs that can occur if we mutate state objects directly. Rather, it's a convention in React to replace the state with a new object without modifying the previous object.
There are a couple of nice syntaxes in ES6 that we can use for this. Both of them rely on computed property names.
### Object.assign()
`Object.assign()` allows us to merge objects together. It is also destructive of the target object. For example:
```js
formState => Object.assign(formState, {[name]: value})
```
Will use the computed property value of the name of our input as the key to merge into the formState object. The `formState` object is the target object and will be modified by the change. In this case, `formState` will actually refer to the same object as before the change, just the modified version.
If we want to create a copy, we can pass an empty object as the first argument and then add the other objects as subsequent arguments:
```js
formState => Object.assign({}, formState, {[name]: value})
```
### Object spread {...}
The Object spread operator allows us to do the same with a more compact syntax.
```js
formState => {...formState, [name]: value}
```
This is more frequently seen like this:
```js
formState => return {
{
...formState,
[name]: value
}
}
```
These actual examples don't make as much sense now in phase 1, but in react there will be a function you'll call to update the state of your UI. If the new state is derived from the old state, you'll want to pass in another function that will take the old state as an argument and return the new state in such a way that the previous state is not modified. This has to do with the way React works internally and will help prevent bugs that are difficult to diagnose.
In practice, you'll have a state variable and a function that will update that variable. Rather than updating the variable directly, you'll call the function to assign the new value for the state. The new state will sometimes be based on the original. So, to continue with the example, let's stay we have a state variable called `formState` and a function to update it called `setFormState`. It will actually end up looking something more like this:
```js
const handleInputChange = (e) => {
const { name, value } = e.target;
setFormState(formState => {
return {
...formState,
[name]: value
}
})
}
```
The main reason that we don't just reassign the `formState` variable to a new value in react is that the function we use to update the `formState` variable in React doesn't **only** update the value of the variable. Calling the function to update the `formState` **also** tells React to take a look at our UI and:
1. See if the change to `formState` should result in a change to the DOM.
2. Make the change to the DOM for us if so.
So, it's important that we get clear on what methods we call are destructive (will mutate the object they're called on) and which are not.
## Review of the difference between Pass by Reference and Pass by Value
<details>
<summary>
What data types in JavaScript are passed by value?
</summary>
<hr/>
- Booleans
- Null
- Undefined
- Numbers
- BigInts
- Strings
- Symbols
<hr/>
</details>
<br/>
<details>
<summary>
What data types in JavaScript are passed by reference?
</summary>
<hr/>
Objects (includes: arrays, objects, dates, promises, functions and more)
<hr/>
</details>
<br/>
```js
true === true // =>
null === null // =>
undefined === undefined // =>
1 === 1 // =>
{} === {} // =>
[] === [] // =>
function(){} === function(){} // =>
new Date('2021-12-22') === new Date('2021-12-22') // =>
```
<details>
<summary>
How can I tell the difference in practice?
</summary>
<hr/>
For pass by value types, we can do a `===` comparison between two examples of the type that look the same and we'll get true.
For pass by reference types, we can do a `===` comparison between two examples of the type that look the same and we'll get false. (Unless we're actually comparing two references to the same object)
<hr/>
</details>
<br/>
<details>
<summary>
Why does the difference between pass by reference and pass by value matter?
</summary>
<hr/>
If we need to avoid mutating objects, we need to pay attention to arguments that are passed by reference.
Reference types can be mutated because the reference to the object/array/function/whatever is passed around.
Value types cannot be mutated because they represent a more abstract idea. All interactions with them result in a different example of the same type, not a modified version of the original.
```js
let t = true;
let hungry = t;
// negate the value of the hungry variable
hungry = !hungry;
// now hungry refers to `false` instead of `true`
// but the underlying value of `true` remains unaffected
// t still refers to `true`
t === hungry // =>
```
Try the same when the value is an object and the result changes
```js
let t = {hungry: true};
let hungryObj = t;
// negate the avlue of hungry within the object
hungryObj.hungry = !hungryObj.hungry;
// now hungryObj.hungry refers to `false` instead of true
// while the boolean value itself isn't mutated
// because it's not a reference type, in this case,
// changing a property of `hungryObj` does affect `t` // because the object is passed by reference when we
// assign `t` as the value for `hungryObj`
t === hungryObj
```
In react, if we're storing a primitive type that will be passed by value, we don't need to worry about modifying the previous state by accident.
If we're storing a reference type in state, we do! So, in those cases, we'll create a copy of the original object and modify the copy without affecting the original.
<hr/>
</details>
<br/>
## Final Aside
### Let and Const vs var
We've focused mainly on working with the ES6 keywords `let` and `const` for declaring variables. This is what you'll be doing in most cases, but you still will see `var` out and about in older codebases.
One key difference to keep in mind is that `let` and `const` are both block scoped, meaning that we can't create **truly** global variables using either in the same way we can with `var`. If we define a variable using either `let` or `const` , the variable will be available in global scope, but it won't be added as a property of the `window` (global) object.
You may encounter 3rd party libraries offered by other software as a service businesses (like [cloudinary](https://cloudinary.com/) that add a property to the global object that you can access from your code. Using the `var` keyword to declare variables will add them to the global object, `window`. Declaring named functions using the function keyword will also add those functions to the global `window` object.
If you're refactoring old code that uses `var` and converting `function` declarations to arrow functions, make sure to look out for references to those variables or functions that are made directly on the window object (`window.varName` or `window.functionName`) as those will no longer work after you change to the new syntax.
In practice:
- stick with `const`
- use `let` if the variable may be reassigned later on
- avoid using `var`
## Resources
- [Top 10 features in ES6](https://www.boardinfinity.com/blog/top-10-features-of-es6/)
- [When should I use Arrow functions in JavaScript](https://stackoverflow.com/questions/22939130/when-should-i-use-arrow-functions-in-ecmascript-6)
- [Object property shorthand in ES6](https://attacomsian.com/blog/javascript-object-property-shorthand)
- [Instantly Invokved Functional Expressions (IIFE) vs ES6 block scope](https://wesbos.com/es6-block-scope-iife)
- [ES6 Features List](http://es6-features.org/)
- [caniuse.com](https://caniuse.com/)
 Sign in with Wallet
Connect another wallet
Sign in with Wallet
Connect another wallet