# SENG-LIVE-011022 - Phase 1 Lecture Notes
# JS Variables and Data Types
💡 Why do we use data types in JavaScript, and what do they help us to accomplish as developers?
- Help us differentiate between different types of data
- different data types have different methods we can access
- primitive data types
- more abstract, they represent an idea that isn't changeable
- true is true
- "name" is "name"
- string
- number
- boolean
- undefined
- null
- symbols
- NaN
- reference data types
- objects
- arrays
- would we use let or const?
- const - because we're not reassigning the array to a new value, but we can still add or remove elements from the array.
Primitive values that I'm going to have the computer remember (using a variable) require the `let` keyword.
Reference values that I'm going to have the computer remember (and update over time) can use the `const` keyword, as long as I'm never reassigning the value to another reference type object.
## Addition
```js
"hello" + "world"
```
## Let vs Const
- pick let when the variable is going to change
- loop counter
- we can reassign a varible declared with the `let` keyword
- we cannot redeclare a variable with the same name (with either let or const)
- pick const when we don't need to reassign a variable to another value.
## Equality
- `=`
- assignment operator
- used when we want to assign a variable to a particular value
- returns the assigned value
- `==`
- loose equality operator (comparison)
- 42 == "42" // true
- 0 == false
- `===`
- strict equality operator (comparison)
- 42 === "42" // false
- 42 === parseInt("42", 10)
## Data Types in JS
-
## Inferring Type from Context
Assuming that the code blocks below run without error, what type must the variable be?
### Example 1
If we see code like this:
```js
var1.split('')
```
what type is `var1` and why?
> String because `.split()` is a string method
### Example 2
```js
var2[0]
```
what type is `var2` and why?
> Array or String or Object, bracket notation works with all of those types.
### Example 3
```js
var3.join(', ')
```
what type is `var3` and why?
> Array because `.join` is an array method
### Example 4
```js
if(var4) {
console.log('wazzup!!?')
}
```
what type is `var4` and why?
> Boolean (something that can be interpreted as true or false)
### Example 5
```js
var5.toLowerCase()
```
what type is `var5` and why?
> String because `.toLowerCase()` is a string method
### Example 6
```js
if (var6 < 13) {
console.log("You're just a kid!")
}
```
what type is `var6` and why?
> Number because we see `<` and a `Number` after it.
### Example 7
```js
let var7 = function(){
console.log('do something')
}
```
```js
var7()
```
what type is `var7` and why?
> function because `()` invokes a function
## As a beginner, why is it important to pay attention to data types?
## What to focus on when learning a language like JavaScript
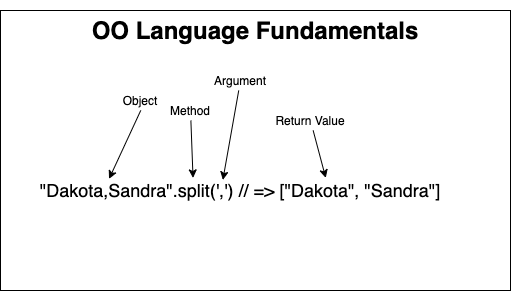
When learning new methods in JavaScript, be sure to review documentation on [MDN](https://developer.mozilla.org/en-US/) frequently so that you know:
1. What type of object you can call the method on
2. What arguments it accepts (and their types)
3. What the method does
4. What value the method returns (and its type)
It's best to make referring to the documentation a habit rather than trying to memorize these things. Over time, you'll naturally end up memorizing the methods that you use most frequently.
## 💡 Important Takeaways
- We solve problems by modeling real world situations
- We need to recognize what information from the real world problem we need to model in our program
- The types of data that we choose to store that information will determine what methods we have available to us
- Using and combining different data types will allow us to break a complicated problem into smaller pieces and solve it one step at a time
# Lecture 2 - JS Functions
## Goals
- Understand the importance of functions in JS and the nuances of how functions work
- Discuss what is meant by first-class function and why it matters
- Cover the many ways that functions can be used in JS because they are first-class
- Introduce students to arrow functions and the differences between arrow and regular functions
## Topics
- Declaring vs invoking functions 📌
- Arrow Functions 💡
- Function Scope 📌
- First Class Functions 🤓
- Callback Functions 💡
## Emoji Legend
- 📌 - Essential to know deeply at this point, worth stopping to solidify
- 💡 - Important to know, but OK to revisit as you progress
- 🤓 - Useful to know for interviews and edge cases but less often used in day-to-day practice
- 📅 - preview of what's coming up
📌📌📌📌📌📌📌📌📌📌📌📌📌📌📌📌📌📌📌📌📌📌
## Difference Between Declaring and Invoking a Function
📌📌📌📌📌📌📌📌📌📌📌📌📌📌📌📌📌📌📌📌📌📌
- Declaring a function returns a function reference
- Invoking a function runs the function body and returns a value
- When a function is declared:
- the expression returns a function reference.
- The function body **does not** run at this time but is stored with the function reference for later use.
- When a function is invoked (by appending `()` to the function reference)
- the arguments are assigned to values for its parameters (in order)
- the function body executes until the body is complete or the function returns a value.

📌📌📌📌📌📌📌📌📌📌📌📌📌📌📌📌📌📌📌📌📌📌
---
💡💡💡💡💡💡💡💡💡💡💡💡💡💡💡💡💡💡💡💡💡💡
## Arrow Functions
💡💡💡💡💡💡💡💡💡💡💡💡💡💡💡💡💡💡💡💡💡💡
```js
const squareMe = (n) => n*n;
```
> In example above, `n*n` is implicitly returned as the arrow (`=>`) points to a single expression without a code block.
```js
const squareMe = (n) => {
return n*n;
}
```
> In this example, the `return` keyword is required because we have included a code block (`{}`) following the arrow (`=>`)
🤓 There are some [differences between arrow functions and regular function declarations](https://dmitripavlutin.com/differences-between-arrow-and-regular-functions/) which come into play when working with Object Oriented JavaScript. We'll be using them interchangeably at the moment and you can too. Understanding the difference in how returns work is sufficient for now. 🤓
💡💡💡💡💡💡💡💡💡💡💡💡💡💡💡💡💡💡💡💡💡💡
---
📌📌📌📌📌📌📌📌📌📌📌📌📌📌📌📌📌📌📌📌📌📌
## Function Scope
📌📌📌📌📌📌📌📌📌📌📌📌📌📌📌📌📌📌📌📌📌📌
[JavaScript identifier lookup](https://www.demo2s.com/javascript/javascript-identifier-lookup.html) will look from the current block scope for a variable and continue exploring parent scopes until the variable is found. If not, we'll get a referenceError indicating that the variable is not defined.

From the `grandChild` function's scope, the `outer` and `child` variables are both accessible. But, the `name` variable within `grandChild` will refer to `'grandChild'`. The `name` variable is found within the `grandChild` scope, so the identifier lookup will stop there.
Identifier lookup travels up the scope chain, but **not** down. From the `outerFunction` scope, the `child` and `grandChild` variables are not accessible because they are defined further down the scope chain.
> The main practical takeaway for us now is to be careful when we name variables. In most cases, it's best to **avoid reusing the same variable name at different scopes for clarity's sake**.
> The only exception that comes to mind is if you had multiple unrelated loops in the same function, reusing the same counter variable `i` would be fine. However, if the loops were nested (a for loop inside of another for loop) you'd need to use different variable names for each loop counter. It is common to use `i` and `j` as loop counter variable names.
📌📌📌📌📌📌📌📌📌📌📌📌📌📌📌📌📌📌📌📌📌📌
🤓🤓🤓🤓🤓🤓🤓🤓🤓🤓🤓🤓🤓🤓🤓🤓🤓🤓🤓🤓🤓🤓
## Hoisting
🤓🤓🤓🤓🤓🤓🤓🤓🤓🤓🤓🤓🤓🤓🤓🤓🤓🤓🤓🤓🤓🤓
All function declarations with the following syntax are hoisted to the top of the scope.
```js
canBeCalled()
function canBeCalled() {
console.log('can I be called from here?')
}
```
Any other method of defining a function in JS (arrow, anonymous, using `var`, `let`, or `const`) will not be hoisted.
```js
cannotBeCalled()
const cannotBeCalled = () => {
console.log('can I be called from here?)
}
```
We generally don't use this feature consciously, preferring to actually define functions before we invoke them.
🤓🤓🤓🤓🤓🤓🤓🤓🤓🤓🤓🤓🤓🤓🤓🤓🤓🤓🤓🤓🤓🤓
---
🤓🤓🤓🤓🤓🤓🤓🤓🤓🤓🤓🤓🤓🤓🤓🤓🤓🤓🤓🤓🤓🤓
## First Class/Higher Order functions
🤓🤓🤓🤓🤓🤓🤓🤓🤓🤓🤓🤓🤓🤓🤓🤓🤓🤓🤓🤓🤓🤓
The phrase First Class functions refers to the idea that functions in JavaScript are first class objects. This means that we can pass them as arguments to other functions and we can also return them from other functions. This
Higher Order functions are functions that fit one of the following criteria:
1. They accept another function as an argument
2. Their return value is another function
Of the two, you'll see the first much more often. The function that we pass as an argument is called a callback function.
> **Key Takeaway**: Unlike all languages, JS Functions are first class objects. This means we can store references to them, pass them as as arguments to other functions, return them from other functions, store them as properties of another object and more. Basically, they retain the same basic features as other types of objects in JS.
🤓🤓🤓🤓🤓🤓🤓🤓🤓🤓🤓🤓🤓🤓🤓🤓🤓🤓🤓🤓🤓🤓
💡💡💡💡💡💡💡💡💡💡💡💡💡💡💡💡💡💡💡💡💡💡
## Callback Functions
💡💡💡💡💡💡💡💡💡💡💡💡💡💡💡💡💡💡💡💡💡💡
The functions that are passed as arguments to other functions are referred to as callback functions. We'll be using them extensively throughout the rest of the course as they offer a lot of flexibility that we can use to control how our code behaves.
There are many different functions built into JavaScript that accept callback functions as arguments. We'll only be using a couple of them today. The `setTimeout` function takes two arguments: a callback function and the number of milliseconds to wait before invoking the callback. After the time elapses, the callback function is invoked.
```js
console.log('starting now');
window.setTimeout(() => {
console.log('2 seconds later')
}, 2000);
```
While we can also use named functions as callbacks, like so:
```js
function callback() {
console.log('2 seconds later')
}
console.log('starting now');
window.setTimeout(callback, 2000);
```
It is much more common to see anonymous functions defined directly within the parameters list like in the first example.
💡 The `setInterval` method returns an `intervalID` that can be used to stop the interval from continuing to run by invoking the `clearInterval` method.
```js
let counter = 10;
const interval = window.setInterval(() => {
console.log(counter);
if(counter === 0) {
window.clearInterval(interval);
}
counter--;
}, 1000);
```
📅 Another common use case for callbacks that we'll explore more tomorrow is iteration. Later on, we'll be looking at how we can use callbacks to handle browser events (like clicks) as well. 📅
💡💡💡💡💡💡💡💡💡💡💡💡💡💡💡💡💡💡💡💡💡💡
🚧 🚧 🚧 🚧 🚧 🚧 🚧 🚧 🚧 🚧 🚧 🚧 🚧 🚧
## Tasks for the Day
🚧 🚧 🚧 🚧 🚧 🚧 🚧 🚧 🚧 🚧 🚧 🚧 🚧 🚧
1. Declare a function called `reward` that takes 0 parameters and logs a message to the console:
- > Congratulations! For dinner tonight, you'll be feasting on: {insert your favorite food here}
2. Declare a function called `delayedGratification`
- the function will take 2 parameters:
- a `reward` function that will be called after the delay
- a `delay` number representing the number of milliseconds we'll have to wait before we see our reward
- The `delayedGratification` function should invoke the `reward` function after `delay` milliseconds have passed.
🚧 🚧 🚧 🚧 🚧 🚧 🚧 🚧 🚧 🚧 🚧 🚧 🚧 🚧
📅 📅 📅 📅 📅 📅 📅 📅 📅 📅 📅 📅 📅 📅
## Coming up in Lecture 3
📅 📅 📅 📅 📅 📅 📅 📅 📅 📅 📅 📅 📅 📅
For Lecture 3, we'll be exploring Arrays in more depth and how we can use them in a program.
📅 📅 📅 📅 📅 📅 📅 📅 📅 📅 📅 📅 📅 📅
# Bonus Stuff
## Closure
🤓🤓🤓🤓🤓🤓🤓🤓🤓🤓🤓🤓🤓🤓🤓🤓🤓🤓🤓🤓🤓🤓
Closure is used under the hood to make a lot of libraries work, but you can get a lot done without using it in your code at all.
One practical example of how closure could be used is a template function.
Let's say we want to be able to create multiple reusable templates that we can use to create different kinds of posts.
Each template will contain a `?` character that will be replaced by whatever data we want to display in the template.
We want to create a generator function that can take in a template as an argument and return a function that will insert data into that template.
The returned function creates a closure over the `template` value passed as an argument to `templateFn` so that the returned function maintains access to `template` even after the `templateFn` has returned.
```js
function templateFn(template) {
return function(data) {
// return a new string based on the template with the ? replaced by the value passed as an argument for the data parameter
return template.replace('?', data);
}
}
const pizzaTime = templateFn("? says: It's Pizza Time!")
console.log(pizzaTime("Dakota"))
console.log(pizzaTime("Sandra"))
```
🤓🤓🤓🤓🤓🤓🤓🤓🤓🤓🤓🤓🤓🤓🤓🤓🤓🤓🤓🤓🤓🤓
## Bonus Note
```js
function outer(greeting, msg = "It's a fine day to learn") { // 2
const innerFunction = function (name, lang = "Python") { // 3
return `${greeting}, ${name}! ${msg} ${lang}`; // 4
};
return innerFunction("student", "JavaScript"); // 5
}
outer("Hello"); // 1
```
```js
function outer(greeting, msg = "It's a fine day to learn") { // 2
const innerFunction = function (name, lang = "Python") { // 3, 5
return `${greeting}, ${name}! ${msg} ${lang}`; // 6
};
return innerFunction("student", "JavaScript"); // 4, 7
}
outer("Hello"); // 1, 8 => "Hello, student! It's a fine day to Learn JavaScript"
```
# Lecture 3 - JS Arrays
## Topics
- 📌 Creating and Accessing arrays
- 💡 Modifying arrays
- 💡 [Pass by value vs. pass by reference](https://pediaa.com/what-is-the-difference-between-pass-by-value-and-pass-by-reference/)
## Warm Up
```js
const meals = [
{
meal: 'Scrambled Eggs',
mealType: 'breakfast'
},
{
meal: 'Buttermilk Pancakes',
mealType: 'breakfast'
},
{
meal: 'Chocolate Protein Shake',
mealType: 'breakfast'
},
{
meal: 'BLT Sandwich',
mealType: 'lunch'
},
{
meal: 'Soup',
mealType: 'lunch'
},
{
meal: 'Burrito',
mealType: 'lunch'
},
{
meal: 'Indian Curry',
mealType: 'dinner'
},
{
meal: 'Grilled Chicken Caesar',
mealType: 'dinner'
},
{
meal: 'Fish & Chips',
mealType: 'dinner'
}
]
```
### What if we want to access all of the breakfasts, lunches or dinners?
```js
function getBreakfasts(meals) {
return meals.filter(meal => meal.mealType === "breakfast")
}
function getLunches(meals) {
return meals.filter(meal => meal.mealType === "lunch")
}
function getDinners(meals) {
return meals.filter(meal => meal.mealType === "dinner")
}
// how would we define one function that could handle any of these meal types?
function getMealsByType(meals, mealType) {
return meals.filter(meal => meal.mealType === mealType)
}
```
Callback defined separately:
```js
function callback(meal) {
return meal.mealType === "dinner"
}
meals.filter(callback)
```
### What about adding a breakfast?
If we can add to the end
```js
meals.push({
meal: 'BEANS',
mealType: 'breakfast'
})
meals.push({
meal: 'Denver Omelette',
mealType: 'breakfast'
})
```
To add in the middle, we need to find where we want to add the element and then use splice to add it.
### How about adding a lunch?
```js
meals.push({
meal: 'sardines',
mealType: 'lunch'
})
meals.push({
meal: 'taco',
mealType: 'lunch'
})
```
### How about removing a lunch?
If we're removing from the beginning or the end
```js
shift() // removes from beginning
pop() // removes from the end
```
### What if we wanted to remove Soup from lunch?
Find the index where the element we want to remove is within the array.
Then call splice on the array, passing that index as the first argument, and the deleteCount of `1` as the second argument.
```js
```
[Helpful Article on MDN](https://developer.mozilla.org/en-US/docs/Web/JavaScript/Guide/Working_with_Objects#objects_and_properties)
### What are the different ways (methods/syntax) that we can access data inside of the `meals` constant?
-
## 💡 What does Pass by Value vs Pass by Reference mean? 💡
Technically, pass by value and pass by reference describe how a variable will behave if it is passed to a function. In some languages, a variable can be passed by reference into a function, meaning its value can be reassigned within the function.
In JavaScript, arguments are technically always passed by value, never by reference. What this means is that a variable passed as an argument into a function cannot have its value reassigned. Where things get a bit tricky is that we do have reference types in javascript. What this means is that if we pass a variable pointing to a reference type into a function, while we can't reassign the variable, we can modify the object it refers to and the variable outside the function will refer to that modified object.
So, within JS, especially as we get into React in Phase 2, we'll need to pay attention when we're working with reference types and make sure that we're aware when we call methods that result in mutations (as those are generally discouraged when writing React code).
Consider the example below:
```
function printName(name) {
name = "Sandra"
console.log(name);
}
let name = "Dakota";
printName(name);
console.log(name);
```
And now consider this one:
```js
function printName(person) {
person.name = "Sandra"
console.log(person.name);
}
let person = {
name: "Dakota"
}
printName(person)
console.log(person.name);
```
# Lecture 4 - JS Objects
## Topics
- 📌 Creating and accessing objects
- 📌 Modifying objects
- 🤓 Prototypal inheritance
- 💡 Iterating through objects
- 💡 [Object.keys()](https://developer.mozilla.org/en-US/docs/Web/JavaScript/Reference/Global_Objects/Object/keys)
- 💡 [Object.values()](https://developer.mozilla.org/en-US/docs/Web/JavaScript/Reference/Global_Objects/Object/values)
- 💡 [for...in](https://developer.mozilla.org/en-US/docs/Web/JavaScript/Reference/Statements/for...in) & [for...of](https://developer.mozilla.org/en-US/docs/Web/JavaScript/Reference/Statements/for...of) loops
- 💡 [Pass by value vs. pass by reference](https://stackoverflow.com/a/25117245/14715297) review
## Notes Before We Start
- [Tangential Questions HackMD doc](https://hackmd.io/vAkOJQ6-ThGTU31hDimUBQ) for questions that you want to ask but feel like they might be an interruption of the current topic. You all can edit this file, so feel free to do so and let me know when you add something and I'll get to it at a logical stopping point :pray:
- How the code we're writing now fits into the bigger picture of your learning journey.
## Agenda
- Discuss the Reduce Function (with examples.js)
- Shallow dive into Prototypal Inheritance
- Discuss Object Iteration
- Do a review of yesterday's content and add a bit
## The Reduce Function
Reduce is a useful iterative function. Whenever we need to iterate and reduce an array to a single value, the reduce function can handle that.
The diagram below outlines how it works in the case where we're looking to reduce an array of shopping list items to its total cost.
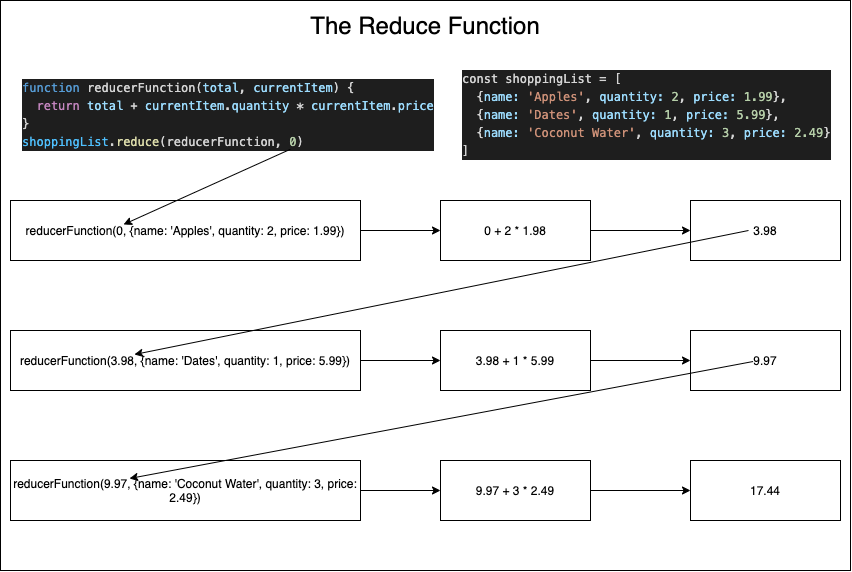
The first parameter in the reducer function is referred to as an accumulator. The second parameter represents the current element in the array being reduced. (Elements are passed to the reducer function as the second argument one at a time until the array has been traversed completely.)
The Docs for Reduce on MDN have a bunch more practical examples we can look over.
For now, let's move to look at examples.js in the repo and take a look at how
```js
let shoppingList = [
{name: 'Apples', quantity: 2, price: 1.99},
{name: 'Dates', quantity: 1, price: 5.99},
{name: 'Coconut Water', quantity: 3, price: 2.49}
]
let total = shoppingList.reduce(function (total, currentItem) {
return total + currentItem.quantity * currentItem.price
}, 0)
// equivalent with forEach
total = 0;
shoppingList.forEach(currentItem => {
total = total + currentItem.quantity * currentItem.price;
})
console.log(total)
```
Reducing an array of objects to an object:
```js
let meals = [
{
meal: 'Scrambled Eggs',
mealType: 'breakfast'
},
{
meal: 'Buttermilk Pancakes',
mealType: 'breakfast'
},
{
meal: 'Chocolate Protein Shake',
mealType: 'breakfast'
},
{
meal: 'BLT Sandwich',
mealType: 'lunch'
},
{
meal: 'Soup',
mealType: 'lunch'
},
{
meal: 'Burrito',
mealType: 'lunch'
},
{
meal: 'Indian Curry',
mealType: 'dinner'
},
{
meal: 'Grilled Chicken Caesar',
mealType: 'dinner'
},
{
meal: 'Fish & Chips',
mealType: 'dinner'
}
]
// the two functions below should take the array of meal objects and turn it into an object with keys for each mealType and values of arrays containing all meals of that type (as strings)
function generateMenuWithDotNotation(meals) {
const newObj = {};
newObj.breakfast = [];
newObj.lunch = [];
newObj.dinner = [];
for (const meal of meals) {
if (meal.mealType === 'breakfast') {
newObj.breakfast.push(meal.meal)
} else if (meal.mealType === 'lunch') {
newObj.lunch.push(meal.meal)
} else if (meal.mealType === 'dinner') {
newObj.dinner.push(meal.meal)
}
}
return newObj
}
console.log('generateMenuWithDotNotation', generateMenuWithDotNotation(meals))
function generateMenuWithBracketNotation(meals) {
const newObj = {};
for(const meal of meals) {
const mealType = meal.mealType;
// if(!newObj[mealType]) {
// newObj[mealType] = [];
//}
newObj[mealType] ||= [];
// newObj[mealType] = newObj[mealType] || []
newObj[mealType].push(meal.meal)
}
return newObj
}
console.log('generateMenuWithBracketNotation', generateMenuWithBracketNotation(meals))
```
## 🤓 Prototypal Inheritance 🤓
The methods we discussed yesterday are defined on the Array prototype. Prototypes are the foundation of how objects in JavaScript can access the functionality built into the language.
If we add a method to the Array prototype like so:
```js
Array.prototype.sample = function() {
return this[Math.floor(Math.random()*(this.length))]
}
```
Then we can call that method on any arrays in our program.
```js
meals.sample() // returns a random element from the meals array.
```
Adding methods to a built in JavaScript Object is called [Monkey Patching](https://www.audero.it/blog/2016/12/05/monkey-patching-javascript/).
The function above is an example of how we're able to access methods like `.pop()` and `.push()` when we interact with arrays. Those methods are both defined on the Array prototype, giving us access to them on all Array objects in our program.
For now, understanding that the methods and properties that we access on objects or primitives within JavaScript are defined either directly on the object itself or on the prototype for that object or primitive data type.
## Object Iteration
What methods can we use to iterate over an object? When would this be useful?
## Tasks for Music Library
- `addSongToPlaylist` (make sure both of these functions add an id to the newly added)
- `calculatePlaylistDuration(playlist)`
## Tasks for Todo List
- `markComplete(todoList, taskId)`
- `addDueDateToTask(todoList, taskId, dueDate)`
## Resources
- [Object.keys()](https://developer.mozilla.org/en-US/docs/Web/JavaScript/Reference/Global_Objects/Object/keys)
- [Object.values()](https://developer.mozilla.org/en-US/docs/Web/JavaScript/Reference/Global_Objects/Object/values)
- [for...in](https://developer.mozilla.org/en-US/docs/Web/JavaScript/Reference/Statements/for...in) & [for...of](https://developer.mozilla.org/en-US/docs/Web/JavaScript/Reference/Statements/for...of) loops
- [For vs forEach() vs for/in vs for/of in JavaScript](https://thecodebarbarian.com/for-vs-for-each-vs-for-in-vs-for-of-in-javascript.html)
- [Pass by value vs. pass by reference](https://stackoverflow.com/a/25117245/14715297)
## When to Use an Array vs an Object (what situations)
# Lecture 5 - DOM Manipulation
DOM Manipulation is the process of updating our webpage via javascript. We can do CRUD operations (Create, Read, Update, and Delete) on the content of a webpage using DOM manipulation.
📅 📅 📅 📅 📅 📅 📅 📅 📅 📅 📅 📅
For the three pillars of JS we learned about in homework:
- Manipulating the DOM
- Recognizing Events
- Communicating with the Server
Manipulating the DOM directly will be something that React handles for us under the hood. So, while it's really cool that we're starting to manipulate the content in the browser, know that most of the methods we're going to be using and learning about today are not ones that you'll be using much at all once you start using a frontend library like React, Vue, Angular, etc.
Once you move into using frontend libraries, you'll be thinking at a higher level of abstraction and managing the interactions between the three pillars we just introduced:
- What events are going to be triggered by our users?
- When they do, what changes to our data do we need to communicate with the server?
- How should the data (and the state of the application) be displayed in the DOM?
We'll get to focus more on **what** we want to happen and **when**, rather than **how** we're going to make it happen.
📅 📅 📅 📅 📅 📅 📅 📅 📅 📅 📅 📅
For Phase 1, we're going to think about **how** to do DOM manipulation at a lower level of abstraction. What this means is that we're going to be doing the DOM manipulation work ourselves for the next couple of weeks and when we get to React we'll have help!
Knowledge of today's content will help you when:
- You want to scrape content from a webpage for your own use
- You're working in a legacy codebase where you don't have access to a modern framework like React
## Key Questions
### What are we doing in the DOM?
- finding an element?
- creating an element?
- inserting an element to the DOM?
- updating an element?
- removing an element?
<details>
<summary>
When finding an element, what method(s) can I use?
</summary>
---
- [document.querySelector()](https://developer.mozilla.org/en-US/docs/Web/API/Document/querySelector) - returns first matching element
- [document.querySelectorAll()](https://developer.mozilla.org/en-US/docs/Web/API/Document/querySelectorAll) - returns [NodeList](https://developer.mozilla.org/en-US/docs/Web/API/NodeList) of matching elements
- [document.getElementById()](https://developer.mozilla.org/en-US/docs/Web/API/Document/getElementById)
- [document.getElementsByClassName()](https://developer.mozilla.org/en-US/docs/Web/API/Document/getElementsByClassName) - returns [HTMLCollection](https://developer.mozilla.org/en-US/docs/Web/API/HTMLCollection) of elements with the matching class name
---
</details>
<br/>
<details>
<summary>
When creating an element, what method(s) can I use?
</summary>
---
- [document.createElement()](https://developer.mozilla.org/en-US/docs/Web/API/Document/createElement)
- [element.innerHTML=](https://developer.mozilla.org/en-US/docs/Web/API/Element/innerHTML)
---
</details>
<br/>
```js
const a = document.createElement('a');
a.innerHTML = '<span style="color: red">Learn about DOM manipulation</span>';
```
<details>
<summary>
When updating an element, what method(s) can I use?
</summary>
---
- [element.innerHTML=](https://developer.mozilla.org/en-US/docs/Web/API/Element/innerHTML)
- [node.textContent=](https://developer.mozilla.org/en-US/docs/Web/API/Node/textContent)
- [htmlElement.innerText=](https://developer.mozilla.org/en-US/docs/Web/API/HTMLElement/innerText)
- You can also update attributes:
- [`.id=`](https://developer.mozilla.org/en-US/docs/Web/HTML/Global_attributes/id)
- [`.className=`](https://developer.mozilla.org/en-US/docs/Web/API/Element/className)
- [`element.dataset`](https://developer.mozilla.org/en-US/docs/Web/API/HTMLElement/dataset)
- [`.classList`](https://developer.mozilla.org/en-US/docs/Web/API/Element/classList)
- [.add()](https://developer.mozilla.org/en-US/docs/Web/API/DOMTokenList/add)
- [.remove()](https://developer.mozilla.org/en-US/docs/Web/API/DOMTokenList/remove)
- [.replace()](https://developer.mozilla.org/en-US/docs/Web/API/DOMTokenList/replace)
- [.toggle()](https://developer.mozilla.org/en-US/docs/Web/API/DOMTokenList/toggle)
---
</details>
<br/>
<details>
<summary>
When removing an element, what method(s) can I use?
</summary>
---
- [element.remove()](https://developer.mozilla.org/en-US/docs/Web/API/Element/remove)
- [node.removeChild(child)](https://developer.mozilla.org/en-US/docs/Web/API/Node/removeChild)
---
</details>
<br/>
## What's the difference between creating and inserting a DOM node?
## Key Takeaways for Phase 1
- When we need to update or remove an element from the DOM, we need to find it inside of the DOM first.
- So, when we add elements to the DOM, we want to be aware of how we'll be able to target them later on.
- We do this by adding attributes or a combination of attributes like className or data attributes so we can find the appropriate element later on (📅 when a relevant event happens)
- Direct DOM manipulation is extremely uncommon in React.
# Lecture 6 - DOM Events
## Key Concepts/Lecture Objectives
- Use a form to add elements to the DOM
- Use submit event handlers
- Use click event handlers
## Tasks for Music Library
- Add a submit event handler to allow adding songs to the Playlist
- Add a click event handler to allow loading songs into the player.
## Tasks for Todo List
- Add a submit event handler to allow adding tasks to the todoList
- Add a click event handler to allow toggling a task's completeness
## Three Pillars
- Recognize Events
- Manipulate the DOM
- Communicate with the Server

### What's the difference between an event listener and an event handler?
- Listener => what we're paying attention to
- Handler => what to do when that happens
Function to add event listener: `addEventListener`
### What do we call `addEventListener` on?
- the target element
- the element that the user is interacting with
For a click event, the target would be: a button, a text input, dropdown, a link (whatever we clicked on)
For a submit event, the target would be: the form that was submitted
### When I add a click event listener to an element, can I trigger it by clicking on any other element?
- Yes, clicking on any child element of the targeted element (for the listener) will trigger the event handler.
- This is called propagation
- An event listener is an interface with our browser that allows us to listen for events that the browser is tracking and attach a function that the browser will invoke when the event occurs.
- An event handler is the function that we pass as a callback when we attach an event listener. It always accepts the triggering `event` object as its parameter.
## Key questions to ask when working on a feature
- What events are involved with this feature?
- What DOM elements will be the targets of those events?
- When those events happen, what information do I need access to in order to affect the change that should happen?
- How do I make sure that the information I need is accessible to me when the event occurs?
## Music Library Application Summary
- `playlist`
- array of song objects with `name`, `artist`, `duration`, `playCount` and `youtubeLink`
- DOM Node Variables:
- `playlistElement` - the `ul` element in the sidebar where songs are displayed.
- `playlistDurationElement` - the `span` element at bottom of sidebar where total duration is displayed.
- `songNameElement` - the element in the main content area where the name of the current song is displayed.
- `artistNameElement` - the element in the main content area where the artist of the current song is displayed.
- `playCountElement` - the element where the play count of the current song is displayed.
- `playerElement` - the `iframe` element where the youtube video for the current song is displayed.
- `nextId(array)`
- takes an array as an argument and returns the next id that an object inside of the array should have.
- `copy(obj)`
- takes an object as an argument and returns a deep copy of it.
- `formatDuration(duration)`
- takes a `duration` integer as an argument and returns a string formatted version.
- `formattedDurationToSeconds(formattedDuration)`
- takes a string formatted duration as an argument and returns a `duration` integer in seconds.
- `renderSong(song)`
- takes a song object as an argument and returns an `li` element for display within the sidebar. This method also appends the element to the `playlistElement` in the sidebar.
- `loadPlaylistToSidebar(playlist)`
- takes the contents of the `playlist` parameter and renders all of the songs as `li` elements, appending them to the `playlistElement` in the sidebar.
- `addSongToPlaylist(playlist, song)`
- takes the `playlist` and a `song` as arguments. It adds the song to the playlist, passes it to `renderSong`, appending it to the `playlistElement` in the sidebar.
- 🚧 `removeSongFromPlaylist(playlist, songId)`
- takes the `playlist` and a `songId` as arguments and finds the `song` within the `playlist` that matches the `songId`, removes it from the `playlist` and removes its corresponding `li` element from the DOM.
- `extractVideoID(url)`
- helper method that takes a youtube url from a user and extracts the YouTube VideoID.
- `loadSongIntoPlayer(song)`
- takes a song as an argument and loads its details into the player.
- `songsByArtist(playlist, artist)`
- takes the `playlist` and an `artist` as arguments, populates the playlist in the sidebar with all songs whose artist matches the `artist` argument.
### Today's Changes
- `handleNewSongSubmit(event)`
- we'll need to prevent the default behavior.
- we'll then need to attach an event listener to the newSong form.
- when the form is submitted, we'll pull the form data out of the form, use it to build a new `song` object and pass it to `addSongToPlaylist`.
- `handleChooseSong(song)`
- we'll need to attach an event listener to each list item in the sidebar.
- when one of them is clicked, we'll invoke `loadSongIntoPlayer` and pass in the appropriate `song` as an argument.
- `loadArtistChoices(playlist)`
- on page load, we'll need to add an option for each artist who has a song in the playlist
- `handleChooseArtist(event)`
- we'll also want to attach an event listener to the select tag where those options live. When the select tag changes, we'll want to update the playlist with the songs by the selected artist. If the choice is all artists, all songs should show.
## Todo List Application Summary
- `todoList`
- array of task objects with `id`, `label`, `complete`, and `dueDate` properties.
- `getTodoListElement()`
- returns the `todoList` element where tasks will be added.
- `renderTask(task)`
- takes a `task` object as an argument and returns an `li` element for displaying the task. This method also appends the `li` to the todoList element.
- `loadTodoList(todoList)`
- takes the `todoList` as an argument, renders all of the tasks as `li` elements, appending them to the `todoList`.
- `addTask(todoList, task)`
- takes the `todoList` array and a `task` object as arguments. It uses the `task` and includes an `id`, also adding a `complete` property before adding it to the `todoList` and appending it to the `todoList` container.
- `removeTask(todoList, taskId)`
- takes the `todoList` and a `taskId` as arguments, finds the task that matches the `taskId`, removes it from the `todoList`, and finds the `li` element representing it from the DOM.
- `toggleComplete(taskId)`
- takes the `taskId` as an argument, finds the `task` element that matches it and toggles its `complete` property and invokes the `updateTask` function to update the DOM.
- `updateTask(task)`
- takes a `task` object as an argument, finds the `li` element that represents it in the DOM, and updates its properties based on the data in the task object.
### Today's Changes
- `handleNewTaskSubmit(event)`
- we'll need to prevent the default behavior.
- we'll then need to attach an event listener to the newTask form.
- when the form is submitted, we'll pull the data out of the form, and pass it to `addTask` function.
- `handleToggleComplete(task)`
- we'll need to attach an event listener to each box in the todo list.
- when one of them is clicked, we'll invoke `toggleComplete` and pass in the appropriate `task` as an argument.
# Lecture 7 - Asynchronous Javascript and Fetch
## Lecture Objectives
- Understand how to [use `fetch`](https://developer.mozilla.org/en-US/docs/Web/API/Fetch_API/Using_Fetch) to send requests
- Understand how to use `.then()` to deal with the [`Response`](https://developer.mozilla.org/en-US/docs/Web/API/Response)
- Understand how the chrome dev tools can be used to debug fetch requests.
- Recognize the difference between synchronous and asynchronous callback functions.
## Agenda
- 💡 Discuss Asynchronous functions in JS
- 🤓 Discuss Promises and the event queue
- 📌 Fetch and .then()
- Break
- Add fetching songs to the Music Library App
- Break
- Review
## Async callbacks (from [MDN article](https://developer.mozilla.org/en-US/docs/Learn/JavaScript/Asynchronous/Introducing))
Async callbacks are functions that are specified as arguments when calling a function which will start executing code in the background. When the background code finishes running, the callback function will be invoked to let you know the work is done, or to let you know that something of interest has happened.
Using callbacks is slightly old-fashioned now, but you'll still see them used in a number of older-but-still-commonly-used APIs.
An example of an async callback is the second parameter of the `addEventListener()` method (as we saw in action above):
```js
btn.addEventListener('click', () => {
alert('You clicked me!');
let pElem = document.createElement('p');
pElem.textContent = 'This is a newly-added paragraph.';
document.body.appendChild(pElem);
});
```
- first parameter is the type of event to be listened for
- second parameter is a callback function that is invoked when the event is fired.
- When we pass a callback function as an argument to another function, we are only passing the function's reference as an argument.
- The function is "called back" to within the enclosing function body, hence the name.
- If the callback function is not executed immediately when its enclosing function is invoked, we refer to it as an asynchronous (or async) callback.
## Not all Callbacks are Async
Note that not all callbacks are async — some run synchronously. An example is when we use [Array.prototype.forEach()](https://developer.mozilla.org/en-US/docs/Web/JavaScript/Reference/Global_Objects/Array/forEach) to loop through the items in an array:
```js
const gods = ['Apollo', 'Artemis', 'Ares', 'Zeus'];
console.log('before forEach')
gods.forEach(function (eachName, index){
console.log(index + '. ' + eachName);
});
console.log('after forEach')
```
In this example we loop through an array of Greek gods and print the index numbers and values to the console. The expected parameter of forEach() is a callback function, which itself takes two parameters, a reference to the array name and index values. However, it doesn't wait for anything — it runs immediately.
## Promises
Promises are the new style of async code that you'll see used in modern Web APIs. A good example is the [fetch()](https://developer.mozilla.org/en-US/docs/Web/API/fetch) API, which is basically like a modern, more efficient version of [XMLHttpRequest](https://developer.mozilla.org/en-US/docs/Web/API/XMLHttpRequest) (which you generally only still still see in legacy code). Let's look at a quick example,
```js
console.log('before fetch')
fetch("https://api.tvmaze.com/singlesearch/shows?q=friends")
.then(function (response) {
console.log(response);
return response.json();
})
.then(function (data) {
console.log(data);
});
console.log('after fetch')
```
- Here we see `fetch()` taking a single parameter — the URL of a resource you want to fetch from the network — and returning a [promise](https://developer.mozilla.org/en-US/docs/Web/JavaScript/Reference/Global_Objects/Promise) for a [`Response`](https://developer.mozilla.org/en-US/docs/Web/API/Response) object.
- The promise is an object representing the eventual completion or failure of the async operation.
- The promise is the browser's way of saying "I promise to get back to you with the answer as soon as I can," hence the name "promise."
Neither of the possible outcomes have happened yet, so the fetch operation is currently waiting on the result of the browser trying to complete the operation at some point in the future. We've then got three further code blocks chained onto the end of the fetch():
- Two `then()` blocks. **Both contain a callback function that will run if the previous operation is successful (a fulfilled promise), and each callback receives as input the result (return value) of the previous successful operation**, so you can go forward and do something else to it. Each `.then()` block returns another promise, meaning that you can chain multiple `.then()` blocks onto each other, so multiple asynchronous operations can be made to run in order, one after another.
- The `catch()` block at the end runs if any of the `.then()` blocks fail, receiving the error that caused the problem as an argument.
- 💡💡💡 **IMPORTANT NOTE**: In the case of `fetch`, if we get a response back from the server we sent the request to, that's considered a fulfilled promise.
- This means that even if we get an error response from our API, it's still considered a resolved promise as fetch was able to successfully retrieve a response (even though the response represented an error)
- We can get around this by checking if `response.ok` and throwing an error that we can catch if not.
```js
console.log('before fetch')
fetch("https://api.tvmaze.com/shows/1389478917389479827389474")
.then(function (response) {
console.log(response);
if(!response.ok) {
throw new Error('something went wrong')
}
return response.json();
})
.then(function (json) {
console.log(json);
})
.catch(function(error) {
console.log(error)
})
console.log('after fetch')
```
- 🤓🤓🤓 BONUS NOTE— in a similar way to synchronous [`try...catch`](https://developer.mozilla.org/en-US/docs/Web/JavaScript/Reference/Statements/try...catch) blocks, an error object is made available inside the `catch()`, which can be used to report the kind of error that has occurred. Note however that synchronous `try...catch` won't work with promises, although it will work with the [async/await](https://developer.mozilla.org/en-US/docs/Learn/JavaScript/Asynchronous/Async_await) syntax that you may wish to learn later on (we'll discuss in ES6 lecture next week).
## The Event Queue
Async operations like promises are put into an **event queue**, which runs after the main thread has finished processing so that they *do not block* subsequent JavaScript code from running. The queued operations will complete as soon as possible then return their results to the JavaScript environment.
## Summary
In its most basic form, JavaScript is a synchronous, blocking, single-threaded language, in which only one operation can be in progress at a time. But web browsers define functions and APIs (like `setTimeout`, `addEventListener`, and `fetch`) that allow us to register functions that should not be executed synchronously, and should instead be invoked asynchronously when some kind of event occurs (the passage of time, the user's interaction with the mouse, or the arrival of data over the network, for example). This means that you can let your code tell the browser to do several things at the same time without stopping or blocking your main thread.
Whether we want to run code synchronously or asynchronously will depend on what we're trying to do.
There are times when we want things to load and happen right away. For example when applying some user-defined styles to a webpage you'll want the styles to be applied as soon as possible.
If we're running an operation that takes time however, like querying a database and using the results to populate templates, it is better to push this off the stack and complete the task asynchronously. Over time, you'll learn when it makes more sense to choose an asynchronous technique over a synchronous one.
## Key Takeaways
### Order of Operations
Sync code runs before Async code.
One of the most important things to take away from this conversation is that asynchronous callbacks will always execute after surrounding synchronous code.
```js
window.setTimeout(() => console.log('async'), 0);
for(let i = 0 ; i < 10000 ; i++) {
console.log('sync');
}
```
### Promises
If a promise is fulfilled, we can attach an async callback that will receive the resolved value via `.then()`. If the promise is rejected, the error can be captured and handled via a callback passed to `.catch()`
Both `.then()` and `.catch()` are called on a `Promise` and return a `Promise`, allowing us to create a chain of asynchronous actions that happen in a particular order.
### Fetch
```js
console.log('before fetch')
fetch("https://api.tvmaze.com/singlesearch/shows?q=friends")
.then(function (response) {
console.log(response);
return response.json();
})
.then(function (show) {
console.log(show);
});
console.log('after fetch')
```
## Posting data to [JSON Server](https://github.com/typicode/json-server)
First, you'll want to make sure that the working directory of your terminal is in the directory where your db.json file is located. Then you can run:
```
json-server --watch db.json
```
This will open up a server on port 3000 that will accept RESTful requests for any resources that have a key present within the db.json file.
For example, if we had this in our db.json file:
```json
{
"songs": []
}
```
Then json-server would give us access to the following routes:
```
GET /songs
GET /songs/1
POST /songs
PUT /songs/1
PATCH /songs/1
DELETE /songs/1
```
When constructing a POST request to create a new record, we'll need to include a configuration object with our fetch call including:
1. method: 'POST'
2. content-type headers indicating we're sending a json formatted body with our request
3. a JSON formatted string passed as the body of our request.
The syntax looks like this:
```js
fetch('http://localhost:3000/songs', {
method: 'POST',
headers: {
'Content-Type': 'application/json'
},
body: JSON.stringify(song)
})
.then(response => response.json())
.then(savedSong => {
addSongToPlaylist(playlist, savedSong);
event.target.reset()
})
```
- `fetch` returns a `Promise` that will resolve to a [`Response`](https://developer.mozilla.org/en-US/docs/Web/API/Response#methods) object if the browser is able to connect to the server and receive a response.
- the first `.then()` callback receives the resolved `response` as an argument.
- The `.json()` method is defined within the `Response` object and it returns a promise that resolves with the result of parsing the response body text as JSON (this converts the string formatted body into the JavaScript data structure that it represents)
- The following `.then()` callback receives the resolved value of the previous promise. This is the JS data structure represented in the body of the response (usually an object or an array of objects)
---
## Resources
- [Fix json-server conflict with Live Server](https://gist.github.com/ihollander/cc5f36c6447d15dea6a16f68d82aacf7)
- [json-server](https://www.npmjs.com/package/json-server)
- [Postman](https://www.postman.com/) (for api testing)
- [JSONView Chrome extension](https://chrome.google.com/webstore/detail/jsonview/chklaanhfefbnpoihckbnefhakgolnmc?hl=en) (for pretty viewing of JSON formatted data in browser)
- [Asynchronous JavaScript Article Series from MDN](https://developer.mozilla.org/en-US/docs/Learn/JavaScript/Asynchronous)
## Three Pillars
- Recognize Events
- Manipulate the DOM
- Communicate with the Server
## Music Library Application Summary
### DOM Manipulation (and helper functions)
- ~~`playlist`~~
- ~~array of song objects with `name`, `artist`, `duration`, `playCount` and `youtubeLink`~~ **Songs will be fetched from json-server, not hard coded in a variable within our code**
- DOM Node Variables:
- `playlistElement` - the `ul` element in the sidebar where songs are displayed.
- `playlistDurationElement` - the `span` element at bottom of sidebar where total duration is displayed.
- `songNameElement` - the element in the main content area where the name of the current song is displayed.
- `artistNameElement` - the element in the main content area where the artist of the current song is displayed.
- `playCountElement` - the element where the play count of the current song is displayed.
- `playerElement` - the `iframe` element where the youtube video for the current song is displayed.
- `newSongForm` - the `form` element that will create a new song when submitted.
- `artistNameSelect` - the `select` element that will have options for filtering the songs by artist.
- `formatDuration(duration)`
- takes a `duration` integer as an argument and returns a string formatted version
- `formattedDurationToSeconds(formattedDuration)`
- takes a string formatted duration as an argument and returns a `duration` integer in seconds.
- `extractVideoID(url)`
- helper method that takes a youtube url from a user and extracts the YouTube VideoID.
- `renderSong(song)`
- takes a song object as an argument and returns an `li` element for display within the sidebar. This method also appends the element into the sidebar.
- `loadSongsIntoSidebar(songs)`
- takes the contents of the `songs` parameter and renders all of the songs as `li` elements, appending them to the playlist `ul` element in the sidebar.
- ~~`addSongToPlaylist(playlist, song)`~~
- ~~takes the `playlist` and a `song` as arguments. It adds the song to the playlist, passes it to `renderSong`, appending it to the `playlistElement` in the sidebar.~~ **(Most of this was data related before with a tiny piece of DOM manipulation mixed in via `renderSong()`. Since we'll be using fetch now, we don't need this function anymore)**
- `removeSongFromPlaylist(songId)`
- takes the `songId` as an argument and finds the `song` that matches the `songId`, removes it from the `playlist` and removing its `li` element from the DOM.
- `loadSongIntoPlayer(song)`
- takes a song as an argument and loads its details into the player.
- `populateReleases(releases)`
- takes an array of other releases (strings) by the selected song's artist and adds them to the spoiler dropdown below the player.
- ~~`songsByArtist(playlist, artist)`~~
- ~~takes the `playlist` and an `artist` as arguments, populates the playlist in the sidebar with all songs whose artist matches the `artist` argument.~~ **(We can also handle loading songs by a particular artist using fetch at this point, so we'll no longer require a separate function)**
- `loadArtistChoices(songs)`
- takes a `songs` of songs as an argument and adds option tags to the `filterByArtist` select tag.
### Event Listeners
- `DOMContentLoaded`
- load songs into sidebar (**using fetch**)
- load options into filterByArtist dropdown.
- `#newSong`->`'submit'`
- pull data about song out of form, **post it to the database using `fetch`** and update the DOM with `renderSong`
- `#filterByArtist`->`'change'`
- **`fetch` all songs by the selected artist option** and load them into the sidebar with `loadSongsIntoSidebar`
- `#playlist li`->`'click'`
- invoke `loadSongIntoPlayer` with the appropriate song as an argument.
### Communicating with the Server (functions we'll build today that use `fetch`)
- `getSongs(artist="")`
- accepts an artist as an argument (optional) returns a promise for all songs (by the artist if an argument is provided or all songs if not)
- `createSong(songData)`
- accepts an object containing song data as an argument and posts it to the database, returning a promise for the persisted song.
- `getInfoAboutArtist(artistId)`
- accepts a musicbrainz artistId as an argument and returns a promise for an array of strings describing that artist's other releases. (`https://musicbrainz.org/ws/2/artist/${artistId}?inc=releases&fmt=json`)
- `searchArtists(artist)`
- takes an artist as an argument and sends a request to the musicbrainz api to retrieve search results for artists matching that name.
- Takes the top search result, reads its musicbrainz artistId and passes it to `getInfoAboutArtist`, using it to return a promise for an array of strings describing the artist's other releases.
### Today's Changes
- Instead of loading hard coding the playlist array, we'll use `fetch` to retrieve the songs from our json-server and then trigger `loadSongsIntoSidebar(songs)`
- Within our event handler for handling the new song form submission, we'll use `fetch` to persist the new song to `db.json` so that it will stay there when we refresh the page.
- **BONUS**: When a song is loaded into the player, we'll use the musicbrainz API to fetch information about the other releases by that song's artist. We'll need to break this task into two requests.
- We'll send the first request ([view example request](https://musicbrainz.org/ws/2/artist/?query=ray+charles&fmt=json)) to search for artists within musicbrainz who match the song's artist. The results come in an array sorted by best match to worst. We'll pick the first artist and retrieve their musicbrainz id to be used in the subsequent request.
- The second request will require the musicbrainz id and will allow us to access all releases by the artist matching that musicbrainz id.
# Lecture 8 CRUD with Fetch - PATCH and DELETE requests
## Learning Goals
- Fetch Requests with PATCH
- Fetch Requests with DELETE
- How to integrate code for these requests (data) with the two other pillars (behavior & DOM manipulation)
## Music Library Application Summary
- Behavior
- initial page load
- fetches songs and
- loads them into the sidebar
- loads the artist choices for filter by artist
- displays the total duration of songs
- new song form submission
- prevent default behavior
- extract song data from form
- use `createSong` to post song to database
- invoke `renderSong` to add the newly saved song to the sidebar
- reset the new song form
- new comment form submission
- prevent default behavior
- extract comment data from form
- use `createComment` to post comment to database
- invoke `renderComment` to add the newly saved comment to the page
- reset the new comment form.
- clicking on a song in the sidebar
- invoke `loadSongIntoPlayer` with the appropriate song passed as an argument
- selecting an artist to filter by
- pull the selected artist value out of the selected option
- invoke `getSongs` with that artist as an argument
- use `loadSongsIntoSidebar` to load those fetched songs into the sidebar.
- pass those same songs to `displayTotalDuration` to update the duration based on the filtered songs.
- Data
- `getSongs(artist="")`
- takes an optional artist (string) as an argument
- if an argument is passed
- fetches all songs by the artist passed as an argument
- if no argument is passed
- fetches all songs stored in the database
- returns a promise for the JSON parsed body of the response
- `createSong(songData)`
- takes in `songData` (object) as an argument
- sends a `POST` request to the database to persist the song
- includes the JSON stringified `songData` as the body of the request
- specifies a `Content-Type` header of `application/json` to indicate that the body of the request is a JSON formatted string
- returns a promise for the JSON parsed body of the Response
- `searchArtists(artist)`
- takes an `artist` (string) as an argument.
- makes a `GET` request to the musicbrainz API to retrieve artists matching the artist passed as an argument
- takes the first matching artist retrieved (the one that's the best match) and passes its id to `getInfoAboutArtist`
- `getInfoAboutArtist(artistId)`
- takes an `artistId` (number) as an argument
- makes a `GET` request to the musicbrainz API to retrieve other releases by that artist.
- parses the body of the response as JSON
- maps over the returned array to construct an array of strings containing the title and date of each release.
- returns a promise for the array of releases (strings)
- Display
- `renderSong(song)`
- takes a song object as an argument and returns an `li` element for display within the sidebar. This method also appends the element into the sidebar.
- `loadSongsIntoSidebar(songs)`
- takes the contents of the `songs` parameter and renders all of the songs as `li` elements, using `renderSong` to add each of them to the playlist `ul` element in the sidebar.
- **`displayTotalDuration(songs)`**
- takes an array of `songs` as an argument and uses the `calculateDuration(songs)` function to calculate the total duration of the songs.
- adds the total duration to the bottom of the song list in the sidebar.
- `addSong(song)`
- takes a `song` as an argument and passes it to `renderSong(song)` adding it to the playlist `ul` element in the sidebar`.
- `removeSongFromPlaylist(songId)`
- takes the `songId` as an argument and finds the `song` within the sidebar that matches the `songId` (found by the data-id attribute)
- removes its `li` element from the DOM.
- `loadSongIntoPlayer(song)`
- takes a song as an argument and loads its details into the player.
- replaces the data attribute for the the new comment form to have the newly loaded song's songId.
- passes the song's artist to the `searchArtists` function to load that songs artist from musibrainz
- uses `populateReleases` to load the artist's other releases into the dropdown in the releases section.
- replaces the visible comments with comments belonging to the selected song.
- `loadArtistChoices(playlist)`
- takes a `playlist` of songs as an argument and adds option tags to the `filterByArtist` select tag.
- `populateReleases(releases)`
- clears out the list of releases
- populates the list of releases with releases belonging to the artist of the selected song.
- `renderComment(record)`
- takes a stored comment `record` (object) as an argument
- creates a `p` tag and populates it with an input containing the comment stored in the database
- **TODO**: Adds event listeners for updating the comment text or deleting the comment
- `renderComments(comments)`
- takes `comments` (array) as an argument
- iterates over the array and renders each comment with the `renderComment` function.
- Helper functions
- `formatDuration(duration)`
- takes a `duration` integer as an argument and returns a string formatted version
- `formattedDurationToSeconds(formattedDuration)`
- takes a string formatted duration as an argument and returns a `duration` integer in seconds.
- `extractVideoID(url)`
- helper method that takes a youtube url from a user and extracts the YouTube VideoID.
- `calculateDuration(songs)`
- takes an array of songs as an argument and uses reduce to return their total duration (formatted as a string)
## Icons
Today, I'll be adding trash can icons as UI elements to allow users to delete records via a click. There is a library called [font awesome](https://fontawesome.com/) that you can use to add icons to your site. In this case, I'm using it to add the trash can icon. There are lots of different icons available for free in the library (in addition to many more that require payment) that can help you spruce up your User Interface. For now, all you need to do if you want to use the icons is to add this CDN link to the head of your `index.html` file.
```html
<link href="https://cdnjs.cloudflare.com/ajax/libs/font-awesome/5.13.0/css/all.min.css" rel="stylesheet">
```
## Editing Content
- Edit Form
- Inline inputs to display content
We can have an edit form for a song that is a separate from our displayed song.
Or, we can display our songs using inputs without borders so they don't appear as inputs until clicking on one of them.
Instead of displaying the information within an `h2` element, we can use an `input` tag. This will allow our users to click upon the element and edit its content.
Say we start with this markup:
```html
<h2 id="song-name" class="text-2xl p-2">No Song Selected</h2>
<div class="relative" style="padding-top: 56.25%">
<iframe id="player-frame" class="absolute inset-0 w-full h-full" frameborder="0" /></iframe>
</div>
<div class="flex justify-between mt-2">
<span id="artist"></span>
<span id="play-count"></span>
</div>
```
We can update it to this:
```html
<form id="editSong">
<h2 class="text-2xl p-2 flex justify-between">
<input id="song-name" class="w-5/6" value="No Song Selected" />
<button id="deleteSong">
<i class="fas fa-trash-alt"></i>
</button>
</h2>
<div class="relative" style="padding-top: 56.25%">
<iframe id="player-frame" class="absolute inset-0 w-full h-full" frameborder="0" /></iframe>
</div>
<div class="flex justify-between mt-2">
<input id="artist" class="w-3/4" />
<span>plays: <input id="play-count" class="w-8" type="number" /></span>
</div>
</form>
```
Here's a quick rundown of the changes:
- we're adding an input tag inside of the `h2` up top and also adding a `deleteSong` button with the trash can icon inside of the `h2` tag.
- we're replacing the `span#artist` with an `input#artist` so users will be able to interact with this value directly.
- we're removing the `id` attribute from the `span#play-count` and adding a number type input with the id of `play-count` so users will be able to directly change this value.
This won't work for the iframe, sadly, but should work for the name, artist and play count. Before we hook things up, though, we need to rework the function that loads the content into these DOM containers. Now that they're inputs, we'll need to use the `value` property instead of `textContent`.
This is the way to code looks currently:
```js
function loadSongIntoPlayer(song) {
document.querySelectorAll('#playlist li').forEach(li => {
li.classList.remove('bg-gray-100')
})
const selectedLi = document.querySelector(`#playlist li[data-id="${song.id}"]`);
selectedLi.classList.add('bg-gray-100')
songNameElement.textContent = song.name;
artistNameElement.textContent = song.artist;
playCountElement.textContent = song.playCount === 1 ? '1 play' : `${song.playCount} plays`;
playerElement.src = `https://www.youtube.com/embed/${extractVideoID(song.youtubeLink)}`;
searchArtists(song.artist)
.then(populateReleases)
// clear out the comments list and load comments for this song into the comments part of the DOM
document.querySelector('#comments').innerHTML = "";
getComments(song)
.then(renderComments)
}
```
We're also going to assign a new value to our `currentSongId` variable whenever a new song is loaded into the player. When we send a PATCH or DELETE request to update or remove a song, we'll need access to its id to send the right request.
When we're done, the function will become this:
```js
function loadSongIntoPlayer(song) {
document.querySelectorAll('#playlist li').forEach(li => {
li.classList.remove('bg-gray-100')
})
const selectedLi = document.querySelector(`#playlist li[data-id="${song.id}"]`);
selectedLi.classList.add('bg-gray-100')
songNameElement.value = song.name;
artistNameElement.value = song.artist;
playCountElement.value = song.playCount === 1 ? '1 play' : `${song.playCount} plays`;
playerElement.src = `https://www.youtube.com/embed/${extractVideoID(song.youtubeLink)}`;
searchArtists(song.artist)
.then(populateReleases)
// store the id of currently loaded song in
// currentSongId, so that we'll be able to
// use it within any PATCH or DELETE requests
// as both of those require the id of the
// record being updated or removed.
// This will also be used when creating a new
// comment associated with the song that is
// loaded into the player.
currentSongId = song.id;;
// clear out the comments list and load comments for this song into the comments part of the DOM
document.querySelector('#comments').innerHTML = "";
getComments(song)
.then(renderComments)
}
```
This covers the display portion of our 3 pillars approach, leaving behavior and data remaining. This time we're working backwards, starting with the display logic then moving to the data and finally hooking up the event listeners/handlers to handle behavior.
### Data
```js
function updateSong(songId, songData) {
return fetch(`http://localhost:3000/songs/${songId}`, {
method: 'PATCH',
headers: {
'Content-Type': 'application/json'
},
body: JSON.stringify(songData)
})
.then(res => res.json())
}
```
### Behavior
In this case, the behavior we're tracking is users interacting with the inputs within our form.
But, since we're editing inline, and the content doesn't look like a form, it would be better if we could trigger auto-saves so that our changes are persisted without having to press a save button or hit enter to submit the form.
In order to do this, we can add a different kind of event listener to our form: `input`. This way, whenever the value of our input tag changes, a `patch` request will be sent automatically to update our API with the new value.
```js
// editSongForm goes up top by our DOM variable definitions
const editSongForm = document.querySelector('#editSong')
// the event listener is attached inside of init
editSongForm.addEventListener('input', (e) => {
triggerSongAutoSave()
})
// I'm doing DOM queries here to get the form inputs before pulling their value
// currently, these inputs are always on the page from the initial page load
// so using the variables defined up top would actually work as well
// I'm doing it this way because in the case where the form is added to the DOM
// via javascript, you'll need to target the inputs in this manner
function triggerSongAutoSave() {
const songId = editSongForm.dataset.songId;
const songData = {
name: document.getElementById('song-name').value,
artist: document.getElementById('artist').value,
playCount: parseInt(document.getElementById('play-count').value, 10)
};
updateSong(songId, songData)
.then(renderSong)
}
```
Let's try this out in the browser now, we can see in our network tab that patch requests are triggered every time we update the name or artist of a song, but we've got a bug:
Every time we change one of the values and the patch goes through, another copy of the song is added to the playlist in the sidebar.
Let's fix it!
### Fixing Duplicate renders upon song update
This one happens because `renderSong` is creating a new list item for the updated song instead of updating the existing list item. We can fix this by changing the first line of the function where we define the `li` constant.
```js
const li = document.createElement('li');
```
Currently, this line of code will always create a new list item. Instead, we want to first check if we have a list item tag for this song already. The way we can do that is by taking a look one line down in the method:
```js
li.dataset.id = song.id;
```
The `renderSong` function creates the list item and assigns the song's id as a data attribute. This will allow us to query the DOM to see if we've already rendered an `existingLi` for this song before creating a new one. If we assign the `li` constant to the `existingLi` element, then all subsequent lines in the method will update the existing DOM node rather than a brand new one. When we called the `append` method later on, no duplicate is added if the appended node is already a child of the target node.
We can use the attribute selector to query the DOM for an existing li.
```js
const existingLi = document.querySelector(
`#playlist li[data-song-id="${song.id}"]`
)
const li = existingLi || document.createElement('li')
```
If we try it now, we'll notice that the edited `li` element gets moved to the bottom of the list. We want it to update, but we don't want it to move!
To fix this, let's try only doing the `target.append(li)` code if we don't already have an `existingLi`.
```js
if (!existingLi) {
playlistElement.append(li);
}
```
After the update, our `renderSong` function looks like this:
```js
function renderSong(song) {
const existingLi = document.querySelector(
`#playlist li[data-song-id="${song.id}"]`
)
const li = existingLi || document.createElement('li')
li.dataset.id = song.id;
li.className = "flex justify-between p-2 pr-4 cursor-pointer";
li.innerHTML = `
<div>
<span class="song font-semibold"></span>
<span class="artist"></span>
</div>
<div class="duration text-gray-400"></div>`;
li.addEventListener('click', (e) => {
loadSongIntoPlayer(song);
})
const songEl = li.querySelector('.song');
const artistEl = li.querySelector('.artist');
const durationEl = li.querySelector('.duration')
songEl.textContent = song.name;
artistEl.textContent = `by ${song.artist}`;
durationEl.textContent = song.duration;
if (!existingLi) {
playlistElement.append(li);
}
return li;
}
```
Now, if we visit our application in the browser, we can update the name of a song in the main content area and see the song's name update within the sidebar in response!
🤓 I'm going to show you a simple example of debouncing, because I think it's pretty cool. I've also included a couple of links below if you'd like to explore further with a more practical and reusable `debounce` function. For now, we're going to do the least amount possible to get this technique working.
This is how the `triggerSongAutoSave` function currently looks:
```js
function triggerSongAutoSave() {
const songData = {
name: document.getElementById('song-name').value,
artist: document.getElementById('artist').value,
playCount: parseInt(document.getElementById('play-count').value, 10)
};
updateSong(currentSongId, songData)
.then(renderSong)
}
```
What we want to do is to declare a timeout variable outside the scope of this function. We'll call it `queuedSongAutoSave`.
These are our steps:
- create `queuedSongAutoSave` outside the function
- clear the previous `queuedSongAutoSave` every time the function is called
- reassign `queuedSongAutoSave` to another timeout to trigger the API/DOM update
The goal is to ensure that a user pauses in their typing briefly before we actually go through with updating the API & the DOM.
```js
let queuedSongAutoSave;
function triggerSongAutoSave() {
window.clearTimeout(queuedSongAutoSave);
queuedSongAutoSave = window.setTimeout(() => {
const songData = {
name: document.getElementById('song-name').value,
artist: document.getElementById('artist').value,
playCount: parseInt(document.getElementById('play-count').value, 10)
};
updateSong(currentSongId, songData)
.then(renderSong)
}, 300)
}
```
- [Debouncing on freecodecamp](https://www.freecodecamp.org/news/javascript-debounce-example/)
- [Debouncing in JS on dev.to](https://dev.to/abhishekjain35/debouncing-in-javascript-276j)
## Deleting Songs from the Playlist
### Display
Add a button with a trash icon inside to the header that will delete the song from the playlist.
```js
<h2 class="text-2xl p-2 flex justify-between">
<input id="song-name" class="w-5/6" value="No Song Selected" />
<button id="deleteSong">
<i class="fas fa-trash-alt"></i>
</button>
</h2>
```
This song will be used to delete whichever song is currently loaded into the player (using the `currentSongId` variable.
### Data
```js
function deleteSong(songId) {
return fetch(`http://localhost:3000/songs/${songId}`, {
method: 'DELETE'
})
}
```
### Behavior
When this button is clicked, we want a few things to happen:
- The song should be deleted from the database
- The song `li` should be removed from the `playlistElement` in the sidebar
- The song should be removed from the player in the main content area
- We can choose to either:
- reset the player to empty or
- fetch all the songs again and load the first song into the player or
- figure out which of the songs should be selected next based on which song was deleted and load that into the player
The DOM update portion of this is a bit tricky to manage here, so I'm going to try to keep this simple for now. Remember that when you learn React, handling DOM manipulation is left to the React library itself, so you'll be able to more easily focus on what you want to have happen here when a song currently loaded into the player is deleted without having to manage the DOM manipulation manually.
For now, I'm going to choose the 2nd option, because it's the one that requires the least new code to be written. When the page loads initially, we fetch all of the songs and load the first one into the player. We can reuse that code here to get the same effect after a song is deleted.
```js
document.getElementById('deleteSong').addEventListener('click', (e) => {
deleteSong(currentSongId)
.then(() => {
document.querySelector(`#playlist li[data-song-id="${currentSongId}"]`).remove();
})
.then(getSongs)
.then(songs => {
loadSongsIntoSidebar(songs);
loadArtistChoices(songs)
displayTotalDuration(songs);
})
console.log('delete button clicked')
})
```
For your project, if you're deleting records from a list view, this wouldn't be an issue as we could just remove the element from the list and be done with it. But, because we've essentially got a list view (in the sidebar) and a detail view (in the player) visible at the same time, we have to address what should happen if we delete a song that's currently loaded into the player.
We'll discuss ways to handle situations like this with more flexibility when we get into React.
## Exercise for additional practice
- Within the `renderComment` function, add event listeners to handle updating and deleting comments.
- Add functions called `updateComment` and `deleteComment` that both return promises.
- `updateComment` will accept both its `id` and the commentData (an object with a comment property) as arguments. It sends a PATCH request using the `id` in the url and the comment in the body.
- `deleteComment` will accept a `commentId` as an argument that will send a DELETE request to delete the comment from the database.
- Within the event handler in `renderComment` for clicking on the delete button, chain on a .then to deleteComment and remove the comment node from the DOM.
 Sign in with Wallet
Connect another wallet
Sign in with Wallet
Connect another wallet