# Openshift 4.11 UPI安装部署
#OpenShift5个
#容器5个
本篇用于记录和梳理Openshift 4.11 UPI(User Provisioned Infrastructure) bare metal的安装部署过程和所需的配置文件。
底层环境采用esxi7.0虚拟化环境。具体架构信息如下:
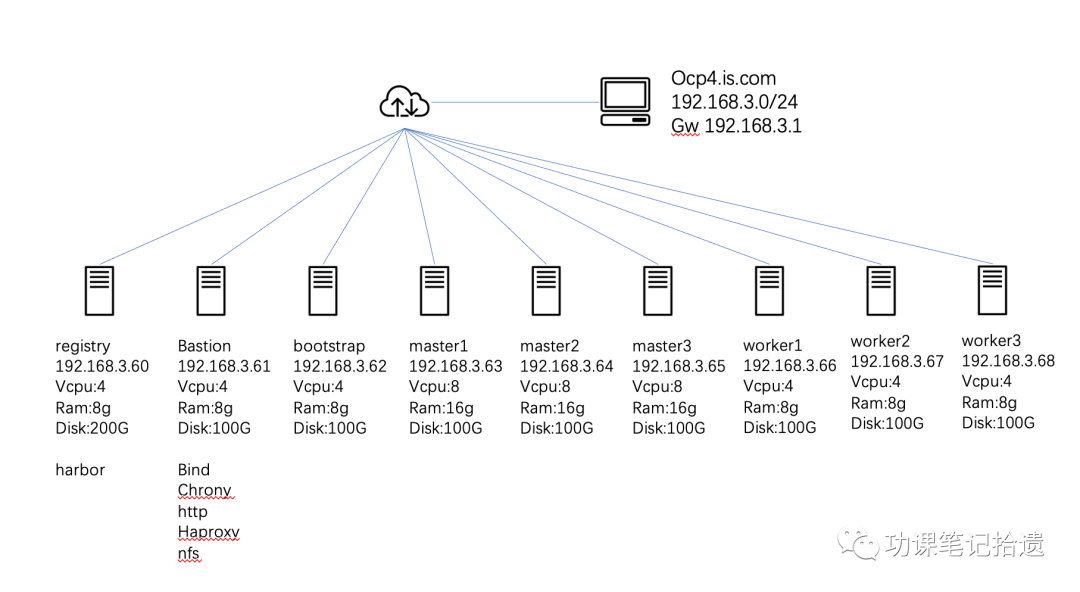
**1 准备工作:**
1. 下载 CentOS 8 x86_64 image以及准备对应yum源
2. 登陆RedHat OpenShift Cluster Manager https://console.redhat.com/openshift
3. 选择cluster -> create cluster -> datacenter -> bare metal(x86_64) -> User-provisioned infrastructure
4. 下载相关文件:
- Openshift Installer for Linux
- Pull secret
- Command Line tools
- Red Hat Enterprise Linux CoreOS (RHCOS) ISO
**2 准备Registry Node**
Registry node将从quay.io下载openshift安装所需的镜像包到本地环境,作为本地镜像仓库提高安装部署的效率和速度。
安装harbor需要的docker-ce以及docker-compose
#curl -o docker.repo https://download.docker.com/linux/centos/docker-ce.repo
#yum install docker-ce docker-compose-plugin
#systemctl enable docker && systemctl start docker
下载harbor离线安装包
#wget https://github.com/goharbor/harbor/releases/download/v2.6.0/harbor-offline-installer-v2.6.0.tgz
#tar zxvf harbor-offline-installer-v2.6.0.tgz
harbor镜像仓库采用https加密方式,因此需要使用到自签名证书进行加密。
生产根证书
#openssl genrsa -out ca.key 4096
#openssl req -x509 -new -nodes -sha512 -days 3650 -subj "/C=CN/ST=Shanghai/L=Shanghai/O=is/OU=Personal/CN=is.com" -key ca.key -out ca.crt
生成签名请求
#openssl genrsa -out is.com.key 4096
#openssl req -sha512 -new -subj "/C=CN/ST=Shanghai/L=Shanghai/O=is/OU=Personal/CN=is.com" -key is.com.key -out is.com.csr
#vi v3.ext
authorityKeyIdentifier=keyid,issuer
basicConstraints=CA:FALSE
keyUsage = digitalSignature, nonRepudiation, keyEncipherment, dataEncipherment
extendedKeyUsage = serverAuth
subjectAltName = @alt_names
[alt_names]
DNS.1=is.com
DNS.2=is
DNS.3=registry.ocp41.is.com
使用根证书进行签名
#openssl x509 -req -sha512 -days 3650 -extfile v3.ext -CA ca.crt -CAkey ca.key -CAcreateserial -in is.com.csr -out is.com.crt
将crt文件转换成cert
#openssl x509 -inform PEM -in is.com.crt -out is.com.cert
将证书拷贝至docker目录
#mkdir -p /etc/docker/certs.d/registry.ocp411.is.com/
#cp is.com.cert /etc/docker/certs.d/registry.ocp411.is.com/
#cp is.com.key /etc/docker/certs.d/registry.ocp411.is.com/
#cp ca.crt /etc/docker/certs.d/registry.ocp411.is.com/
修改harbor配置模版
#cp harbor.yml.tmpl harbor.yml
编辑安装配置文件
#vi harbor.yml
hostname: registry.ocp4.is.com
http:
port: 5080
https:
port: 5088
certificate: /etc/docker/certs.d/registry.ocp4.is.com/is.com.cert
private_key: /etc/docker/certs.d/registry.ocp4.is.com/is.com.key
harbor_admin_password: Harbor12345
database:
password: root123
data_volume: /data
执行准备文件,检查安装文件完整性
#./prepare
执行安装脚本,并且安装notray,trivy,chartmuseum
# ./install.sh --with-notary --with-trivy --with-chartmuseum
安装完成后测试登录
#docker login -u admin https://registry.ocp4.is.com
' fill='%23FFFFFF'%3E%3Crect x='249' y='126' width='1' height='1'%3E%3C/rect%3E%3C/g%3E%3C/g%3E%3C/svg%3E)
创建新的项目ocp4用于存放openshift 4.11的镜像文件
' fill='%23FFFFFF'%3E%3Crect x='249' y='126' width='1' height='1'%3E%3C/rect%3E%3C/g%3E%3C/g%3E%3C/svg%3E)
解压软件包
#tar zxvf oc-4.11.8-linux.tar.gz
将文件移至对应目录
#mv oc /usr/local/sbin/
#mv kubectl /usr/local/sbin/
将pull-secert.txt转换为json文件
#cat pull-secert.txt | jq . > /root/pull-secert.json
将harbor密码进行转换
#echo -n 'admin:Harbor12345' | base64 -w0
将获得的结果添加入pull-secert.json文件
添加后的pull-secert.json文件如下:
' fill='%23FFFFFF'%3E%3Crect x='249' y='126' width='1' height='1'%3E%3C/rect%3E%3C/g%3E%3C/g%3E%3C/svg%3E)
定义变量
#OCP_RELEASE=4.11.8 #对应openshift版本
#LOCAL_REGISTRY='registry.ocp4.is.com' #本地registry
#LOCAL_REPOSITORY=ocp4/openshift4.11 #本地repo
#PRODUCT_REPO='openshift-release-dev' #指定版本
#LOCAL_SECRET_JSON='/pull-secert.json' #密码文件
#RELEASE_NAME="ocp-release" #指定名称
#ARCHITECTURE=x86_64 #架构
#REMOVABLE_MEDIA_PATH=/home/images #可移动介质目录,用于移动拷贝
#GODEBUG=x509ignoreCN=0
将harbor镜像仓库所使用的自签证书ca.crt拷贝至 /etc/pki/ca-trust/source/anchors/ 并执行证书更新
#cp ca.crt /etc/pki/ca-trust/source/anchors/
#update-ca-trust extract
#trust list |head -n 10 #可以查看到当前服务器安装的证书状态
' fill='%23FFFFFF'%3E%3Crect x='249' y='126' width='1' height='1'%3E%3C/rect%3E%3C/g%3E%3C/g%3E%3C/svg%3E)
开始镜像文件
#oc adm release mirror -a ${LOCAL_SECRET_JSON} --from=quay.io/${PRODUCT_REPO}/${RELEASE_NAME}:${OCP_RELEASE}-${ARCHITECTURE} --to=${LOCAL_REGISTRY}/${LOCAL_REPOSITORY} --to-release-image=${LOCAL_REGISTRY}/${LOCAL_REPOSITORY}:${OCP_RELEASE}-${ARCHITECTURE}
镜像完成后提示成功,保存imageContentSources字段用于后续安装。
imageContentSources:
- mirrors:
- registry.ocp4.is.com/ocp4/openshift4.11
source: quay.io/openshift-release-dev/ocp-release
- mirrors:
- registry.ocp4.is.com/ocp4/openshift4.11
source: quay.io/openshift-release-dev/ocp-v4.0-art-dev
' fill='%23FFFFFF'%3E%3Crect x='249' y='126' width='1' height='1'%3E%3C/rect%3E%3C/g%3E%3C/g%3E%3C/svg%3E)
**3 准备bastion Node**
安装chrony NTP软件
#yum install chrony -y
修改chrony配置
# vim /etc/chrony.conf
server ntp1.aliyun.com iburst #以server开头指定NTP服务器,可添加多台。
driftfile /var/lib/chrony/drift # 根据实际时间计算出服务器增减时间的比率,然后记录到一个文件中,在系统重启后为系统做出最佳时间补偿调整。
makestep 1.0 3 # 如果系统时钟的偏移量大于1秒,则允许系统时钟在前三次更新中步进。
rtcsync # 启用实时时钟(RTC)的内核同步。
allow 192.168.3.0/24 # 指定 NTP 客户端地址,以允许或拒绝连接到扮演时钟服务器的机器
keyfile /etc/chrony.keys # 指定包含 NTP 身份验证密钥的文件。
logdir /var/log/chrony # 指定日志文件的目录。
启动服务并加入系统自启动
#systemctl start chronyd && systemctl enable chronyd
开启网络时间同步
#timedatectl set-ntp true
查看当前NTP服务器状态
#chronyc sources -v
安装bind DNS服务
#yum install bind bind-utils
#vi /etc/named.conf
options {
listen-on port 53 { any; };
listen-on-v6 port 53 { ::1; };
directory "/var/named";
dump-file "/var/named/data/cache_dump.db";
statistics-file "/var/named/data/named_stats.txt";
memstatistics-file "/var/named/data/named_mem_stats.txt";
secroots-file"/var/named/data/named.secroots";
recursing-file"/var/named/data/named.recursing";
allow-query { any; };
recursion yes;
dnssec-enable yes;
dnssec-validation yes;
managed-keys-directory "/var/named/dynamic";
pid-file "/run/named/named.pid";
session-keyfile "/run/named/session.key";
logging {
channel default_debug {
file "data/named.run";
severity dynamic;
};
};
zone "." IN {
type hint;
file "named.ca";
};
zone "ocp4.is.com" IN {
type master;
file "ocp4.is.com.zone";
};
zone "3.168.192.in-addr.arpa" IN {
type master;
file "3.168.192.in-addr.arpa.zone";
};
include "/etc/named.rfc1912.zones";
include "/etc/named.root.key";
添加A记录,部分域名将在后续使用。
#vi /var/named/ocp4.is.com.zone
$TTL 1D
@ IN SOA @ ns1.ocp4.is.com. (
2021032700 ; serial
3H ; refresh
30M ; retry
2W ; expire
1W ) ; minimum
@ NS ns1.ocp4.is.com.
ns1 IN A 192.168.3.60
dns IN A 192.168.3.60
registry IN A 192.168.3.60
bastion IN A 192.168.3.61
nfs IN A 192.168.3.61
lb IN A 192.168.3.61
api IN A 192.168.3.61
api-int IN A 192.168.3.61
bootstrap IN A 192.168.3.62
master1 IN A 192.168.3.63
master2 IN A 192.168.3.64
master3 IN A 192.168.3.65
worker1 IN A 192.168.3.66
worker2 IN A 192.168.3.67
worker3 IN A 192.168.3.68
*.apps IN A 192.168.3.61
添加PTR记录
#vi /var/named/3.168.192.in-addr.arpa.zone
$TTL 1D
@ IN SOA @ ns1.ocp4.is.com. (
2021032700 ; serial
3H ; refresh
30M ; retry
2W ; expire
1W ) ; minimum
@ NS ns1.ocp4.is.com.
60 IN PTR ns1.ocp4.is.com.
60 IN PTR dns.ocp4.is.com.
61 IN PTR nfs.ocp4.is.com.
61 IN PTR bastion.ocp4.is.com.
60 IN PTR registry.ocp4.is.com.
61 IN PTR lb.ocp4.is.com.
61 IN PTR api.ocp4.is.com.
61 IN PTR api-int.ocp4.is.com.
62 IN PTR bootstrap.ocp4.is.com.
63 IN PTR master1.ocp4.is.com.
64 IN PTR master2.ocp4.is.com.
65 IN PTR master3.ocp4.is.com.
66 IN PTR worker1.ocp4.is.com.
67 IN PTR worker2.ocp4.is.com.
68 IN PTR worker3.ocp4.is.com.
启动named服务并加入系统自启动
#systemctl start named && systemctl enable named
编辑/etc/resolv.conf
#echo "nameserver 192.168.3.61" > /etc/resolv.conf
通过dig命令确认DNS是否生效
# dig registry.ocp4.is.com
#dig -x 192.168.3.60
安装NFS服务
#yum install nfs-utils -y
创建NFS共享目录
#mkdir /shares
修改属主
#chown -R nobody:nobody /shares/
修改权限
#chmod -R 777 /shares/
添加共享权限文件
#echo "/shares 192.168.3.0/24(rw,sync,root_squash,no_subtree_check,no_wdelay)" > /etc/exports
使共享目录生效
# exportfs -rv
启用NFS服务并加入开机启动
# systemctl enable nfs-server rpcbind && systemctl start nfs-server rpcbind nfs-mountd
安装HAproxy负载均衡
#yum install haproxy
#vi /etc/haproxy/haproxy.cfg
# Global settings
#---------------------------------------------------------------------
global
maxconn 20000
log /dev/log local0 info
chroot /var/lib/haproxy
pidfile /var/run/haproxy.pid
user haproxy
group haproxy
daemon
# turn on stats unix socket
stats socket /var/lib/haproxy/stats
#---------------------------------------------------------------------
# common defaults that all the 'listen' and 'backend' sections will
# use if not designated in their block
#---------------------------------------------------------------------
defaults
log global
mode http
option httplog
option dontlognull
option http-server-close
option redispatch
option forwardfor except 127.0.0.0/8
retries 3
maxconn 20000
timeout http-request 10000ms
timeout http-keep-alive 10000ms
timeout check 10000ms
timeout connect 40000ms
timeout client 300000ms
timeout server 300000ms
timeout queue 50000ms
# Enable HAProxy stats
listen stats
bind :9000
stats uri /stats
stats refresh 10000ms
# Kube API Server
frontend k8s_api_frontend
bind :6443
default_backend k8s_api_backend
mode tcp
backend k8s_api_backend
mode tcp
balance source
server bootstrap 192.168.3.62:6443 check
server master1 192.168.3.63:6443 check
server master2 192.168.3.64:6443 check
server master3 192.168.3.65:6443 check
# OCP Machine Config Server
frontend ocp_machine_config_server_frontend
mode tcp
bind :22623
default_backend ocp_machine_config_server_backend
backend ocp_machine_config_server_backend
mode tcp
balance source
server bootstrap 192.168.3.62:22623 check
server master1 192.168.3.63:22623 check
server master2 192.168.3.64:22623 check
server master3 192.168.3.65:22623 check
# OCP Ingress - layer 4 tcp mode for each. Ingress Controller will handle layer 7.
frontend ocp_http_ingress_frontend
bind :80
default_backend ocp_http_ingress_backend
mode tcp
backend ocp_http_ingress_backend
balance source
mode tcp
server worker1 192.168.3.66:80 check
server worker2 192.168.3.67:80 check
frontend ocp_https_ingress_frontend
bind *:443
default_backend ocp_https_ingress_backend
mode tcp
backend ocp_https_ingress_backend
mode tcp
balance source
server worker1 192.168.3.66:443 check
server worker2 192.168.3.67:443 check
#systemctl start haproxy && systemctl enable haproxy
安装HTTP服务
#yum install http
#vi /etc/httpd/conf/httpd.conf
修改监听端口 调整为 9080
#vi /etc/httpd/conf.d/welcome.conf
修改Options +Indexes
启动http并加入开机启动
#systemctl start httpd && systemctl enable httpd
**4 准备OCP安装配置文件**
创建OCP安装目录
#mkdir -p /opt/install/ocp/
生成ssh-key文件,用于登录bootstrap和master节点
#ssh-keygen -t rsa -b 4096 -N '' -f /opt/install/id_rsa
启动ssh-agent
#eval "$(ssh-agent -s)"
添加key,成功后会有对应提示
#ssh-add /opt/install/id_rsa
解压缩openshift-install包
#tar zxvf openshift-install-linux.tar.gz
将可执行文件移动至指定目录
#mv openshift-install /usr/local/sbin
编辑install-config.yaml安装文件
#vim /opt/install/ocp/install-config.yaml
apiVersion: v1
baseDomain: is.com
compute:
- hyperthreading: Enabled
name: worker
replicas: 0 # Must be set to 0 for User Provisioned Installation as worker nodes will be manually deployed.
controlPlane:
hyperthreading: Enabled
name: master
replicas: 3
metadata:
name: ocp4 # Cluster name
networking:
clusterNetwork:
- cidr: 10.128.0.0/14
hostPrefix: 23
networkType: OpenShiftSDN
serviceNetwork:
- 172.30.0.0/16
platform:
none: {}
fips: false
pullSecret: '{"auths":{"registry.ocp4.is.com":{"auth":"YWRtaW46SGFyYm9yMTIzNDU=","email":"xxx@xxx.com"}},"cloud.openshift.com":{"auth":"xxxxxxxxxxxxxxxxxx"}}}'
sshKey: "ssh-rsa ... root@bastion.ocp4.is.com" #bastion的id_rsa.pub
additionalTrustBundle: | #添加registry的ca.crt
-----BEGIN CERTIFICATE-----
....
-----END CERTIFICATE-----
imageContentSources: #添加OCP镜像完成后的Imagecontentsources
- mirrors:
- registry.ocp4.is.com/ocp4/openshift4.11
source: quay.io/openshift-release-dev/ocp-release
- mirrors:
- registry.ocp4.is.com/ocp4/openshift4.11
source: quay.io/openshift-release-dev/ocp-v4.0-art-dev
创建openshift manifests文件
#openshift-install create manifests --dir /opt/install/ocp/
修改/opt/install/ocp/manifests/cluster-scheduler-02-config.yml将masterschedulable由true变更为false,让master节点不会被调度。
apiVersion: config.openshift.io/v1
kind: Scheduler
metadata:
creationTimestamp: null
name: cluster
spec:
mastersSchedulable: false
policy:
name: ""
status: {}
创建点火文件
# openshift-install create ignition-configs --dir /opt/install/ocp/
拷贝ign文件至http服务器
#cp /opt/install/ocp/*.ign /var/www/html/
修改ign文件权限
#chmod 755 /var/www/html/*.ign
**5 安装openshift**
使用coreos启动bootstrap虚拟机以及master 虚拟机启动后运行如下命令
bootstrap节点
#sudo coreos-installer install /dev/sda -I http://192.168.3.61:9080/bootstrap.ign --insecure --insecure-ignition --append-karg ip=192.168.3.62::192.168.3.1:255.255.255.0:bootstrap.ocp4.is.com:ens192:none --append-karg nameserver=192.168.3.61
master节点
#sudo coreos-installer install /dev/sda -I http://192.168.3.61:9080/master.ign --insecure --insecure-ignition --append-karg ip=192.168.3.63::192.168.3.1:255.255.255.0:master1.ocp4.is.com:ens192:none --append-karg nameserver=192.168.3.61
安装完成其余节点
在bastion运行安装命令观察安装状态
#openshift-install --dir /opt/install/ocp/ wait-for bootstrap-complete --log-level=debug
观察haproxy状态
' fill='%23FFFFFF'%3E%3Crect x='249' y='126' width='1' height='1'%3E%3C/rect%3E%3C/g%3E%3C/g%3E%3C/svg%3E)
bootstarp安装引导完成后,会提示可以移除bootstrap资源。此时修改haproxy。
' fill='%23FFFFFF'%3E%3Crect x='249' y='126' width='1' height='1'%3E%3C/rect%3E%3C/g%3E%3C/g%3E%3C/svg%3E)
注释对应bootstrap内容,重启haproxy服务
' fill='%23FFFFFF'%3E%3Crect x='249' y='126' width='1' height='1'%3E%3C/rect%3E%3C/g%3E%3C/g%3E%3C/svg%3E)
#systemctl restart haproxy
安装worker节点
#sudo coreos-installer install /dev/sda -I http://192.168.3.61:9080/worker.ign --insecure --insecure-ignition --append-karg ip=192.168.3.66::192.168.3.1:255.255.255.0:worker1.ocp4.is.com:ens192:none --append-karg nameserver=192.168.3.61
节点安装完成后,修改kubeconfig文件
cat /opt/install/ocp/auth/kubeconfig > /root/.kube/config
通过oc命令查看csr 是否有pending的内容
' fill='%23FFFFFF'%3E%3Crect x='249' y='126' width='1' height='1'%3E%3C/rect%3E%3C/g%3E%3C/g%3E%3C/svg%3E)
批准证书
# oc get csr -o go-template='{{range .items}}{{if not .status}}{{.metadata.name}}{{"\n"}}{{end}}{{end}}' | xargs oc adm certificate approve
' fill='%23FFFFFF'%3E%3Crect x='249' y='126' width='1' height='1'%3E%3C/rect%3E%3C/g%3E%3C/g%3E%3C/svg%3E)
由于依赖顺序关系,批准证书的操作需要执行多次
' fill='%23FFFFFF'%3E%3Crect x='249' y='126' width='1' height='1'%3E%3C/rect%3E%3C/g%3E%3C/g%3E%3C/svg%3E)
在bastion节点运行安装命令观察ocp集群安装状态
#openshift-install --dir /opt/install/ocp/ wait-for install-complete --log-level=debug
' fill='%23FFFFFF'%3E%3Crect x='249' y='126' width='1' height='1'%3E%3C/rect%3E%3C/g%3E%3C/g%3E%3C/svg%3E)
固化路由节点
标记label
#oc label node worker1.ocp4.is.com node-role.kubernetes.io/infra= --overwrite
# oc label node worker2.ocp4.is.com node-role.kubernetes.io/infra= --overwrite
修改operator调度
#oc patch ingresscontrollers.operator.openshift.io default -n openshift-ingress-operator --type=merge --patch '{"spec":{"nodePlacement":{"nodeSelector":{"matchLabels":{"node-role.kubernetes.io/infra":""}}}}}'
安装过程中节点会逐个ready
' fill='%23FFFFFF'%3E%3Crect x='249' y='126' width='1' height='1'%3E%3C/rect%3E%3C/g%3E%3C/g%3E%3C/svg%3E)
oc get co 查看operator启用状态
' fill='%23FFFFFF'%3E%3Crect x='249' y='126' width='1' height='1'%3E%3C/rect%3E%3C/g%3E%3C/g%3E%3C/svg%3E)
安装完成提示
' fill='%23FFFFFF'%3E%3Crect x='249' y='126' width='1' height='1'%3E%3C/rect%3E%3C/g%3E%3C/g%3E%3C/svg%3E)
登录控制台 https://console-openshift-console.apps.ocp4.is.com
#192.168.3.61 ocp-svc api.ocp4.is.com console-openshift-console.apps.ocp4.is.com oauth-openshift.apps.ocp4.is.com downloads-openshift-console.apps.ocp4.is.com alertmanager-main-openshift-monitoring.apps.ocp4.is.com grafana-openshift-monitoring.apps.ocp4.is.com prometheus-k8s-openshift-monitoring.apps.ocp4.is.com thanos-querier-openshift-monitoring.apps.ocp4.is.com#可添加hosts文件方便访问。
' fill='%23FFFFFF'%3E%3Crect x='249' y='126' width='1' height='1'%3E%3C/rect%3E%3C/g%3E%3C/g%3E%3C/svg%3E)
' fill='%23FFFFFF'%3E%3Crect x='249' y='126' width='1' height='1'%3E%3C/rect%3E%3C/g%3E%3C/g%3E%3C/svg%3E)
登录后会有提示添加身份供应商,配置告警等。
设置集群,选择对应频道,对平台进行更新。
' fill='%23FFFFFF'%3E%3Crect x='249' y='126' width='1' height='1'%3E%3C/rect%3E%3C/g%3E%3C/g%3E%3C/svg%3E)
openshift bare metal安装之后不提供默认的存储空间,因此管理状态为removed,在集群安装完成后我们可以调整为managed状态
#oc edit configs.imageregistry.operator.openshift.io
' fill='%23FFFFFF'%3E%3Crect x='249' y='126' width='1' height='1'%3E%3C/rect%3E%3C/g%3E%3C/g%3E%3C/svg%3E)
#vi registry-vol.yaml
apiVersion: v1
kind: PersistentVolume
metadata:
name: registry-pv
spec:
accessModes:
- ReadWriteMany
capacity:
storage: 100Gi
persistentVolumeReclaimPolicy: Retain
nfs:
path: /shares
server: 192.168.3.61
创建存储
#oc create -f registry-vol.yaml
查看存储挂载状态
#oc get pvc -n openshift-image-registry' fill='%23FFFFFF'%3E%3Crect x='249' y='126' width='1' height='1'%3E%3C/rect%3E%3C/g%3E%3C/g%3E%3C/svg%3E)
openshift集群需要增加认证方式,增加htpasswd方式
采用htpasswd方式进行加密
#htpasswd -n -B -b <username> <password>
#vi oauth-htpasswd.yaml
apiVersion: v1
data:
htpasswd: YWRtaW46JDJ5JDA1JGl5NVNsQ2guN3gxSGlabUJZYlVody5Rck0zOVpidks5c3lVSlZtQzZ3V3ViZkE4bTRYdTFhCg==
kind: Secret
metadata:
name: htpasswd-secret
namespace: openshift-config
type: Opaque
---
apiVersion: config.openshift.io/v1
kind: OAuth
metadata:
name: cluster
spec:
identityProviders:
- name: htpasswd_provider
mappingMethod: claim
type: HTPasswd
htpasswd:
fileData:
name: htpasswd-secret
#oc apply -f oauth-htpasswd.yaml
# oc adm policy add-cluster-role-to-user cluster-admin admin
再次登录控制台,选择htpasswd_provider方式登录
' fill='%23FFFFFF'%3E%3Crect x='249' y='126' width='1' height='1'%3E%3C/rect%3E%3C/g%3E%3C/g%3E%3C/svg%3E)
可以在operatorhub中选择对应的operator进行安装。
' fill='%23FFFFFF'%3E%3Crect x='249' y='126' width='1' height='1'%3E%3C/rect%3E%3C/g%3E%3C/g%3E%3C/svg%3E)
至此openshift UPI on bare metal的安装已经完成。
如在安装过程出出现问题,需要进行定位可以使用gather命令收集对应日志
#openshift-install gather bootstrap --dir /opt/install/ocp --bootstrap=192.168.3.62 --master=192.168.3.63 --master=192.168.3.64 --master=192.168.3.65
参考链接:https://console.redhat.com/openshift/install/metal/user-provisioned
https://docs.openshift.com/container-platform/4.11/installing/installing_bare_metal/installing-bare-metal.html