# iOS App Dev Tutorial SwiftUI
> Apple의 공식 iOS App Dev Tutorial 중 SwiftUI 파트를 따라하며 학습합니다.
<br>
🗓️ 학습 기간: `23.04.13` ~
<br>
# Record blu's study
[Keyword](#-keyword)
[Study](#-study)
[Trouble Shooting](#-trouble-shooting)
[Check List](#-check-list)
[Reference Link](#-reference-link)
[A-ha!](#-a-ha)
## 🔑 Keyword
`SwiftUI` , `Stack`, `Text`, `SF Symbols`, `Alignment`, `Supplement accessibility data`, `Label`, `List`, `NavigationStack`, `Property wrappers`, `Scene`, `View life cycle events`, `AVPlayer`
## 📚 Study
<details>
<summary><b>SwiftUI</b></summary>
<div>
- **SwiftUI overview**
SwiftUI is a **declarative framework** for building apps for any Apple platform. SwiftUI provides a common API that you can use to define an app’s user interface and platform-specific behavior.
Create apps more quickly and with fewer errors with these key SwiftUI features:
- **Declarative syntax**—Define which views appear onscreen - using simple Swift structures.
- **A compositional API**—Quickly create and iterate your user interface using built-in views and modifiers. Compose more complex views by combining simpler views.
- **A powerful layout system**—Easily arrange views onscreen relative to their parent views and to each other. When existing views and controls don’t suit your needs, you can draw your own.
- **Views that reflect app data**—Define a view’s data dependencies, and SwiftUI automatically updates the view when data changes, avoiding errors from invalid view states.
- **Automatic accessibility support**—SwiftUI adds basic accessibility that you’ll learn to enhance with minimal effort.
- **나만의 언어로 정리하는 Swift는**
- multiplatform app의 레이아웃과 액션을 구성하는 데 사용
- declarative framework(선언형 프레임워크)
- UIKit 는 **Event driven** 이라면 SwiftUI는 **Data driven**
- View를 Customize 하기 위해 **수정자**로 알려진 메서드를 호출, 수정자는 새 View를 반환함, 수정자는 단일 보기에서 여러 개 사용할 수 있으며, 수정자를 연결하기 위해서는 수직으로 쌓으면 됨
- SwiftUI view file의 구조
- View 프로토콜을 준수하며 View를 반환하는 body 속성의 단일 요구사항
- View의 콘텐츠, 레이아웃, 동작을 설명
- 캔버스에 표시할 해당 Viewdml preview를 정의
</div>
</details>
<details>
<summary><b>Text</b></summary>
<div>
- `.font()` modifier(수정자)로 텍스트 크기를 조절할 수 있음
</div>
</details>
<details>
<summary><b>SF Symbols</b></summary>
<div>
- System이 SF Symbols의 이미지는 font처럼 취급하여 사용자의 디바이스 설정에 따라 동적으로 확장됨
</div>
</details>
<details>
<summary><b>Alignment</b></summary>
<div>
- VStack의 alignment는 HorizontalAlignment 타입
- VStack 정렬의 기본 동작은 **center**이지만 재정의하여 정렬 가능
- 일부 system은 left, right를 사용하지만 SwiftUI는 **leading, trailing 정렬을 사용하여 앱의 현지화를 용이하게 함**
- 직접 지정해주는 방법도 있지만 VStack 선택 후 Attributes inspector에서 Alignment 옵션을 사용하여 정렬을 설정할 수도 있음
- **Alignment**
HorizontalAlignment와 VerticalAlignment를 포괄하는 상위 개념!
ZStack에 view를 배치하거나 `overlay(alignment:content:)` 또는 `background(alignment:content:)를 사용하여 다른 view 앞이나 뒤에 view를 배치하는 경우와 같이 특정 레이아웃 컨테이너 및 수정자의 동작을 지시하는 정렬 가이드

- **HorizontalAlignment**
VStack에서 뷰를 수직으로 배치할 때와 같이 수평으로 배치하는 방법에 대한 가이드

- **VerticalAlignment**
HStack에 뷰를 나란히 배치하거나 GridRow를 사용하여 Grid에 뷰 행을 생성할 때와 같이 뷰를 수직으로 배칠할 때의 정렬 가이드

</div>
</details>
<details>
<summary><b>Supplement accessibility data (접근성 보완)</b></summary>
<div>
- SwiftUI에는 접근성 기능이 내장되어 있음
- 약간의 추가 작업으로 접근성 지원을 받을 수 있음
- 예) Text view의 문자열 콘텐츠에 자동으로 접근 가능, 하지만 사용자의 접근성 환경을 개선하기 위해 추론된 데이터를 보완해야 할 수 있음
- `.accessibilityAddTraits()`를 사용하면 특성을 추가해서 읽어주는 것, 예시대로 `.isHeader`를 넣으면 사용한 요소와 함께 "heading"이라고 읽어주어 view 의 information architecture를 전달하는 데 도움이 됨
</div>
</details>
<details>
<summary><b>Label</b></summary>
<div>
- 제목이 있는 아이콘으로 구성된 표준 레이블
- 가장 일반적인 것은 아이콘 + 레이블 조합
- `.labelStyle()` 수정자를 통해 타이틀만 보이게, 아이콘만 보이게, 둘 다 보이게 설정할 수 있음
- 기본 스타일을 수정하여 커스터마이징된 레이블 스타일을 만들 수도 있음
- 완전히 새로운 스타일을 만들고 싶은 경우 LabelStyle 프로토콜을 채택 후 LabelStyleConfiguration을 구현하면 됨
- 레이블 그룹에 공통 레이블 스타일을 적용하려면 포함된 뷰 계층 구조에 스타일을 적용하면 됨
- TrailingIconLabelStyle.swift 파일 참고!
- icon 부분에 SF Symbol과 같은 이미지 대신 programmatically하게 view를 사용하여 레이블을 만드는 것도 가능함
예) `Circle()`
</div>
</details>
<details>
<summary><b>List</b></summary>
<div>
- List를 사용하여 단순히 생성하는 경우 아래와 같은 오류가 발생함
> Initializer 'init(_:rowContent:)' requires that 'DailyScrum' conform to 'Identifiable'
> ➜ DailyScrum이 Identifiable을 준수해야 함!!
- 왜 내부에 들어갈 데이터 타입은 Identifiable을 준수해야 할까?
- List의 정의부는 다음과 같음
`@MainActor struct List<SelectionValue, Content> where SelectionValue : Hashable, Content : View`
데이터 타입에 해당하는 SelectionValue가 Hashable을 채택하고 있기 때문!
- 공식 튜토리얼상 컬렉션의 개별 item을 식별하는 방법이 필요하기 때문! 튜토리얼에는 모든 테스트 데이터가 다른 이름을 가지고 있으므로 해당 속성을 키 값의 경로로 사용하도록 `id: \.title`으로 설정해줌
- 튜토리얼상 테스트 데이터는 다른 이름을 가지고 있었지만 사용자가 동일한 이름으로 새 데이터를 생성하는 경우 문제가 발생함!
- 사용자가 생성한 콘텐츠로 작업하기 위해 SelectionValue가 ID를 전달하는 identifiable 프로토콜을 준수할 수 있음
- identifiable은 채택하면 엔티티에 대한 안정적인 식별자를 제공하기 위한 id 프로퍼티를 요구함
- UUID()를 데이터 모델의 초기화자에 사용하면 매개변수의 기본값을 정의하기 위해 초기화자나 함수를 호출할 때 해당 매개변수를 생략할 수 있음
</div>
</details>
<details>
<summary><b>Property wrappers in SwiftUI</b></summary>
<div>
- 일반적인 프로퍼티 초기화 패턴을 캡슐화하여 속성에 동작을 효율적으로 추가하는 데 도움을 줌
- SwiftUI는 `@State` 및 `@Binding` 프로퍼티 래퍼를 사용하여 뷰가 쉽게 액세스할 수 있는 정보 소스를 유지하는 데 도움을 줌
- **값 타입**의 경우 `@State` 및 `@Binding`을 사용
- **참조 타입**의 경우 `@ObservedObject`, `@StateObject`, `@EnvironmentObject`를 사용
- 참조 타입의 경우 프로퍼티 래퍼를 사용하기 위해서 관찰 가능하게(observable) 만들어야 함
- `ObservableObject` 프로토콜을 채택하여 클래스를 관찰 가능하게 만들고 각 속성 선언 시 `@Published` 키워드를 추가함
**값 타입 property wrapper**
- `@State`
- 프로퍼티를 `@State로 선언하면 view 내에서 신뢰할 수 있는 데이터 원본이 생성됨
- memberwise initializer에서 초기값을 설정하는 것을 방지하기 위해 private로 선언해야 함
- Class와 같은 참조 타입을 저장해야 하는 경우 `StateObject`를 사용
- 시스템은 `@State` 속성 값에 따라 달라지는 view의 모든 요소를 식별함
- 사용자의 상호작용은 `@State` 프로퍼티를 변경할 수 있음
- 시스템은 해당 프로퍼티애 의존하는 view를 업데이트하여 새로운 버전의 UI를 렌더링함
- 영구적인 상태보다 **일시적인** 상태를 관리하는 데 도움이 되므로 state property를 private로 선언하는 것을 권장 (예: 버튼의 강조 표시 상태, 필터 설정, 현재 선택된 목록 등)
- State의 기본값에 접근하기 위해서는 WrappedValue 속성을 사용해야 하지만 shortcut으로 swift를 사용하면 State 인스턴스를 직접 참조하여 래핑된 값에 접근할 수 있음
- view structure에 로컬인 가변 소스를 정의하기 위한 구문
- 그렇다면, 다른 뷰(하위 뷰)에서 동일한 데이터 소스를 사용하려면?! ➜ Binding을 전달하면 됨!
- 속성 이름 앞에 달러 기호($)를 붙이면 해당 상태의 projectedValue에 접근하여 State Value에 대한 바인딩을 가져올 수 있음
- `@Binding`
- `@Binding`으로 래핑하는 프로퍼티는 `@State` 프로퍼티와 같은 기존 소스와 읽기 및 쓰기 접근권한을 공유함
- 데이터를 직접 저장하지 않는 대신 기존 정보 소스와 해당 데이터를 표시하고 업데이트하는 view 사이에 양방향 연결을 생성
- 이 연결을 통해 데이터와 연결된 여러 보기가 동기화됨
- 시스템은 `@State`의 데이터와 `@Binding`이 포함된 view 간에 종속성을 설정함
- 상위/하위 view는 원본으로 정의한 프로퍼티를 읽거나 수정할 수 있음
- binding을 사용하여 신뢰할 수 있는 단일 데이터 소스를 전파하는 패턴은 view 계층 구조에 효과적임!
➜ 데이터 소스의 변화를 관찰하는 코드를 별도로 작성하지 않아도 되기 때문!
**참조 타입 property wrapper**
- `@StateObject`
- App, Scene, View 내부에서 관찰 가능한(observable) 개체를 만듦
- 시스템은 개체를 초기화하고 개체를 전달하는 다른 view에서 사용할 수 있도록 개체를 유지
- `@ObservedObject`
- 상위 소스에서 개체를 수신했음을 알려주는 프로퍼티 래퍼
- 상위 구조에서 개체를 생성하고 소유하고 있으므로 하위 뷰는 `ObservedObject`에 대한 초기값이 필요하지 않음
- `@EnvironmentObject`
- 위 2개의 프로퍼티 래퍼는 상하위 view가 명확한 경우 사용하지만, `EnvironmentObject`는 복잡한 view 계층구조에서 관찰 가능한 개체를 공유함
- 이니셜라이저를 통해 개체를 전달하는 대신 `environmentObject(_:)` 수정자를 통해 개체를 environment에 배치
- 배치된 개체는 중간 view에 대한 참조가 없더라도 사용 가능
- 중간 view에서 불필요한 종속성을 생성하지 않도록 도와줌
</div>
</details>
<details>
<summary><b>Scene</b></summary>
<div>
**Scene architecture**
- Scene
- 시스템이 관리하는 수명주기가 있는 앱 User interface의 일부
- 앱이 제공하는 view 계층 구조의 컨테이너
- iOS, WatchOS에서는 하나의 Scene만 display할 수 있지만, macOS나 iPadOS의 경우 여러 Scene을 사용할 수 있음
- 앱을 만들기 위해서는 `App` 프로토콜을 준수하는 구조를 정의해야 함, 정의부에 `@main` 속성을 사용하여 앱의 유일한 진입점임을 시스템에 알림
- App structure의 본문에 `Scene` 프로토콜을 준수하는 하나 이상의 Scene을 추가
- SwiftUI는 `WindowGroup`과 같은 구체적인 Scene을 제공
**Scene phases and transitions**
- App 실행 중에 Scene은 세 단계로 전환될 수 있음
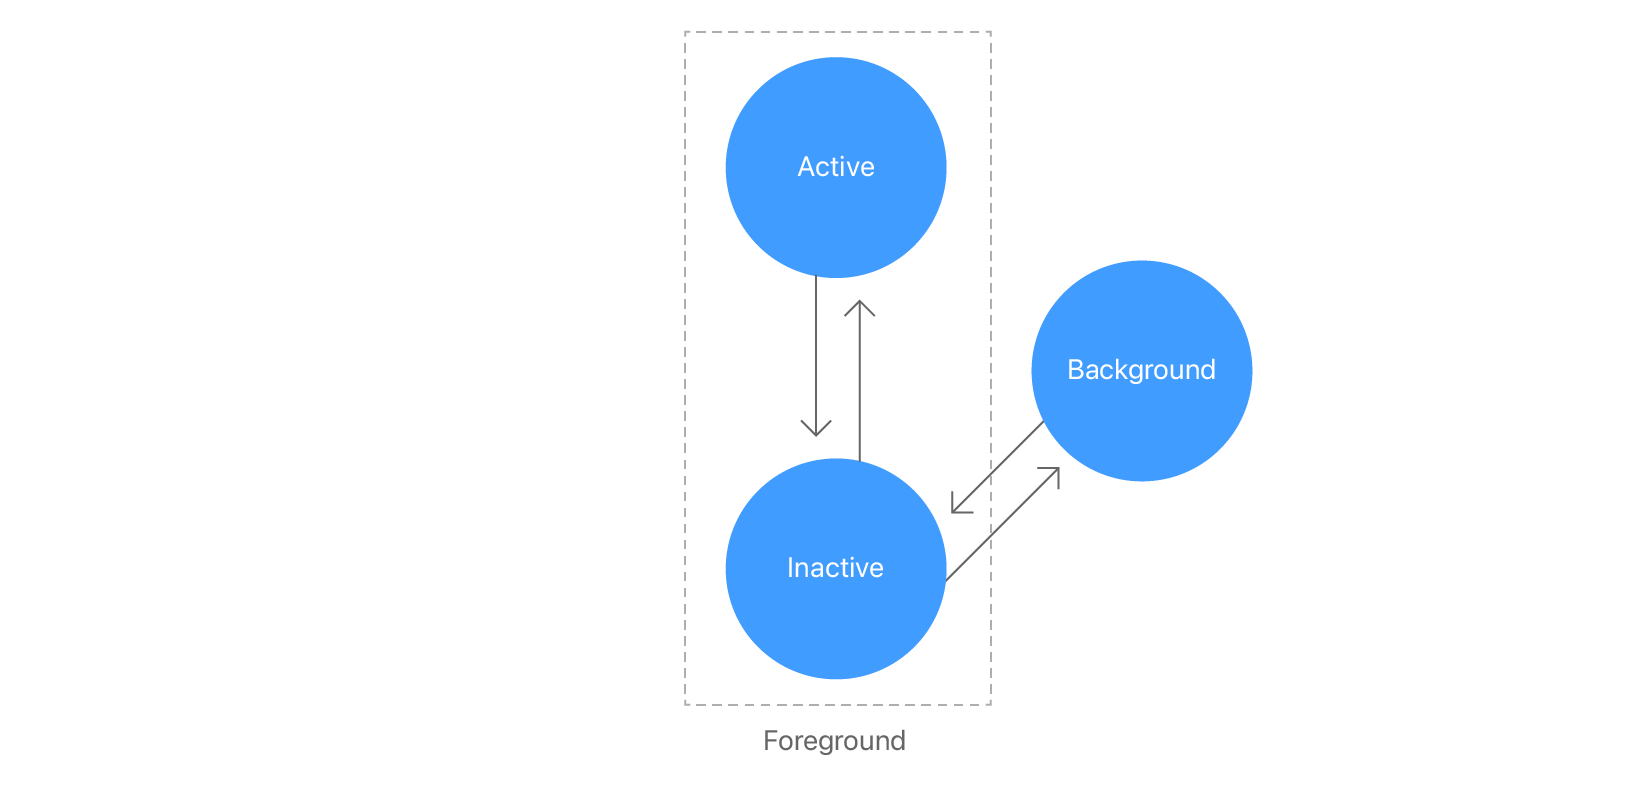
- `active`: Scene이 foreground에 있고, 사용자와 상호작용 할 수 있는 단계
- `inactive`: Scene을 볼 수 있지만 system이 상호작용을 비활성화한 단계
- `background`: 앱이 실행 중이지만 사용자 인터페이스에 표시되지 않는 단계, 앱 종료 전 단계
- `scenePhase` environment 값을 사용하여 Scene의 현재 상태를 읽을 수 있음
- `onChange(of:perform:)` 수정자를 사용하면 Scene이 `inactive`한 단계가 됐을 때 앱 데이터를 저장하는 작업이 가능
</div>
</details>
<details>
<summary><b>View life cycle events</b></summary>
<div>
- view의 생명주기 이벤트에 대해 응답하는 세 가지 수정자
- `onAppear(perform:)`: view가 화면에 그려질 때마다 응답
- `onDisappear(perform:)`: view가 화면에서 사라질 때 응답
- `task(priority:_:)`: view가 화면에 나타나기 전 비동기 작업을 수행
</div>
</details>
## 🏀 Trouble Shooting
## ✅ Check List
- [ ] iOS App Dev Tutorials (SwiftUI)
- [x] SwiftUI essentials
- [x] Views
- [x] Navigation and modal presentation
- [x] Passing Data
- [ ] State management
- [ ] Persistence and concurrency
- [ ] Drawing
- [ ] Recording audio
- [x] 선언형 프레임워크란?
- 주로 UI 개발에서 사용되어 선언형 UI라고도 함
- 원하는 결과를 명시(선언)하고 프레임워크가 자동으로 이를 구현하는 방식의 프로그래밍 패러다임을 말함
- 코드의 구체적인 로직을 작성하지 않고도 원하는 결과를 달성할 수 있음
- *어떤 방법*으로 해야 하는지를 나타내기 보다 *무엇*을 나타낼지를 묘사하는 것
- **왜 SwiftUI가 선언형 프레임워크인가?**
- UI를 구현하기 위해 코드를 작성하는 대신 UI의 레이아웃, 스타일, 상호작용을 명시(선언)하고 SwiftUI가 이를 처리하기 때문
- 선언적인 문법
개발자가 어떻게 UI를 만들지 명시하면 SwiftUI가 코드를 추상화하고 UI를 생성
- 상태 관리
앱의 상태를 관리하기 위해 데이터 바인딩을 사용, 상태 변경이 감지되면 자동으로 UI를 업데이트하고 변경사항을 적용함
- 이처럼 SwiftUI는 선언적 문법과 상태 관리를 통해 UI를 구현하는 간결하고 직관적인 선언형 프레임워크
- [x] UIKit과 SwiftUI의 차이점
- **UIKit**
- Event Driven
예를 들어 버튼이 눌렸을 때 버튼이 눌렸을 때 호출할 함수를 호출하고, 호출된 함수 내부에서 배경 색을 바꿈
이처럼 View는 자신이 어떻게 변화할지를 예상할 수 없음
- Objcect-C 기반으로 만들어진 프레임워크
- **SwiftUI** (WWDC19에서 발표)
- Data Driven
예를 들면 버튼이 눌렸을 때 버튼이 눌렸는지 확인하는 Bool 타입의 값을 변경, 상태에 맞게 이미 선언한 대로 View를 다시 그림
- Swift를 기반으로 만들어진 것
- [x] Preview struct 내에서 static으로 프로퍼티를 선언해주는 이유?(Getting started with Scrumdinger)

- preview는 시간이나 사용자 입력에 따라 변경되는 것이 아니라 정적인 뷰를 보여주는 것이 목적이기 때문에 사용되는 데이터도 정적인 데이터가 되어야 함
- static 프로퍼티는 인스턴스화 없이도 클래스나 구조체에서 직접 접근할 수 있는 프로퍼티이므로 preview에서도 쉽게 사용할 수 있기 때문
- preview에서는 데이터를 쉽게 수정하거나 변경할 수 있어야 하기 때문
- static 프로퍼티를 사용하면 view에서 사용되는 데이터를 따로 분리할 수 있기 때문, view와 데이터의 분리를 통해 더욱 모듈화된(기능 단위로 나누어진) 코드를 작성할 수 있음
- [ ] where절 사용에 대한 공부(Using stacks to arrange views)
- [ ] Hashable protocol
- [ ] Property Wrappers
## 🔗 Reference Link
- 튜토리얼 시 숙지가 필요한 Swift 공식문서
- [Swift doc - The Basics](https://docs.swift.org/swift-book/documentation/the-swift-programming-language/thebasics/)
- [Swift doc - Closures](https://docs.swift.org/swift-book/documentation/the-swift-programming-language/closures/)
- [Apple Developer - Text](https://developer.apple.com/documentation/swiftui/text/)
- [Apple Developer - HorizontalAlignment](https://developer.apple.com/documentation/swiftui/horizontalalignment)
- [Apple Developer - Label](https://developer.apple.com/documentation/swiftui/label)
- [Apple Developer - List](https://developer.apple.com/documentation/swiftui/list/)
- [Apple Developer - Property Wrappers](https://docs.swift.org/swift-book/documentation/the-swift-programming-language/properties/#Property-Wrappers)
- [Apple Developer - Managing model data in your app](https://developer.apple.com/documentation/swiftui/managing-model-data-in-your-app)
- [WWDC21 - Demystify SwiftUI](https://developer.apple.com/videos/play/wwdc2021/10022/)
- [Swift doc - Control Flow(where)](https://docs.swift.org/swift-book/documentation/the-swift-programming-language/controlflow#Where)
## 💡 A-ha!
- **Creating a card view 파트의 Check Your Understanding**
> Which framework should you import to define the structure?
```swift
struct Person {
var name: String
var age: Int
var favoriteColor: Color
}
```
Foundation을 선택했는데 Color는 SwiftUI에 속해있는 것이다...! UIKit는 UIColor였음!
- **모르고 사용하던 VStack의 alignment가 HorizontalAlignment속성이라는 것...!**
>An Alignment contains a HorizontalAlignment guide and a VerticalAlignment guide.
위의 공식문서 내용에 의하면 Alignment에는 HorizontalAlignment, VerticalAlignment guide가 포함되어 있다고 한다!
➜ 즉, Alignment가 HorizontalAlignment와 VerticalAlignment를 포괄하는 상위 개념!
- **Creating a navigation hierarchy 파트의 Check Your Understanding**
> Which code snippet displays the navigation title in the NavigationStack?
```swift
struct ListView: View {
var body: some View {
NavigationStack {
List {
Section(header: Text("Cats")) {
NavigationLink(destination: CatsView()) {
Text("Duncan")
}
}
}
.navigationTitle("Adoptable Animals")
}
}
}
```
title이나 bar item과 같은 navigation modifier(수정자)를 child view에 추가하면 시스템에서 modifier를 parent `NavigationStack`에 전파함!
➜ NavigationLink 자체에는 navigation title을 추가하지 않음!
- **Passing data with bindings 파트의 Check your Understanding**
> What is the type of $book.identifier?
```swift
struct Book {
var title: String
var identifier: Int
}
@State private var book = Book(title: "The Adventures of Smudge", identifier: 19237)
```
정답: `Binding<Int>`
Binding 된 타입의 내부의 속성 타입은 해당 타입만을 기술하는 것이 아닌 `Binding<Type>`임!
위의 경우 `Int`가 아닌 `Binding<Int>`임!
<details>
<summary><b>깜빡일지</b></summary>
<div>
`23.04.21`, `23.05.02`
</div>
</details>
 Sign in with Wallet
Connect another wallet
Sign in with Wallet
Connect another wallet