###### tags: `Missions` `tutorials` *authors: Jordan Koffman*
# intro mission sequence 21-22
This intro mission is meant to lead you through the entire "workflow" of the Learning Lab Studio. You'll also get a little taste of what's involved in each of the "big 3" labs all LLUFs will work with this year: theatreLab, AVLab, and storyLab.
If you want a little more explanation of how these labs work together, check out [this little explanation](https://hackmd.io/afItaPUJTja9sLjEEGILHg), but you can also just follow this mission sequence step by step and you'll get a more embodied experience of how everything fits together.
Long story short, you're just going to do an introduction of yourself--all LLUFs will do this, whether you're in storyLab, theatreLab, or avLab.
## Devising Your Performance
If the end product is, essentially a short intro in which you tell us who you are, what you're working on this year, and why that matters, then the "devising" step will involve developing each of these.
**You know who you are**, and you probably have a little script of an introduction that you present each time you meet new folks. So we can start here and build that into a more dynamic "performance" for this intro mission.
The next part of your intro as a LLUF invloves what you are excited about. Since you are just now embarking on your Fall 2021 LLUF journey, how could you possibly know everything you might do at the LL? Well, this is just the beginning of your LLUF story this year, and we are going to focus on the excitement that permeates those first few moments of a story. So let's start there...using our iconic LL cards!
1. Grab a stack of cards
2. Start writing down some of the things you might be interested in working on this year--it doesn't have to be your final final forever choice, but what are you into? Maybe list the labs (are you gravitating to theatreLab, avLab, or storyLab), the tools (cameras, finalcutpro, adobe illustrator, cards), the mediums (photo essays, data visualization, augmented reality)
3. Now zero in on one and come up with a name or title for it. This could simply be the name of the lab, or it could be something punchy that describes an intersection of interests you have (for example, if you are excited about data visualization and web design maybe something like "Data Stories for the Web"). Again! This is just one little thing you're interested in, it doesn't need to be comprehensive and include
So the next step is for you to explain WHY that MATTERS. And this is probably the most important part, so here are some steps to do that will help you in articulating it. Basically, there are two parts of this rationale. The first being why it matters to you, those idiosyncratic reasons why you are drawn to it.The second is about really grasping the essence of a given tool or medium's significance to our work at the LL (and to the undergrad curriculum--essentailly, why this should be of interest to EVERYONE at Harvard). And what we need to work on in our performance is building a bridge between these two.
1. Grab some more cards!
2. Now write down some one-word reasons, personal or otherwise that you're excited about this. So if you are excited about learning to edit video because you will move from being a consumer of media to a producer of media, then write down "produce" on a card.
4. Now let's apply that iconic TENSION --> RESOLUTION story structure. What problem is being solved by investing in this tool or medium? There's a binary opposituon to two things, and in a storytelling you want to amplify that.
5. So take your list of words, and find their binary oppositions. so for "produce" you'd write "consume."
6. Once you have this list, begin thinking about how some of these new words might apply to aspects of your undergraduate experience...this will help you find the problem you are solving; that tension that will be resolved by incorporating the thing you are excited about.
Once you've workshopped your story, you're ready to start improvising and developing your performance. To recap, the basic structure of your "script" for this intro is:
* a greeting (hello! hi! hey, y'all! comrades!)
* your name (and any other indentifiers you'd like to share)
* "I'm a Learning Lab Undergraduate Fellow"
* what you are excited to work on
* why it matters--to you as an individual, but also importantly to the broader goal of innovating udergraduate education at Harvard
## learn the gear, play with it
We are going to do this activity in 2-3 locations, so find out from the LL Staff where this should happen the day you're in, then . . .
-> start from scratch here, or jump down to "Main Studio" if that's where you are going to set up.
* connect the cameras and the computer you'll be using as your video source to the inputs on the **ATEM Mini Extreme ISO** (we'll call it the **AMX**). If you are in the small studio, you will find labelled cables for the three available cameras you can use.
* connect HDM1 on the AMX to the TV you'll use as your confidence monitor
* connect the AMX to the computer you'll use as your switcher with a USB C cable--it doesn't need to be the same computer, and you may even *want* to experiment with both ways of doing it. But for the rest of this guide, we'll be calling one computer your "video-source-computer" and one your "switching computer" even if you've decided to use the same machine for both (also note that you can actually have *more* than one video-source-computer, as you're only limited by the 8-input-max of the AMX)
* set up // once the TV, all of the cameras, your video-source computer and the AMX are on, you should see an image on the TV. If you don't it's time for troubleshooting. Do us a favor and log any problems you have for future LLUFs giving this a shot.
* test out all of the feeds using the buttons right there on the ATEM hardware. Each feed number corresponds with the same-numbered input on the AMX back. Hit the number corresponding to each of your inputs and see if the image shows up on the TV. Troubleshoot if any don't.
---
---
#### MAIN STUDIO :camera_with_flash: :movie_camera: :star2: :film_projector:
*this is where you jump in if you are already set up in the main studio*
* open up the **ATEM Setup** app on your switching-computer and make sure that it recognizes the connected AMX
* then open up the **ATEM Software Control** app on your switching-computer and get the lay of the land. Try to perform some of the same switching operations you were able to do with the hardware buttons. See if you can change the main view to the multi-source, or picture-in-picture.
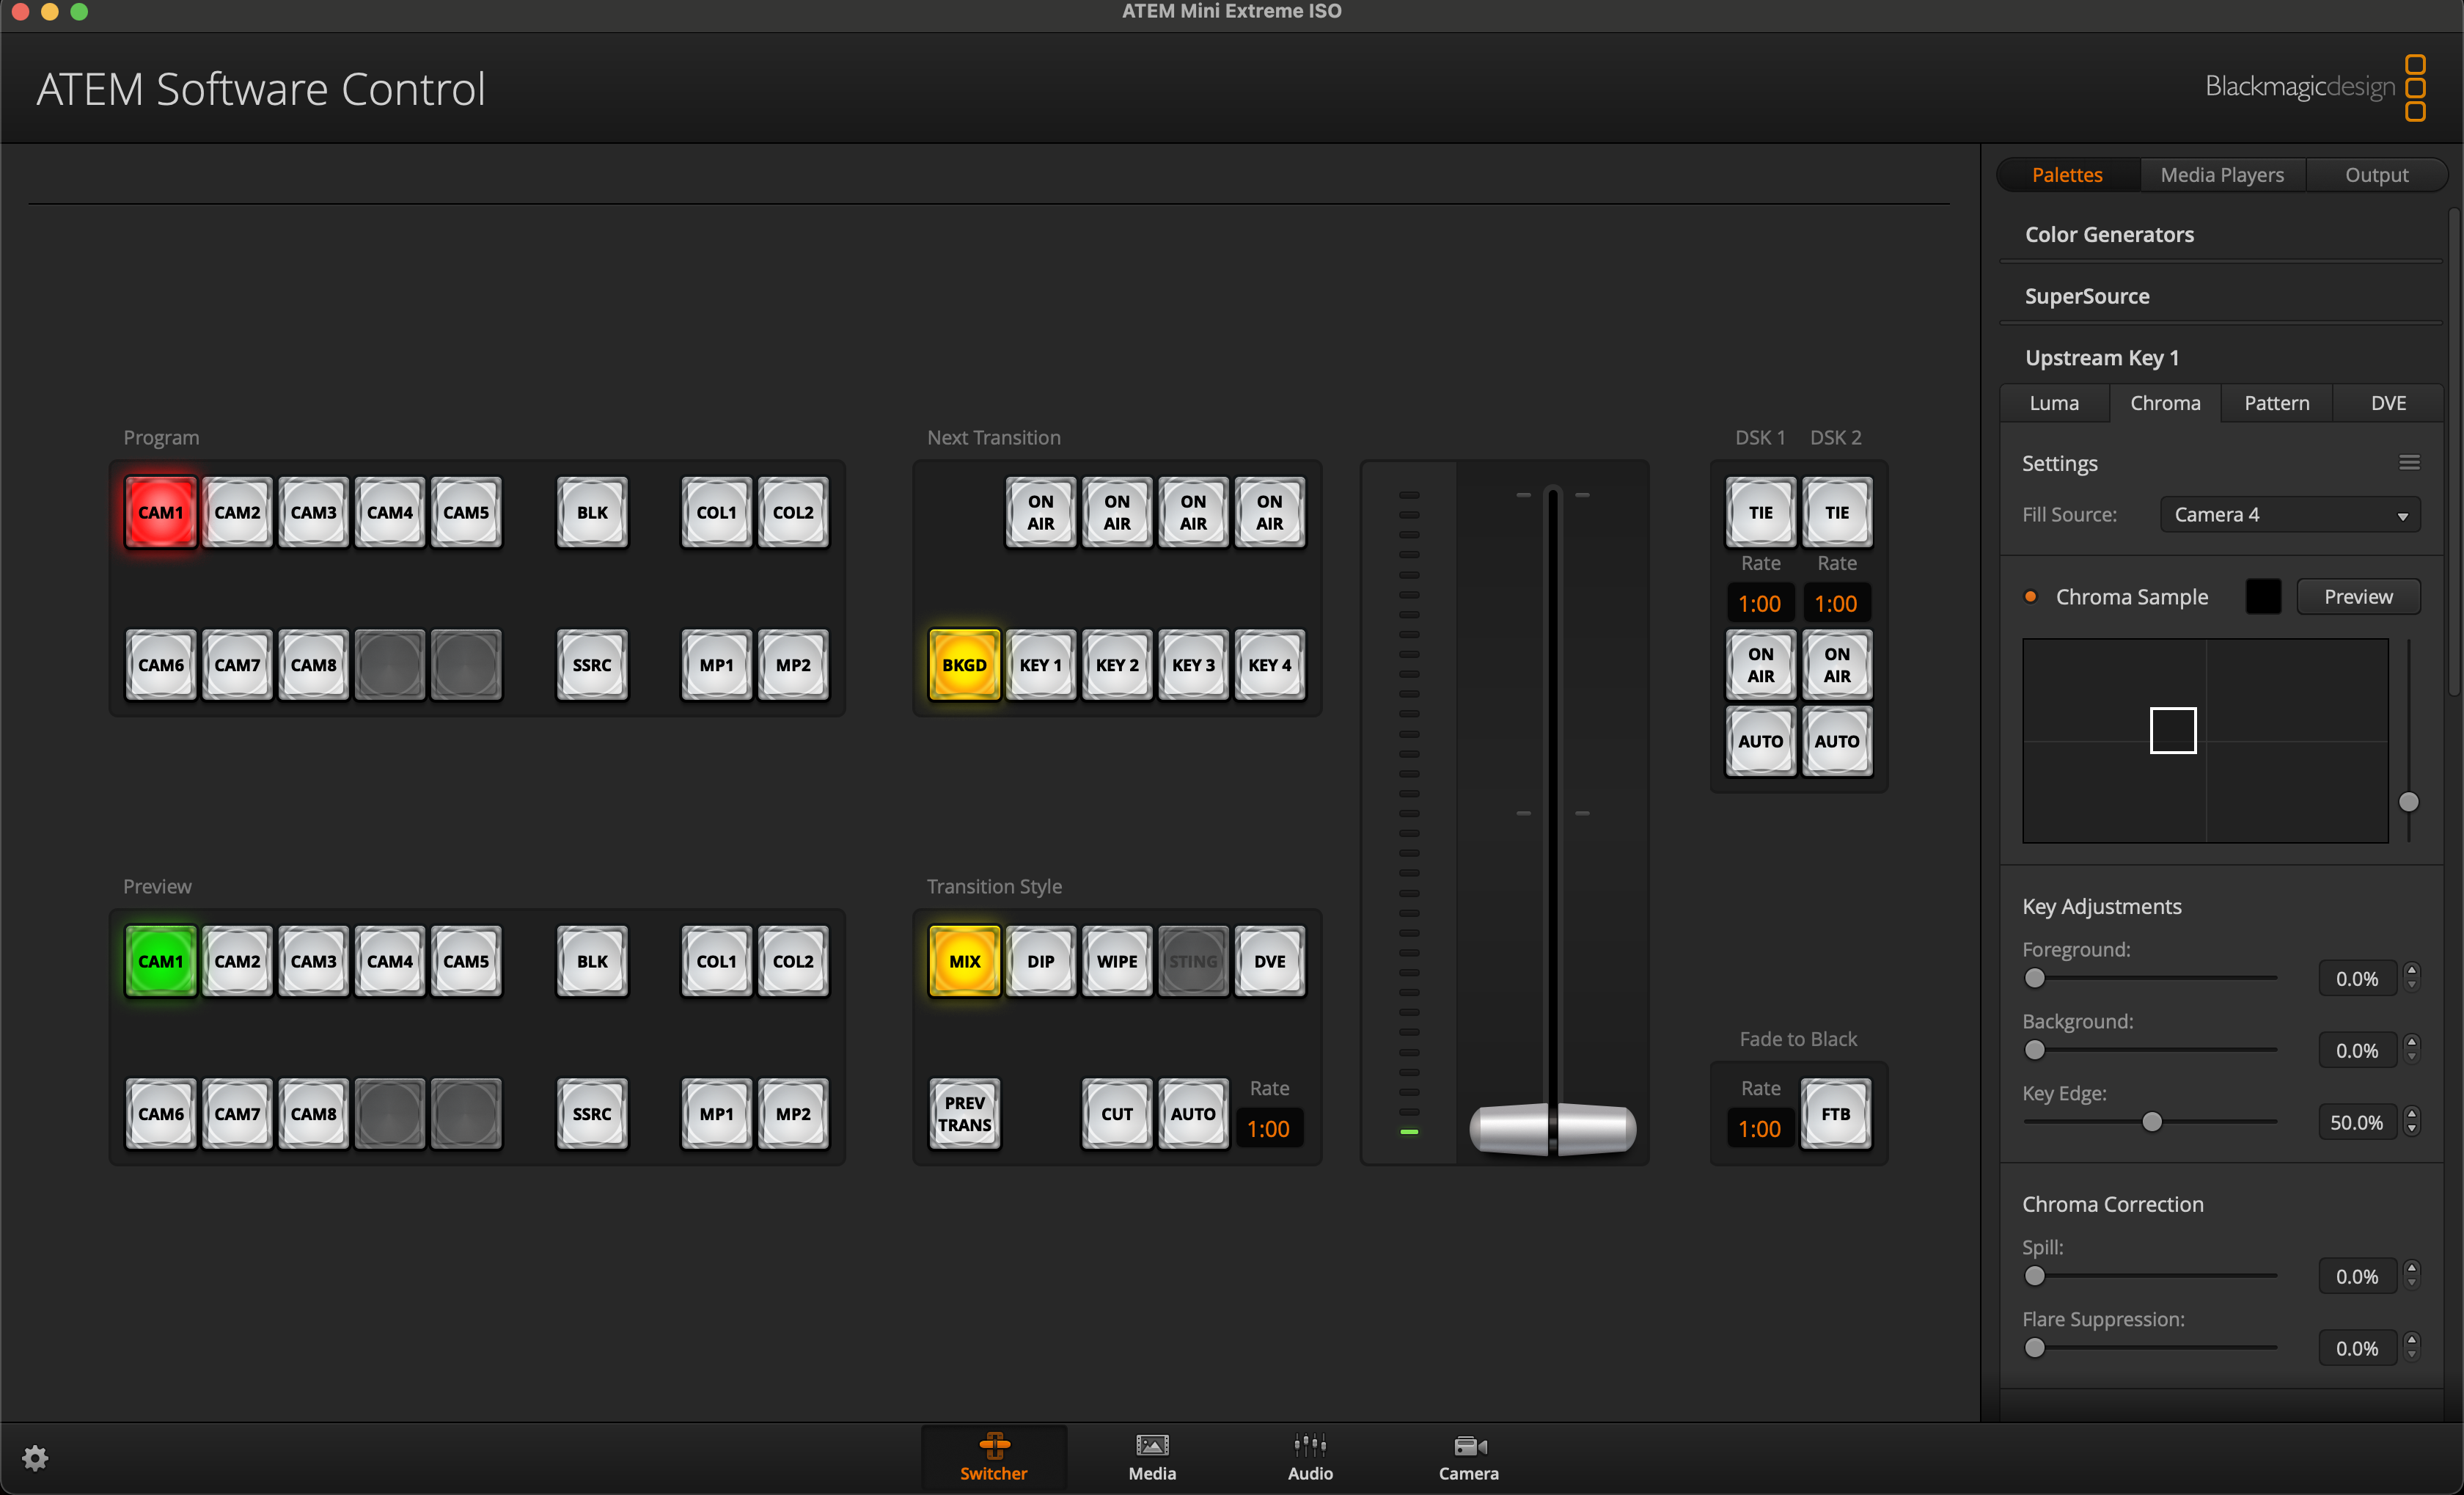
* next up we are going to add a chroma key. So add something green to one of your shots (preferably something that fills a fair portion of the frame), then use this signal as your "fill source" in the chroma key (Upstream Key 1 => Chroma). You'll need to make sure that they key isn't active , then you'll want to hit "chroma sample" and do your best to select a relatively large portion of the green object in the frame (but don't select anything that ISN'T green--you want the full range of greens in your object, but you don't want to include any other colors)

* once you've selected your green, you can activate the key by clicking the "on air" button just above the "key 1" button in the "next transition" zone. You won't be able to see anything if you are on the fill source in the Program feed (which you probably are, since you were probably just looking at it to dial in your green selection in the previous step). Go ahead and cut to a different camera by clicking a different source in the program zone.
* once your key is working, try putting your hand in front of the object to see how clean the key is. You may have to play with the Key Adjustments and Chroma Corrections to dial it in. Frequently this means boosting "foreground" a touch and boosting "Key Edge" quite a bit. Then maybe adding a bit of "Spill" correction to get rid of any green that's reflecting off the edges of your subject.
* now you are all set up to play around a bit with layering and looping your video sources. Try creating a "Window" in your scene that plays back a window of video from your computer, etc.
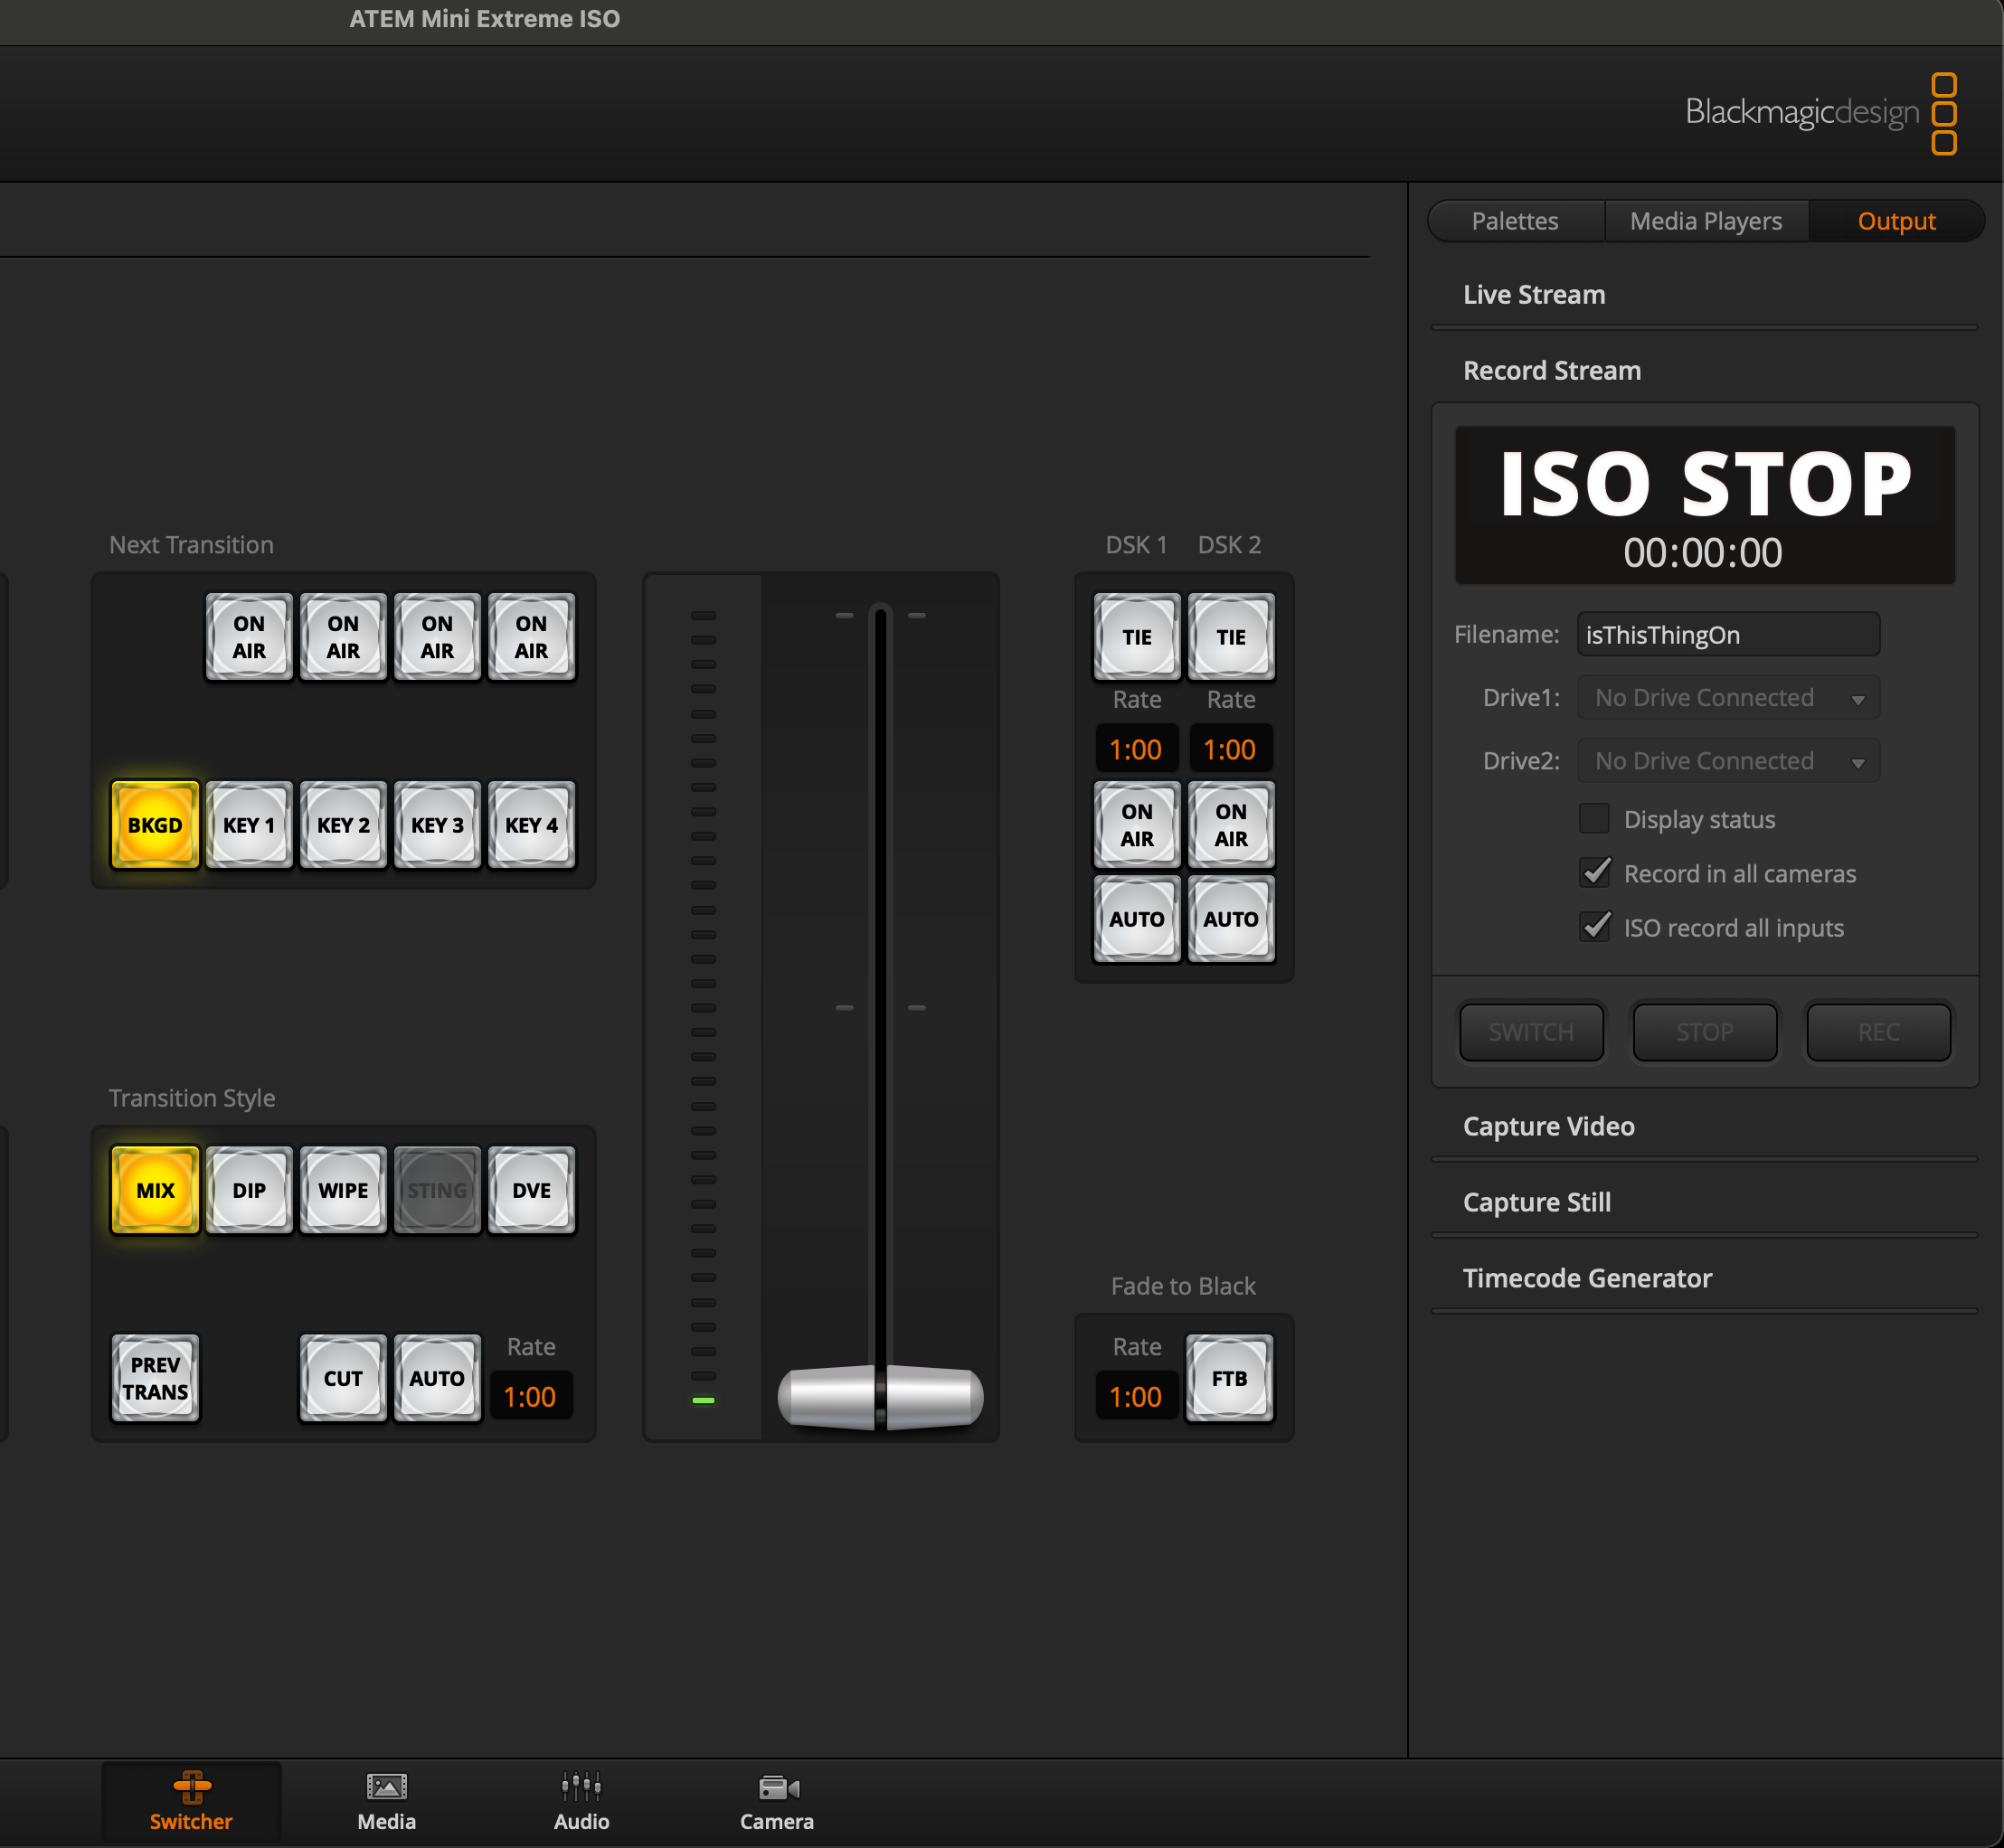
* before you stop playing around for the day, make sure you know how to record your cameras and program feed. Connect an SSD to the AMX and then open up the "Output" tab at the right of your interface. You'll want to make sure that "ISO record all inputs" is selected under "Record Stream" and that the timecode generator seems to be MORE or less running in alignment with clocktime. Hit record, then stop, then grab the SSD, connect it to the computer, and check the footage out on a computer.
* You are now done this step! Send a little clip of your footage to Slack to let us all know!
## Building Your Stage
The footage we capture is going to serve as the first element in the story we tell about your work this year. We essentially want to know something about you and what you want to do. In other words, this is going to "set the stage" for what your LLUF story will be.
Now your actual "stage" for this footage will be a sort of tablescape built on one of our butcher block tables. The size of your stage will be slightly larger than our 11x17 paper, to give you an idea of how much space you have to perform in.
---
Here is our inspiration for building this sort of stage that we first created for Katie's 30th birthday!
---
Your stage needs to be built to tell your story--the choices you make in terms of "set" and "props" should play a functional role. So Katie's props of party favors, and her key frame being a "30!" clearly support the story of this being her 30th Birthday celebration.
Also think about how you use the space. Your LLUF stage needs to be constructed to support the story you are telling, or at least set it up to be the introduction of the story that will unfold across your work with us. So make sure the aesthetic choices you are making are intentional, and functionally support your "story."
One final set of requests from Jordan:
* at the beginning and end of your performance, can you "draw the curtain" like this:
* can you create an "app-sized icon" made of 1 object and your name card. So for Brenda's above, maybe it would be the headphones and the "Brenda :heart:" card
<!--Once you've had these "Tastes" you will zero in on one (doesn't have to be your final final forever choice) and start crafting a narrative for the final step.
Here are some readings on x to help you craft your performance:
-----
<iframe width="560" height="315" src="https://www.youtube.com/embed/eoVheGZ808A" title="YouTube video player" frameborder="0" allow="accelerometer; autoplay; clipboard-write; encrypted-media; gyroscope; picture-in-picture" allowfullscreen></iframe>
Here is a model of a LLUF reflection that has happened at the END of the term - let's make the form way better. In any case, this can give you a sense of something that we have done in the past sort of in this zone.
----
<!--
* things to add?
* let's get some readings in here
* on space? on performance? on classroom design? on the stage?
* and some Jessi help if she's available
* should it be a version of the Harvard intro?
* have a taste of a number of tools or labs? and try to offer a rationale for them? (if we want them to decide on a tool for the final step?)
### one option = devised performance as LLUF-plan development
* if the end product is, essentially a short intro in which they tell us who they are, what they're working on this year, and why, then the "devising" step will involve developing each of these
* they know who they are, but they can get help from Jessi on presence as they craft this element (or, again, we could add the gesture)
* for the what they're working on this year, we may want to integrate 2, 3 or 4 little experiences during which they
* get a taste of a tool or lab (even 15 minutes)
* take a stab at articulating why it seems cool using some storyLab techniques they've learned from us
* with the basic idea that it's in this articulation of a rationale that you really grasp the essence of a given tool or medium's significance to our work (and to the undergrad curriculum)
* try articulating this within the iconic TENSION -> RESOLUTION story structure. What problem is being solved by investing in this tool or medium?
* once they've had these "Tastes" they zero in on one (doesn't have to be their final final forever choice) and start crafting a narrative for the final step
### another option = a "thinner" devising process here, delaying the storyLab component
another option is to make this a more poetic tableau or more dancerly performance, saving the storyLab portion for a later step
* work with Jessi on movement, presence and expression, come up with a GIF-able move that says something about you
* create a stage on the table for your performance.
* record it.
* then in the FINAL step below--AFTER "perform and capture" create a text-based "show and tell" that unpacks your performance, says what you're going to work on this year, etc.
If there's an advantage of this, it's that it separates the theatre and story elements, rather than condensing them, but I don't know if this is really an advantage!!
-->
## perform & capture
* confirm that all the connections are the way you want them to be
* hit record
* do your thing
* press stop and grab the SSD and **don't lose the files!**
* we are going to rename the files according to the following convention:
* [explain naming convention]
## show & tell

* Create a "sneak peek" gif and paragraph. Check out this [Create a Gif](https://hackmd.io/viIVxO5WRb6nR6pANE5BxQ) study guide.
* Post your sneak peek to #ll-virtual-studio
* Feel free to pitch any supercut edit ideas for putting everyone's performance together.
## leveling up
if you have extra time or just want to go further down any of the paths you encounter in this process, here are some ideas for leveling up.
* layering and looping more and more analog and digital signals than the ones we've suggested
* wrap marlon's 4x5 camera in black foil and point a camera at it to get the craziest tilt-shift rig you can imagine--the bokeh will be insane
* capture footage on your phone and play it back
* connect your own computer to OBS and pre-layer additional found footage
* team up with another student running a green-screen rig in another studio and put yourselves side-by-side (the only maskless duets we can manage right now)
* look for other green stuff and imagine what you can do with it (hint, if you ride our green yogibo, what are some things you could swap in?)
* think of something you need to argue or explain for one of your classes, imagine a way to use this workflow to do it effectively, then do it!
* help someone else (or many others)
* expand your story to include a "meta-story" like a "how-to" or "behind-the-scenes" that helps others grasp your process
* improve this documentation by adding words and images
 Sign in with Wallet
Connect another wallet
Sign in with Wallet
Connect another wallet