# Detecting Pothole: An OPENcv challenge
In my opinion, OpenCV is one of the highest-performing, most versatile as well as notorious tools out there. You can spend a whole week trying to figure out why all test cases won’t pass and realise all you had to do was convert the image into a binary image. For the Eklavya Mentorship program, my teammate and I used the OAK-D camera to detect road potholes using Stereo Vision.
The Task was fun and intimidating at the same time but we were able to complete it thanks to the guidance of some great mentors and an amazing community, all courtesy of our college club: [SRA](https://sravjti.in/)
## What is an Oak-D
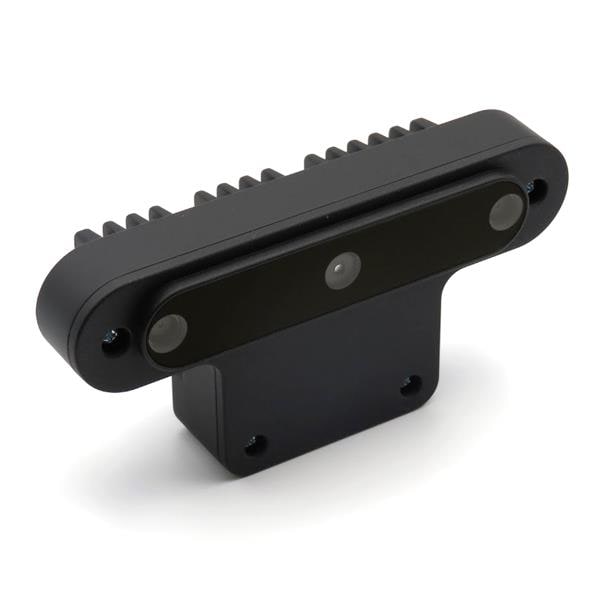
First things first having read that our project depends majorly on the Oak-D camera, we googled what is an Oak-D camera. To our surprise, we found out that this palm size robotic eye is actually worth 200 dollars! Sounds like an assault on your pockets right? We soon realised its worth once we started reading its specifications. This is a camera which can simultaneously run advanced neural networks and provide real-time depth image of a scene using its two stereo cameras, perform object tracking, person detection, Motion estimation, Expression estimation and whatnot! On digging up more we came across the term DepthAI.
## Hello DepthAI!
So what is DepthAI?
In layman’s terms, DepthAI is a Spatial AI platform which with the combination of its features: Artificial Intelligence, Computer Vision, Depth perception and Performants offers an embedded, low-power solution enabling the computer to perceive the world as the human eye.

Firstly we clone the DepthAI repo in our local directory. Then we create a python virtualenv and install all the required requirements. Once this is done, we finally run the code to generate the depth image from the Oak-D camera and save it.
And this is what a depth image looks like:

## Disparity and Rectification: Not a cup of my tea
So the very first step of the implementation process was to take stereo images from the camera, rectify it manually and generate a depth map from it manually.
Piece of cake right?NOOOO!!! So for rectification, you need some camera parameters which were unknown to us at that time. So we spend the first few days trying to conjure up a way to rectify images without having to know any information about it. As the sub-heading suggests, we failed to do so. So we again played with the camera to get its focal length and calibration details. Having them, now we thought we were unstoppable and the very first task is almost done. Little did we know that we were going to get such an unwelcoming outcome.
This is the outcome we got. If you look real close, you’ll notice the pothole depth that the image tries to signify.

Anyhoo, using the oak-d camera itself to get the depth seemed better, more convenient and beneficial to the overall project. So we continued with that.
## Surface why wont you fit :(
A major part of our project depended on road surface fitting. So what is Road Surface fitting? Umm, to answer this, I’ll describe Road surface fit as the chart that we desire to obtain as the road surface that would have been in case there was no pothole present. Sounds super easy right? All you gotta do is run the simple algorithm already present in a very articulate research paper that has been served to you by your mentors, on all pixels of the image, identify the recorded depths as potholes and carry out the succeeding steps, right? Well if you thought any of this, that's a violation. Cause this “super-easy” task took me 2 weeks! To be honest, I was even convinced that this method is not legit.
Our attempts looked something like this:

So weeks of trying it out and reaching out to our mentors for slight hints and help, we(I mean Our mentor_:) ) finally cracked the logic behind doing it. We studied the same, realised what we did wrong, cursed ourselves and continued with the project.
This is what the surface looked like btw. Note that this also considers the non-road regions in the picture for the fit. If we manually select an ROI, we can get a scene-specific better outcome.

## All that holes is not Pothole
So once we have this surface fit, our next task is to identify the pothole by simply comparing the actual coordinates in 3d space and then comparing them with the corresponding coordinates on the surface map and if we find them to lie below it, it’s a Pothole. Voila!! So simple. Let me just rephrase this. The only thing left to do is to meticulously separate the patches corresponding to the actual potholes from those that merely exist below the surface chart, plotted using the least square regression algorithm, which necessitates general binarization of the image with a standard mean threshold on which we conduct the various morphological commands that involve: degrading dilation of the image followed by thickening erosion only to be followed by a reverse of both the procedure again to get the best-optimized result.

A simple layman's translation of the above procedure is to convert the depth image into a binary image using the average value of depth as the threshold. Any point deeper than this is considered a pothole. To eliminate the errors, we dilate the image to reduce any small inconsistency followed up by thickening of the actual pothole region. We also define the central portion of the image as our region of interest to eliminate errors like those that occur due to the junction between the wall and the ground.

## Connected Component Labelling (CCL):
Once the correct pothole region is identified, we gotta label them now so that multiple potholes can be detected. For the above picture say we detect 3 potholes we will assign them numbers 1,2,3. Now if even a part of any of these candidate potholes lies outside the central ROI, we eliminate them. By far the simplest. Genuinely speaking XD .
## Found you Pothole!
Now once we have successfully identified the pothole coordinates, we draw a rectangle on the depth image along with specifying the average depth of all coordinates corresponding to a pothole. Annnddd now we are done!!

## Conclusion
As sophomores, we learned a lot from this project. To enlist a few I would say:
* OpenCV can ruin you and save you simultaneously.
* Pothole **is** a HUGE problem
* Oak-D camera is G.O.A.T
* Depth Estimation is fun with enormous future scope
* Connecting with Seniors is beneficial
* Jotting down all the Tasks to be carried out in a day helps a lot
* Prioritizing tasks and carrying them out is a skill you’ll only learn the hard way
* Bernie Meme superiority
## Know more about our project
Do read our project report and checkout and **star** our Github repo to get more insights of our project.
[Github](https://github.com/Dhruvanshu-Joshi/Pothole-Detection)
[Project Report](https://github.com/Dhruvanshu-Joshi/Pothole-Detection/blob/main/Assets/Report_Pothole_Detection.pdf)
 Sign in with Wallet
Connect another wallet
Sign in with Wallet
Connect another wallet