###### tags: `linux2019`
# 2019q1 Homework2 (fibdrv)
contributed by < `ambersun1234` >
## 環境
```shell
$ uname -a
Linux 4.15.0-45-generic #48~16.04.1-Ubuntu SMP Tue Jan 29 18:03:48 UTC 2019 x86_64 x86_64 x86_64 GNU/Linux
$ gcc -v
gcc version 5.4.0 20160609 (Ubuntu 5.4.0-6ubuntu1~16.04.11)
```
## 說明
+ [作業說明](https://hackmd.io/HIn9ZuKFS62quuQjSO0eEw?view)
## 效能分析
### 基本效能改進
+ 根據 [你所不知道的C語言:遞迴呼叫篇](https://hackmd.io/@sysprog/rJ8BOjGGl?type=view#Q-Matrix),可以得知對比遞迴以及迭代的方式進行計算,使用 `fast-doubling` 可以有效的加速費氏數列。以下簡單的實驗測試 `fast-doubling` & `tail recursion` 的執行效率
+ 
+ 上述實驗結果在 `93` 即停止,即使以 `uint64_t` 撰寫費氏數列計算可以發現再之後的數值都爆開
+ 觀察上圖,可能是因為數字太小看不出來,但是可以發現 `tail recursion` 是屬於 $O(n)$ 的成長級數,而 `tail recursion` 是屬於 $O(log_n)$
> 實驗程式碼: [\[gist\] ambersun1234 / FibonacciSequence](https://gist.github.com/ambersun1234/c322ebcfaf05d22fd67bce5a01d43f77)
### 印出更大的數值
+ 為了要解決 `93` 以上的數字無法正常顯示的問題,當然最直覺的就是做一個大數加法器就好了,在借鑒 [ztex 的報告](https://hackmd.io/@ztex/HJ6SVmRIN?type=view#Make-k-gt-100) 以及 [rebvivi 的報告](https://hackmd.io/@1az9eaZgQwG38Qx2YiKXDw/SJ94OIZUV?type=view#2019q1-Homework2-fibdrv) 後有發現一個我覺得較為特別的解法
+ 以下程式碼引用自 [rebvivi](https://hackmd.io/@1az9eaZgQwG38Qx2YiKXDw/SJ94OIZUV?type=view#Fibonacci-%E6%95%B8%E5%88%97%E7%9A%84%E5%9F%B7%E8%A1%8C%E6%95%88%E7%8E%87)
```=c
struct U64 {
unsigned long long msl;
unsigned long long lsl;
};
struct U64 fib_sequence(unsigned long long g)
{
unsigned long long a;
a = 10000000000000000000;
struct U64 fib[g + 1];
int i, j, k;
for (i = 0; i < g + 2; i++) {
fib[i].lsl = 0;
fib[i].msl = 0;
}
fib[0].lsl = 1;
fib[1].lsl = 1;
for (k = 2; k <= g; k++) {
fib[k].lsl = fib[k - 1].lsl + fib[k - 2].lsl;
fib[k].msl = fib[k - 1].msl + fib[k - 2].msl;
if (fib[k].lsl > a) {
fib[k].lsl = fib[k].lsl - a;
fib[k].msl = fib[k].msl + 1;
}
}
return fib[g - 1];
}
```
+ 搭配 [費氏數列](https://hackmd.io/@sysprog/BJPZlyDSV?type=view#%E9%97%9C%E6%96%BC%E8%B2%BB%E5%BC%8F%E6%95%B8%E5%88%97%E7%9A%84%E9%82%A3%E4%BA%9B%E4%BA%8B) 下去解讀,發現可能跟 [GNU Multiple Precision Arithmetic Library(GMP)](https://gmplib.org/) 有關係。
+ 為了解相關內容,我找到了一篇對 `Precision Arithmetic` 滿好的解釋 [Arbitrary-precision arithmetic Explanation](https://stackoverflow.com/a/1218185)。他的第一句話是這樣子的 `It's all a matter of adequate storage and algorithms to treat numbers as smaller parts.` 這大概就可以給 `struct U64` 一個合理的解釋
```c
struct U64 {
unsigned long long msl;
unsigned long long lsl;
};
```
+ 既然一個 `unsigned long long` 無法容納大於 93 的結果,那麼使用兩個變數組合成大型數字 `(U64 + U64)`就可以容納更大範圍了對吧
+ `rebvivi` 的程式碼大致上都還滿清楚的,唯獨有一個地方我不太清楚,進位的部份是以 `a = 10000000000000000000;`。
+ `unsigned long long` 的最大值為 **18446744073709551615**
+ fib(92) 為 **7540113804746346429**
+ fib(93) 為 **12200160415121876738**
+ fib(94) 會爆掉
+ 所以他的進位是從 `10000000000000000000` :arrow_right: fib(92) 之後就是開始拆分上半部跟下半部
+ 以上分析完畢,考慮 `fast doubling`,`tail recursion` 與 `arbitrary precision arithmetic` 的執行速度比較
+ 
+ 費氏數列輸出為
```
88 01100087778366101931 1190
89 01779979416004714189 1210
90 02880067194370816120 1210
91 04660046610375530309 1230
92 07540113804746346429 1250
93 12200160415121876738 1340
94 19740274219868223167 1330
95 31940434634990099905 1360
96 51680708854858323072 1340
97 83621143489848422977 1370
98 135301852344706746049 1660
99 218922995834555169026 1560
100 354224848179261915075 1410
```
對照 [The first 300 Fibonacci numbers, completely factorised
](http://www.maths.surrey.ac.uk/hosted-sites/R.Knott/Fibonacci/fibtable.html) 可以確定說數值皆為正確的
+ 透過上述實驗可以發現其實 `arbitrary precision arithmetic` 的實做並沒有進行最佳化,它僅僅是突破 fib(93) 以上而已,所以可以預期他的執行效率不會太好
> 實驗程式碼: [\[gist\] ambersun1234 / FibonacciSequence](https://gist.github.com/ambersun1234/c322ebcfaf05d22fd67bce5a01d43f77)
### Kernel 與 User Space 間的傳遞時間
+ 為了要計算傳遞時間,我將 `fib_read` 做了些微修改
```c
static ssize_t fib_read(struct file *file,
char *buf,
size_t size,
loff_t *offset)
{
ktime_t t = ktime_get();
long long ns = ktime_to_ns(t);
return ns;
}
```
User Space 測試程式如下 `transfer.c`
```c
#define _POSIX_C_SOURCE 199309L
#include <fcntl.h>
#include <stdio.h>
#include <stdlib.h>
#include <string.h>
#include <sys/types.h>
#include <time.h>
#include <unistd.h>
#define FIB_DEV "/dev/fibonacci"
#define MYMAX 100
static long diff_in_ns(struct timespec t1, struct timespec t2)
{
struct timespec diff;
if (t2.tv_nsec-t1.tv_nsec < 0) {
diff.tv_sec = t2.tv_sec - t1.tv_sec - 1;
diff.tv_nsec = t2.tv_nsec - t1.tv_nsec + 1000000000;
} else {
diff.tv_sec = t2.tv_sec - t1.tv_sec;
diff.tv_nsec = t2.tv_nsec - t1.tv_nsec;
}
return (diff.tv_sec * 1000000000.0 + diff.tv_nsec);
}
int main()
{
int fd;
long long sz;
ssize_t buf;
char write_buf[] = "testing writing";
int offset = MYMAX; // TODO: test something bigger than the limit
int arr[MYMAX + 1] = {0};
int i = 0;
struct timespec start, end;
FILE *fp;
srand(time(NULL));
fd = open(FIB_DEV, O_RDWR);
fp = fopen("./kernel2user", "w");
if (fd < 0) {
perror("Failed to open character device");
exit(1);
}
for (i = 0; i <= offset; i++) {
int tmp;
do {
tmp = rand() % (MYMAX + 1);
} while (arr[tmp] == 1);
arr[tmp] = 1;
lseek(fd, tmp, SEEK_SET);
clock_gettime(CLOCK_MONOTONIC, &start);
sz = read(fd, &buf, sizeof(ssize_t));
clock_gettime(CLOCK_MONOTONIC, &end);
printf("%lld * %lld * %lld\n",
(long long)(start.tv_sec * 1e9 + start.tv_nsec),
sz,
(long long)(end.tv_sec * 1e9 + end.tv_nsec));
long long u2k = sz - (long long)(start.tv_sec * 1e9 + start.tv_nsec);
long long k2u = (long long)(end.tv_sec * 1e9 + end.tv_nsec) - sz;
fprintf(fp, "%d %lld %lld\n", tmp, u2k, k2u);
}
close(fd);
fclose(fp);
return 0;
}
```
只要計算在 `kernel space` 的 `monotonic time` 以及返回至 `user space` 的 `monotonic time` 時間差即可計算傳遞時間
+ 結果如下
+ 
+ 可以看到不論是 User Space 傳遞到 Kernel Space 或者是 Kernel Space 傳遞到 User Space,所需時間大致呈現 $O(1)$
> [實驗程式碼](https://github.com/ambersun1234/fibdrv/commit/7659c9e22451c0928ec985487f7f486d983862e2)
>
### 實做
即使已經分析出要速度快而且又要支援更大的數值的辦法了,實做上來說還是有東西需要分析的,`fast-doubling` 的計算是需要做乘法的,聽起來算是還可以,但是稍微思考一下就可以發現需要實做的是 `大數乘法`,不光如此,還必須要做 `大數減法` 以及 `大數加法`,這樣 `arbitrary precision arithmetic` 與 `fast-doubling` 才能夠完整的結合在一起
+ 大數的加減法實做起來比較容易,所以很快就做完了,問題比較大的是大數的乘法
+ 借鏡 [ztex](https://hackmd.io/@ztex/HJ6SVmRIN?type=view#Speed-up) 的大數乘法,就與一般直式乘法運算一樣,只是它是以二進位的觀點去看待。
+ 把全部的東西整合跑過一次之後發現,在 `fib(95)` 的時候計算開始出現錯誤。`fib(95)` 的二進位為 `1011111`,我把 fast doubling 每一步驟的計算結果進行輸出,得到以下結果
```
01
05
089
028657
02971215073
13493690561280548289
```
可以寫成
|binary|fib|current|fib|next|
|:--:|:--:|:--:|:--:|:--:|
|1|1|1|||
|0|2|1|3|2|
|1|5|5|6|8|
|1|11|89|12|144|
|1|23|28657|24|46386|
|1|47|2971215073|48|4807526976|
|1||13493690561280548289||43233964781148771456|
透過以上表格可以滿清楚的發現到 `fast doubling` 的計算過程是沒有錯的,可能是 `adder` `subtrator` 或者是 `multiplier` 有錯誤。
+ 透過詳細的檢查,我發現到是 `multiplier` 有錯誤,只要乘法需要進位到 `msl` 的都會開始錯誤。我嘗試了一個測資,`9999999999999999925` * `2`,得到的結果誤差為 `18446744073709551616`,這個數字也很特別,因為他是 `unsigned long long` 的 ==max + 1==。這是因為乘法時,lsl 必須將 bit 推出去到 msl,但因為推出去的這個 bit 沒有被正確的推到 msl,所以導致有誤差。原本的程式碼是
```c
tmp.lsl = (input1->lsl << i);
tmp.msl = 0;
```
但這個並沒有考慮到 lsl 推出去的 bit 必須要推到 msl,應該要是
```c
tmp.lsl = (input1->lsl << i);
tmp.msl = i == 0 ? 0 : (input1->lsl >> (width - i));
```
+ 以上述的例子來看就是
```
9999999999999999925 二進位 msl, lsl
00000000 00000000 00000000 00000000 00000000 00000000 00000000 00000000
10001010 11000111 00100011 00000100 10001001 11100111 11111111 10110101
2 二進位 msl, lsl
00000000 00000000 00000000 00000000 00000000 00000000 00000000 00000000
00000000 00000000 00000000 00000000 00000000 00000000 00000000 00000010
19999999999999999850 二進位 msl, lsl
00000000 00000000 00000000 00000000 00000000 00000000 00000000 00000001
00010101 10001110 01000110 00001001 00010011 11001111 11111111 01101010
```
結果的 msl 有個 1, 所以結果就是 ==18446744073709551616 * msl + lsl==。但是結果還是錯的,因為加法器以及減法器所定義的 CARRY 還是 `10000000000000000000`,所以要把 CARRY 改為 `18446744073709551616`。
這邊要注意,因為他是最大值,所以會 error,解決辦法就是把它減一,歸還這個 `1` 的部份是由減法器去做的,原本的 code 長
```c
struct u64 *r = malloc(sizeof(struct u64));
if (input1->lsl < input2->lsl) {
unsigned long long mycarry = CARRY;
input1->msl -= 1;
r->lsl = mycarry + input1->lsl - input2->lsl;
r->msl = input1->msl - input2->msl;
} else {
r->lsl = input1->lsl - input2->lsl;
r->msl = input1->msl - input2->msl;
}
return r;
```
要把 `r->lsl = mycarry + input1->lsl - input2->lsl;` 改成 `r->lsl = mycarry + input1->lsl - input2->lsl + 1;`
> [Update carry](https://github.com/ambersun1234/fibdrv/commit/216409fd87c437029558e009703ee1c3aee67c42)
+ 更新完之後發現,透過驗證工具可以發現,fib(94) 以上都有錯
> [Add verification python code](https://github.com/ambersun1234/fibdrv/commit/cfb2039163379b0878441892116a170d47dc6113)
+ 後來我有把加法器重新寫一遍,因為我一開始把他想得很複雜,於是把它簡化過一遍,跑了一次大數測試([Add header check verfiy python code](https://github.com/ambersun1234/fibdrv/commit/fe5d458f2b483d62aff816ec2380ed81d6d46ba6)),測試是沒問題的,但是跟乘法器一起使用還是會有問題,於是參考了 [ztex 的加法器實做](https://github.com/tony2037/fibdrv/blob/master/tests/fastFib/foo.c#L44) 發現一個有點...匪夷所思的 code,實作中,它並沒有處理兩個 ull 相加會造成溢位(即使知道會溢位)的問題,於是我寫了一小段程式去測試(如下)
```c
#include <stdio.h>
#include <limits.h>
int main() {
unsigned long long a;
a = ULLONG_MAX;
printf("%llu\n", a + 10);
printf("%llu\n", a + 100);
printf("%llu\n", a + 1000);
printf("%llu\n", a + 10000);
printf("%llu\n", a + 100000);
return 0;
}
```
```
9
99
999
9999
99999
```
結果很驚人的發現,即使相加會溢位,他的答案會是溢位後剩下的數值(這裡數字會差1的原因是 `unsigned long long` 與 `18446744073709551616` 相差1)。我的加法器的改良版本是長這樣
```c
unsigned long long diff = 0;
r->lsl = input1->lsl;
r->msl = input1->msl + input2->msl;
// diff = CARRY - r->lsl;
diff = ULLONG_MAX - r->lsl;
if (input2->lsl >= diff) {
input2->lsl -= diff;
r->lsl += input2->lsl;
r->msl += 1;
} else {
r->lsl += input2->lsl;
}
```
很明顯的思路是雷同的,但會造成運算結果不同的原因是<br>`input2->lsl -= diff`<br>依照上述實驗結果,在確認是否進位後,我只要將 `r->lsl` 與它相加即可。最後可以透過 `make verify` 進行數值的驗證;在 user space 的程式撰寫已經完成且正確,實際運行時間如下圖

接下來移植到 kernel space 進行驗證
### 移植到 kernel space
+ 移植的部份就相對容易,比如說
+ 把 `malloc` 改成 `kmalloc`
+ 調整 fibonacci 最大數值為 150
+ 傳回 user space 改用字串的方式,因為數值太過於龐大
+ 更改完以上這些,就能夠順利執行,而且數值也都正確,可以用 `make ktest` 驗證程式的正確性
```
Reading from /dev/fibonacci at offset 140, returned the sequence 4394049148*18446744073709551616+15565999719459585437
Reading from /dev/fibonacci at offset 141, returned the sequence 7109720871*18446744073709551616+1233533820207347330
Reading from /dev/fibonacci at offset 142, returned the sequence 11503770019*18446744073709551616+16799533539666932767
Reading from /dev/fibonacci at offset 143, returned the sequence 18613490890*18446744073709551616+18033067359874280097
Reading from /dev/fibonacci at offset 144, returned the sequence 30117260910*18446744073709551616+16385856825831661248
Reading from /dev/fibonacci at offset 145, returned the sequence 48730751801*18446744073709551616+15972180111996389729
Reading from /dev/fibonacci at offset 146, returned the sequence 78848012712*18446744073709551616+13911292864118499361
Reading from /dev/fibonacci at offset 147, returned the sequence 127578764514*18446744073709551616+11436728902405337474
Reading from /dev/fibonacci at offset 148, returned the sequence 206426777227*18446744073709551616+6901277692814285219
Reading from /dev/fibonacci at offset 149, returned the sequence 334005541741*18446744073709551616+18338006595219622693
Reading from /dev/fibonacci at offset 150, returned the sequence 540432318969*18446744073709551616+6792540214324356296
```
## 自我檢查清單
### 檔案 `fibdrv.c` 裡頭的 `MODULE_LICENSE`, `MODULE_AUTHOR`, `MODULE_DESCRIPTION`, `MODULE_VERSION` 等巨集做了什麼事,可以讓核心知曉呢? `insmod` 這命令背後,對應 Linux 核心內部有什麼操作呢?請舉出相關 Linux 核心原始碼並解讀
+ 透過觀察 [linux/module.h](https://github.com/torvalds/linux/blob/222a21d29521d144f3dd7a0bc4d4020e448f0126/include/linux/module.h#L162),可以發現到 MODULE_LICENSE, MODULE_AUTHOR 等巨集都會將參數傳到另一個巨集 `MODULE_INFO` 裡面。
```c
#define MODULE_INFO(tag, info) __MODULE_INFO(tag, tag, info)
```
進一步追蹤可以發現,又傳到 `__MODULE_INFO` 裡, 其定義於 [include/linux/moduleparam.h](https://github.com/torvalds/linux/blob/8c79f4cd441b27df6cadd11b70a50e06b3b3a2bf/include/linux/moduleparam.h#L23)
```c
#define __MODULE_INFO(tag, name, info) \
static const char __UNIQUE_ID(name)[] \
__used __attribute__((section(".modinfo"), unused, aligned(1))) \
= __MODULE_INFO_PREFIX __stringify(tag) "=" info
```
`__stringify` 定義於 [linux/reg.h](https://github.com/torvalds/linux/blob/2f4c53349961c8ca480193e47da4d44fdb8335a8/arch/powerpc/boot/reg.h#L16)
```c
#define __stringify_1(x) #x
#define __stringify(x) __stringify_1(x)
```
其中 `__UNIQUE_ID` 定義於許多地方 [include/linux/compiler-clang.h](https://github.com/torvalds/linux/blob/bb617b9b4519b0cef939c9c8e9c41470749f0d51/include/linux/compiler-clang.h) 和 [include/linux/compiler-gcc.h](https://github.com/torvalds/linux/blob/bb617b9b4519b0cef939c9c8e9c41470749f0d51/include/linux/compiler-gcc.h) 其內容如下
```c
# define __UNIQUE_ID(prefix) __PASTE(__PASTE(__UNIQUE_ID_, prefix), __COUNTER__)
```
`__PASTE` 定義在 [linux/mm.h](https://github.com/torvalds/linux/blob/6f0d349d922ba44e4348a17a78ea51b7135965b1/tools/testing/scatterlist/linux/mm.h#L62)
```c
#define ___PASTE(a,b) a##b
#define __PASTE(a,b) ___PASTE(a,b)
```
`__counter__` 是 GUN C extensions 之一。其功用為展開 sequential integral values。[Common Predefined Macros](https://gcc.gnu.org/onlinedocs/cpp/Common-Predefined-Macros.html)
假設現在有 `MODULE_INFO("A simple character device driver");`。則 macro 展開後則為
```c
static const char __UNIQUE_ID_name0[] \
__used __attribute__((section(".modinfo"), unused, aligned(1))) \
= "tag=A simple character device driver"
```
其中 `__attribute__` 也跟上述 `__counter` 一樣,為 GNU C extensions;在這個 case, 它可以將資訊放入 `.modinfo` 裡面,也因此就可以讓核心知曉
+ 首先先利用 `strace` 觀察 `insmod` 時會呼叫的 system call。
```
execve("/sbin/insmod", ["insmod", "hellochar.ko"], [/* 26 vars */]) = 0
brk(NULL) = 0x5583e7cea000
access("/etc/ld.so.nohwcap", F_OK) = -1 ENOENT (No such file or directory)
access("/etc/ld.so.preload", R_OK) = -1 ENOENT (No such file or directory)
open("/etc/ld.so.cache", O_RDONLY|O_CLOEXEC) = 3
fstat(3, {st_mode=S_IFREG|0644, st_size=156538, ...}) = 0
mmap(NULL, 156538, PROT_READ, MAP_PRIVATE, 3, 0) = 0x7f3f3a484000
close(3) = 0
...
fstat(3, {st_mode=S_IFREG|0664, st_size=10312, ...}) = 0
mmap(NULL, 10312, PROT_READ, MAP_PRIVATE, 3, 0) = 0x7f3f3a4a8000
finit_module(3, "", 0) = 0
munmap(0x7f3f3a4a8000, 10312) = 0
close(3) = 0
exit_group(0) = ?
+++ exited with 0 +++
```
其中比較重要的就是 `finit_module`,查看 [man finit_module](https://linux.die.net/man/2/finit_module),可以得知他是將 ELF image 從 file descriptor 讀入並載入至 kernel space。對照者 source code 觀察可以發現 `finit_module` 定義於 [kernel/module.c](https://github.com/torvalds/linux/blob/222a21d29521d144f3dd7a0bc4d4020e448f0126/kernel/module.c)
```c
SYSCALL_DEFINE3(finit_module, int, fd, const char __user *, uargs, int, flags)
{
struct load_info info = { };
loff_t size;
void *hdr;
int err;
err = may_init_module();
if (err)
return err;
pr_debug("finit_module: fd=%d, uargs=%p, flags=%i\n", fd, uargs, flags);
if (flags & ~(MODULE_INIT_IGNORE_MODVERSIONS
|MODULE_INIT_IGNORE_VERMAGIC))
return -EINVAL;
err = kernel_read_file_from_fd(fd, &hdr, &size, INT_MAX,
READING_MODULE);
if (err)
return err;
info.hdr = hdr;
info.len = size;
return load_module(&info, uargs, flags);
}
```
`load_module` 定義於 [linux/module.c](https://github.com/torvalds/linux/blob/222a21d29521d144f3dd7a0bc4d4020e448f0126/kernel/module.c#L3671),其功用就是將 device driver 載入 kernel space。
### 當我們透過 `insmod` 去載入一個核心模組時,為何 `module_init` 所設定的函式得以執行呢?Linux 核心做了什麼事呢?
+ `module_init` 定義於 [linux/module.h](https://github.com/torvalds/linux/blob/222a21d29521d144f3dd7a0bc4d4020e448f0126/include/linux/module.h) 該 macro 呼叫了 `__initcall()`,一直往下呼叫。
歸納得到以下關係
`module_init()` :arrow_right: `__initcall()` :arrow_right: `device_initcall()` :arrow_right: `__define_initcall(fn, 6)` :arrow_right: `___define_initcall()`
除了 `module_init()` 以外,其餘函式皆定義於 [linux/init.h](https://github.com/torvalds/linux/blob/master/include/linux/init.h)
`___define_initcall()` 的原始定義如下所示
```c
#ifdef CONFIG_HAVE_ARCH_PREL32_RELOCATIONS
#define ___define_initcall(fn, id, __sec) \
__ADDRESSABLE(fn) \
asm(".section \"" #__sec ".init\", \"a\" \n" \
"__initcall_" #fn #id ": \n" \
".long " #fn " - . \n" \
".previous \n");
#else
#define ___define_initcall(fn, id, __sec) \
static initcall_t __initcall_##fn##id __used \
__attribute__((__section__(#__sec ".init"))) = fn;
#endif
```
其中我比較關心這行
```c
#define __define_initcall(fn, id) \
static initcall_t __initcall_##fn##id __used \
__attribute__((__section__(".initcall" #id ".init"))) = fn
```
由於目前撰寫的程式是 device driver,因此會呼叫的參數是 [__define_initcall(fn, 6)](https://github.com/torvalds/linux/blob/master/include/linux/init.h#L226),其中 fn 為 `module_init()` 裡面的參數。所以假設 fn 為 hellochar, 則 macro 展開為 `static initcall_t __initcall_hellochar6 __used __attribute(.initcall6.init) = hellochar`
根據 [Linux内核很吊之 module_init解析 (上)](https://blog.csdn.net/richard_liujh/article/details/45669207) 之內容可以得知,**.initcall6.init** 區段之內容是從 **__initcall6_start** 開始連接,於是找到他是定義在 [init/main.c](https://github.com/torvalds/linux/blob/f632a8170a6b667ee4e3f552087588f0fe13c4bb/init/main.c)。
最後發現初始化是由 [do_initcalls()](https://github.com/torvalds/linux/blob/f632a8170a6b667ee4e3f552087588f0fe13c4bb/init/main.c#L1010) 起始呼叫。for loop 裡面的 level 指的是優先級,此函式目的在迭代所有的優先級
```c
static void __init do_initcalls(void)
{
int level;
for (level = 0; level < ARRAY_SIZE(initcall_levels) - 1; level++)
do_initcall_level(level);
}
```
往下呼叫到 [do_initcall_level()](https://github.com/torvalds/linux/blob/f632a8170a6b667ee4e3f552087588f0fe13c4bb/init/main.c#L994)。此函式即針對每個優先級進行初始化,優先級的宣告在[initcall_levels](https://github.com/torvalds/linux/blob/f632a8170a6b667ee4e3f552087588f0fe13c4bb/init/main.c#L970)
```c
static void __init do_initcall_level(int level)
{
initcall_entry_t *fn;
strcpy(initcall_command_line, saved_command_line);
parse_args(initcall_level_names[level],
initcall_command_line, __start___param,
__stop___param - __start___param,
level, level,
NULL, &repair_env_string);
trace_initcall_level(initcall_level_names[level]);
for (fn = initcall_levels[level]; fn < initcall_levels[level+1]; fn++)
do_one_initcall(initcall_from_entry(fn));
}
```
最後呼叫 [do_one_initcall()](https://github.com/torvalds/linux/blob/f632a8170a6b667ee4e3f552087588f0fe13c4bb/init/main.c#L929)。即真正進行初始化
```c
int __init_or_module do_one_initcall(initcall_t fn)
{
int count = preempt_count();
char msgbuf[64];
int ret;
if (initcall_blacklisted(fn))
return -EPERM;
do_trace_initcall_start(fn);
ret = fn();
do_trace_initcall_finish(fn, ret);
msgbuf[0] = 0;
if (preempt_count() != count) {
sprintf(msgbuf, "preemption imbalance ");
preempt_count_set(count);
}
if (irqs_disabled()) {
strlcat(msgbuf, "disabled interrupts ", sizeof(msgbuf));
local_irq_enable();
}
WARN(msgbuf[0], "initcall %pS returned with %s\n", fn, msgbuf);
add_latent_entropy();
return ret;
}
```
c.f.
|符號|作用|舉例|
|:--:|:--:|:--:|
|##|串接|\_\_initcall\_##fn##id<br>fn = hellochar, id = 6 :arrow_right: \_\_initcall_hellochar6
|#|取值|#id<br>id = 6 :arrow_right: 6|
### 試著執行 `$ readelf -a fibdrv.ko`, 觀察裡頭的資訊和原始程式碼及 `modinfo` 的關聯,搭配上述提問,解釋像 `fibdrv.ko` 這樣的 ELF 執行檔案是如何「植入」到 Linux 核心
+ `ELF(Executable and Linking Format)` 為 UNIX/Linux 中的目的檔格式,他是用於執行檔,目的檔,共用函式庫的標準檔案格式。

ELF 檔案擁有兩個標頭,`Program header table` 是程式執行期的主要結構,`Section header table` 是連結時期主要結構。 [目的檔格式(elf)](http://ccckmit.wikidot.com/printer--friendly//lk:elf)
+ `modinfo ./fibdrv.ko`
```shell
filename: .../fibdrv.ko
version: 0.1
description: Fibonacci engine driver
author: National Cheng Kung University, Taiwan
license: Dual MIT/GPL
srcversion: 24DC5FB7E7608AF16B0CC1F
depends:
retpoline: Y
name: fibdrv
vermagic: 4.15.0-54-generic SMP mod_unload
```
+ `readelf -a fibdrv.ko` 僅節錄部份
```shell
ELF Header:
Magic: 7f 45 4c 46 02 01 01 00 00 00 00 00 00 00 00 00
Class: ELF64
Data: 2\'s complement, little endian
Version: 1 (current)
OS/ABI: UNIX - System V
ABI Version: 0
Type: REL (Relocatable file)
Machine: Advanced Micro Devices X86-64
Version: 0x1
Entry point address: 0x0
Start of program headers: 0 (bytes into file)
Start of section headers: 6752 (bytes into file)
Flags: 0x0
Size of this header: 64 (bytes)
Size of program headers: 0 (bytes)
Number of program headers: 0
Size of section headers: 64 (bytes)
Number of section headers: 26
Section header string table index: 23
Section Headers:
[Nr] Name Type Address Offset
Size EntSize Flags Link Info Align
[ 0] NULL 0000000000000000 00000000
0000000000000000 0000000000000000 0 0 0
[ 1] .note.gnu.build-i NOTE 0000000000000000 00000040
0000000000000024 0000000000000000 A 0 0 4
[ 2] .text PROGBITS 0000000000000000 00000070
```
可以看到 fibdrv.ko 這個 ELF 檔案最主要包含 `ELF Header` 以及 `Section Headers`,最主要裡面的資訊都是一些 section 的地址。光是看這個並沒有太深刻的了解,所以我選擇繼續使用 `objdump -s ./fibdrv.ko` 觀察 section 的資訊。其中一段 section 資訊值得一看
```shell
Contents of section .modinfo:
0000 76657273 696f6e3d 302e3100 64657363 version=0.1.desc
0010 72697074 696f6e3d 4669626f 6e616363 ription=Fibonacc
0020 6920656e 67696e65 20647269 76657200 i engine driver.
0030 61757468 6f723d4e 6174696f 6e616c20 author=National
0040 4368656e 67204b75 6e672055 6e697665 Cheng Kung Unive
0050 72736974 792c2054 61697761 6e006c69 rsity, Taiwan.li
0060 63656e73 653d4475 616c204d 49542f47 cense=Dual MIT/G
0070 504c0000 00000000 73726376 65727369 PL......srcversi
0080 6f6e3d32 34444335 46423745 37363038 on=24DC5FB7E7608
0090 41463136 42304343 31460000 00000000 AF16B0CC1F......
00a0 64657065 6e64733d 00726574 706f6c69 depends=.retpoli
00b0 6e653d59 006e616d 653d6669 62647276 ne=Y.name=fibdrv
00c0 00766572 6d616769 633d342e 31352e30 .vermagic=4.15.0
00d0 2d35342d 67656e65 72696320 534d5020 -54-generic SMP
00e0 6d6f645f 756e6c6f 61642000 mod_unload .
```
可以發現 `objdump -s ./fibdrv.ko` 的結果與 `modinfo ./fibdrv.ko` 是一樣的
+ ELF 執行檔是如何植入 Linux 核心
+ 註冊 Character Device Driver 有兩種 API 可以使用,分別為 `register_chrdev` & `cdev_add`。
+ 其中 `register_chrdev` 已經不建議使用,因為它會直接註冊 256 個 `minor ID`。詳見 [What is the main difference between register_chrdev() and alloc_chedev()?](https://stackoverflow.com/questions/55287522/what-is-the-main-difference-between-register-chrdev-and-alloc-chedev) 以及 [Dynamic Kernels: Modularized Device Drivers](https://www.linuxjournal.com/article/1219)
+ `cdev_add` 定義於 [linux/fs/char_dev.c](https://github.com/torvalds/linux/blob/a2d79c7174aeb43b13020dd53d85a7aefdd9f3e5/fs/char_dev.c#L479)
```c
int cdev_add(struct cdev *p, dev_t dev, unsigned count)
{
int error;
p->dev = dev;
p->count = count;
error = kobj_map(cdev_map, dev, count, NULL,
exact_match, exact_lock, p);
if (error)
return error;
kobject_get(p->kobj.parent);
return 0;
}
```
其中程式碼長的最為關鍵的就是 `kobj_map`,其定義在 [linux/map.c](https://github.com/torvalds/linux/blob/6f0d349d922ba44e4348a17a78ea51b7135965b1/drivers/base/map.c#L19)
```c
struct kobj_map {
struct probe {
struct probe *next;
dev_t dev;
unsigned long range;
struct module *owner;
kobj_probe_t *get;
int (*lock)(dev_t, void *);
void *data;
} *probes[255];
struct mutex *lock;
};
```
簡單的觀察即可發現 `kobj_map` 是用來管理設備驅動(`major`)以及其256個(`minor`)設備
另外 function `kobj_map` 也同樣定義於 [linux/map.c](https://github.com/torvalds/linux/blob/6f0d349d922ba44e4348a17a78ea51b7135965b1/drivers/base/map.c#L32)
```c
int kobj_map(struct kobj_map *domain, dev_t dev, unsigned long range,
struct module *module, kobj_probe_t *probe,
int (*lock)(dev_t, void *), void *data)
{
unsigned n = MAJOR(dev + range - 1) - MAJOR(dev) + 1;
unsigned index = MAJOR(dev);
unsigned i;
struct probe *p;
if (n > 255)
n = 255;
p = kmalloc_array(n, sizeof(struct probe), GFP_KERNEL);
if (p == NULL)
return -ENOMEM;
for (i = 0; i < n; i++, p++) {
p->owner = module;
p->get = probe;
p->lock = lock;
p->dev = dev;
p->range = range;
p->data = data;
}
mutex_lock(domain->lock);
for (i = 0, p -= n; i < n; i++, p++, index++) {
struct probe **s = &domain->probes[index % 255];
while (*s && (*s)->range < range)
s = &(*s)->next;
p->next = *s;
*s = p;
}
mutex_unlock(domain->lock);
return 0;
}
```
這段 code 裡面有兩個 for 迴圈,仔細觀察可以發現他們在做的事情就是初始化全部的 `minor`(也就是設備),植入到 `cdev_map`裡面
> [linux设备:cdev和kobj_map](https://blog.csdn.net/zlsh007/article/details/22291993)
接下來植入 Linux 核心的部份,`load_module` 定義於 [linux/module.c](https://github.com/torvalds/linux/blob/222a21d29521d144f3dd7a0bc4d4020e448f0126/kernel/module.c#L3671)
```c
static int load_module(struct load_info *info, const char __user *uargs,
int flags)
{
struct module *mod;
long err = 0;
char *after_dashes;
err = elf_header_check(info);
if (err)
goto free_copy;
err = setup_load_info(info, flags);
if (err)
goto free_copy;
if (blacklisted(info->name)) {
err = -EPERM;
goto free_copy;
}
err = module_sig_check(info, flags);
if (err)
goto free_copy;
err = rewrite_section_headers(info, flags);
if (err)
goto free_copy;
/* Check module struct version now, before we try to use module. */
if (!check_modstruct_version(info, info->mod)) {
err = -ENOEXEC;
goto free_copy;
}
/* Figure out module layout, and allocate all the memory. */
mod = layout_and_allocate(info, flags);
if (IS_ERR(mod)) {
err = PTR_ERR(mod);
goto free_copy;
}
audit_log_kern_module(mod->name);
/* Reserve our place in the list. */
err = add_unformed_module(mod);
if (err)
goto free_module;
#ifdef CONFIG_MODULE_SIG
mod->sig_ok = info->sig_ok;
if (!mod->sig_ok) {
pr_notice_once("%s: module verification failed: signature "
"and/or required key missing - tainting "
"kernel\n", mod->name);
add_taint_module(mod, TAINT_UNSIGNED_MODULE, LOCKDEP_STILL_OK);
}
#endif
/* To avoid stressing percpu allocator, do this once we're unique. */
err = percpu_modalloc(mod, info);
if (err)
goto unlink_mod;
/* Now module is in final location, initialize linked lists, etc. */
err = module_unload_init(mod);
if (err)
goto unlink_mod;
init_param_lock(mod);
/* Now we've got everything in the final locations, we can
* find optional sections. */
err = find_module_sections(mod, info);
if (err)
goto free_unload;
err = check_module_license_and_versions(mod);
if (err)
goto free_unload;
/* Set up MODINFO_ATTR fields */
setup_modinfo(mod, info);
/* Fix up syms, so that st_value is a pointer to location. */
err = simplify_symbols(mod, info);
if (err < 0)
goto free_modinfo;
err = apply_relocations(mod, info);
if (err < 0)
goto free_modinfo;
err = post_relocation(mod, info);
if (err < 0)
goto free_modinfo;
flush_module_icache(mod);
/* Now copy in args */
mod->args = strndup_user(uargs, ~0UL >> 1);
if (IS_ERR(mod->args)) {
err = PTR_ERR(mod->args);
goto free_arch_cleanup;
}
dynamic_debug_setup(mod, info->debug, info->num_debug);
/* Ftrace init must be called in the MODULE_STATE_UNFORMED state */
ftrace_module_init(mod);
/* Finally it's fully formed, ready to start executing. */
err = complete_formation(mod, info);
if (err)
goto ddebug_cleanup;
err = prepare_coming_module(mod);
if (err)
goto bug_cleanup;
/* Module is ready to execute: parsing args may do that. */
after_dashes = parse_args(mod->name, mod->args, mod->kp, mod->num_kp,
-32768, 32767, mod,
unknown_module_param_cb);
if (IS_ERR(after_dashes)) {
err = PTR_ERR(after_dashes);
goto coming_cleanup;
} else if (after_dashes) {
pr_warn("%s: parameters '%s' after `--' ignored\n",
mod->name, after_dashes);
}
/* Link in to sysfs. */
err = mod_sysfs_setup(mod, info, mod->kp, mod->num_kp);
if (err < 0)
goto coming_cleanup;
if (is_livepatch_module(mod)) {
err = copy_module_elf(mod, info);
if (err < 0)
goto sysfs_cleanup;
}
/* Get rid of temporary copy. */
free_copy(info);
/* Done! */
trace_module_load(mod);
return do_init_module(mod);
sysfs_cleanup:
mod_sysfs_teardown(mod);
coming_cleanup:
mod->state = MODULE_STATE_GOING;
destroy_params(mod->kp, mod->num_kp);
blocking_notifier_call_chain(&module_notify_list,
MODULE_STATE_GOING, mod);
klp_module_going(mod);
bug_cleanup:
/* module_bug_cleanup needs module_mutex protection */
mutex_lock(&module_mutex);
module_bug_cleanup(mod);
mutex_unlock(&module_mutex);
ddebug_cleanup:
ftrace_release_mod(mod);
dynamic_debug_remove(mod, info->debug);
synchronize_rcu();
kfree(mod->args);
free_arch_cleanup:
module_arch_cleanup(mod);
free_modinfo:
free_modinfo(mod);
free_unload:
module_unload_free(mod);
unlink_mod:
mutex_lock(&module_mutex);
/* Unlink carefully: kallsyms could be walking list. */
list_del_rcu(&mod->list);
mod_tree_remove(mod);
wake_up_all(&module_wq);
/* Wait for RCU-sched synchronizing before releasing mod->list. */
synchronize_rcu();
mutex_unlock(&module_mutex);
free_module:
/* Free lock-classes; relies on the preceding sync_rcu() */
lockdep_free_key_range(mod->core_layout.base, mod->core_layout.size);
module_deallocate(mod, info);
free_copy:
free_copy(info);
return err;
}
```
其中 `struct load_info` 定義於 [linux/module-internal.h](https://github.com/torvalds/linux/blob/86c2f5d653058798703549e1be39a819fcac0d5d/kernel/module-internal.h#L11)
```c
struct load_info {
const char *name;
/* pointer to module in temporary copy, freed at end of load_module() */
struct module *mod;
Elf_Ehdr *hdr;
unsigned long len;
Elf_Shdr *sechdrs;
char *secstrings, *strtab;
unsigned long symoffs, stroffs, init_typeoffs, core_typeoffs;
struct _ddebug *debug;
unsigned int num_debug;
bool sig_ok;
#ifdef CONFIG_KALLSYMS
unsigned long mod_kallsyms_init_off;
#endif
struct {
unsigned int sym, str, mod, vers, info, pcpu;
} index;
};
```
此 struct 是用來儲存 ELF 相關有用訊息的,回到 `load_module` 本身,可以發現一開始是針對 ELF 檔進行各種檢查,之後就是一連串的設定。最後 `trace_module_load()` 執行完成後就植入完成
> [Linux 可加载内核模块剖析](https://www.ibm.com/developerworks/cn/linux/l-lkm/index.html)
> [理解内核模块](https://toutiao.io/posts/161339/app_preview)
> [内核模块的加载](https://blog.csdn.net/lidan113lidan/article/details/45313535)
### 這個 `fibdrv` 名稱取自 Fibonacci driver 的簡稱,儘管在這裡顯然是為了展示和教學用途而存在,但針對若干關鍵的應用場景,特別去撰寫 Linux 核心模組,仍有其意義,請找出 Linux 核心的案例並解讀。提示: 可參閱 [Random numbers from CPU execution time jitter](https://lwn.net/Articles/642166/)
+ `jitter`
> On a modern processor, there are many different factors that can impact the amount of time it takes to execute the same set of instructions. If one measures that execution time precisely multiple times, it will show variation—jitter.
我們測量一個任務執行所花費的時間,會得到一個時間;假使將以上操作多做幾次,會發現到時間不一定是一樣的。造成這個現象就是軟體跟硬體的時間差,而 `jitter` 就是一個用來表示此單位的時間差,單位為 $10^{-3}$ 秒
+ 以 [linux/s3c_adc_battery.c](https://github.com/torvalds/linux/blob/6f0d349d922ba44e4348a17a78ea51b7135965b1/drivers/power/supply/s3c_adc_battery.c#L44) 為例子,他是一個 `battery controller driver` 裡面有用到 `jitter` 的程式碼如下所示
```c
#define JITTER_DELAY 500 /* ms */
static void s3c_adc_bat_ext_power_changed(struct power_supply *psy)
{
schedule_delayed_work(&bat_work,
msecs_to_jiffies(JITTER_DELAY));
}
```
`schedule_delayed_work` 定義於 [linux/workqueue.h](https://github.com/torvalds/linux/blob/92c1d6522135050cb377a18cc6e30d08dfb87efb/include/linux/workqueue.h#L603)
```c
static inline bool schedule_delayed_work(struct delayed_work *dwork,
unsigned long delay)
{
return queue_delayed_work(system_wq, dwork, delay);
}
```
`queue_delayed_work` 定義於 [linux/workqueue.h](https://github.com/torvalds/linux/blob/92c1d6522135050cb377a18cc6e30d08dfb87efb/include/linux/workqueue.h#L501)
```c
static inline bool queue_delayed_work(struct workqueue_struct *wq,
struct delayed_work *dwork,
unsigned long delay)
{
return queue_delayed_work_on(WORK_CPU_UNBOUND, wq, dwork, delay);
}
```
`queue_delayed_work_on` 定義於 [linux/workqueue.c](https://github.com/torvalds/linux/blob/92c1d6522135050cb377a18cc6e30d08dfb87efb/kernel/workqueue.c#L1663)
```c
bool queue_delayed_work_on(int cpu, struct workqueue_struct *wq,
struct delayed_work *dwork, unsigned long delay)
{
struct work_struct *work = &dwork->work;
bool ret = false;
unsigned long flags;
/* read the comment in __queue_work() */
local_irq_save(flags);
if (!test_and_set_bit(WORK_STRUCT_PENDING_BIT, work_data_bits(work))) {
__queue_delayed_work(cpu, wq, dwork, delay);
ret = true;
}
local_irq_restore(flags);
return ret;
}
EXPORT_SYMBOL(queue_delayed_work_on);
```
可以看到這個功能的實做相對簡單,就是當供電發生改變時執行函式,而裡面的 `schedule_delayed_work` 是為了配合軟體以及硬體的時間差所以需要,在這個 Kernel Module 裡作者將延遲的時間定 `500ms`,因此可以預期在這個時間後將繼續動作。
另外`s3c_adc_bat_ext_power_changed` 函式呼叫時機定義如以下
```c
static const struct power_supply_desc main_bat_desc = {
.name = "main-battery",
.type = POWER_SUPPLY_TYPE_BATTERY,
.properties = s3c_adc_main_bat_props,
.num_properties = ARRAY_SIZE(s3c_adc_main_bat_props),
.get_property = s3c_adc_bat_get_property,
.external_power_changed = s3c_adc_bat_ext_power_changed,
.use_for_apm = 1,
};
```
+ cf. 根據 [ADC (Analog-to-Digital Converter) - 成大資工Wiki](http://wiki.csie.ncku.edu.tw/embedded/ADC) 可以得知 `adc` 是數位類比轉換器,目的是將連續的類比訊號或者物理量(通常為電壓)轉換成數位訊號
> [函数INIT_DELAYED_WORK()/schedule_delayed_work() / cancel_delayed_work_sync()](https://blog.csdn.net/jgw2008/article/details/52693268)
### 查閱 [ktime 相關的 API](https://www.kernel.org/doc/html/latest/core-api/timekeeping.html),並找出使用案例 (需要有核心模組和簡化的程式碼來解說)
+ 在 [linux/dd.c](https://github.com/torvalds/linux/blob/a2d79c7174aeb43b13020dd53d85a7aefdd9f3e5/drivers/base/dd.c#L634) 裡有一個 function 定義如下所示
```c
static int really_probe_debug(struct device *dev, struct device_driver *drv)
{
ktime_t calltime, delta, rettime;
int ret;
calltime = ktime_get();
ret = really_probe(dev, drv);
rettime = ktime_get();
delta = ktime_sub(rettime, calltime);
printk(KERN_DEBUG "probe of %s returned %d after %lld usecs\n",
dev_name(dev), ret, (s64) ktime_to_us(delta));
return ret;
}
```
如名稱,他是針對 `really_probe` 的一個 debug 的函式,其中有用到 `ktime_get()` 去計算 `really_probe` 所需的時間,將它打印於 [dmesg](http://man7.org/linux/man-pages/man1/dmesg.1.html)
+ 在電腦硬體中有所謂的 `pwm 風扇`,在 Linux Kernel 中也有對應的程式碼 [linux/pwm-fan.c](https://github.com/torvalds/linux/blob/a2d79c7174aeb43b13020dd53d85a7aefdd9f3e5/drivers/hwmon/pwm-fan.c#L54),其中設定轉速的部份有使用到 ktime 並如下所示
```c
static void sample_timer(struct timer_list *t)
{
struct pwm_fan_ctx *ctx = from_timer(ctx, t, rpm_timer);
int pulses;
u64 tmp;
pulses = atomic_read(&ctx->pulses);
atomic_sub(pulses, &ctx->pulses);
tmp = (u64)pulses * ktime_ms_delta(ktime_get(), ctx->sample_start) * 60;
do_div(tmp, ctx->pulses_per_revolution * 1000);
ctx->rpm = tmp;
ctx->sample_start = ktime_get();
mod_timer(&ctx->rpm_timer, jiffies + HZ);
}
```
### [clock_gettime](https://linux.die.net/man/2/clock_gettime) 和 [High Resolution Timers (HRT)](https://elinux.org/High_Resolution_Timers) 的關聯為何?請參閱 POSIX 文件並搭配程式碼解說
+ 作業系統之所以能運作,通常是借助硬體振盪器所產生的週期性訊號。Linux Kernel 每隔固定週期都會發送出 `interrupt requests(IRQ)`,`HZ` 是用來定義**每一秒有幾次中斷**,而 `tick` 是定義**每一次中斷的時間**,為 `HZ` 的倒數。`jiffies` 是用來紀錄自開機以來已經發生過多少的 tick,發生一次中斷即+1
+ [High Resolution Timers (HRT)](https://elinux.org/High_Resolution_Timers) 是為了實做 [POSIX 1003.1b Section 14(Clocks and Timers)](http://www.open-std.org/jtc1/sc22/open/n4217.pdf#page=532) API。POSIX 文件部份內容如下
> Time Value Specification Structures
> Many of the timing facility functions accept or return time value specifications. A time value structure timespec specifies a single time value and includes at least the following members:
> Member Type Member Name Description
> time_t tv_sec Seconds.
> long tv_nsec Nanoseconds.
> The tv_nsec member is only valid if greater than or equal to zero, and less than the number of nanoseconds in a second (1 000 million). The time interval described by this structure is (tv_sec * 109 + tv_nsec) nanoseconds
對照者 `clock_gettime()`,其函式原形為 `int clock_gettime(clockid_t clk_id, struct timespec *tp);`,函式可以透過 `clt_id` 取得特定的 clock ,[man page](https://linux.die.net/man/2/clock_gettime) 描述節錄以下
> The functions clock_gettime() and clock_settime() retrieve and set the time of the specified clock clk_id.
>
> The res and tp arguments are timespec structures, as specified in <time.h>:
>
> struct timespec {
time_t tv_sec; /* seconds */
long tv_nsec; /* nanoseconds */
};
> The clk_id argument is the identifier of the particular clock on which to act. A clock may be system-wide and hence visible for all processes, or per-process if it measures time only within a single process.
所以基本上可以確定說 `clock_gettime()` 所得到的時間是 `HRT` 的時間
+ 在 Linux 核心中,有許多用到 `clock_gettime()` 的地方,比如說 [linux/futex_bench.c](https://github.com/torvalds/linux/blob/2f4c53349961c8ca480193e47da4d44fdb8335a8/tools/testing/selftests/powerpc/benchmarks/futex_bench.c#L20)
```c
int test_futex(void)
{
struct timespec ts_start, ts_end;
unsigned long i = ITERATIONS;
clock_gettime(CLOCK_MONOTONIC, &ts_start);
while (i--) {
unsigned int addr = 0;
futex(&addr, FUTEX_WAKE, 1, NULL, NULL, 0);
}
clock_gettime(CLOCK_MONOTONIC, &ts_end);
printf("time = %.6f\n", ts_end.tv_sec - ts_start.tv_sec + (ts_end.tv_nsec - ts_start.tv_nsec) / 1e9);
return 0;
}
```
很明顯的以上程式碼在做的事情就是測試 `futex` 所需要的時間。[futex(fast user-space locking)](http://man7.org/linux/man-pages/man2/futex.2.html) 是 Linux 核心同步中的一個機制,他的機制主要是提供 User Space 一個更有效與多執行緒的同步方式並且降低 Kernel 的介入。可參考 [Basics of Futexes](https://eli.thegreenplace.net/2018/basics-of-futexes/)
另外我有發現在 [torvalds/linux](https://github.com/torvalds/linux) 裡搜尋 `clock_gettime()` 會發現到出來的結果大多位於 **tools/testing/selftests/**,其實這是 Linux Kernel 的自我檢測,就跟一般軟體工程一樣都會有的測試。可參考 [Linux Kernel Selftests](https://www.kernel.org/doc/html/v4.14/dev-tools/kselftest.html)
> [Linux Kernel 驅動程式特有的時間管理機制,HZ,tick 與 jiffies](https://eeepage.info/jiffies-kernel-timer/)
> [Linux 核心設計: Timer 及其管理機制](https://hackmd.io/@sysprog/HJElbeHkr)
### `fibdrv` 如何透過 [Linux Virtual File System](https://www.win.tue.nl/~aeb/linux/lk/lk-8.html) 介面,讓計算出來的 Fibonacci 數列得以讓 userspace (使用者層級) 程式 (本例就是 `client.c` 程式) 得以存取呢?解釋原理,並撰寫或找出相似的 Linux 核心模組範例
+ #### Virtual FileSystem(VFS) 基本概念
+ `VFS` 是 Kernel 中的一個==抽象層軟體介面==,負責處理所有跟檔案系統有關的 system call,同時在使用者與特定的檔案系統中,它也提供了一個介面;有了這個介面,檔案系統的實做就可以依靠 VFS 所提供的 API 來實現。
+ Linux Kernel 裡的檔案樹結構都在 VFS 之下,意謂者新的檔案系統將會被掛載在 VFS 之下
+ **general file system model**
+ 檔案系統模型包含了以下*中繼資料*(==描述資料的資料==)
+ **superblock**
+ 它儲存了掛載的檔案系統的資料,包含 `檔案系統區塊大小`,`最大檔名長度值`,`最大檔案大小`...等
+ **inode(index node)**
+ 它包含了一個檔案的基本資料,`檔案型態`,`檔案大小`,`權限`,`存取,修改時間`...等
:::info
通常檔名不會存於 inode,檔名會存於 dentry
:::
+ **file**
+ 它是最靠近使用者的檔案系統元件,這個結構僅存於 VFS 中,在硬體中它並沒有實體
+ 它包含了 `檔案指標`,`指向 inode 的指標`
+ **dentry(directory entry)**
+ 它包含了 `一個可以辨認 inode 的數字`,`檔名`
+ dentry 在硬碟上擁有一個紀錄,但它並不是直接指向的,因為每個檔案系統的儲存方式有所不同
> [File system frivers(Part 1)](https://linux-kernel-labs.github.io/master/labs/filesystems_part1.html#lab-objectives)
+ #### `user space` 與 `kernel space` 的存取溝通
+ 前面 VFS 提到,任何跟檔案系統有關的操作,都會經過 VFS,所以可以得知一般 process 跟 filesystem 的溝通可以歸納得以下
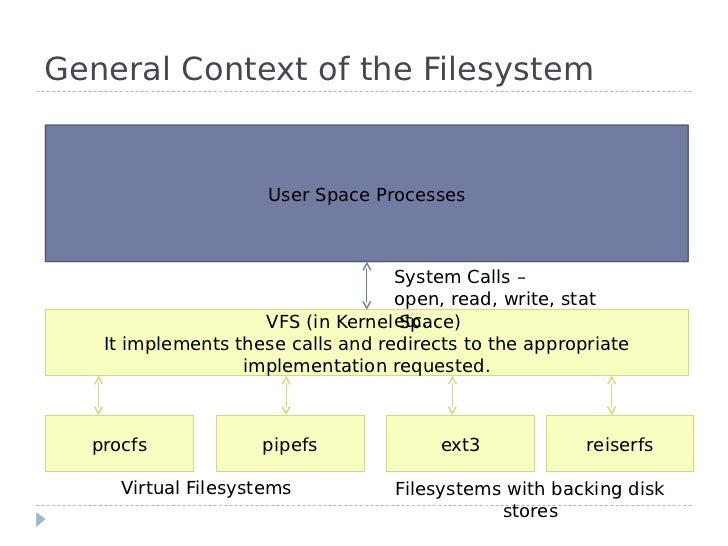
我們可以先回到 `fibdrv.c` 本身去觀察,跟檔案系統有關的操作似乎跟這段脫離不了關係
```c
const struct file_operations fib_fops = {
.owner = THIS_MODULE,
.read = fib_read,
.write = fib_write,
.open = fib_open,
.release = fib_release,
.llseek = fib_device_lseek,
};
```
`struct file_operations` 定義於 [linux/fs.h](https://github.com/torvalds/linux/blob/master/include/linux/fs.h#L1789),裡面的這些操作是為了要告訴 VFS 要如何操作這個檔案
```c
struct file_operations {
struct module *owner;
loff_t (*llseek) (struct file *, loff_t, int);
ssize_t (*read) (struct file *, char __user *, size_t, loff_t *);
ssize_t (*write) (struct file *, const char __user *, size_t, loff_t *);
ssize_t (*read_iter) (struct kiocb *, struct iov_iter *);
ssize_t (*write_iter) (struct kiocb *, struct iov_iter *);
int (*iopoll)(struct kiocb *kiocb, bool spin);
int (*iterate) (struct file *, struct dir_context *);
int (*iterate_shared) (struct file *, struct dir_context *);
__poll_t (*poll) (struct file *, struct poll_table_struct *);
long (*unlocked_ioctl) (struct file *, unsigned int, unsigned long);
long (*compat_ioctl) (struct file *, unsigned int, unsigned long);
int (*mmap) (struct file *, struct vm_area_struct *);
unsigned long mmap_supported_flags;
int (*open) (struct inode *, struct file *);
int (*flush) (struct file *, fl_owner_t id);
int (*release) (struct inode *, struct file *);
int (*fsync) (struct file *, loff_t, loff_t, int datasync);
int (*fasync) (int, struct file *, int);
int (*lock) (struct file *, int, struct file_lock *);
ssize_t (*sendpage) (struct file *, struct page *, int, size_t, loff_t *, int);
unsigned long (*get_unmapped_area)(struct file *, unsigned long, unsigned long, unsigned long, unsigned long);
int (*check_flags)(int);
int (*flock) (struct file *, int, struct file_lock *);
ssize_t (*splice_write)(struct pipe_inode_info *, struct file *, loff_t *, size_t, unsigned int);
ssize_t (*splice_read)(struct file *, loff_t *, struct pipe_inode_info *, size_t, unsigned int);
int (*setlease)(struct file *, long, struct file_lock **, void **);
long (*fallocate)(struct file *file, int mode, loff_t offset,
loff_t len);
void (*show_fdinfo)(struct seq_file *m, struct file *f);
#ifndef CONFIG_MMU
unsigned (*mmap_capabilities)(struct file *);
#endif
ssize_t (*copy_file_range)(struct file *, loff_t, struct file *,
loff_t, size_t, unsigned int);
loff_t (*remap_file_range)(struct file *file_in, loff_t pos_in,
struct file *file_out, loff_t pos_out,
loff_t len, unsigned int remap_flags);
int (*fadvise)(struct file *, loff_t, loff_t, int);
} __randomize_layout;
```
以 `read` system call為例子,它定義於 [linux/read_write.c](https://github.com/torvalds/linux/blob/a2d79c7174aeb43b13020dd53d85a7aefdd9f3e5/fs/read_write.c#L595)
```c
SYSCALL_DEFINE3(read, unsigned int, fd, char __user *, buf, size_t, count)
{
return ksys_read(fd, buf, count);
}
```
往下追蹤 `ksys_read` 定義於 [linux/read_write.c](https://github.com/torvalds/linux/blob/a2d79c7174aeb43b13020dd53d85a7aefdd9f3e5/fs/read_write.c#L576)
```c
ssize_t ksys_read(unsigned int fd, char __user *buf, size_t count)
{
struct fd f = fdget_pos(fd);
ssize_t ret = -EBADF;
if (f.file) {
loff_t pos, *ppos = file_ppos(f.file);
if (ppos) {
pos = *ppos;
ppos = &pos;
}
ret = vfs_read(f.file, buf, count, ppos);
if (ret >= 0 && ppos)
f.file->f_pos = pos;
fdput_pos(f);
}
return ret;
}
```
其中 `vfs_read` 定義於 [linux/read_write.c](https://github.com/torvalds/linux/blob/a2d79c7174aeb43b13020dd53d85a7aefdd9f3e5/fs/read_write.c#L446)
```c
ssize_t vfs_read(struct file *file, char __user *buf, size_t count, loff_t *pos)
{
ssize_t ret;
if (!(file->f_mode & FMODE_READ))
return -EBADF;
if (!(file->f_mode & FMODE_CAN_READ))
return -EINVAL;
if (unlikely(!access_ok(buf, count)))
return -EFAULT;
ret = rw_verify_area(READ, file, pos, count);
if (!ret) {
if (count > MAX_RW_COUNT)
count = MAX_RW_COUNT;
ret = __vfs_read(file, buf, count, pos);
if (ret > 0) {
fsnotify_access(file);
add_rchar(current, ret);
}
inc_syscr(current);
}
return ret;
}
```
`__vfs_read` 定義於 [linux/read_write.c](https://github.com/torvalds/linux/blob/a2d79c7174aeb43b13020dd53d85a7aefdd9f3e5/fs/read_write.c#L421)
```c
ssize_t __vfs_read(struct file *file, char __user *buf, size_t count,
loff_t *pos)
{
if (file->f_op->read)
return file->f_op->read(file, buf, count, pos);
else if (file->f_op->read_iter)
return new_sync_read(file, buf, count, pos);
else
return -EINVAL;
}
```
`return file->f_op->read(file, buf, count, pos);` 中的 file 是 `struct file`,繼續尋找
`struct file` 定義於 [linux/fs.h](https://github.com/torvalds/linux/blob/master/include/linux/fs.h#L922)
```c
struct file {
union {
struct llist_node fu_llist;
struct rcu_head fu_rcuhead;
} f_u;
struct path f_path;
struct inode *f_inode; /* cached value */
const struct file_operations *f_op;
/*
* Protects f_ep_links, f_flags.
* Must not be taken from IRQ context.
*/
spinlock_t f_lock;
enum rw_hint f_write_hint;
atomic_long_t f_count;
unsigned int f_flags;
fmode_t f_mode;
struct mutex f_pos_lock;
loff_t f_pos;
struct fown_struct f_owner;
const struct cred *f_cred;
struct file_ra_state f_ra;
u64 f_version;
#ifdef CONFIG_SECURITY
void *f_security;
#endif
/* needed for tty driver, and maybe others */
void *private_data;
#ifdef CONFIG_EPOLL
/* Used by fs/eventpoll.c to link all the hooks to this file */
struct list_head f_ep_links;
struct list_head f_tfile_llink;
#endif /* #ifdef CONFIG_EPOLL */
struct address_space *f_mapping;
errseq_t f_wb_err;
} __randomize_layout
__attribute__((aligned(4))); /* lest something weird decides that 2 is OK */
struct file_handle {
__u32 handle_bytes;
int handle_type;
/* file identifier */
unsigned char f_handle[0];
};
```
可以發現 `f_op` 就是 `struct file_operations`,`f_op->read()` 就是自定義的 `fib_read()`!
這意謂者,User Space Process 去打開一個檔案的時候,Kernel 會呼叫 system call `read`,然後 `VFS` 會去呼叫自定義的 function,達到 User Space 與 Kernel Space 溝通!
> [linux-kernel-implementation-of-pipes-and-fifos](https://www.slideshare.net/divyekapoor/linux-kernel-implementation-of-pipes-and-fifos)
+ 在 Linux 核心模組中的 TTY 也有用到這個概念 [linux/tty_io.c](https://github.com/torvalds/linux/blob/a2d79c7174aeb43b13020dd53d85a7aefdd9f3e5/drivers/tty/tty_io.c#L477)
```c
static const struct file_operations tty_fops = {
.llseek = no_llseek,
.read = tty_read,
.write = tty_write,
.poll = tty_poll,
.unlocked_ioctl = tty_ioctl,
.compat_ioctl = tty_compat_ioctl,
.open = tty_open,
.release = tty_release,
.fasync = tty_fasync,
.show_fdinfo = tty_show_fdinfo,
};
static const struct file_operations console_fops = {
.llseek = no_llseek,
.read = tty_read,
.write = redirected_tty_write,
.poll = tty_poll,
.unlocked_ioctl = tty_ioctl,
.compat_ioctl = tty_compat_ioctl,
.open = tty_open,
.release = tty_release,
.fasync = tty_fasync,
};
static const struct file_operations hung_up_tty_fops = {
.llseek = no_llseek,
.read = hung_up_tty_read,
.write = hung_up_tty_write,
.poll = hung_up_tty_poll,
.unlocked_ioctl = hung_up_tty_ioctl,
.compat_ioctl = hung_up_tty_compat_ioctl,
.release = tty_release,
.fasync = hung_up_tty_fasync,
};
```
可以發現這裡的宣告跟上述所討論是一樣的,皆定義了各種的操作
### 注意到 `fibdrv.c` 存在著 `DEFINE_MUTEX`, `mutex_trylock`, `mutex_init`, `mutex_unlock`, `mutex_destroy` 等字樣,什麼場景中會需要呢?撰寫多執行緒的 userspace 程式來測試,觀察 Linux 核心模組若沒用到 mutex,到底會發生什麼問題
+ 需要注意的是 `fibdrv.c` 是一個 `Character Device Driver`,同時也是一個 `Linux Kernel Module(LKM)`。既然身為一個 Kernel Module,那麼他勢必是在 **Kernel Space** 所執行的。在作業系統的課程中有提到的一個概念是 ==中斷(Interrupt)==,亦即 CPU 收到硬體或軟體的信號,致使 CPU 必須處理事件。
+ 前面提到 Kernel Module 的執行環境是 **Kernel Space**,亦即它有可能會被作業系統所中斷,如果我們在開發 Kernel Module 沒有考慮到這個問題時,會發生不可預期的事情。
+ 實驗輸出
```
Data: ZZ --> Received from kernel: OO
Data: HH --> Received from kernel: HH
Data: OO --> Received from kernel: HH
Data: PP --> Received from kernel: PP
Data: DD --> Received from kernel: DD
Data: GG --> Received from kernel: GG
Data: AA --> Received from kernel: AA
Data: WW --> Received from kernel: WW
Data: CC --> Received from kernel: CC
Data: EE --> Received from kernel: EE
Data: OO --> Received from kernel: OO
Data: EE --> Received from kernel: EE
Data: ZZ --> Received from kernel: ZZ
Data: KK --> Received from kernel: KK
Data: ZZ --> Received from kernel: ZZ
Data: BB --> Received from kernel: BB
Data: YY --> Received from kernel: YY
Data: FF --> Received from kernel: FF
Data: OO --> Received from kernel: FF
Data: KK --> Received from kernel: ZZ
```
我撰寫了一個 Character Device Driver,它會讀入字串,並將其原封不動返回至 User Space,可以看到上面輸出有些正確有些則錯誤
詳細程式碼請參閱 [\[gist\] ambersun1234 / Character Device Driver](https://gist.github.com/ambersun1234/a003dd264d8ec3fe95f60a4254cf6721)
### 許多現代處理器提供了 [clz / ctz](https://en.wikipedia.org/wiki/Find_first_set) 一類的指令,你知道如何透過演算法的調整,去加速 [費氏數列](https://hackmd.io/s/BJPZlyDSV) 運算嗎?請列出關鍵程式碼並解說
+ 在 [你所不知道的C語言:遞迴呼叫篇](https://hackmd.io/@sysprog/rJ8BOjGGl?type=view#Q-Matrix) 中有提到可以利用 `Q-matrix` & `fast-doubling` 的方法來加速費氏數列。
+ #### Q-matrix
+ 考慮費氏數列兔子問題,假設成年兔子為 `a` ,幼年兔子為 `b` ,我們可以得到以下關係
$$a_{n+1} = a_n + b_n \\ b_{n+1} = a_n$$
+ 根據上述推導公式,把它寫成矩陣的形式就會變成
$$
\begin{pmatrix}
a_{n+1} \\ b_{n+1}
\end{pmatrix}
=
\begin{pmatrix}
1 & 1 \\
1 & 0
\end{pmatrix}
\begin{pmatrix}
a_n \\ b_n
\end{pmatrix}
$$
+ 則 $\begin{pmatrix} 1 & 1 \\ 1 & 0 \end{pmatrix}$ 就是所謂的 ==Q-matrix==,那我們可以把它寫成
$$
Q =
\begin{pmatrix}
1 & 1 \\
1 & 0
\end{pmatrix}
=
\begin{pmatrix}
F_2 & F_1 \\
F_1 & F_0
\end{pmatrix}
\\
Q^n =
\begin{pmatrix}
F_{n+1} & F_n \\
F_n & F_{n-1}
\end{pmatrix}
$$
> [The Fibonacci Q-matrix](https://www.youtube.com/watch?v=lTHVwsHJrG0)
+ #### fast-doubling
$\begin{split}
\begin{bmatrix}
F(2n+1) \\
F(2n)
\end{bmatrix} &=
\begin{bmatrix}
1 & 1 \\
1 & 0
\end{bmatrix}^{2n}
\begin{bmatrix}
F(1) \\
F(0)
\end{bmatrix}\\ \\ &=
\begin{bmatrix}
1 & 1 \\
1 & 0
\end{bmatrix}^n
\begin{bmatrix}
1 & 1 \\
1 & 0
\end{bmatrix}^n
\begin{bmatrix}
F(1) \\
F(0)
\end{bmatrix}\\ \\ &=
\begin{bmatrix}
F(n+1) & F(n) \\
F(n) & F(n-1)
\end{bmatrix}
\begin{bmatrix}
F(n+1) & F(n) \\
F(n) & F(n-1)
\end{bmatrix}
\begin{bmatrix}
1 \\
0
\end{bmatrix}\\ \\ &=
\begin{bmatrix}
F(n+1)^2 + F(n)^2\\
F(n)F(n+1) + F(n-1)F(n)
\end{bmatrix}
\end{split}$
+ 所以得到兩個公式
$\begin{split}
F(2k) &= F(k)[2F(k+1) - F(k)] \\
F(2k+1) &= F(k+1)^2+F(k)^2
\end{split}$
+ 根據 fibonacci sequence 原始定義 `F(0) = 0, F(1) = 1, F(2) = 1` 我們就可以用這三個值,依據上述公式推導出之後的值
+ 參考了 [ztex](https://hackmd.io/@ztex/HJ6SVmRIN?type=view#How-to-use-clz-to-optimize-fast-doubling) 的報告後,對於如何使用 clz 進行加速有了初步的認識。
+ `fast doubling` 是以上方兩個公式進行計算的,簡單的觀察可以發現他是以倍數的方式進行計算的,而且是 2 的倍數,所以可以跟二進位進行結合
+ 大概的概念就是
+ 先去除數字以前的 0 bit,因為真正的數字不包含 leading 0s,所以計算它也沒用,因此需要 clz 計算有多少 leading 0s
+ 碰到 0 :arrow_right: 進行 fast doubling
+ 碰到 1 :arrow_right: 進行 fast doubling,往下 iterate 1
+ 動手實驗,如下所示
+ 
+ 顯示的結果我覺得滿意外的,同樣都是使用 fast doubling ,有用 clz 加速計算下速度竟不如預期?
+ 上圖的測試程式,clz 的撰寫方式是使用基本的,也就是 for loop 逐一檢查
```c
uint32_t clz32(uint32_t input) {
unsigned int count = 0;
if (input == 0) {
count = 32;
}
else {
for (count = 0; ((input & 0x80000000) == 0); count++, input <<= 1);
}
return count;
}
```
+ 於是我把它改成理論上相對快速的 clz 方法,得到新的結果
+ 
+ 看起來速度有稍微比較接近
+ 這個的 clz 使用的是一次檢查 4 個的版本
```c
uint32_t clz(uint32_t input) {
// check 4 bit a time
uint8_t count = 0;
uint8_t clz_table[16] = {
4, 3, 2, 2,
1, 1, 1, 1,
0, 0, 0, 0,
0, 0, 0, 0
};
if (input == 0) count = 32;
else {
for (count = 0; ((input & 0xF0000000) == 0); count += 4, input <<= 4);
count += clz_table[input >> (32 - 4)]; // 32 - 4 because we just need to examine the last 4 bits
}
return count;
}
```
+ 最後實驗一下 binary search 版本的 clz
+ 
+ 透過上圖可以很清楚的發現,這次有用 clz 加速的 fast doubling 比原先的還要快了!
+ 以上 clz fast doubling 實驗程式碼均放在 [\[gist\]ambersun1234 / FibonacciSequence](https://gist.github.com/ambersun1234/c322ebcfaf05d22fd67bce5a01d43f77)
:::info
可嘗試用 Linux 核心的 ==[ffs](https://www.kernel.org/doc/htmldocs/kernel-api/API-ffs.html)== 改寫
:notes: jserv
:::
 Sign in with Wallet
Connect another wallet
Sign in with Wallet
Connect another wallet