# Linux輸入子系統Input subsystem學習筆記
Linux系統中有許多輸入設備:鍵盤、滑鼠、觸摸屏幕…等,而若是針對每一個輸入設備撰寫相對應的驅動程序,則應用層就必須知道每個設備節點的名稱,根據不同的設備開啟不同的設備節點,只要其中一個設備修改,就必須修改應用層,對整個系統產生不小的影響。
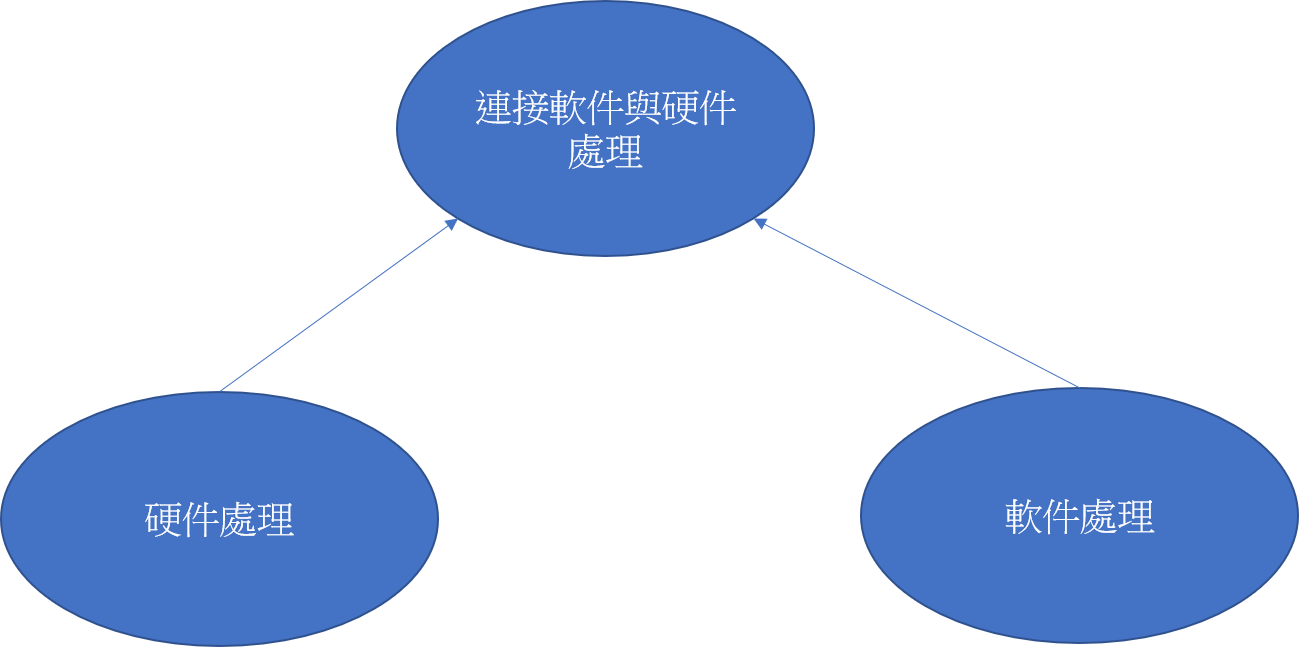
因此Linux系統發展出一套能夠兼容所有輸入設備的系統:輸入子系統(Input subsystem),將所有輸入設備進行統一管理,抽象出三部分:軟件處理、硬件處理、連接軟件與硬件處理。由此框架得知,若新增一輸入設備,程序員只需要根據輸入子系統的框架撰寫硬件處理驅動即可,應用程序仍可以依照輸入子系統定義的API去操作硬件。
# Linux 4.19.x 內核解析
drivers/input/input.c:
## 1. 入口函數:input_init
## 2. 註冊
加載evdev.c時入口函數會註冊handler,加載gpio_keys.c入口函數會註冊device
input_register_device
```c=
int input_register_device(struct input_dev *dev)
{
list_add_tail(&dev->node, &input_dev_list); // 放入鏈表
list_for_each_entry(handler, &input_handler_list, node) // 對於每個handler調用input_attach_handler
input_attach_handler(dev, handler);
}
```
input_register_handler
```c=
int input_register_handler(struct input_handler *handler)
{
list_add_tail(&handler->node, &input_handler_list); // 放入鏈表
list_for_each_entry(dev, &input_dev_list, node) // 對於每個dev調用input_attach_handler
input_attach_handler(dev, handler);
}
```
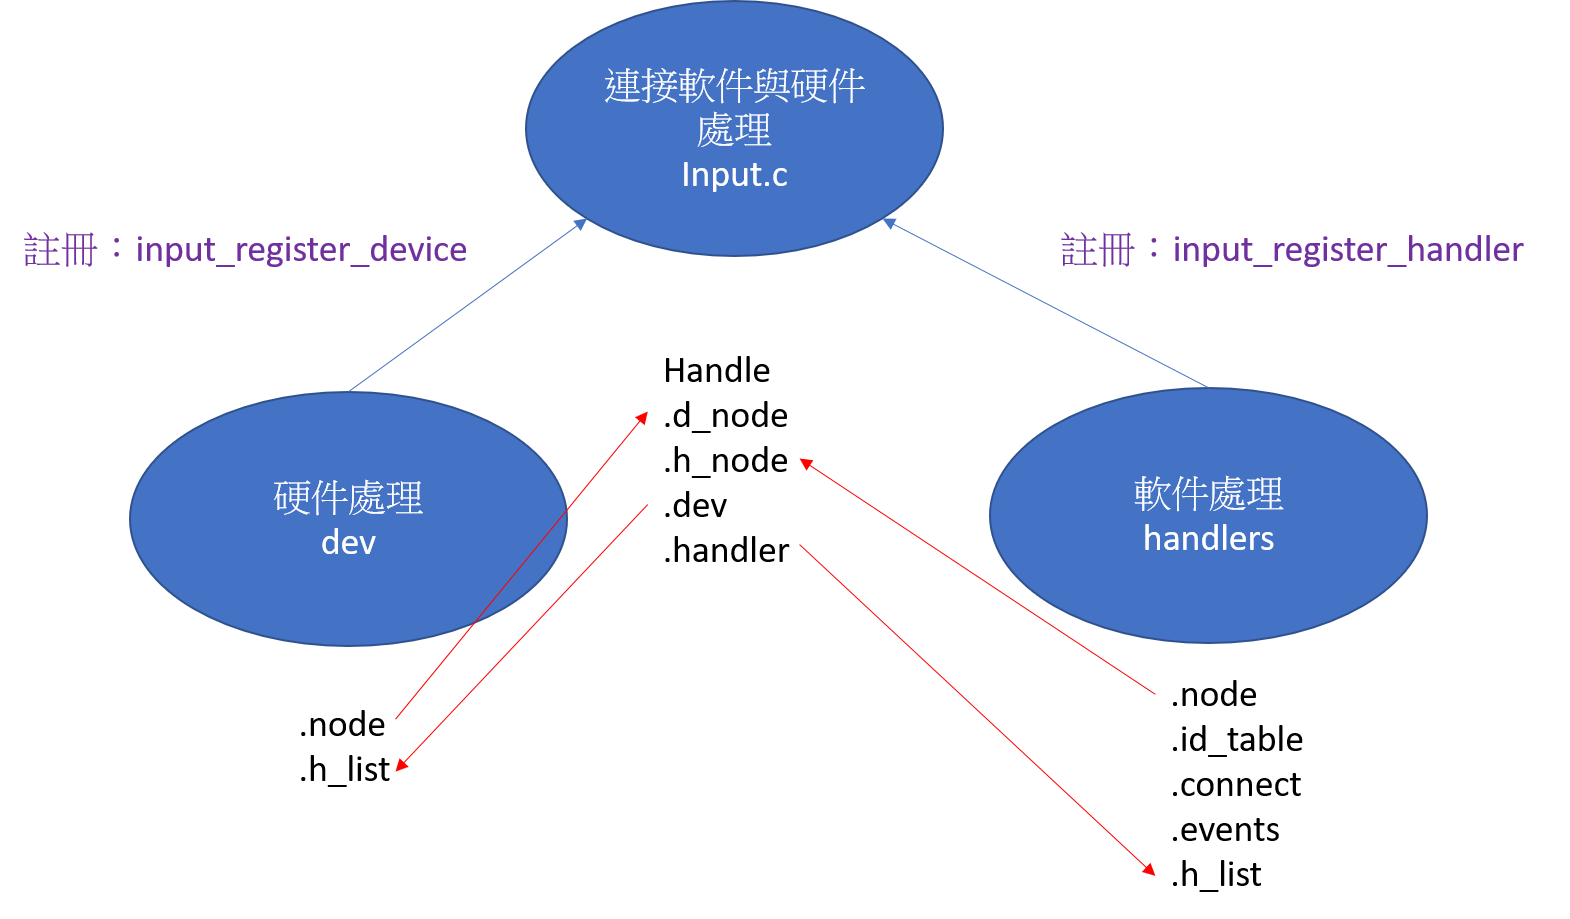
在註冊device或handler時,會將input_dev_list列表中的每個dev與input_handler_list裡handler裡進行兩兩比對,用handler裡的id_table來判斷是否支持此input_dev,若能夠支持,則會調用handler裡的connect函數。
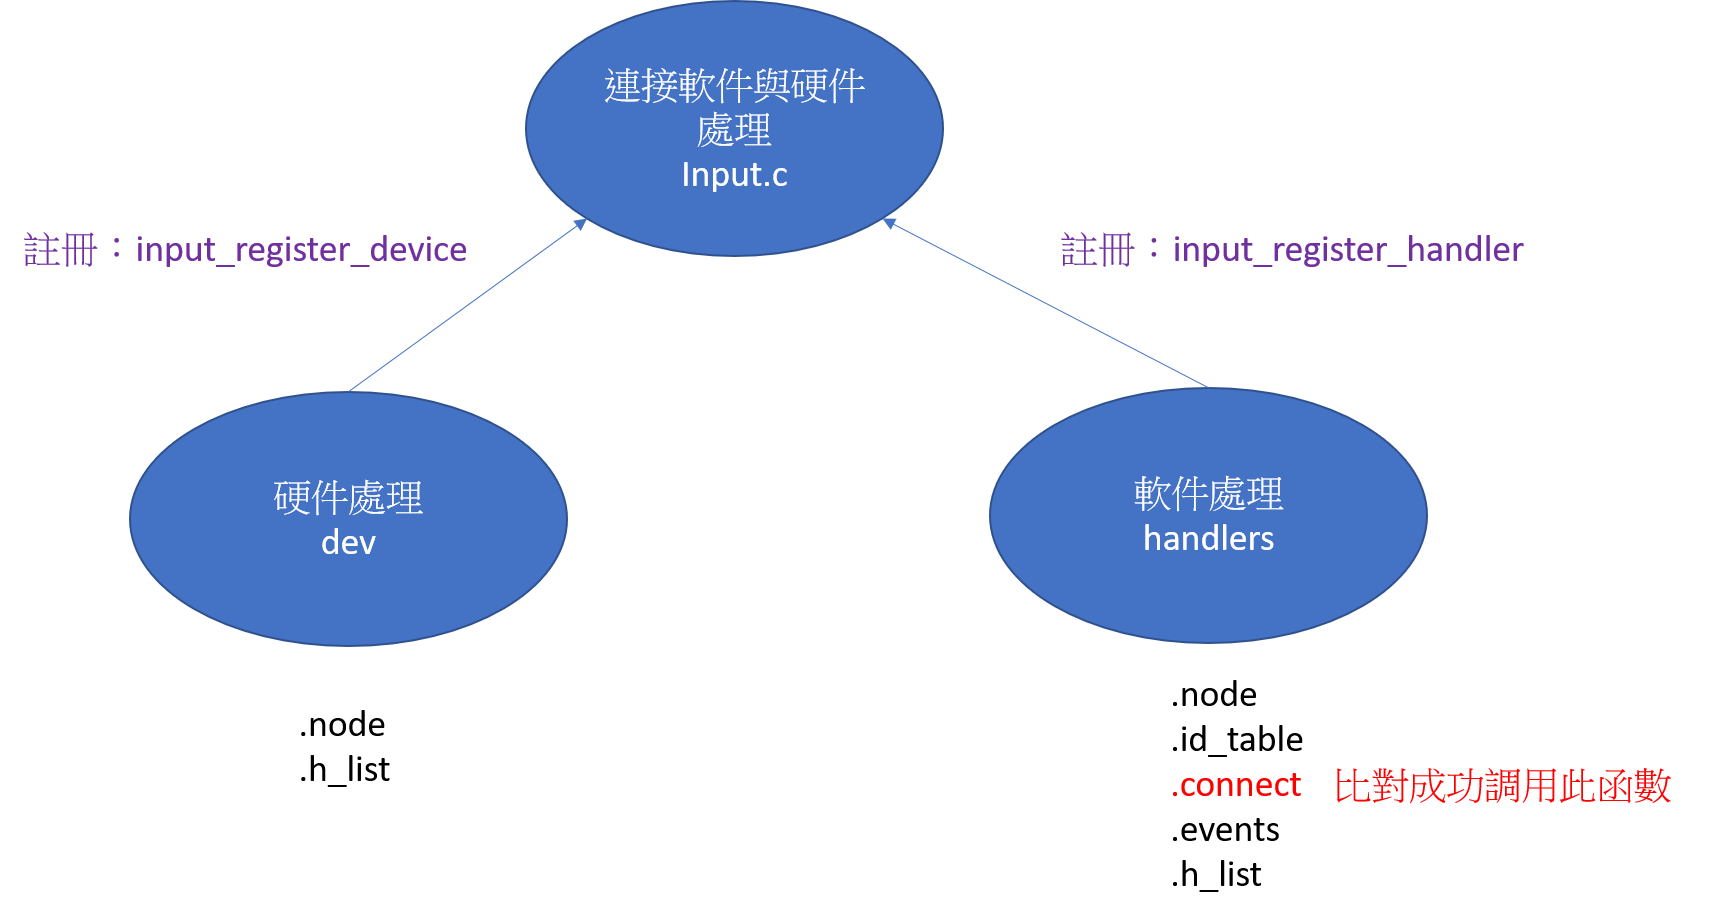
## 3. 配對成功調用connect函數,底下以evdev為例
```c=
static int evdev_connect(struct input_handler *handler, struct input_dev *dev, const struct input_device_id *id)
{
evdev = kzalloc(sizeof(struct evdev), GFP_KERNEL); // 分配一個input_handle
evdev->handle.dev = input_get_device(dev); // input_handle裡的dev指向左邊的dev
evdev->handle.handler = handler; // input_handle裡的handler指向右邊的handler
input_register_handle(&evdev->handle); //註冊handle
}
```
input_register_handle函數
```c=
int input_register_handle(struct input_handle *handle)
{
struct input_handler *handler = handle->handler;
struct input_dev *dev = handle->dev;
list_add_tail_rcu(&handle->d_node, &dev->h_list); // dev的h_list指向handle裡的d_node
list_add_tail_rcu(&handle->h_node, &handler->h_list); // handler的h_list指向handle裡的h_node
cdev_init(&evdev->cdev, &evdev_fops); // 初始化字符設備
}
```
其中evdev_fops的結構如下
```c=
static const struct file_operations evdev_fops = {
.owner = THIS_MODULE,
.read = evdev_read,
.write = evdev_write,
.poll = evdev_poll,
.open = evdev_open,
.release = evdev_release,
.unlocked_ioctl = evdev_ioctl,
#ifdef CONFIG_COMPAT
.compat_ioctl = evdev_ioctl_compat,
#endif
.fasync = evdev_fasync,
.llseek = no_llseek,
};
```
## 4. APP使用read函數
最終會調用evdev_read
```c=
evdev_read
{
//若無數據且選擇非阻塞方式打開,則直接回覆錯誤
if (client->packet_head == client->tail && (file->f_flags & O_NONBLOCK))
return -EAGAIN;
//若無數據且沒有選擇非阻塞方式,則進入休眠
if (!(file->f_flags & O_NONBLOCK)) {
wait_event_interruptible(evdev->wait,
client->packet_head != client->tail ||
!evdev->exist || client->revoked);
}
}
```
## 5. 進入休眠,誰來喚醒?
```c=
evdev_events
evdev_pass_values
wake_up_interruptible(&evdev->wait);
```
## 6. evdev_events被誰調用?
猜測應由硬件input_dev的中斷接收到資料後再調用evdev_events,底下以gpio_keys.c為例
gpio_keys_gpio_isr
```c=
input_report_key(bdata->input, button->code, 1);
input_event(dev, EV_KEY, code, !!value);
```
gpio_keys_irq_isr
```c=
input_event(input, EV_KEY, *bdata->code, 1);
input_sync(input);
```
中斷處理函式為gpio_keys_gpio_isr或是gpio_keys_irq_isr,但皆會呼叫到input_event
```c=
void input_event(struct input_dev *dev, unsigned int type, unsigned int code, int value)
{
input_handle_event(dev, type, code, value);
}
```
進入input_handle_event
```c=
static void input_handle_event(struct input_dev *dev,
unsigned int type, unsigned int code, int value)
{
input_pass_values(dev, dev->vals, dev->num_vals);
}
```
進入input_pass_values
```c=
static void input_pass_values(struct input_dev *dev,
struct input_value *vals, unsigned int count)
{
handle = rcu_dereference(dev->grab);
if (handle) {
count = input_to_handler(handle, vals, count);
}
}
```
進入input_to_handler
```c=
static unsigned int input_to_handler(struct input_handle *handle,
struct input_value *vals, unsigned int count)
{
if (handler->events)
handler->events(handle, vals, count); //由此調用handler的events函數
}
```
# 應用層
架構圖如下

-----
經過上述分析初步瞭解linux輸入子系統的架構,接下來要學習
1. 怎麼寫符合输入子系统框架的驅動程序呢?
2. 應用層要如何使用輸入子系統得到輸入數據呢?