## 離線安裝docker
把檔案撈進來後先關掉網路離線安裝,避免虛擬網卡起來有問題,把以下轉到內網
1. [docker_package.zip](https://drive.google.com/file/d/1FU2GuyqDSWy3AxZCjzhlGeca2UqFY6UR/view?usp=drive_link)
2. [oracle_database_19.3.0-ee.tar.gz](https://drive.google.com/file/d/1VuZDNQ9sDsvnKFHc_3rDoC1Wo7w-t_sb/view?usp=drive_link)
### 1. Download Docker
```
yum-config-manager –add-repo https://download.docker.com/linux/centos/docker-ce.repo
```
[docker_package.zip](https://drive.google.com/file/d/1FU2GuyqDSWy3AxZCjzhlGeca2UqFY6UR/view?usp=drive_link)
```
yum install –downloadonly –downloaddir=./docker_package docker-ce
```
### 2. Install Docker
```
yum localinstall ./docker_package/*.rpm -y
```
### 3. 去掉BRIDGE網卡
```
mkdir -p /etc/docker
```
整段
```
cat <<EOF > /etc/docker/daemon.json
{
"bridge": "none"
}
EOF
```
### 4. Run Docker
```
systemctl start docker
systemctl enable docker
```
### 確認網卡
```
ip a | grep docker0
```
## 安裝 Oracle
```ebnf
su root
```
[oracle_database_19.3.0-ee.tar.gz](https://drive.google.com/file/d/1VuZDNQ9sDsvnKFHc_3rDoC1Wo7w-t_sb/view?usp=drive_link)
On the destination system, you can load this image using:
```
gunzip -c oracle_database_19.3.0-ee.tar.gz | docker load
```
After loading, verify the image is available with:
```
docker images | grep oracle/database
```
### 2. Run the Oracle 19c Docker Container
Fix permissions on the host, 54321 is the typical UID/GID for the oracle user in Oracle containers
```plain
sudo mkdir -p /opt/oracle/oradata
sudo chown -R 54321:54321 /opt/oracle/oradata
```
--------------
Run the Docker container using the following command:
```
docker run --name "oracle19.3" \
--network host \
-e ORACLE_PDB=orapdb1 \
-e ORACLE_PWD=topsecretpass \
-e ORACLE_MEM=4000 \
-v /opt/oracle/oradata:/opt/oracle/oradata \
-d oracle/database:19.3.0-ee
```
* `--name`: The name of the container.
* `ORACLE_PDB`: Name of the pluggable database.
* `ORACLE_PWD`: Database password.
* `ORACLE_MEM`: Memory allocated to the database (in MB).
* `-v`: Mounts the volume to persist data outside the container.
### 3. Verify the database is fully started:
初始化時間通常需要 15-30 分鐘,視系統性能而定。
```plain
docker logs oracle19.3 | grep -i "DATABASE IS READY"
```
確認container運行狀態
```vim
docker ps -al
```

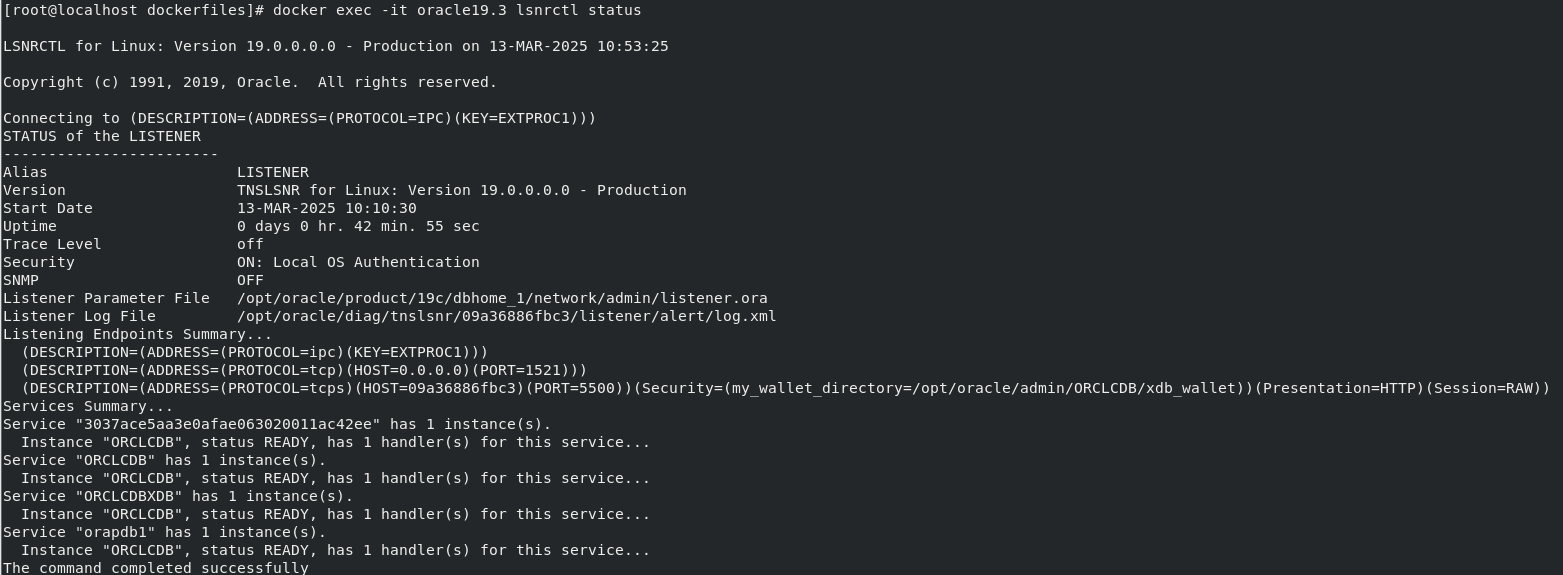
**Verify the listener is running** inside the container:
```sql
# 檢查監聽器狀態
docker exec -it oracle19.3 lsnrctl status
```
```sql
# 檢查可用服務
docker exec -it oracle19.3 lsnrctl services
```
這是**沒有**服務

這是**有**服務

如果服務沒有起來要改listener.ora設定,IP的部分記得要根據實際虛擬機異動
```bash
# First, check the current listener configuration
docker exec -it oracle19.3 bash -c "cat /opt/oracle/product/19c/dbhome_1/network/admin/listener.ora"
# Create a new listener.ora file with your actual IP address
docker exec -it oracle19.3 bash -c "echo 'LISTENER =
(DESCRIPTION_LIST =
(DESCRIPTION =
(ADDRESS = (PROTOCOL = IPC)(KEY = EXTPROC1))
(ADDRESS = (PROTOCOL = TCP)(HOST = 192.168.80.130)(PORT = 1521))
)
)' > /opt/oracle/product/19c/dbhome_1/network/admin/listener.ora"
# Restart the listener
docker exec -it oracle19.3 bash -c "source /home/oracle/.bashrc && lsnrctl stop && lsnrctl start"
```
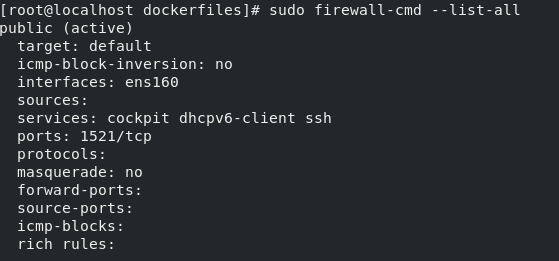
**Check firewall rules** in the VM:
```bash
sudo firewall-cmd --list-all
# Add port if needed
sudo firewall-cmd --permanent --add-port=1521/tcp
sudo firewall-cmd --reload
```
### 4. Connect to the Database
You can connect using **SQL Developer** or log into the container and use `sqlplus`:
```python
docker exec -it oracle19.3 /bin/bash
```
checks if any Oracle database instances are running on the system
```python
ps -ef | grep pmon
```
This command sources (runs) the oraenv script, which sets up the Oracle environment variables
```python
. oraenv
```
```python
sqlplus / as sysdba
```
If that doesn't work, let's try connecting with the complete connection string:
```plain
docker exec -it oracle19.3 sqlplus sys/topsecretpass@//localhost:1521/ORCLCDB as sysdba
```
### 5. create a user account under your PDB (orapdb1) with table creation privileges
1. **First, connect to the container database as SYSDBA**:
```bash
docker exec -it oracle19.3 sqlplus / as sysdba
```
If that doesn't work, let's try connecting with the complete connection string:
```awk
docker exec -it oracle19.3 sqlplus sys/topsecretpass@//localhost:1521/ORCLCDB as sysdba
```
2. **Switch to your pluggable database**:
```sql
ALTER SESSION SET CONTAINER = orapdb1;
```
3. **Create a new user with necessary privileges**:
```sql
-- Create the user with a password
CREATE USER myuser IDENTIFIED BY mypassword;
-- Grant connection privileges
GRANT CREATE SESSION TO myuser;
-- Grant table creation privileges
GRANT CREATE TABLE TO myuser;
-- Grant tablespace quota (required to create tables)
ALTER USER myuser QUOTA UNLIMITED ON USERS;
-- Optional: Grant additional privileges as needed
GRANT CREATE VIEW, CREATE PROCEDURE, CREATE SEQUENCE TO myuser;
```
4. **Verify the user was created**:
```sql
SELECT username, account_status FROM dba_users WHERE username = 'MYUSER';
```
5. **Exit SQL\*Plus**:
```sql
EXIT;
```
Now you can connect to this user in SQL Developer with:
* Username: myuser
* Password: mypassword
* Hostname: Your VM IP (192.168.80.128)
* Port: 1521
* Service name: orapdb1
The user will be able to create and manage their own tables within the pluggable database.
* * *
### Useful Docker Commands
Here are some commands to manage your Docker container:
* **Stop the container**:
```apache
docker container stop oracle19.3
```
* **Start the container**:
```sql
docker container start oracle19.3
```
* **List running containers**:
```powershell
docker ps
```
* **List all images**:
```ebnf
docker images
```
* **Delete an image**:
```powershell
docker image rm "image_id_here"
```
 Sign in with Wallet
Connect another wallet
Sign in with Wallet
Connect another wallet