---
tags: ironhack, lecture,
---
<style>
.markdown-body img[src$=".png"] {background-color:transparent;}
.alert-info.lecture,
.alert-success.lecture,
.alert-warning.lecture,
.alert-danger.lecture {
box-shadow:0 0 0 .5em rgba(64, 96, 85, 0.4); margin-top:20px;margin-bottom:20px;
position:relative;
ddisplay:none;
}
.alert-info.lecture:before,
.alert-success.lecture:before,
.alert-warning.lecture:before,
.alert-danger.lecture:before {
content:"👨🏫\A"; white-space:pre-line;
display:block;margin-bottom:.5em;
/*position:absolute; right:0; top:0;
margin:3px;margin-right:7px;*/
}
b {
--color:yellow;
font-weight:500;
background:var(--color); box-shadow:0 0 0 .35em var(--color),0 0 0 .35em;
}
.skip {
opacity:.4;
}
</style>

# Express | Dynamic Views
## Learning Goals
After this lesson you will be able to:
- Create `views` in Express.
- Understand what `dynamic templates` are and why we use them.
- Understand and use `HandlebarsJS` for creating dynamic templates.
- Use `if`, `with` and `each` block helpers.
## Introduction
ExpressJS can send text to the browser with just a few lines of code:
:::info lecture
La façon la plus simple pour Express de répondre à une requête est de renvoyer du texte, grâce à `response.send()` :
:::
```javascript
var express = require('express');
var app = express();
app.get('/', (request, response, next) => {
response.send('hello world');
});
app.listen(3000);
```
We can also send more complex HTML to the browser:
:::info
:bulb: We refer to the arguments in our route's callback as `request` and `response` as a demonstration.
These are represented commonly as `req` and `res` in the documentation, so we'll use that going forward.
:::
:::info lecture
Ainsi, nous pouvons tout aussi bien (toujours grâce à `.send`) retourner du html, multilignes :
:::
```javascript
app.get('/hello', (req, res, next) => {
res.send(`
<!doctype html>
<html>
<head>
<link rel="stylesheet" href="stylesheets/style.css">
</head>
<body>
This is my second route
</body>
</html>
`);
});
```
:::info lecture
☝️On abrègera à partir de maintenant en `req`, `res` les paramètres de la fonction de callback.
:::
This way would be tedious and complicated as our application grows. Can you imagine our `app.js` having thousands of lines? There must be a better way!
:::info lecture
Nous avons également vu dans le cours précédent que nous allons pouvoir renvoyer le contenu d'un fichier :
```javascript
res.sendFile(__dirname + '/views/index.html');
```
:::
In ExpressJS *-and most frameworks-* you can create files specifically for our HTML. This way, we can keep the HTML separated from the logic of our application.
These files will be called **views**, and once we learn how to use them, we can simply call `res.render` instead of `res.send` and send an HTML file to the browser:
:::info lecture
Nous allons en réalité davantage utiliser la méthode `res.render` dont le chemin d'accès aux fichiers sera paramétrable, par ex `views/` :
:::
```javascript
app.get('/', (req, res, next) => {
res.render('index.html');
});
```
## Dynamic Views
Views are templates for specifically HTML. HTML is what the client will see in their browser.
To start using views, we should create a folder inside of our project called `views` to group them. We will create our first view `index.hbs`:
:::info lecture
Nous allons donc réunir tous nos templates HTML dans un dossier `views/`.
:::
```
$ mkdir views
$ touch views/index.hbs
$ tree .
.
├── app.js
├── package.json
├── stylesheets
│ └── style.css
└── views
└── index.hbs
```
:::warning
:bulb: Notice we use a new extension **.hbs** instead of **.html**.
The advantage of separating views is that we separate the ExpressJS server logic (routes, server setup, server start, etc.) and the presentation (HTML), making our code more manageable and well structured.
:::
ExpressJS won't know by itself where we decided to group our views, but there is an easy fix. We can tell our Express app where to look for our views:
:::info lecture
**Configurons** maintenant Express afin qu'il sache où aller chercher nos template lorsque nous appèlerons (sans chemin) :
```javascript
res.render('index.html');
```
:::
```javascript
// creates an absolute path pointing to a folder called "views"
app.set('views', __dirname + '/views');
```
---
:::info lecture
Nous n'allons en réalité pas écrire nos templates en HTML pur, mais dans un **langage de templating appelé Handlebars**.
---
👉Handlebars nous permettra notamment d'imprimer des valeurs à l'intérieur du HTML (chose qui n'est directement pas possible en HTML pur) :
```htmlmixed
<div class="entry">
<h1>{{title}}</h1>
<p>
{{text}}
</p>
</div>
```
:::
In Express, instead of using plain HTML, we can use a fancier version of HTML: **`hbs`**, or **[Handlebars](http://handlebarsjs.com/)**.
We'll get into more detail shortly about **HBS**, but for now, make sure you install it in our app:
:::info lecture
Handlebars etant un logiciel opensource, nous allons devoir l'installer avec `npm` :
:::
```
$ npm install hbs
```
... And tell our Express app that **HBS** will be in charge of rendering the HTML:
:::info lecture
Mais également définir Handlebars comme notre moteur de templates pour Express :
:::
```javascript
app.set('views', __dirname + '/views');
app.set('view engine', 'hbs'); // 👈
```
:::info lecture
L'extension des fichiers Handlebars est `hbs`. Créons notre fichier `views/index.hbs` :
:::
Open the `views/index.hbs` file and add some content:
```htmlmixed
<!DOCTYPE html>
<html lang="en">
<head>
<meta charset="utf-8">
<title>My first view</title>
<link rel="stylesheet" href="stylesheets/style.css">
</head>
<body>
<h1>Ironhacker Be Like</h1>
<img src="https://media.giphy.com/media/l0MYEqEzwMWFCg8rm/giphy.gif">
</body>
</html>
```
Finally, instead of `res.send()`. we have to tell Express to send and render our `index` view to the client:
:::info lecture
Rendons notre template sur la route `/`:
:::
```javascript
app.get('/', (req, res, next) => {
// send views/index.hbs for displaying in the browser
res.render('index');
});
```
When we visit `localhost:3000`, we'll see our HTML rendered!
**Time to Practice**
:::info lecture
<span style="font-size:500%">🏋🏽♀️</span>
:::
Create a new route called `about`:
- It should render a separate view also called `about.hbs`
- Create an `h1` with your name
- Add a giphy image that you like
## Handlebars

:::info lecture
```{{Moustache}}```
:::
As we saw in the previous example, our file had a `.hbs` extension. This extension stands for *Handlebars*. [**Handlebars.js**](http://handlebarsjs.com/) is a sweet javascript library for building clean logicless templates based on the **[Mustache Templating Language](https://mustache.github.io/)**.
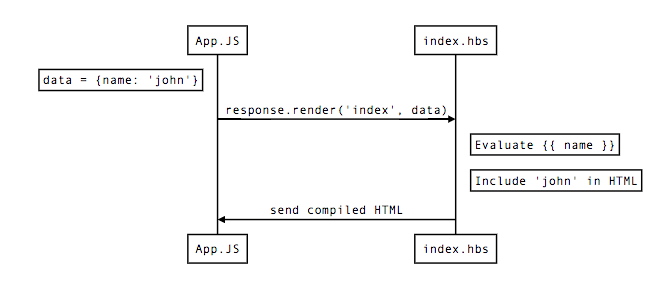
One of the essential features of using **Handlebars** is that we can make templates dynamic by sending information to them and using that data to render our web app.
The `res.render()` method can take an additional parameter that will contain a JavaScript object with information we can use in the view.
Let's look at an example:
:::info lecture
La partie intéressante de `res.render` est que nous pouvons en 2e paramètre passer à la vue des données à intégrer dans le rendu du template : cf. L9
:::
```javascript=
// app.js
app.get('/', (req, res, next) => {
let data = {
name: "Ironhacker",
bootcamp: "IronHack WebDev"
};
res.render('index', data);
});
```
:::info lecture
Nous pouvons ensuite dans le template `index.hbs` consommer ces datas grâce à la notation moustache : cf. L8
:::
```htmlmixed=
<!DOCTYPE html>
<html lang="en">
<head>
<meta charset="utf-8">
<title>Home</title>
</head>
<body>
<h1>Hello {{name}}!</h1>
<p>Welcome to the {{bootcamp}}!!</p>
</body>
</html>
```
Any key passed in the object will be available in the view, with a variable of the same name.
**`{{ variableName }}`** signifies that a variable will be output to the HTML we send to the client
Templates are mostly HTML, but `HBS` will analyze them and execute JavaScript before it renders the final HTML and sends it to the browser:
## Handlebars - Escaping HTML
:::info lecture
Une chose à noter est qu'Handlebars par défaut *échappe* le HTML :
:::
By default Handlebars escapes HTML values included in a expression with the `{{ }}`. That means if we send data like this:
```javascript
app.get('/', (req, res, next) => {
let data = {
name: "Ironhacker",
bootcamp: "<span>IronHack WebDev</span>"
};
res.render('index', data);
});
```
And then print it on our `HBS` file:
```htmlmixed
<!DOCTYPE html>
<html lang="en">
<head>
<meta charset="utf-8">
<title>Home</title>
</head>
<body>
<h1>Hello {{name}}!</h1>
<p>Welcome to the {{bootcamp}}!!</p>
</body>
</html>
```
We will see the following:

:::info lecture
Si nous voulons empêcher Handlebars d'échapper le HTML, nous devons utilser les triple-moustaches : ```{{{bootcamp}}}```
:::
If we don't want Handlebars to escape a value, we should use the triple-stash: **`{{{ }}}`**.
```htmlmixed
<!DOCTYPE html>
<html lang="en">
<head>
<meta charset="utf-8">
<title>Home</title>
</head>
<body>
<h1>Hello {{name}}!</h1>
<p>Welcome to the {{{bootcamp}}}!!</p>
</body>
</html>
```

## Built-In Helpers
Besides the dynamic template feature, Handlebars give us some great helpers to make our life easier when coding our web! :wink:
:::info lecture
Handlebars va nous permettre également d'implémenter un peu de logique dans nos templates :
- si le user est connecté, alors on affiche...
:::
### The `if` block helper
:::info lecture
Pour conditionner l'affichage de certains éléments/blocks de nos pages, nous disposons du helper `{{#if cond}}` :
:::
You can use the `if` helper to render a block conditionally. That means, if its argument returns <b>`false`, `undefined`, `null`, `""`, `0`, or `[]`</b>, **Handlebars** will not render the block.
:::info lecture
Par ex, n'afficher un élément h2 que si `lastName` a été passé dans les datas du `res.render` :
:::
```javascript
app.get('/', (req, res, next) => {
let data = {
name: "Ironhacker",
};
res.render('index', data);
});
```
```htmlmixed
<h1>Hello {{name}}!</h1>
{{#if lastName}}
<h2>This won't be displayed!!</h2>
{{/if}}
```
Since `lastName` is `undefined`, our `<h2>` tag will not be displayed! Now, let's add the `lastName` property to the data!
```javascript
app.get('/', (req, res, next) => {
let data = {
name: "Ironhacker",
lastName: "Rocking it!"
};
res.render('index', data);
});
```
```htmlmixed
<h1>Hello {{name}} {{lastName}}!</h1>
{{#if lastName}}
<h2>This will be displayed!!</h2>
{{/if}}
```
:::info lecture
`{{else}}`
:::
We can also add an `else` statement, which makes this even more powerful!
```htmlmixed
<h1>Hello {{name}} {{lastName}}!</h1>
{{#if address}}
<h2>This won't be displayed!!</h2>
{{else}}
<h2>This will be displayed because the "address" property does not exists!!</h2>
{{/if}}
```
### The `unless` block helper
:::info lecture
`{{#unless}}` est l'opposé d'un if
:::
You can use the `unless` helper as the inverse of the `if` helper. It will render the block if the expression returns a **falsy value**.
```htmlmixed
<h1>Hello {{name}} {{lastName}}!</h1>
{{#unless address}}
<h3>WARNING: We can't find the address!</h3>
{{/unless}}
```
:::info
If looking up `address`` under the current context returns a **falsy value**, Handlebars will render the warning. Otherwise, it will render nothing. In our example, it will render the WARNING.
:::
If we add the `address` property, then the warning should disappear!
```javascript
app.get('/', (req, res, next) => {
let data = {
name: "Ironhacker",
lastName: "Rocking it!",
address: "Your heart"
};
res.render('index', data);
});
```
### The `each` block helper
:::info lecture
`{{#each}}` pour boucler sur un tableau de datas
:::
The `each` block helps us to iterate over a list of elements, mainly `objects` and `array`. Imagine printing the list of cities where Ironhack has a campus. We can do something like this:
```htmlmixed
<ul>
<li>Miami</li>
<li>Madrid</li>
<li>Barcelona</li>
<li>Paris</li>
<li>México</li>
<li>Berlín</li>
</ul>
```
We are repeating the same `<li>` tag six times, only changing the content inside the tags. Using the `each` block, we can do the following:
First, we need to pass the data to our view:
:::info lecture
Par ex ici les villes :
:::
```javascript
app.get('/', (req, res, next) => {
let data = {
name: "Ironhacker",
lastName: "Rocking it!",
address: "Your heart",
cities: ["Miami", "Madrid", "Barcelona", "Paris", "México", "Berlín"]
};
res.render('index', data);
});
```
Once we have the data on our `index.hbs` file:
```htmlmixed
<ul>
{{#each cities}}
<li>{{this}}</li>
{{/each}}
</ul>
```
:::info lecture
`{{this}}` à l'intérieur d'un `{{#each}}` représentera l'élément courant de la boucle
:::
:::info
:bulb: Inside the block, you can use `this` to reference the element we are iterating.
:::
You can optionally provide an `{{else}}` section which will display only when the list is empty.
```htmlmixed
<ul>
{{#each cities}}
<li>{{this}}</li>
{{else}}
<p>No cities yet!</p>
{{/each}}
</ul>
```
#### `@index`
:::info lecture
`{{@index}}`
:::
When looping through items in `each`, you can optionally reference the current loop **index** via `{{@index}}`
```htmlmixed
<ul>
{{#each cities}}
<li>{{@index}}: {{this}}</li>
{{/each}}
</ul>
```
#### `@key`
:::info lecture
`{{#each}}` permettra également d'itérer sur un objet.
- On pourra accéder à chacune des clés grâce à `{{@key}}`.
- `{{this}}` fera lui référence à la valeur
:::
Additionally for `object` iteration, `{{@key}}` references the current key name:
```htmlmixed
{{#each object}}
{{@key}}: {{this}}
{{/each}}
```
#### `@first` - `@last`
:::info lecture
`{{@first}}` et `{{@last}}` au sein d'un `{{#each}}` :
:::
The first and last steps of iteration are noted via the `@first` and `@last` variables when iterating over an array.
```htmlmixed
<ul>
{{#each cities}}
{{#if @first}}
<li><b>{{this}}</b></li>
{{else if @last}}
<li><i>{{this}}</i></li>
{{else}}
<li>{{this}}</li>
{{/if}}
{{/each}}
</ul>
```
:::info
It is important to notice that the `@first` and `@last` helpers return a boolean! When iterating over an object, only the @first is available.
:::
### The `with` block helper
Commonly, Handlebars evaluates its templates against the context passed into the compiled method. We can shift that context to a section of a template by using the built-in `with` block helper.
For example, passing the following data:
:::info lecture
`{{#with address}}` permettra de raccourcir `{{address.street}}` en `{{street}}`
:::
```javascript
app.get('/', (req, res, next) => {
let data = {
name: "Ironhacker",
lastName: "Rocking it!",
address: {
street: "Your heart",
number: 87
},
cities: ["Miami", "Madrid", "Barcelona", "Paris", "México", "Berlín"]
};
res.render('index', data);
});
```
We can do this:
```htmlmixed
<h1>Hello {{name}} {{lastName}}!</h1>
{{#with address}}
<p>{{street}}, {{number}}</p>
{{/with}}
```
:::info
Using the `with` helper, we shift the context inside it, so we can refeer to `{{address.street}}` and `{{address.number}}`, as `{{street}}` and `{{number}}`.
:::
## Summary
In this lesson, we talked a bit about templating with `hbs`.
Ideally, you want to have as little logic as possible in your views (more on this later), but using `loops` and the occasional `if` statement allows you to harness the real power of using a backend framework.
## Extra Resources
- [HandlebarsJS documentation](http://handlebarsjs.com/)