---
tags: ironhack, lecture,
---
<style>
.markdown-body img[src$=".png"] {background-color:transparent;}
.alert-info.lecture,
.alert-success.lecture,
.alert-warning.lecture,
.alert-danger.lecture {
box-shadow:0 0 0 .5em rgba(64, 96, 85, 0.4); margin-top:20px;margin-bottom:20px;
position:relative;
ddisplay:none;
}
.alert-info.lecture:before,
.alert-success.lecture:before,
.alert-warning.lecture:before,
.alert-danger.lecture:before {
content:"👨🏫\A"; white-space:pre-line;
display:block;margin-bottom:.5em;
/*position:absolute; right:0; top:0;
margin:3px;margin-right:7px;*/
}
b {
--color:yellow;
font-weight:500;
background:var(--color); box-shadow:0 0 0 .35em var(--color),0 0 0 .35em;
}
.skip {
opacity:.4;
}
</style>

# Express Generator
## Learning Goal
After this lesson you will be able to:
- Understand what generators are and why they help us
- Install & use the `ironhack_generator`
- Run a `seeds.js` file to fill your database before starting a project
## Introduction
:::info lecture
Pour chaque projet, nous utilisons la même base :
- Express
- Handlebars
- Mongoose
- un dossier `public/`
- un dossier `views/`
- un dossier `models/`
- un fichier `app.js`
- ...
:::
During this module, we learned how to build our backend using **NodeJS** with **Express**, how to store our data in a **Mongo** database, how to use **Mongoose** (Object Document Mapper (ODM)) and render the views with **handlebars**. Combining all these, we are ready to close the circle and create **full-stack web applications**.
:::info lecture
Plutôt que de re-créer manuellement tout cela à chaque nouveau projet, nous vous proposons d'utiliser un outil qu'Ironhack met à votre disposition : [IronGenerator](https://www.npmjs.com/package/ironhack_generator) !
:::
But, sometimes layering all these parts takes to much time, and doing everything "manually" when starting each project can be overwhelming and such repetitive work. And we as developers don't like to spend time on the things that we need to repeat all over again, right? :wink" That's why we will start using the application generator tool, **[IronGenerator](https://www.npmjs.com/package/ironhack_generator)**, which will help us to quickly create an application skeleton.
## Generators
:::info lecture
Présentation du rôle d'un générateur...
:::
A generator is a **program that helps to create other application programs which can run on a particular platform**. As we said, when building new applications, we repeat a lot of the work over and over, especially when setting up the environment so these programs help us generating a basic application layout and saving us a lot of time.
### Irongenerator
:::info lecture
Présentation des features :
:::
The `ironhack_generator` is Ironhack's NPM package, so it can be installed globally, and run it from the command-line in an easy way. On this learning unit, we will explain how to use **ironhack_generator** in order to create express projects quickly.
The `ironhack_generator` is strongly opinionated:
- Follows industry best practices
- Predefined directory structure:
- public: Public Assets folder (css, js, images)
- models: Mongoose Schemas and models
- routes: Project routes
- views: Project views and layouts
- **Views Template**: Handlebars
- **CSS Engine**: SCSS - Node-sass-middleware
- **ODM**: Mongoose
- Comes pre-populated with popular, useful Express middlewares
- **Logger**: morgan
- **Favicon**: serve-favicon
- **HTTP POST Params**: body-parser
- **Cookies**: cookie-parser
- **Error handling**: 404 (Not found), 500 (Internal Server Error)
- Creates project .gitignore - removes node_modules, etc.
- **Environment variables** loaded from .env configuration file
- **Server monitoring**: nodemon
## Install the IronGenerator
You need to install `ironhack_generator` as a global NPM package so you can run it from anywhere on your computer. This installation is pretty straightforward, and you should be familiarized with this process:
:::info lecture
On install `ironhack_generator` de manière globale :
:::
```shell
$ npm install -g ironhack_generator
```
### Quick Start
The quickest way to get started with express is to utilize the executable `irongenerate` which will generate an application as shown below:
```shell
$ irongenerate name-of-the-project
```
So let's now start using this command and let's create our first "irongenerated" project 🥁
We will name our project *library-project*, so we will run the following line:
:::info lecture
Initialisons un projet exemple, `library-project` :
:::
```shell
$ irongenerate library-project
```
If everything went ok, we should see the following on our terminal:
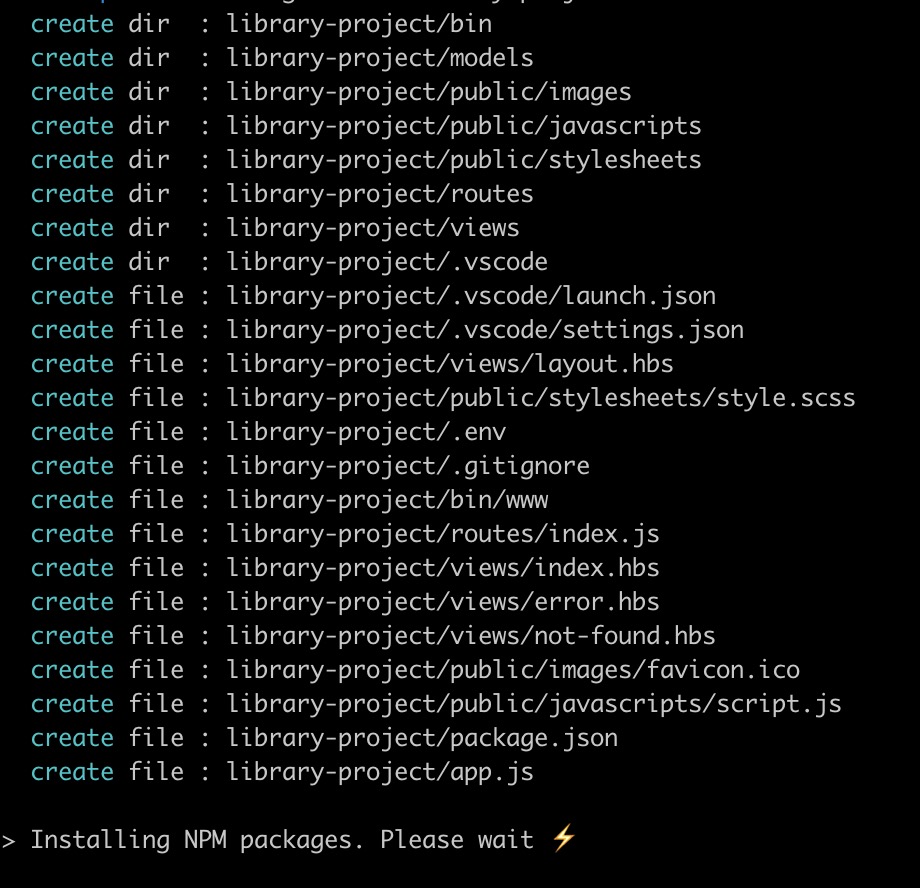
The image above shows the folder structure the generator just created. After navigating to the project we just created, we can run our application.
```shell
$ cd library-project
```
For `dev` (development) mode (using `nodemon`), we should run the following command:
:::info lecture
Démarrage du serveur (mode dev) :
:::
```shell
$ npm run dev
```
This is the command we will keep using and later on, when we start deploying our projects, we will want to run it in `prod` (production) mode, and then we can use this command:
:::info lecture
Démarrage du serveur (mode prod) :
:::
```shell
$ npm start
```
If we navigate to `http://localhost:3000` we should see the following:

### Folder Structure
The generator creates the following directory structure:
:::info lecture
Examinons la structure des fichiers/dossiers :
:::
```
library-project/
├── bin
│ ├── www
├── models
├── node_modules
├── public
│ ├── images
│ ├── javascripts
│ │ └── script.js
│ └── stylesheets
│ └── styles.scss
├── routes
│ └── index.js
├── views
│ ├── error.hbs
│ ├── index.hbs
│ ├── layout.hbs
│ └── not-found.hbs
├── .env
├── .gitignore
├── app.js
├── package-lock.json
└── package.json
```
- **bin**
- *www* - contains our server configuration. Which `port` we will be using and **error** handlers in case we cannot start the server.
- **app.js** - has our application's main configuration, like a database connection and everything we need to set to Express (static files, routes).
- **package.json** - has every dependency we will need.
- **models** - the folder where you will add Mongoose models files.
- **routes**
- *index.js* - the route configuration, by default, is set for the `/` route.
- **views** - the folder containing all the default views. All of them using **handlebars**
- *error.hbs* - the view that will be rendered in case we have an `error` on the server.
- *index.hbs* - the view that will be rendered when navigating to the root.
- *layout.hbs* - a layout file created by default.
- **public** - a folder to store all our static files. In the `app.js` the basic set up is already done for us and it points all static files in and from *public* folder. It has the following structure:
- *images*
- *javascripts*
- script.js
- *stylesheets*
- styles.sass
### Restructuring our applications
It is essential to notice that now we have our **routes** and **models** in different files. When we learned about them, in the previous lessons, we added them all to our main file. That kind of made sense at that moment since all the applications we created were really small. When creating bigger applications is much better to separate these files in different folders, so we have a better-structured project.
Although we will be using the structure provided by *ironhack_generator* we want you to keep in mind the following:
:::info
The app structure created by the generator is just one of many ways to structure Express apps.
:::
#### Routes
:::info lecture
De la même façon que nous avons un dossier `models/` dédié, nous avons maintenant un dossier `routes` afin de ne pas les écrire directement dans `app.js`.
:::
Inside our **routes** folder we have the `index.js` file, where we can add our routes. But also, we can create multiple routes files and split them meaningfully.
:::warning
All the routes files always need to be connected to the *app.js*. You can see it here for `index.js`, and all the other routes files need to follow the same pattern:
```javascript
// routes/index.js
const express = require('express');
const router = express.Router();
//
// Our routes :
//
router.get('/', ...);
module.exports = router;
```
```javascript
// app.js
const index = require('./routes/index.js');
app.use('/', index);
```
:::
### Command Line Options
We can also further configure the `ironhack_generator` with the following command line flags:
-h, --help output usage information
--version output the version number
-c, --css <engine> add stylesheet <engine> support (plain|less|sass|scss) (defaults to scss)
-f, --force force on non-empty directory
## Creating your first app
Okay, so we created our first express app using irongenerator (**library-project**) and now we have to start adding the pieces and integrating them into our app.
:::info
We will be using this same project on the following learning units!
:::
### Adding the model
Every library has books - ours will have too 📚 So the first thing to do is to create a blueprint for each book we will save in the database. We want all the books in the DB to have: *title*, *description*, *author*, *rating*. This blueprint is a **model** so let's create a file inside models folder - **models/book.js** and let's add the following code:
:::info lecture
Tout bien rangé dans `models/`, notre modèle de livre (avec son schéma) :
:::
```javascript
// models/book.js
const mongoose = require("mongoose");
const Schema = mongoose.Schema;
const bookSchema = new Schema({
title: String,
description: String,
author: String,
rating: Number
}, {
timestamps: {
createdAt: "created_at",
updatedAt: "updated_at"
}
});
const Book = mongoose.model("Book", bookSchema);
module.exports = Book;
```
:::info lecture
NB : `timestamps`
:::
### Creating a seed file
Since we are building this project from scratch, our database is empty. We can import some data through **seeds.js** file, so let's do it.
Go ahead and create a `seeds.js` file inside the `bin` folder, and paste the following code:
:::info lecture
Notre modèle de livre en place, nous allons vouloir mettre en place des données exemples dans notre DB, grâce à `bin/seeds.js` :
:::
```javascript
// bin/seeds.js
const mongoose = require('mongoose');
const Book = require('../models/book'); // we call our Book model from here
const dbName = 'library-project';
mongoose.connect(`mongodb://localhost/${dbName}`);
// the datas:
const books = [
{
title: "The Hunger Games",
description: "Lorem ipsum dolor sit amet, consectetur adipiscing elit, sed do eiusmod tempor incididunt ut labore et dolore magna aliqua. Ut enim ad minim veniam, quis nostrud exercitation ullamco laboris nisi ut aliquip ex ea commodo consequat. Duis aute irure dolor in reprehenderit in voluptate velit esse cillum dolore eu fugiat nulla pariatur. Excepteur sint occaecat cupidatat non proident, sunt in culpa qui officia deserunt mollit anim id est laborum.",
author: "Suzanne Collins",
rating: 10
},
{
title: "Harry Potter",
description: "Lorem ipsum dolor sit amet, consectetur adipiscing elit, sed do eiusmod tempor incididunt ut labore et dolore magna aliqua. Ut enim ad minim veniam, quis nostrud exercitation ullamco laboris nisi ut aliquip ex ea commodo consequat. Duis aute irure dolor in reprehenderit in voluptate velit esse cillum dolore eu fugiat nulla pariatur. Excepteur sint occaecat cupidatat non proident, sunt in culpa qui officia deserunt mollit anim id est laborum.",
author: "J.K. Rowling ",
rating: 9
},
{
title: "To Kill a Mockingbird ",
description: "Lorem ipsum dolor sit amet, consectetur adipiscing elit, sed do eiusmod tempor incididunt ut labore et dolore magna aliqua. Ut enim ad minim veniam, quis nostrud exercitation ullamco laboris nisi ut aliquip ex ea commodo consequat. Duis aute irure dolor in reprehenderit in voluptate velit esse cillum dolore eu fugiat nulla pariatur. Excepteur sint occaecat cupidatat non proident, sunt in culpa qui officia deserunt mollit anim id est laborum.",
author: "Harper Lee",
rating: 8
},
{
title: "Pride and Prejudice ",
description: "Lorem ipsum dolor sit amet, consectetur adipiscing elit, sed do eiusmod tempor incididunt ut labore et dolore magna aliqua. Ut enim ad minim veniam, quis nostrud exercitation ullamco laboris nisi ut aliquip ex ea commodo consequat. Duis aute irure dolor in reprehenderit in voluptate velit esse cillum dolore eu fugiat nulla pariatur. Excepteur sint occaecat cupidatat non proident, sunt in culpa qui officia deserunt mollit anim id est laborum.",
author: "Jane Austen",
rating: 9
},
{
title: "Twilight",
description: "Lorem ipsum dolor sit amet, consectetur adipiscing elit, sed do eiusmod tempor incididunt ut labore et dolore magna aliqua. Ut enim ad minim veniam, quis nostrud exercitation ullamco laboris nisi ut aliquip ex ea commodo consequat. Duis aute irure dolor in reprehenderit in voluptate velit esse cillum dolore eu fugiat nulla pariatur. Excepteur sint occaecat cupidatat non proident, sunt in culpa qui officia deserunt mollit anim id est laborum.",
author: "Stephenie Meyer ",
rating: 10
},
{
title: "The Book Thief ",
description: "Lorem ipsum dolor sit amet, consectetur adipiscing elit, sed do eiusmod tempor incididunt ut labore et dolore magna aliqua. Ut enim ad minim veniam, quis nostrud exercitation ullamco laboris nisi ut aliquip ex ea commodo consequat. Duis aute irure dolor in reprehenderit in voluptate velit esse cillum dolore eu fugiat nulla pariatur. Excepteur sint occaecat cupidatat non proident, sunt in culpa qui officia deserunt mollit anim id est laborum.",
author: "Markus Zusak",
rating: 7
},
{
title: "The Chronicles of Narnia",
description: "Lorem ipsum dolor sit amet, consectetur adipiscing elit, sed do eiusmod tempor incididunt ut labore et dolore magna aliqua. Ut enim ad minim veniam, quis nostrud exercitation ullamco laboris nisi ut aliquip ex ea commodo consequat. Duis aute irure dolor in reprehenderit in voluptate velit esse cillum dolore eu fugiat nulla pariatur. Excepteur sint occaecat cupidatat non proident, sunt in culpa qui officia deserunt mollit anim id est laborum.",
author: "C.S. Lewis",
rating: 8
},
{
title: "Animal Farm",
description: "Lorem ipsum dolor sit amet, consectetur adipiscing elit, sed do eiusmod tempor incididunt ut labore et dolore magna aliqua. Ut enim ad minim veniam, quis nostrud exercitation ullamco laboris nisi ut aliquip ex ea commodo consequat. Duis aute irure dolor in reprehenderit in voluptate velit esse cillum dolore eu fugiat nulla pariatur. Excepteur sint occaecat cupidatat non proident, sunt in culpa qui officia deserunt mollit anim id est laborum.",
author: "George Orwell",
rating: 9
},
{
title: "Gone with the Wind ",
description: "Lorem ipsum dolor sit amet, consectetur adipiscing elit, sed do eiusmod tempor incididunt ut labore et dolore magna aliqua. Ut enim ad minim veniam, quis nostrud exercitation ullamco laboris nisi ut aliquip ex ea commodo consequat. Duis aute irure dolor in reprehenderit in voluptate velit esse cillum dolore eu fugiat nulla pariatur. Excepteur sint occaecat cupidatat non proident, sunt in culpa qui officia deserunt mollit anim id est laborum.",
author: "Margaret Mitchell",
rating: 10
},
{
title: "The Fault in Our Stars ",
description: "Lorem ipsum dolor sit amet, consectetur adipiscing elit, sed do eiusmod tempor incididunt ut labore et dolore magna aliqua. Ut enim ad minim veniam, quis nostrud exercitation ullamco laboris nisi ut aliquip ex ea commodo consequat. Duis aute irure dolor in reprehenderit in voluptate velit esse cillum dolore eu fugiat nulla pariatur. Excepteur sint occaecat cupidatat non proident, sunt in culpa qui officia deserunt mollit anim id est laborum.",
author: "John Green",
rating: 8
}
]
//
// Create all the books
//
Book.create(books, (err) => {
if (err) { throw(err) }
console.log(`Created ${books.length} books`);
// Once created, close the DB connection
mongoose.connection.close();
});
```
And then run the following code:
:::info lecture
Exécutons-le finalement :
:::
```bash
$ node bin/seeds.js
```
Running the `seeds.js`, we are connecting to our database, creating new **books** collection based on our `Book` model and then closing our connection to the database.
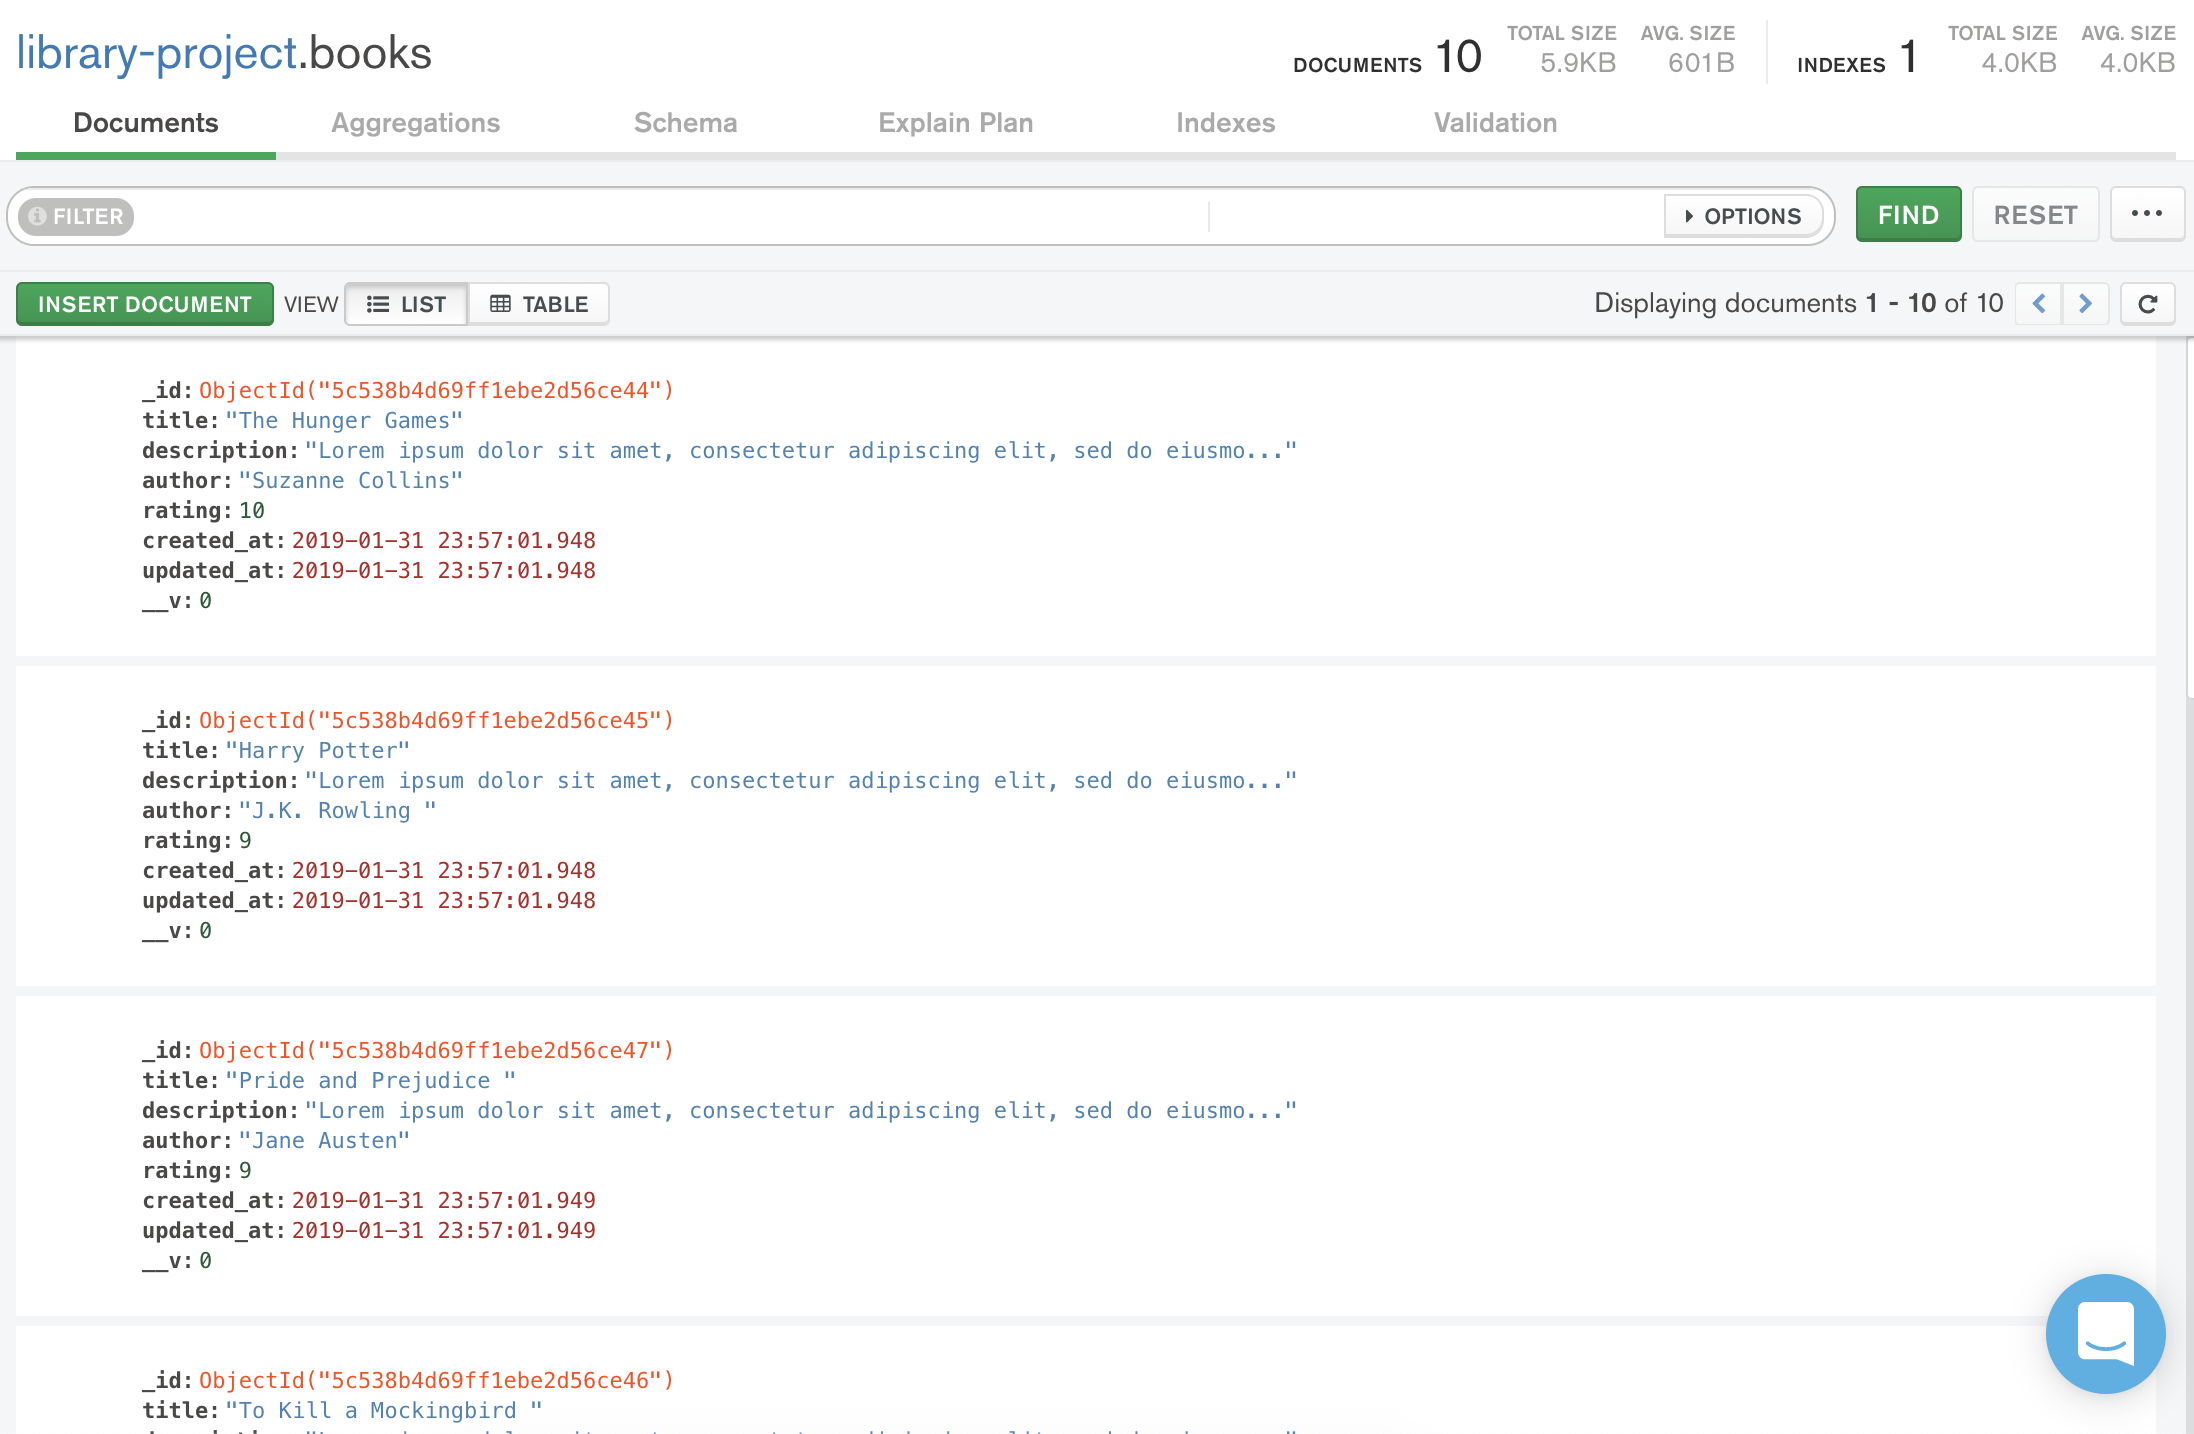
If now we go to MongoDB Compass, we will be able to see our `library-project` database and the `books` collection with ten documents inside it.
## Summary
In this lesson, we learned how to install and use the `ironhack_generator` npm package. This tool will save us a lot of time when creating a new app, especially to configure all the essential environment settings.
We also made the first step into the integration of all the concept we saw during the second module, mixing **Express**, **MongoDB** and **Mongoose**.
## Extra Resources
- [Express Application Generator](https://expressjs.com/en/starter/generator.html)
 Sign in with Wallet
Connect another wallet
Sign in with Wallet
Connect another wallet