---
tags: ironhack, lecture,
---
<style>
.markdown-body img[src$=".png"] {background-color:transparent;}
.alert-info.lecture,
.alert-success.lecture,
.alert-warning.lecture,
.alert-danger.lecture {
box-shadow:0 0 0 .5em rgba(64, 96, 85, 0.4); margin-top:20px;margin-bottom:20px;
position:relative;
ddisplay:none;
}
.alert-info.lecture:before,
.alert-success.lecture:before,
.alert-warning.lecture:before,
.alert-danger.lecture:before {
content:"👨🏫\A"; white-space:pre-line;
display:block;margin-bottom:.5em;
/*position:absolute; right:0; top:0;
margin:3px;margin-right:7px;*/
}
b {
--color:yellow;
font-weight:500;
background:var(--color); box-shadow:0 0 0 .35em var(--color),0 0 0 .35em;
}
.skip {
opacity:.4;
}
</style>

# Passport | Strategies and Social Login
## Learning Goals
*After this lesson, you will be able to:*
- Understand what OAuth is and how it works
- Understand why social login has increased its importance nowadays
- Authorize the users in our application through Slack login
- Authorize the users in our application through Google Account login
## Introduction
:::info lecture
Passeport en place, nous allons pouvoir tirer parti des autres stratégies d'authentification qu'il propose... 🙌
:::
In the previous lesson, we have seen that [Passport](http://passportjs.org/) is a flexible and modular authentication middleware for Node.js, and we have seen how to configure a project with basic authorization.
Now we are going to focus on the modularity and the different strategies we can follow to allow users access to our site. We are going to see what OAuth is and how to configure Passport to work with it. Finally, we are going to describe social login strategies and we configure one of the different options we have.
We will be working on the same project we used in the previous lesson. So open it in your code editor, and let's start working!
## OAuth
:::info lecture
OAuth est un standard d'authentification qui permet d'obtenir pour un accès utilisateur en utilisant un autre service : **par ex, un utilisateur pourra s'authentifier via son compte Facebook**.
:::
Before we start working, it's important to understand what OAuth is. In modern web applications, authentication can take a variety of forms. We have seen the most traditional way to log in, by providing username and password.
With the appearance of social networking, single sign-on using an OAuth provider (such as Facebook, Slack, or Twitter) has become a popular authentication method.
[OAuth](https://en.wikipedia.org/wiki/OAuth) is an open standard for authorization commonly used as a way for social network users to authorize external websites to access their information, without giving them the passwords.
OAuth provides the users a secure way to access external websites without creating a user account on it, so they can log into our apps with their social network accounts.
Passport offers 300+ authentication mechanisms, known as strategies, that allow integrating our web application with different external services such as Facebook, Twitter, GitHub, Gmail, Instagram, etc.
:::info lecture
Passeport propose plus de 500 intégrations : http://www.passportjs.org/packages/
:::
Social login consists of using your social network profile to authenticate yourself in external websites.
## Social Login
We will work on two different social login configurations: Slack and Google accounts. The first is the one of the most popular chat apps in the world, while the second is one of the most used accounts for email.
:::info lecture
Reprenons notre projet [`localpassport`](https://drive.google.com/file/d/1xGVQbUDpTRGUp9YCfLifUWV_Y8-pQ5Kd/view?usp=sharing) du cours précédent et tentons d'y ajouter 2 authentification tierces : Slack et Google...
:::
### User model
We are going to need two new fields in our `User` model for users who log in with social networks.
:::info lecture
On n'enlève rien à notre user qui conserve bien son `username` et `password` : c'est la base !
:::
:::info lecture
On va par contre, ajouter 2 champs : `slackID` et `googleID` pour enregistrer ses 2 comptes s'il utilise le social login.
:::
```javascript
// models/user.js
const mongoose = require("mongoose");
const Schema = mongoose.Schema;
const userSchema = new Schema(
{
username: String,
password: String,
slackID: String, // 👈
googleID: String // 👈
},
{
timestamps: true
}
);
const User = mongoose.model("User", userSchema);
module.exports = User;
```
### Slack

We are going to create the authentication with [Slack](http://passportjs.org/docs/slack) as a provider. Support for Slack is implemented by [`passport-slack`](https://github.com/mjpearson/passport-slack#readme) module.
:::info lecture
Commençons par Slack !
:::
#### Slack app
:::info lecture
Avant toute chose, nous allons devoir **enregistrer notre application** auprès de Slack.
But du jeu, obtenir :
- un client ID
- un client Secret
afin que Slack puisse identifier notre application.
:::
The first thing we have to do is to create an app at [Slack Developers](https://api.slack.com/). Once we create this account, Slack will provide us the keys, that we will configure in our middleware.
- To create a new Slack app, we have to visit the [Slack API](https://api.slack.com/apps) page and click on the `Create an app` button.
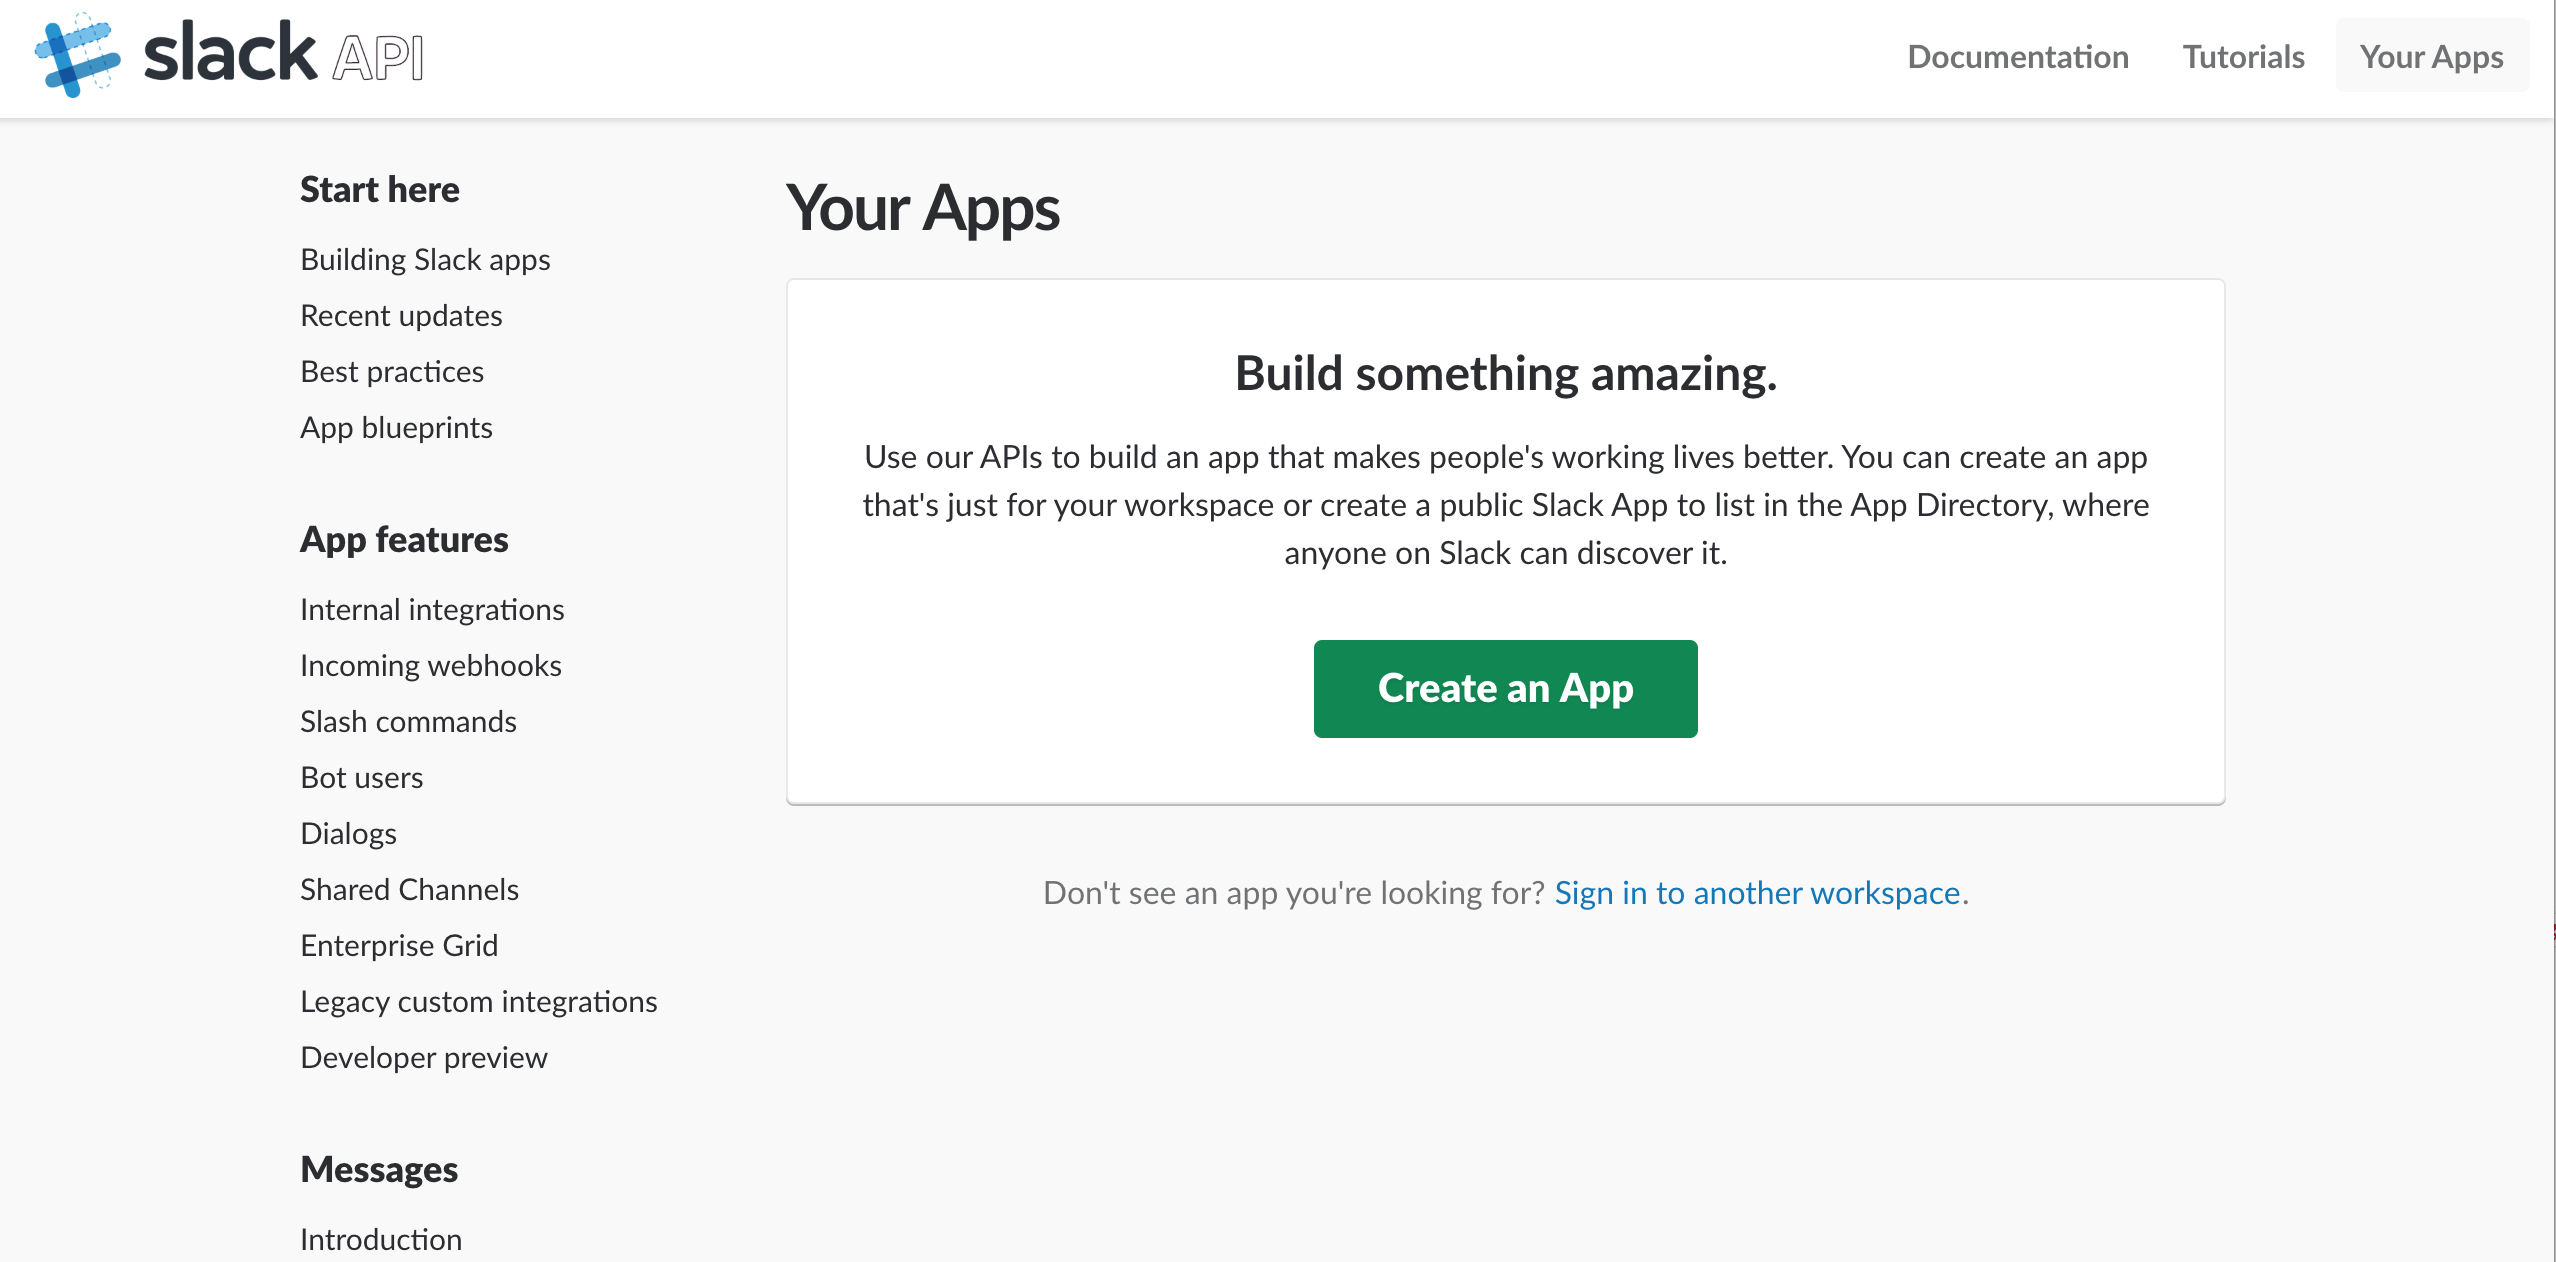
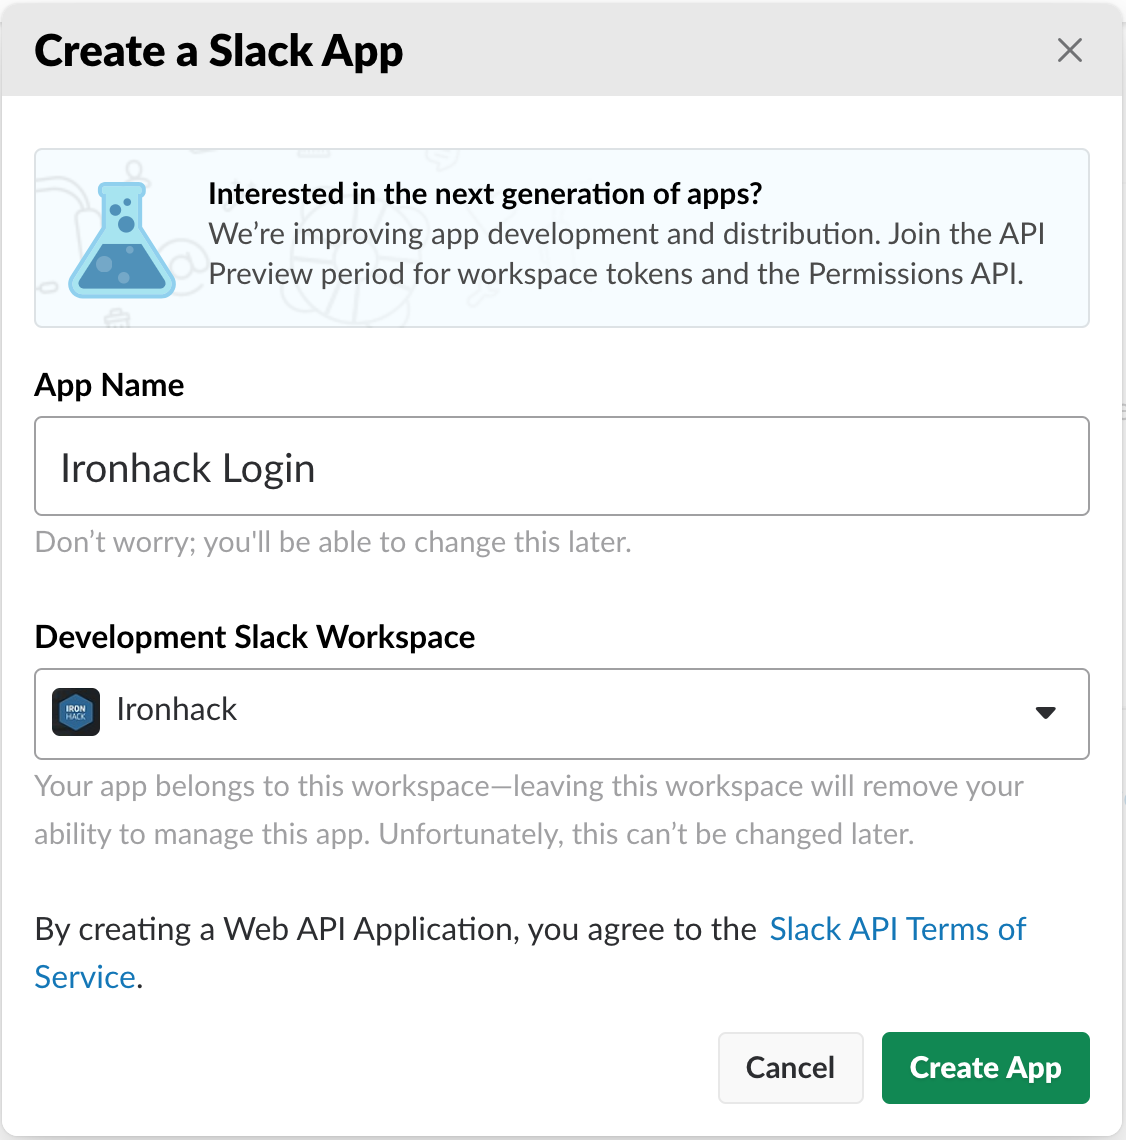
- Then, we have to indicate the Display Name (the name of our app), and the workspace, in our case we can choose the Ironhack's one.
- Once we have created the app, we will find the keys we need in the "App Credentials" section. In this section, you can see all the information you need to configure the middleware.
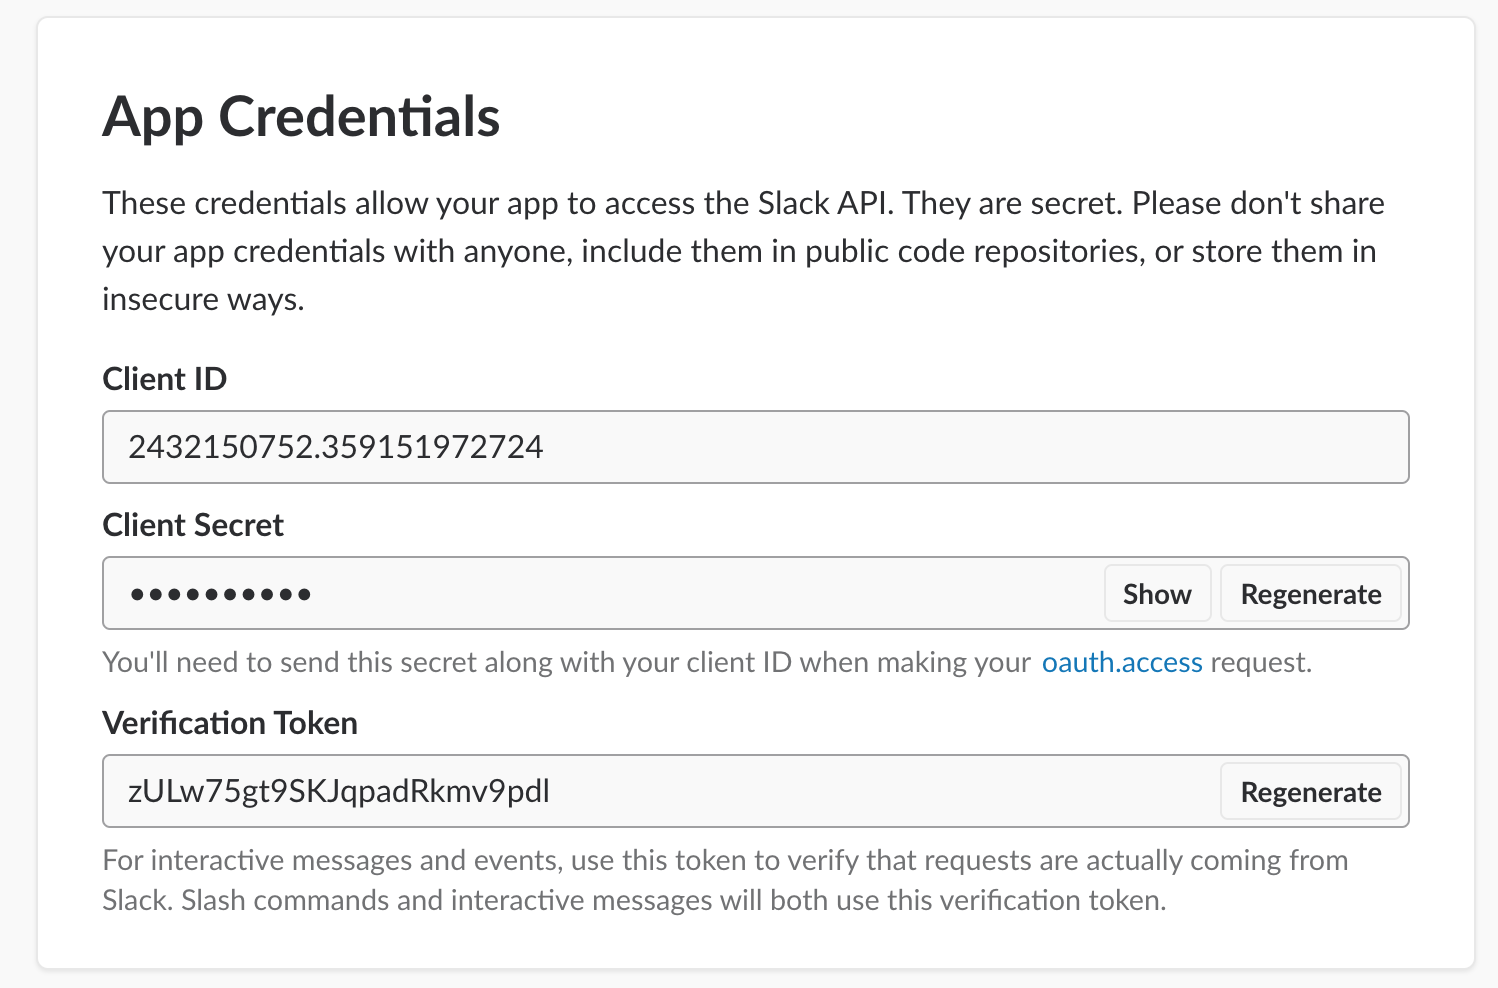
Note how you have to press the "Show" button on the App Secret to reveal the secret key in the panel.
- Then you have to go in the "**OAuth & Permissions**" tab to add the following Redirect URL: `http://localhost:3000/auth/slack/callback`

:::warning
☝️Don't forget to click on `Save URLs` button!
:::
#### Configuration
:::info lecture
Notre `clientID`/`clientSecret` en poche, passons à la **définition de notre nouvelle "stratégie"**...
:::
First, we have to install the `passport-slack` package to be able to use it in the app:
:::info lecture
le package :
:::
```shell
$ npm install passport-slack
```
In our `app.js`, let's add the following code:
```javascript
// app.js
...
const SlackStrategy = require("passport-slack").Strategy;
...
passport.use(
new SlackStrategy(
{
clientID: "2432140752.862088668305", // 👈
clientSecret: "a5124861bb16f127585bd0c1bb7b7210", // 👈
callbackURL: "/auth/slack/callback"
},
(accessToken, refreshToken, profile, done) => {
// to see the structure of the data in received response:
console.log("Slack account details:", profile);
User.findOne({ slackID: profile.id })
.then(user => {
// If found, login with that user:
if (user) {
done(null, user);
return;
}
// Otherwise, create that new user:
User.create({ slackID: profile.id })
.then(newUser => {
done(null, newUser);
})
.catch(err => done(err))
;
})
.catch(err => done(err))
;
}
)
);
```
:::warning
Remember, we have to insert our Slack app credentials: the `clientID` and the `clientSecret` values.
:::
This is all the configuration we have to change to be able to login with Slack accounts!
#### Routes File
Now, we have to change our routes to use the Slack strategy to log in our application. To do that, we will create two different routes:
```javascript
// routes/auth-routes.js
...
const passport = require("passport");
router.get("/auth/slack", passport.authenticate("slack"));
router.get("/auth/slack/callback", passport.authenticate("slack", {
successRedirect: "/private-page",
failureRedirect: "/login"
}));
```
:::info lecture
Explications :
1. Notre utilisateur va accéder à notre route `/auth/slack`. Passeport va alors le rediriger vers Slack et lui demander la permission :

2. Une fois la permission donnée(ou refusée), Slack doit ensuite re-rediriger l'utilsateur vers notre site : `/auth/slack/callback` qui en fonction de l'autorisation donnée ou non, redirigera vers `successRedirect` ou `failureRedirect`
:::
#### View
In the last part of the configuration, we have to create the login route. We don't need a form to log in the application. Instead, we will redirect the user to Slack, and they will have to give us permissions to access their data.
We will add the link in the home page, `views/index.hbs` as it follows:
:::info lecture
Ajoutons un lien vers la route `/auth/slack` sur notre homepage :
:::
```htmlmixed
{{! views/index.hbs }}
...
<a href="/auth/slack">Login With Slack</a>
```
This is the route we have defined in the routes, that will call the `passport.authenticate("slack")` method to log the user in.
These are the different pieces of Slack and Local Strategies. The logout, protected routes, and views are the same in both. The main difference is the user information we are provided with.
:::info lecture
Testons le flow !
:::
:::warning lecture
Ici, si un user se crée un compte avec le signup normal, puis plus tard se loggue avec Slack, nous aurons 2 utilisateurs distincts en base!!! 😱😱
---
Une solution pour éviter cela consisterait à ne plus utiliser de champ `username` mais `email` à la place. Ainsi et puisque Slack nous retourne l'email du user, nous pourrions recouper l'information et nous contenter d'ajouter le SlackID au user, retrouvé grâce à son email.
:::
### Google Account

:::info lecture
En exercice, configurez maintenant l'authentification avec Google...
:::
Next we are going to allow users to authenticate themselves through their Google Account. You may notice how similar this process is to the Slack login.
Google accounts can be configured by using different OAuth strategies. We are going to use [passport-google-oauth20 npm package](https://www.npmjs.com/package/passport-google-oauth20). This npm package is based on the Passport strategy for authenticating with Google using the OAuth 2.0 API.
#### New App in the Google Developers Console
Before we move forward into using previously mentioned npm package, we have to register a new application in the [Google Developers Console](https://console.developers.google.com/).
Steps to follow:
1. Once you go to the Google Developers Console website, click on the **Credentials** tab in the left vertical navigation bar:
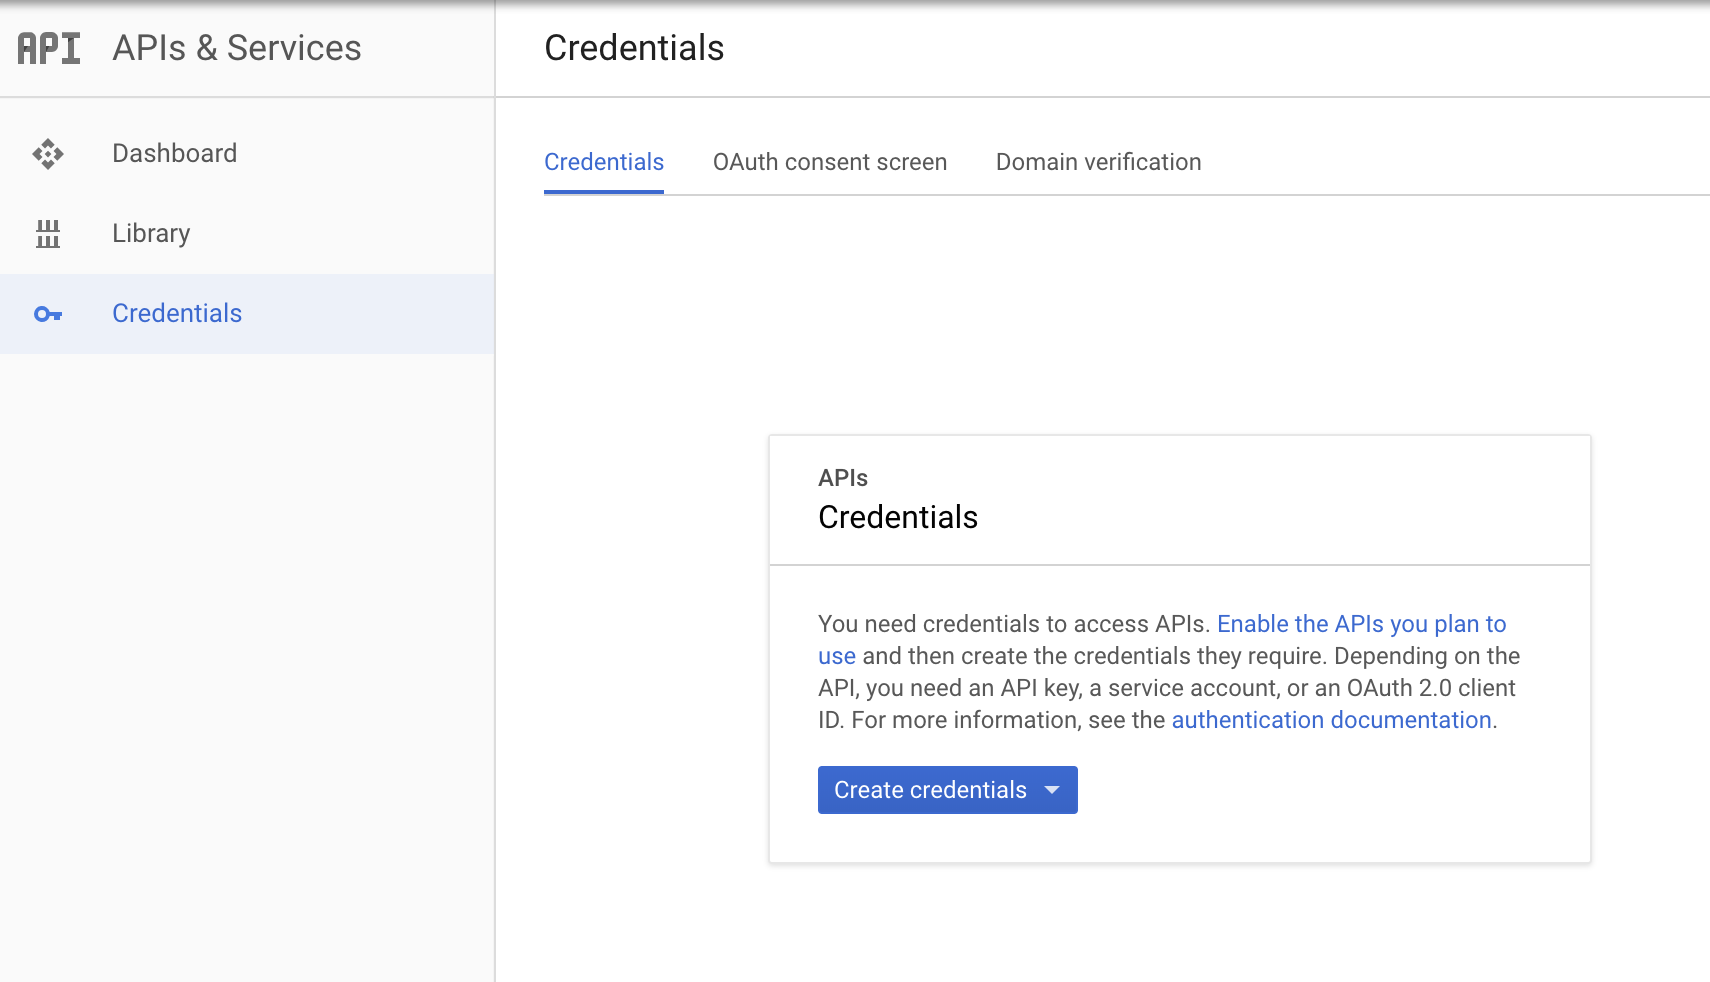
2. As shown in the image above, a pop up will be shown. Click on the **Create credentials** button and pick the **OAuth client ID** option.
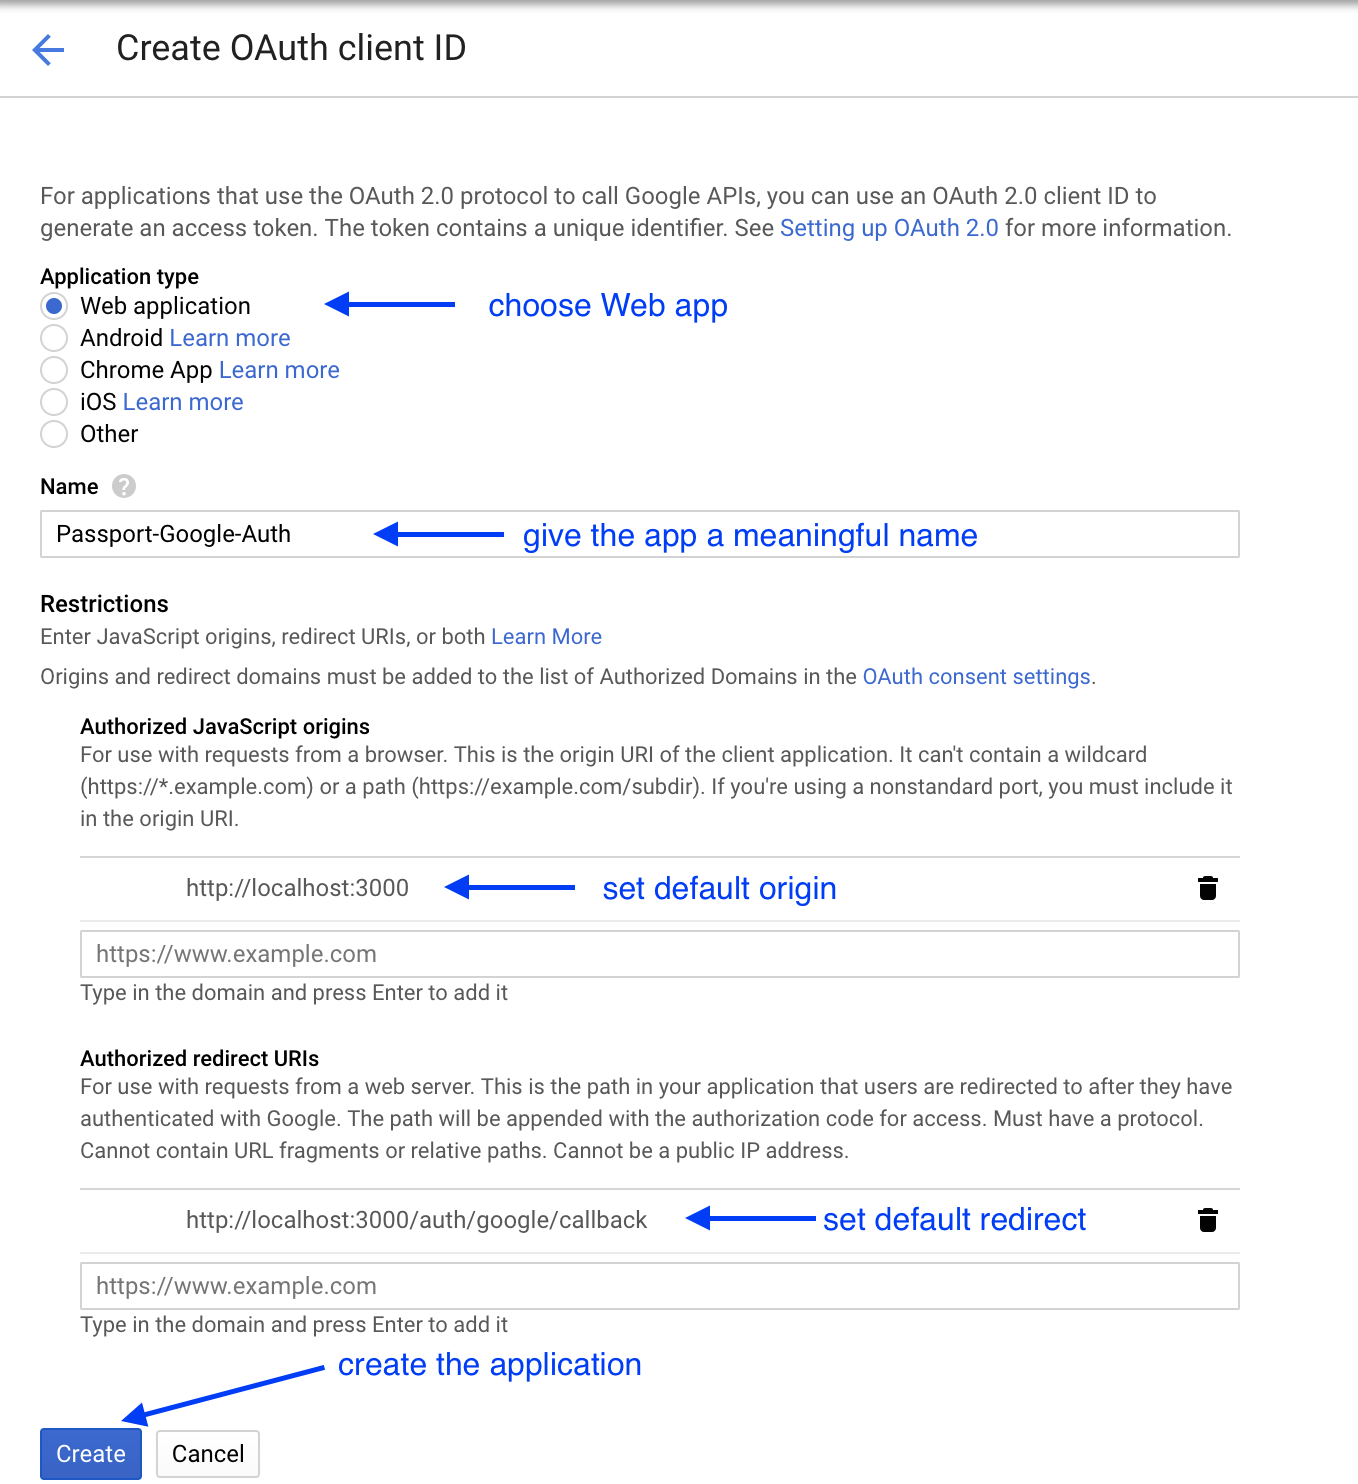
3. You will be redirected to the *Create OAuth client ID* page and given to choose what kind of application you are building. Pick **Web application**. An additional form will open. Follow the given instructions in the image below:
4. And voila! A pop up containing your client ID and client secret will be shown. Save them temporary somewhere since very soon you will need to add them in your code.
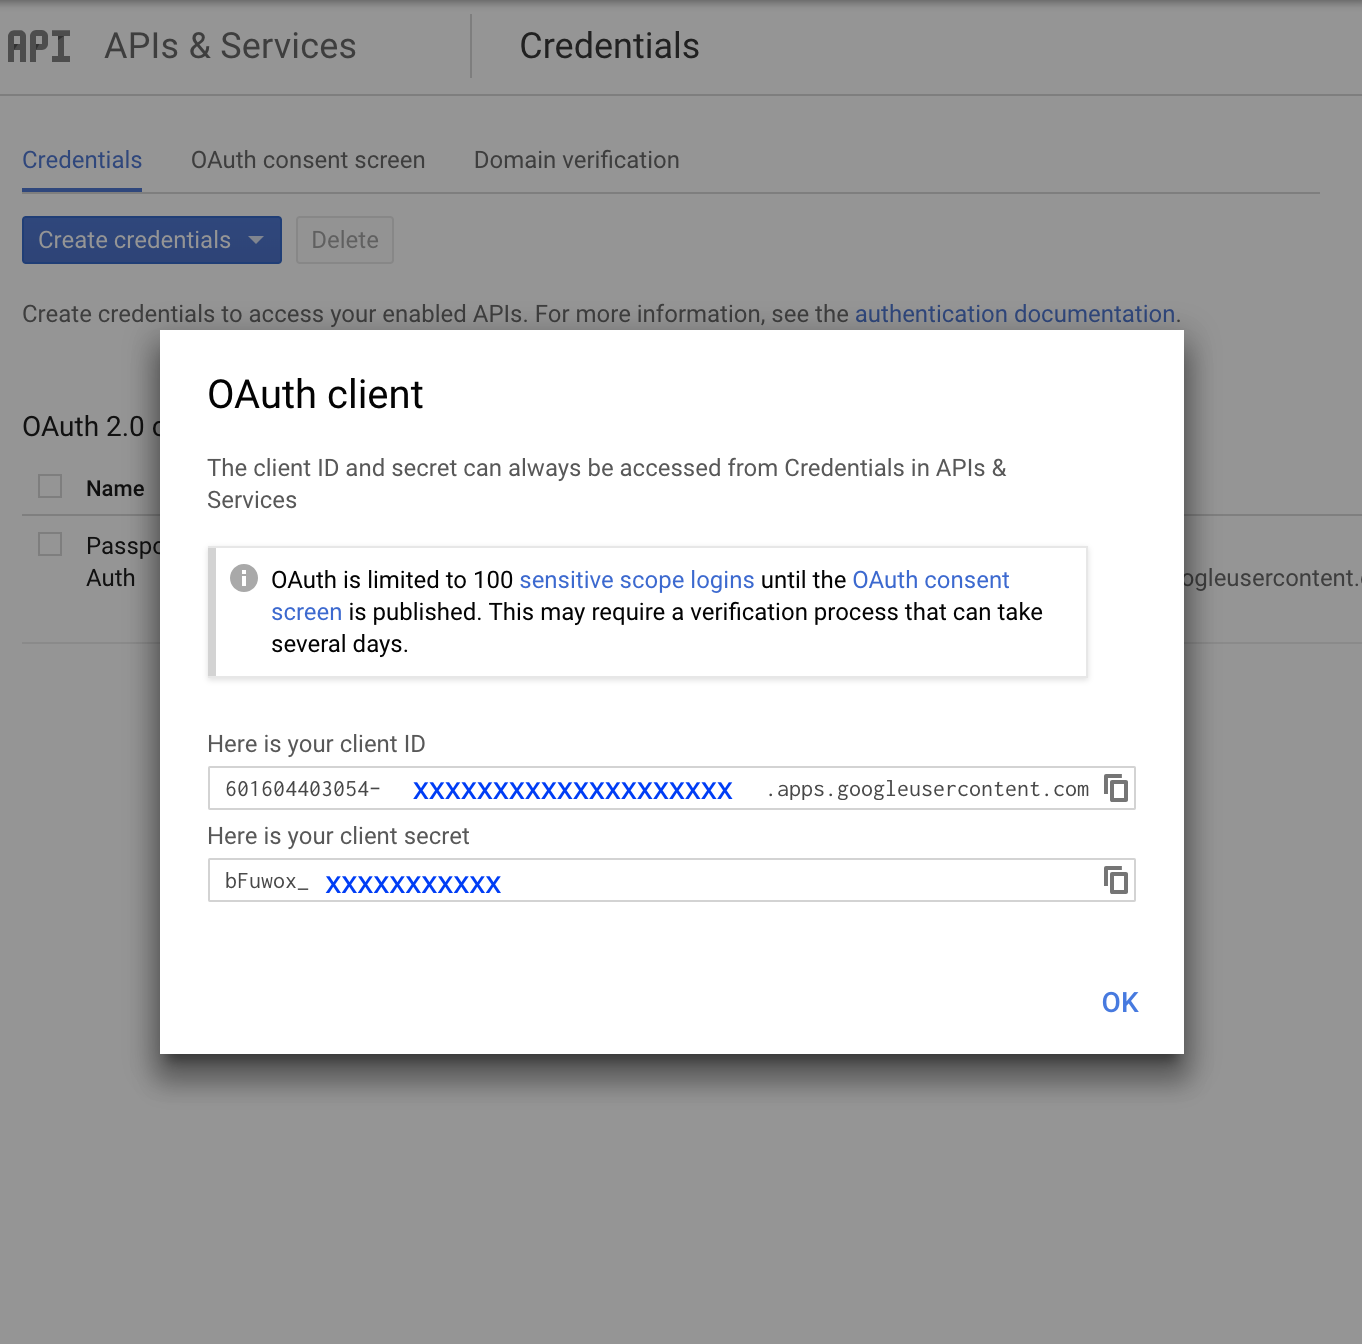
After clicking **Ok**, you will get redirected to the *Credentials* page where you will see the name of your app when it was created and your Client ID. In case you lose your credentials, you can always come back and recreate them by clicking on *Create credentials* button in the upper left corner of the page.
Now, let's set up our code.
#### Configuration
Again, we are going to start over the base project we created, with the basic authorization process. First of all, we have to install the package we are going to use:
```bash
$ npm install passport-google-oauth20
```
In our `app.js`, let's add the following code:
```javascript
// app.js
...
const GoogleStrategy = require("passport-google-oauth20").Strategy;
...
passport.use(
new GoogleStrategy(
{
clientID: "637810395829-i1g1e7ph4ariol4lfkl0pugpspo2ltrc.apps.googleusercontent.com", // 👈
clientSecret: "ULvrXN4ZdCzFysCv0r3a6clr", // 👈
callbackURL: "/auth/google/callback"
},
(accessToken, refreshToken, profile, done) => {
// to see the structure of the data in received response:
console.log("Google account details:", profile);
User.findOne({ googleID: profile.id })
.then(user => {
if (user) {
done(null, user);
return;
}
User.create({ googleID: profile.id })
.then(newUser => {
done(null, newUser);
})
.catch(err => done(err))
;
})
.catch(err => done(err))
;
}
)
);
```
Don't forget we have to insert the Client ID and the Client Secret. With this, we finished the configuration. The next thing we have to do is to change our routes to use the correct methods during the login process.
#### Routes File
In the routes file, we have to add the routes which will handle login using the Google credentials:
```javascript
// routes/auth-routes.js
...
router.get("/auth/google", passport.authenticate("google", {
scope: [
"https://www.googleapis.com/auth/userinfo.profile",
"https://www.googleapis.com/auth/userinfo.email"
]
}));
router.get("/auth/google/callback", passport.authenticate("google", {
successRedirect: "/private-page",
failureRedirect: "/login"
}));
```
This will open a new window in the browser where the user will have to authorize the app to get Google Account data. Now we have to configure the view by adding the login link.
#### View
We will update the login link in the main page, located in `views/index.hbs`, just if there is no user logged on the application:
```htmlmixed
{{! views/index.hbs }}
...
<a href="/auth/google">Login With Google</a>
```
This will call the URL we just defined in our routes, and it will call Google authorization page to complete the authentication process.
This is all that we need to do to have the social login with Google account in our application. As you may notice, both social logins are very similar when it comes to the process of setting them up in our app. The other provider configurations work the same way, so you should be able to configure whichever provider you need in your app.
## Summary
We have seen that today, with the rise of social networks, OAuth has become very common way to allow social logins in our application. The key benefit is having the account created and later on authenticated without us creating a password.
We have also seen how we can configure two different providers, Slack and Google accounts, to allow our users to use their external accounts to access our application.
## Extra Resources
- [NPM package docs - passport-google-oauth20](https://www.npmjs.com/package/passport-google-oauth20)
- [Slack Account Social Login with Passport](http://passportjs.org/docs/slack)
- [Facebook Social Login with Passport](http://passportjs.org/docs/facebook)
- [Twitter Social Login with Passport](http://passportjs.org/docs/twitter)
 Sign in with Wallet
Connect another wallet
Sign in with Wallet
Connect another wallet