---
tags: ironhack, lecture,
---
<style>
.markdown-body img[src$=".png"] {background-color:transparent;}
.alert-info.lecture,
.alert-success.lecture,
.alert-warning.lecture,
.alert-danger.lecture {
box-shadow:0 0 0 .5em rgba(64, 96, 85, 0.4); margin-top:20px;margin-bottom:20px;
position:relative;
ddisplay:none;
}
.alert-info.lecture:before,
.alert-success.lecture:before,
.alert-warning.lecture:before,
.alert-danger.lecture:before {
content:"👨🏫\A"; white-space:pre-line;
display:block;margin-bottom:.5em;
/*position:absolute; right:0; top:0;
margin:3px;margin-right:7px;*/
}
b {
--color:yellow;
font-weight:500;
background:var(--color); box-shadow:0 0 0 .35em var(--color),0 0 0 .35em;
}
.skip {
opacity:.4;
}
</style>

# React | Components & Props
## Learning Goals
* Know how the Component tree works
* How the DOM is rendered in the browser
* What props are in React components
* Syntax for passing props to a component
## Introduction - Know how the Component tree works
**Components are the core building block of React apps.** A typical React app is composed of multiple components. That structure can be represented as a **component tree** - having one root component (usually named "App" component) and then a potentially infinite amount of nested child & descendant components.
:::info lecture
Le découpage d'une application en composants va nous permettre de la simplifier en plus petits morceaux :

---
et ainsi de la :
- simplifier (un composant fait une chose)
- découpler (tout n'est pas lié, chaque composant est plus indépendant) -> cf. [separation of concerns](https://fr.wikipedia.org/wiki/S%C3%A9paration_des_pr%C3%A9occupations)
:::
:::info lecture
Un composant pourra être :
- aussi grand que toute notre application
- qu'aussi petit qu'un simple bouton

:::
:::info lecture
Un composant contiendra d'autres composants : structure imbriquée
[
](https://mbostock.github.io/d3/talk/20111116/pack-hierarchy.html)
:::
:::info lecture
React devTools extension nous permettra d'inspecter la structure de nos différents composants :

:::
---
React lets you define components as classes or functions. **Functional components** are just JavaScript functions and they let you return/render some jsx to the DOM. They **can receive props** but they **don't have state**. More about this when we talk about **state** in a different lesson.
**Components** defined **as classes** currently provide more features. The first and the most important one is that class components can **have state** (again more on that in a later lesson). The most common way to define a React class component is by extending React's built-in `React.Component` class:
:::info lecture
La première façon que nous verrons de créer un composant sera sous forme d'une classe, étendue de `React.Component` :
:::
```jsx
import React from "react";
class Welcome extends React.Component {
render() {
// return some jsx here
}
}
```
:::info lecture
`React.Component` VS. `{ Component }` :
:::
You might also see the `React.Component` class referenced as just `Component` class when it's imported directly from the `react` library:
```jsx
import React, { Component } from "react";
class Welcome extends Component {
render() {
// return some jsx here
}
}
```
:::info lecture
Rappel cheatsheet [ES6 modules](https://www.notion.so/abernier/JS-aa22c24cf2374ef09e7b0841885e2c0d#c0bdf894c8b046e5b54082c443b00edd).
:::
Here we create our class `Welcome` by extending React's `Component`. We do this to make our class inherit all the useful built-in properties and methods of a React component.
Both of previous examples are the same, just in the second example we are dealing with [named import](https://developer.mozilla.org/pt-PT/docs/Web/JavaScript/Reference/Statements/import).
:::warning
:warning: <b>Importing `React` from the `react` library is **always** required</b> in every React component (class or function) because it is responsible for rendering our content to the DOM.
:::
:::success lecture
C'est d'ailleurs comme cela que nous avons créer notre premier composant `<App />`.
:::
So far this all looks familiar, right? This is the way our `App.js`, the root component is built.
:::info
:bulb: Conceptually, components are like JavaScript functions. They accept arbitrary inputs (called `props`) and return React elements describing what should appear on the screen.
:::
Let's go now into our code in `react-module-day1-start` and let's make some structural changes. First of all, so far we have only one component (*App.js component*) and we said that React is all about working with a lot of components, so let's update our code.
In the root of our app let's create folder `components` and in this folder, let's create `User.js` file. `User.js` is going to be example of a *functional* component.
:::info lecture
Créons un 2e composant `<User />` dans notre projet `react-module-day1-start` :
:::
```jsx
// src/User.js
import React from "React";
class User extends React.Component {
render() {
return (
<div className="User">
<p>Welcome, Pablo!</p>
</div>
);
}
}
export default User;
```
:::info lecture
- Importons ce composant dans `App`
- Créons 2 instances de ce composant `<User/>` dans `<App/>`
-> Expliquer les instances et les relier aux classes
:::
## Props
:::info lecture
Plutôt que de toujours afficher `"Welcome, Pablo!"`, nous allons vouloir passer le prénom en paramètre...
:::
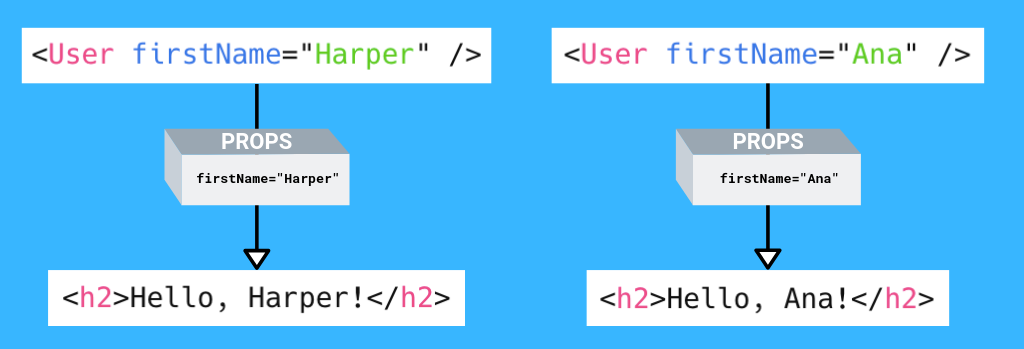
One of the fundamental concepts when dealing with React components is that of **props** - these are the _pieces of information that come from outside of the component_. Another way to describe them is they are _the data passed into the component_. The term **props** is short for _properties_. In JSX, when a prop is sent to a component, it looks like an HTML attribute.
In our `render` method in `App.js` component, let's find `<User />` tag and let's pass our first prop `firstName` to the `User.js` component.
:::info lecture
Voici comment nous allons pouvoir "passer des choses" à notre composant lors de son instanciation :
:::
```jsx
// src/App.js
...
<User firstname="Joe" />
<User firstname="Billy" />
...
```
:::info lecture
NB : montrer que les props sont affichées dans l’onglet React
NB : props est un peu comme des paramètres que l’on passe à des fonctions.
:::
And after that let's update our `User.js` component:
:::info lecture
Modifions notre composant afin qu'il tienne compte de ce paramètre `firstname` transmis (`this.props.firstname` L11) :
:::
```jsx=
// src/User.js
import React from "React";
class User extends React.Component {
render() {
console.log("props=", this.props); // 👈
return (
<div className="User">
<p>Welcome, {this.props.firstname}!</p> {/* 👈 */}
</div>
);
}
}
export default User;
```
:::info lecture
- L7: montrer que `this.props` vaut un objet des props passées
:::
In a functional component like `User` we receive all the props as the **first argument** of the function. We refer to that variable by its name, `props` and access indivual props from inside the object with dot notation like `{props.firstName}`.
:::warning
:warning: If we were inside a class we would have to use `this` keyword so it would be `{this.props.firstName}`.
:::
If rebundle our app now (`npm run webpack`) we can see the changes.
And now if we talk about reusability, we can reuse our `User` component and pass different data to change the way it's displayed. We can display the component again by adding another `<User />`.
```jsx
// App.js
// ...
render() {
return (
<div className="App">
<User firstName="Joe"/>
<User firstName="Billy"/>
</div>
);
}
// ...
```
Rebundle your app and check out the changes in the DOM.
So far we covered **props** and we now know that props allow us to **pass data in the component**. Explained with industry terms, we could say that **props allow you to pass data down the component tree**. Changes in component triggered by props will eventually lead to re-rendering the DOM.
:::info lecture
Montrer que le changement de la valeur de firstname engendre le re-rendu automatique du composant :

:::
:::info
The changes in `props` and/ or `state` trigger React to re-render the components and potentially update the DOM.
:::
---
:::info lecture
Bonus
--
Let's now reuse our `user` object and pass some extra-props to our first `<User/>`:
```jsx
<User
firstname={user.firstname}
lastname={user.lastname}
email={user.emails[0]}
photo={user.avatarUrl}
/>
```
```jsx
function displayAvatar(avatarUrl) {
if (avatarUrl) {
return <img src={avatarUrl}/>;
} else {
return <img src="https://twirpz.files.wordpress.com/2015/06/twitter-avi-gender-balanced-figure.png?w=1280"/>;
}
}
class User extends React.Component {
render() {
console.log(this.props);
const {firstname, lastname, email, photo} = this.props;
return (
<div className="User">
<p>Welcome, {firstname} {lastname}!</p>
Your email is {email} and your photo is {displayAvatar(photo)};
</div>
);
}
}
```
:::
## When do you use props?
### (1) Props are like function arguments
:::info lecture
Les props se comportent un peu comme des paramètres d'une fonction, mais cette fois appliqués à un composant.
:::
You can use props to make your components re-usable. Props usually control how a component is displayed so passing in **different props** often results in the component **looking or behaving differently**.
In this way, props for a component are like arguments of a function. Arguments control how a function behaves just like props control how a component is displayed.
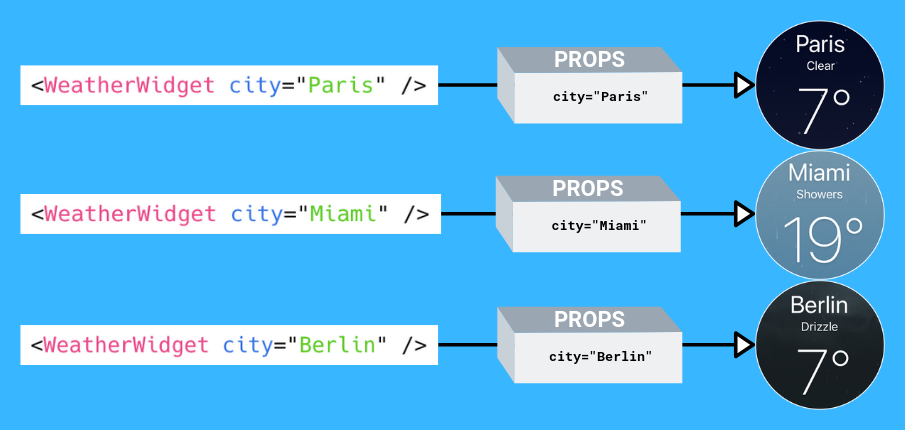
Imagine we had a cool **component to display the weather** of a particular city. In that case the prop we send would probably be the city name. Using that name it would probably access the weather data from an API.
Rendering the component would probably look like this:
```jsx
// This code is just hypothetical
// ...
render() {
return <WeatherWidget city="Mexico City" />;
}
// ...
```
Sending a different `city` prop should produce different information.
### (2) Share data between components
:::info lecture
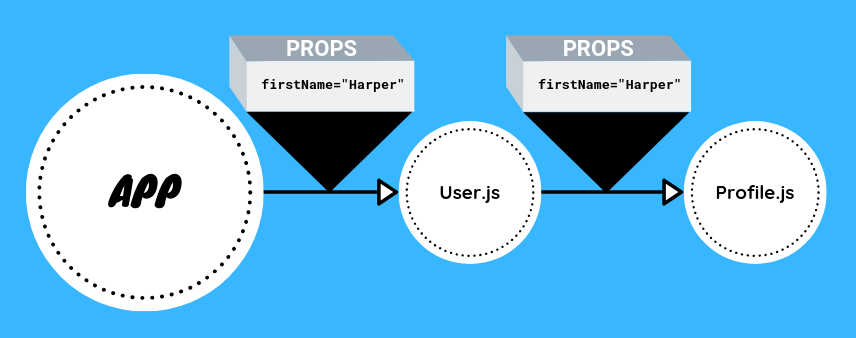
Les props sont donc une façon de communiquer une données à un composant.
Ce composant peut alors lui-même, repasser cette même info à un autre composant et faire descendre l'information...
:::
By definition, props let you **share data** between a parent component and a child component. Sharing data is important because you will eventually have many components inside your application and it's quite common for an action that happens in one component **to affect how another** should behave.
The `App` component can share information with its child `User` and `User` can also share information with its potential children and so forth.
### (3) Components from npm
There are many pre-made components on npm. Often, components you get from npm will allow you to configure and customize them through the use of props. Let's see an example!
First let's install the `react-player` npm package.
:::info lecture
Beaucoup de librairies existent sous forme de composants React, comme `<ReactPlayer>` :
:::
```shell
$ npm install react-player
```
Now let's import it inside `App.js`:
```jsx
// App.js
import React, { Component } from "react";
// import the npm package's component
import ReactPlayer from "react-player";
import "./App.css";
// ...
```
Next, we use it in our JSX. The basic usage only involves the `url` prop – the address of the video we want to display. It works with many of the popular video services like YouTube and Vimeo. Let's start with a popular Vimeo video.
:::info lecture
Instancions `<ReactPlayer />`
:::
```jsx
// App.js
// ...
render() {
return (
<div className="App">
<User firstName="Harper"/>
<User firstName="Ana"/>
// our Vimeo video
<ReactPlayer url="https://vimeo.com/channels/top/22439234" />
</div>
);
}
// ...
```
Aside from `url` the component also has other props which you can find in [the package's documentation](https://github.com/CookPete/react-player#readme). Let's try some of the other ones with a YouTube video. First there's the `playing` prop – a boolean prop that controls autoplay.
:::info lecture
Essayons la prop `playing` vue dans la doc :
:::
```jsx
// App.js
// ...
render() {
return (
<div className="App">
<User firstName="Harper"/>
<User firstName="Ana"/>
<ReactPlayer url="https://vimeo.com/channels/top/22439234" />
// our YouTube video
<ReactPlayer
url="https://www.youtube.com/watch?v=kJQP7kiw5Fk"
playing
/>
</div>
);
}
// ...
```
Don't like the most popular YouTube video of the day? Maybe two new props can help! The `controls` prop adds player controls and the `volume` prop lets you control the volume.
:::info lecture
ou encore `controls` ou `volume=""`
:::
```jsx
// App.js
// ...
render() {
return (
<div className="App">
<User firstName="Harper"/>
<User firstName="Ana"/>
<ReactPlayer url="https://vimeo.com/channels/top/22439234" />
// see the new props!
<ReactPlayer
url="https://www.youtube.com/watch?v=kJQP7kiw5Fk"
playing
controls
volume="0.5"
/>
</div>
);
}
// ...
```
In a mature component like `ReactPlayer`, you can see that props allow you to customize the way the component works for you.
## Summary
In this lesson we covered the core of the React magic world - we learned about components and influencing them from the outside using *props*. Props are like function arguments but for components and they let you share data between components. Also components from npm use props a lot for customization and configuration.
## Extra Resources
- [`React.Component` on reactjs.org](https://reactjs.org/docs/react-component.html)
- [Understanding Props in React](https://www.agiliq.com/blog/2018/05/understanding-react-state-and-props/#understanding-reactjs-props)
 Sign in with Wallet
Connect another wallet
Sign in with Wallet
Connect another wallet