---
tags: ironhack, lecture,
---
<style>
.markdown-body img[src$=".png"] {background-color:transparent;}
.alert-info.lecture,
.alert-success.lecture,
.alert-warning.lecture,
.alert-danger.lecture {
box-shadow:0 0 0 .5em rgba(64, 96, 85, 0.4); margin-top:20px;margin-bottom:20px;
position:relative;
ddisplay:none;
}
.alert-info.lecture:before,
.alert-success.lecture:before,
.alert-warning.lecture:before,
.alert-danger.lecture:before {
content:"👨🏫\A"; white-space:pre-line;
display:block;margin-bottom:.5em;
/*position:absolute; right:0; top:0;
margin:3px;margin-right:7px;*/
}
b {
--color:yellow;
font-weight:500;
background:var(--color); box-shadow:0 0 0 .35em var(--color),0 0 0 .35em;
}
.skip {
opacity:.4;
}
</style>

# Express - File Upload CDN
## Learning Goals
After this lesson, you will be able to:
- Configure Cloudinary to store our files
- Upload files to the Cloud
- Use file upload to add an extra nice feature to your apps
## Introduction
:::info lecture
Nous allons voir comment nos utilisateurs vont pouvoir uploader des fichiers et dans cet ex, des images...
:::
We already learn how to upload images in our Express projects using `multer` npm package. Using `multer` we are uploading the files to the server where we are hosting our application. We use **Heroku** to deploy our projects, and Heroku does not support file uploads. The filesystem is **read-only**, so you'll have to host your uploaded files somewhere else.
:::info lecture
Nous utiliserons pour cela `multer` et un service de "stockage" d'images : Cloudinary.
:::
:::warning lecture
Heroku ne nous autorisera pas à stocker des fichiers sur ses disques durs : c'est pourquoi nous utiliserons Cloudinary pour y stocker nos images.
:::
The are several options such as **[AmazonS3](https://aws.amazon.com/s3)** or **[Cloudinary](https://cloudinary.com/)**. In the following learning, we will see how we can configure a **Cloudinary** account to upload files.
:::info lecture
On pourrait tout aussi bien utiliser un autre service : par ex amazon S3 (une sorte de disque dur en ligne de fichiers).
:::
## Creating a new Project
Let's create a new project to practice how to upload the files to Cloudinary. We will work on a `movie-project`, where users can create new movies adding the title, description, and poster of a movie, so first let's generate a new project using our generator:
:::info lecture
Créons rapidement un nouveau projet `movie-project` :
:::
```bash
$ irongenerate movie-project
$ cd movie-project
$ npm install
```
### Model
Inside the `models` folder, we need to create a `movie.js` and add the fields our model will have. We are going to have the movie `title` and `description`, and the `imgName` and `imgPath`.
:::info lecture
Définissons notre modèle de `Movie` :
:::
```javascript
// models/movie.js
const mongoose = require("mongoose");
const Schema = mongoose.Schema;
const movieSchema = new Schema({
title: String,
description: String,
imgName: String,
imgPath: String,
}, {
timestamps: true
});
var Movie = mongoose.model("Movie", movieSchema);
module.exports = Movie;
```
### Routes
In the beginning, we are going to have two routes. The `/` where we will list all the movies from the database and print them, and a `movie-add`, where we will display a form so the user can add new movies. So, on the `routes/index.js` add the following code:
:::info lecture
2 routes :
- `/` : listing des films
- `/movie/add` : formulaire d'ajout d'un film
:::
```javascript
// routes/index.js
const express = require('express');
const router = express.Router();
const Movie = require('../models/movie.js');
router.get('/', (req, res, next) => {
Movie.find()
.then((movies) => {
res.render('index', { movies });
})
.catch((error) => next(error))
;
});
router.get('/movie/add', (req, res, next) => {
res.render('movie-add');
});
module.exports = router;
```
**What are we doing on the `/` route before rendering the view?**
### Views
In our `views/index.hbs` we will print all the movies, so let's add some code:
:::info lecture
Et enfin les 2 templates correspondants :
:::
```htmlmixed
{{! views/index.hbs }}
<h1>Welcome to the Movie Project</h1>
<div class="movies-wrapper">
{{#each movies}}
<div class="movie-item">
<img src="{{imgPath}}" alt>
<h4>{{title}}</h4>
<p>{{description}}</p>
</div>
{{else}}
<p>There are no movies yet! :(</p>
{{/each}}
</div>
```
:::info
Notice we are using the `{{#each}}` and `{{else}}` so we can display a message that there are no movies on the database yet! :wink:
:::
We also need a form to add new movies, the same way we did for uploading files using `multer` so let's add a <b>form with the `enctype`</b> property. Create a `movie-add.hbs` file and copy/paste the following:
```htmlmixed
{{! views/movie-add.hbs }}
<h2>Upload a new Movie</h2>
<form action="/movie/add" method="post" enctype="multipart/form-data">
<label>Title</label>
<input type="text" name="title">
<label>Description</label>
<input type="text" name="description">
<label>Poster</label>
<input type="file" name="photo">
<input type="submit" value="SAVE">
</form>
```
:::warning
Don't forget the attribute `enctype="multipart/form-data"` in your form.
:::
Finally, add some CSS to give style to our application:
```css
.movies-wrapper {
display: flex;
flex-wrap: wrap;
}
.movie-item {
width: 30%;
margin: 15px;
}
.movie-item img {
width: 50%;
}
```
We are ready! Let' do it! :muscle:
## Cloudinary Set Up
As we said, we are going to use **Cloudinary**. "Cloudinary provides a comprehensive cloud-based image management solution. Cloudinary is being used by tens of thousands of web and mobile application developers all around the world, from small startups to large enterprises. We are here to cover your every image-related need."
:::info lecture
Configurons maintenant le service Cloudinary en nous créant un compte :
:::
Navigate to https://cloudinary.com/ and create your account.

### Configuration
Create a new `config` folder, and inside create a `cloudinary.js` file. Here we will store all the configuration needed. Copy/paste the following code into the `cloudinary.js` file:
:::info lecture
Créons un fichier de configuration de multer+cloudinary :
:::
```javascript
// config/cloudinary.js
const cloudinary = require('cloudinary');
const cloudinaryStorage = require('multer-storage-cloudinary');
const multer = require('multer');
cloudinary.config({
cloud_name: process.env.CLOUDINARY_NAME,
api_key: process.env.CLOUDINARY_KEY,
api_secret: process.env.CLOUDINARY_SECRET
});
var storage = cloudinaryStorage({
cloudinary: cloudinary,
folder: 'folder-name', // The name of the folder in cloudinary
allowedFormats: ['jpg', 'png'],
filename: function (req, file, cb) {
cb(null, file.originalname); // The file on cloudinary would have the same name as the original file name
}
});
const uploadCloud = multer({ storage: storage });
module.exports = uploadCloud;
```
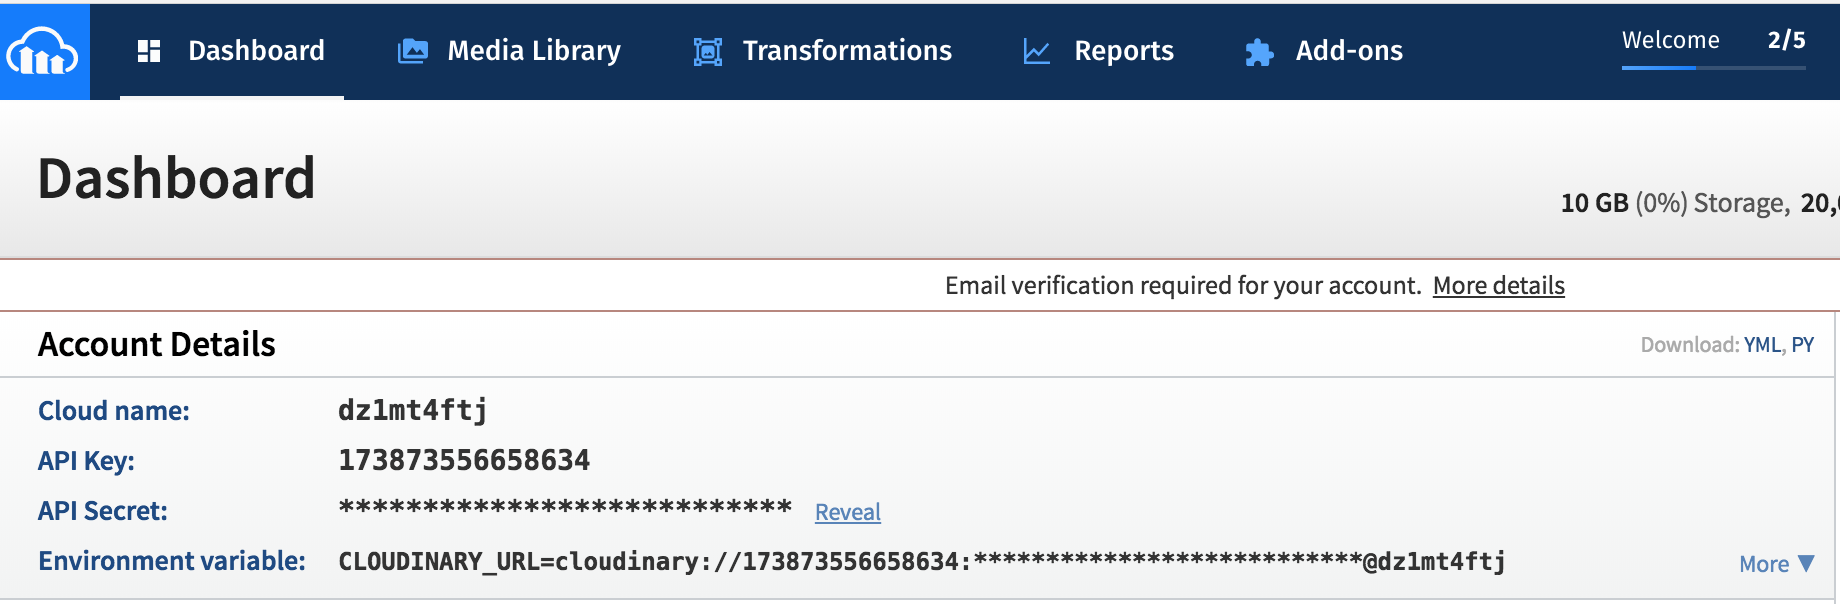
Notice that the values we pass to the `cloudinary.config()` method should be on our `.env` file. So go to the file and add that info. Also, the `folder` value will be the name of the folder where everything will be upload on our Cloudinary account. The folder will accept the formats we include on the `allowedFormats` array.
:::info lecture
Afin de ne pas "hardcoder" nos credentials Cloudinary, passons par `.env` :
:::
```bash
# .env
CLOUDINARY_NAME=yourCLOUDINARYNameHere
CLOUDINARY_KEY=yourCLOUDINARYKeyHere
CLOUDINARY_SECRET=youCLOUDINARYSecretHere
```
:::info lecture
NB : Nous trouverons ces identifiants sur notre compte Cloudinary
:::
:::info
You can find this info on your Cloudinary profile page.
:::
### Route Set Up
:::info lecture
Enfin, ne nous reste plus qu'à écrire la route de traitement du formulaire...
:::
In our `routes/index.js` file, we should require the `cloudinary` configuration. On the top of the file, add the following:
```javascript
// routes/index.js
...
const uploadCloud = require('../config/cloudinary.js'); //
```
Now we need to install all the NPM Packages we are using to setup everything, so go to the terminal:
:::info lecture
N'oublions pas d'installer tous les paquets requis :
:::
```bash
$ npm install --save cloudinary multer-storage-cloudinary multer
```
Let's create a `/movie/add` route with a `POST` method, and add our `uploadCloud` as a middleware. We should call the `.single()` method of the `uploadCloud` and pass as a parameter, the `name` attribute we set to the `input` on the form: `photo`.
The `uploadCloud` middleware will upload the photo and attach to the `req.file` object all the info about the file we just upload. We must take that info to store it into our database.
:::info lecture
Enfin la route de traitement elle-même :
:::
```javascript
// routes/index.js
...
router.post('/movie/add', uploadCloud.single('photo'), (req, res, next) => {
const { title, description } = req.body;
const imgPath = req.file.url;
const imgName = req.file.originalname;
const newMovie = new Movie({title, description, imgPath, imgName});
newMovie.save()
.then(movie => {
res.redirect('/');
})
.catch(error => {
next(error);
})
;
});
```
:::success lecture
Remarquon l'utilsation de `uploadCloud.single('photo')`, `'photo'` correspondant au nom du champ du formulaire `<input type="file" name="photo">`
:::
Awesome! So now we are ready to try our `movie-project`!
## Summary
We learned why uploading our files to Heroku is not the best option when deploying our apps if we are using the free service. Using **Cloudinary** or **S3** is much better for storing our files, and both have free versions so that's all we need for now.
## Extra Resources
- [Amazon Web Service S3](https://aws.amazon.com/s3)
- [Cloudinary](https://cloudinary.com/)
- [Multer Cloudinary NPM](https://www.npmjs.com/package/multer-cloudinary)