---
tags: ironhack, lecture,
---
<style>
.markdown-body img[src$=".png"] {background-color:transparent;}
.alert-info.lecture,
.alert-success.lecture,
.alert-warning.lecture,
.alert-danger.lecture {
box-shadow:0 0 0 .5em rgba(64, 96, 85, 0.4); margin-top:20px;margin-bottom:20px;
position:relative;
ddisplay:none;
}
.alert-info.lecture:before,
.alert-success.lecture:before,
.alert-warning.lecture:before,
.alert-danger.lecture:before {
content:"👨🏫\A"; white-space:pre-line;
display:block;margin-bottom:.5em;
/*position:absolute; right:0; top:0;
margin:3px;margin-right:7px;*/
}
b {
--color:yellow;
font-weight:500;
background:var(--color); box-shadow:0 0 0 .35em var(--color),0 0 0 .35em;
}
.skip {
opacity:.4;
}
</style>

# Express | Introduction
## Learning Goals
After this lesson you will be able to:
- Understand the idea of a framework
- Understand the two most common HTTP verbs: `GET` and `POST`
- Use the Express framework to create a basic web application
- Incorporate static assets (CSS and images) into your Express application
- Keep your HTML code for your Express app in separate files
## Introduction
:::info lecture
Nous utiliserons un framework Node.js appelé `Express` pour développer nos backends :
- Express est publié en tant que module npm
- c'est un standard
- il nous permettra d'aller plus vite dans nos développements
:::
In this lesson, we will learn how a **framework** like Express can help us make our back end code more organized. Before we can get into the real capabilities of the back end, we must first learn how to set up a basic Website using back end technologies. That's exactly what we will be learning here: **how to make a basic Website** using Node.js and Express.
:::warning
:warning: This kind of Website **doesn't need Express or back end**. It would be better to make a Website like this with plain old HTML, CSS and JavaScript.
We are only making these simple Websites to lay the foundation of how to use Express so we can do more appropriate back end tasks later.
:::
<div class="skip">
## Web Frameworks
**Why would I use a *framework*?**
[Web Frameworks](https://en.wikipedia.org/wiki/Web_framework) or web application framework (WAF) is a software framework that is designed to support the development of web applications including web services, web resources and web APIs. Web frameworks aim to alleviate the overhead associated with common activities performed in web development.
For example, many web frameworks provide:
- **Libraries for database access** (for saving your data permanently)
- **Templating frameworks** (for making dynamic HTML that changes between users)
- **Session management** (for keeping track of users)
- **Often promote code reuse** (for keeping your code DRY)
Though they often target development of dynamic websites they are also applicable to static websites.
We can build a full-blown web application using just Node.js, Ruby, Python or any other backend language. Over time though, people have developed *frameworks* on top of these different languauges for a few reasons:
- We do many of the aforementioned tasks for *every* web application, and it's tedious to set up.
- We need a way to structure our code, all of our complex logic can build up over time, leaving us with a mess.
- We benefit from other people's hard work. If you're using your own framework, then every bug is yours to fix. With a community surrounding the framework, we get some help in this regard.
</div>
### Express Web Framework

[ExpressJS](http://expressjs.com/) is the most commonly used framework in the Node.js ecosystem. Every Node.js player has heard of it and is using it with or without noticing.
It’s currently on its 4th generation, and there are quite a few [Node.js frameworks](http://expressjs.com/en/resources/frameworks.html) built based upon it or inspired by its concepts.
Express.js, or simply Express, is a web application framework for Node.js, released as free and open-source software under the MIT License.
It is designed for building web applications and APIs. It is the de facto standard server framework for Node.js. The original author described it as a relatively minimal with many features available as plugins.
Express is the backend part of the <b>MERN</b> stack - which we will fully cover during this course. What will make you full stack developers is knowing Express and MongoDB in the backend and React frontend framework.
<div class="skip">
## More HTTP - HTTP Verbs
Before we get into our first Express code, we need to add a little to our knowledge of HTTP. We need to talk about something called **HTTP verbs**.
When a client sends an HTTP request to a server, aside from specifying the URL the client also has to specify an extra piece of text called an **HTTP verb** (also known as an _HTTP method_). This **HTTP verb** has to be one of a list of valid words in the HTTP specification. The verbs are designed for clients to **communicate the intention of the request** to servers. Servers software is programmed to consider the verb when deciding what to do with a request.
The most common two verbs are `GET` and `POST`. Most of the requests your browser makes on a daily basis are `GET` requests, to retrieve some kind of information. For example, we make a `GET` request to `https://www.netflix.com/browse`, and the server gives us back an HTML page. The server decides whether a request using that verb and that URL is possible.
We need to know about these verbs because when we program our own back end, we decide which **HTTP verbs** work with which URLs.
### `GET`
`GET` requests:
- Should be used only to retrieve data from a server
- Can be cached
- Remain in the browser history
- Can be bookmarked
- Should never be used to send sensitive data (more on this later)
- Have length restrictions (you can't send giant files)
**Example**
Type google.com in your URL bar and hit enter. You just made a `GET` request!
### `POST`
A `POST` request is for *sending data to the server.*
`POST` requests:
- Should be used to send data to the server
- Are never cached
- Do not remain in the browser history
- Cannot be bookmarked
- Are better for sensitive data (again, more on this later)
- Have no restrictions on data length (you can send big files)
**Example**
When you enter information into a login form on facebook, and hit submit you are making a `POST`. You're saying to Facebook's servers: "Here's my login info, log me in please".
Also, when making banking transactions they are often handled through `POST` requests. This is to prevent you from withdrawing (or crediting) your money over and over by accidentally repeating transactions. You wouldn't want to pay your bills twice, would you?
</div>
## Express Hello World
[ExpressJS](http://expressjs.com/) is a web framework built on Node.js that has functions that closely resemble the request-response process.
Let's get set up with our first Express app.
:::info lecture
Notre dossier principal :
:::
**1 |** Create a folder called `express-hello-world`.
```shell
$ mkdir express-hello-world
$ cd express-hello-world
$ code .
```
:::info lecture
Initialisons npm puis installons Express
:::
**2 |** Install **Express** with NPM and save it as a dependency in our project, then create a file to run our *server* named `app.js`
```shell
$ npm init --yes
$ npm install express
$ touch app.js
```
:::info lecture
Ecrivons notre programme `app.js` :
:::
**3 |** Write our `app.js` server
We have to first require Express so we can use it in our app.
The [express()](https://expressjs.com/en/4x/api.html#express) function creates an [Express application](https://expressjs.com/en/4x/api.html#app).
```javascript=
const express = require('express');
// We create our own server named app
// Express server handling requests and responses
const app = express();
```
:::info lecture
Définissons la route de notre homepage.
Les routes définissent les URLs auxquelles nos pages seront disponibles.
:::
**4 |** Set up a Route
Web Apps have many different pages, and we need to tell our server what to do when it receives a request. Normally a server identify requests with two parameters:
- **URLs**
In back end, we only consider the part of the URL that comes after the the domain. Examples:
- If the full URL is [example.com/profile](http://example.com/profile) we refer to it as `/profile`
- If the full URL is [example.com/blogs](http://example.com/blogs) we refer to it as `/blogs`
- If the full URL is [example.com](http://example.com) we refer to it as `/`
- **HTTP Method**: `get`
For now, we will stick to `GET` requests. We will talk more about `POST` in a later lesson.
```javascript=
const express = require('express');
const app = express();
// our first Route
app.get('/', (request, response, next) => {
console.log(request);
response.send('<h1>Welcome Ironhacker. :)</h1>');
});
```
:::info lecture
Le 2e paramètre de `app.get` est une fonction de callback :
:::
Notice, each route will accept a *callback*. This is the function that will be called when someone makes a request to `/`.
- **app**: Our express server
- **`get`**: the **HTTP Verb** needed to access this page
- **`/`**: the route that the User will type into the URL bar
- `request`: An *object* containing information about the request, such as the headers. More on this later.
- `response`: An *object* containing information about the response, such as headers and any data we need to send to the client.
- `next`: We will use this later to handle errors. Leave it there for now.
The three parameters of the `request`, `response` and `next` will always be passed to the callback function for any route. The `response` object has methods that allow us to control what we send the client. In this case, we are using the `send()` method that just sends a string.
:::info lecture
Pour démarrer le serveur : `app.listen`
:::
**5 |** Start the Server!
Tell our server to *continuously listen for requests* on port 3000. You can optionally provide a callback to do something once the listening is set up.
```javascript=12
// Server Started
app.listen(3000, () => {
console.log('My first app listening on port 3000!')
});
```
**Our first Express code**
```javascript=
// Require Express
const express = require('express');
// Express server handling requests and responses
const app = express();
// our first Route:
app.get('/', (request, response, next) => {
response.send('<h1>Welcome Ironhacker. :)</h1>');
});
// Server Started
app.listen(3000, () => {
console.log('My first app listening on port 3000!');
});
```
To view your first web app, we must run the server with node. Remember that because we executed `app.listen()`, the program will run until we stop it manually.
```shell
$ node app.js
```
And visit [localhost:3000](http://localhost:3000)!
:::info lecture
ctrl+c pour arreter
:::
:::info
:bulb: To stop the server, type <b>`CONTROL`+`C`</b> in the terminal
:::
## nodemon
:::info lecture
À chaque fois que nous changerons un fichier, il nous faudra relancer le serveur afin que les modifications soient prises en compte.
Pour éviter cela : `nodemon`
:::
We are about to make a lot of changes to our to our `app.js`. Remember that every time you change something in your server program, you have to stop it with `CONTROL + C` and run it again with `node app.js`. Let's fix that annoyance right now!
There is another awesome npm package called [**nodemon**](https://nodemon.io/) that can help us reload our application automatically every time we save a change in our JavaScript. First, let's start by installing it:
:::info lecture
Que nous pouvons installer en global :
:::
```shell
$ npm install nodemon --global
```
We are installing **nodemon** with the `--global` option, which means we are installing it as a command in the terminal. This will allow us to run our application using the `nodemon` command instead of `node`.
```shell
$ nodemon app.js
```
Once you have your `app.js` running with **nodemon**, you will see it reload automatically in the terminal **every time you save**. No need to `CONTROL + C` anymore!
## Static Files
:::info lecture
Une fois la page HTML livrée, le navigateur va alors tenter de télécharger nos images/feuilles de styles...etc depuis notre serveur...
---
Pour cela, nous allons configurer notre serveur afin qu'ils puissent livrer des fichiers depuis le dossier `public/` :
:::
Static files are things like images, CSS, and client-side JavaScript that are sent directly from the server to the browser as is.
Express has built-in support for serving these kinds of files.
Typically, these files are saved in a folder called `public`:
```
$ mkdir public
```
Let's create a folder for images, and download a cool cat picture to that folder:
```
$ mkdir public/images
$ curl -o public/images/cool-cat.jpg https://wallpapercave.com/wp/X7VjxFk.jpg
```
:::info lecture
Disons à Express depuis quel dossier aller chercher les fichiers :
:::
Inside of Express, we have to tell our server to serve static files from the `public` directory:
:::warning lecture
☝️Attention, l'ordre compte !
:::
```javascript=4
// ...
const app = express();
// Make everything inside of public/ available
app.use(express.static('public'));
// our first Route:
app.get('/', (request, response, next) => {
// ...
```
Visit [localhost:3000/images/cool-cat.jpg](http://localhost:3000/images/cool-cat.jpg) and you will see your image! Notice that the URL **doesn't include the `public`** part. This is important when you are linking your HTML to these external files.
One of the benefits of using static assets is that we can incorporate them into our HTML for the browser to read.
**Create a stylesheet:**
:::info lecture
une feuille de styles
:::
```
$ mkdir public/stylesheets
$ touch public/stylesheets/style.css
```
**Add the following styles to `style.css`:**
```css=
body {
color: blue;
background-color: bisque;
}
```
**Create a new route:**
:::info lecture
Ajoutons une nouvelle route `/cat` delivrant cette fois une vraie page HTML (grâce aux backticks ES6) :
:::
```javascript
// ...
app.get('/cat', (request, response, next) => {
response.send(`
<!doctype html>
<html>
<head>
<meta charset="utf-8">
<title>Cat</title>
<link rel="stylesheet" href="/stylesheets/style.css" />
</head>
<body>
<h1>Cat</h1>
<p>This is my second route</p>
<img src="/images/cool-cat.jpg" />
</body>
</html>
`);
});
// ...
```
Now visit [localhost:3000/cat](http://localhost:3000/cat)!
Again, notice the URLs we use when linking to these files:
1. `public/images/cool-cat.jpg` is linked as `/images/cool-cat.jpg`
2. `public/stylesheets/style.css` is linked as `/stylesheets/style.css`
**Linking Static Files**
Some **important observations** when you are linking static files in Express:
- Leave out the `public` part
- Always start the link with `/`
- Never hardcode [localhost:3000](http://localhost:3000)
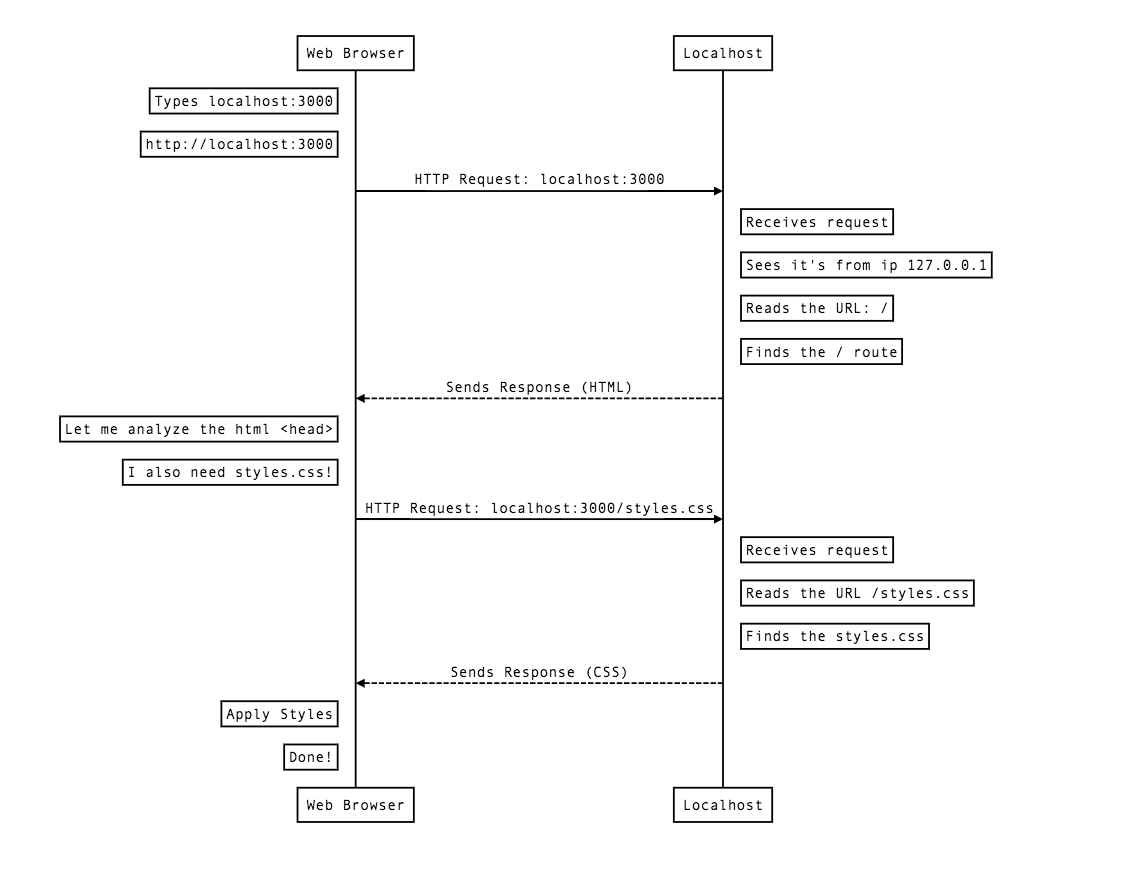
### Statics Assets Request-Response Flow
:::info lecture
Il est important de comprendre que c'est l'analyse de l'`index.html` par le navigateur qui va provoquer le téléchargement successif de `stylesheets/style.css` :
:::
## Separate HTML
In the previous example, we started adding a more realistic HTML structure to our `send()` method. As you can see, it can get very messy to put a bunch of HTML inside a JavaScript string. It has a few downsides:
1. **Bad readability** - It makes our routes _very_ long, making them harder to read.
2. **No syntax options** - We don't benefit from syntax highlighting and the snippets that we get in an HTML file.
3. **Bad separation of concerns** - Ultimately, we want to separate the logic of our back end (the routes and their functionality) from the appearance of our application (the HTML and CSS that users see). In this case, mixing the two leads to bad code.
To solve these problems, we have the ability to create separate HTML files for each of our pages' content. This may sound similar to what we used to do in Module 1 but the key difference is that **the URL of the page doesn't have to match the HTML file name**. Let's see how this is done.
We start by creating a folder for our HTML files and then the files themselves.
:::info lecture
Afin de ne pas "mélanger" JS et HTML dans le même fichier, nous allons maintenant mettre nos différentes pages dans un dossier `views` :
:::
```shell
$ mkdir views
$ touch views/home-page.html
$ touch views/cat-page.html
```
:::info
:bulb: In this case, `views/` is referring to the **presentation code**, the code that the users see (thus the term _views_). We will discuss the name of the `views/` folder in a future lesson.
:::
- The `home-page.html` file will contain the content for our `/` route.
- The `cat-page.html` will contain the content for our `/cat` route.
Starting with `home-page.html`:
```htmlmixed=
<!doctype html>
<html>
<head>
<meta charset="utf-8">
<title>Welcome Ironhacker</title>
<link rel="stylesheet" href="/stylesheets/style.css" />
</head>
<body>
<h1>Welcome Ironhacker. :)</h1>
<a href="/cat">See Cat Page</a>
</body>
</html>
```
Now `cat-page.html`:
```htmlmixed=
<!doctype html>
<html>
<head>
<meta charset="utf-8">
<title>Cat</title>
<link rel="stylesheet" href="/stylesheets/style.css" />
</head>
<body>
<h1>Cat</h1>
<p>This is my second route</p>
<img src="/images/cool-cat.jpg" />
<a href="/">Back to Home</a>
</body>
</html>
```
Notice again how we are linking between the pages using the route URLs:
- `/` for the home page
- `/cat` for the cat page.
How are the HTML files connected to the routes? That's our next change.
In `app.js` we modify both our routes to refer to the HTML files:
:::info lecture
Modifions cela dans `app.js` :
:::
```javascript=10
// ...
// our first Route:
app.get('/', (request, response, next) => {
response.sendFile(__dirname + '/views/home-page.html');
});
// cat route:
app.get('/cat', (request, response, next) => {
response.sendFile(__dirname + '/views/cat-page.html');
});
// ...
```
- Here we are using a new method of `response`: `sendFile()`. The `sendFile()` method allows us to respond with the contents of a file. It's an alternative to `send()` which only allows us to send a string directly.
- `__dirname` (two underscores) refers to the folder in which our `app.js` is located. Try to `console.log(__dirname)` so you can see it's value. If we don't specify the **complete path to the HTML file** our `sendFile()` will fail.
:::danger
:rotating_light: Don't get confused between the name of the HTML file and the URL. **The URL is determined by the route**: `app.get('/cat', ...)` means that we need to go to [localhost:3000/cat](http://localhost:3000/cat). Through the `response` we connect to the route's URL to the HTML file: `response.sendFile(__dirname + 'views/cat-page.html');`.
:electric_plug: Making these connections is what back end is all about.
:::
:::info
:zap: Couldn't we have placed the HTML files in `public/` and referred to them directly like [localhost:3000/cat-page.html](http://localhost:3000/cat-page.html)? Yes! But we will see later that this structure of having the **route refer to its HTML** will be useful later.
:::
Final version of our first Express app's `app.js`:
```javascript=
// Require Express
const express = require('express');
// Express server handling requests and responses
const app = express();
// Make everything inside of public/ available
app.use(express.static('public'));
// our first Route:
app.get('/', (request, response, next) => {
response.sendFile(__dirname + '/views/home-page.html');
});
// cat route:
app.get('/cat', (request, response, next) => {
response.sendFile(__dirname + '/views/cat-page.html');
});
// Server Started
app.listen(3000, () => {
console.log('My first app listening on port 3000!');
});
```
:::info lecture
Pour que nodemon prenne en compte également les changements dans les fichiers HTMLs :
```shell
$ nodemon -e js,html app.js
```
:::
## Summary
In this lesson that a **framework** is code that we can use to organize our back end applications better (instead of starting from scratch every time). We also learned how to build a *super* basic web app with Express. In that app, we incorporated static files like CSS and images and we separated our HTML from out application's main JavaScript file to keep things more organized.
HTTP and web concepts are almost a language on their own. We're going to continue to reinforce and use the different HTTP concepts, including HTTP verbs.
## Extra Resources
- [Express Getting Started](https://expressjs.com/en/starter/installing.html)
- [Express Hello World](https://expressjs.com/en/starter/hello-world.html)
- [What is HTTP(video)](https://www.youtube.com/watch?v=eesqK59rhGA)
- [HTTP Made Really Easy](https://www.jmarshall.com/easy/http/)
- [A Beginner’s Guide to HTTP and REST](https://code.tutsplus.com/tutorials/a-beginners-guide-to-http-and-rest--net-16340)
 Sign in with Wallet
Connect another wallet
Sign in with Wallet
Connect another wallet