---
tags: ironhack, lecture,
---
<style>
.markdown-body img[src$=".png"] {background-color:transparent;}
.alert-info.lecture,
.alert-success.lecture,
.alert-warning.lecture,
.alert-danger.lecture {
box-shadow:0 0 0 .5em rgba(64, 96, 85, 0.4); margin-top:20px;margin-bottom:20px;
position:relative;
ddisplay:none;
}
.alert-info.lecture:before,
.alert-success.lecture:before,
.alert-warning.lecture:before,
.alert-danger.lecture:before {
content:"👨🏫\A"; white-space:pre-line;
display:block;margin-bottom:.5em;
/*position:absolute; right:0; top:0;
margin:3px;margin-right:7px;*/
}
b {
--color:yellow;
font-weight:500;
background:var(--color); box-shadow:0 0 0 .35em var(--color),0 0 0 .35em;
}
.skip {
opacity:.4;
}
</style>

# AJAX | Axios GET Request
## Learning Goals
In this learning unit, you will:
- understand what AXIOS is and what it can be used for,
- make AJAX GET requests to Web APIs,
- understand what Axios is and what it can be used for,
- use Axios to make AJAX GET requests to Web APIs,
- retrieve data from a Web API to use it in your app.
## Introduction
There are many resources on the Internet that we can use for our applications, not only for retrieving data but for enabling functionalities too. Think of Google Maps, [MailChimp](https://mailchimp.com/), or many others.
On the other hand, sometimes we simply want to get information to store it in our application's database or as an input for the logic of our app in the server.
:::info lecture
Jusqu'à maintenant, nous générons **nos requêtes en utilisant le navigateur** : GET et POST en utilisant la barre d'adresse ou un formulaire :
:::
:::info lecture
En réalité, nous allons également pouvoir générer des requêtes HTTP de manière programmatique : en javascript (browser-side et server-side)
:::
:::info lecture
Qu'est-ce qu'AJAX ?
En 1998, Microsoft crée l'AJAX et permet **au sein d'une meme page de faire une autre requete HTTP**, en Javascript (XMLHttpRequest ou xhr).
 
La technologie est reprise par l'ensemble des navigateurs et les développeurs s'en apparent pour enrichir les pages :

Les requetes beaucoup plus légères sont plus rapides et apportent à l'expérience utilisateur un sentiment de grande responsivité.
Les développeurs vont pousser dans le sens de toujours plus d'AJAX, pour aboutir à des sites sans rafraichissement de page (sauf le 1er).


:::
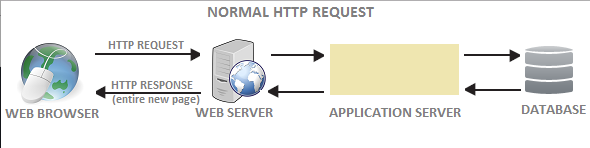
The problem comes when we want to include that functionality in our application and use it without reloading the entire HTML every time we make a request to a remote server.
Here is where Axios saves our day.
## Intro to Axios
:::info lecture
Pour cela, nous allons utiliser un package `axios` qui présente l'avantage de fonctionner **de la même façon entre le client et le serveur**.
:::
Axios is a **<b>Promise-based</b>** HTTP client for JavaScript which can be used in your front-end application and your Node.js backend.
By using Axios, it’s easy to send an asynchronous HTTP request to REST endpoints and perform CRUD operations.
Now, this being said in human-understandable language: AJAX allows **web pages** to be **updated asynchronously** by **exchanging data with a web server behind the scenes**. This means that it is possible to **update parts of a web page, without reloading the whole page**.
Axios is relying on AJAX technology. **AJAX** is a technique for accessing web servers from a web page and stands for *Asynchronous JavaScript And XML*.
### Axios - Main Features
- Make [XMLHttpRequests](https://developer.mozilla.org/en-US/docs/Web/API/XMLHttpRequest) from the browser,
- make `HTTP` requests from [Node.js](https://nodejs.org/api/http.html),
- supports the [Promise API](https://developer.mozilla.org/en-US/docs/Web/JavaScript/Reference/Global_Objects/Promise),
- intercept requests and responses,
- transform requests and responses data,
- cancel requests,
- automatic transforms JSON into JS objects,
- client-side support for protecting against [XSRF](https://en.wikipedia.org/wiki/Cross-site_request_forgery).
## Request method aliases
:::info lecture
Les principales signatures d'axios :
:::
For convenience, the aliases have been provided for all supported request methods:
- `axios.request(config)`
- `axios.get(url[, config])`
- `axios.post(url[, data[, config]])`
:::info lecture
Nous verrons plus tard, qu'il existe plus que 2 types de requetes HTTP que sont GET et POST 😏...
:::
<div class="skip">
But also:
- `axios.delete(url[, config])`
- `axios.head(url[, config])`
- `axios.options(url[, config])`
- `axios.put(url[, data[, config]])`
- `axios.patch(url[, data[, config]])`
</div>
**When using the alias method `url`, the `data` and `config` properties don't need to be specified (that's why they are in the `[]`, which means they are optional).**
### Common Axios uses
Some use-cases when to use Axios calls could be:
- When updating data or part of the structure of an HTML,
- in form validations,
- when filtering data,
- when making comments,
- when reading files.
## Installing Axios
We can install Axios with **NPM** or we can add it through a CDN.
Since we are creating a simple page with just **HTML**, **JS** & **CSS** (no **node**) it will be easier and faster for us to use the **CDN** :wink:. If we were building a more complex app we would choose the **NPM** version.
:::info lecture
Puisqu'axios fonctionne tant côté client que serveur, nous allons pouvoir l'installer de 2 façons :
:::
**Using CDN**
```html=
<script src="https://unpkg.com/axios/dist/axios.min.js"></script>
```
**Using NPM**
```bash
$ npm install axios
```
## API testing
The Internet is filled with free APIs available for developers. Google, YouTube, Yahoo, Instagram, Twitter, Flickr, LinkedIn, and many more huge and famous applications provide an open API to integrate into our platform.
To demonstrate how AJAX works, we will use the `REST COUNTRIES API`.
### The REST COUNTRIES API
:::info lecture
Internet regorge d'API librement utilisables : https://www.programmableweb.com/category/all/apis
---
NB : Une API très bien faite et documentée : https://developer.github.com/v3/gists/#list-all-public-gists
:::
:::info lecture
Nous reverrons plus tard dans le détail ce que l'on appelle une API dite REST... Pour le moment, considérons REST comme une série de conventions respectées par les différentes APIs.
:::
The [restcountries](https://restcountries.eu/) is a REST API created by Faydel Florez and acquired by [apilayer](https://apilayer.com/).
REST COUNTRIES provides a simple API for getting information about the world's nations via REST calls. These calls allow users to retrieve all available countries or to retrieve a given country's currency, its capital city, calling code, region, sub-region, ISO 639-1 language, name, or country code.
:::info lecture
Nous allons dans notre cours, explorer une API donnant des informations sur les pays du monde :
:::
If we visit [restcountries end points](https://restcountries.eu/#api-endpoints) we can see which REST endpoints are available for us to use to search for countries.
Some examples are:
- search by country name: ```https://restcountries.eu/rest/v2/name/{name}```
- search by capital city: ```https://restcountries.eu/rest/v2/capital/{capital}```
- Search by ISO 4217 currency code: ```https://restcountries.eu/rest/v2/currency/{currency}```
But let's see it in practice.
### API testing through the browser's navigation bar
If you copy any of the links into the browser's navigation bar and replace the part within `{}` with real value, you can test any endpoint.
:::info lecture
Essayons le endpoint directement dans l'adresse de notre navigateur :
:::
After inputting this URL: https://restcountries.eu/rest/v2/name/spain, you should see something like this:

:::info lecture
Afin de visualiser plus facilement des objets JSON dans notre navigateur, nous pouvons installer l'extension Chrome [JSONView](https://chrome.google.com/webstore/detail/jsonview/chklaanhfefbnpoihckbnefhakgolnmc?hl=en)
:::
:::info
It might be possible that your browser shows a different and unformatted object. If that happens, try installing the **[JSONView](https://chrome.google.com/webstore/detail/jsonview/chklaanhfefbnpoihckbnefhakgolnmc?hl=en)** extension.\*\*
:::
## Postman
:::info lecture
Cependant, s'il est possible de "tester" certains endpoints de l'API en utilisant notre navigateur, nous sommes limités aux requêtes GET.
:::
:::info lecture
Nous allons utiliser un outil dédié pour "jouer" et explorer les APIs : POSTMAN
:::
[Postman](https://www.getpostman.com/docs) allows us to test Web API requests from our system. We could set the desired parameters as if we were in our code.
We can use any HTTP verb for the request, and we can handle any amount of parameters.
### Installing Postman

Go to [the official website](https://www.getpostman.com) and download Postman. Be careful to select the right Operating System for your computer.
**We can use Postman as a Google Chrome extension too, but we will use the [GUI](https://en.wikipedia.org/wiki/Graphical_user_interface) version since it's more intuitive.**
**You can also use [Insomnia](https://insomnia.rest) which has similar features.**
### GET request
Open Postman. You will see this:
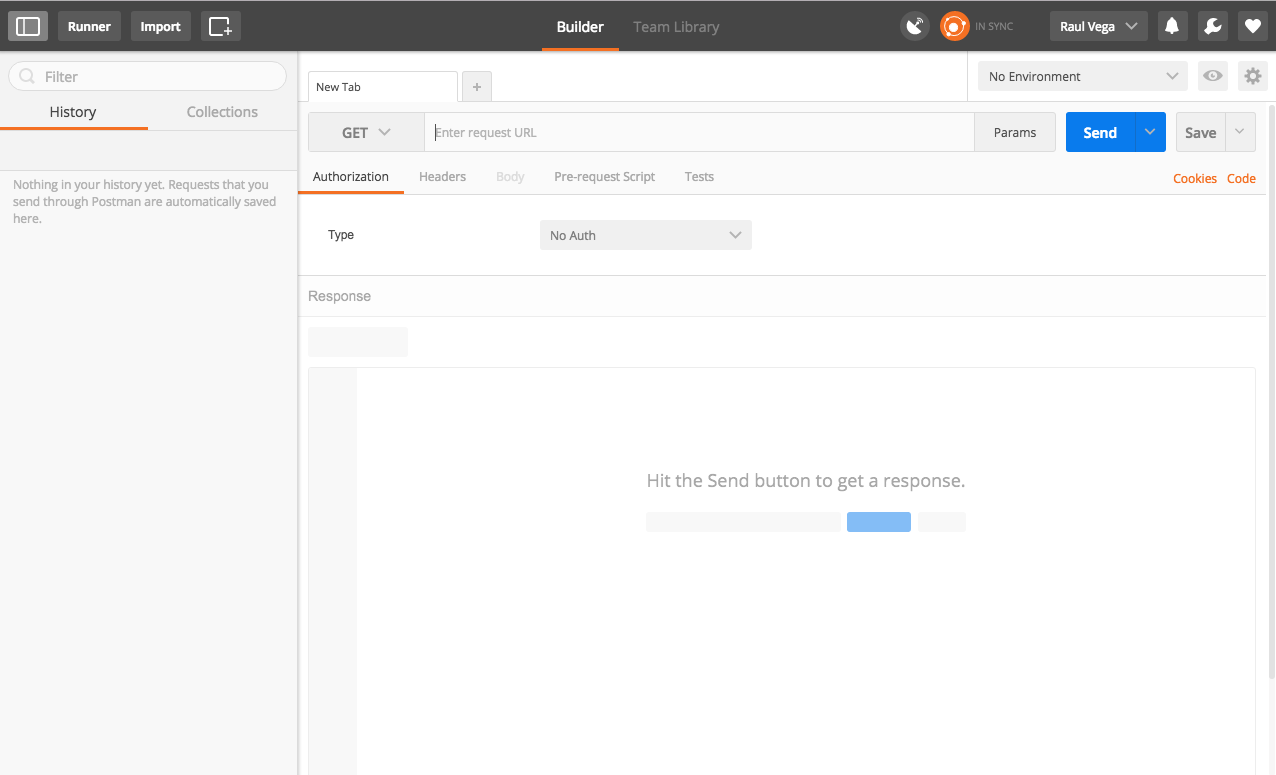
For now, we will focus on the navigation bar:

- **The navigation bar** simulates the browser's navigation bar,
- **the `select` input** on the left indicates the HTTP verb you want to use in the request,
- **the *Params* button** on the right is for specifying parameters in the request. If the HTTP <b>verb</b> used is *GET*, it will add the parameters in the URL's *query string*,
- **the *SAVE* button** allows you to save the request, in case you want to repeat the same request. This is useful when you are introducing the same data repeatedly,
- **the *SEND* button** will create the request and send it.
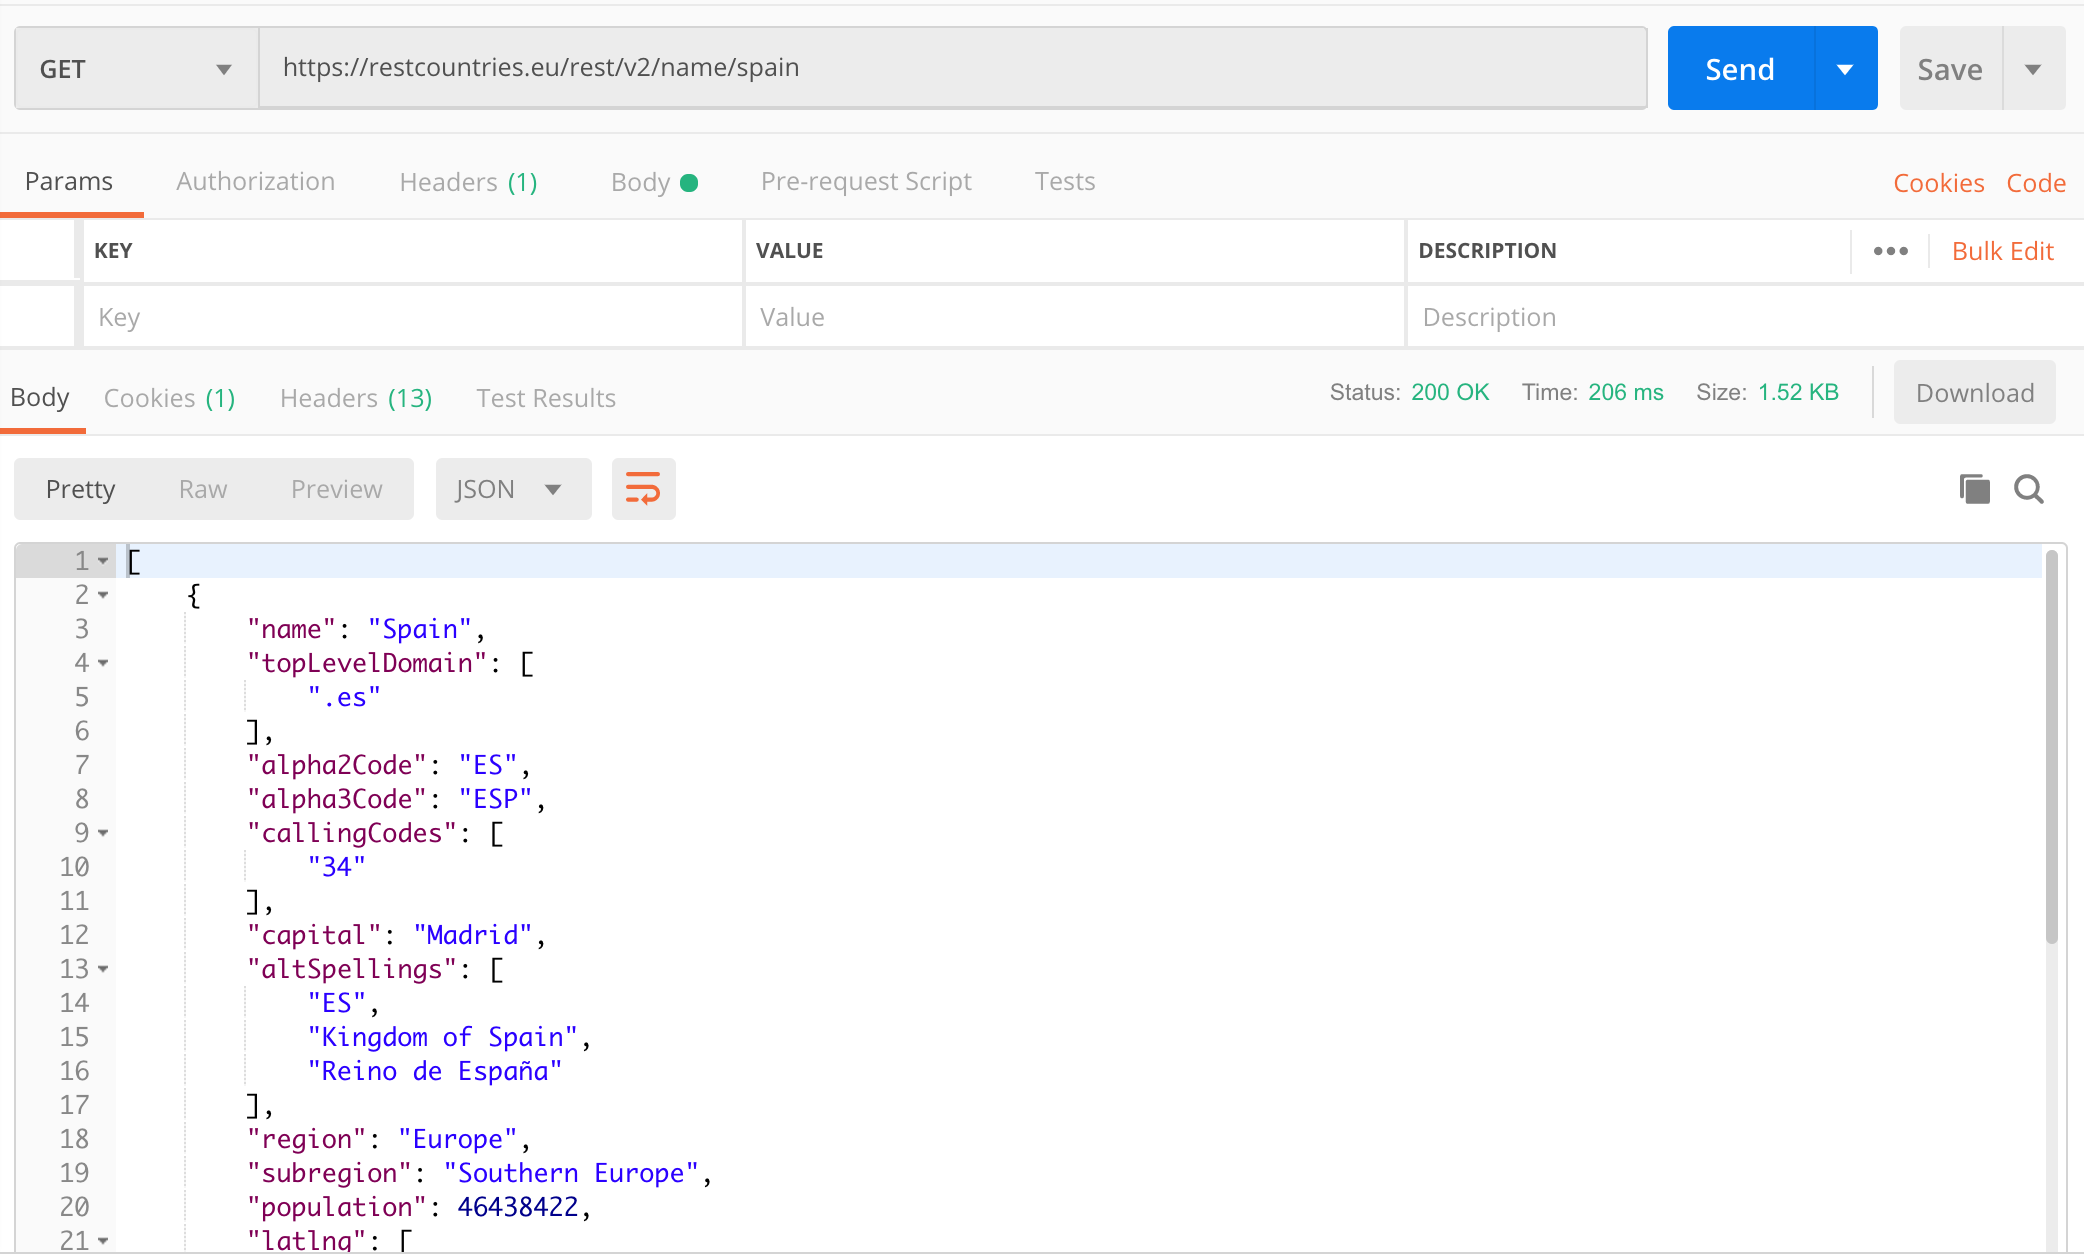
Let's input the request to search by country name:

When the *SEND* button is clicked, Postman will display the information related to the response in the panel below.
Now, you can try to get the data from some other API endpoint. It's easy, right? :100:
:::info lecture
En général, nous allons toujours tester nos requêtes dans POSTMAN avant de les implémenter en JS avec axios (afin d'être sûr qu'elles marchent bien).
:::
## Axios calls
### Axios GET call
A standard Axios call for any HTTP request is a function `axios()` that receives a JavaScript object that specifies different options of the request.
Since **Axios** is Promise based, we need to add our `.then()` to process the response, and the `.catch()` method in case there is an error on the response.
These are the most common options:
:::info lecture
La syntax générale d'axios :
:::
```javascript
axios({
method: "The HTTP method (verb) we are going to use, e.g. GET, POST, PUT, etc.",
url: "The url the server is going to receive.",
params: "URL parameters to be sent with the request"
})
.then(response => {
// Here we can do something with the response object
})
.catch(err => {
// Here we catch the error and display it
});
```
There are many other options we can configure in our **Axios** requests. You can check all of them in the <b>[Axios Documentation](https://github.com/axios/axios#request-config)</b>
- **`baseURL`**: will be pre-pended to `url`. If you wanted to make a request to the `REST COUNTRIES API`, https://restcountries.eu/rest/v2/ , would be the baseURL because it remains the same in every endpoint.
- **[`responseType`](https://developer.mozilla.org/en-US/docs/Web/API/XMLHttpRequest/responseType)**: indicates the type of data that the server will respond. Options are `arraybuffer`, `blob`, `document`, `json`, `text`, `stream`.
- **`maxContentLength`**: defines the max size of the http response content allowed.
**:eyes: Check the official documentation to see the full list of available options.**
### Making a request to a REST API
We will practice making `axios get` requests.
<div class="skip">
To start, create the folder `rest-countries` and inside create two files: `index.html` and `index.js`.
```bash
$ mkdir rest-countries
$ cd rest-countries
$ touch index.html index.js
```
```
└── rest-countries
├── index.html
└── index.js
```
Now add this code to `index.html`.
```html
<!-- index.html -->
<!DOCTYPE html>
<html lang="en">
<head>
<meta charset="UTF-8" />
<meta name="viewport" content="width=device-width, initial-scale=1.0" />
<meta http-equiv="X-UA-Compatible" content="ie=edge" />
<title>Rest Countries API</title>
</head>
<body>
<h1>Countries Info</h1>
<!-- use input's id to grab the value from the input field -->
<label for="theInput"></label>
<input id="theInput" type="text" />
<button id="theButton">Get the country</button>
<!-- the data we get from the API will be populated in here: -->
<h2 id="countryName"></h2>
<p id="countryCapital"></p>
<script src="https://unpkg.com/axios/dist/axios.min.js"></script>
<script type="text/javascript" src="index.js"></script>
</body>
</html>
```
Notice that we did not put the label and the input inside a *<form>* element, that is because the default behavior of form elements is to reload the page on submit. We will address later how to avoid this while keeping with the *W3C* standard.
</div>
:::info lecture
Testons axios coté client...
:::
<iframe height="300" style="width: 100%;" scrolling="no" title="bGNwdyd" src="https://codepen.io/abernier/embed/bGNwdyd?height=300&theme-id=0&default-tab=result" frameborder="no" allowtransparency="true" allowfullscreen="true">
See the Pen <a href='https://codepen.io/abernier/pen/bGNwdyd'>bGNwdyd</a> by Antoine BERNIER
(<a href='https://codepen.io/abernier'>@abernier</a>) on <a href='https://codepen.io'>CodePen</a>.
</iframe>
And now add some code to the `index.js`:
```javascript
// index.js
const restCountriesApi = axios.create({
baseURL: "https://restcountries.eu/rest/v2/name/"
});
function getCountryInfo(theName) {
restCountriesApi
.get(theName)
.then(responseFromAPI => console.log("Response from API is: ", responseFromAPI.data))
.catch(err => console.log("Error is: ", err));
}
document.getElementById("theButton").onclick = function() {
const country = document.getElementById("theInput").value;
getCountryInfo(country);
};
```
:::info lecture
Examinons:
- en console le résultat d'une 200 (ex: "fr"): `.data`
- l'onglet Network XHR
- en console le résultat d'une 404 (ex: "frr")
- expliquer les différents status 2XX, >=400
:::
:exclamation: **Most of the time we use the syntax `axios.get(URL, body)` since it is more readable!**
If you input **spain** and click the button, you will see this array of object(s) in the browser's console:
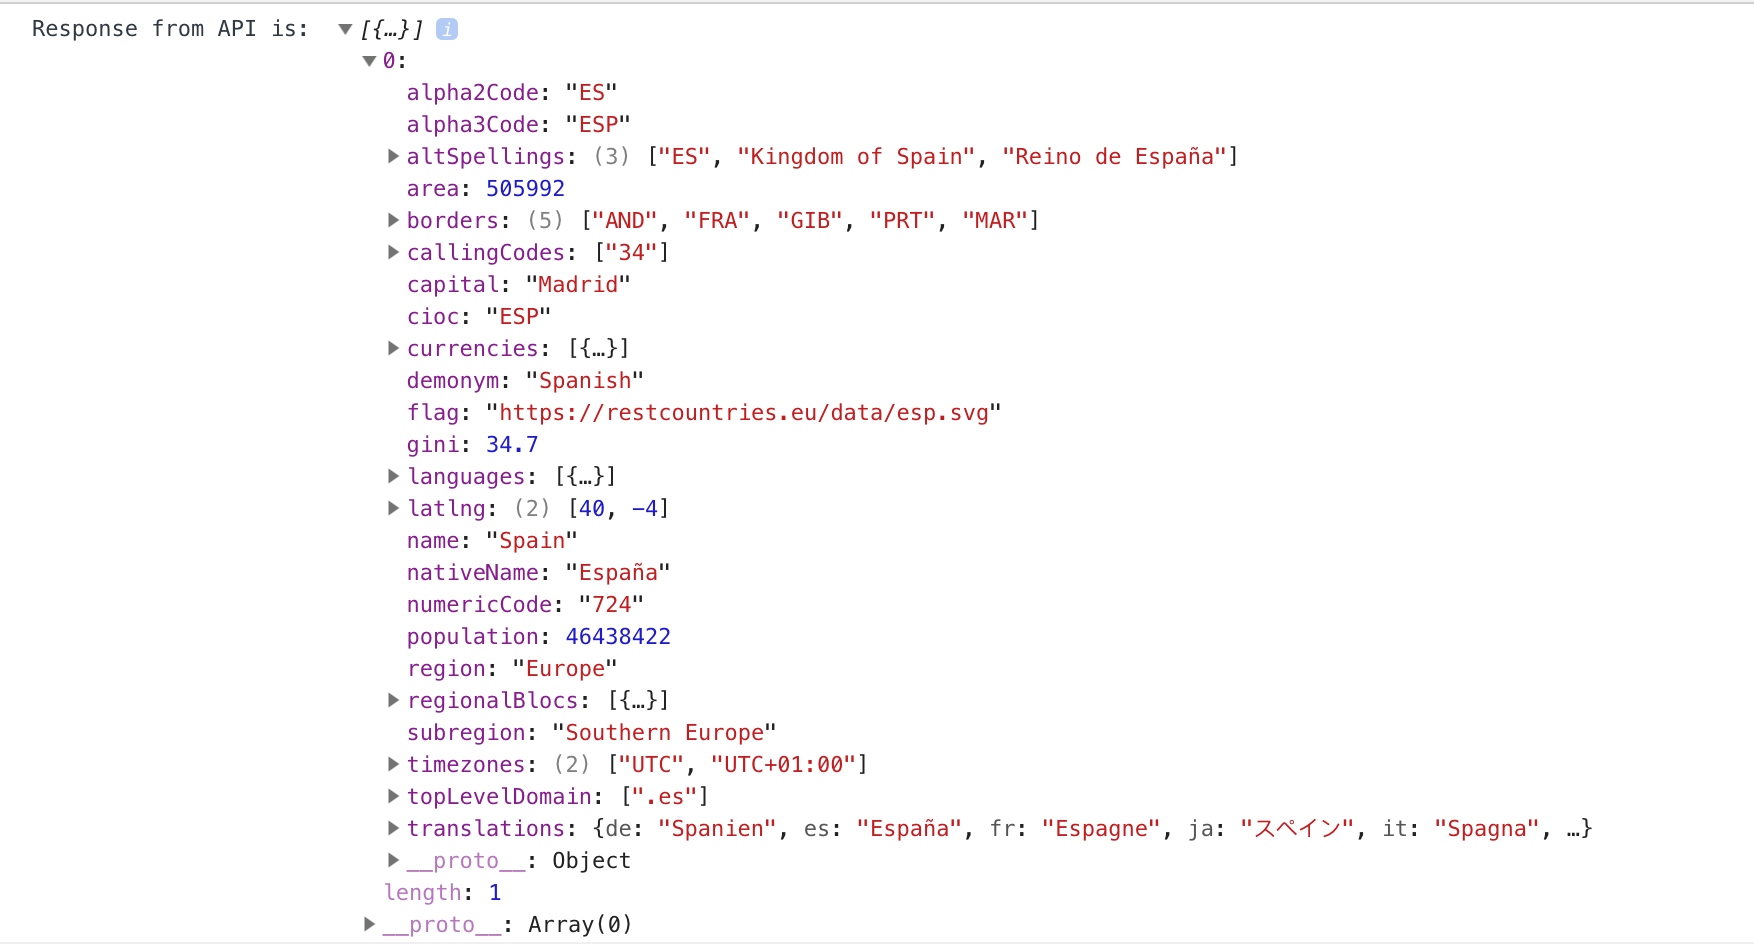
The key concept of Axios requests: **there is no page reload!** If you keep changing the countries. You will get the data without refreshing the page.
Remember that usually, after every HTTP request, the page is refreshed with a full new page to render. If that were the case, the console would be empty.
<div class="skip">
Let's do an extra step and display the data in the browser, not just in the console. Update the code in `index.js` with the following:
```js
// index.js
let errDiv;
const restCountriesApi = axios.create({
baseURL: "https://restcountries.eu/rest/v2/name/"
});
function getCountryInfo(theName) {
restCountriesApi
.get(theName)
.then(responseFromAPI => {
removeErrDiv();
const countryName = responseFromAPI.data[0].name;
const countryCapital = responseFromAPI.data[0].capital;
// instead in the console, show data in the browser using JS DOM manipulation:
document.getElementById("countryName").innerHTML = countryName;
document.getElementById("countryCapital").innerHTML = "Capital: " + countryCapital;
})
.catch(err => {
if (err.response.status === 404) {
removeCountryInfo();
createDiv();
const theErr = document.createTextNode(`What the heck is ${theName}? 🤭`);
errDiv.appendChild(theErr);
} else {
console.log("err => ", err);
}
});
}
function createDiv() {
errDiv = document.createElement("div");
errDiv.setAttribute("id", "error");
document.body.appendChild(errDiv);
}
function removeErrDiv() {
if (document.getElementById("error")) {
const error = document.getElementById("error");
error.parentNode.removeChild(error);
}
}
function removeCountryInfo() {
document.getElementById("countryName").innerHTML = "";
document.getElementById("countryCapital").innerHTML = "";
}
function checkInput() {
removeErrDiv();
if (document.getElementById("theInput").value === "") {
document.getElementById("theButton").disabled = true;
removeCountryInfo();
createDiv();
const theErr = document.createTextNode(`Wanna input something? 🤪`);
errDiv.appendChild(theErr);
} else {
document.getElementById("theButton").disabled = false;
}
}
document.getElementById("theButton").onclick = function() {
removeErrDiv();
const country = document.getElementById("theInput").value;
getCountryInfo(country);
};
```
And there's one update in the `index.html`:
```html
<!-- index.html -->
...
<input id="theInput" type="text" onkeyup="checkInput()">
...
```
At this point, we won't go in details since these are the basics of DOM manipulation we covered in Module 1, but this could be very good recap exercise in case you started forgetting it :wink:
#### Your turn
:::info
Try to get the information hitting the endpoint that returns a response based on the `currency` that's officially being used.
:::
</div>
## More Practice
Let's keep practicing a bit! In this case, we will retrieve stock data from an [IEX Trading API](https://iextrading.com/developer/), and display it on a chart.
:::info lecture
Utilisons cette fois-ci une API de change, pour créer un diagram à l'aide des données de l'API...
:::
### ChartJS
:::info lecture
Nous utiliserons une librairie de graphs: chart.js
:::
For displaying our data, we will use a library called [ChartJS](http://www.chartjs.org/), that help us to print impressive charts we few lines of code.

### Set up
Create a `stock-chart` folder. Inside the folder, create an `index.html` and an `index.js`.
:::info lecture
Setup:
:::
```bash
$ mkdir stock-chart
$ cd stock-chart
$ touch index.html index.js
```
```
└── stock-chart
├── index.html
└── index.js
```
Let's create a basic HTML structure in our `index.html` and don't forget to link our `javascript` file.
We will divide our assignment into two steps: (1) getting the data using the GET request and (2) print the chart that displays the data we got in step 1.
### Step 1: get the data
To get the data from the API, we need to do a GET request using Axios, so go ahead and add the Axios CDN on the `<head>` tag of our HTML.
:::info lecture
N'oublions pas d'inclure `axios` et de lier notre fichier `index.js` :
:::
```html
<script src="https://unpkg.com/axios/dist/axios.min.js"></script>
<script src="index.js"></script>
```
Connect you `index.js` with your `index.html`. On our `index.js`, we should have the necessary code to make the GET request.
We will build our example around the [ALPHA VANTAGE](https://www.alphavantage.co/) which is a leading provider of free APIs for real-time and historical data on stocks, forex (FX), and digital/cryptocurrencies. The primary key to our success, like in every other case when working with APIs is the **[Alpha Vintage API documentation](https://www.alphavantage.co/documentation/#daily)**.
:::info lecture
Testons dans POSTMAN la requete : https://www.alphavantage.co/query?function=TIME_SERIES_DAILY&symbol=MSFT&apikey=demo

:::
Let's do it. Based on the docs, we have multiple options - do we want the daily data, weekly data, data at specified intervals, and so on. We will go for the **daily** option.
:::info lecture
Implémentons maintenant la requete avec axios :
:::
```javascript
// index.js
const key = "demo";
const functionName = "TIME_SERIES_DAILY";
const symbolName = "MSFT";
const apiUrl = `https://www.alphavantage.co/query?function=${functionName}&symbol=${symbolName}&apikey=${key}`;
axios
.get(apiUrl)
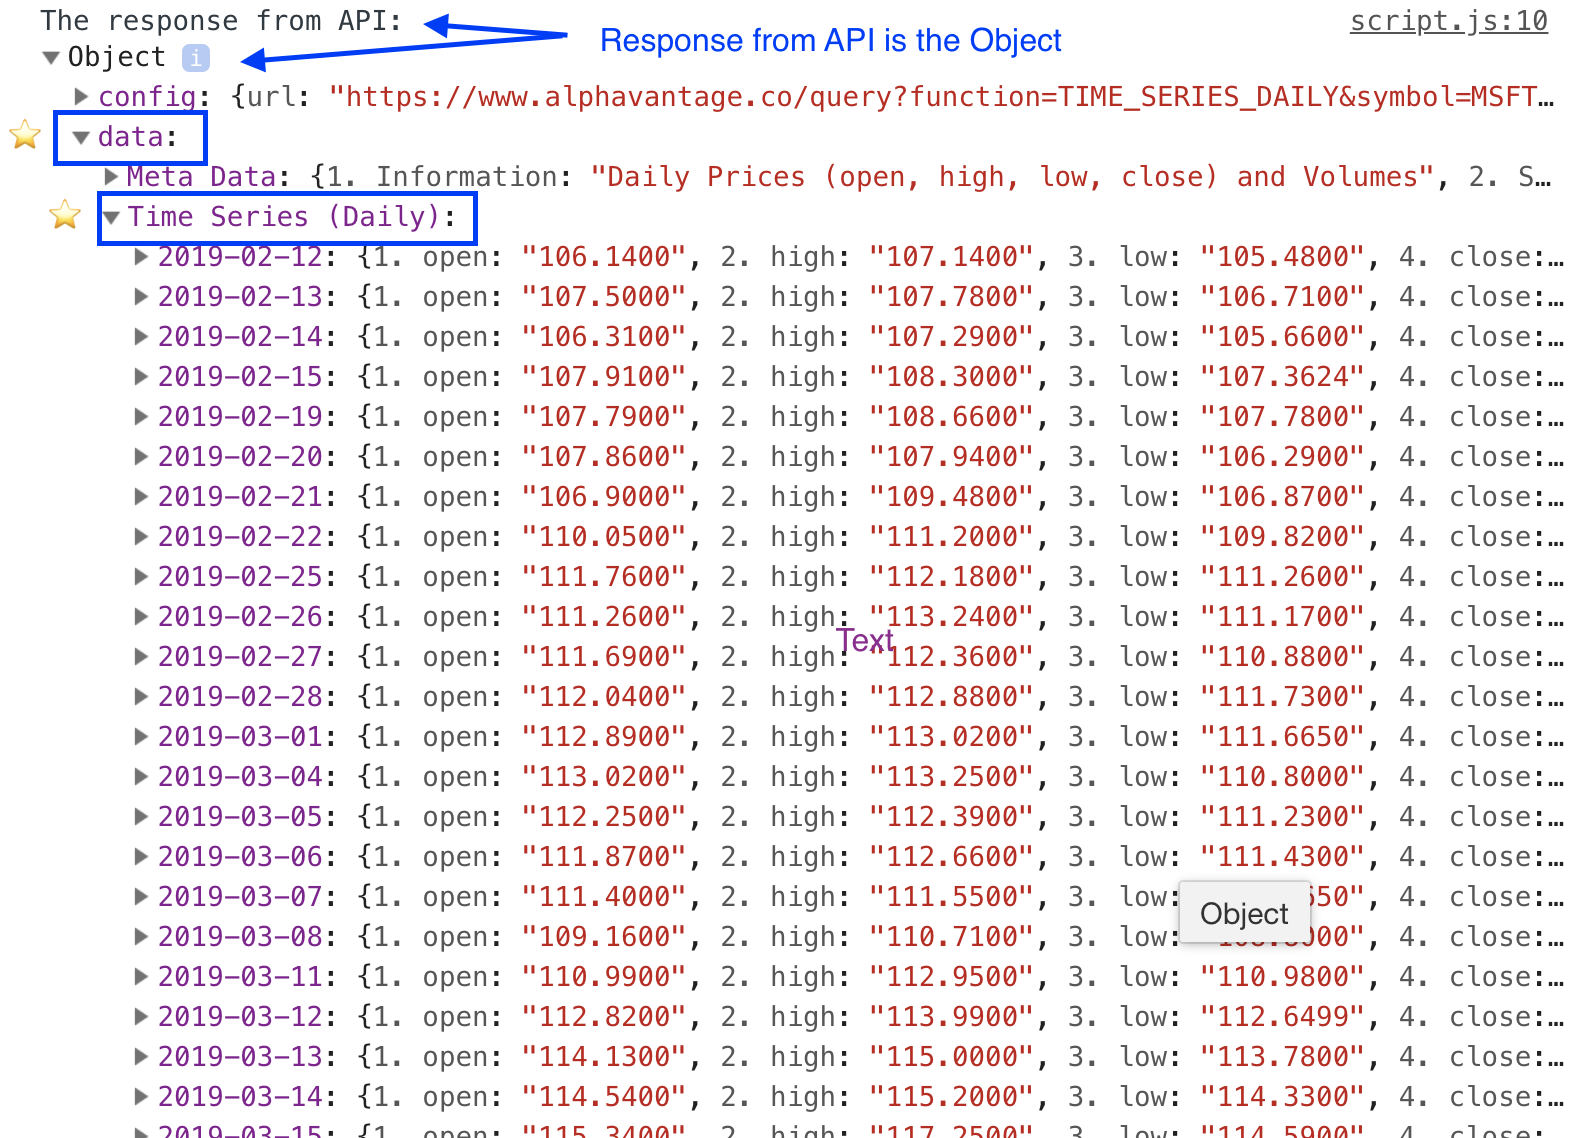
.then(responseFromAPI => console.log("The response from API: ", responseFromAPI))
.catch(err => console.log("Error while getting the data: ", err));
```
Now open your browser on `index.html` and open the console. Check the result you're getting. It should be something along these lines:
This was quite easy, don't you think so? :wink:
### Step 2: add ChartJS
:::info lecture
Occupons-nous maintenant d'afficher ses données dans le graphique...
:::
We have several ways to add ChartJS to our project. In this case, we will use the CDN, so go ahead and add it to the `<head>` of our `index.html` file:
:::info lecture
Ajout de la librairie `chart.js` :
:::
```html
<script src="https://cdnjs.cloudflare.com/ajax/libs/Chart.js/2.4.0/Chart.min.js"></script>
```
According to [ChartJS Documentation](http://www.chartjs.org/docs/latest/getting-started/) we also need to add a `canvas` in our HTML file, so place it inside the `body`.
:::info lecture
La librairie utilise un `<canvas>` :
:::
```html
<canvas id="myChart"></canvas>
```
We are ready to print our Chart. On the `index.js`, let's add a `printTheChart()` function. We will call this function after we get the data from the API and pass that data to function.
:::info lecture
Résumons la tâche d'affichage à une fonction `printTheChart` :
:::
```javascript=
axios
.get(apiUrl)
.then(responseFromAPI => {
printTheChart(responseFromAPI.data); // <== call the function here where you used to console.log() the response
})
.catch(err => console.log("Error while getting the data: ", err));
function printTheChart(stockData) {
const dailyData = stockData["Time Series (Daily)"];
const stockDates = Object.keys(dailyData);
const stockPrices = stockDates.map( date => dailyData[date]["4. close"] );
const ctx = document.getElementById("myChart").getContext("2d");
const chart = new Chart(ctx, {
type: "line",
data: {
labels: stockDates,
datasets: [
{
label: "Stock Chart",
backgroundColor: "rgb(255, 99, 132)",
borderColor: "rgb(255, 99, 132)",
data: stockPrices
}
]
}
});
}
```
:::info lecture
Préparation des données utiles :
- L11 : chaque clé constituera un label
- L12 : on extrait un tableau de valeurs issues de la clé `"4. close"`
---
Affichage :
- `new Chart()` de type "line", cf. doc: https://www.chartjs.org/docs/latest/charts/line.html
:::
That's it! If you navigate to the `index.html` on the browser, you should be able to see the chart with the data:
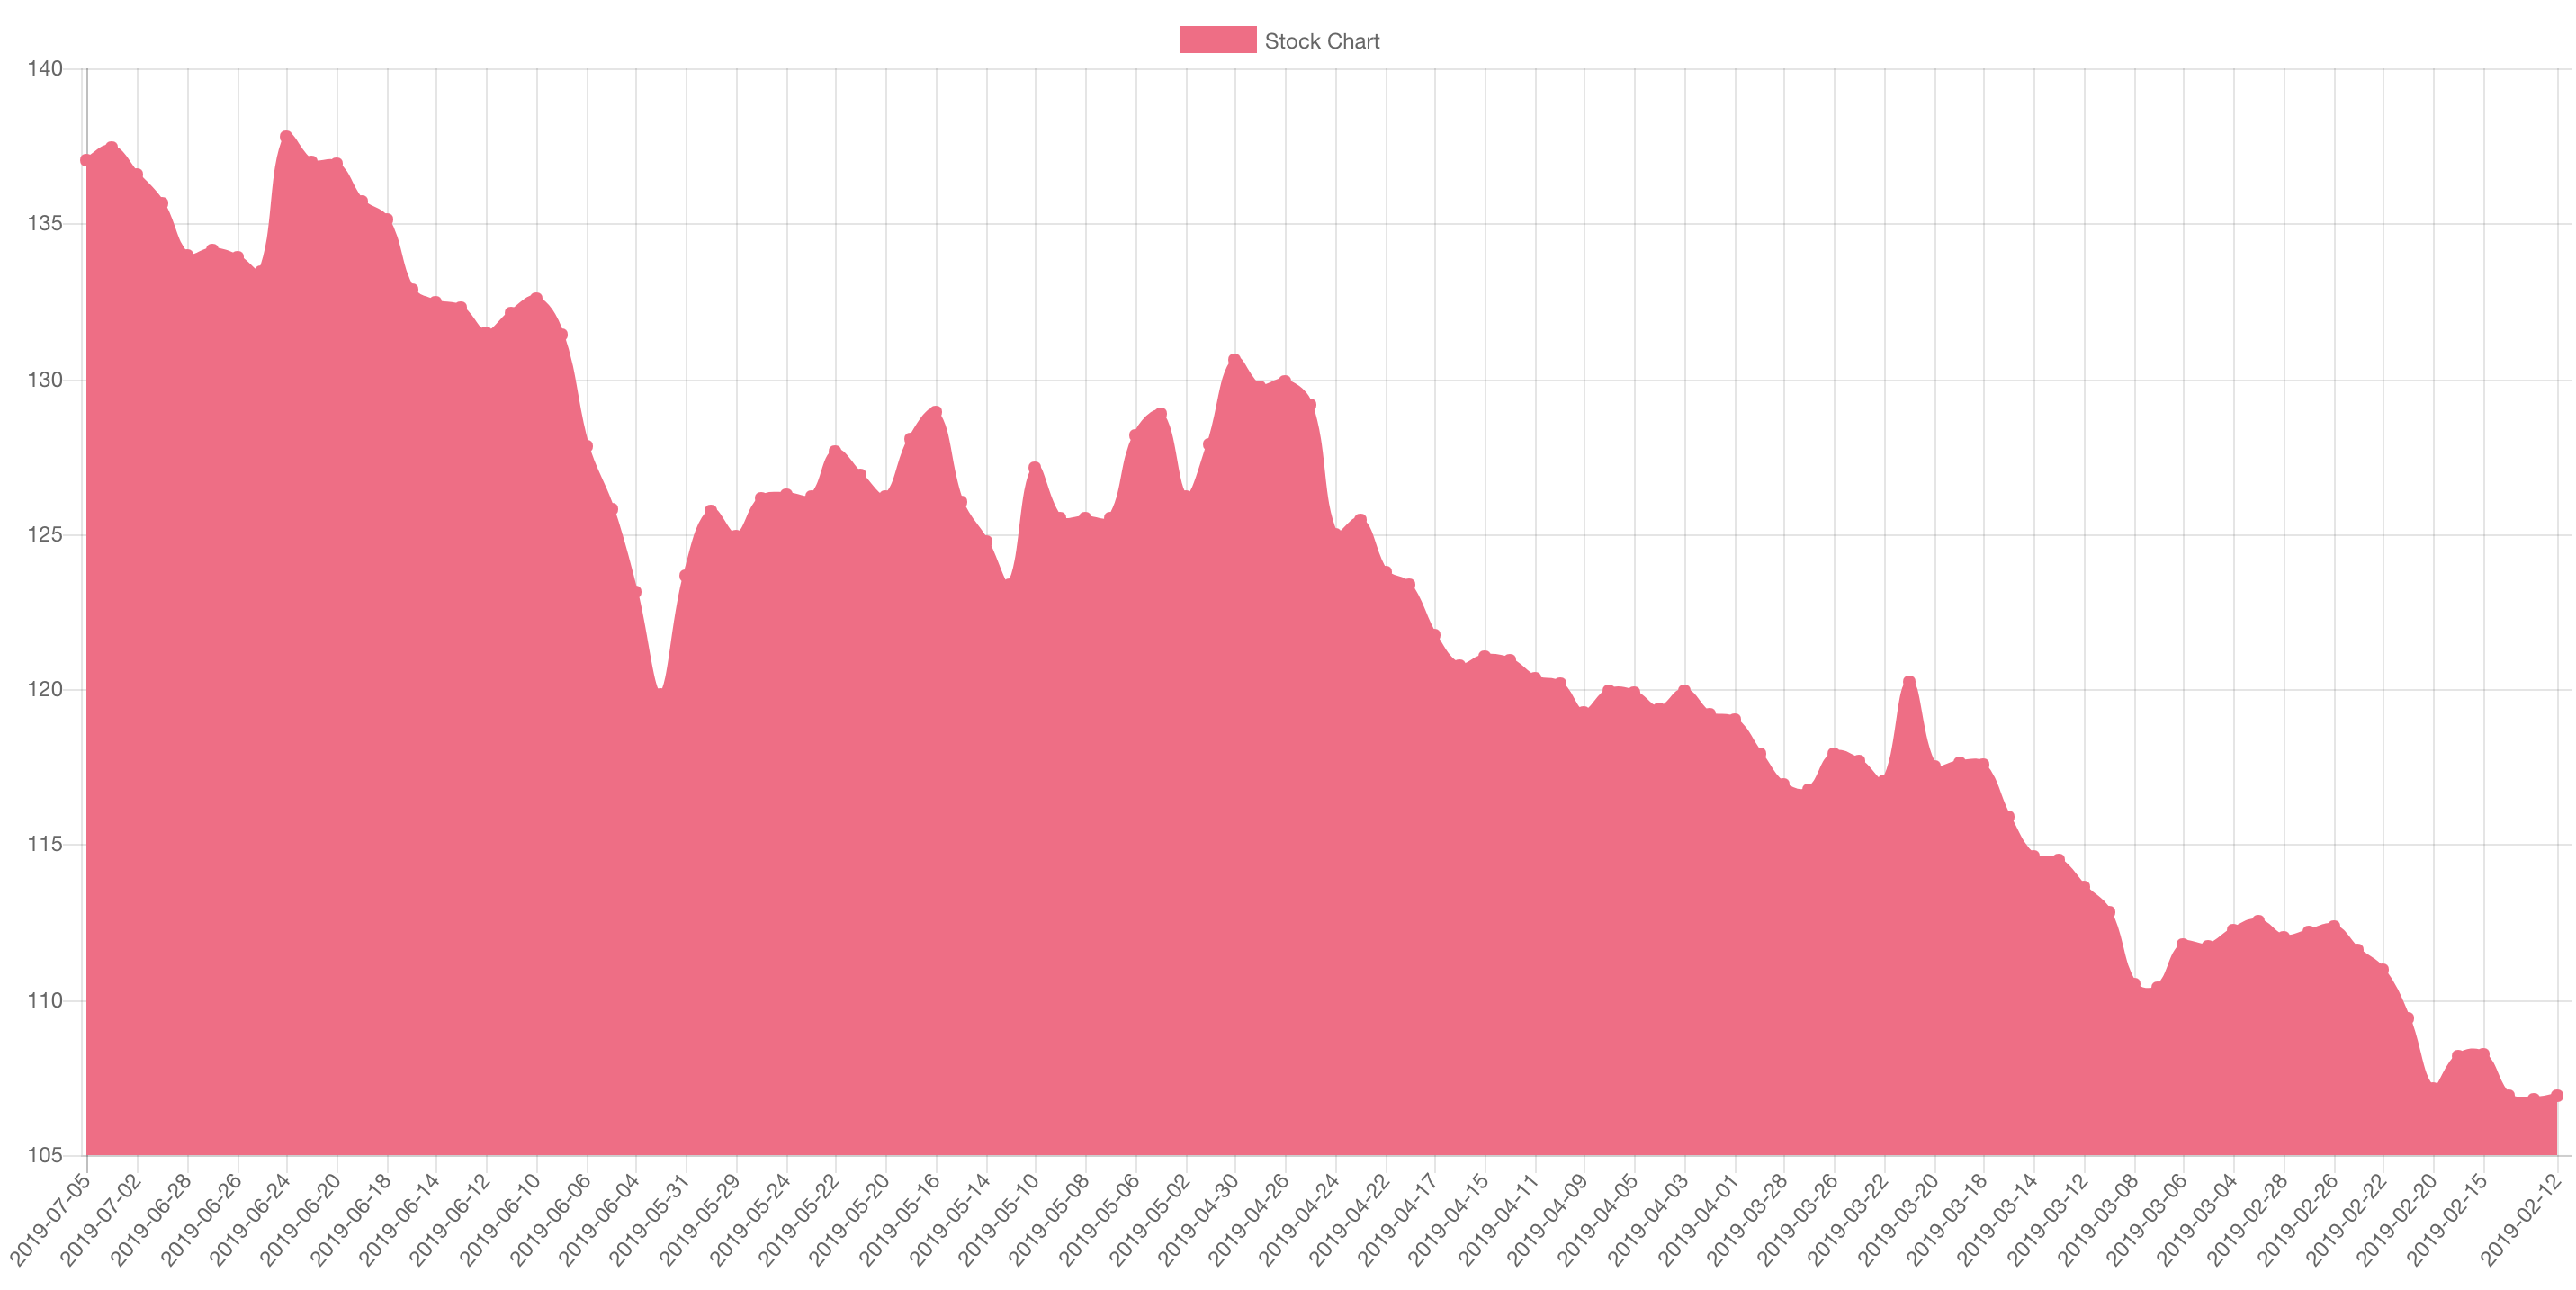
As you may notice, on the `dataset` property of the chart, we can change the `backgroundColor` or the `borderColor`. We have several options to display the Chart. We encourage you to check the ChartJS documentation to customize it as much as you want.
#### Exercise
Create a chart that shows currency exchange rates of American Dollar (USD).
## Summary
In this lesson, we learned about *axios* and got familiar with the way they work asynchronously, making the **promise based** HTTP requests to any server. This server could be our server or any remote server.
We learned how to create axios requests using `axios.get()` function, and before everything, how to *create axios* using`axios.create()` method.
Finally, we learned that with axios, we could retrieve data which we can use in our views **without refreshing the page**.
## Extra Resources
- [AXIOS Docs](https://github.com/axios/axios)
- [Postman](https://www.getpostman.com/docs/) - Official documentation
- [ChartJS Docs](https://www.chartjs.org/docs/latest/)