---
tags: ironhack, lecture,
---
<style>
.markdown-body img[src$=".png"] {background-color:transparent;}
.alert-info.lecture,
.alert-success.lecture,
.alert-warning.lecture,
.alert-danger.lecture {
box-shadow:0 0 0 .5em rgba(64, 96, 85, 0.4); margin-top:20px;margin-bottom:20px;
position:relative;
ddisplay:none;
}
.alert-info.lecture:before,
.alert-success.lecture:before,
.alert-warning.lecture:before,
.alert-danger.lecture:before {
content:"👨🏫\A"; white-space:pre-line;
display:block;margin-bottom:.5em;
/*position:absolute; right:0; top:0;
margin:3px;margin-right:7px;*/
}
b {
--color:yellow;
font-weight:500;
background:var(--color); box-shadow:0 0 0 .35em var(--color),0 0 0 .35em;
}
.skip {
opacity:.4;
}
</style>

# Canvas | Code Along - Basic Animations
## Learning Goals
After this lesson you will be able to:
- Fully understand basic animations using canvas
- Learn how to implement all animations in a single project
## Introduction
In the last learning unit, we learn the concepts to implement basic animations on canvas. Now we now we need clear and redraw our `canvas`, scheduling an update.
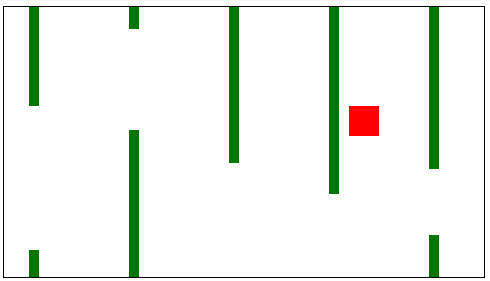
In this lesson, we will incorporate everything we've learned so far in a single game project. We are going to create a basic game to avoid obstacles controlling a `player` that will be represented by a red square.
Our game is based on the [w3schools.com HTML Game tutorial](https://www.w3schools.com/graphics/game_intro.asp). If something wasn't clear by the end of the lesson, you can follow the original tutorial on the [w3schools.com Website](https://www.w3schools.com/graphics/game_intro.asp).
## The Game
We are not opting for the best UI prize with the following game, we will create a basic one where the user can move the `player` through the canvas to avoid crashing into obstacles, but applying some imagination and style you can get an awesome game just using a really similar logic. :wink:
At the end of the learning unit, we will have something like this:
<img src="https://s3-eu-west-1.amazonaws.com/ih-materials/uploads/upload_5e57f92e86e0837bb4a4be0c5ae46cb0.gif" style="width:100%">
**So, let´s go! Let´s create our awesome first game!** :muscle:
### Game Area
:::info lecture
```shell
$ cd ~code
$ mkdir canvas-codealong
$ code canvas-codealong
```
:::
First, let's set up our HTML and create our game area. This time instead of adding the `canvas` tag directly in the HTML, we will add it from our JavaScript file. So we need to add a `canvas`, specifying the `width`, `height`, `context` and insert it into our `body` tag.
Create an HTML file with just a basic structure and a `script` tag to connect to our JS file:
```html
<!DOCTYPE html>
<html lang="en">
<head>
<meta charset="UTF-8" />
<title>Animations Code-along</title>
</head>
<body>
<script src="./js/script.js"></script>
</body>
</html>
```
We will create a `myGameArea` object, and store in properties everything related to it. This way we have a much cleaner code!
```javascript=
var myGameArea = {
canvas: document.createElement("canvas"),
start: function() {
this.canvas.width = 480;
this.canvas.height = 270;
this.context = this.canvas.getContext("2d");
document.body.insertBefore(this.canvas, document.body.childNodes[0]);
},
};
```
:::info lecture
- L2 : Nous créons ici la balise `<canvas>` directement en JS.
- L7 : Nous l'insérons dans le DOM au moment du `start()`.
:::
### Components
:::info lecture
`Component` va être une classe utilitaire pour rassembler propriétés/méthodes d'un même objet de notre jeu.
:::
:::info lecture
☝️ C'est une très bonne pratique !
:::
We will create components, for our `player` element, and for the `obstacles`, so we are going to need a **Component** Class. For creating a component we will need some parameters such as `width`, `height`, `color` and the `x` and `y` position to print it on the `canvas`
```javascript=10
class Component {
constructor(width, height, color, x, y) {
this.width = width;
this.height = height;
this.color = color;
this.x = x;
this.y = y;
}
update() {
var ctx = myGameArea.context;
ctx.fillStyle = this.color;
ctx.fillRect(this.x, this.y, this.width, this.height);
}
}
```
:::info lecture
Créons notre player grâce à `Component` :
:::
We are ready to create our `player` element. 👤 In a variable name `player` we are going to call the `Component` class to create it. Remember we need to send the `width`, `height`, `color` and `x`,`y` coordinates for the element.
```javascript=26
var player = new Component(30, 30, "red", 0, 110);
```
### Schedule updates and Clear the `canvas`
We know that for updating our **game area** we will need to schedule updates, and in this case, we will do it using `setInterval()` function that calls a new function named `updateGameArea`. So into our `myGameArea.start()` let´s add an interval property. After adding those things, our `myGameArea` variable will look like something like this:
:::info lecture
Appelons `updateGameArea` toutes les 20ms, ie : boucle d'animation
NB : nous allons définir `updateGameArea` juste après...
:::
```javascript=1
var myGameArea = {
canvas: document.createElement("canvas"),
start: function() {
this.canvas.width = 480;
this.canvas.height = 270;
this.context = this.canvas.getContext("2d");
document.body.insertBefore(this.canvas, document.body.childNodes[0]);
// 👇 call updateGameArea() every 20 milliseconds
this.interval = setInterval(updateGameArea, 20);
},
};
```
:::info lecture
Ajoutons une méthode `clear` à `myGameArea` :
:::
When updating a `canvas`, we can not forget to clear it before starting the new draw. Let´s add a `clear()` function into our `myGameArea` object.
```javascript
var myGameArea = {
...
// 👇
clear: function() {
this.context.clearRect(0, 0, this.canvas.width, this.canvas.height);
}
};
```
:::info lecture
Créons notre fonction `updateGameArea` qui sera appelé toutes les 20ms. Celle-ci :
- effacera toute la zone de dessin
- `update`ra notre player (en le redessinant)
:::
Let's not forget to add that new `updateGameArea` function. All it needs to do right now is call the game area's `clear()` method and the `player` object's `update()` method.
```javascript=35
function updateGameArea() {
myGameArea.clear();
player.update();
}
```
:::info lecture
N'oublions pas de démarrer le jeu :
:::
Now to see our immobile red `player` on the screen, we have to call the game area's `start()` method to kick things off.
```javascript=40
myGameArea.start();
```
:::info lecture

🙌
:::
### Moving the **player**
:::info lecture
Notre player s'affiche maintenant en continue (toutes les 20ms), mais il ne bouge pas encore...
:::
Our player is created, but now we need to move it. For that purpose, we will add into our **Component** Class `speedX` and `speedY` properties.
```javascript=17
class Component {
constructor(width, height, color, x, y) {
this.width = width;
this.height = height;
this.color = color;
this.x = x;
this.y = y;
// 👇 new speed properties
this.speedX = 0;
this.speedY = 0;
}
...
}
```
:::info lecture
`newPos()` method, va nous permettre de calculer `x` et `y` en fonction de ses vitesses :
:::
We'll also need a `newPos()` method that will use the speed properties to change the position.
```javascript
class Component {
...
newPos() {
this.x += this.speedX;
this.y += this.speedY;
}
}
```
Our player will be able to move **up, down, right and left**. We want our player to move according to keyboard arrows so we need to add a `keydown` function attached to the document and add to or subtract from our `x` or `y` positions.
:::info lecture
Lorsque l'on enfonche la touche `down` on incrément la `speedY`
:::
```javascript=43
document.onkeydown = function(e) {
switch (e.keyCode) {
case 38: // up arrow
player.speedY -= 1;
break;
case 40: // down arrow
player.speedY += 1;
break;
case 37: // left arrow
player.speedX -= 1;
break;
case 39: // right arrow
player.speedX += 1;
break;
}
};
```
:::info lecture
Lorsque l'on la relache : on reset à 0
:::
We will also need a `keyup` function so we stop adding speed to our player, otherwise, this won´t stop until another key is pressed. Let´s add it as well.
```javascript=60
document.onkeyup = function(e) {
player.speedX = 0;
player.speedY = 0;
};
```
Now to put this all into play, we need to change our `updateGameArea` function so that it updates the player's position before we draw them.
```javascript=65
function updateGameArea() {
myGameArea.clear();
player.newPos(); // 👈 update the player's position before drawing
player.update();
}
```
You should now be able to move your red `player` with the arrow keys!
:::info lecture

Notre player bouge !
:::
### Create Obstacles
Our player is almost done, but our game needs some obstacles to make it interesting.
For creating them we will call our **Component** class, passing the needed parameters to create them. And to make this recurringly, we are going to add into our `myGameArea` object a `frame` variable that increments every time we update our `canvas`. Every 120 times we update the `canvas`, a new **pair of obstacles** will be created. If you want to make it harder, just put a lower number :wink:
To get the effect of having space between to go through, every time we create **obstacles** we will create two of them, one printed on the top of our `canvas`, and the other on the bottom. We will need a `gap` between both of them where our `player` can go through.
First we are going to call a new function named `updateObstacles` from the `updateGameArea` function:
:::info lecture
Dans notre game-loop, nous allons mettre à jour les obstacles
NB : Nous créerons la fonction `updateObstacles` juste après
:::
```javascript=65
function updateGameArea() {
myGameArea.clear();
player.newPos();
player.update();
updateObstacles(); // 👈 update the obstacles array
}
```
Next we add some variables that we will need to store important data: a `myObstacle` array to store all of our obstacles and a `frames` property on the game area object. This will help us to count how many times we call the `updateGameArea` function. This way, we can push new obstacles every certain amount of updates.
:::info lecture
Nous allons vouloir créer un obstacle toutes les 120 frames (toutes les `120*20ms` soit 2.4s).
Pour cela, créons une propriété `frames` dans `myGameArea` ainsi qu'une liste d'obstacles vide au départ :
:::
```javascript=1
var myObstacles = []; // 👈
var myGameArea = {
canvas: document.createElement("canvas"),
frames: 0, // 👈
...
};
```
Next we create the `updateObstacles` function with the following code. We will explain every line below:
:::info lecture
Créons maintenant notre fonction `updateObstacles` (appelée par `updateGameArea`) :
:::
```javascript=68
function updateObstacles() {
myGameArea.frames += 1;
if (myGameArea.frames % 120 === 0) {
var W = myGameArea.canvas.width;
var H = myGameArea.canvas.height;
var minHeight = 20;
var maxHeight = 200;
var height = Math.floor(Math.random() * (maxHeight - minHeight + 1) + minHeight);
var minGap = 50;
var maxGap = 200;
var gap = Math.floor(Math.random() * (maxGap - minGap + 1) + minGap);
myObstacles.push(new Component(10, height, "green", W, 0));
myObstacles.push(new Component(10, H - height - gap, "green", x, height + gap));
}
}
```
- L68: `myGameArea.frames +=1` Every time we call `updateGameArea()` we will add 1 to our `frames` variable.
- L70: `if (myGameArea.frames % 120 === 0){...}` This condition will determine every how many `update` we create new `obstacles`. We set every 120 updates, that means 2.4 seconds, because we call the `updateGameArea()` function every 20 milliseconds.
- L71: `W = myGameArea.canvas.width` We set the `x` coordinate of the new `obstacle` according our canvas `width`
- L76: `height = Math.floor(Math.random()*(maxHeight-minHeight+1)+minHeight)` We set the `minHeight` to **20** and the `maxHeight` to **200**. So in this line we are getting a random value for our obstacle height, and it will always **20 < height < 200**.
- `gap = Math.floor(Math.random()*(maxGap-minGap+1)+minGap)` The same as the obstacles, we want to add some gaps between them where our player can go through. Our gap will always be **50 < gap < 200**.
- `myObstacles.push(new component(10, height, "green", W, 0))` Finally we will add our obstacles. We will add 2 of them, this line adds one obstacle in the top of our `canvas` setting the random `height`.
- `myObstacles.push(new component(10, H - height - gap, "green", W, height + gap))`. The second one will be on the bottom of our `canvas`, separate from the one on the top thanks to our `gap` variable.
:::info lecture
[](https://docs.google.com/drawings/d/1Ha90iwR3RblzDuElgdhyzXDlOys5hWGrBcyWZWu1zEw/edit)
:::
After creating them, we need to move the `obstacles`, just adding something to the `x` axis. We add 1, but if you want to make it more difficult, go ahead and add more.
```javascript=68
function updateObstacles() {
// 👇 update each obstacle
for (i = 0; i < myObstacles.length; i++) {
myObstacles[i].x += -1;
myObstacles[i].update();
}
...
}
```
Now you have your player and some green obstacles that move.
:::info lecture

:::
### Crash check
:::info lecture
Occupons-nous des collisions !
:::
The obstacles are created, but if we hit them nothing happens. The game is supposed to end when we crash. So let´s create our final function to detect this crashes. First we will add a `stop` function to `myGameArea()` object. This function will stop our `setInterval()` and therefore the movement of all the objects.
:::info lecture
Une méthode `stop()` pour arrêter notre game-loop :
:::
```javascript=3
var myGameArea = {
...
stop: function() {
clearInterval(this.interval);
}
};
```
Then we need to create a function that checks if the position of the `player` is not the same as the obstacle´s one. So let´s add this function into our `Component` Class.
:::info lecture
Une methode `crashWith` retournant un booléen :
:::
```javascript
class Component {
...
left() {
return this.x;
}
right() {
return this.x + this.width;
}
top() {
return this.y;
}
bottom() {
return this.y + this.height;
}
crashWith(obstacle) {
return (
this.bottom() > obstacle.top() &&
this.top() < obstacle.bottom() &&
this.right() > obstacle.left() &&
this.left() < obstacle.right()
);
}
}
```
:::info lecture
[](https://docs.google.com/drawings/d/1dH14Y4xfIeP1aYQOpqECmo6rbCX7lC5c7OJ681grpaQ/edit)
:::
:::info lecture
Implementons une fonction `checkGameOver` qui sera exécutée à chaque tour de notre gameloop :
:::
This is almost done, we just need to check our `crashWith()` function every time we update our game, and call the `myGameArea.stop()` if this happens.
```javascript=117
function checkGameOver() {
var crashed = myObstacles.some(function(obstacle) {
return player.crashWith(obstacle);
});
if (crashed) {
myGameArea.stop();
}
}
```
:::info lecture
N'oublions pas de l'inclure dans notre gameloop :
:::
Let's call our new `checkGameOver` function from inside of `updateObstacles`.
```javascript=127
function updateGameArea() {
myGameArea.clear();
player.newPos();
player.update();
updateObstacles();
checkGameOver(); // 👈 check if the game should stop
}
```
### Score Creation
Maybe we want to challenge somebody or just know our best performance, so we need a scoring system. In this example, I think we can use our `myGameArea.frame` variable to set a score. Remember this variable increases every time we update the `canvas`.
In our example, we are going to divide it by 5, but you can set it the way you prefer.
Let´s add a `score` function to the `myGameArea` object.
```javascript
var myGameArea = {
...
score: function() {
var points = Math.floor(this.frames / 5);
this.context.font = "18px serif";
this.context.fillStyle = "black";
this.context.fillText("Score: " + points, 350, 50);
}
};
```
And of course we have to call this method from inside the `BLAH` function:
```javascript=133
function updateGameArea() {
myGameArea.clear();
player.newPos();
player.update();
updateObstacles();
checkGameOver();
myGameArea.score(); // 👈 update and draw the score
}
```
We are done! We have a full game running. Easy right? Giving these tools you can start to imagine some games for the first project.
Go ahead and take a look of the CodePen and how our game looks!
<iframe height='265' scrolling='no' title='Game Practice' src='//codepen.io/ironhack/embed/dzQxBq/?height=265&theme-id=0&default-tab=result&embed-version=2' frameborder='no' allowtransparency='true' allowfullscreen='true' style='width: 100%;'>See the Pen <a href='https://codepen.io/ironhack/pen/dzQxBq/'>Game Practice</a> by Ironhack (<a href='https://codepen.io/ironhack'>@ironhack</a>) on <a href='https://codepen.io'>CodePen</a>.
</iframe>
## Summary
We just create a full game using `canvas` and basic animations. If you want, check again all the steps we did so you make sure you understand everything.
Of course, this is not the only way to develop games in `canvas`; you can structure them in a completely different way. We chose this way since it shows clearly what each function does and why we need it.
## Extra Resources
- [Original HTML Game tutorial on w3schools.com](https://www.w3schools.com/graphics/game_intro.asp)
 Sign in with Wallet
Connect another wallet
Sign in with Wallet
Connect another wallet