---
tags: ironhack, lecture,
---
<style>
.markdown-body img[src$=".png"] {background-color:transparent;}
.alert-info.lecture,
.alert-success.lecture,
.alert-warning.lecture,
.alert-danger.lecture {
box-shadow:0 0 0 .5em rgba(64, 96, 85, 0.4); margin-top:20px;margin-bottom:20px;
position:relative;
ddisplay:none;
}
.alert-info.lecture:before,
.alert-success.lecture:before,
.alert-warning.lecture:before,
.alert-danger.lecture:before {
content:"👨🏫\A"; white-space:pre-line;
display:block;margin-bottom:.5em;
/*position:absolute; right:0; top:0;
margin:3px;margin-right:7px;*/
}
b {
--color:yellow;
font-weight:500;
background:var(--color); box-shadow:0 0 0 .35em var(--color),0 0 0 .35em;
}
.skip {
opacity:.4;
}
</style>

# Node.js | Basic Authorization
## Learning Goals
After this lesson, you will be able to:
- Understand what authorization is, why it's necessary for contemporary applications, and what kind of accounts we can create
- Understand the basics of security and how it helps in the authorization process
- Understand how to create user accounts using their email and password
## Introduction
:::info lecture
A la banque, nous avons besoin d'être autorisés par l'agent d'accueil afin de retirer nos objets du coffre.
Il en va de même pour nos utilisateurs qui vont devoir être autorisés à effectuer ou non certaines actions.
:::
You can't go to a bank and take money from any bank account. You can only get your money, otherwise, banks would not make any sense at all. We need authorization to take our money, and this helps the bank protect everyone's money.
Nowadays, the authorization is an important part of everyday web applications. Like banks, applications such as Dropbox, Gmail, Facebook, Twitter, and even Ironhack's platform use authorization to limit how users access the content on our Web applications.

## Authorization
### What is the authorization?
Authorization is the method we use to protect access to some content in our app from certain users. Let's look at [Dropbox](https://www.dropbox.com/) as an example.
In Dropbox you are authorized to access all the folders you create in your account but no one else's, protecting user files, photos, and videos.
| Me | Unknown person |
| -------- | -------- |
|  |  |
You can also provide access to a folder to other users, by sending them invitations. So you are also authorizing other users to access the folder contents.

It's very important to provide our users some kind of authorization ability in our web applications, so they can choose who is able to access their information.
:::info
We will cover authentication in another learning unit. In this learning unit we will just cover the concept of **authorizing** the user, and the different ways we can do that.
:::
### Types of authorization
We have several ways to provide authorization in our applications. Each method has its pros and cons, and depending on the scope of our application we will have to choose the most convenient one.
#### Email and password
The most basic approach for authorization: we identify a user with an `email account` and their password. Once the user is authorized they can check which content is available for logged in users (as opposed to _anonymous_ users) and also check what's available for the user with that particular email account.
PROS | CONS
-----|-----
Everyone has an email account. 100% users covered. | People may have many email accounts. Very common to forget which email you used to sign up.
#### Username
Some applications like Twitter authorize their users with a `username`. It allows you to have an "alias" that identifies you in the web applications you use. Your account usually has an email account as well, to be able to recover your data in case you forget it.
PROS | CONS
-----|-----
You can show the username to other users in the application, providing them some privacy. You can't provide this privacy with the email address. | You may have different usernames in different platforms, making it difficult to remember which username you are using in each platform.
#### Social login
With the rise of the social networks, a new way to authorize users appears: it's called `social login`. We can use a social network account to authorize them in our application.

PROS | CONS
-----|-----
It's easy and fast to implement and use, for the developers and the web users. | Users might be hesitant to provide all their social network information to the website, and we lose the people that are not in social networks.
As you can see, there is always a common factor in the process: a password. We are going to secure our user passwords.
### Password Security
:::info lecture
Besoin de crypter le mot de passe afin de ne JAMAIS l'enregistrer en clair en base de données.
:::

As you may know, we can send information on a form submission in websites in two different ways, depending on the HTTP method we use:
- **GET**: we submit the form values through the Web address' query string.
- **POST**: we submit the form values hidden in the request's body.
In both cases, we receive the values somehow. The problem is that we are sending the password in plain text to the server.
:::danger
:bomb: **Passwords in plain text = HUGE Security Risk**
:::
:::danger lecture
Les utilisateur utilisant en général les mêmes mot de passe entre différents sites : imaginez si votre mot de passe était volé sur ne serait-ce qu'un seul...
:::
People usually use the same password in different places, so we have to provide them a secure way to store passwords in the database. **We are going to encrypt them.**
<div class="skip">
#### Brief History of Encryption
We can't talk about encryption without talking a little bit about the Enigma machine. Enigma was the first encryption machine that was created during the Second World War. The German army used this machine to encrypt all their messages and avoid being spied on by the enemies.

[Alan Turing](https://en.wikipedia.org/wiki/Alan_Turing) used reverse engineering to create the machine that was able to decrypt the messages, greatly assisting the allied effort in the Second World War with his invention.
There are several types of encryption, and each one has its own purpose. To encrypt our passwords, we are going to use a [Hash function](https://en.wikipedia.org/wiki/Cryptographic_hash_function).
</div>
#### Hash functions
:::info lecture
Une fonction de hash va découper une chaine de caractères et la transformer en une chaine de longueur fixe. On peut par ex hasher un fichier entier pour obtenir un hash le représentant (md5).
:::
A [hash function](https://en.wikipedia.org/wiki/Hash_function) is any function that, given any string as a parameter, generates a (fairly) unique string of data with a fixed size.

How can we decrypt the encrypted string?
:::info lecture
Le procédé n'est pas réversible : on ne peut aucunement à partir d'un hash retrouver la chaine d'origine.
:::
**We can't.**
:::info lecture
Par contre, ce qu'il serait possible est d'essayer des chaines au hasard et de les hasher jusqu'à retrouver par hasard celle correspondant : force brute !
:::
:::info
:bulb: It's not impossible to **decrypt a hash value to get its original content**. We could generate a set of possible inputs that, when computed with the same hash function, generate the same hash.
Decrypting a hash value **is just extremely impractical**. Because of the math involved and how computationally intense these operations are, we can assume that even if the user steals our encrypted passwords, it will take a lot of time/resources to generate a string that generates the same hash. It could take years!
:::
Why is it so useful to use hash functions to check out if passwords are correct? Hash functions are used in cryptography to ensure the integrity of the text. The same string will have always have the same hash.
:::info lecture
Une même chaine hashée 2x aura toujours le meme hash de sortie.
:::
You could think that if the output string has a fixed size, maybe two different input strings have the same output hash. It can happen, but it's very difficult. **It's called hash a collision.**
There are a lot of algorithms used to encrypt data with hash functions. The most common are <b>MD5, SHA, SHA-1</b>, BLAKE... and bcrypt. We are going to use the last one to hash our passwords.
We are going to use [bcrypt](https://en.wikipedia.org/wiki/Bcrypt) because it provides a salt protect against [rainbow table](https://en.wikipedia.org/wiki/Rainbow_table) attacks, and an adaptive function: over time, the iteration count can be increased to make it slower, so it remains resistant to [brute-force](https://en.wikipedia.org/wiki/Brute-force_search) attacks. It's also specially designed for passwords.
#### Encryption with BCrypt
:::info lecture
Nous n'allons pas coder nous-même une telle fonction de hashing...
:::
Node.JS [bcrypt package](https://www.npmjs.com/package/bcrypt) allows us to encrypt passwords using the bcrypt algorightm. Let's work over an small example to see how encrypt a password and the different options bcrypt give us:
:::info lecture
Créons un petit projet `bcrypt_hello_world` rapide :
:::
```shell
$ mkdir bcrypt_hello_world
$ cd bcrypt_hello_world
$ npm install bcrypt
$ touch app.js
```
:::warning
If using **[`bcrypt`](https://www.npmjs.com/package/bcrypt)** gives you troubles or you are using Windows environment, you should install **[`bcryptjs`](https://www.npmjs.com/package/bcryptjs)** instead of `bcrypt`.
```shell
$ mkdir bcrypt_hello_world
$ cd bcrypt_hello_world
$ npm install bcryptjs
$ touch app.js
```
:::
Let's open `app.js` in our text editor and add the following code:
```javascript
// app.js
const bcrypt = require("bcrypt");
const saltRounds = 10;
const plainPassword1 = "HelloWorld";
const plainPassword2 = "helloworld";
const salt = bcrypt.genSaltSync(saltRounds);
const hash1 = bcrypt.hashSync(plainPassword1, salt);
const hash2 = bcrypt.hashSync(plainPassword2, salt);
console.log("Hash 1 -", hash1);
console.log("Hash 2 -", hash2);
```
If we execute `node app.js` several times in the terminal, we are going to get different values every time!
```
// result in the terminal console:
$ node app.js
Hash 1 - $2a$10$UTQ/Dxe.k2vfvszSH5AaI.0dX1l6vI5PJ2fSaU1UbwuASaGfLtElC
Hash 2 - $2a$10$UTQ/Dxe.k2vfvszSH5AaI.1/9ipt0XBaN3C9aNKH.AM9wgkEKHR.u
$ node app.js
Hash 1 - $2a$10$WhmIRxIN2LLkCnvzgvPtj.j25XqEMwGYlNC685F8N3EGrGUtFv9du
Hash 2 - $2a$10$WhmIRxIN2LLkCnvzgvPtj.oiMxYg.NzaspXTpkPOXA3FXMwU.uMoa
$ node app.js
Hash 1 - $2a$10$RDk4bt7zkX68XY9eZqM/muEbuesvfgdUtHyVX1Jldtl.RW38GepPq
Hash 2 - $2a$10$RDk4bt7zkX68XY9eZqM/mu/hwTxC2hniN/rx8HtfVuCkyiGsaIkci
```
How is it possible? Note that the `bcrypt.hashSync()` function receives two different parameters:
- The password we are going to encrypt and
- A variable called `salt`.
The second parameter has two different goals: first of all, it specifies the cost of execution of the algorithm. It allows us to make the algorithm slower, to prevent the [brute-force](https://en.wikipedia.org/wiki/Brute-force_search) attacks.
It also tells how many times to execute that internal hash function. So that's why the result is different between different executions. The first two results we got are the following:
```
B-ID B-SALT 128-bit-salt 184-bit-hash
$2a $10 $UTQ/Dxe.k2vfvszSH5AaI. 0dX1l6vI5PJ2fSaU1UbwuASaGfLtElC
$2a $10 $UTQ/Dxe.k2vfvszSH5AaI. 1/9ipt0XBaN3C9aNKH.AM9wgkEKHR.u
```
It's composed by the following (separated by `$`):
- **Bcrypt id**
- **Bcrypt salt**
- 128 bit **salt**
- 184 bit **hash**
You can see how the salt is incorporated into the generated hash. It will be very helpful when we use the password hash to check out if the plain password is correct or not.
Let's create our first project with sign up!
:::info
Note that we have used the synchronous way to generate the password hash. There are two other ways to use bcrypt:
- [Asynchronous](https://www.npmjs.com/package/bcrypt#async-recommended). We can generate the salt and the hash asynchronously.
- [Promises](https://www.npmjs.com/package/bcrypt#with-promises). We can use [JavaScript Promises](https://developer.mozilla.org/es/docs/Mozilla/JavaScript_code_modules/Promise.jsm/Promise) to generate the hash of the indicated password.
:::
## Sign up
Let's create a project to generate the basic authorization functionality to use in our projects. We are going to create a basic authorization code by using username and password.
Before start coding, let's take a look at the following diagram, where you can see how it will work.
### Sign up workflow
:::info lecture
Flow général d'un signup (register) :
:::
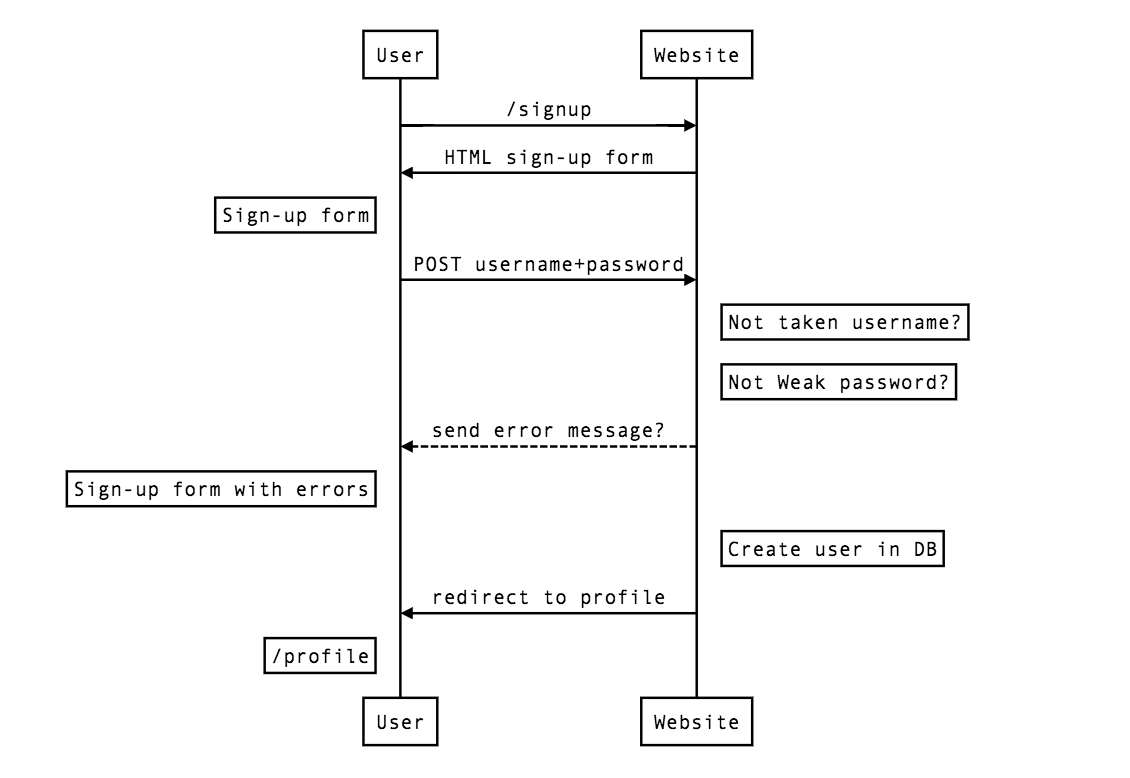
When a user wants to sign up, they have to fill out the signup form, indicating the username and the password. Once the form is filled up and sent to the server, we have to check that they have indicated valid information.
After checking all the data is correct, we create the user in our database and redirect them to the home page. Let's start coding!
### Create the project
#### Express Generator
We are going to use `Ironhack Generator` (command: `irongenerate`) to create the main project we are going to use. Let's create a new folder and create our project:
:::info lecture
Créons un nouveau projet `basic-auth` grâce à `irongenerate` :
:::
```shell
$ irongenerate basic-auth
$ cd basic-auth
```
The next we need to do is to install `bcrypt` (in case you get issues while using *bcrypt*, install `bcryptjs`).
:::info lecture
Installons en plus `bcrypt` :
:::
```shell
$ npm install bcrypt
```
#### Auth Routes
By default, there is a route configured in the `app.js` file. We have to remove it, and change them by doing the following:
:::info lecture
Un petit router pour nos routes d'authentication :
:::
```javascript
// app.js
...
const router = require('./routes/auth');
app.use('/', router);
```
#### User Model
Inside our `models` folder we will create **user** model. This model will have user-specific properties that all our users built based on this model will share.
:::info lecture
Nous allons avoir besoin d'enregistrer des utilisateurs en DB. Créons donc un modèle pour cela :
:::
```shell
$ touch models/user.js
```
We will create the view `signup.hbs` inside the `/views/auth/` path. Let's create both directory and file by typing the following in the console:
:::info lecture
Créons notre formulaire de signup :
:::
```shell
$ mkdir views/auth
$ touch views/auth/signup.hbs
```
Our folder structure should be the following:
```
/basic-auth
|-- bin
|-- models
| |-- user.js
|-- node_modules
|-- public
|-- routes
| |-- auth.js
|-- views
| |-- auth
| | |-- signup.hbs
|-- .gitignore
|-- app.js
|-- package.json
```
### Model
Before saving any data in the database, we have to create a model, where we will specify the Schema we will use to store data. Our users will have a username and a password, so we will code the `models/user.js` as follows:
:::info lecture
Notre schéma de `User` :
- `username`
- `password`
:::
```javascript
// models/user.js
const mongoose = require("mongoose");
const Schema = mongoose.Schema;
const userSchema = new Schema({
username: String,
password: String
}, {
timestamps: true
});
const User = mongoose.model("User", userSchema);
module.exports = User;
```
This is all that we need to define the model for our users in the database. Let's create the interface that will be used to call this model.
### Template
We will create the HTML and CSS to create the interface that the users will use to sign up in our application. We will need to have:
- **Input text**: the username.
- **Password text**: the password.
- **Button**: to send the information to the server.
Let's add the following code in the `signup.hbs` file:
:::info lecture
Notre formulaire d'inscription :
:::
```htmlmixed
{{! views/auth/signup.hbs }}
<form id="form" action="/signup" method="POST">
<label for="username">Username</label><br>
<input type="text" name="username">
<label for="password">Password</label><br>
<input type="password" name="password">
<button type="submit">Create account</button>
</form>
```
We will add some styles to the stylesheet we can find in `public/stylesheets/style.css` (or `public/stylesheets/style.scss` if you are using SCSS):
```css
#form {
margin: 30px auto;
width: 380px;
}
#form label {
color: #666;
display: inline-block;
margin-bottom: 10px;
text-align: center;
width: 100%;
}
#form input,
#form button {
box-sizing: border-box;
font-size: 14px;
outline: 0;
padding: 4px;
width: 100%;
margin-bottom: 20px;
}
#form button {
background: #43a3e6;
border: 1px solid #43a3e6;
border-radius: 4px;
color: #fff;
cursor: pointer;
display: inline-block;
font-size: 14px;
padding: 8px 16px;
text-decoration: none;
text-transform: uppercase;
transition: .3s ease background;
width: 100%;
}
#form button:hover {
background: #fff;
color: #43a3e6;
transition: .3s ease background;
}
```
Start the project to see the result of what we have done. Let's run our app by executing the following command in the terminal:
:::info lecture
Lançons le serveur :
:::
```shell
$ npm run dev
```
Open the browser, and visit the `http://localhost:3000/signup` URL:
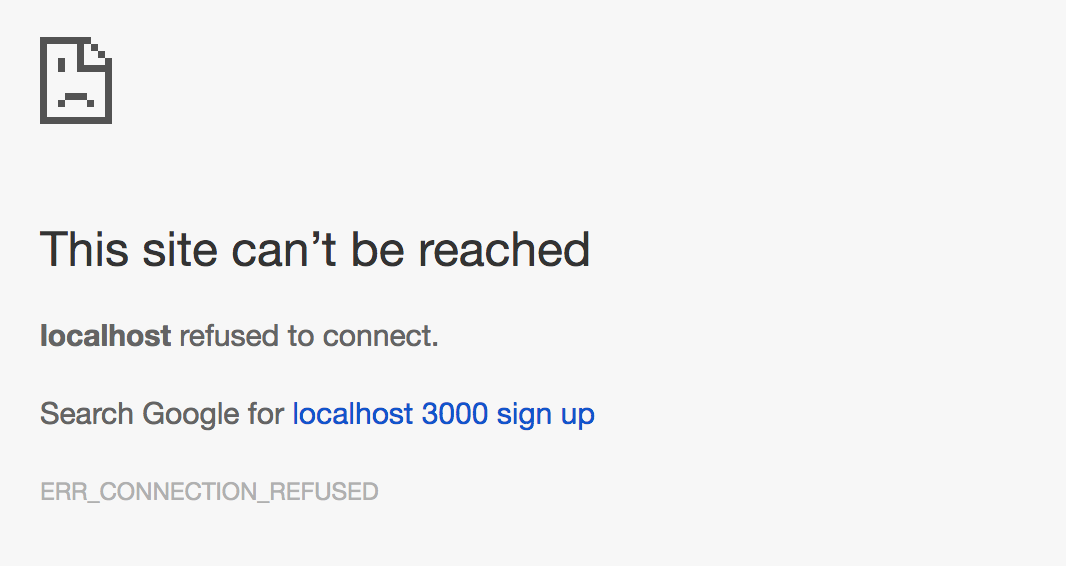
Something like this should appear. We need to create the route to show the sign up form. In the `routes/auth.js` file, let's add the following:
:::info lecture
N'oublions pas la route :
:::
```javascript
// routes/auth.js
const express = require("express");
const router = express.Router();
router.get("/signup", (req, res, next) => {
res.render("auth/signup");
});
module.exports = router;
```
If we refresh the page in the browser, we will see our awesome form.
:::info lecture
TADA
:::

If we fill the form and press "Create account" button, an error will appear. We have to handle user's information and **create** the user.
### Create Account
:::info lecture
Maintenant, la route te traitement du signup...
:::
We have specified in the form that the URL that will receive the signup form is a POST method with the same URL:
:::info lecture
La route de traitement du formulaire est défini par :
- l'`action`
- la `method`
:::
```htmlmixed
{{! views/auth/signup.hbs }}
<form id="form" action="/signup" method="POST">
...
```
So we have to add to the `router` the code to handle this request:
:::info lecture
Implémentons cette route de traitement :
:::
```javascript
// routes/auth.js
...
// User model
const User = require("../models/user");
// BCrypt to encrypt passwords
const bcrypt = require("bcrypt");
const bcryptSalt = 10;
...
router.post("/signup", (req, res, next) => {
const username = req.body.username;
const password = req.body.password;
// Let's hash the password
const salt = bcrypt.genSaltSync(bcryptSalt);
const hashPass = bcrypt.hashSync(password, salt);
User.create({
username,
password: hashPass // 👈 store the hashed version
})
.then(() => {
res.redirect("/");
})
.catch(err => next(err))
;
});
```
We have added the model and the bcrypt package into the routes in the post method we got the values from the request, and created the user with the encrypted password.
Once the user has been created, we redirect them to the root page of the site (that doesn't exist yet). Once we submitted the form, we will find saved user in the database:
:::info lecture
Signupons-nous et vérifions en base :
:::

You can see how the password is stored in the database: it is encrypted.
:::info lecture
🙌
:::
---
At this point, we have created the basic authorization to use in our web apps, right? What happens if a username already exists? What if the user doesn't indicate any field?
:::info lecture
Quid si **`username` ou bien `password` vide** ?
:::

It seems we forgot to take care of some of the things in our code. We need to implement **validations** before saving a new user in the database.
#### Form validations
:::info lecture
Nous allons vouloir empêcher cela...
:::
First of all, we are going to validate that both fields are correctly filled up. To do that, we are going to add the following in our code:
```javascript=
// routes/auth.js
...
router.post("/signup", (req, res, next) => {
...
if (username === "" || password === "") {
res.render("auth/signup", {
errorMessage: "Indicate a username and a password to sign up"
});
return;
}
...
```
:::info lecture
- L7 si l'un des 2 vides :
- L8 on re-rend le template en lui passant un `errorMessage`
:::
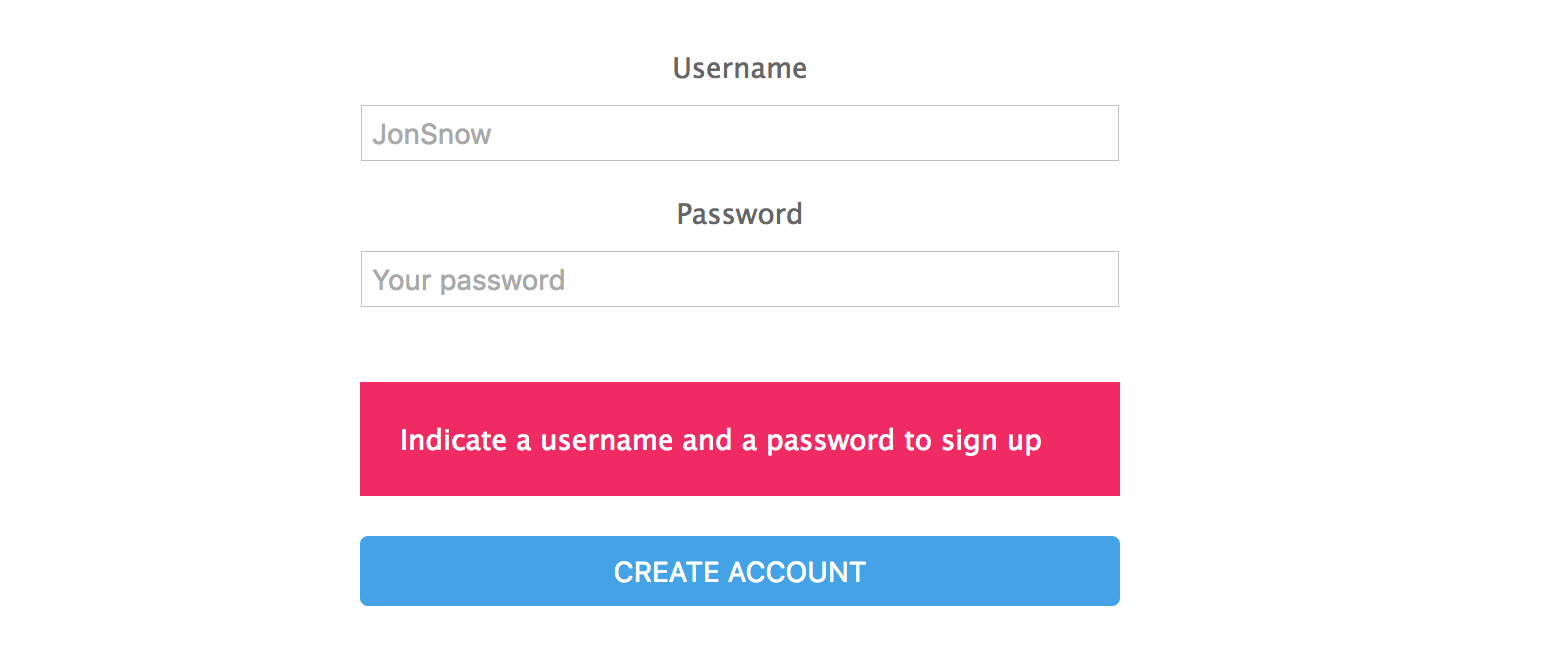
Note how we specify as a second parameter of the `res.render()` method an object with an `errorMessage` key. This will allow us to show the corresponding error in the view when the user doesn't specify username or password:
:::info lecture
`errorMessage` que l'on va pouvoir afficher dans notre template :
:::
```htmlmixed
<!-- input this in the hbs to have error message displayed -->
...
{{#if errorMessage}}
<div class="error-message">{{ errorMessage }}</div>
{{/if}}
```
:::info lecture
et meme styliser :
:::
```css
.error-message {
background: #F02B63;
box-sizing: border-box;
color: #fff;
margin: 20px auto;
padding: 20px;
width: 100%;
}
```
---
:::info lecture
Quid si **`username` déjà pris** ?
:::
Now if we try to create a new account without filling the fields, we will get an error on the screen:
We need to check out if the indicated username is already defined in the database before create a new one. To do that, we will add the following:
:::info lecture
Nous allons également vouloir l'empêcher :
:::
```javascript=
// routes/auth.js
router.post("/signup", (req, res, next) => {
...
// [...] checking not empty `username`/`password`
...
User.findOne({ "username": username })
.then(user => {
if (user) {
res.render("auth/signup", {
errorMessage: "The username already exists!"
});
return; // ✋STOP
}
// continue...
const salt = bcrypt.genSaltSync(bcryptSalt);
const hashPass = bcrypt.hashSync(password, salt);
User.create({
username,
password: hashPass
})
.then(() => {
res.redirect("/");
})
.catch(err => next(err))
})
.catch(err => next(err))
;
```
:::info lecture
- L10 on cherche un user du même `username`
- L12 si on en a un : `errorMessage`
:::
<!-- :::info
Another way is create an unique index `db.users.createIndex( { "username": 1 }, { unique: true } )` in mongo shell.
So if you try to repeat a username mongo will launch an error.
::: -->
We have solved the username validation by doing this:

Finally, we have to consider the errors generated when we save the user in the database. We will show them in the view as the previous errors:
```javascript
// routes/auth.js
...
.catch(err => {
next(err);
})
```
By adding these validations, we have all the code we need to get the basic authorization in our web application.
### BONUS: Advanced security
We can add extra features to provide our users with more advanced security. One is related to the passwords, and the other one helps us to prevent massive user account creations.
#### Password strength measurement
The first thing we can add to our website is a password strength measurement. It will allow the user to create strong passwords to access our website.
Node provides us a package to implement this functionality, [`zxcvbn`](https://www.npmjs.com/package/zxcvbn). It provides the tools to check the password strength in both front-end and back-end.
#### Prevent bot created accounts
We could add some features to prevent the [bots](https://en.wikipedia.org/wiki/Internet_bot) from creating user accounts massively on our website. Can you imagine malicious programs creating millions of accounts on your website? It would be a mess!
We recommend you add the [re-captcha](https://www.npmjs.com/package/express-recaptcha) to the sign up form. It provides us the necessary code to be sure that form submissions don't come from a robot.

## Summary
We have learnt what authorization is and why it's important in today's websites. We have seen that there are different types of authorizations depending on the needs we have.
We have also seen how important it is to encrypt passwords to provide our users an extra security layer when they sign up to our website, and how to encrypt the passwords by using hash functions.
We have created the basic authorization exercise using bcrypt to encrypt our passwords. In this exercise, we covered the most important parts of our projects: an HTML form, a Mongoose model, and error validations.
Lastly, we have seen two different extra tools that provide our users an advanced security like password strength measurement, and re-captcha.
## Extra Resources
- [Enigma machine emulator](http://enigma.louisedade.co.uk/enigma.html)
- [Plain Text Offenders](http://plaintextoffenders.com/)
 Sign in with Wallet
Connect another wallet
Sign in with Wallet
Connect another wallet