---
tags: ironhack, lecture,
---
<style>
.markdown-body img[src$=".png"] {background-color:transparent;}
.alert-info.lecture,
.alert-success.lecture,
.alert-warning.lecture,
.alert-danger.lecture {
box-shadow:0 0 0 .5em rgba(64, 96, 85, 0.4); margin-top:20px;margin-bottom:20px;
position:relative;
ddisplay:none;
}
.alert-info.lecture:before,
.alert-success.lecture:before,
.alert-warning.lecture:before,
.alert-danger.lecture:before {
content:"👨🏫\A"; white-space:pre-line;
display:block;margin-bottom:.5em;
/*position:absolute; right:0; top:0;
margin:3px;margin-right:7px;*/
}
b {
--color:yellow;
font-weight:500;
background:var(--color); box-shadow:0 0 0 .35em var(--color),0 0 0 .35em;
}
.skip {
opacity:.4;
}
</style>

# DOM | Manipulation
After this lesson, you should be able to:
- Create, change and delete the DOM elements
- Create, change and delete the content of the DOM elements
- Create, change and delete the attributes of the DOM elements
- Create and assign events to the DOM elements
## Introduction to DOM Manipulation
:::info lecture
Jusqu'à maintenant, nos pages étaient chargées mais ne changeait pas au cours du temps !
Dans ce cours, nous allons voir comment manipuler les éléments de la page en répondant à des actions utilisateur.
:::
Until now, all of our HTML pages have been static pages. Once the HTML is created and the CSS styles are applied, the page will always look the same.
In this lesson we will learn how to manipulate DOM elements, creating dynamic pages that respond to user interaction through dynamic forms, buttons and more.
## Element content manipulation
During the execution of our application, the users will interact with the page, and these interactions will produce changes in the DOM.
### Recap: how to select an element
:::warning lecture
Rappel : avant de pouvoir manipuler un élément, **il faut au prealable l'avoir "saisi"** grâce aux méthodes apprises dans le cours précédent !
:::
To manipulate an HTML element, first, we will need to select it.
Let's practice a little bit using some real elements.
:::info lecture
Setup pour la suite :
:::
:memo: Create folder `dom-manipulation` and inside, create files `index.html` and `index.js`. Copy the code below in the `index.html`:
```htmlmixed
<!-- index.html -->
<!DOCTYPE html>
<html lang="en">
<head>
<meta charset="UTF-8">
<title>DOM Manipulation</title>
</head>
<body>
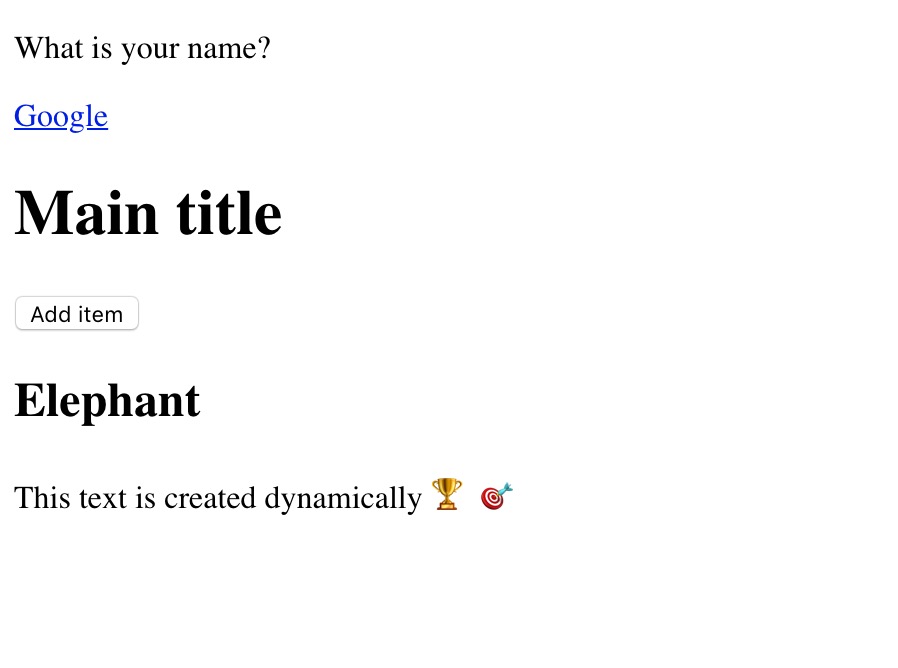
<p id="paragraph">What is your name?</p>
<a href="#" id="google-link" class="link">Google</a>
<div id="content">
<h1 id="title">Main title</h1>
<ul id="item-list"></ul>
</div>
<button id="add-item-button">Add item</button>
<!-- make sure you load .js file in the end so it executes when the DOM is ready -->
<script src="index.js"></script>
</body>
</html>
```
```javascript
// index.js
let paragraph = document.getElementById('paragraph');
console.log(paragraph); // <== <p id="paragraph">What is your name?</p>
```
<div class="skip">
In the JavaScript above, to select the paragraph element, we will use the `document.getElementById()` method. This method returns the selected `p` node.
We can also select an element by its `className`. But be careful with this method. It will **always return an array of DOM nodes**, no matter if it finds one or more elements in the code.
```javascript
let links = document.getElementsByClassName('link');
console.log(links); // <== HTMLCollection [a#google-link.link, google-link: a#google-link.link]
// 0: a#google-link.link
// length: 1
// google-link: a#google-link.link
// __proto__: HTMLCollection
```
Finally, we can select an element by its `tagName`. This selector will **return an array of nodes** as well, even if there is only one element.
```javascript
let divs = document.getElementsByTagName('div');
console.log(divs);
```
The fact that the **`.getElementById()` returns a single element** makes sense. Remember, in HTML, you use the `id` tag to reference just one element in the document. Correspondingly, the `classes` and the `tags` can be used several times. So it becomes clear that the functions to get elements by class and tag should return a collection of elements.
:::info
:eyeglasses: **Hint:** A useful trick to distinguish when a selector function will return an array of elements or it will return a single element is to take a look at the function name:
- The method `.getElementById()` returns always **one element** - the first one found in the code. That's why the "element" word in the name is **singular**.
- The methods `.getElementsByClassName()` and`.getElementsByTagName()` they return always **an array** of objects. The "elements" word in the name is **plural**.
:::
</div>
## Operating with <b>attributes</b>
### Getting an element attribute content
:::info lecture
Lire la valeur d'un attribut
:::
To get the value of an element, we will use the method `.getAttribute()`.
```javascript
let attribute = element.getAttribute(attributeName);
```
:::success
The method above receives the name of the attribute we are looking for and returns the value of the specified attribute. If the attribute doesn't exist, the function will return `null` or an empty string `""`.
:::
:::info lecture
Lisons par ex, la valeur de l'attribut `id` de notre paragraphe :
:::
```javascript
// index.js
let paragraph = document.getElementById('paragraph');
let paragraphId = paragraph.getAttribute('id');
console.log(paragraphId); // <== paragraph
```
### Changing the value of an element's attribute
:::info lecture
Changer la valeur d'un attribut...
:::
:::info
To change the value of an existing attribute on the specified element, call the method `.setAttribute()`.
```javascript
element.setAttribute(name, value);
```
:::
In this method, `id` is the name of the attribute as a string and the `value` is the desired new value of the attribute. The `.setAttribute()` method returns `undefined`.
:::info lecture
Changeons par ex la valeur de l'attribut `id` de notre paragraphe par `info-paragraph`
:::
```javascript
// index.js
let paragraph = document.getElementById('paragraph');
paragraph.setAttribute('id', 'info-paragraph');
```
As we can see, the value of id is changed from "paragraph" to "info-paragraph":
:memo: **Time to practice**
:::info lecture
<span style="font-size:500%">🏋🏼♂️</span>
Changez la valeur du lien `google-link`.
:::
Set the `href` attribute of the `a` element identified as *google-link* to `http://www.google.com`.
### Creating a new element's attribute
:::info lecture
`.setAttribute` permet également de créer des attributs !
:::
:::success
The <b>`.setAttribute()` method is very useful for creating new attributes</b>. When we call the method, it will look for the attribute specified in the first parameter `name` in the element. If the attribute is found, it will change the value. If not, it will create a new attribute using the name and the desired value.
```javascript
contentDiv.setAttribute('name', 'username');
```
:::
:memo: **Time to practice**
:::info lecture
<span style="font-size:500%">🏋🏼♂️</span>
Ajouter un attribut `target="_blank"` à ce meme lien.
:::
Complete your `a` element with a target attribute. Set the value to `"_blank"` to open the new page in a new tab of your browser.
### Removing an existing element's attribute
:::info lecture
Supprimer un attribut : `.removeAttribute()`
:::
:::success
The method `.removeAttribute()` allows us to remove an element's attribute.
```javascript
element.removeAttribute(attrName);
```
:::
This method receives one parameter: `attrName`, a string that sets the name of the attribute we want to remove from `element`. Attempting to remove an attribute that is not on the element doesn't raise an exception.
:::info lecture
Si vous tentez de supprimer un attribut qui n'existe pas, c'est ok.
:::
As we will probably use the same CSS style for all the paragraphs in the webpage, let's remove the `class` attribute from the `p` element:
```html
<p class="paragraph">This is the text content</p>
```
We might select the element by its `class` or by its `id`. In this case, we will use `.getElementById()` because it won't return an array and it will be easier to change.
Remember that we could select all the elements with the same class using `.getElementByClass()`. This would be useful to apply the same CSS styles to several elements or manipulate them at the same time.
```javascript
// index.js
// ...
let paragraph = document.getElementById('paragraph');
paragraph.removeAttribute('id');
paragraph.setAttribute('class', 'paragraph');
```
Now if you open browser's console and "Elements" tab, you will see that what it used to be *id="paragraph"* is now set to *class="paragraph*.
:memo: **Time to practice**
:::info lecture
<span style="font-size:500%">🏋🏼♂️</span>
:::
Remove the `class` attribute from the paragraph element.
## Create a DOM object
:::info lecture
Nous allons également pouvoir dynamiquement créer de nouvelle balises dans notre page, grâce à `document.createElement()`
:::
You can also create elements in the DOM using `
```javascript
document.createElement(tagName);
```
:::info lecture
Créons par ex une balise `<h2>` :
:::
```javascript
// index.js
// ...
let h2Tag = document.createElement('h2');
console.log(h2Tag); // <== <h2></h2>
```
- `h2Tag` is the created tag.
- `h2` is a string that specifies the type of element to be created. The nodeName of the created element is initialized with the value of `tagName`. Don't use qualified names (like "`html:a`") with this method.
### Add content into the element and add the element to the DOM
:::info lecture
Notre h2 créé est vide, ajoutons-lui du contenu grâce à la propriété déjà vue : `.innerHTML` :
:::
Let's add some content to an element:
```javascript
// index.js
// ...
h2Tag.innerHTML = "Elephant";
```
:::info lecture
Enfin, insérons notre élément dans la page : grâce à `element.appendChild()` appliqué au `body` :
:::
Let's add an element into a parent element:
```javascript
// index.js
// ...
let parent = document.getElementsByTagName('body')[0];
parent.appendChild(h2Tag);
```
- `parent` is the parent element
- `h2Tag` is the child node to append to parent
Now if you check your DOM, you'll see a newly added heading "Elephant".
Entire elements or nodes can also be manipulated. This is a powerful functionality to create dynamic web pages by adding, changing and deleting elements or even whole sections using JavaScript functions.
### Create a text node
:::info lecture
On peut aussi créer/insérer du texte en dehors de toute balise :
:::
:::info
The text inside an element, inside a `p` tag for instance, could be added with `innerHTML`. But there is an alternative way to add text to an element: `.createTextNode()`.
```javascript
let text = document.createTextNode(data);
```
:::
In the method above, `text` is a Text node and `data` is always a string to put in the text node. The method returns the new node.
```javascript
// index.js
// ...
let text = document.createTextNode('This text is created dynamically 🏆 🎯');
parent.appendChild(text);
```
As we can see, the text is on the DOM :white_check_mark:
:memo: **Time to practice**
:::info lecture
<span style="font-size:500%">🏋🏼♂️</span>
:::
Create two nodes in your JavaScript file:
- A `p` element.
- A text node. It will have "Hi there! I am using JavaScript" as value.
Then, add the text into the `p` tag and finally add it to the DOM
#### Adding an element before another element
:::info lecture
Au lieu d'insérer l'élément toujours à la fin, on peut aussi l'insérer AVANT un autre élément grâce à `parentEl.inserBefore(el, beforeEl)`
:::
Inserting elements at the end could be a little limited, don't you think? What if we wanted to insert an element at any order inside our DOM? We can achieve this with the method `.insertBefore()`.
:::success
The `.insertBefore()` method allows us to select an existing element and insert another before that selected element.
:::
:::info lecture
Essayons d'inséser un nouvel `<h1>` avant notre `<h2>` Elephant:
:::
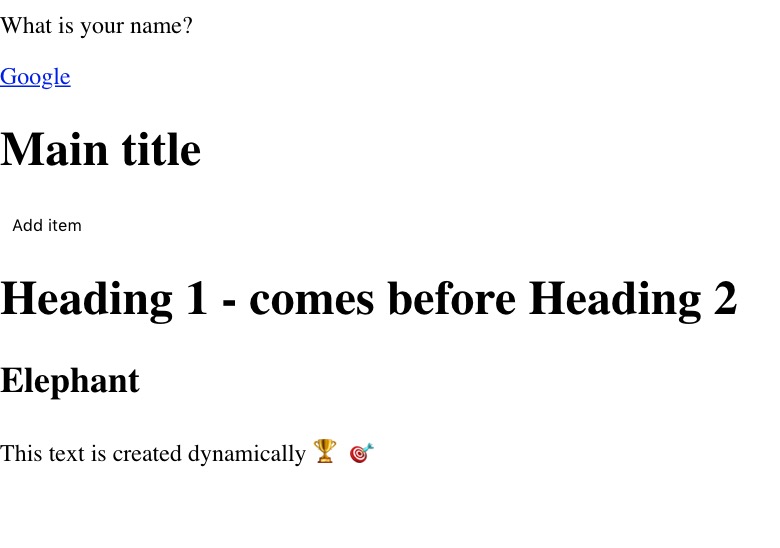
Let's add *"h1"* tag before our *"h2"* tag. We have defined `parent` already but we will do it here again for your convenience. If you did it already ignore this part:
```javascript
// index.js
// ...
let parent = document.getElementsByTagName('body')[0]; // you don't have to do this again
let h1Tag = document.createElement('h1');
h1Tag.innerHTML = "Heading 1 - comes before Heading 2";
parent.insertBefore(h1Tag, h2Tag);
```
:memo: **Time to practice**
:::info lecture
<span style="font-size:500%">🏋🏼♂️</span>
:::
Insert a `input` node before the the `button` with the *id="add-item-button"*.
### Remove an existing element
:::info lecture
On peut aussi supprimer des éléments :
```javascript
parent.removeChild(el);
```
:::
:::success
To remove an existing element in the DOM, we will need to use the method `.removeChild()`. The method can be applied to any DOM element and it can accept 1 parameter: the selected element child.
:::
:heavy_check_mark: We need to select the parent node. Then, call the method `.removeChild()` passing the element we want to remove as a parameter.
Let's say we want to remove button with *id="add-item-button"*. The parent element, in this case, is the *body*.
```javascript
// index.js
// ...
let theParagraph = document.getElementById("paragraph");
parent.removeChild(theParagraph);
```
If you refresh your window now, the button is gone :tophat:.
:memo: **Time to practice**
:::info lecture
<span style="font-size:500%">🏋🏼♂️</span>
:::
Remove the previous `h2` node you inserted before.
### Clear an existing element
:::info lecture
On peut tout effacer (profondément), grâce à
```javascript
el.innerHTML = "";
```
:::
If we wanted to delete everything inside an element, we have to get one by one all the children elements inside, right? Well, here is when **`innerHTML`** appears.
The `innerHTML` property **returns everything inside the element**, not only text. This means all the HTML inside, including tags, will be returned inside a string.
Let's remove all the content of our *div* with *id="content"*:
```javascript
let contentDiv = document.getElementById('content');
contentDiv.innerHTML = ""; // clears the whole element
```
<div class="skip">
:memo: **Time to practice**
Add the following code to your `html` and afterward remove it from the DOM.
```htmlmixed
<ul class="super-list">
<li> First:
<ol>
<li> Sub-first 1 </li>
<li> Sub-first 2 </li>
</ol>
</li>
<li>Second</li>
<li>Third</li>
</ul>
```
</div>
## Events in JavaScript elements
:::info lecture
Grâce au DOM et à JavaScript, nous allons pouvoir répondre à certaines interactions utilisateur.
Comme par ex, réagir au click sur un bouton...
:::
There are a lot of times where we want to give users the ability to interact with the app, for example, clicking on a button, responding to a typing, dragging a box, etc.
All these interactions are called **events**, and these events are attached to the DOM elements. There are plenty of them, and now we are going to learn how to attach them to the DOM element.
### Assign events to DOM elements
:::info lecture
Pour cela nous allons pouvoir définir sur un élément, un écouteur sur un certain évènement. Au déclenchement de l'évènement, nous pourrons alors exécuter une fonction.
:::
The first thing we need to do is to select the element we want the event to be attached. Then, we are going to select the event for that element. In this case, we want to create a `click` event for the `button#add-item-button`.
:::info lecture
Par ex : sur notre bouton, nous définissons ici un écouteur sur l'évènement `"click"` :
:::
```javascript
// index.js
// ...
let button = document.getElementById("add-item-button");
button.onclick = function(){
console.log("adding an element to the list");
}
```
We create a `click event` assigned to the button `add-item-button`. Then, we have assigned a new anonymous function to that `click event`. This anonymous function will be executed once the event is fired, in this case when the button is clicked.
If you check your browser's console you will see there's *"adding an element to the list"* and the number of times you clicked the button shown in there.
:memo: **Time to practice**
:::info lecture
<span style="font-size:500%">🏋🏼♂️</span>
Au click sur le bouton, ajouter une `<li>` à la `<ul>` :
:::
Create a click event for the `button#add-item-button`. This event will add a `li` element with "Item number " + item number. Your DOM suppose to look something like this:
```htmlmixed
<!-- index.html -->
<ul id="items-list">
<li>Item number 1</li> <!-- Element created dynamically -->
<li>Item number 2</li> <!-- Element created dynamically -->
<li>Item number 3</li> <!-- Element created dynamically -->
<li>Item number 4</li> <!-- Element created dynamically -->
<li>Item number 5</li> <!-- Element created dynamically -->
</ul>
<button id="add-item-button">Add item</button>
```
## Inputs manipulation
It is really common to deal with forms in web pages. In this section, we will see how to manage the inputs.
### Getting a current value from the input field
:::info lecture
La propriété `.value` d'un champ de formulaire nous permet d'accéder à la valeur saisie par l'utilisateur.
:::
Let's add to our DOM these couple of lines, after everything that's already there:
```htmlmixed
<label for="username">Name</label>
<input name="username" type="text">
<button id="send-btn">Send</button>
```
It will show next on the page:

If we wanted to get the value on that input we need to get the element first, and then call to the attribute `value`. By default, if the input does not have any text introduced it will return an empty string.
```javascript
// index.js
// ...
let input = document.getElementsByTagName('input')[0];
console.log(input.value); //=> ""
```
The problem is we normally send the information once the inputs are filled, right? Let's create a `click event` for the button:
```javascript
let sendButton = document.getElementById('send-btn');
// move the input inside the function (this step is optional):
sendButton.onclick = function(){
let input = document.getElementsByTagName('input')[0]; // or leave it as it is, outside
console.log(input.value);
}
```
Now, if you input your name in the input field and hit the *Send* button, in your browser's console you will see your name!
:::warning
:warning: For now, use the inputs without no *form* tag. Otherwise, the page will be refreshed and all your operations will be lost. We will learn how to deal with this a bit later.
:::
### Getting the current node object
:::info lecture
Quand un évènement a lieu, par ex un "click" sur un bouton et qu'un écouteur est défini dessus, la fonction (ou handler) se verra recevoir l'évènement lui-même en paramètre :
```javascript
const btn = document.querySelector('button');
btn.onclick = function (event) {
debugger;
console.log('just clicked');
}
```
Cet `event` contient beaucoup d'informations : https://developer.mozilla.org/en-US/docs/Web/API/Event#Properties

:::
When operating with events, sometimes we need to know which of the assigned nodes or DOM elements were clicked. Now we present you the `event` object.
The `event` object (sometimes referred as `e`) is an object inherited in every event we create. It has a lot of properties and you can check the full list of [event properties](https://developer.mozilla.org/en-US/docs/Web/API/Event#Properties) here.
:::info lecture
Une propriété très utile de cet objet, va être `event.currentTarget` qui contiendra une reférence à l'élément du DOM sur lequel l'évènement a lieu.
:::
For now, let's focus on `currentTarget`:
```javascript
let liTags = document.getElementsByTagName('li');
for(let i=0; i < liTags.length; i++){
liTags[i].onclick = function(e){
console.log(e.currentTarget.innerHTML);
}
}
```
The `currentTarget` returns the node where the event was fired. In this case, we had a list of `li` elements and we assigned an `onclick` event to them.
Once this function is executed, it will print the clicked `li` content (remember `innerHTML` returns a DOM element content).
:memo: **Time to practice** but this time (almost) together
:::info lecture
Ajoutons cette liste à notre page :
:::
Let's add the following code to our `index.html`, after everything that's already in there:
```htmlmixed
<ul class="list">
<li>Ana</li>
<li>Alex</li>
<li>Mat</li>
</ul>
```
So these are not the only `"li"` tags in our `index.html` so we can't target them using `.querySelector('li)` but instead, we will target the `ul` tag using its `class` attribute and then we will access to its children elements. Afterwards, we will attacg the `onclick` function to each `li` element and print in our console the text of the element we just clicked on. So let's get to work. Try to do it alone, and if you reallllly struggle check our solution :wink:
:::info lecture
Sur chaque `<li>` définissons un écouteur sur le `"click"` dont la fonction handler affichera le texte de la `<li>` cliquée dans la console :
:::
```javascript
[...document.querySelectorAll('.list li')].forEach(li => {
li.onclick = function () {
console.log(li.innerHTML);
};
});
```
Not that complicated, right?
**Your turn**
:::info lecture
<span style="font-size:500%">🏋🏼♂️</span>
Au click sur une `<li>`, supprimer cette li du DOM :
:::
Okay, now please, moderate the code above and, instead of printing the text of the clicked element, remove that element from the DOM. :dart:
<div class="skip">
## Scraping a Website
Manipulating the DOM do not seem a big thing, and we can do super cool stuff. Besides manipulating our own HTML file, we can do web scraping, getting info from other websites.
Let´s play around a bit and see what we can do really quickly.
In a new tab navigate to the [Hacker News](https://news.ycombinator.com/) webpage, and open the Chrome console. We know that here we can write JavaScript. Copy and paste the following code.
```javascript
let titles = document.getElementsByClassName("storylink");
```
Now we have on our `titles` variable, all elements that contain `storylink` class. We can for example print the text of each of them doing the following:
```javascript
for (let i=0; i<titles.length;i++){
console.log(titles[i].innerHTML)
}
```
Cool huh?? All the news have a different amount of points, what if we get all the titles and order them according to this metric. Let´s do it!
```javascript
let elems = document.getElementsByClassName("itemlist");
let articles = elems[0].children[0].getElementsByClassName("athing");
let pointsElement;
let articlesArray = [];
for(let i=0; i < articles.length - 1; i++){
pointsElement = articles[i].nextSibling.getElementsByClassName("score")[0]
points = pointsElement ? pointsElement.innerText : "0";
articlesArray.push({
title: articles[i].children[2].innerText,
point: parseInt(points.split(" ")[0])
})
}
articlesArray.sort(function(a,b){
return a.point - b.point
})
```
</div>
## Summary
In this lesson, we learned about the DOM elements and how to create, modify and delete them and their different parts: contents, attributes and the element itself.
We learned about events and how to add them to any element in the DOM. Also, we learned about the `event` object and how to manage it.
## Other Resources
- [Handling events for multiple elements](https://www.kirupa.com/html5/handling_events_for_many_elements.htm)
- [Attaching events for dynamic elements](https://toddmotto.com/attaching-event-handlers-to-dynamically-created-javascript-elements/)
 Sign in with Wallet
Connect another wallet
Sign in with Wallet
Connect another wallet