# 資料結構 (Data Structure)
> 2018.1.11 AndyLee
<style>
.align-right {
text-align: right;
}
.align-center {
text-align: center;
color: blue;
}
</style>
## Array
### 優點:
* random access:只要利用index即可在O(1)時間對Array的資料做存取。
* 較Linked list為節省記憶體空間:因為Linked list需要多一個pointer來記錄下一個node的記憶體位置。
### 缺點:
* 新增/刪除資料很麻煩:若要在第一個位置新增資料,就需要O(N)時間把矩陣中所有元素往後移動。同理,若要刪除第一個位置的資料,也需要O(N)時間把矩陣中剩餘的元素往前移動。
* 若資料數量時常在改變,要時常調整矩陣的大小,會花費O(N)的時間在搬動資料(把資料從舊的矩陣移動到新的矩陣)。
### 適用時機:
* 希望能夠快速存取資料。
* **已知欲處理的資料數量**,便能確認矩陣的大小。
* 要求記憶體空間的使用越少越好。
## Linked list
### 優點:
* 新增/刪除資料較Array簡單,只要對O(1)個node(所有與欲新增/刪除的node有pointer相連的node)調整pointer即可,不需要如同Array般搬動其餘元素。
* 若是在Linked list的「開頭」新增node,只要O(1)。
* 若要刪除特定node,或者在特定位置新增node,有可能需要先執行O(N)的「搜尋」。
* Linked list的資料數量可以是動態的,不像Array會有resize的問題。
### 缺點:
* 因為Linked list沒有index,若要找到特定node,需要從頭(ListNode *first)開始找起,搜尋的時間複雜度為O(N)。
* 需要額外的記憶體空間來儲存pointer。
### 適用時機:
* 無法預期資料數量時,使用Linked list就沒有resize的問題。
* 需要頻繁地新增/刪除資料時。
* 不需要快速查詢資料。
---
### 206. Reverse Linked List
```javascript=j
# Definition for singly-linked list.
# class ListNode(object):
# def __init__(self, val=0, next=None):
# self.val = val
# self.next = next
class Solution(object):
def reverseList(self, head):
"""
:type head: ListNode
:rtype: ListNode
"""
current = head
prev = None
while current:
next = current.next # give next node a name
current.next = prev # reverse the next to previous node
prev = current # exchange current and previous node
current = next # let current to the next node
return prev
```
### Linked Node 與 Linked List定義
```clike=
// C++ code
#include <iostream>
using std::cout;
using std::endl;
class LinkedList; // 為了將class LinkedList設成class ListNode的friend,
// 需要先宣告
class ListNode{
private:
int data;
ListNode *next;
public:
ListNode():data(0),next(0){};
ListNode(int a):data(a),next(0){};
friend class LinkedList;
};
class LinkedList{
private:
// int size; // size是用來記錄Linked list的長度, 非必要
ListNode *first; // list的第一個node
public:
LinkedList():first(0){};
void PrintList(); // 印出list的所有資料
void Push_front(int x); // 在list的開頭新增node
void Push_back(int x); // 在list的尾巴新增node
void Delete(int x); // 刪除list中的 int x
void Clear(); // 把整串list刪除
void Reverse(); // 將list反轉: 7->3->14 => 14->3->7
};
```
### PrintList()列舉所有ListNode的value
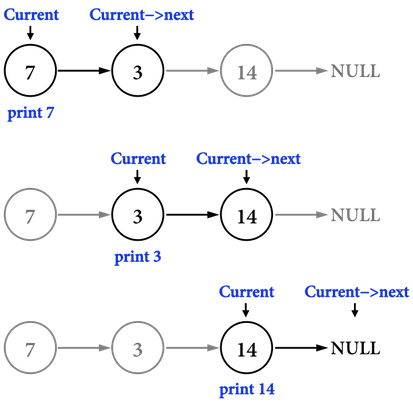
```clike=
// C++ code
void LinkedList::PrintList(){
if (first == 0) { // 如果first node指向NULL, 表示list沒有資料
cout << "List is empty.\n";
return;
}
ListNode *current = first; // 用pointer *current在list中移動
while (current != 0) { // Traversal
cout << current->data << " ";
current = current->next;
}
cout << endl;
}
```
### Push_front()開頭新增newNode資料
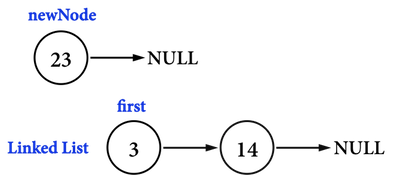
```clike=
void LinkedList::Push_front(int x){
ListNode *newNode = new ListNode(x); // 配置新的記憶體
newNode->next = first; // 先把first接在newNode後面
first = newNode; // 再把first指向newNode所指向的記憶體位置
}
```
### Push_back()尾巴新增newNode資料
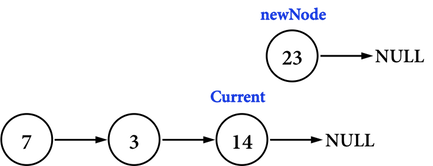
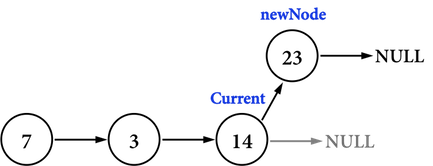
```clike=
// C++ code
void LinkedList::Push_back(int x){
ListNode *newNode = new ListNode(x); // 配置新的記憶體
if (first == 0) { // 若list沒有node, 令newNode為first
first = newNode;
return;
}
ListNode *current = first;
while (current->next != 0) { // Traversal到最後一個node
current = current->next;
}
current->next = newNode; // 將newNode接在list的尾巴
}
```
### Delete 刪除資料為int x的node
```clike=
// C++ code
void LinkedList::Delete(int x){
ListNode *current = first;
ListNode *previous = 0;
while (current != 0 && current->data != x) { // Traversal linked list
previous = current; // 如果current指向NULL
current = current->next; // 或是current->data == x
} // 即結束while loop
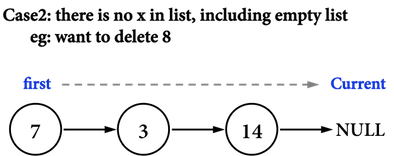
if (current == 0) { // list沒有要刪的node, 或是list為empty
std::cout << "There is no " << x << " in list.\n";
return;
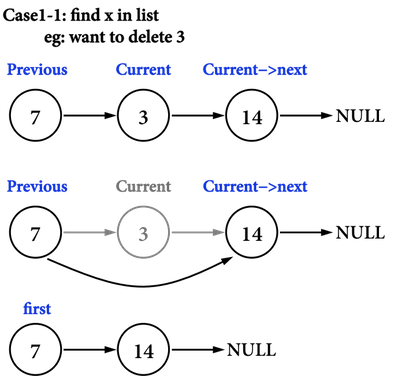
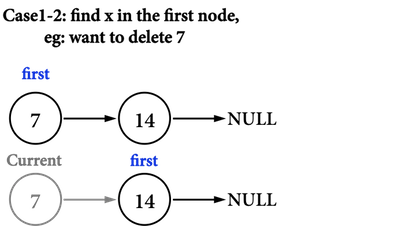
}else if (current == first) { // 要刪除的node剛好在list的開頭
first = current->next; // 把first移到下一個node
delete current; // 如果list只有一個node, 那麼first就會指向NULL
current = 0; // 當指標被delete後, 將其指向NULL, 可以避免不必要bug
return;
}else { // 其餘情況, list中有欲刪除的node,
previous->next = current->next; // 而且node不為first, 此時previous不為NULL
delete current;
current = 0;
return;
}
}
```
### Clear()清除整個Linked list
```clike=
// C++ code
void LinkedList::Clear(){
while (first != 0) { // Traversal
ListNode *current = first;
first = first->next;
delete current;
current = 0;
}
}
```
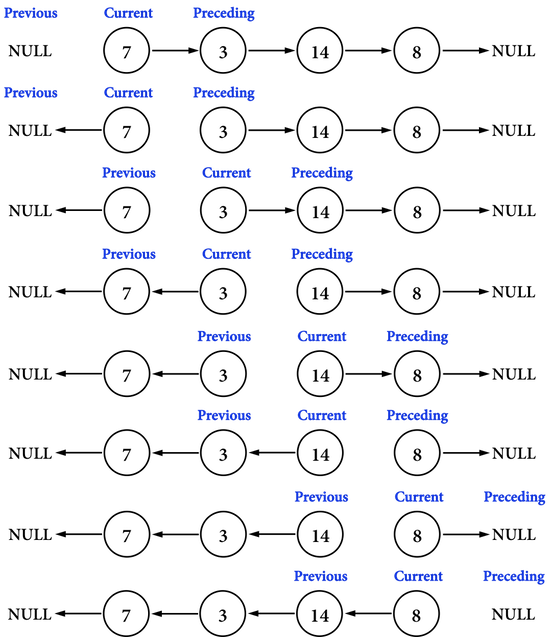
### Reverse()反轉Linked list
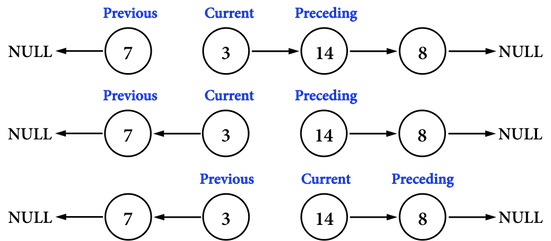
有了這三個指標後,要執行的步驟只有兩個:
* 將current->next從原本指向preceding更新成指向previous,如圖。執行current->next=previous,就把node(3)的指向node(7)。
* 把三個指標「按照順序」往前移動,然後進行下一個node之pointer調整,如圖。
* previous=current,將previous移動到node(3)。
* current=preceding,將current移動到node(14)。
* preceding=preceding->next,將preceding移動到node(8)。
重複上述步驟,直到preceding更新成NULL,調整Linked list的first所指向的記憶體位置,即完成Linked list之反轉。
```clike=
// C++ code
void LinkedList::Reverse(){
if (first == 0 || first->next == 0) {
// list is empty or list has only one node
return;
}
ListNode *previous = 0;
ListNode *current = first;
ListNode *preceding = first->next;
while (preceding != 0) {
current->next = previous; // 把current->next轉向
previous = current; // previous往後挪
current = preceding; // current往後挪
preceding = preceding->next; // preceding往後挪
} // preceding更新成NULL即跳出while loop
current->next = previous; // 此時current位於最後一個node, 將current->next轉向
first = current; // 更新first為current
}
```
Reference: http://alrightchiu.github.io/SecondRound/linked-list-xin-zeng-zi-liao-shan-chu-zi-liao-fan-zhuan.html
---
## Stack
在以下Array實作Stack程式範例中,StackArray的private data有三項:
* int top:記錄於stack中,最上面資料的index。
* int capacity:即為Array的size,也就是實際配置的記憶體大小。
* int *stack:這裡以int的Array來表示Stack。
```clike=
// C++ code
#include <iostream>
class StackArray{
private:
int top; // index of top element
int capacity; // allocated memory space of array
int *stack; // array representing stack
void DoubleCapacity(); // double the capacity of stack
public:
StackArray():top(-1),capacity(1){ // constructor
stack = new int[capacity]; // initial state: top=-1, capacity=1
}
void Push(int x);
void Pop();
bool IsEmpty();
int Top();
int getSize();
};
```
DoubleCapacity():因為利用Array來存放資料,所以有可能在不斷新增資料時,碰上一開始分配給Array的記憶體空間(capacity)不夠的情況,可以透過重新配置一個capacity為==兩倍大的Array來解決==。
更理想的做法是,能夠先對欲放進Stack處理的資料數量有個底,在初始化時,就把capacity設定在差不多的範圍,如此一來,不需要重複多次DoubleCapacity(),也不會過分浪費記憶體空間。
本篇文章提供的範例程式碼將capacity初始為11,主要是為了方便測試DoubleCapacity()。
```clike=
void StackArray::DoubleCapacity(){
capacity *= 2; // double capacity
int *newStack = new int[capacity]; // create newStack
for (int i = 0 ; i < capacity/2; i++) { // copy element to newStack
newStack[i] = stack[i];
}
delete [] stack; // release the memory of stack
stack = newStack; // redirect stack to newStack
}
```
Stack的基本處理資料的函式:
**Push()**
```clike=
void StackArray::Push(int x){
if (top == capacity - 1) { // if stack is full, double the capacity
DoubleCapacity();
}
stack[++top] = x; // update top and put x into stack
}
```
**Pop()**
```clike=
void StackArray::Pop(){
if (IsEmpty()) { // if stack is empty, there is nothing to pop
std::cout << "Stack is empty.\n";
return;
}
top--; // update top
// stack[top] = 0; // (*1)
// stack[top].~T(); // (*2)
}
```
**IsEmpty()**
```clike=
bool StackArray::IsEmpty(){
// if (top == -1) {
// return true;
// }
// else {
// return false;
// }
return (top == -1);
}
```
**Top()**
```clike=
int StackArray::Top(){
if (IsEmpty()) { // check if stack is empty
std::cout << "Stack is empty.\n";
return -1;
}
return stack[top]; // return the top element
}
```
**getSize()**
```clike=
int StackArray::getSize(){
return top+1; // return the number of elements in stack
}
```
---
## Queue
Queue是具有**First-In-First-Out**的資料結構,Queue也具有以下特徵:
隊伍有前方(front)以及後方(rear)之分。
* 若要進入隊伍(Push),一定是從rear進入。
* 若要離開隊伍(Pop),一定是從front離開。
使用陣列來實作佇列,我們必須保留兩個旗標,假設front指向佇列的前端,rear向佇列的後端,我們每次從佇列後端加入一個資料,rear就加1指向最後一個資料,每次從佇列前端取出一個資料,front就加1指向佇列的最前端,如下圖所示:
<div class="align-center">

</div>
這是最簡單的佇列實作,但是由於陣列的大小必須先決定,所以這種線性的結構有個問題,front與rear會到達陣列的後端,而這個陣列就不能再使用了,為了解決這個問題,將陣列當作**環狀**來使用,當front或rear到達陣列後端時,就重新從陣列前端再循環,也就是形成**環狀佇列**,如下圖所示:
<div class="align-center">

</div>
不過陣列的容量還是受限制,所以這個陣列還是會滿的,當front = rear時,佇列就滿了;
Queue的基本操作有五項:**新增佇列、加入資料、顯示前端資料、取出前端資料、顯示所有的佇列元素**。
```clike=
#include <stdio.h>
#include <stdlib.h>
#define N 10
void createq(int[], int*, int*);
void showfront(int[], int, int);
void add(int[], int*, int*, int);
void del(int[], int*, int*);
void showqueue(int[], int, int);
int main(void) {
int queue[N];
int front, rear;
int input, select;
createq(queue, &front, &rear);
while(1) {
printf("\n\n請輸入選項(-1結束):");
printf("\n(1)插入值至佇列");
printf("\n(2)顯示佇列前端");
printf("\n(3)刪除前端值");
printf("\n(4)顯示所有內容");
printf("\n$c>");
scanf("%d", &select);
if(select == -1)
break;
switch(select) {
case 1:
printf("\n輸入值:");
scanf("%d", &input);
add(queue, &front, &rear, input);
break;
case 2:
showfront(queue, front, rear);
break;
case 3:
del(queue, &front, &rear);
break;
case 4:
showqueue(queue, front, rear);
break;
default:
printf("\n選項錯誤!");
}
}
printf("\n");
return 0;
}
void createq(int queue[], int* front, int* rear) {
int i;
for(i = 0; i < N; i++)
queue[i] = 0;
*front = *rear = 0;
}
void showfront(int queue[], int front, int rear) {
if(front == rear)
printf("\n佇列為空!");
else
printf("%d", queue[(front+1) % N]);
}
void add(int queue[], int* front, int* rear, int data) {
int f, r;
f = *front;
r = *rear;
r = (r+1) % N;
if(f == r) {
printf("\n佇列已滿!");
return;
}
queue[r] = data;
*rear = r;
}
void del(int queue[], int* front, int* rear) {
int f, r;
f = *front;
r = *rear;
if(f == r) {
printf("\n佇列為空!");
return;
}
f = (f+1) % N;
*front = f;
}
void showqueue(int queue[], int front, int rear) {
int i;
printf("\n佇列內容:");
for(i = (front+1) % N; i <= rear; i++)
printf("%d ", queue[i]);
}
```
## Binary Tree Traversal

* **Pre-order(VLR)**:當CurrentNode移動到A時,會先對A進行Visiting,接著前往left child進行Visiting,再前往right child進行Visiting。(若child指向NULL則忽略。)
* **In-order(LVR)**:當CurrentNode移動到A時,會先對A的left child(B)進行Visiting,接著回到A進行Visiting,再前往right child(C)進行Visiting。(若child指向NULL則忽略。)
* **Post-order(LRV)**:當CurrentNode移動到A時,會先對A的left child(B)進行Visiting,再前往right child(C)進行Visiting,接著回到A進行Visiting。(若child指向NULL則忽略。)