# **SSH伺服器**
#### **介紹**
1. 有加密
2. 預設戶號 22
### **安裝方式**
apt install openssh-server (預設已安裝)
### **查詢伺服器狀態**
1. systemctl status sshd :查詢狀態
2. systemctl start sshd :啟動伺服器
3. systemctl stop sshd :停止伺服器
4. systemctl enable sshd :開啟開機自啟動
5. systemctl disable sshd :關閉開機自啟動
6. systemctl restart sshd :重新啟動(會中斷)
7. systemctl reload sshd :重新加載(不會中斷)
## 使用
ubuntu1~$ ssh user@ubuntu2位置
:::danger
預設不讓使用root登入
需要修改SSH伺服器配置檔(/etc/ssh/sshd_config)
1. ubuntu2~#vim sshd_config (要使用root權限)

2. 修改要重啟伺服器

:::
### 無密碼登入(Root登入步驟一樣)
1. ubuntu1~$ ssh-keygen (產生公鑰私鑰)
:::success
放置在/home/user/.ssh

:::
2. ubuntu1~$ ssh-copy-id user@ubuntu2IP位置
:::success
將公鑰複製到ubuntu2

:::
3. ubuntu1~$ ssh user@ubuntu2位置
:::success
登入ubuntu2

:::
### 到ubuntu2執行指令
將指令串接在後面
:::success
ubuntu1~$ ssh user@ubuntu2 "pwd"

ubuntu1~$ ssh user@ubuntu2 "cd /tmp && pwd"

:::
## 複製 (sftp)
### 複製檔案
1. ubuntu1:~$ scp file user@ubuntu2:/tmp
:::success
將file檔案傳送到ubuntu2的tmp資料夾下

查看ubuntu2

:::
2. ubuntu1:~$ scp user@ubuntu2:/tmp/file .
:::success
將ubuntu2下的tmp資料夾裡的file傳送到本地端

:::
### 複製資料夾
1. ubuntu1:~$ scp -r test user@ubuntu2:/tmp
:::success
將test資料夾傳送到ubuntu2的tmp資料夾下

查看ubuntu2

:::danger
參數 -r:遞迴複製
:::
2. ubuntu1:~$ scp -r user@ubuntu2:/tmp/test .
:::success
將ubuntu2下的tmp資料夾裡的test資料夾傳送到本地端


:::danger
參數 -r:遞迴複製
:::
# NFS Server
使得 Linux 之間可以共享資料夾
## 伺服端
1. ubuntu1:~$ sudo apt install -y nfs-kernel-server
:::success
安裝伺服端
:::
2. 建立資料夾並產生四個檔案

3. 更改資料夾擁有者

4. 修改配置檔 `/etc/exports`,加入下列程式碼
```vim=
/nfs-server *(rw,sync,no_subtree_check,all_squash)
```

5. 重新啟動
```vim=
ubuntu1:~# systemctl restart nfs-kernel-server
```

## 客戶端
1. ubuntu2:~$sudo apt install nfs-common -y
:::success
安裝客戶端
:::
2. ubuntu2:~#mkdir /nfs-client
:::success
建立資料夾
:::
3. 將遠端的資料夾掛載到本地端的資料夾
:::success
mount -t nfs -o rw,resvport ubuntu1:/nfs-server /nfs-client
:::
4. 查看客戶端資料夾是否有四個檔案

:::info
取消連結
ubuntu2:~#umount /nfs-client (要離開nfs-client資料夾)

:::
# 使用USB
插入USB後查看掛載點

## 修改USB掛載點
1. ubuntu1:~#mkdir /myusb
:::success
建立新的資料夾當USB的掛載點
:::
2. 將USB掛載到myusb資料夾上

# 新增硬碟
1. 先檢查新加入的硬碟

2. 磁碟切割
1. ubuntu1:~# fdisk /dev/sdb

2. 輸入n (新增分區)

3. 輸入p (選擇主要分割區,皆使用預設)

4. 輸入w (寫入設定)

3. 格式化硬碟

4. 建立要掛載的資料夾
:::success
ubuntu1:~# mkdir /mydisk
:::
5. 將sdb1掛載到mydisk資料夾上,就可以使用
:::success
ubuntu1:~#mount /dev/sdb1 /mydisk
:::
6. 檢查掛載是否成功

7. 查詢新增硬碟的UUID

8. 編輯/etc/fstab

9. 重開機
10. 檢查是否有自動掛載到mydisk資料夾上

# 存儲空間
### 1. lsblk
#### 列出系統的塊設備(block devices),主要用於查看磁碟、分區和掛載信息

### 2. df
#### 顯示文件系統的的可用空間、已用空間及總大小,還提供已掛載設備的信息
常用參數:
-h:以常見格式顯示大小(如 GB、MB)
-T:顯示文件系統類型
-i:顯示 inode 使用情況
>[!Note]
>僅顯示出某個欄位 (腳本程式常用)
>
>將指令存儲成變數 (腳本程式常用)
>
>
>[!Important]
>正則表達式:
>1. $ 匹配字符串的結尾
>
>2. ^ 匹配字符串的開頭
>
### 3. du
#### 顯示目錄或文件的大小
常用參數:
-h:以常見格式顯示大小(如 GB、MB)
-s:僅顯示總大小

### 4. dstat
#### 監控磁碟讀寫狀況 (預設沒有安裝)
常用參數:
-c:顯示 CPU 使用率
-n:顯示網絡流量
-d:顯示磁碟的讀寫數據

### 5. iotop
#### 監控磁碟I/O活動(預設沒有安裝)
數據解析:
Total DISK READ/WRITE:顯示整體系統的磁碟讀寫速度
USER:運行進程的用戶
DISK READ/WRITE:該進程的磁碟讀取/寫入速率。
IO%:進程的 I/O 使用率
# MariaDB
## 安裝流程
### 伺服端
#### 1. 安裝金鑰
1. 安裝apt-transport-https和curl
:::success
ubuntu1:~$ sudo apt install apt-transport-https curl
:::
2. 建立資料夾
:::success
ubuntu1:~$ sudo mkdir -p /etc/apt/keyrings
:::
3. 下載金鑰
:::success
sudo curl -o /etc/apt/keyrings/mariadb-keyring.pgp 'https://mariadb.org/mariadb_release_signing_key.pgp'
:::
#### 2. 加入儲存庫
`ubuntu1:~# vim /etc/apt/sources.list.d/mariadb.sources`,加入下列程式碼
```vim=
# MariaDB 11.1 repository list - created 2023-11-08 06:16 UTC
# https://mariadb.org/download/
X-Repolib-Name: MariaDB
Types: deb
# deb.mariadb.org is a dynamic mirror if your preferred mirror goes offline. See https://mariadb.org/mirrorbits/ for details.
# URIs: https://deb.mariadb.org/11.1/ubuntu
URIs: https://ftp.ubuntu-tw.org/mirror/mariadb/repo/11.7.1/ubuntu
Suites: jammy
Components: main main/debug
Signed-By: /etc/apt/keyrings/mariadb-keyring.pgp
```

#### 3. 安裝 MariaDB Server
1. 安裝MariaDB
:::success
ubuntu1:~$ sudo apt install mariadb-server
:::
2. 檢查伺服器狀態
:::success
ubuntu1:~$ systemctl status mariadb
:::
3. 初始化MariaDB
1. ubuntu1:~# mysql_secure_installation

2. 預設MariaDB沒有密碼,直接按enter就好了

3. 沒有強制使用,輸入 n。

4. 修改資料庫root帳號密碼,輸入y

5. 輸入root密碼
6. 移除匿名帳號,輸入y

7. 不允許遠端使用root帳號登入,輸入n

8. 移除測試資料庫與帳號,輸入y
9. 重新載入權限設定,輸入y

4. 登入MariaDB
5. 編輯/etc/mysql/mariadb.conf.d/50-server.cnf,將bind-address=127.0.0.1改成bind-address=0.0.0.0,使得所有人都可以連線

6. 重啟MariaDB伺服器
:::success
ubuntu1:~$ systemctl restart mariadb
:::
7. 新增資料庫權限
```vim=
GRANT ALL PRIVILEGES ON *.* TO 'root'@'%' IDENTIFIED BY 'user' WITH GRANT OPTION;
```

8. 更新系統權限表
```vim=
FLUSH PRIVILEGES;
```

9. 關閉防火牆,並且設為開機不自啟動

### 客戶端
#### 1. 安裝MariaDB Client
ubuntu2:~$ sudo apt install mysql-client
#### 2. 登入MariaDB

## 使用
1. 顯示目前有的資料庫
2. 創建新的資料庫
:::success
create database 資料庫名稱;

:::
3. 使用資料庫
:::success
use 資料庫名稱;

:::
4. 顯示目前有的資料表

5. 創建資料表
:::success
create table 資料表名稱(資料表欄位1,資料表欄位2,...);

:::
6. 加入資料到資料表中
:::success
insert into 資料表名稱(資料表欄位1,資料表欄位2) values (欄位1值,欄位2值);

:::
7. 顯示資料表中的資料
:::success
select 欄位1,欄位2 from 資料表名稱;

select 欄位1,欄位2 from 資料表名稱 where 欄位="搜尋目標";

:::
8. 更新資料表中的資料
:::success
update 資料表名稱 set 欄位="更改的值" where 欄位="更改的目標";

:::
# 連結 (捷徑)
## 硬連結
硬連結是一個直接指向文件數據塊的條目
#### 特性
1. 硬連結不是指向文件路徑,而是直接指向文件的數據塊
2. 即使目標文件被刪除,硬連結仍然有效,因為數據仍保存在磁碟中(除非所有指向該數據的硬連結都被刪除)
3. 只能在同一個文件系統中創建,不能跨分區
4. 不能指向目錄
#### ubuntu1:~$ ln 檔名 硬連結檔名

## 符號連結
符號連結是一個類似於快捷方式的文件。它指向另一個文件或目錄的路徑,而不是數據本身
#### 特性
1. 符號連結是一個獨立的文件,存儲的是目標文件的路徑。
2. 如果目標文件被刪除或移動,符號連結會失效(變成“斷開的連結”)。
3. 可以跨文件系統創建(目標和連結可以位於不同的磁碟分區)。
4. 可以指向文件或目錄。
#### ubuntu1:~$ ln -s 檔名 符號連結檔名

## 兩者比較
| 特性 | 符號連結 (Symbolic Link) | 硬連結 (Hard Link) |
| ------------- | ----------------------- | ---------------------- |
| 概念 | 指向文件的路徑 | 指向文件的數據 |
| 是否可以指向目錄 | 可以 | 不可以 |
| 跨磁碟分割區 | 支持 | 不支持 |
| 目標文件刪除影響 | 連結失效(斷開連結) | 不受影響(數據仍存在) |
| 文件系統inode | 使用新的 inode | 與原始文件共享同一個 inode |
>[!Important] inode
>用於描述每個文件和目錄的元數據(metadata),每個文件或目錄都對應著一個唯一的 inode,即使檔案內容相同inode仍不一樣,包含以下內容:
>1. 文件屬性:
>* 文件大小
>* 文件類型(普通文件、目錄、符號連結等)
>* 文件的許可權(如 rwx 權限)
>* 所有者(用戶 ID 和組 ID)
>2. 數據位置:
>* 指向存儲數據塊的指針(即文件的實際數據位置)
# Curl
### 安裝
ubuntu1:~$ sudo apt install curl
#### 介紹
:::success
1. 是一種文字版的瀏覽器,可將網頁抓回來(以html格式回傳)
2. 可用於測試網頁
>1. 回傳值為0,網頁正常
>
>2. 回傳值為非0,網頁不正常(-connect-timeout 秒數:指定執行秒數結束)
>
:::
# Apache 伺服器
## 安裝伺服器與網頁管理工具
ubuntu1:~$sudo apt -y install apache2 apache2-utils
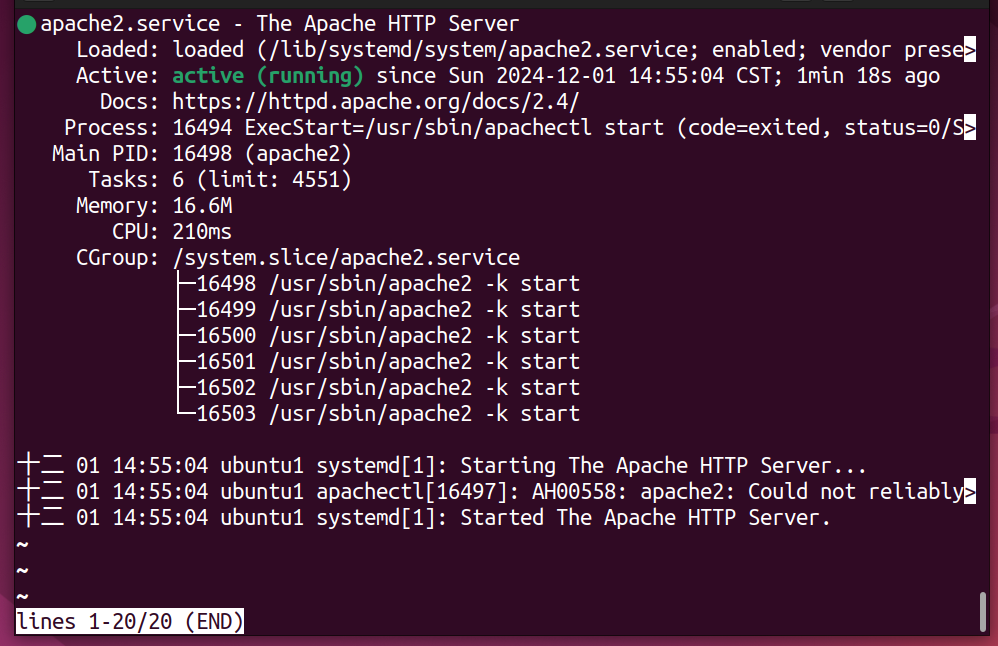
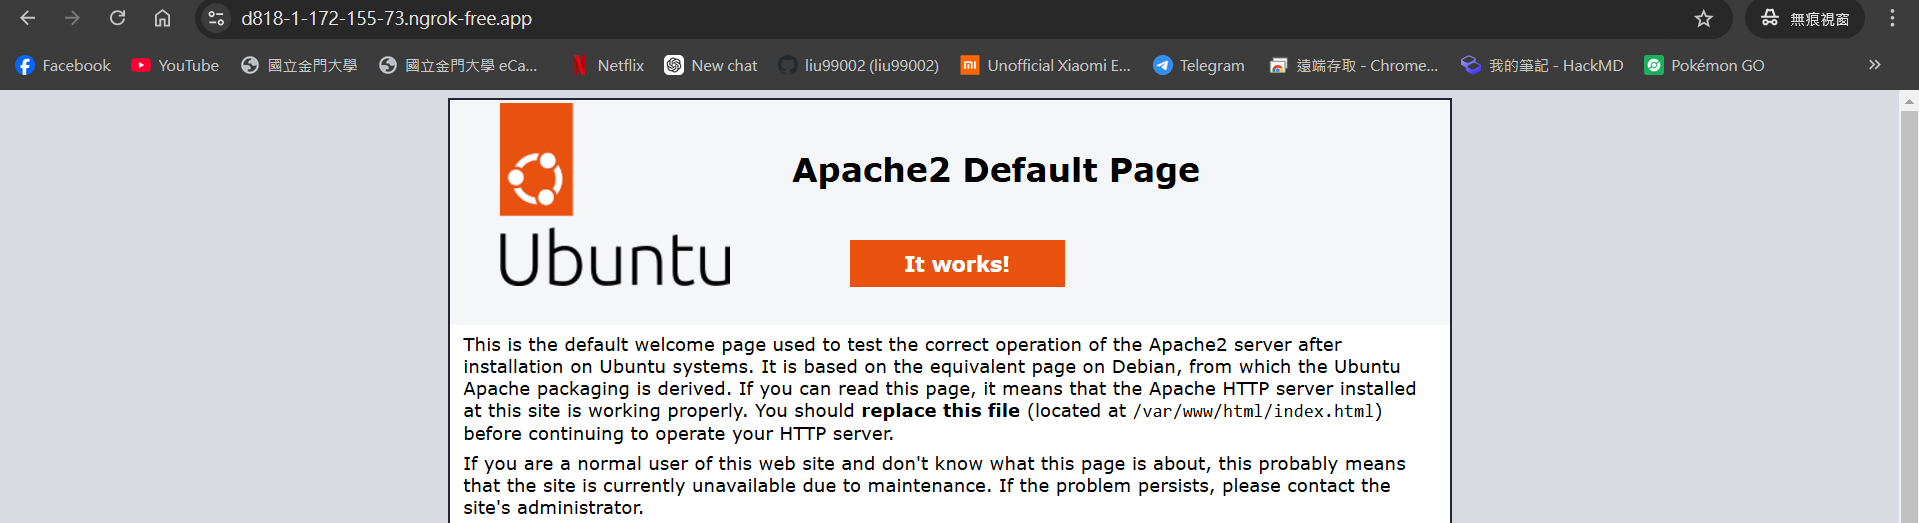
### 確認伺服器狀態
:::success
ubuntu1:~$ systemctl status apache2

使用ubuntu1的IP嘗試連接

:::
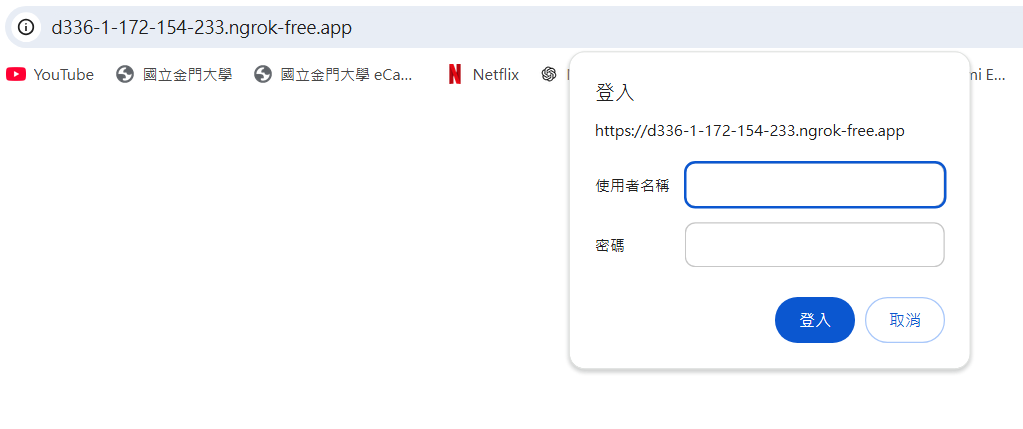
## 加密網頁
1. 安裝apache2-utils
```
ubuntu1:~$ sudo apt-get install apache2-utils
```
2. 產生htpasswd (第一次安裝需要加 -c 產生密碼檔)
```
ubuntu1:~$ sudo htpasswd -c /etc/apache2/.htpasswd 使用者名稱
```
3. 設定使用者密碼

4. 設置第二位使用者 (不需要加 -c 產生密碼檔)
```
ubuntu1:~$ sudo htpasswd /etc/apache2/.htpasswd 使用者名稱
```

5. 到 /var/www/html/sec 產生要加密的網頁
```
ubuntu1:/var/www/html/sec# echo "This is a private webpage" > index.html
```
6. 修改Apache virtual host設定檔 (預設在 /etc/apache2/sites-enabled/000-default.conf )
```
<Directory "/var/www/html/sec">
AuthType Basic
AuthName "You need to login"
AuthUserFile /etc/apache2/.htpasswd
Require valid-user
</Directory>
```

7. 重新啟動 Apache2 伺服器
```
ubuntu1:~# systemctl restart apache2
```
8. 確認網頁是否需要密碼驗證

>[!Caution]
>查看/etc/apache2/.htpasswd 可以知道加入了幾個使用者
>**密碼有加密**
>
## 啟用UserDir
1. 啟用userdir功能
```ubuntu1:~$ sudo a2enmod userdir```
2. 編輯 /etc/apache2/mods-enabled/userdir.conf ,將內容修改成下列程式碼
```
<IfModule mod_userdir.c>
UserDir public_html
UserDir disabled root
<Directory /home/*/public_html>
AllowOverride All
Options MultiViews Indexes SymLinksIfOwnerMatch
<Limit GET POST OPTIONS>
Require all granted
</Limit>
<LimitExcept GET POST OPTIONS>
Require all denied
</LimitExcept>
</Directory>
</IfModule>
```
3. 重新啟動 Apache 伺服器
```ubuntu1:~$ systemctl restart apache2```
4. 建立 **public_html** 目錄,在 **index.html** 裡加入內容

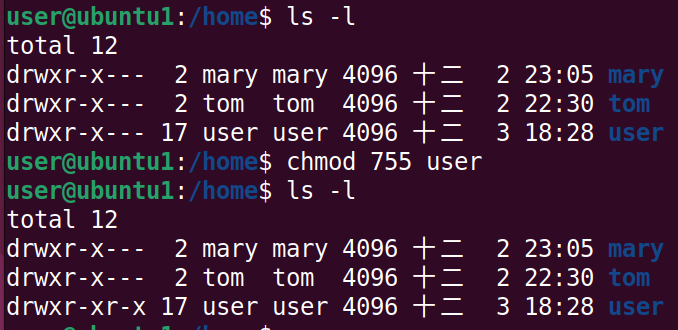
5. 因為 **public_html** 放置在各個使用者的家目錄裡,所以需要將使用者的目錄權限修改,讓所有人都可以進行訪問
6. 確認網頁


## 設置虛擬主機(Virtual Hosts)
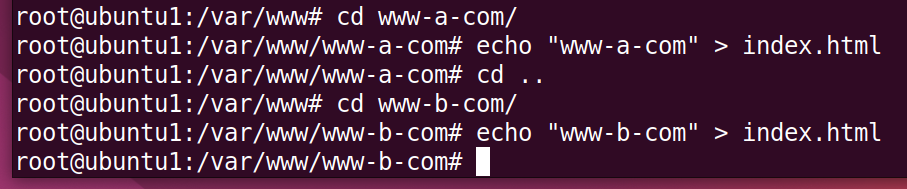
1. 在 **/var/www**中建立兩個不同網站的家目錄 `www-a-com` 和 `www-b-com`
2. 確認 **/var/www** 是否為所有人都可以進行訪問

3. 在各自網站的家目錄中建立 **index.html**
4. 在 **/etc/apache2/sites-available** 中建立新的虛擬主機文件
1. www-a-com:
```ubuntu1:~# vim /etc/apache2/sites-available/www-a-com.conf```
加入下列程式碼
```
<VirtualHost *:80>
ServerAdmin admin@www.a.com
ServerName a.com
ServerAlias www.a.com
DocumentRoot /var/www/www-a-com
ErrorLog ${APACHE_LOG_DIR}/error.log
CustomLog ${APACHE_LOG_DIR}/access.log combined
</VirtualHost>
```
2. www-b-com:
```ubuntu1:~# vim /etc/apache2/sites-available/www-b-com.conf```
加入下列程式碼
```
<VirtualHost *:80>
ServerAdmin admin@www.b.com
ServerName b.com
ServerAlias www.b.com
DocumentRoot /var/www/www-b-com
ErrorLog ${APACHE_LOG_DIR}/error.log
CustomLog ${APACHE_LOG_DIR}/access.log combined
</VirtualHost>
```
5. 將下列加入 Windows 電腦中的 **C:\Windows\System32\drivers\etc\hosts**
```
192.168.44.140 www.a.com
192.168.44.140 www.b.com
```
6. 啟動新增的虛擬主機文件
```ubuntu1:~# a2ensite www-a-com.conf```
```ubuntu1:~# a2ensite www-b-com.conf```
7. 重新載入伺服器
`ubuntu1:~# systemctl reload apache2`
8. 確認網頁


## 查看伺服器連線紀錄
連線紀錄放置在`/var/log/apache2/access.log`

#### 管理範例
使用:
grep:篩選符合條件的行
awk:對文本進行更靈活的處理和過濾
sort:排序文件
uniq:處理重複數據的工具
查看使用 Firefox 瀏覽器進行訪問的IP和作業系統

# PHP 伺服器 (動態網頁)
## 安裝
1. 增加 PHP 套件庫來源
:::success
ubuntu1:~$ sudo apt install software-properties-common
:::
2. 新增 PHP 8 的 PPA 來源
:::success
ubuntu1:~$ sudo add-apt-repository ppa:ondrej/php
:::
3. 更新 apt 來源
:::success
ubuntu1:~$ sudo apt update
:::
4. 安裝 PHP 相關套件
:::success
1. ubuntu1:~$ sudo apt install php8.1 libapache2-mod-php8.1 php8.1-gd php8.1-mysql php8.1-curl php8.1-mbstring php8.1-intl -y
2. ubuntu1:~$ sudo apt install php8.1-gmp php8.1-bcmath php8.1-imagick php8.1-xml php8.1-zip -y
:::
5. 啟用 Apache 的 PHP 模組
:::success
ubuntu1:~$ sudo a2enmod php8.1
:::
6. 重新啟動 Apache 伺服器
:::success
ubuntu1:~$ sudo systemctl restart apache2
:::
7. 確認 Apache 伺服器狀態
8. 測試 PHP 版本資訊
:::success
1. 編輯 /var/www/html/info.php
>ubuntu1:~$ sudo vim /var/www/html/info.php
>
2. 確認網頁
>
:::
9. 編輯連結資料庫測試網頁
1. 將下列程式碼加入/var/www/html/test.php
```
<?php
$servername="192.168.44.140";
$username="root";
$password="user";
$dbname="testdb";
$conn = new mysqli($servername, $username, $password, $dbname);
if($conn->connect_error){
die("connection failed: " . $conn->connect_error);
}
else{
echo "connect OK!" . "<br>";
}
$sql="select name,phone from addrbook";
$result=$conn->query($sql);
if($result->num_rows>0){
while($row=$result->fetch_assoc()){
echo "name: " . $row["name"] . "\tphone: " . $row["phone"] . "<br>";
}
} else {
echo "0 record";
}
?>
```
2. 確認測試網頁是否連接到資料庫

>[!Note] Python flask
>1. ubuntu1:~$ sudo apt install python3 python3-pip
>2. ubuntu1:~$ sudo pip3 install flask
>3. ubuntu1:~$ vim test.py
>加入下列程式碼
>```
>from flask import Flask
>app = Flask(__name__)
>
>@app.route('/')
>def hello_world():
> return '<h2>Hello, World!</h2>'
>
>if __name__ == '__main__':
> app.run(host='0.0.0.0', port=3000, debug=True)
>```
>4. ubuntu1:~$ python3 test.py
>
>5. 確認測試網頁
>
>[!Note] Tree
>**介紹:** 以樹狀結構顯示目錄和文件的工具
>**安裝:** ubuntu1:~$ sudo apt install tree
>**使用:**
>
# Ngrok
#### 用於將本地伺服器公開到互聯網上
## 安裝
1. 通過以下命令使用 Apt 安裝 ngrok:
```
ubuntu1:~# curl -sSL https://ngrok-agent.s3.amazonaws.com/ngrok.asc \
| sudo tee /etc/apt/trusted.gpg.d/ngrok.asc >/dev/null \
&& echo "deb https://ngrok-agent.s3.amazonaws.com buster main" \
| sudo tee /etc/apt/sources.list.d/ngrok.list \
&& sudo apt update \
&& sudo apt install ngrok
```
2. 將authtoken添加到預設的 ngrok.yml 配置文件中
```
ubuntu1:~# ngrok config add-authtoken 2nmQc5kaIFBLMwY4dcEtVYZqCMN_dDfDuHSFhnxRJiNvDZxC
```
## 使用
ngrok http http://localhost:80 (使用 Apache2 的端口,也可使用別的)

## 網頁加密 (密碼長度要大於8個字元)
```vim=
ubuntu1:~# ngrok http 80 --basic-auth "使用者名稱1:密碼1" --basic-auth "使用者名稱2:密碼2"
```
# 帳號管理
## Root
#### 家目錄:

## 一般使用者
#### 家目錄 /home/使用者名稱 :

#### 切換使用者
1. ```ubuntu1:~# su 使用者名稱```
>不會切換到使用者家目錄
2. ```ubuntu1:~# su - 使用者名稱```
>會切換到使用者家目錄
## 新增一般使用者
#### 1.```ubuntu1:~# useradd -m 使用者名稱 -s 使用的shell``` (腳本程式常用)
常見參數:
1. -m: 自動創建使用者的家目錄
2. -s: 指定使用者所使用的shell
3. -g: 指定使用者的主要群組 (預設為創建與使用者名稱相同的群組)
4. -G: 指定使用者的附加群組
5. -u: 指定使用者的UID (預設為現有 UID +1)
6. -d: 指定使用者家目錄
#### 2.```ubuntu1:~# adduser 使用者名稱```
以問答的方式新增
>
## 新增群組
```ubuntu1:~# groupadd 群組名稱```
## 刪除一般使用者
`ubuntu1:~# userdel 使用者名稱`
## 刪除群組
`ubuntu1:~# groupdel 群組名稱`
## 兩者比較
| | root | 一般使用者 |
| -------- | -------- | -------- |
| 帳號名稱 | root | 建立時自訂 |
| 家目錄位置 | /root | /home/使用者名稱 |
| 對檔案的權限 | 可讀取、修改系統中所有檔案及目錄的內容及權限| 僅能讀取、修改具有權限的檔案及目錄 |
| 執行指令的權限 | 可執行系統中所有指令 | 僅能執行具有權限的指令|
| UID | UID = 0 | 從1000開始 (預設 user UID = 1000) |
| GID | GID = 0 | 從1000開始 (預設 user GID = 1000) |
>[!Note] 查看一般使用者可執行的管理員指令
>```ubuntu1:~$sudo -l```
>
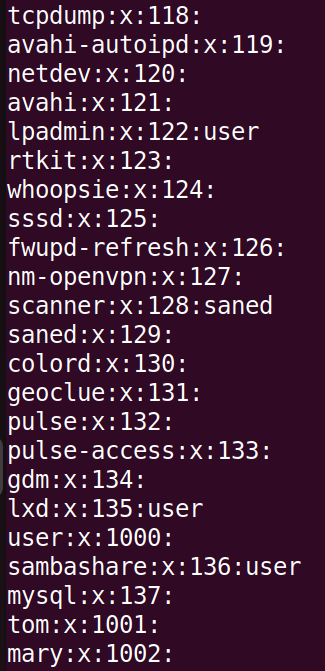
>[!Note] 存儲帳號訊息的位置
>存放在``/etc/passwd``
>**所有人都可以讀取**
>
>>使用者名稱:密碼(不存放在這):UID:GID:comment:家目錄:使用的shell
>[!Note] 存儲群組訊息的位置
>存放在``/etc/group``
>**所有人都可以讀取**
>
>[!Note] 暫時停止使用者登入
>修改```/etc/passwd```中的使用者所使用的shell,修改為```/usr/sbin/nologin```
>
>即可停止帳號登入
>
>[!Note] 查詢使用者UID、GID、GROUPS
>```ubuntu1:~$ id 使用者名稱```
>
>[!Important] 希望新的使用者也可以使用管理者權限
>將新的使用者的附屬群組加入 **sudo**
>[!Caution] 存儲密碼訊息的位置
>**僅管理員可以讀取**
>存放在``/etc/shadow`` (**有加密**)
# SAMBA 伺服器
Linux 與 Windows 之間共享資料夾
## 安裝 Samba 及其相關組件
`ubuntu1:~$sudo apt install samba samba-common -y`
## 設定
```
目標:
資料夾1 => 主要測試所有人都可以直接進入不需要打帳號密碼即可存取
資料夾2 => 主要測試需要輸入ubuntu 主機設定的sambs 帳號密碼才可以進入存取
```
1. 到根目錄下建立要進行分享的資料夾
```
ubuntu1:/# mkdir 資料夾名稱1
ubuntu1:/# mkdir 資料夾名稱2
```
2. 確認分享的資料夾權限為777
```
ubuntu1:/# ls -ld 資料夾名稱
```

3. 建立本機測試帳號
```
ubuntu1:/# useradd 使用者名稱1
ubuntu1:/# useradd 使用者名稱2
```
4. 建立samba密碼
```
ubuntu1:/# smbpasswd –a 使用者名稱1
ubuntu1:/# smbpasswd –a 使用者名稱2
```

5. 編輯伺服器配置檔,配置檔位於 `/etc/samba/smb.conf`,加入下列程式碼
```
[sharea]
path = 資料夾1位置
comment = guest access folder
writable = yes
browseable = yes
guest ok = yes
[shareb]
path = 資料夾2位置
comment = have auth can access
writable = yes
browseable = yes
valid users=使用者名稱1,使用者名稱2
write list=使用者名稱1,使用者名稱2
```
6. 檢查 Samba 配置文件是否正確性
```
ubuntu1~# testparm -s
```

7. 重啟 Samba 伺服器
`ubuntu1:~# systemctl restart smbd`
8. 在 **Windows** 檔案總管搜尋 `\\UbuntuIP` 即可看到設定分享的資料夾
9. 測試在`sharea`中建立檔案

`在 Ubuntu 中也可以看到該檔案`

10. 測試在`shareb`中建立檔案
`進入 shareb 需要進行身分驗證`

:::danger 刪除連線
cmd: net use * /delete
:::
## Linux 與 Linux 之間共享資料夾
### 客戶端安裝
1. 安裝 **SambaCliebt**
`ubuntu2:~# apt install smbclient -y`
2. 查看 Samba 伺服器共享的資料夾
`ubuntu2:~# smbclient --list=Samba Server IP --user=使用者名稱`

3. 連接共享資料夾
`ubuntu2:~$ smbclient --user=使用者名稱 //Samba Server IP/要連接的資料夾`
>[!Note] 上傳檔案
>`smb: \> put 檔案`
>
>[!Note] 下載檔案
>`smb: \> get 檔案`
>
# 架設 PPTP Server
## 安裝
`ubuntu1:~#apt install pptpd`
## 設定**PPTPD Server**
1. Ubunut:
1. 允許內網中的客戶端通過 **ens33** 網卡訪問外網
`ubuntu1:~# iptables -t nat -A POSTROUTING -o ens33 -j MASQUERADE`
2. 編輯 `/etc/ppp/chap-secrets`,加入以下內容
```vim=
"帳號" * "密碼" *
```
3. 編輯 /etc/pptpd.conf ,設定要分配的 IP
```vim=
localip 192.168.34.1
remoteip 192.168.34.2-200
```
2. Windows:
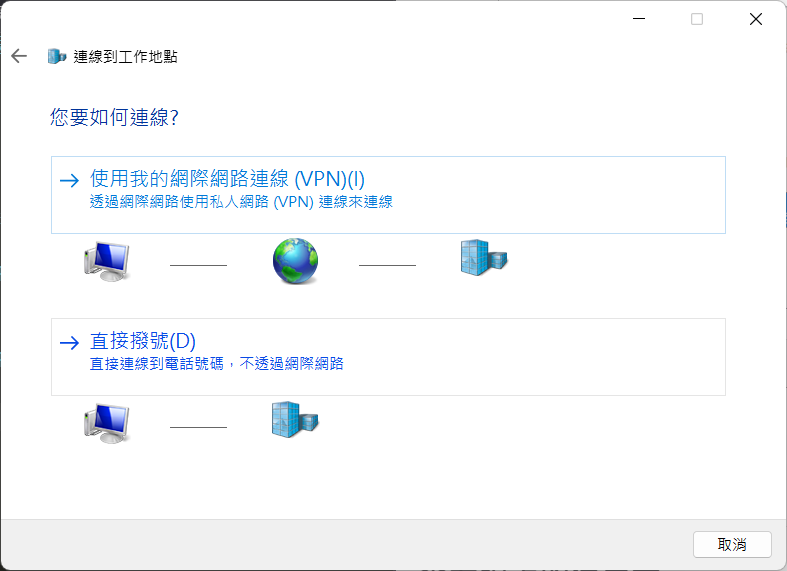
1. 在「網路和共用中心」,按下「設定新的連線或網路」
2. 選擇連線到工作地點

3. 選擇使用我的網際網路連線
4. 接著要填入要連線的 VPN Server IP `192.168.44.132`

5. 選擇剛建立的項目,按下連線
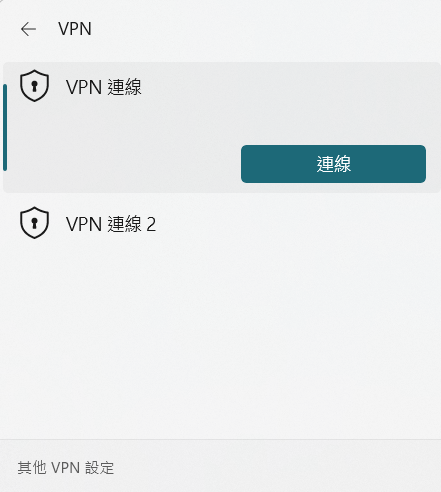
6. 輸入帳號密碼

# 檢視系統資訊
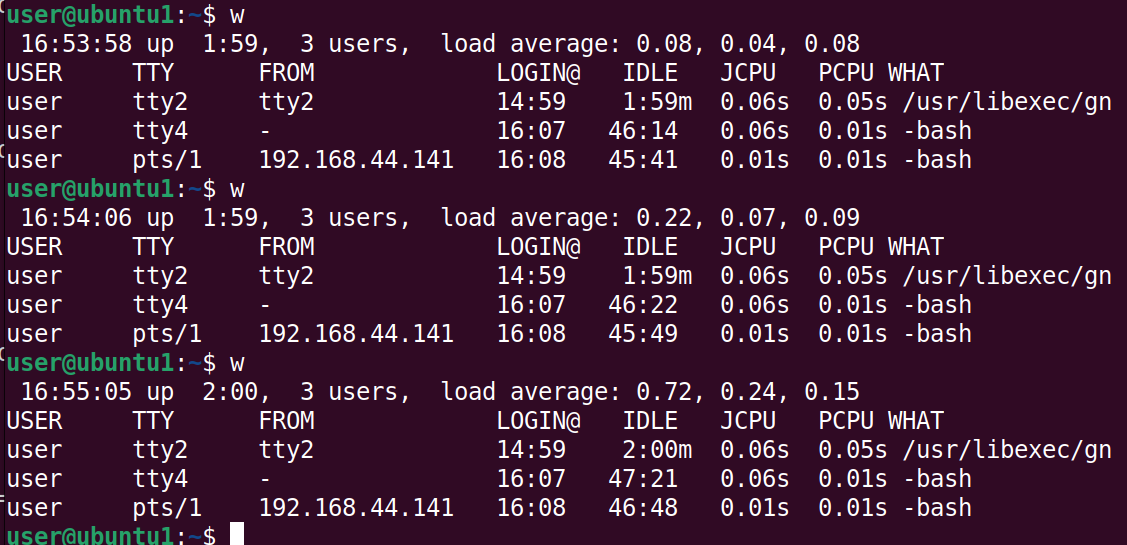
## 查看線上的使用者
1. w
```
pts: 使用ssh連線登入的
tty: 本地登錄伺服器
```

```
第一行:
當前時間:16:08:59
系統運行時間:up 1:14
登入用戶數:4 users
系統負載:
1. 1分鐘CPU平均負載:0.00
2. 5分鐘CPU平均負載:0.06
3. 15分鐘CPU平均負載:0.14
表格部分:
USER:登入用戶名
TTY:終端名稱(如 pts/0 表示虛擬終端)
FROM:用戶的來源 IP 或主機名
LOGIN@:用戶登入時間
IDLE:用戶閒置時間
JCPU:該終端執行的所有進程耗費的 CPU 時間
PCPU:當前進程耗費的 CPU 時間
WHAT:用戶正在執行的命令
```
>[!Note] 增加負載查看`w`輸出變化
>`ubuntu1:~$ dd if=/dev/zero of=/dev/null`
>
2. who
`簡單地檢查用戶登入狀態`

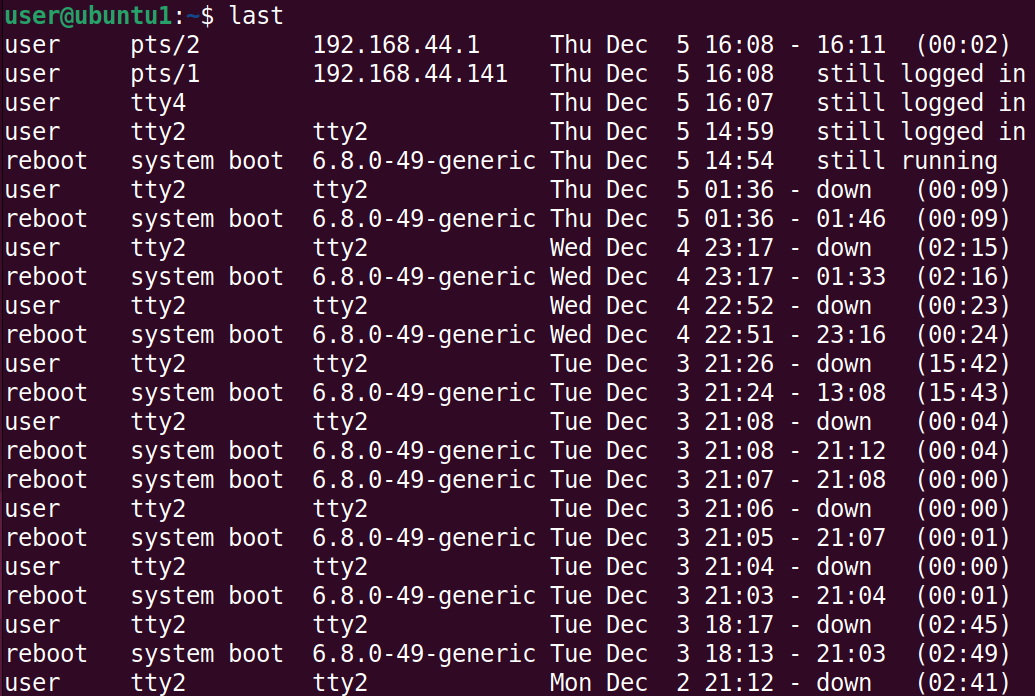
3. last
`查看曾登入此系統之使用者`
## 顯示記憶體使用狀態
### free
#### 常用參數:
-h :以易讀格式顯示內存(例如 KB, MB, GB,自動選擇合適單位)
-t :顯示記憶體的總量(包括內存和交換區)
-s :每隔指定秒數持續顯示內存狀態
-c :限制 -s 的輸出次數

## 查看系統資源的使用狀況
1. top
`能顯示系統當前運行的process、CPU 和記憶體使用情況`
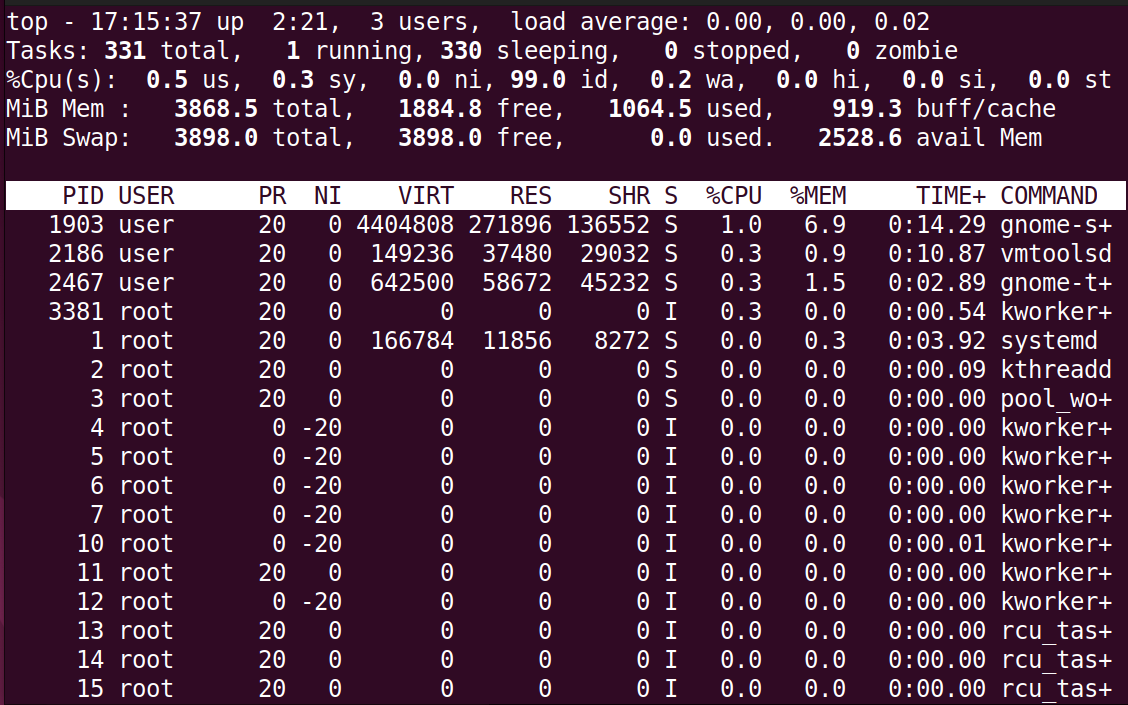
```
常用快捷鍵:
u: 僅顯示指定使用者的process
k: 終止指定進程(需要輸入 PID)。
```
# 網路實驗
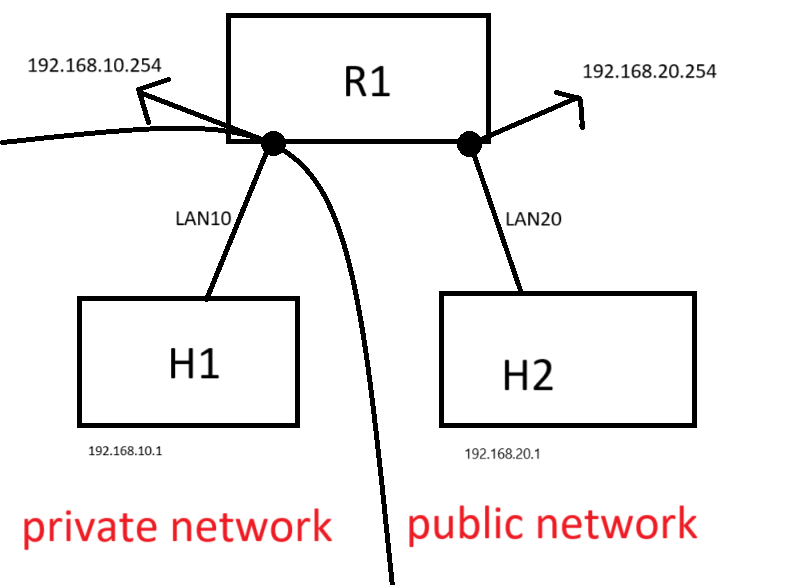
## 1. 由一台 Ubuntu 當路由器,連接另外兩客戶端 (客戶端需手動設置**IP**)
使得 H1 和 H2 雖然在不同的區域網,卻可以互相傳送封包
### **架構圖**

### **設定**
1. Router
1. 新增兩張網路卡,並設定不同的區域網


2. 確認兩張網路卡名稱
```vim=
ens33: NAT
ens37: LAN10
ens38 :LAN20
```
3. 設置 **ens37 IP** 為192.168.10.254
```vim=
R1:~# ip addr add 192.168.10.254/24 dev ens37
```
>[!Tip] 也可使用圖形化介面進行設置
>
4. 設置 **ens38 IP** 為192.168.20.254
```vim=
R1:~# ip addr add 192.168.20.254/24 dev ens38
```
>[!Tip] 也可使用圖形化介面進行設置
>
5. 確認 **IP** 設置
6. 開啟路由器
```vim=
R1:~# echo 1 > /proc/sys/net/ipv4/ip_forward
```
>[!Tip] 修改配置檔固定網路卡IP
>在`/etc/netplan/01-network-manager-all.yaml`加入下列程式碼
>```vim=
># Let NetworkManager manage all devices on this system
>network:
> version: 2
> renderer: NetworkManager
> ethernets:
> ens33:
> dhcp4: true
> ens37:
> addresses:
> - 192.168.10.254/24
> ens38:
> addresses:
> - 192.168.20.254/24
>```
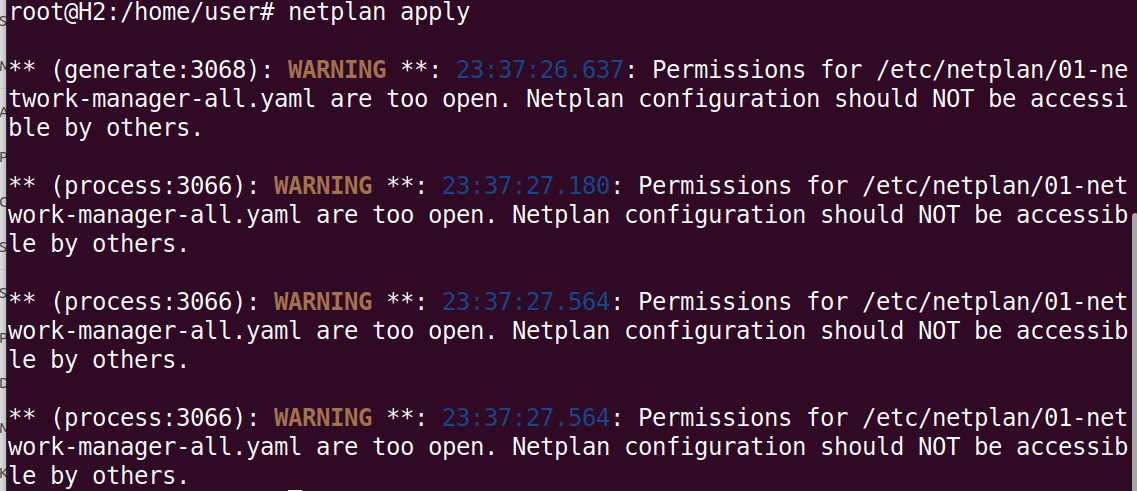
>使用`R1:~# netplan try` 檢查配置檔是否有錯誤
>
>使用`R1:~# netplan apply` 應用修改過後的配置
>
>[!Tip] 修改配置檔固定路由功能預設開啟
>在`/etc/sysctl.conf` 中,找到`net.ipv4.ip_forward=1`,將開頭的`#`刪除
>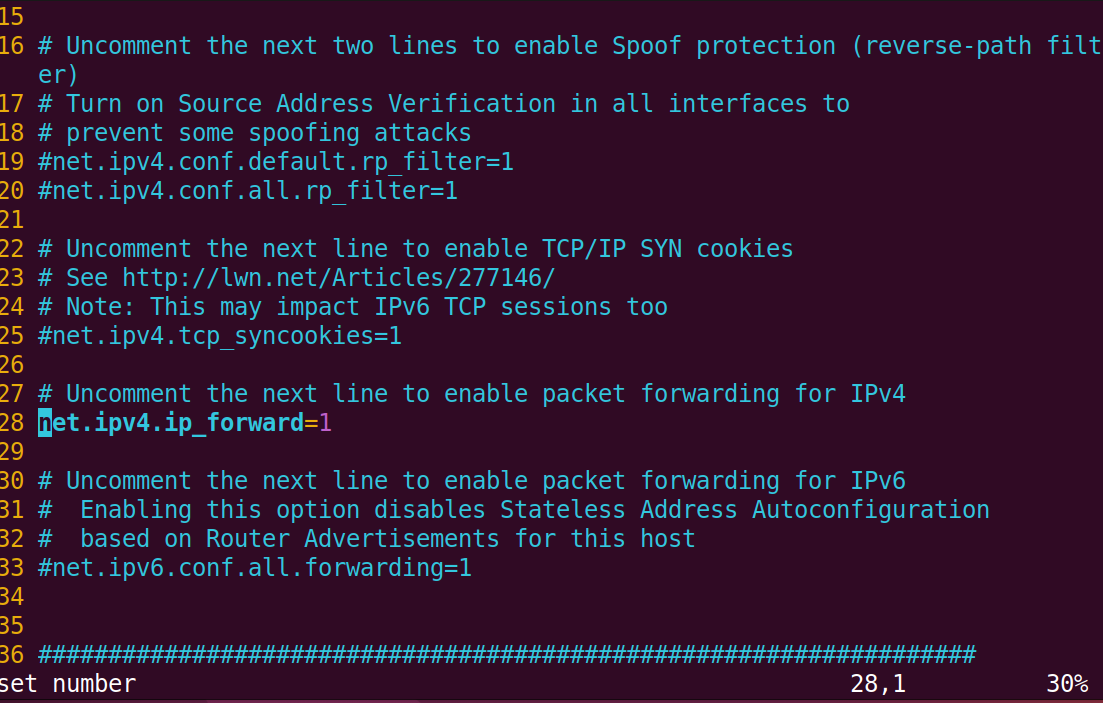
>使用`R1:~# sysctl -p /etc/sysctl.conf` 應用修改過後的配置
2. H1
1. 將網路卡設置為區域網:LAN10

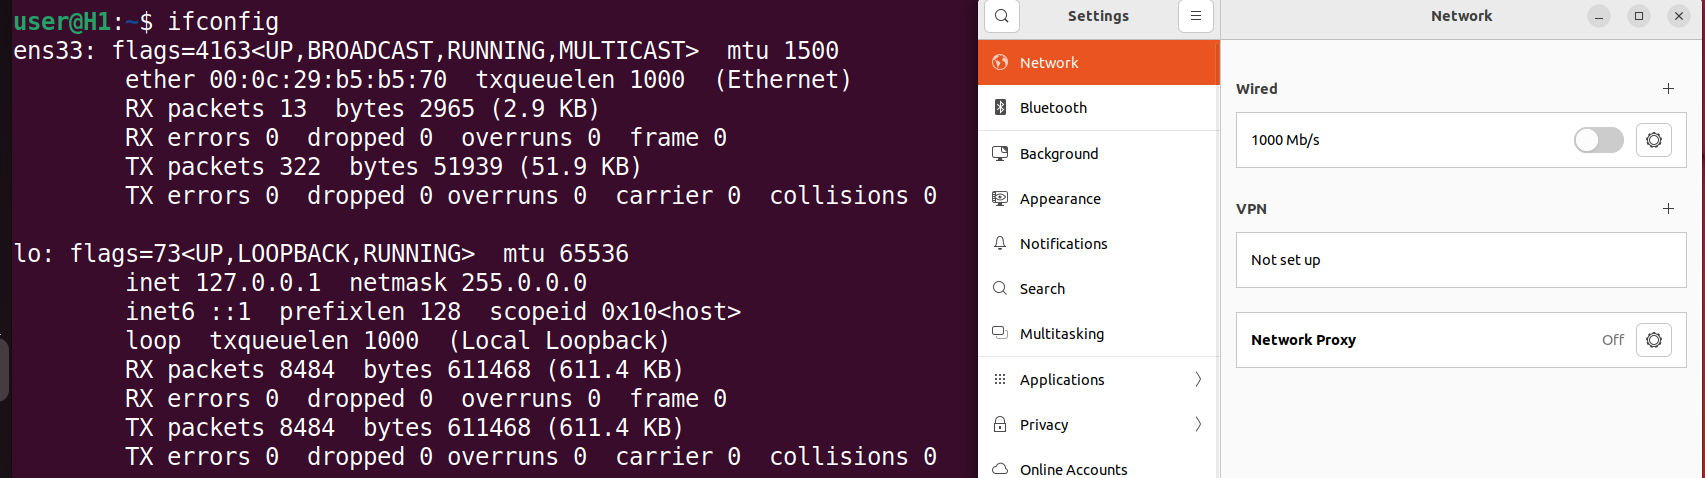
2. 確認網路卡名稱
```vim=
H1:~# ifconfig
```
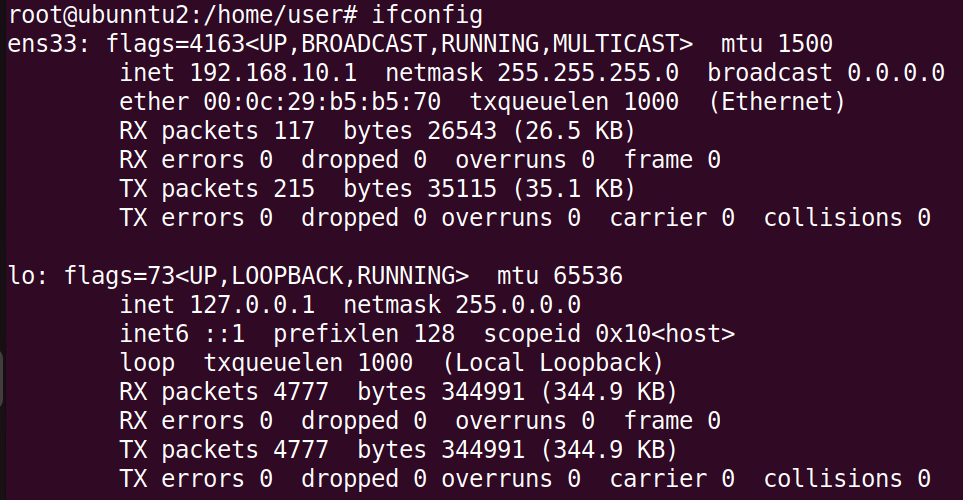
3. 手動設置 **IP** 為192.168.10.1
```vim=
H1:~# ip addr add 192.168.10.1/24 dev ens33
```
4. 手動設置預設路由為192.168.10.254
```vim=
H1:~# ip route add default via 192.168.10.254
```
5. 確認 **IP** 和預設 **Router** 設置正確
```vim=
H1:~# ip route show
```

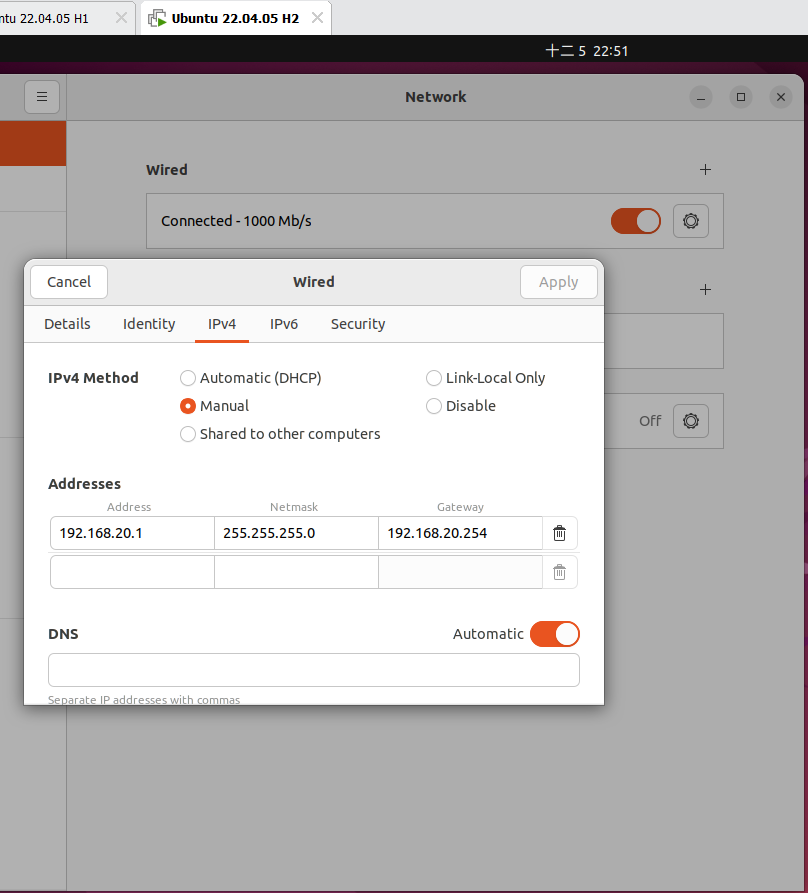
>[!Tip] 也可使用圖形化介面進行設置
>
>[!Tip] 修改配置檔固定網路卡IP
>在`/etc/netplan/01-network-manager-all.yaml`加入下列程式碼
>```vim=
># Let NetworkManager manage all devices on this system
>network:
> version: 2
> renderer: NetworkManager
> ethernets:
> ens33:
> addresses:
> - 192.168.10.1/24
> routes:
> - to: default
> via: 192.168.10.254
>```
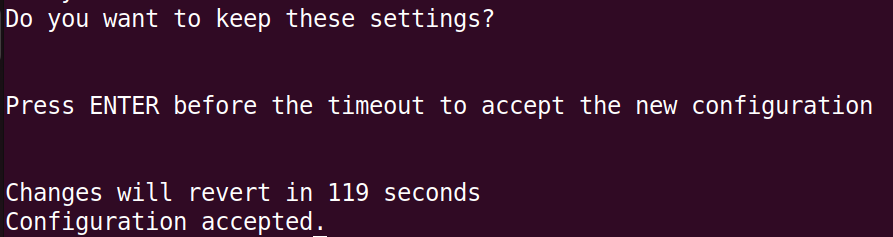
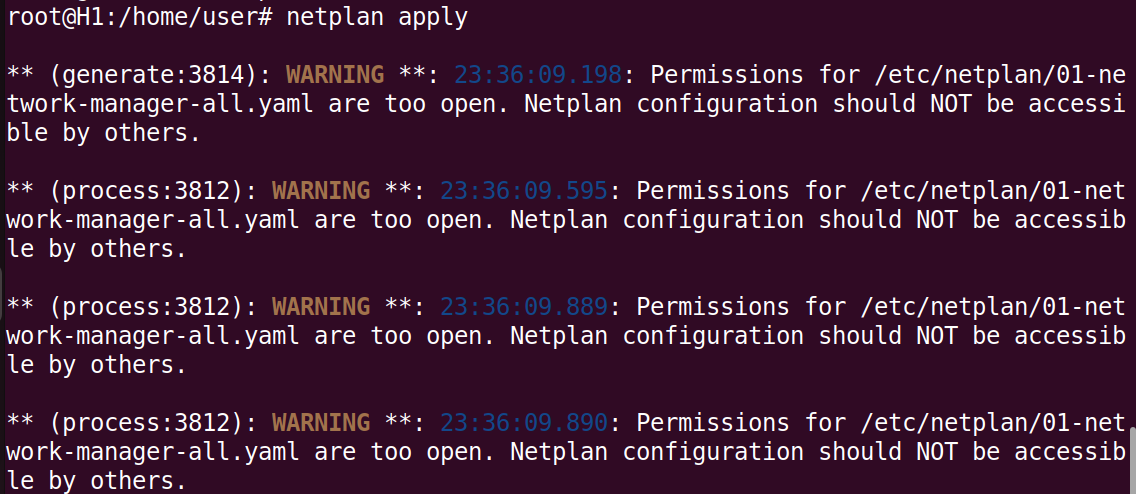
>使用`H1:~# netplan try` 檢查配置檔是否有錯誤
>
>使用`H1:~# netplan apply` 應用修改過後的配置
>
3. H2
1. 將網路卡設置為區域網:LAN20

2. 確認網路卡名稱
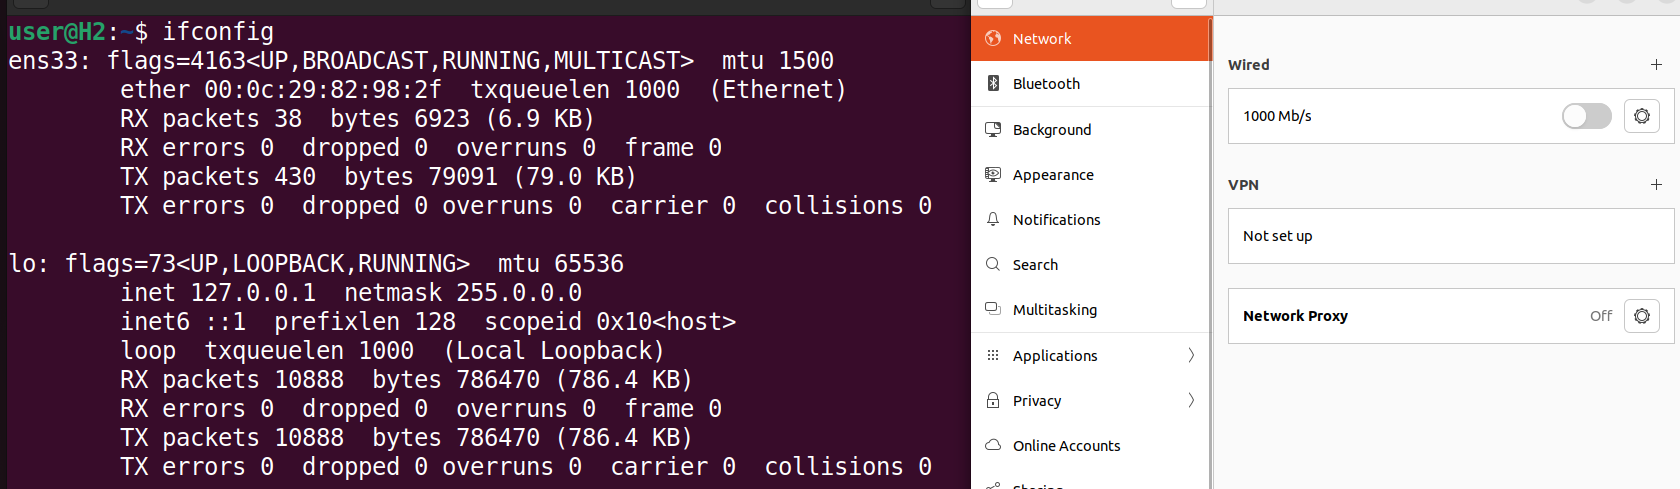
```vim=
H2:~# ifconfig
```

3. 手動設置 **IP** 為192.168.20.1
```vim=
H2:~# ip addr add 192.168.20.1/24 dev ens33
```
4. 手動設置預設路由為192.168.20.254
```vim=
H2:~# ip route add default via 192.168.20.254
```
5. 確認 **IP** 和預設 **Router** 設置正確
```vim=
H2:~# ip route show
```

>[!Tip] 也可使用圖形化介面進行設置
>
>[!Tip] 也可使用圖形化介面進行設置
>
>[!Tip] 修改配置檔固定網路卡IP
>在`/etc/netplan/01-network-manager-all.yaml`加入下列程式碼
>```vim=
># Let NetworkManager manage all devices on this system
>network:
> version: 2
> renderer: NetworkManager
> ethernets:
> ens33:
> addresses:
> - 192.168.20.1/24
> routes:
> - to: default
> via: 192.168.20.254
>```
>使用`H2:~# netplan try` 檢查配置檔是否有錯誤
>
>使用`H2:~# netplan apply` 應用修改過後的配置
>
### 確認封包可以傳達

>[!Note] 網路卡設置
>1. 清除網路卡ip , network mask等設定
>`ifconfig 網路卡名稱 0`
>2. 關閉網路卡
>`ifconfig 網路卡名稱 down`
>3. 啟動網路卡
>`ifconfig 網路卡名稱 up`
<a id="section-2"></a>
## 2. 由一台 Ubuntu 當路由器,連接另外兩台客戶端,加入**DHCP Server** ,使客戶端不需手動設置**IP**
使得 H1 和 H2 雖然在不同的區域網,卻可以互相傳送封包
### **架構圖**

### **設定**
1. Router
1. 新增兩張網路卡,並設定不同的區域網


2. 確認兩張網路卡名稱
```vim=
ens33: NAT
ens37: LAN10
ens38 :LAN20
```

3. 設置 **ens37 IP** 為192.168.10.254
```vim=
R1:~# ip addr add 192.168.10.254/24 dev ens37
```
>[!Tip] 也可使用圖形化介面進行設置
>
4. 設置 **ens38 IP** 為192.168.20.254
```vim=
R1:~# ip addr add 192.168.20.254/24 dev ens38
```
>[!Tip] 也可使用圖形化介面進行設置
>
5. 確認 **IP** 設置

6. 開啟路由器
```vim=
R1:~# echo 1 > /proc/sys/net/ipv4/ip_forward
```
>[!Tip] 修改配置檔固定路由功能預設開啟
>在`/etc/sysctl.conf` 中,找到`net.ipv4.ip_forward=1`,將開頭的`#`刪除
>
>使用`R1:~# sysctl -p /etc/sysctl.conf` 應用修改過後的配置
7. 安裝 DHCP Server
```vim=
R1:~# apt install isc-dhcp-server -y
```
8. 進行原始的**DHCP Server**配置檔備份,檔案在`/etc/dhcp/dhcpd.conf`
```vim=
R1:~# cp /etc/dhcp/dhcpd.conf /etc/dhcp/dhcpd.conf.backup
9. 修改**DHCP Server**配置檔
```vim=
R1:~# vim /etc/dhcp/dhcpd.conf
```
加入下列程式碼:
```vim=
subnet 192.168.10.0 netmask 255.255.255.0 {
range 192.168.10.1 192.168.10.100;
option subnet-mask 255.255.255.0;
option routers 192.168.10.254;
option broadcast-address 192.168.10.255;
default-lease-time 600;
max-lease-time 7200;
}
subnet 192.168.20.0 netmask 255.255.255.0 {
range 192.168.20.1 192.168.20.100;
option subnet-mask 255.255.255.0;
option routers 192.168.20.254;
option broadcast-address 192.168.20.255;
default-lease-time 600;
max-lease-time 7200;
}
```
10. 重啟**DHCP Server**
```vim=
R1:~# systemctl restart isc-dhcp-server
2. H1
`未開啟網路卡連接時:`
`開啟網路卡連接時:` (自動分配**IP**)

3. H2
`未開啟網路卡連接時:`
`開啟網路卡連接時:` (自動分配**IP**)

### 確認封包可以傳達
## 3. 由一台 Ubuntu 當路由器,連接另外兩台客戶端,一台在`private network`,另一台在`public network`,加入**DHCP Server** ,使客戶端不需手動設置**IP**
[設置參考第二部分](#section-2),僅**Router**需多加設定
### **架構圖**
### Router
1. 允許內網(192.168.10.0/24)中的客戶端通過 **ens38** 網卡訪問外網
```vim=
R1:~# iptables -t nat -A POSTROUTING -s 192.168.10.0/24 -o ens38 -j MASQUERADE
```
### 查看封包
1. 安裝 **wireshark**
```vim=
R1:~# apt install wireshark-*
```
2. 執行 **wireshark**
```vim=
R1:~# wireshark
```

3. 檢查封包
1. 抓取通過**ens38**網卡的封包
`H1傳送封包給H2`

`可以發現 Source 的 IP 被更改,保護(192.168.10.0/24)中的客戶端`

2. 抓取通過**ens37**網卡的封包
`可以發現 Source 的 IP 沒有被更改`

## 4. 靜態路由拓樸
### **架構圖**
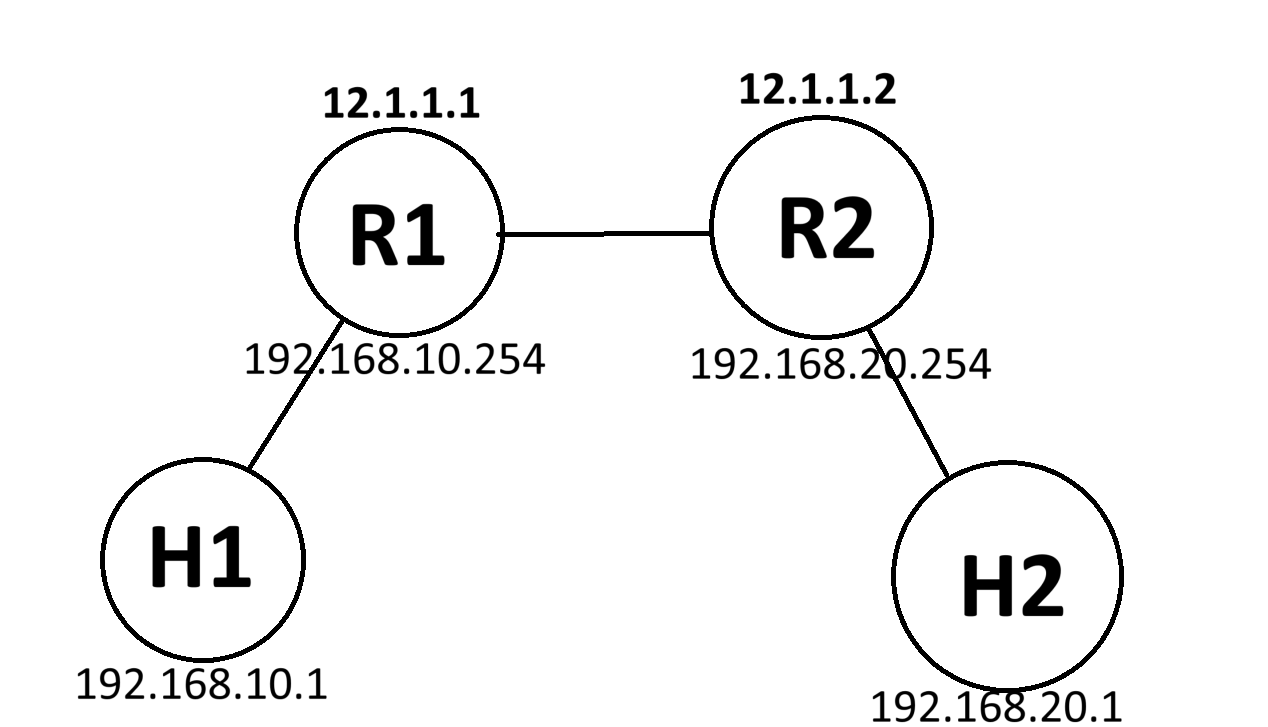
### **設定**
[設置參考第二部分](#section-2),使用**DHCP Server** 為`H1`和`H2`自動分配**IP**
1. Router1:
1. 設定`ens37` 和`ens38` 兩張網路卡IP

2. 確認路由功能開啟 (1為開啟狀態)
`R1:~# cat /proc/sys/net/ipv4/ip_forward`

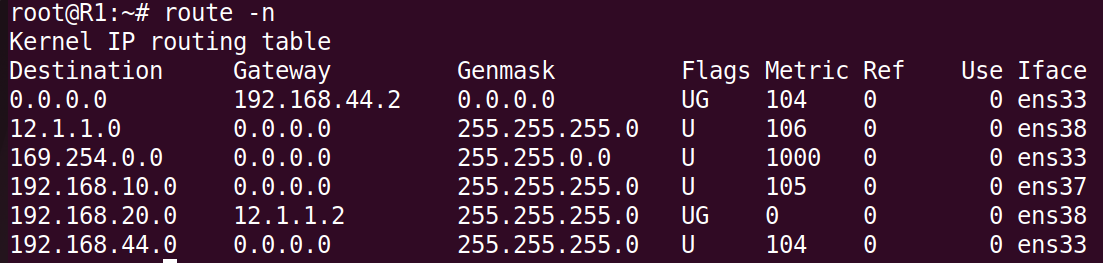
3. 查看路由表
`R1:~# route -n`

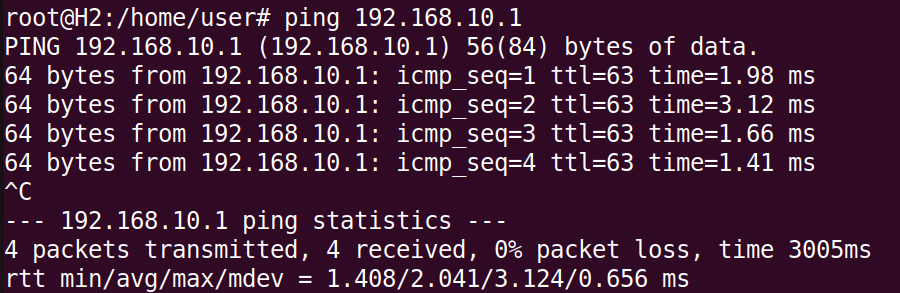
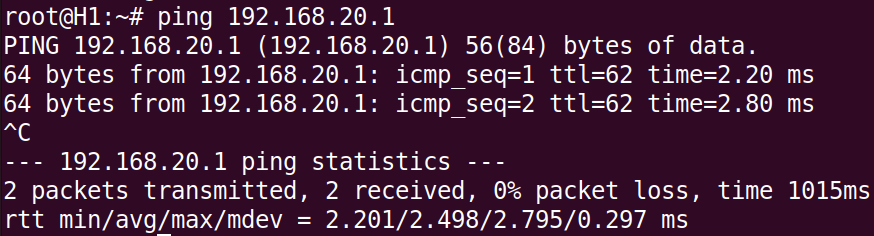
4. 檢測`R1`和`H1`之間的網路連通性
`H1:~# ping 192.168.10.254`

`H1:~# ping 12.1.1.1`

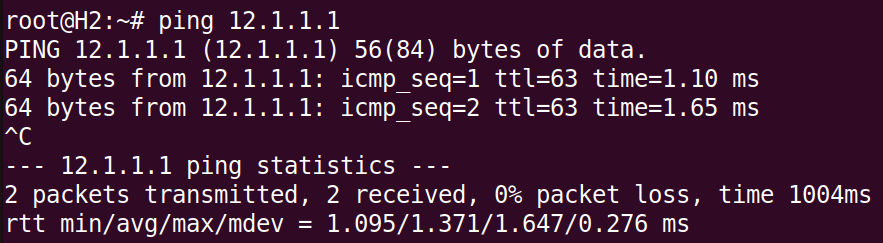
5. 檢測`H2`和`R1`之間的網路連通性,因為`H2`和`R1`不在同個區域往內,所以需要經由`R2`將封包轉發到`R1`
`H2:~# ping 12.1.1.1`

>[!Important] H2 和 R1 之間的網路不連通
>因為此時`R1`的路由表中並沒有可以到達`192.168.20.0/24`的紀錄,所以`R1`沒辦法回應`H2`,所以需要在`R1`的路由表中加入`192.168.20.0/24` 並將封包轉發給`R2`
>`R1:~# ip route add 192.168.20.0/24 via 12.1.1.2`
>**再次查看路由表**
>
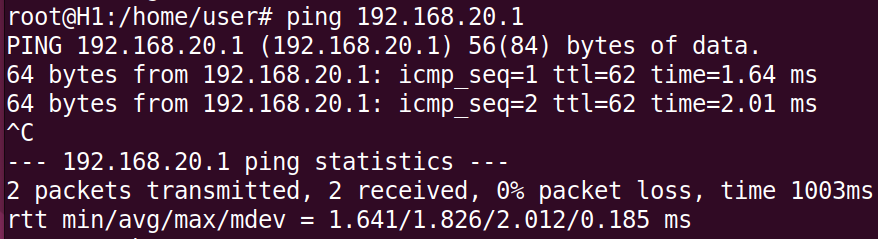
6. 再次檢測`H2`和`R1`之間的網路連通性
`H2:~# ping 12.1.1.1`
2. Router2:
1. 設定`ens37` 和`ens38` 兩張網路卡IP
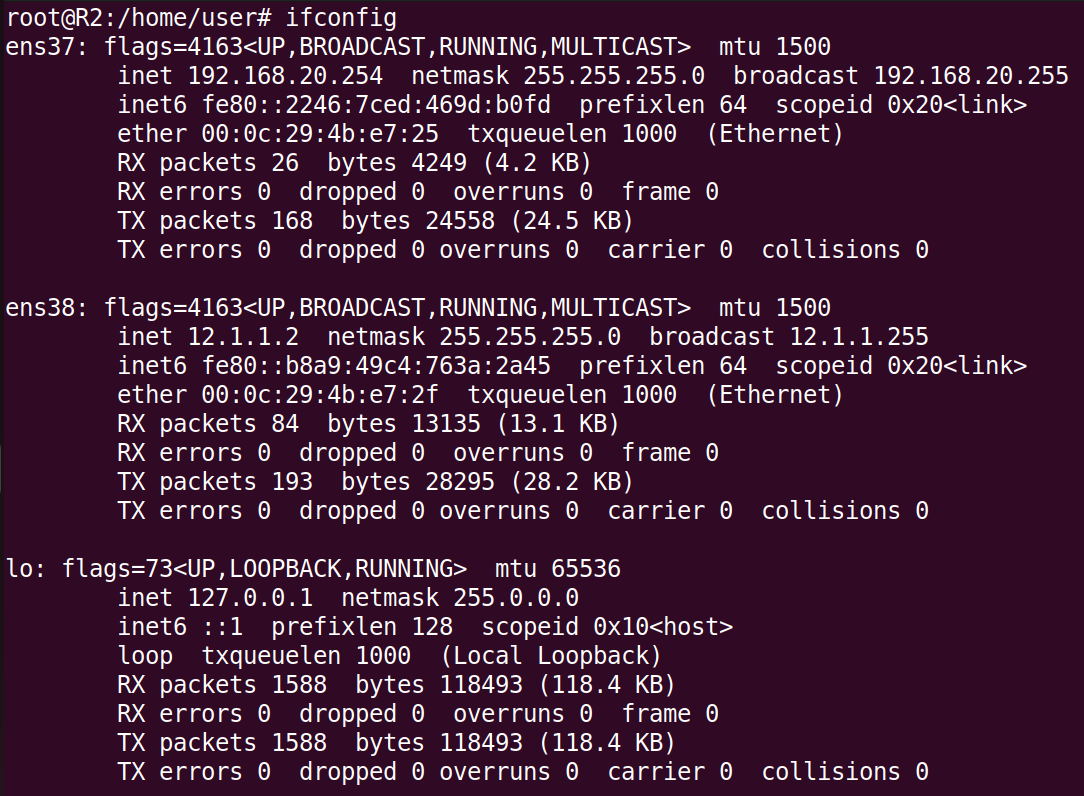
2. 確認路由功能開啟 (1為開啟狀態)
`R2:~# cat /proc/sys/net/ipv4/ip_forward`

3. 查看路由表
`R2:~# route -n`

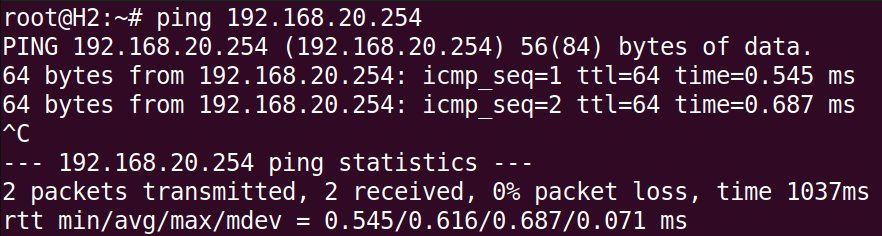
4. 檢測`R2`和`H2`之間的網路連通性
`H2:~# ping 192.168.20.254`

`H2:~# ping 12.1.1.`
5. 檢測`H1`和`R2`之間的網路連通性,因為`H1`和`R2`不在同個區域往內,所以需要經由`R1`將封包轉發到`R2`
`H1:~# ping 12.1.1.2`

>[!Important] H1 和 R2 之間的網路不連通
>因為此時`R2`的路由表中並沒有可以到達`192.168.10.0/24`的紀錄,所以`R2`沒辦法回應`H1`,所以需要在`R2`的路由表中加入`192.168.10.0/24` 並將封包轉發給`R1`
>`R2:~# ip route add 192.168.10.0/24 via 12.1.1.1`
>**再次查看路由表**
>
6. 再次檢測`H1`和`R2`之間的網路連通性
`H1:~# ping 12.1.1.2`
### 確認封包可以傳達
1. H1
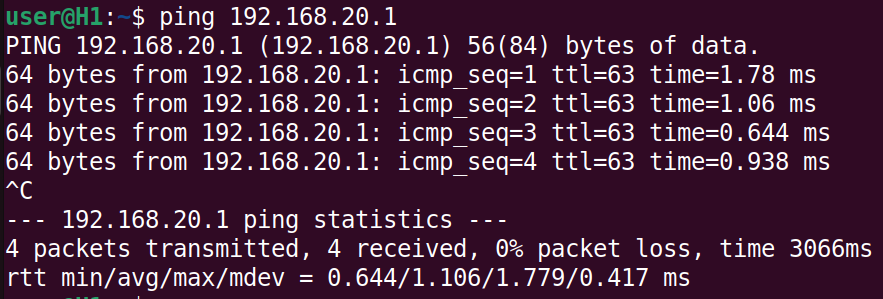
`H1:~#ping 192.168.10.254`
`H1:~#ping 12.1.1.1`
`H1:~#ping 12.1.1.2`

`H1:~#ping 192.168.20.254`

`H1:~#ping 192.168.20.1`
2. H2
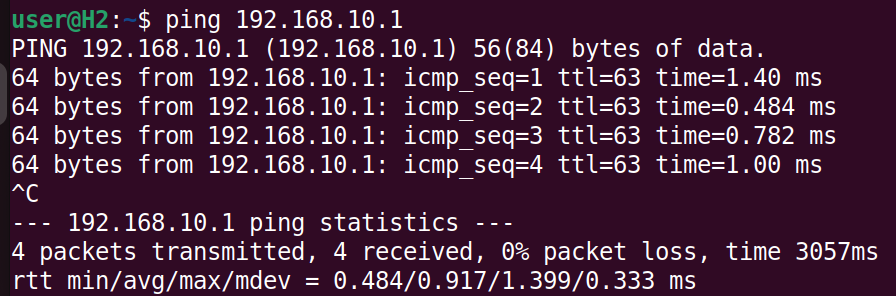
`H2:~#ping 192.168.20.254`

`H2:~#ping 12.1.1.2`

`H2:~#ping 12.1.1.1`

`H2:~#ping 192.168.10.254`
`H2:~#ping 192.168.10.1`

## 5. 靜態路由拓樸,一台在`private network`,另一台在`public network`,並使用`DNAT`,將外部請求引導到內部伺服器時使用
### **架構圖**

### **設定**
[設置參考第二部分](#section-2),使用**DHCP Server** 為`H1`和`H2`自動分配**IP**
1. Router1:
1. 設定`ens37` 和`ens38` 兩張網路卡IP

2. 確認路由功能開啟 (1為開啟狀態)
`R1:~# cat /proc/sys/net/ipv4/ip_forward`

3. 查看路由表
`R1:~# route -n`

4. 檢測`R1`和`H1`之間的網路連通性
`H1:~# ping 192.168.10.254`

`H1:~# ping 12.1.1.1`

5. 檢測`H2`和`R1`之間的網路連通性,因為`H2`和`R1`不在同個區域往內,所以需要經由`R2`將封包轉發到`R1`
`H2:~# ping 12.1.1.1`

>[!Important] H2 和 R1 之間的網路不連通
>因為此時`R1`的路由表中並沒有可以到達`192.168.20.0/24`的紀錄,所以`R1`沒辦法回應`H2`,所以需要在`R1`的路由表中加入`192.168.20.0/24` 並將封包轉發給`R2`
>`R1:~# ip route add 192.168.20.0/24 via 12.1.1.2`
>**再次查看路由表**
>
6. 再次檢測`H2`和`R1`之間的網路連通性
`H2:~# ping 12.1.1.1`

7. 將通過 `ens38`的封包源地址轉換為 `R1` 的 `ens38` 地址,去讓在私有網路裡的`H1`,也可以訪問公開網路
`R1:~# iptables -t nat -A POSTROUTING -o ens38 -j MASQUERADE`
8. 將發往 12.1.1.1:80 的流量轉發到內部伺服器 192.168.10.1:80
`R1:~# iptables -t nat -A PREROUTING -p tcp -d 12.1.1.1 --dport 80 -j DNAT --to-destination 192.168.10.1:80`
2. Router2:
1. 設定`ens33` 和`ens37` 兩張網路卡IP
2. 確認路由功能開啟 (1為開啟狀態)
`R2:~# cat /proc/sys/net/ipv4/ip_forward`

3. 查看路由表
`R2:~# route -n`

4. 因為`H1`和`R2`不在同個區域往內,所以無法連接

# Shell Script 程式設計
## 基礎指令與功能
1. echo
1. 表達特殊字元,如跳行、tab等
* 無法表達特殊字元
```vim=
ubuntu1:~$ echo "hi\n123"
```

* 表達特殊字元需加參數:`-e`
```vim=
ubuntu1:~$ echo -e "hi\n123"
```

2. 查看上一個指令是否執行成功
`指令執行後,必定會回傳一個「結束狀態碼」`
1. 結束狀態碼為0: 指令正常結束

2. 結束狀態碼為非0: 指令錯誤或不正常結束

2. 環境變數
`ubuntu1:~$ echo $變數` 印出變數
1. HOME: 目前使用者的家目錄

2. IFS: 用來分隔欄位的字元清單 (預設為空白鍵)
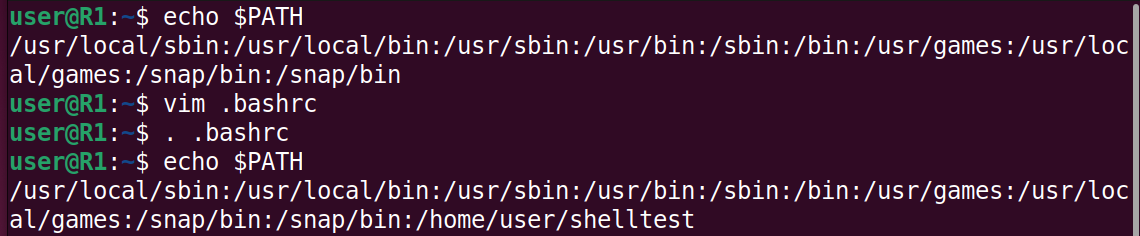
3. PATH: 用分號分隔的一連串目錄,代表執行指令時的搜尋路徑清單

>[!Note] 範例: 在`PATH`中加入新的路徑 (當前視窗有效)
>```vim=
>ubuntu1:~$ export PATH=$PATH:/home/user/shelltest
>ubuntu1:~/shelltest$ hello.sh
>```
>
>[!Note] 範例: 在`PATH`中加入新的路徑 (永久)
>修改配置檔`/home/user/.bashrc`,加入下列程式碼
>```vim=
>export PATH=$PATH:/home/user/shelltest
>```
>重新加載
>```vim=
>ubuntu1:~$ source .bashrc
>or
>ubuntu1:~$ . .bashrc
>```
>
4. USER: 目前使用者帳號名稱
5. UID: 目前使用者的uid
6. HISTFILE: 儲存下過的指令清單的檔案位置
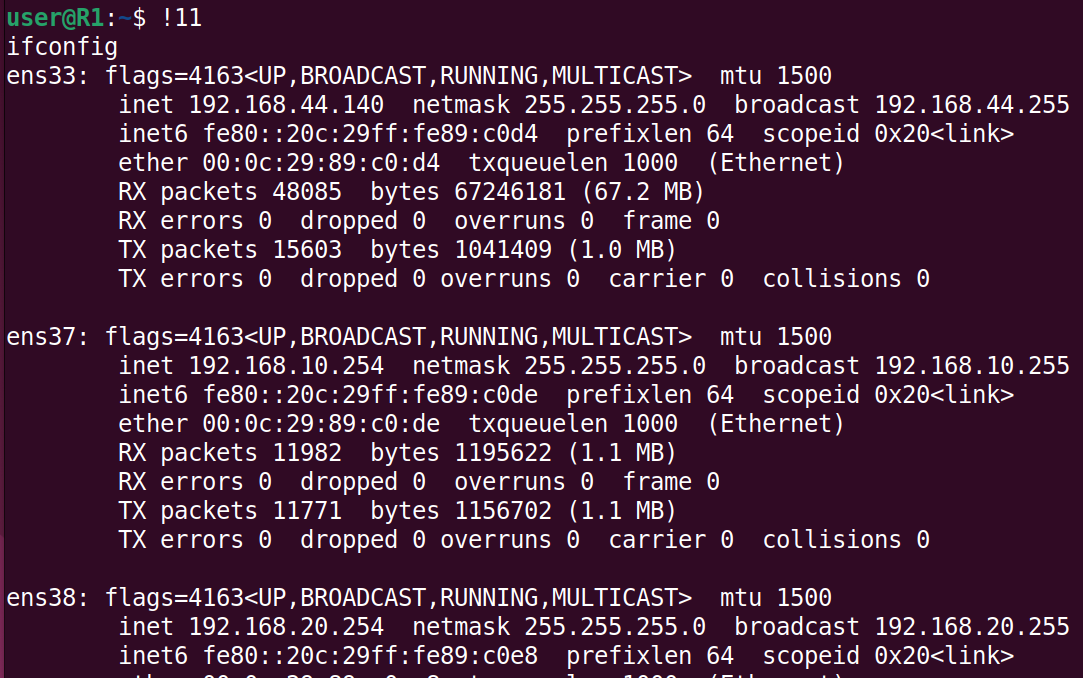
>[!Note] history
>顯示曾經用過的指令
>
>**使用:**
>`ubuntu1:~$ !11`
>
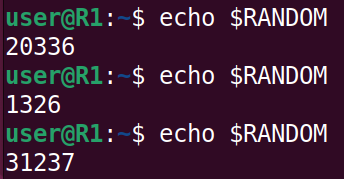
7. RANDOM: 每次取得變數資料,都會給一個0到32767的亂數
`ubuntu1:~$ echo $RANDOM`
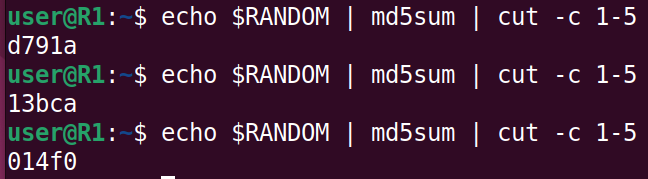
:::success
常用搭配:
1. md5sum:
`計算 MD5 哈希值`
`ubuntu1:~$ echo 'hello world' | md5sum`

2. cut
`提取部分內容`
`ubuntu1:~$ echo 'hello world' | cut -c 1-5`

3. 合併使用:
`產生固定長度的亂碼`
`ubuntu1:~$ echo $RANDOM | md5sum | cut -c 1-5`
:::
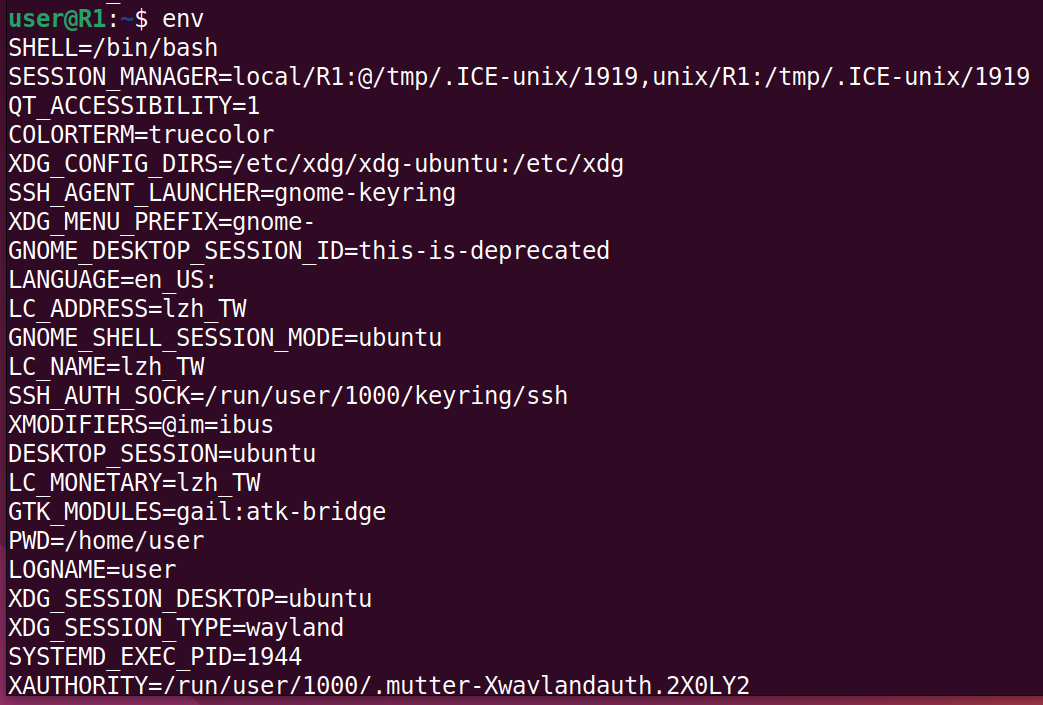
>[!Note] env 或 set
>`env`顯示當前 shell 的所有環境變數及其值
>
>`set`顯示當前 shell 的所有環境變數及其值,比`env`更詳細
>
3. 取得使用者輸入變數值
`read`
**範例:**
```vim=
#!/usr/bin/bash
read -p "Enter your name: " name
echo "Welcome, $name!"
```

4. 單引號與雙引號
* 單引號: 當文字內容不需特別解譯或是單純的一段文字時
* 雙引號: 文字內容中若需要解譯變數(如$USER)以顯示變數的內容

5. 條件判斷: `test`
1. 檔案相關測試
```vim=
-d 檔案: 測試檔案是否為目錄?
-e 檔案: 測試檔案是否存在
-r 檔案: 測試檔案是否可讀?
-w 檔案: 測試檔案是否可寫入?
-x 檔案: 測試檔案是否可執行?
-L 檔案: 測試檔案是否為連結(link) ?
```
2. 字串測試
```vim=
-z 字串: 測試字串長度是否為0(空字串)?
字串 = 字串: 測試等號左右邊字串是否相等?
字串 != 字串: 測試等號左右邊字串是否不相等?
```

3. 數值比較測試
```vim=
n1 -eq n2 : 測試n1等於n2
n1 -ne n2 : 測試n1不等於n2
n1 -ge n2 : 測試n1大於等於n2
n1 -gt n2 : 測試n1大於n2
n1 -le n2 : 測試n1小於等於n2
n1 -lt n2 : 測試n1小於n2
```

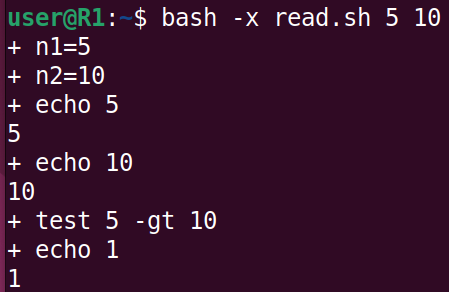
6. 接受命令列的參數
`利用$1 $2 $3等取得第一個、第二個、等三個等參數值 `
```vim=
n1=$1
n2=$2
echo $n1
echo $n2
test $n1 -gt $n2
echo $?
```

>[!Tip] `bash -x` 用於執行腳本時顯示命令的執行過程
>
7. 判斷式
```vim=
if test 條件
then
結果為真執行的命令
else
結果為假執行的命令
fi
```

8. for迴圈
```vim=
for 變數 in 資料集合
do
要重複的指令
done
```
1. 印出1~10
2. 印出指定目錄下的所有檔案

3. 印出指定目錄下的子目錄
## 範例
1. 使用腳本安裝
```vim=
#!/usr/bin/bash
if test $UID -ne 0
then
echo "change to root first"
exit 0
fi
ans=`dpkg -l | grep $1 | wc -l`
if test $ans -ne 0
then
echo "$1 has already been installed"
exit 0
fi
apt install apache2 -y 2>&1 > /dev/null
result=`echo $?`
if test $result -eq 0
then
echo "$1 has been installed successfully"
fi
```

# 排程
## 格式
| * | * | * | * | * | 指令 |
| - | - | - | - | - | - |
| 分 | 時 | 日 | 月 | 星期 | |
| 0-59 | 0-23 | 1-31 | 1-12 | 0-7 (0 = 星期日) | |
### 範例
1. `1 * * * * 指令` 每小時的第一分鐘執行一次
2. `* * * * * 指令` 每時每分都執行一次
3. `*/n * * * * 指令` 每小時的第n分鐘執行一次
4. `1 1 * * * 指令` 每天的1點1分執行一次
5. `* 1 * * * 指令` 每天1點的每分鐘執行一次
6. `20 2 1,15 * * 指令` 每月的1號和15號的2點20分執行一次
7. `0 7,21 * * * 指令` 每天的7點和21點 執行一次
8. `0 1-4 * * * 指令` 每天的1點到4點執行一次
### 編輯使用者的排程表
1. `ubuntu1:~# crontab -e`
2. 選擇`2`使用 `vim`
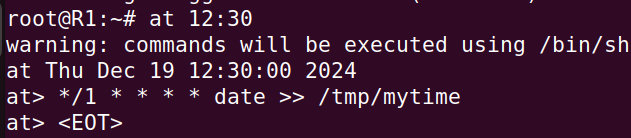
3. 加入範例程式`*/1 * * * * date >> /tmp/mytime`
`每1分鐘將最新的時間加入 /tmp/mytime`
4. 讀取 `/tmp/mytime`,使用 `ubuntu1:~# tail -f /tmp/mytime` ,即時的讀取新加入`/tmp/mytime` 的時間

### 檢視目前排程的工作
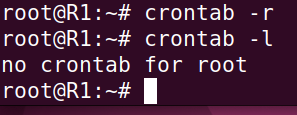
`ubuntu1:~# crontab -l`
### 刪除排程的工作
`ubuntu1:~# crontab -r`
### 指定某個使用者
`ubuntu1:~# crontab -u 使用者名稱`
## 用於執行一次性任務 `at`
1. 設定執行時間 `at 時間`
2. 進入交互模式,輸入指令,輸入`EOT`或是`ctrl + D`後結束
### 查看排程
`ubuntu1:~# atq`

### 刪除排程
`ubuntu1:~$ atrm 工作編號`

# 打包檔案
## tar 指令的參數
1. `-c:建立一個新的 tar 檔`
2. `-v:顯示運作過程的資訊`
3. `-f:指定檔案名稱`
4. `-z:呼叫 gzip 壓縮指令執行壓縮、解壓縮`
5. `-j:呼叫 bzip2 壓縮指令執行壓縮、解壓縮`
6. `-t:檢視壓縮檔案內容`
7. `-x:解開 tar 檔`
### 範例
1. 壓縮: `ubuntu1:~# tar -cvzf 打包後檔名 要打包的檔案`


2. 解壓縮: `ubuntu1:~# tar -xvzf 要解壓縮的檔名`


# **補充**
:::spoiler dpkg -l
軟體套件管理程式
參數:-l 以清單方式呈現
:::
:::spoiler netstat -tunlp
查詢網路狀態
參數:
1. t:tcp
2. u:udp
3. n:not resolve
4. l:listen
5. p:process
:::
:::spoiler 0.0.0.0
意義:
1. 伺服器端:任意介面
2. 客戶端:任一個節點
3. 一般PC:尚未取得IP
:::
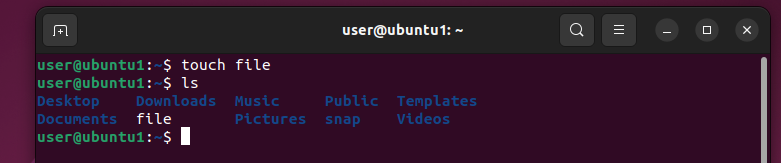
:::spoiler touch file
產生一個名為file的空白檔案
:::
:::spoiler touch a{00..99}.txt
產生大量的空白檔

:::
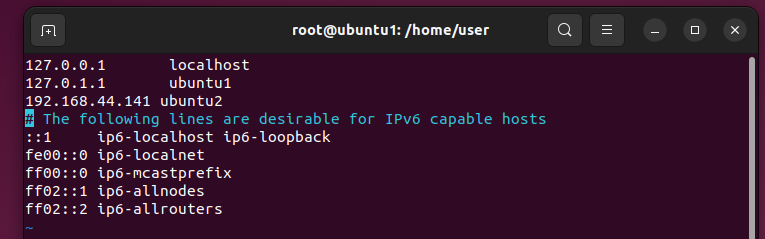
:::spoiler ubuntu2去代替IP位置
將ubuntu2IP加進配置檔裡
ubuntu1:~#vim /etc/hosts
:::
:::spoiler Hydra
1. 安裝Hydra
ubuntu1:~$ sudo apt install hydra
2. 建立一個常見帳號的文字檔或上網抓
3. 建立一個常見密碼的文字檔或上網抓

4. 進行攻擊
ubuntu1:~$ hydra -L user.txt -P passwd.txt ssh://ubuntu2
:::danger
參數:
1. -L:使用者帳號檔案來源
2. -P:使用者密碼檔案來源
:::
:::spoiler 當編輯檔案權限不夠
**暫時提升權限** ubuntu1:~$ sudo bash -c 'echo hi > hi.htm'
:::
:::spoiler 在vim編輯器中顯示行數
**在命令模式下輸入**: set number

:::
:::spoiler John the Ripper 進行密碼破解
1. 先更新 apt ```ubuntu1:~$ sudo apt update```
2. 安裝**snapd** ```ubuntu1:~$ sudo apt install snapd```
3. 安裝**John the Ripper** ```ubuntu1:~$ sudo snap install john-the-ripper```
4. 安裝**john** ```ubuntu1:~$ sudo apt install john```
5. 準備一個密碼檔去破解
6. 把 **/etc/passwd** 和 **/etc/shadow** 合併到**mypasswd.txt**
```ubuntu1:~# unshadow /etc/passwd /etc/shadow > mypasswd.txt```
7. 進行破解 ```ubuntu1:~# john --wordlist=準備的密碼檔 --format="crypt" mypasswd.txt```

:::
:::spoiler 使用腳本程式新增大量使用者範例
1. 編輯 useradd.sh 加入下列程式碼
```
#!/usr/bin/bash
groupadd student
for user in user1 user2 user3
do
useradd -g student -d /home/${user} ${user}
echo "${user}:${user}" | chpasswd
echo "${user} is added"
done
```
2. 將 useradd.sh 新增可執行權限
```ubuntu1:~$ chmod +x useradd.sh```
3. 執行 useradd.sh
```ubuntu1:~# ./useradd.sh```
:::
:::spoiler 查看目錄的權限
```ubntu1:~$ ls -ld 目錄名稱``` 查看目錄的權限
```ubntu1:~$ ls -l 目錄名稱``` 查看目錄內檔案的權限
:::
:::spoiler 單人模式-忘記root密碼可以進入此模式修改
1. 修改 **/etc/default/grub** ,去延長開機選單的時間
將 **GRUB_TIMEOUT_STYLE** 和 **GRUB_TIMEOUT** 修改為
`GRUB_TIMEOUT_STYLE=menu`
`GRUB_TIMEOUT=5`
2. 更新選單檔案
`ubuntu:~$ sudo update-grub`
3. 重開機後按下 **e** 進入選單
4. 加上`rw init=/bin/bash`
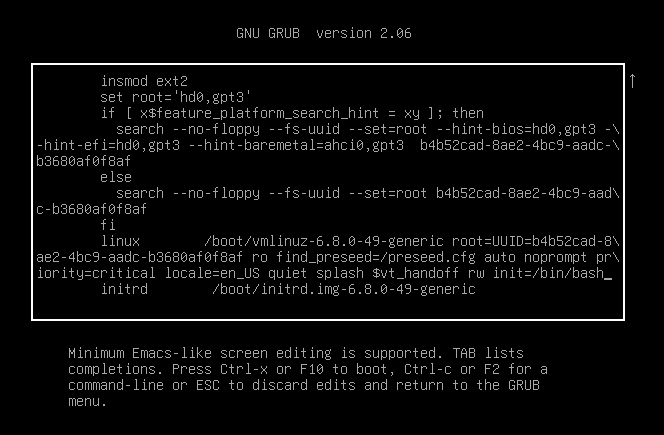
5. 按`Ctrl + x` 或按`F10` 啟動系統,即可進入單人模式

6. 更改密碼 `passwd root`
:::
:::spoiler 查看某用戶的進程(process)
`ubuntu1:~# ps -u 使用者名稱`

`ps 常用參數:aux 顯示所有進程,並附加 CPU 和內存使用率信息`
:::
:::spoiler 結束進程(process)
`ubuntu1:~# kill PID`
>[!Caution] 強制結束進程(process)
>`ubuntu1:~# kill -9 PID`
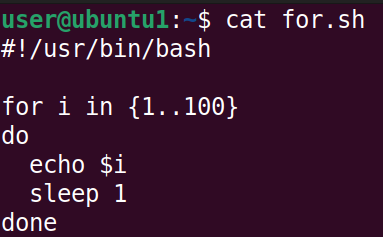
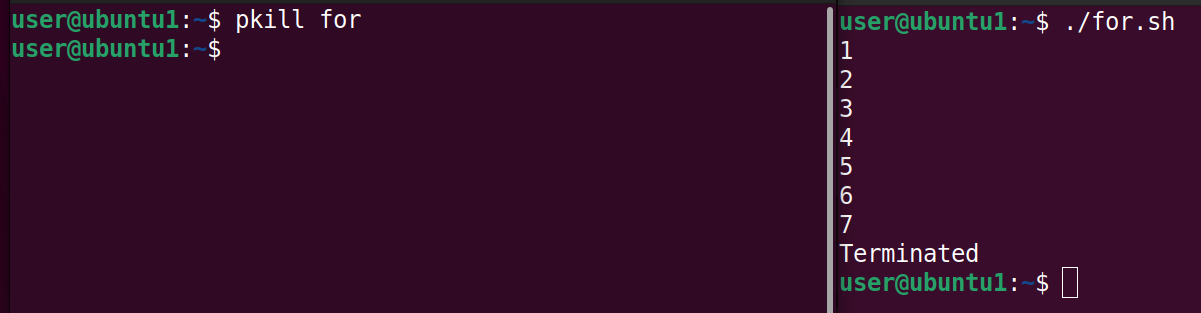
>範例: 強制結束一個包含for迴圈的進程
>1. 執行腳本
>`ubuntu1:~$ ./for.sh`
>
>2. 查詢該進程的PID (PID = 3533 : 這個是腳本本身)
>
>3. 結束`for.sh`
>
:::
:::spoiler 移除使用者帳號與檔案
1. 找出使用者所有的進程(process)
`ubuntu1:~# ps -u 使用者名稱`
2. 強制結束所有進程(process)
`ubuntu1:~# kill -9 PID`
3. 找到使用者所有檔案並刪除
`ubuntu1:~# find / -u 使用者名稱 -print -exec rm -rf {} \;`
4. 刪除帳號
`ubuntu1:~# userdel 使用者名稱`
:::
:::spoiler grep排除不符合的
加上`-v`

:::
:::spoiler pkill
`根據進程名稱或其他條件終止進程的命令`
:::
:::spoiler DNS 配置問題
`apt` 安裝或更新軟體包時無法解析某些網址
**更新 DNS 配置**
編輯 `/etc/resolv.conf`,加入下列程式碼
```vim=
nameserver 8.8.8.8
```
:::
:::spoiler 重新選擇 `crontab` 編輯器
```vim=
ubuntu1:~# select-editor
```
:::
:::spoiler 將輸入的文字附加到檔案中,直到輸入結束文字才停止(結束文字不會附加到檔案中)
`cat > 檔案 <<結束文字`

:::
# Telegram 即時監控通知系統
系統管理時,E-mail 通知太慢了,即時通訊軟體才能讓你第一時間收到重要通知。
## 步驟一:建立一個 Telegram Bot
1. 在 Telegram 中搜尋 @BotFather 並開始對話。
2. 輸入指令 /newbot 來建立一個新的機器人。
3. 為機器人取一個名稱 (Name)。名稱必須以 _bot 結尾,例如:Telegram_bot。
4. 建立成功後,BotFather 會有一長串的 API Token。
5. 建立一個群組 (Group):在 Telegram 建立一個新的群組,將 Bot 加入群組
6. 打開瀏覽器,貼上以下網址(替換成自己的 Token):https://api.telegram.org/bot<YOUR_HTTP_API_TOKEN>/getUpdates,刷新頁面後,找到 "chat" 這個物件,裡面的 "id" 就是 Chat ID(通常是一個負數)。
7. 執行下列程式碼就可以收到訊息
```=
import requests
def send_msg(msg: str, token: str, chat_id: str):
"""
透過 Telegram Bot 發送訊息的函式。
"""
# 確保傳入的訊息是字串
assert type(msg) == str, "傳入訊息必須為字串"
# 使用 f-string 組裝 API 網址
url = f'https://api.telegram.org/bot{token}/sendMessage?chat_id={chat_id}&text={msg}'
# 發送 GET 請求
requests.get(url)
my_str = "金門大學資工系!"
my_token = "YOUR_TOKEN"
my_chat_id = "YOUR_CHAT_ID"
# --- 執行發送 ---
send_msg(my_str, my_token, my_chat_id)
print("訊息已發送!")
```
# 本地部署大型語言模型 (Ollama)
1. 安裝ollama後使用`ollama run llama3:8b`下載模型並運行
2. 運行python就可以與ollama進行對話
```=
from langchain_community.llms import Ollama
llm = Ollama(base_url="http://127.0.0.1:11434", model="llama3:8b")
res = llm.invoke("你是誰?請用繁體中文回答。")
print(res)
```
# Web UI 與 RAG 知識庫
## 安裝 Page Assist - Ollama Web UI
Page Assist 是一個 Chrome 擴充套件,它能自動偵測到你電腦上運行的 Ollama 服務,並提供一個功能豐富的網頁介面。
## 使用 RAG
幻想:小型模型訓練資料有限,且缺乏即時資訊,當被問到超出其知識範圍的問題時,它會基於機率生成看似合理的答案,而非承認「不知道」。
### 解決方案 - RAG (檢索增強生成):
給 LLM 外部文件,讓它根據外部文件的內容來回答。
1. 下載 Embedding 模型:RAG 的第一步是將我們的文件「向量化」。這需要一個專門的 Embedding 模型。`ollama pull nomic-embed-text`
2. 設定知識庫 (Knowledge Base):在 Page Assist 介面,點擊齒輪圖示進入 Settings。找到 RAG Settings,在 Embedding Model 欄位選擇剛剛下載的 nomic-embed-text。
3. 點擊 Add Knowledge,上傳 金門大學資工老師.txt 文字檔,並給它一個標題(如:nqu_csie_teacher)。
```=
不使用 RAG:直接問模型「柯志亨是哪裡的博士?」 -> 模型會亂掰
使用 RAG:點擊輸入框下方的 Knowledge 按鈕,勾選剛剛建立的 nqu_csie_teacher 知識庫。再問一次「柯志亨是哪裡的博士?」。
結果:模型準確回答「柯志亨是國立成功大學電機工程研究所的博士」,因為它從我們提供的文字檔中找到了答案!
```
### RAG 的挑戰 - 表格資料:
上傳了包含大量表格的「金門大學行事曆」文件。
現象:當我們詢問開學日期、放假日時,即使使用了 RAG,模型的回答仍然錯誤百出。
結論:目前的 RAG 技術對於非結構化的純文字處理得比較好,但對於結構化的表格資料理解能力仍然有限
### 關鍵參數:Temperature (溫度)
LLM 非常重要的參數。
靠近 0:回答更精準、更具決定性,適合知識問答、程式碼生成。
靠近 1:回答更有創意、更有想像力,適合寫詩、寫文案。
# Prometheus 的核心架構
1. Prometheus Server:監控系統的大腦。它主動去拉取(Pull)各個被監控端的數據。
2. Exporter:安裝在「被監控端」(例如你的 Web Server、資料庫主機)上的代理程式。它的工作是收集本機的各項指標(CPU、記憶體、網路流量等),並暴露一個 HTTP 端點讓 Server 來抓資料。最常用的是 node-exporter,用於監控主機本身的狀態。
3. Push Gateway:適用於一些無法被 Server 主動拉取數據的短生命週期任務。這些任務可以主動將數據「推送(Push)」到 Gateway,再由 Server 從 Gateway 拉取。
4. Alertmanager:告警管理器。你可以在 Prometheus Server 設定告警規則(例如:CPU 使用率超過 80% 連續 5 分鐘),一旦觸發,Server 就會把告警事件發給 Alertmanager,再由它透過 E-mail、Telegram 等方式通知你。
5. Web UI / Grafana:數據視覺化的工具。Prometheus 自帶一個簡易的 Web UI,但業界更常用 Grafana 來打造酷炫、資訊豐富的監控儀表板(Dashboard)
## 步驟二:安裝與設定 Prometheus (Master 端)
至少兩台虛擬機,一台當 Master (Prometheus Server),一台當被監控的 Client (Node Exporter)。
### 校時:確保所有機器的時間同步,這對監控系統至關重要。
```=
sudo timedatectl set-timezone Asia/Taipei
sudo apt install ntpdate
sudo ntpdate tock.stdtime.gov.tw
```
### 安裝 Prometheus 套件:在 Master 機器上安裝 Server 和本機的 Exporter。
```=
sudo apt update
sudo apt install prometheus prometheus-node-exporter
```
在瀏覽器中訪問 http://<Master的IP>:9090,應該能看到 Prometheus 的 Web UI。
### 設定監控目標 (Targets)
告訴 Prometheus Server 你要去監控哪些機器。
編輯設定檔:
`sudo vim /etc/prometheus/prometheus.yml`
編輯完後重啟服務:讓新的設定生效。
`sudo systemctl restart prometheus`
# 具備即時上網能力的 AI 代理人 (Agent)
1. 申請Google API Key,授權程式可以使用 Google 的雲端服務。
(申請網址:https://console.cloud.google.com/apis/credentials)
`進入後點擊「建立憑證」->「API 金鑰」`
2. 建立新的搜尋引擎,讓 Google 知道你要用哪個「自訂搜尋引擎」來查資料。(申請網址:https://programmablesearchengine.google.com/controlpanel/create)
`隨意取個名稱,選擇「搜尋整個網路」,然後點擊「建立」。`
:::info
必須在 Google Cloud Console 中啟用 Custom Search API 這個服務
:::
3. OpenAI API Key 申請:
讓我們的程式可以呼叫 GPT 模型來進行語言理解與生成。(申請網址:https://platform.openai.com/api-keys)
## 程式實作
```=
import os
from langchain.chat_models.openai import ChatOpenAI
from langchain.embeddings import OpenAIEmbeddings
from langchain.vectorstores import Chroma
from langchain.utilities import GoogleSearchAPIWrapper
from langchain.retrievers.web_research import WebResearchRetriever
from langchain.chains import RetrievalQAWithSourcesChain
os.environ["OPENAI_API_KEY"] = "OpenAI API Key"
os.environ["GOOGLE_CSE_ID"] = "Programmable Search Engine ID"
os.environ["GOOGLE_API_KEY"] = "Google API Key"
llm = ChatOpenAI(model_name="gpt-3.5-turbo-16k", temperature=0)
vectorstore = Chroma(embedding_function=OpenAIEmbeddings(), persist_directory="./chroma_db_oai")
search = GoogleSearchAPIWrapper()
web_research_retriever = WebResearchRetriever.from_llm(
vectorstore=vectorstore,
llm=llm,
search=search
)
qa_chain = RetrievalQAWithSourcesChain.from_chain_type(llm, retriever=web_research_retriever)
user_input_question = "台灣的首都是哪裡?"
result = qa_chain({"question": user_input_question})
print("【精簡答案】:")
print(result["answer"])
print("-" * 30)
print("【資料來源】:")
print(result["sources"])
```
# Prometheus 進階 - 計算 CPU 使用率
CPU 使用率 = 100% - CPU 空閒率 (Idle Rate)
1. 找出 CPU 時間的原始指標:node_cpu_seconds_total。這是一個 Counter(只會增加的計數器),記錄了 CPU 在各種模式(如 idle, user, system)下花費的總秒數。
2. 計算一段時間內的增量:increase(node_cpu_seconds_total{mode="idle"}[5m])。increase 函式可以計算出一個 Counter 在過去 5 分鐘內增加了多少。
3. 計算空閒率:increase(node_cpu_seconds_total{mode="idle"}[5m]) / increase(node_cpu_seconds_total[5m])這個公式用「空閒時間增量」除以「總時間增量」,就得到了單一 CPU 核心的空閒率。
4. 跨核心匯總 (SUM):一台主機可能有多個 CPU 核心,我們需要把它們的數據加總。sum by (instance) (increase(node_cpu_seconds_total{mode="idle"}[5m]))。sum by (instance) 會根據 instance 標籤(也就是主機 IP)來分組加總。
```=
最終公式:
100 * (1 - (sum by (instance)(increase(node_cpu_seconds_total{mode="idle"}[5m])) / sum by (instance)(increase(node_cpu_seconds_total[5m]))))
```
# Push Gateway - 主動回報狀態
1. 新增push_ping_status.sh
```=
#!/bin/bash
instance_name=$(hostname -f)
label="ens33_ping_status"
target_ip="192.168.164.134" # 請換成你的目標 IP
pushgateway_addr="192.168.164.134:9091" # 請換成你的 Push Gateway IP:Port
ping -c1 -W1 ${target_ip} > /dev/null 2>&1
if [ $? = "0" ]; then
status=1
else
status=0
fi
http://<gateway>/metrics/job/<job_name>/instance/<instance_name>
echo "$label $status" | curl --data-binary @- http://${pushgateway_addr}/metrics/job/pushgateway_test/instance/${instance_name}
echo "Metric pushed: $label = $status"
```
2. 回到 Prometheus UI ,在查詢框中輸入自訂的ens33_ping_status,就能看到來自 ubuntu2 這台機器的回報值
# 本地 LLM 整合網路搜尋與 Agent
```=
import os
import ollama
from langchain_core.tools import Tool
from langchain_google_community import GoogleSearchAPIWrapper
os.environ["GOOGLE_CSE_ID"] = "YOUR_CSE_ID"
os.environ["GOOGLE_API_KEY"] = "YOUR_GOOGLE_API_KEY"
search = GoogleSearchAPIWrapper()
tool = Tool(
name="google_search",
description="Search Google for recent results.",
func=search.run,
)
question = "where is the capital city of France?"
context = tool.run(question)
print("context=", context)
prompt = f"""Use the following pieces of context to answer the question at the end.
If you don't know the answer, just say that you don't know, don't try to make up an answer.
Answer only factual information based on the context.
Context: {context}.\n
Question: {question}
Helpful Answer:"""
response = ollama.chat(model='llama3.2:1b', messages=[
{
'role': 'system',
'content': 'You are a useful AI assistant, answer only based on the information from the user prompt and nothing else.',
},
{
'role': 'user',
'content': f'{prompt}',
},
])
output = response['message']['content']
print("="*50)
print("result=", output)
```
# Agent 與函式呼叫 (Function Calling)
我們寫好一些工具函式(Function),並用文字「描述」這些函式的功能。當使用者提出請求時,LLM 會自己去理解問題,並從我們提供的工具箱中,挑選出最適合的工具來執行。
```=
from langchain_ollama import OllamaLLM
from langchain_core.prompts import ChatPromptTemplate
from langchain_core.tools import tool
from langchain.tools.render import render_text_description
from langchain_core.output_parsers import JsonOutputParser
model = OllamaLLM(model='mistral:instruct')
#使用 @tool 裝飾器來標示這是一個工具
@tool
def add(first: int, second: int) -> int:
"Add two integers."
return first + second
@tool
def multiply(first: int, second: int) -> int:
"""Multiply two integers together."""
return first * second
@tool
def converse(input: str) -> str:
"Provide a natural language response using the user input."
return model.invoke(input)
tools = [add, multiply, converse]
rendered_tools = render_text_description(tools)
system_prompt = f"""You are an assistant that has access to the following set of tools.
Here are the names and descriptions for each tool:
{rendered_tools}
Given the user input, return the name and input of the tool to use.
Return your response as a JSON blob with 'name' and 'arguments' keys.
The value associated with the 'arguments' key should be a dictionary of parameters."""
prompt = ChatPromptTemplate.from_messages(
[("system", system_prompt), ("user", "{input}")]
)
chain = prompt | model | JsonOutputParser()
print(chain.invoke({'input': 'What is 3 times 23'}))
print(chain.invoke({'input': 'How are you today?'}))
```
# Prometheus 警告系統
# Ansible
基於SSH做管理和維護,可以對一群電腦進行控制
設立三台機器,且每台主機名稱都設定完成
> no passwd login
[無密碼登入](https://github.com/stereomp3/note/blob/main/linux/111semester01/1-.md#SSH-server)
```sh
$ hostnamectl set-hostname centos7-1
$ bash
```
設定ssh key (可以直接enter跳過選項)
```sh
$ ssh-keygen
```
```sh
$ vim /etc/hosts
```
[](https://github.com/stereomp3/note/blob/main/linux/111semester01/picture/etc_host.png)
這樣就可以使用host name 直接連線到SSH
```sh
$ ssh-copy-id root@centos7-2
$ ssh-copy-id root@centos7-3
```
ssh連線
```sh
$ ssh root@centos7-2
```
```sh
$ systemctl start sshd # client, [centos7-2, centos7-3]
$ yum install ansible # server, [centos7-1]
```
> set up ansible hosts
```sh
$ vim /etc/ansible/hosts
```
伺服器通常是以功能或是作業系統去分類,這邊只有開兩台虛擬機,所以就簡單分兩類
```
[server1]
192.168.42.136 # centos7-2
[server2]
192.168.42.135 # centos7-3
[servers]
192.168.42.136
192.168.42.135
```
ansible 測試
````sh
$ ansible server1 -m ping # -m代表module,這裡使用ping module
$ ansible servers -m ping
````
> ansible test
ansible操作有兩種模式:
ad hoc: 簡單測試不同模組,上面就是使用這樣的方式
```sh
$ ansible servers -m shell -a "chdir=/var/log cmd'ls -l | grep log'"
```
playbook: 寫成腳本執行,真正使用的方式,通常使用YAML編寫
```
cmd: ls -l | grep log
chdir:/var/log
```
查看ansible支援模組有沒有sql
```sh
$ ansible-doc -l | grep -i mysql
$ ansible-doc ping # 詳細說明ping模組
$ ansible-doc -s ping # 簡單說明ping模組 -s == summary
```
遠端指令 command,command是default模組,所以也可以直接使用
```sh
$ ansible servers -m command -a "ifconfig" # -a代表參數
$ ansible servers -a "ifconfig ens33"
```
並不是所有指令command都可以支援,如果使用像是 `|`、`>`...,在指令裡面,就會發生錯誤
command只能用在簡單的操作上面
所以要使用shell模組解決這個問題
```sh
$ ansible servers -m shell -a "ifconfig | grep -A 3 enp0s3"
$ ansible-doc -s shell # 查看shell指令可以加入什麼參數
$ ansible servers -m shell -a "chdir=/tmp pwd" # 使用參數改變目前資料夾位置 tmp
```