<style>
.border-img {
border:solid 1px #888888;
border-radius: 4px;
box-shadow: 1px 1px #aaaaaa;
}
</style>
Bubble Hands-on | Have Fun, and Good Luck!
=====
# 目次 | Table of Contents
- 本講義の目的 | Purpose of this lecture
- Bubbleについて | About Bubble
- 作るアプリの説明 | About the application to be created
- CRUDについての説明 | About CRUD
- 作ってみよう! | Let's make it!
# 本講義の目的 | Purpose of this lecture
メモアプリの作成を通じて以下の2つのことを学ぶ | Through the creation of a memo application, you will learn two things
- ソフトウェアの基本機能CRUDについて | About CRUD, the software's basic functionality
- ノーコードツールBubbleの基本的な使い方について | Basic Usage of the No-Code Tool Bubble
# Bubbleについて | About Bubble
Bubbleは世の中に数多くあるノーコードツールの中でも最も高度なアプリが作成できるツールの一つです。 | Bubble is one of the most advanced no-code tools out there.
AirBnBのような民泊サービスやクラウドファンディングサービス、転職サイトまでさまざまなツールがBubbleで作られ実際にローンチされています。
Uberのようなライドシェアサービスが作れるテンプレートもあったりします。
Various tools such as AirBnB, crowdfunding services, and even job search sites have been created and actually launched on Bubble.
There are also templates that can be used to create Uber-like ride-sharing services.
日本においても、VR住宅展示場アプリや結婚式の準備アプリなどさまざまな事例があるようです。
In Japan, there are various examples such as VR housing exhibition hall applications and wedding applications.
事例が載っているサイト | A website with case studies
- [Bubble Showcase](https://bubble.io/showcase?ref=index-header)
- [【開発事例15選】ノーコードで作られたアプリまとめ-Bubble編](https://walker-s.co.jp/media/bubble-development-case/)
# 作るアプリの説明 | About the application to be created
## 概要 | summary
メモの作成・確認・編集ができるシンプルなアプリを作ります。
Create a simple application that allows users to create, check, and edit memos.
## ワイヤーフレーム | Wireframe
https://miro.com/app/board/uXjVPENJMVA=/
## 画面一覧 | Screen List
https://docs.google.com/spreadsheets/d/1UpXBIBSA4ZzxAikJoY2egG4TWd41XcJVK894zegh1no/edit#gid=0
## CRUDについて | About CRUD
以下の頭文字をとったもの
The following acronyms
C: Create(作成)
R: Read(読み出し)
U: Update(更新)
D: Delete(削除)
データベースに対して行う4つの基本操作であり、すべてのソフトウェアの機能はこれらの4つの操作の繰り返しで実現されている。
These are the four basic operations performed on the database, and all software functions are realized by repeating these four operations.
# 実際につくってみよう! | Let's make it!
## プロジェクトの作成 | Create a new app
- 一人一人プロジェクトを作成 | One app per student
- Login to bubble.io (ask Lecturer/TA for account & password)
1. bubbleトップページの右上の`GetStarted`をクリックする
<img class="border-img" src="https://hackmd.io/_uploads/ryLG15QR2.png" />
2. `Log in with Google`をクリックする
<img class="border-img" src="https://hackmd.io/_uploads/Hyuqk9mA2.png" />
3. 画像のような質問が出てくるので適宜答える
<img class="border-img" src="https://hackmd.io/_uploads/BkapJ57C3.png" />
<img class="border-img" src="https://hackmd.io/_uploads/ByxAJqQC3.png" />
<img class="border-img" src="https://hackmd.io/_uploads/SJfAJ5m03.png" />
<img class="border-img" src="https://hackmd.io/_uploads/HJVC1qXA2.png" />
4. この画面になったら右下の`Skip and Create app`をクリックする
<img class="border-img" src="https://hackmd.io/_uploads/HkDmgqQ02.png" />
5. `Get started`をクリックする
<img class="border-img" src="https://hackmd.io/_uploads/rJU8g5Q03.png" />
6. 左下の`Start with basic features`をクリックする
<img class="border-img" src="https://hackmd.io/_uploads/HkGde97Rn.png" />
7. アプリケーション名を入力する
アプリケーション名は`名前_学籍番号`
App Name: `Name_StudentNumber` eg. `HiroShiihara_123098`
<img class="border-img" src="https://hackmd.io/_uploads/HJZ2e9X03.png" />
8. step2,3,4はそのまま進めていく
<img class="border-img" src="https://hackmd.io/_uploads/ryfHW57An.png" />
<img class="border-img" src="https://hackmd.io/_uploads/ByLHW9mA3.png" />
<img class="border-img" src="https://hackmd.io/_uploads/HyYHb9703.png" />
9. この画面になったらプロジェクト作成完了!
<img class="border-img" src="https://hackmd.io/_uploads/S18D-5m0n.png" />
<!-- ## 手順書の見方
- 手順に書いてある`(Create: Design)`などの表記は`(ページ: モード)`の意味です
<kbd> <img src="https://s3-ap-northeast-1.amazonaws.com/ts-hackmd-image/uploads/upload_612e1b2fd3ba5cd6e5c6b1035353ac62.png
" alt="drawing" width="450"/></kbd>
- 1段目のリストにそのブロックでやることが書かれている
- リストのネストを抜けるとモーダル内での作業は完了です
-->
## 新規メモ作成画面(C: Create) | New Memo Creation Screen
### 画面作成(Create: Design) | Screen Creation (Create: Design)
#### やること | what to do
メモを新規作成する画面を作成する | Create a screen to create a new memo
#### 手順 | procedure
1. 新規作成ページを作成する | Create a new page
1. 左上の`Page:`をクリック | Click on `Page:` in the upper left corner
<kbd><img src="https://s3-ap-northeast-1.amazonaws.com/ts-hackmd-image/uploads/upload_4da67a8e95aa0b6706b55045ff93d8f2.png" width="200"/></kbd>
1. `Add a new page...`を選択 | Select `Add a new page...`
<kbd><img src="https://s3-ap-northeast-1.amazonaws.com/ts-hackmd-image/uploads/upload_8161a3491e32a8afba56fe952d00064c.png" width="200"/></kbd>
1. `Page name`に`create`と入力 | Enter `create` in `Page name`
2. `CREATE`ボタンを押してページを作成 | Press CREATE button to create a page.
<kbd><img src="https://s3-ap-northeast-1.amazonaws.com/ts-hackmd-image/uploads/upload_83b4c870f8829e93c692d97f070698ac.png" width="200"/></kbd>
2. ページのレイアウトを設定する | Set the page layout
1. キャンバスをダブルクリック | Double click on the white canvas in the middle
<kbd><img src="https://s3-ap-northeast-1.amazonaws.com/ts-hackmd-image/uploads/upload_289b4a1d17e171daa33acd13bf4e54aa.png" width="400"/></kbd>
1. `Layout`タブを選択 | Select Layout tab
1. `Container layout`を`Column`
3. `Width for UI builder`を`320`に変更

1. ページのタイトルを表示する要素の作成する | Create an element to display the title of the page
1. 左のメニューから`Text`を選択しキャンバスをクリックして要素を追加 | Select Text from the menu on the left and click on the canvas to add elements

1. 内容を`Create New` | Change content to `Create New`
<kbd><img src="https://s3-ap-northeast-1.amazonaws.com/ts-hackmd-image/uploads/upload_af1608e5c554a42fae1558f833732647.png" width="400"/></kbd>
1. メモのタイトルを入力する入力欄を作成する | Create an input field for the title of the memo
1. 左のメニューから`Text`を選択しキャンバスをクリックして要素を追加 | Select Text from the menu on the left and click on the canvas to add elements
1. テキストを`Title`に変更 | Change text to `Title`

1. 左のメニューから`Input`を選択しキャンバスをクリックして要素を追加 | Select Input from the menu on the left and click on the canvas to add elements
<kbd><img src="https://s3-ap-northeast-1.amazonaws.com/ts-hackmd-image/uploads/upload_9b4726d99e61a3a9426e735a73a8fa7c.png" width="150"/></kbd>
1. `Placeholder`を`Title`に変更 | Change Placeholder to Title

1. メモの内容を入力する入力欄を作成する | Create an input field for entering memo content
1. 左のメニューから`Text`を選択しキャンバスをクリックして要素を追加 | Select Text from the menu on the left and click on the canvas to add elements
1. テキストを`Content`に変更 | Change text to Content

1. 左のメニューから`Multipleline Input`を選択しキャンバスをクリックして要素を追加 | Select Multipleline Input from the menu on the left and click on the canvas to add elements

1. `Placeholder`を`Content`に変更 | Change Placeholder to Content

1. メモを保存する保存ボタンの作成する | Create a save button to save notes
1. 左のメニューから`Button`を選択しキャンバスをクリックして要素を追加 | Select Button from the menu on the left and click on the canvas to add an element

1. テキストを`Create`に変更 | Change text to Create

### 動作の設定(Create: Workflow)
#### やること | what to do
画面に作成した入力欄に入力された情報を使用してデータを登録するActionを作成する
Create an Action that registers data using the information entered in the input fields created on the screen.
#### 手順 | procedure
2. メモを保存するActionを作成する | Create an Action to save notes
1. create ボタンを選択した状態で`Add workflow`をクリックする

1. `Click here to add an action`をクリックする

3. `Data(Things)` > `Create a new thing...`をクリックする

4. `Type`で`Create a ner type`を選択する

5. `New type`に`Memo`を入力し、Confirmをクリックする

6. `Set another field`をクリックする

1. `click` > `Create a new field...`をクリックしてフィールドを作成 | `click` > `Create a new field... Click `click` to create a new field.


2. `Filed name`に`Title`と入力し`Filed type`で`text`を選択

3. 入力欄内の`click`をクリックして`Input Title` > `'s value`を選択


7. 6と同様にtextのフィールドを作成する
1. `click` > `Create a new field...`をクリックしてフィールドを作成 | `click` > `Create a new field... Click `click` to create a new field.
1. `Filed name`に`Content`と入力 | Enter `Content` in the `Filed name` field.
2. `Filed type`で`text`を選択 | Select `text` for `Filed type
3. Click `CREATE`
4. 入力欄内の`click`をクリックして`Multiplelineinput Content` > `'s value`を選択 | Click `click` in the input field and select `Multiplelineinput Content` > `'s value`
<kbd><img src="https://s3-ap-northeast-1.amazonaws.com/ts-hackmd-image/uploads/upload_357ec04df27a9d0fef89285f11c2ac80.png" width="400"/></kbd>
1. 入力完了後に入力欄をリセットするActionを追加する | Add an Action to reset the input field after completion of input.
1. Select `Click here to add an action...` > `Reset relevant inputs`


### 確認
1. 画面上部の`Preview`ボタンをクリック | Click the `Preview` button at the top of the screen

2. 実際に内容を入力してCreateボタンを押してみる | Try to actually enter the content and press the Create button.
3. 開発画面に戻って左のメニューで`Data`を選択 |Return to the development screen and select `Data` in the menu on the left

4. `App data`タブを選択 | Select the `App data` t
ab
5. 左のメニューで`All Memos`を選択 | Select `All Memos` in the left menu
6. 内容が入っていることを確認 | Confirm that the contents are included.

7. 1~5を何回か繰り返してみましょう | Let's repeat 1~5 several times
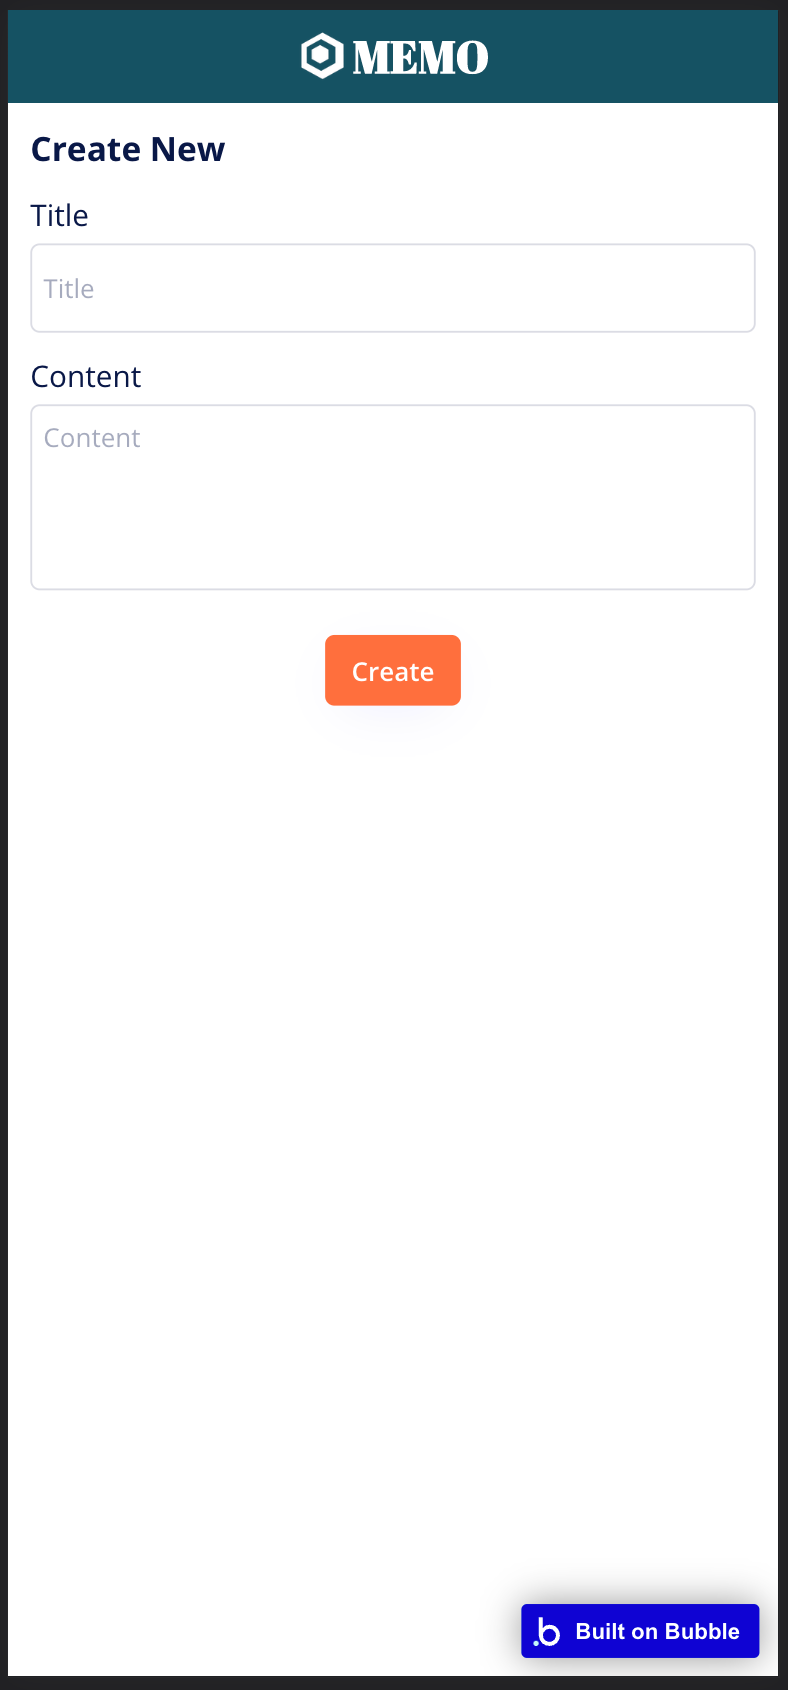
### 完成図 How your app should look like
This is the minimum, you are very welcome to add your own design
#### 開発画面 Development side
<kbd><img src="https://s3-ap-northeast-1.amazonaws.com/ts-hackmd-image/uploads/upload_c0712c1ec6e1cd066df8f5657d5c83ea.png" width="500"/></kbd>
#### プレビュー画面 Preview side
<kbd><img src="https://s3-ap-northeast-1.amazonaws.com/ts-hackmd-image/uploads/upload_8e2df7a459b838561d207d13592f365e.png" width="500"/></kbd>
# 9/5ここまで
## 一覧画面(R: Read) | Overview (List) Screen
### 画面作成(Index: Design) | Screen Creation
#### やること | what to do
データベースに保存されたメモの一覧を表示する画面を作成する
Create a screen that displays a list of memos stored in the database
#### 手順 | procedure
1. ページのレイアウトを設定する | Set the page layout
1. キャンバスをダブルクリック | Double-click on the canvas
1. `Layout`タブを選択 | Select Layout tab
3. `Container layout`を`Column`に変更 | Change Container layout to Column
4. `Width for UI builder`を`320`に変更 | Change Width for UI builder to 320
<kbd><img src="https://s3-ap-northeast-1.amazonaws.com/ts-hackmd-image/uploads/upload_dd16e246f737c4adcd1f4c3b8cd17c08.png" width="300"/></kbd>
1. ページのタイトルを表示する要素の作成する | Create an element to display the page title
1. 左のメニューから`Text`を選択しキャンバスをクリックして要素を追加 | Select Text from the left menu, click on the canvas, and add an element
1. 要素名を`PageTitle`に変更 | Change the element name to PageTitle
3. 内容を`List`に変更 | Change the content to List
1. リストを作成するために枠を作成する | Create a frame to create the list
1. 左のメニューから`Repeating Group`を選択しキャンバスをクリック | Select Repeating Group from the menu on the left and click on the canvas
1. `Layout`タブを選択 | Select Layout tab
1. `Container layout`を`Column`に変更 | Change Container layout to Column
1. `Appearance`タブを選択 | Select the `Appearance` tab
1. `Type of content`で`Memo`を選択 | Select `Memo` for `Type of content
1. `Data source`で`Do Search for`を選択 | Select `Do Search for` in `Data source
1. `Type`で`Memo`を選択 | Select `Memo` for `Type
1. `Sort by`で`Created Date`を選択 | Select `Created Date` for `Sort by`. 1.
1. `Decending`で`Yes`を選択 | Select `Yes` for `Decending
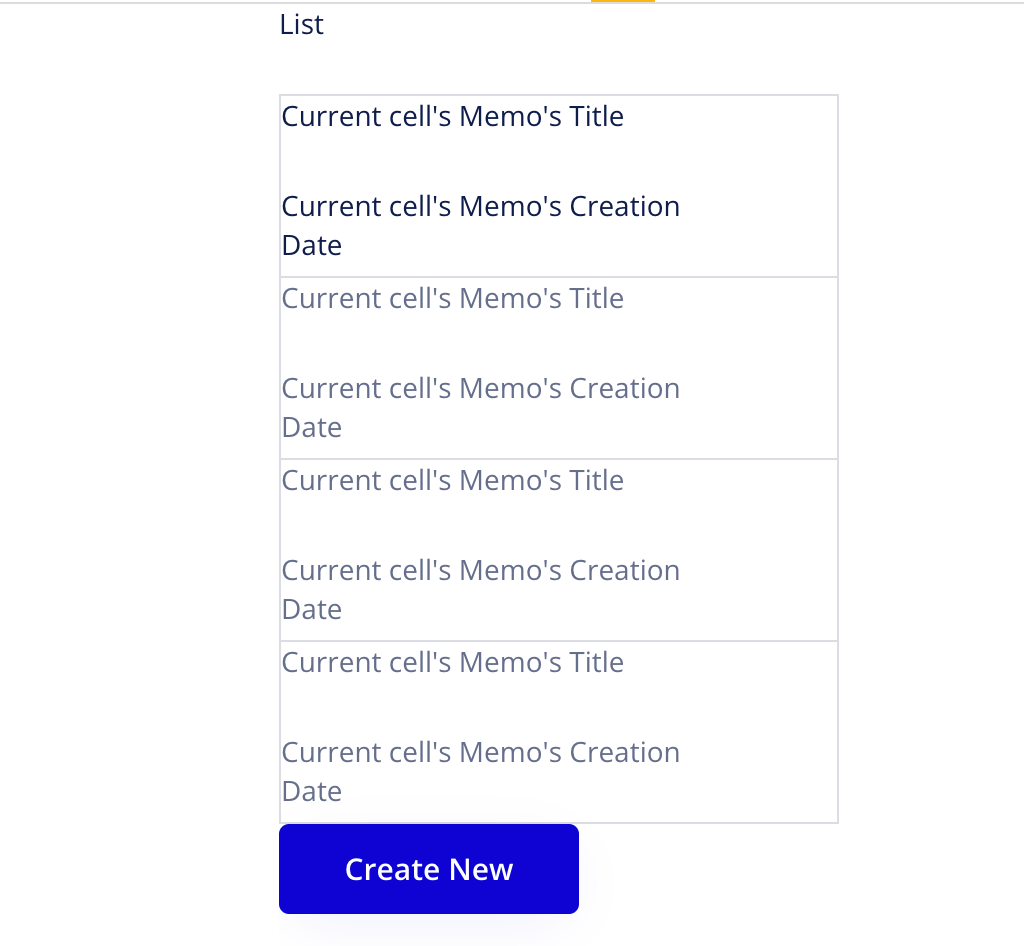
5. リストに内容を表示する要素を作成する | create an element to display the contents in a list
1. 左のメニューから`Text`を選択し`Repeating Group`の一番上をクリックして要素を追加 | select `Text` from the left menu and click on the top of `Repeating Group` to add an element
1. テキストで`Insert dynamic data`を選択 | Select `Insert dynamic data` in `Text
1. `Current cell's Memo` > `'s Title`を選択 | Select `Current cell's Memo` > `'s Title`
1. 左のメニューから`Text`を選択し`Repeating Group`の一番上をクリックして要素を追加 | select `Text` from the menu on the left and click on the top of `Repeating Group` to add an element
1. テキストで`Insert dynamic data`を選択 | Select `Insert dynamic data` in the text.
1. `Current cell's Memo` > `'s Creation Date`を選択 | Select `Current cell's Memo` > `'s Creation Date`
2. 新規作成画面へ遷移するボタンを作成する | Create a button to go to the new creation screen.
1. 左のメニューから`Button`を選択しキャンバスをクリックして要素を追加 | select `Button` from the menu on the left and click on the canvas to add an element.
1. テキストを`Create New`に変更 | Change the text to `Create New`
2.
### 動作の設定(Index: Workflow)
#### やること | To do.
画面に作成した入力欄に入力された情報を使用してデータを登録するActionを作成する
Create an Action that registers data using the information entered in the input fields created on the screen
#### 手順 | Procedure
1. `Create New`ボタンを押したら新規作成画面に遷移するようにActionを追加する | Add an Action so that the user will be redirected to the Create New screen when the `Create New` button is clicked.
1. `Click here to add an event...`をクリックしてActionを追加 | click `Click here to add an event... Click here to add an event...
2. `Elements` > `An Element is clicked`を選択 | Select `Elements` > `An Element is clicked`
1. `Element`を `Button Create New`に変更 | Change `Element` to `Button Create New`
3. `Click here to add an action...` > `Navigation` > `Go to page`を選択 | `Click here to add an action... Select ` > `Navigation` > `Go to page`
1. `Destination`で`create`を選択して遷移先を指定 | Select `create` in `Destination` and specify the destination.
1. 新規作成後に一覧画面に戻ってこれるようにActionを追加する | Add an Action to return to the list screen after creating a new page.
1. 左上の`Page: index` > `create`を選択してページを変更 | Change the page by selecting `Page: index` > `create` in the upper left corner
1. 先ほど作った`Workflow`を選択してActionを追加 | Select the `Workflow` you just created and add an Action.
1. `Click here to add an action...` > `Navigation` > `Go to page`を選択してActionを追加 | add an Action by selecting `Click here to add an action... Select `Navigation` > `Go to page` to add an Action
1. `Destination`で`index`を選択して遷移先を指定 | Select `index` in `Destination` to specify the destination.
### 確認 | confirm
1. 画面上部の`Preview`ボタンをクリック | click the `Preview` button at the top of the screen
2. メモの作成からリスト表示までを確認してみる | check the process from creating a memo to displaying the list
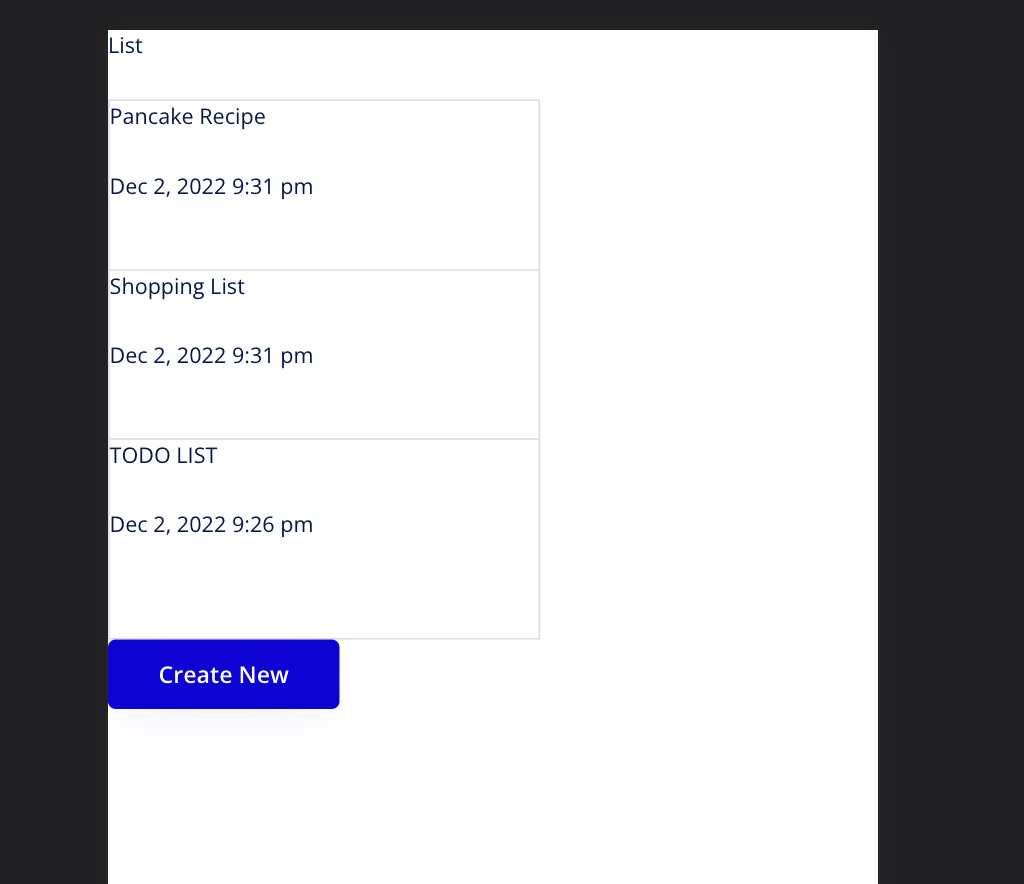
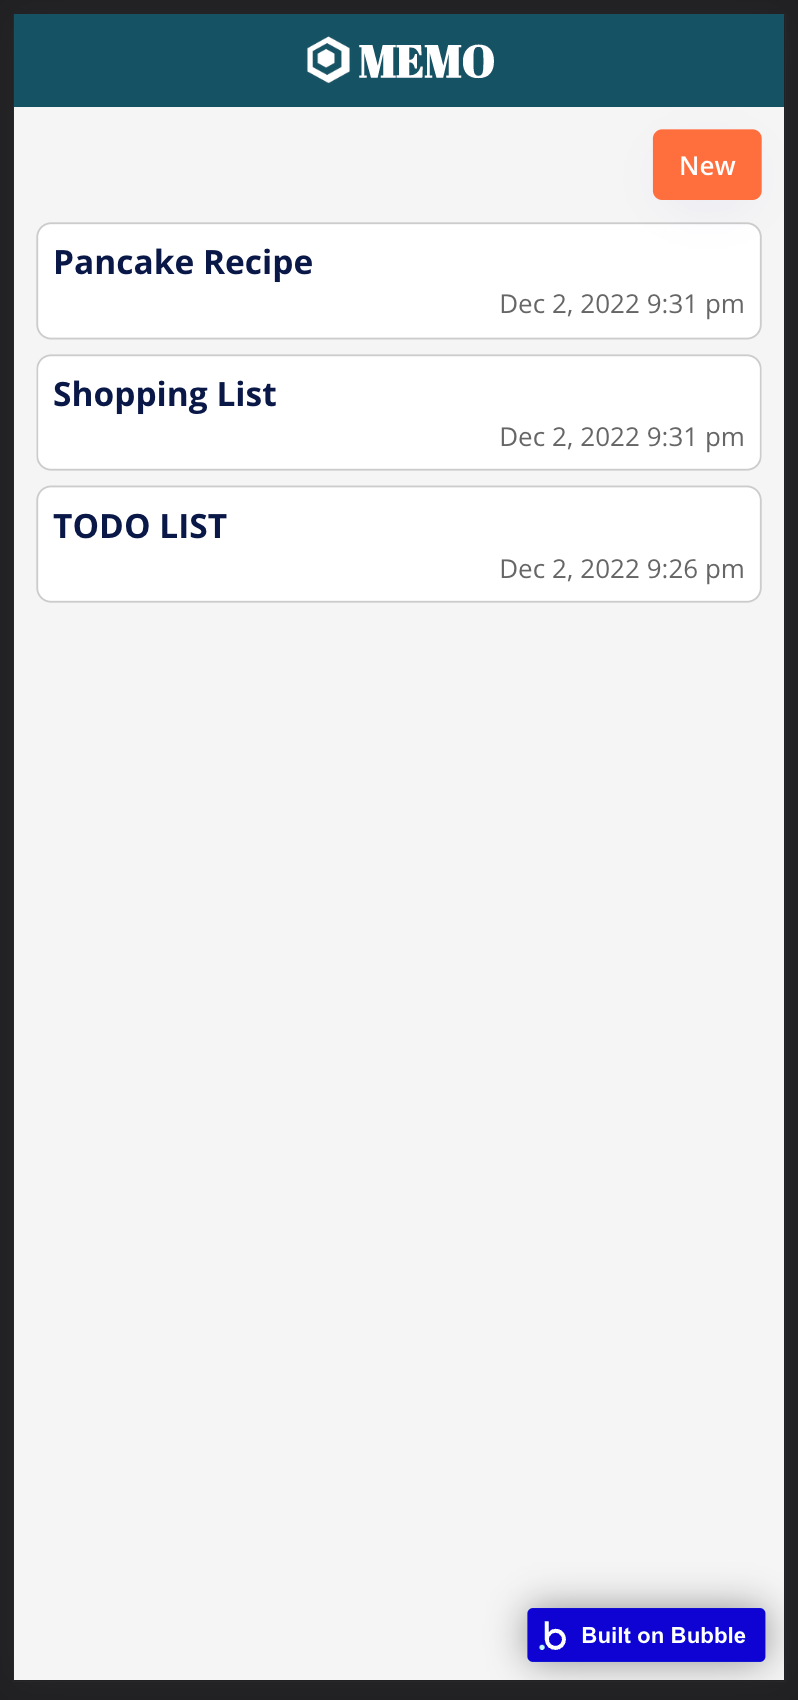
### 完成図 | Complete Image
#### 開発画面 | Development Screen
#### プレビュー画面 | Preview Screen
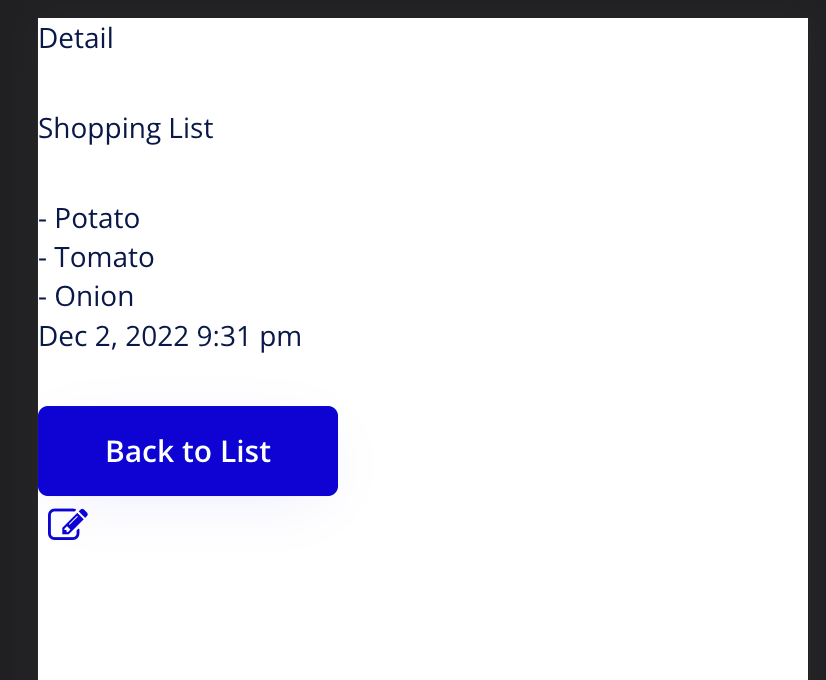
## 詳細画面(R: Read) | Detail Screen (R: Read)
1つ1つのメモの詳細が見れるページ
A page where you can see the details of each memo.
### 画面の作成(Detail: Design)
#### やること | what to do
一覧をからメモをクリックした時に遷移する各メモの詳細画面のベースを作る
Create the base of each memo's detail screen that is displayed when a user clicks on a memo from the list.
#### 手順 | Procedure
1. ページの作成 | create a page
1. 左上の`Page:`をクリック | Click `Page:` in the upper left corner.
1. `Add a new page...`を選択 | Select `Add a new page... Select `Page:`
1. `Page name`に`detail`と入力 | Enter `detail` in `Page name`
2. `CREATE`ボタンを押してページを作成 | click `CREATE` button to create the page
1. ページレイアウトの設定 | set up the page layout
1. キャンバスをダブルクリック | double-click on the canvas
2. `Layout`タブを選択 | Select `Layout` tab
3. `Container layout`を`Column`に変更 | Change `Container layout` to `Column
4. `Width for UI builder`を`320`に変更 | Change `Width for UI builder` to `320`
<kbd><img src="https://s3-ap-northeast-1.amazonaws.com/ts-hackmd-image/uploads/upload_dd16e246f737c4adcd1f4c3b8cd17c08.png" width="300"/></kbd>
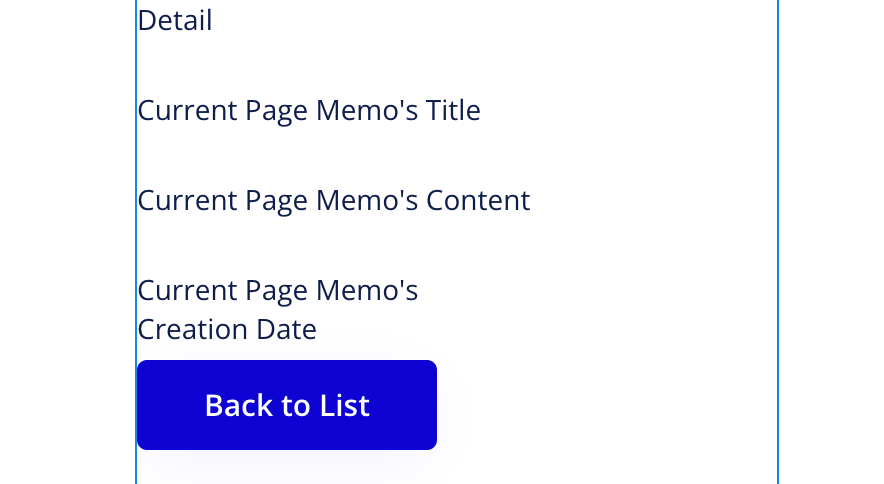
1. ページタイトルを表示する要素の作成 | create an element to display the page title
1. 左のメニューから`Text`を選択しキャンバスをクリックして要素を追加 | select `Text` from the menu on the left, click the canvas, and add an element.
2. 要素名を`PageTitle`に変更 | Change the element name to `PageTitle`
3. 内容を`Detail`に変更 | Change the content to `Detail

1. 戻るボタンの作成 | create a back button
1. 左のメニューから`Button`を選択しキャンバスをクリックして要素を追加 | select `Button` from the left menu, click on the canvas and add an element
1. テキストを`Back to List`に変更 | Change the text to `Back to List`
### 動作の設定(Detail: Workflow)
#### やること | what to do
戻るボタンを押した時に一覧画面に戻るActionを設定する
Set Action to return to the list screen when the Back button is pressed.
#### 手順 | procedure
2. 詳細ページにから一覧に戻るActionを追加 | Added an Action to return to the list from the detail page.
1. `Click here to add an event...`をクリックしてActionを追加 | click `Click here to add an event... Click here to add an Action
1. `Elements` > `An Element is clicked`を選択 | Select `Elements` > `An Element is clicked
1. `Element`を `Button Back to List`に変更 | Change `Element` to `Button Back to List`
1. `Click here to add an action...` > `Navigation` > `Go to page`を選択 | Select `Click here to add an action...` > `Navigation` > `Go to page`
1. `Destination`で`index`を選択して遷移先を指定 | Select `index` in `Destination` to specify the destination
### 動作の設定(Index: Workflow)
#### やること | what to do
一覧をからメモのタイトルをクリックした時にデータを詳細画面に送信して遷移するAction設定する
Set up Action to send data to the detail screen and transition when the memo title is clicked from the list.
#### 手順 | procedure
1. メモをクリックするとそのクリックしたデータを渡して詳細ページに遷移するActionを追加 | Added an Action that moves to the detail page by passing the clicked data when the note is clicked.
1. `Click here to add an event...`をクリックしてActionを追加 | `Click here to add an event... Click here to add an event...
1. `Elements` > `An Element is clicked`を選択 | Select `Elements` > `An Element is clicked`
1. `Element`を `Text Current Cell's Memo`に変更 | Change `Element`を `Text Current Cell's Memo`
<kbd><img src="https://s3-ap-northeast-1.amazonaws.com/ts-hackmd-image/uploads/upload_6834c78db7a265b11c1021301a87b0bc.png" width="400"/></kbd>
1. Select `Click here to add an action...` > `Navigation` > `Go to page`
1. `Destination`で`detail`を選択して遷移先を指定 | Select `detail` in `Destination` to specify the destination.
2. `Data to send`で`Current cell's Memo`を選択(`Detail's content type is not set.The data you're sending now it type list` が右側(or 左側)に出てきたらそれをクリック) | Select `Current cell's Memo` in `Data to send` (If `Detail's content type is not set. The data you're sending now it type list` appears on the right side (or left side), click it)
### 画面の作成(Index: Design)
#### やること | what to do
一覧画面から送信されたデータを詳細画面に表示する要素を追加する
Add an element to display data sent from the list screen on the detail screen
#### 手順 | procedure
1. メモの内容を表示する要素を作成 | Create an element to display the contents of the memo
1. 左のメニューから`Text`を選択してキャンバスをクリックして要素を追加 | select `Text` from the menu on the left and click on the canvas to add an element
1. テキストで`Insert dynamic data`を選択 | select `Insert dynamic data` in the text`
1. `Current Page Memo` > `'s Title`を選択 | Select `Current Page Memo` > `'s Title`
1. 左のメニューから`Text`を選択してキャンバスをクリックして要素を追加 | select `Text` from the menu on the left and click on the canvas to add an element
1. テキストで`Insert dynamic data`を選択 | Select `Insert dynamic data` in `Text`
1. `Current Page Memo` > `'s Content`を選択 | Select `Current Page Memo` > `'s Content`
1. 左のメニューから`Text`を選択してキャンバスをクリックして要素を追加 | select `Text` from the menu on the left and click on the canvas to add an element
1. テキストで`Insert dynamic data`を選択 | Select `Insert dynamic data` in `Text`
1. `Current Page Memo` > `'s Creation Date`を選択 | Select `Current Page Memo` > `'s Creation Date`
### 確認
1. 画面上部の`Preview`ボタンをクリック | click the `Preview` button at the top of the screen
2. メモの一覧からメモのタイトルをクリックして詳細ページに飛べるか確認 | check if you can jump to the detail page by clicking the memo title in the memo list
3. メモの詳細画面から戻るボタンで一覧画面に戻れるか確認 | check if you can go back to the list page by clicking the back button from the memo detail page
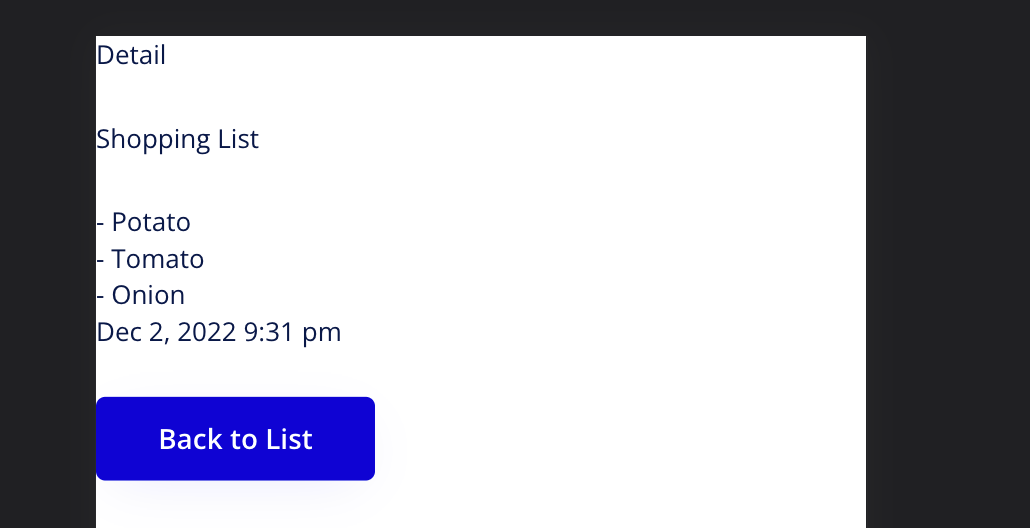
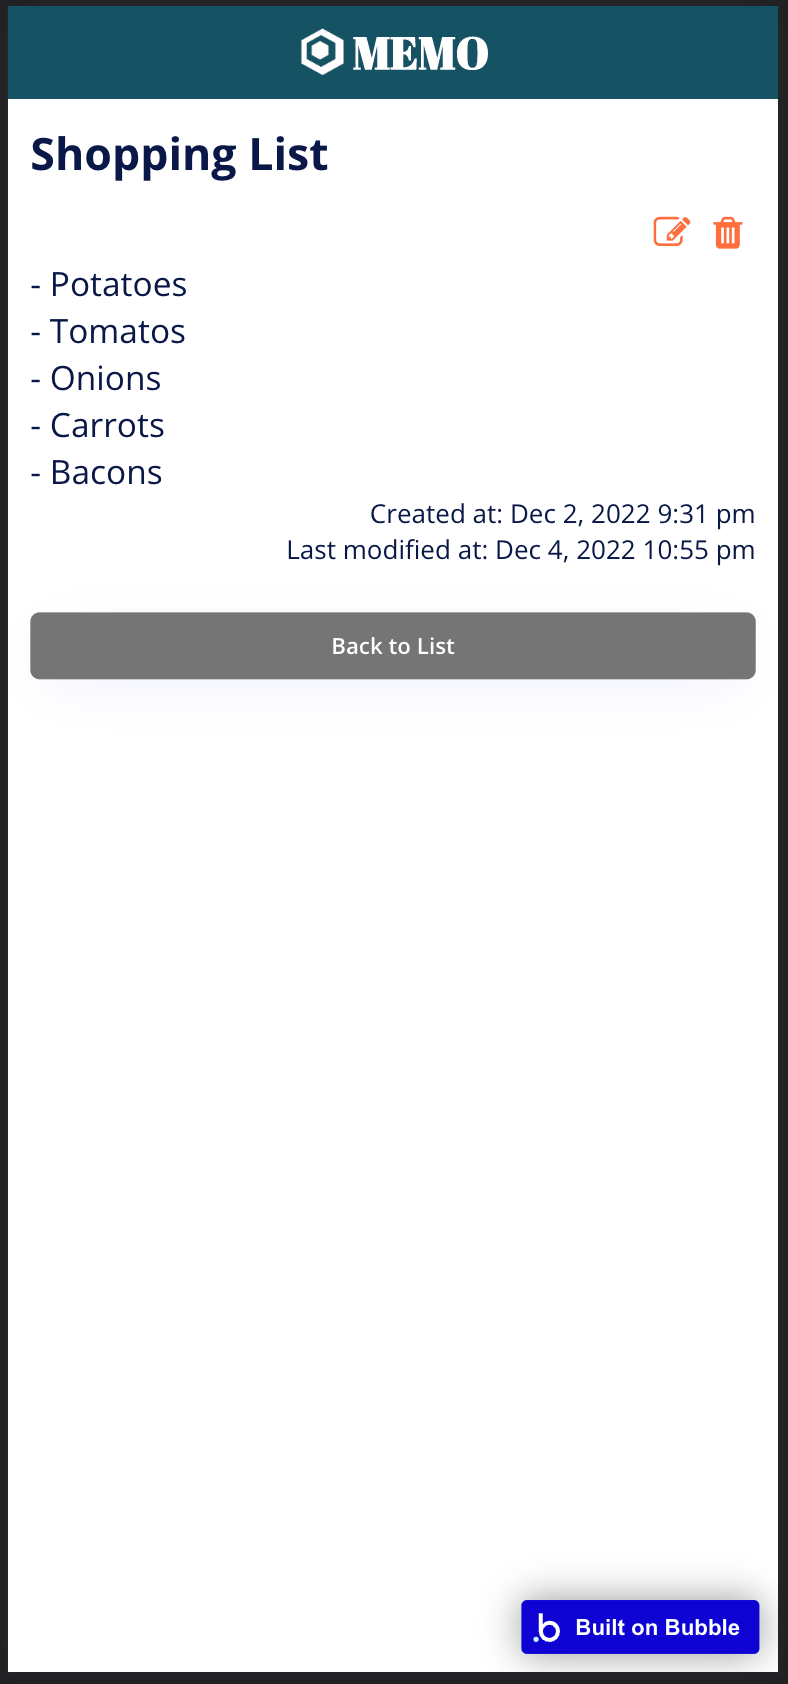
### 完成図
#### 開発画面
#### プレビュー画面
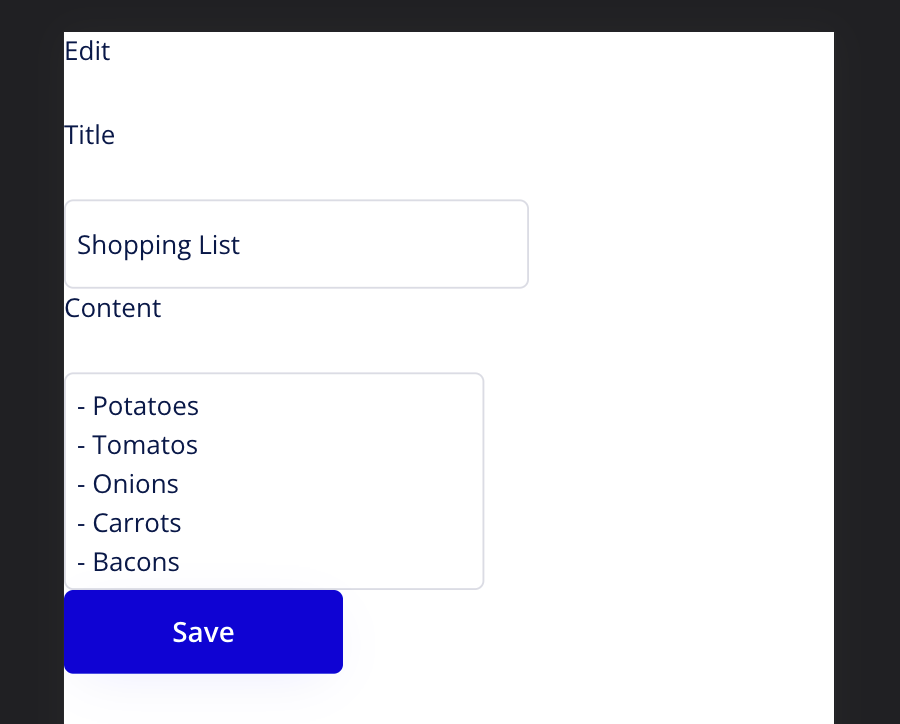
## 編集画面(U: Update) Update Screen
### 画面の作成(Edit: Design)
#### やること
新規作成ページを複製(Clone)して、編集ページを作成する
要素を編集画面用に調整する
Clone a new page to create an edit page
Adjust elements for the edit page
#### 手順
1. 編集ページを作成する | create an edit page
1. 左上の`Page:` > `Add a new page` をクリック | Click `Page:` > `Add a new page` in the upper left corner.
1. `Page Name`: `edit` と入力 | Enter `Page Name`: `edit`
1. `Clone from`: `create` と選択 | Select `Clone from`: `create`
1. `CREATE`をクリックしてページを作成 | Click `CREATE` to create a page
1. 編集画面用に画面を調整する | adjust the screen for the edit screen
3. `Create New` のテキストを選択し `Edit` に編集 | Select `Create New` text and edit to `Edit`
5. `Create` ボタンを選択し `Save` に編集 | Select the `Create New` button and edit to `Save
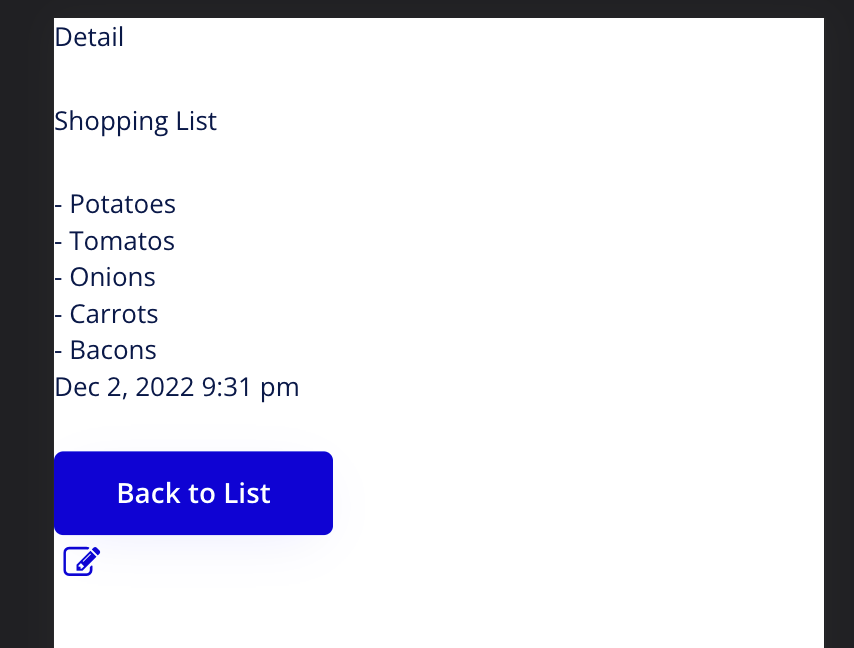
### 画面の編集(Detail: Design)
#### やること
詳細ページを編集して編集ボタンを追加する
Edit detail page to add edit button
#### 手順 | procedure
1. 詳細画面に編集ボタンの追加 | Add edit button on detail screen
3. 左のメニューから`Icon`を選択してキャンバス内の `Current Page Memo's Title` の右側をクリックして要素を追加 | Select `Icon` from the left menu and click on the right side of `Current Page Memo's Title` in the canvas to add an element
1. Icon `pencil` を検索して好きなアイコンを選択 | Search for Icon `pencil` and select your favorite icon
<kbd><img src="https://s3-ap-northeast-1.amazonaws.com/ts-hackmd-image/uploads/upload_3cbb620bf288af0ca4ba78942d49a41a.png" width="400"/></kbd>
1. 要素名を`Icon Edit`に変更 | Rename element name to `Icon Edit`
<kbd><img src="https://s3-ap-northeast-1.amazonaws.com/ts-hackmd-image/uploads/upload_1247ddf4e6e1571a4edfebe9b287c67e.png" width="400"/></kbd>
### 動作の設定(Detail: Workflow)
#### やること
詳細ページの編集ボタンを押したときに編集ページにデータを送信して遷移できるようにする
Allow data to be sent to the edit page for transition when the edit button on the detail page is pressed
#### 手順
1. 編集ボタンを押した時に編集画面でデータを送信して遷移するActionを追加 | Add Action to send data and transition on the edit screen when the edit button is pressed.
1. `Click here to add an event...`をクリックしてActionを追加 | add an Action by clicking `Click here to add an event... Click here to add an event...
2. `Elements` > `An Element is clicked`を選択 | Select `Elements` > `An Element is clicked`
1. `Element`を `Icon Edit`に変更 | Change `Element` to `Icon Edit`
3. `Click here to add an action...` > `Navigation` > `Go to page`を選択 | `Click here to add an action... Select ` > `Navigation` > `Go to page`
1. `Destination`で`edit`を選択して遷移先を指定 | Select `edit` in `Destination` to specify the destination.
2. `Data to send`で`Current Page Memo`を選択(`Detail's content type is not set.The data you're sending now it type list` が右側(or 左側)に出てきたらそれをクリック | Select `Current Page Memo` for `Data to send` (If you see `Detail's content type is not set. The data you're sending now it type list` on the right (or left) side, click it.
### 画面の編集(Edit: Design)
#### やること
編集画面で編集したいメモのデータを読み込めるようにする
Enable to read the data of the memo to be edited on the edit screen.
#### 手順
1. 入力欄に編集するデータを読み込む用に設定する | Set up the input fields to load the data to be edited.
1. Title のテキスト入力を選択 | Select text input for Title
1. Initial content で`Insert dynamic data`を選択
1. `Current Page Memo` > `'s Title`を選択
<kbd><img src="https://s3-ap-northeast-1.amazonaws.com/ts-hackmd-image/uploads/upload_4bc40005e4251acde5138e6c1d100d72.png" width="400"/></kbd>
4. Contentのテキスト入力を選択 | Select Content text input
1. Initial content に`Insert dynamic data`を選択
1. `Current Page Memo` > `'s Content`を選択
### 動作の設定(Edit: Workflow)
#### やること
不要なActionを削除する
編集内容を保存するActionを作成する
#### 手順
1. create画面からCloneされた不要なActionを削除する
1. `When Button Save is clicked` をクリックし
<kbd><img src="https://s3-ap-northeast-1.amazonaws.com/ts-hackmd-image/uploads/upload_c0770db4e2e50c7b765e91a76b4e5fc3.png" width="150"/></kbd>
1. Click `When Butten Edit is clicked` , Click `Step 1`, click `delete` 3 ステップのActionを削除 to delete all action steps (3 steps)
<kbd><img src="https://i.imgur.com/P9nUkue.png" height="220"/></kbd> → <kbd><img src="https://i.imgur.com/MTPpVte.png" height="220"/></kbd> → <kbd><img src="https://i.imgur.com/fmqj4Sq.png" height="220"/></kbd>
1. 編集した内容を保存して一覧画面に戻るActionを作成する | Save your changes and add an Action to go back to Overview/List page
1. `Click here to add an event...`をクリックしてActionを追加
2. `Elements` > `An Element is clicked`を選択
1. `Click here to add an action` > `Data (things)` > `Make changes to thing`を選択
1. `Thing to change` の `Click` をクリック
7. `Thing to change`を`Current Page Memo`に変更
1. `Change another field`をクリック
1. `click` > `Title`をクリック
4. 入力欄内の`click`をクリックして`Input Title` > `'s value`を選択
1. `Change another field`をクリック
1. `click` > `Content`をクリック
4. 入力欄内の`click`をクリックして`MultiplelineInput Current` > `'s value`を選択
<kbd><img src="https://s3-ap-northeast-1.amazonaws.com/ts-hackmd-image/uploads/upload_b65555ef93814fad544d16ee6b737308.png" width="300"/></kbd>
![Uploading file..._p6dgvdn2h]()
1. `Click here to add an action...` > `Navigation` > `Go to page`を選択
1. `Destination`で`detail`を選択して遷移先を指定
1. `Data to send`で`Current Page Memo`を選択(`Detail's content type is not set.The data you're sending now it type list` が右側(or 左側)に出てきたらそれをクリック)
### 確認
- `Page:` > `index` をクリック
- 画面上部の`Preview`ボタンをクリック
- Memo 選択し、編集アイコンをクリック
- 適当に編集し、保存
### 完成図
|before Edit|Editing|After Edit|
|-|-|-|
|  |  |  |
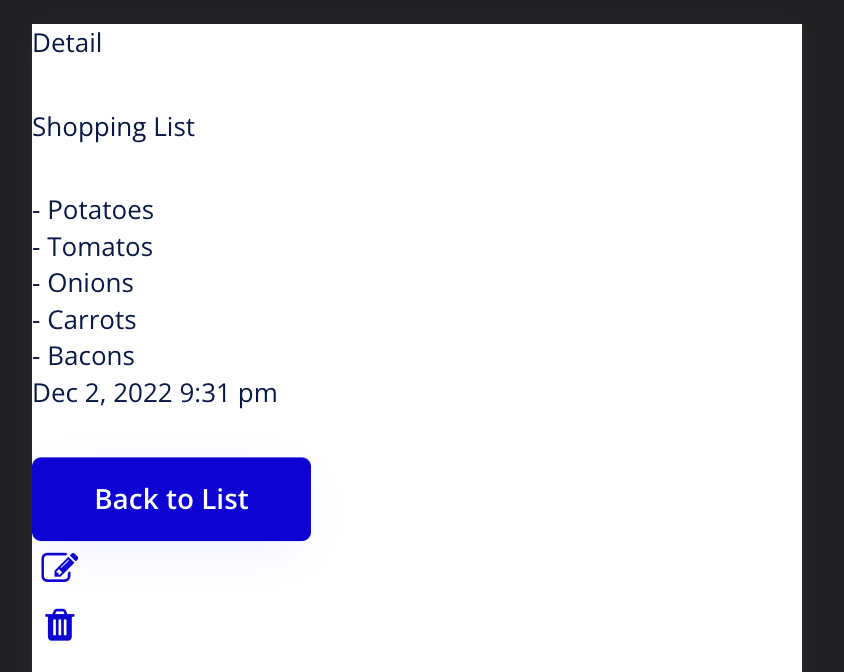
## 削除機能の実装(D: Delete)
### 画面の編集(Detail: Design)
#### やること
詳細画面にメモの削除機能ボタンを追加する
#### 手順
1. モードを`Design`に切り替える
1. 左のメニューで`Design`を選択
1. ページの変更
1. 左上の`Page:` > `detail` をクリック
1. 詳細画面に編集ボタンを追加する
3. 左のメニューから`Icon`を選択してキャンバスをクリックして要素を追加
1. Icon `trash` を検索して好きなアイコンを選択
1. 要素名を`Icon Delete`に変更
### 動作の設定(Detail: Workflow)
#### やること
メモを削除するActionを設定する
#### 手順
1. モードを`Workflow`に切り替える
1. 左のメニューで`Workflow`を選択
1. 編集ボタンを押した時に編集画面でデータを送信して遷移するActionを追加
1. `Click here to add an event...`をクリックしてActionを追加
2. `Elements` > `An Element is clicked`を選択
1. `Element`を `Icon Edit`に変更
1. `Click here to add an action` > `Data (things)` > `Delete thing...`を選択
2. `To delete`を`Current Page Memo`に変更
1. `Click here to add an action...` > `Navigation` > `Go to page`を選択
1. `Destination`で`index`を選択して遷移先を指定
### 完成図
### 確認
- `Page:` > `index` をクリック
- 画面上部の`Preview`ボタンをクリック
- Memo 選択し、削除アイコンをクリック
- 消えていることを確認
## デザインを調整する
Web開発では画面の要素はHTML、デザインはCSSという言語で記載していきます。
Bubbleでもそのルールに似た指定方法で
### Height/width
- 要素の高さ(Height)と幅(Width)を指定するプロパティーです
- ピクセル数(px)や割合(%)で設定ができます
### Padding/Margin
- 要素の余白を設定するプロパティーです。
- Paddingは要素の内側に、Marginは要素の外側に余白を設定します
- 参考サイト: [marginとpaddingとは?基礎から解説!ゼロから始めるHTML/CSS講座Vol08](https://blog.codecamp.jp/margin_padding)
### サンプル
BEENOS Memo App: https://beenos-memo-sample-designed.bubbleapps.io/version-test
You are very welcome to add your own design!
| Index | Create | Detail |
| ---------------------------------------------------------------------------------------------------------------- | ------| ------ |
| |  |  |
## 時間が余れば追加したい機能 | Some fun features to add, if you have extra time
- 検索機能 | Search
- タグ機能 | Tags
- 位置情報記録機能 | Add location
 Sign in with Wallet
Connect another wallet
Sign in with Wallet
Connect another wallet