
# Backend Deployment - Fly.io and Mongo Atlas
<span style="color:#d8d8d8">*Last updated: December 2022*</span>
## Learning goals
After this lesson, you will be able to:
- Create a MongoDB database in the cloud using the MongoDB Atlas
- Set up a connection to the cloud MongoDB database
- Configure your NodeJS application for deployment
- Deploy your NodeJS application with Fly.io
<br>
## MongoDB Atlas
**[MongoDB Atlas](https://www.mongodb.com/cloud/atlas/lp/try2) is a cloud database** that handles all the complexity of instantiating and managing your MongoDB database. MongoDB Atlas provides an easy way to host your MongoDB database in the cloud.
<br>
<br>
### Step 1 | Create a MongoDB Atlas Account
<br>
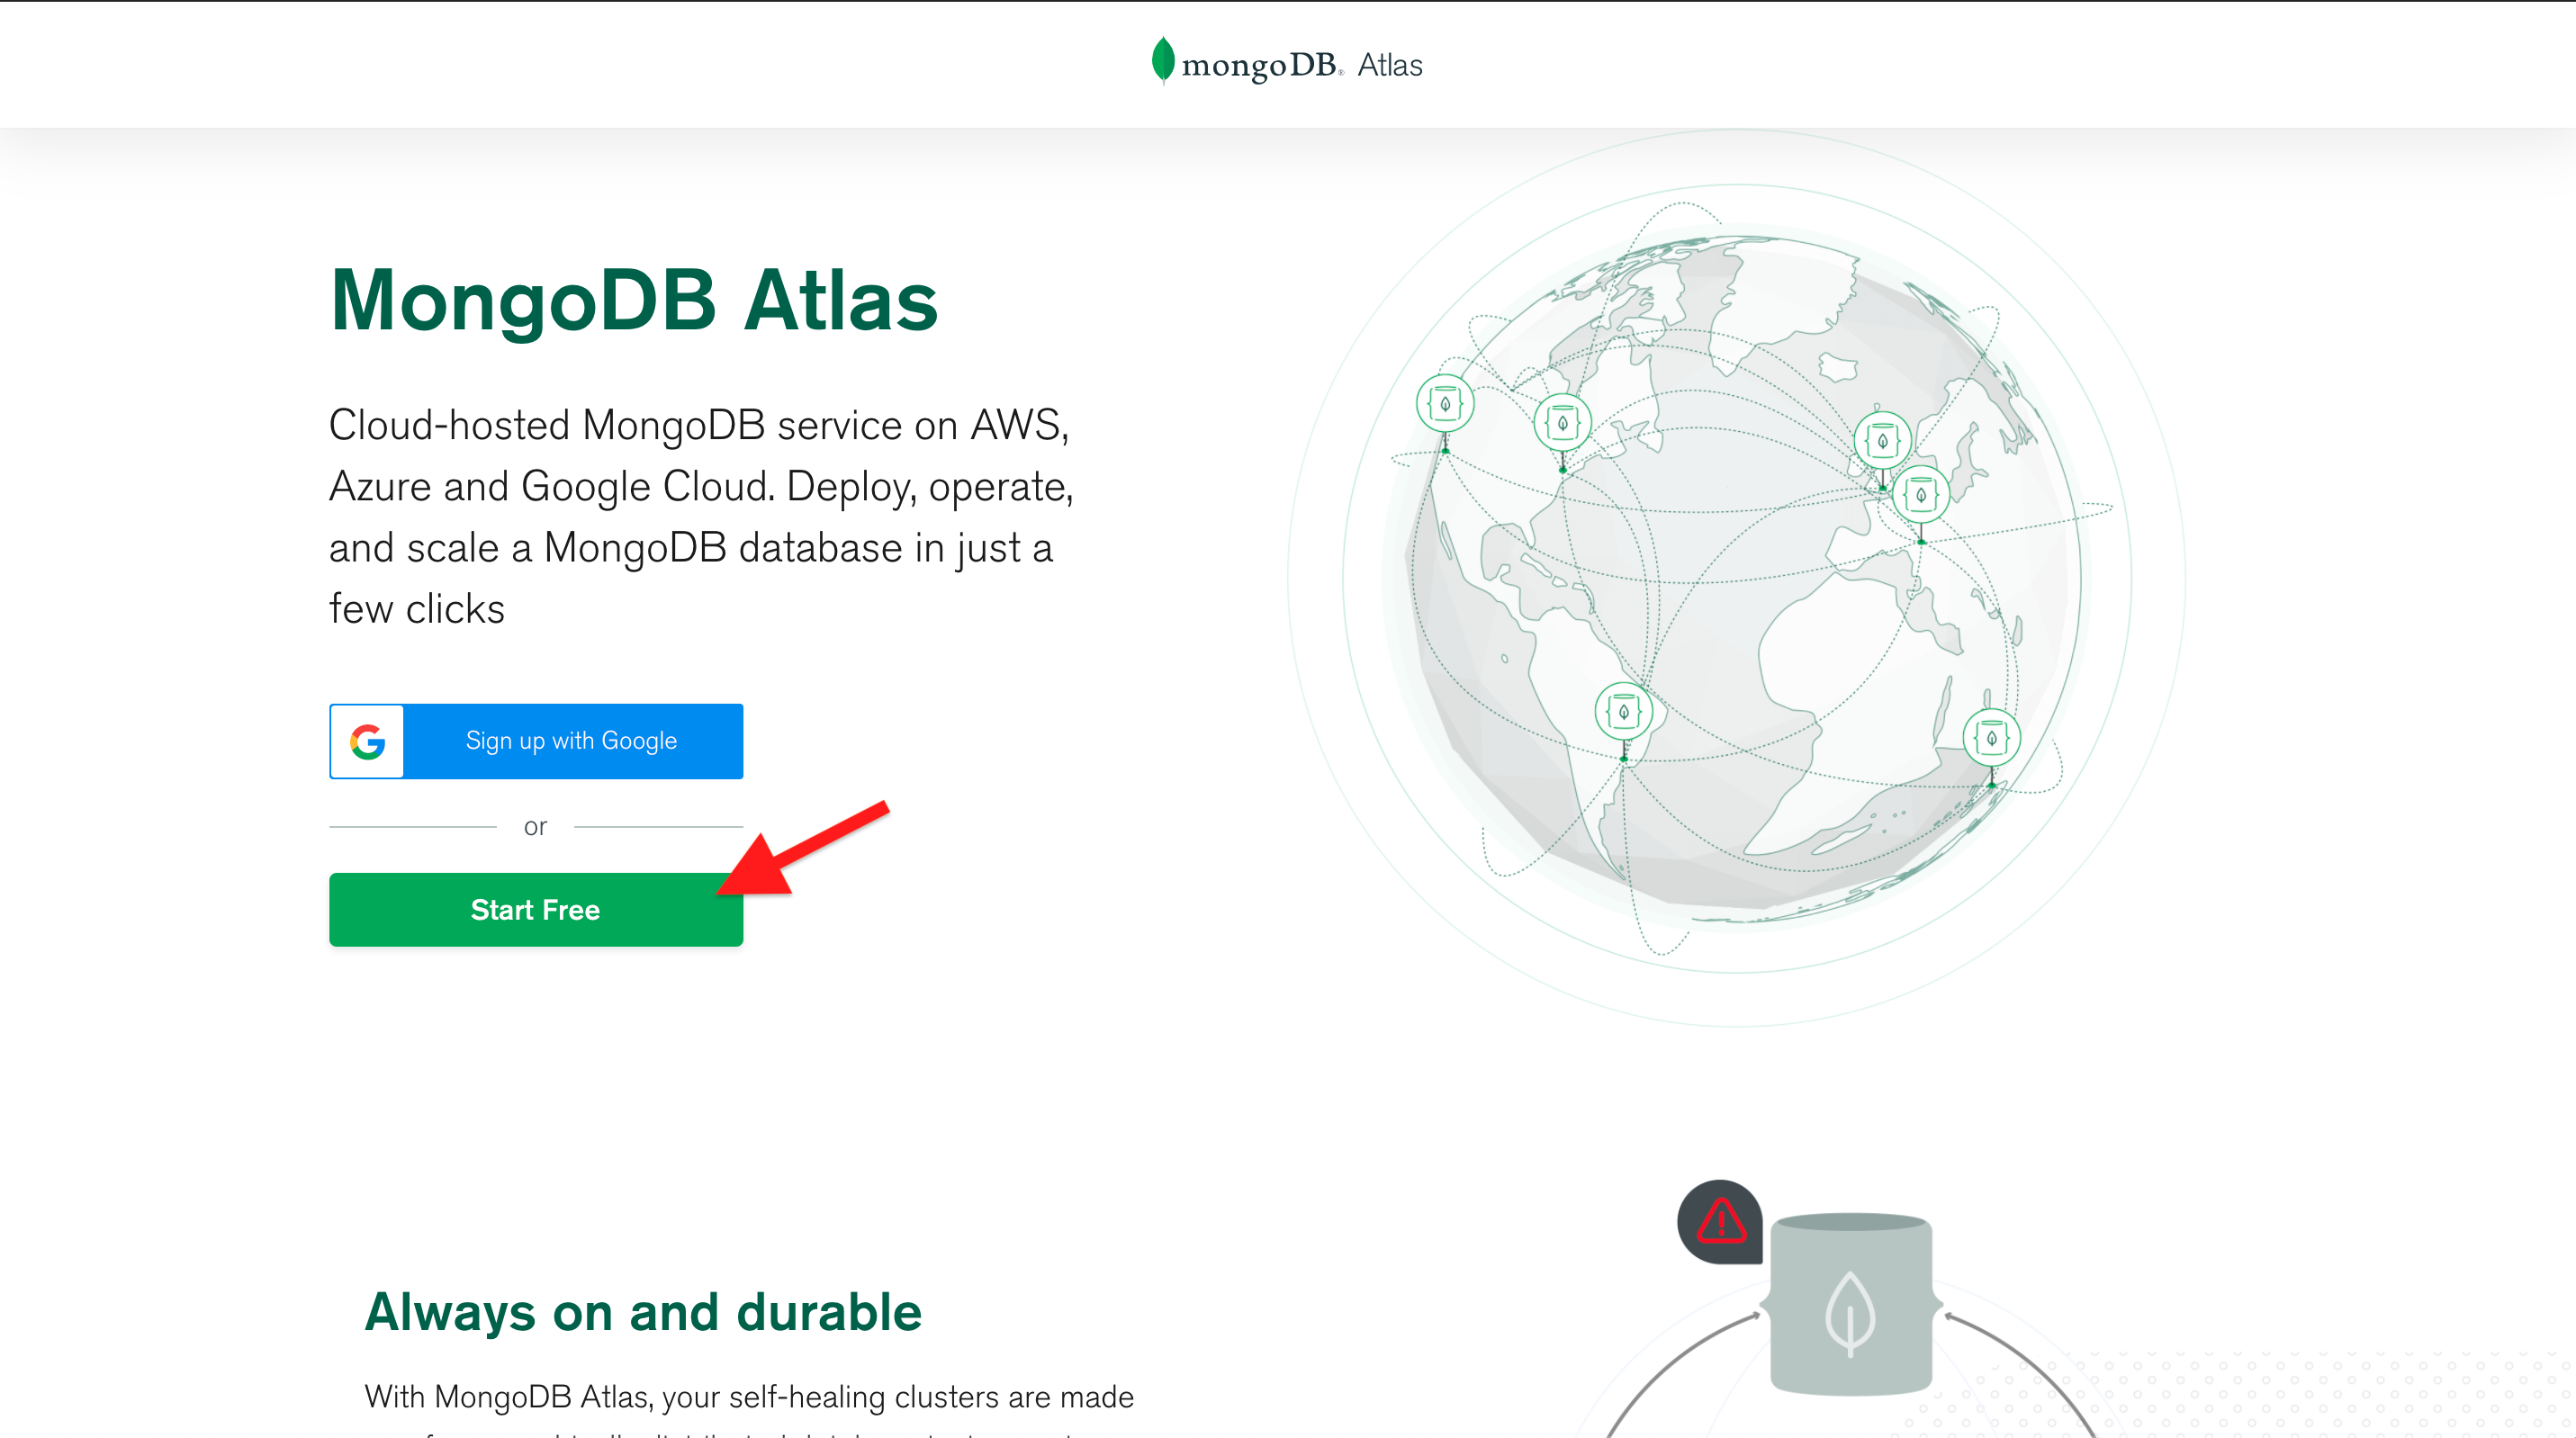
1. Start by opening the MongoDB Atlas [registration page](https://www.mongodb.com/cloud/atlas/lp/try2).
2. You can register for an Atlas account using your Google Account or an email address. Click on the **Start Free** button.
<details style="font-size: 14px; cursor: pointer; outline: none; color: #575d70;">
<summary>Check the visual</summary>
<br>
</details>
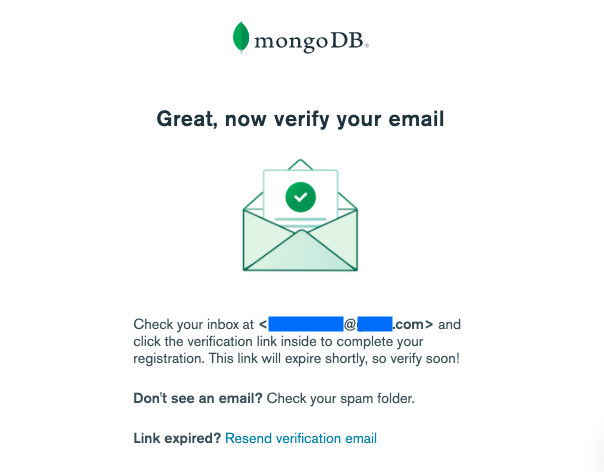
3. Fill up the required fields and finish the sign-up process.
4. You'll receive an **email with the verification link**. **Click the verification link** inside the email to complete your registration.
<details style="font-size: 14px; cursor: pointer; outline: none; color: #575d70;">
<summary>Check the visual</summary>
<br>
</details>
<br>
### Step 2 | Create a MongoDB Atlas Cluster
<br>
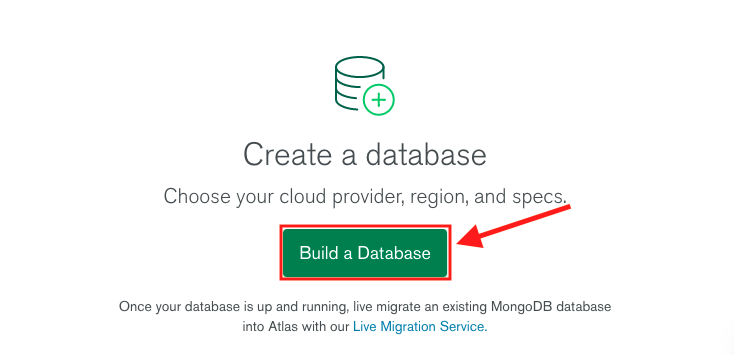
1. Open the *MongoDB Atlas* [login page](https://account.mongodb.com/account/login) and log in with your newly created account.
2. You will be redirected to the main dashboard. Click on the green button **Build a Database**.
<details style="font-size: 14px; cursor: pointer; outline: none; color: #575d70;">
<summary>Check the visual</summary>
<br>
</details>
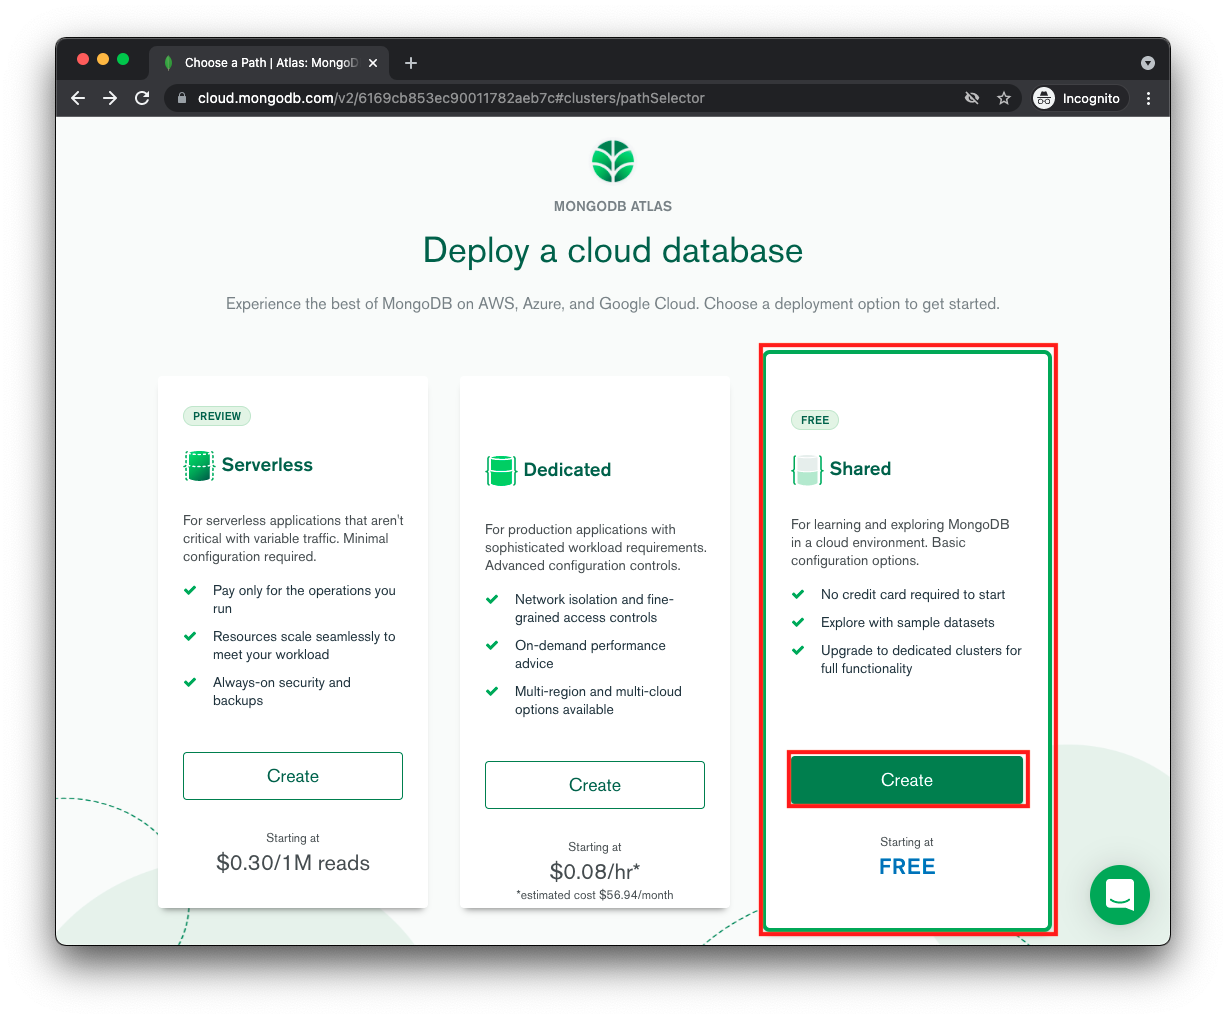
3. In the next screen, select the **Shared** option (labeled **FREE**) and click on the **Create** button.
<details style="font-size: 14px; cursor: pointer; outline: none; color: #575d70;">
<summary>Check the visual</summary>
<br>
</details>
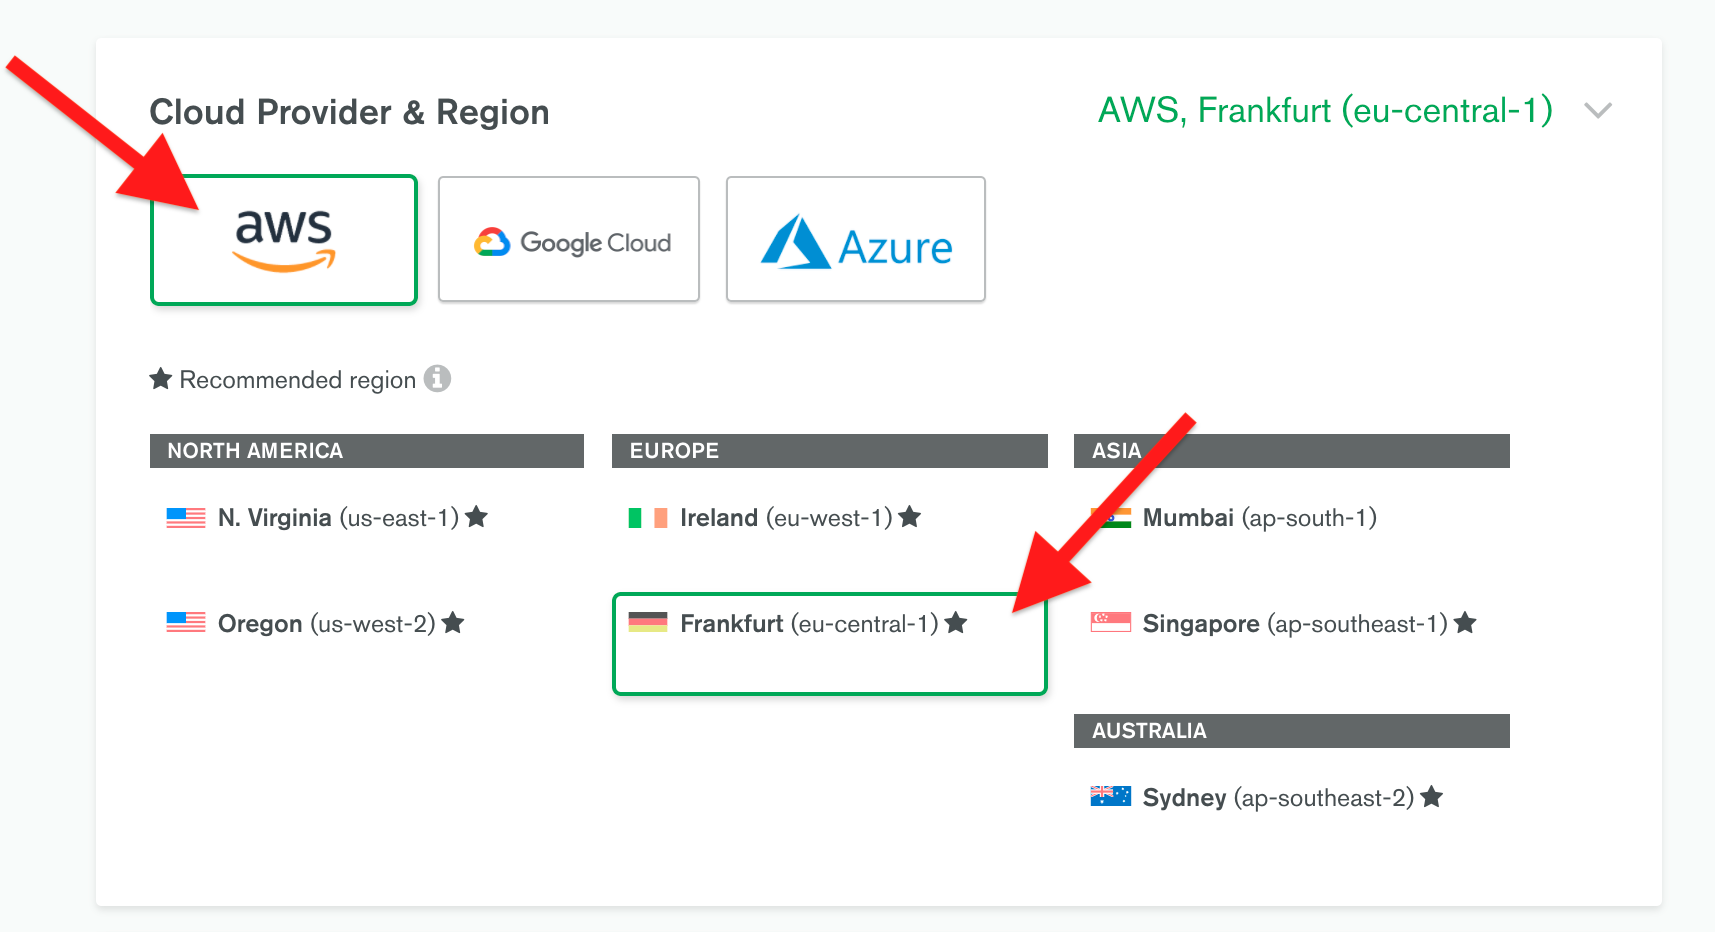
4. In the **Cloud Provider & Region** panel, select **AWS** and one of the recommended regions (marked with a star ★) closest to your location.
<details style="font-size: 14px; cursor: pointer; outline: none; color: #575d70;">
<summary>Check the visual</summary>
<br>
</details>
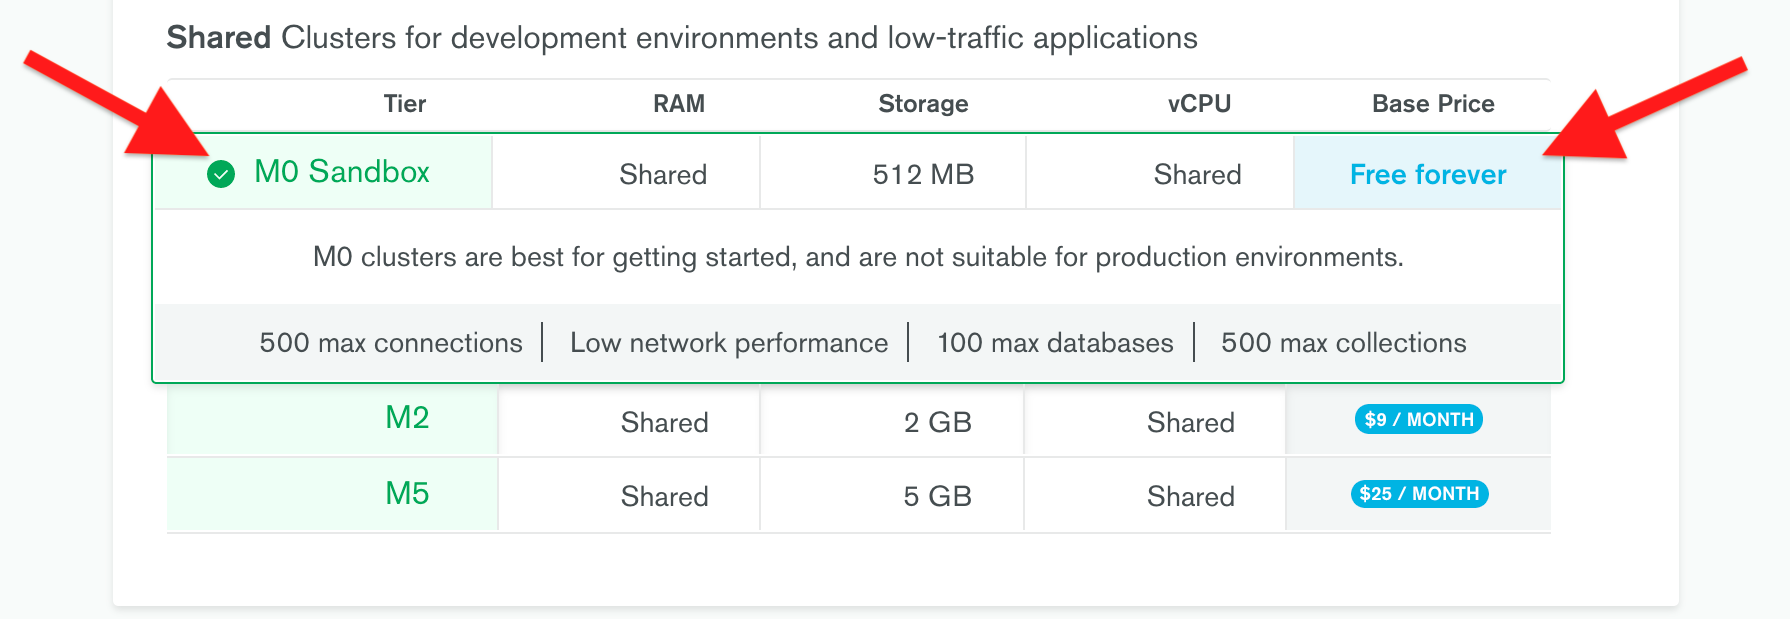
5. In the following **Cluster Tier** panel, select **M0 Sandbox** for cluster tier.
<details style="font-size: 14px; cursor: pointer; outline: none; color: #575d70;">
<summary>Check the visual</summary>
<br>
</details>
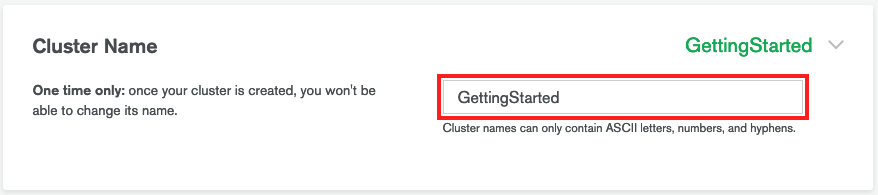
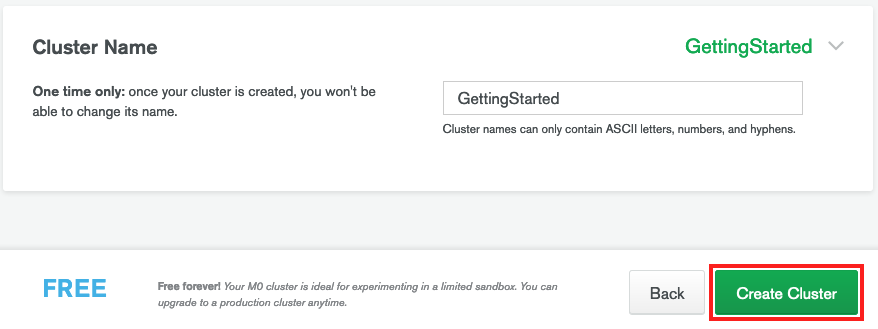
6. Enter a name for your cluster in the **Cluster Name** field (optional).
<details style="font-size: 14px; cursor: pointer; outline: none; color: #575d70;">
<summary>Check the visual</summary>
<br>
</details>
7. Click the green button **Create Cluster** to deploy the cluster. You will be redirected to the main dashboard.
<details style="font-size: 14px; cursor: pointer; outline: none; color: #575d70;">
<summary>Check the visual</summary>
<br>
</details>
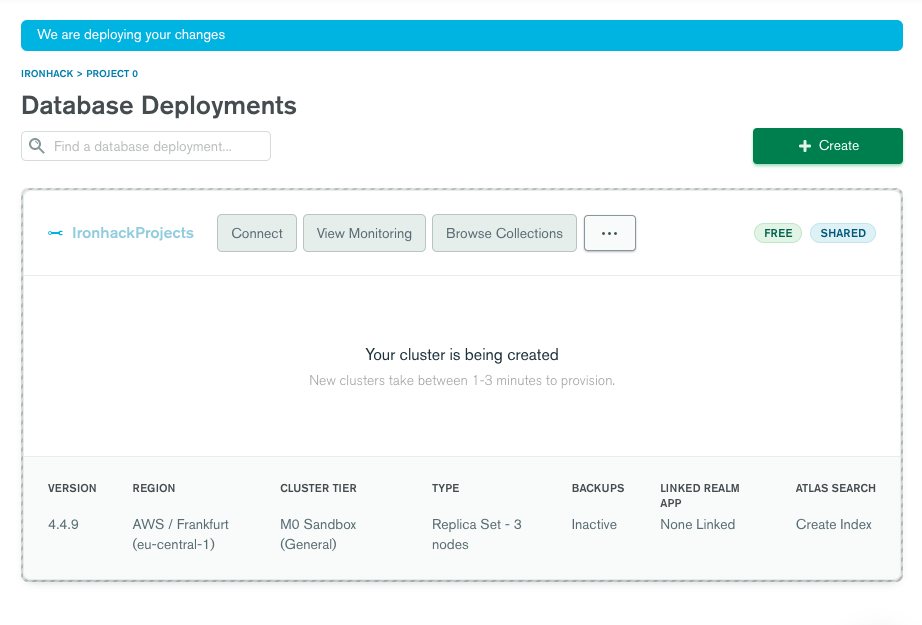
8. It can take up to 10 minutes for your cluster to provision and become ready to use.
<details style="font-size: 14px; cursor: pointer; outline: none; color: #575d70;">
<summary>Check the visual</summary>
<br>
</details>
<br>
### Step 3 | Configure the Atlas Cluster
<br>
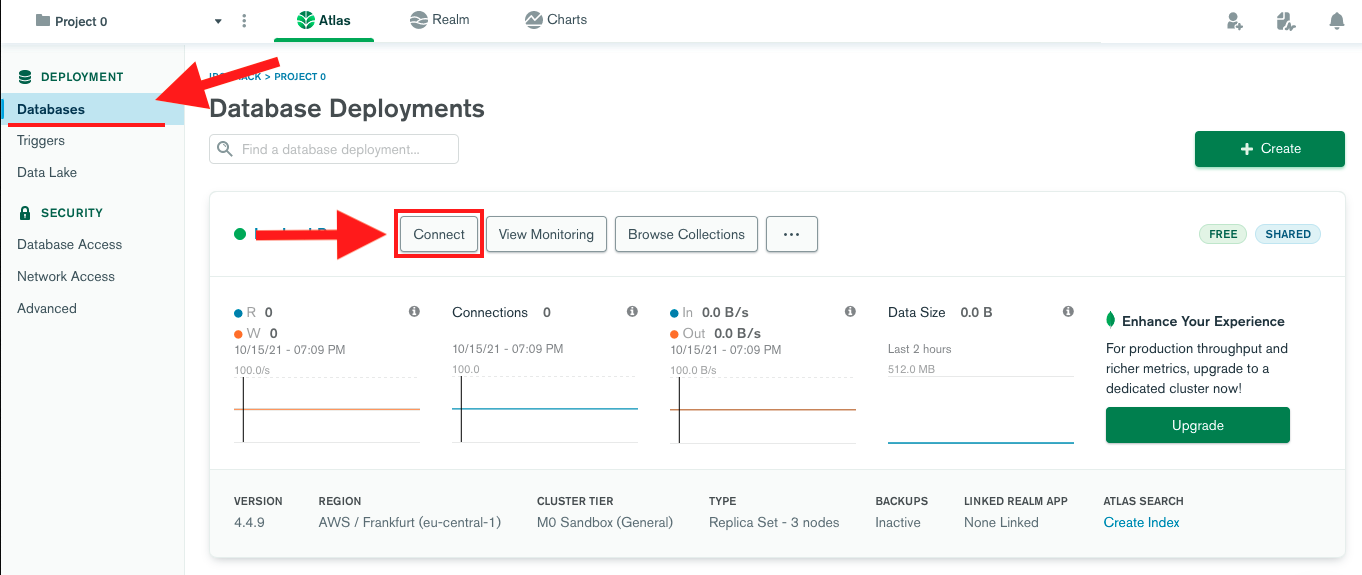
1. While in the [main dashboard](https://cloud.mongodb.com/), click **Databases** in the top-left corner. In the **Database Deployments** panel, click the **Connect** button.
<details style="font-size: 14px; cursor: pointer; outline: none; color: #575d70;">
<summary>Check the visual</summary>
<br>
</details>
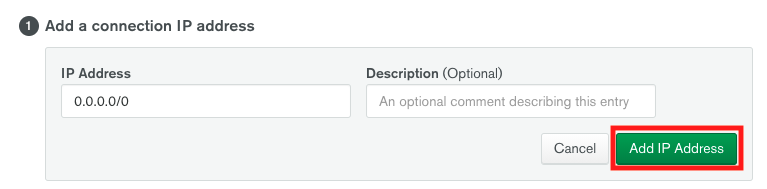
2. In the **Add a connection IP address** section, click the button **Allow Access from Anywhere**. In the dropdown that will open, click **Add IP Address**.
<details style="font-size: 14px; cursor: pointer; outline: none; color: #575d70;">
<summary>Check the visual</summary>
<br/>

<br/>
</details>
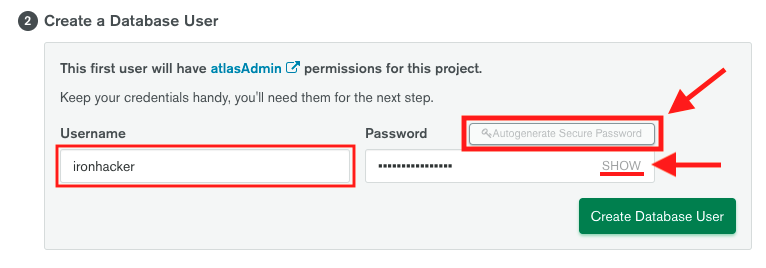
3. In the **Create a Database User** section, enter the desired username and click **Autogenerate Secure Password**.
**IMPORTANT:** Write down the *username* and the *password* you just created. You'll need your MongoDB user's credentials in the next step.
<details style="font-size: 14px; cursor: pointer; outline: none; color: #575d70;">
<summary>Check the visual</summary>
<br>
</details>
4. To create the database user click on the button **Create Database User**.
<details style="font-size: 14px; cursor: pointer; outline: none; color: #575d70;">
<summary>Check the visual</summary>
<br>

</details>
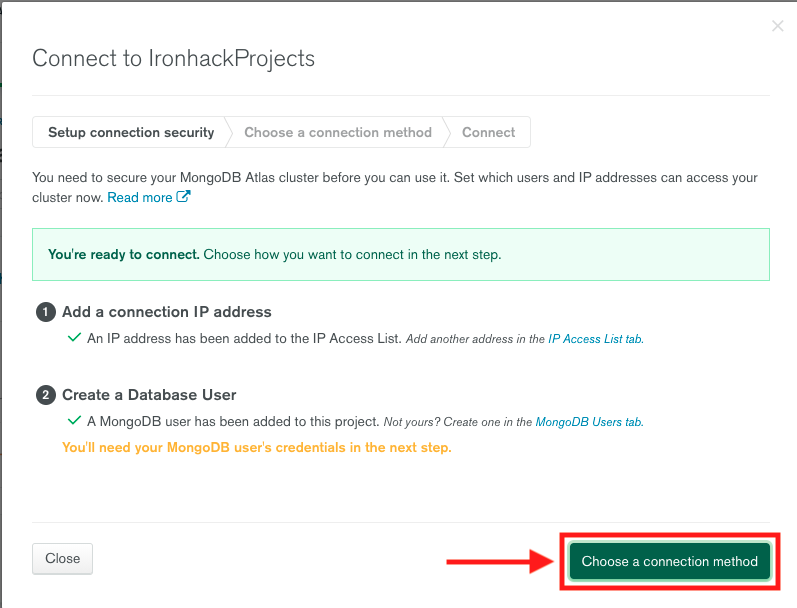
5. The next step is to obtain a database connection string. To do this, click the **Choose a connection method** button.
<details style="font-size: 14px; cursor: pointer; outline: none; color: #575d70;">
<summary>Check the visual</summary>
<br>
</details>
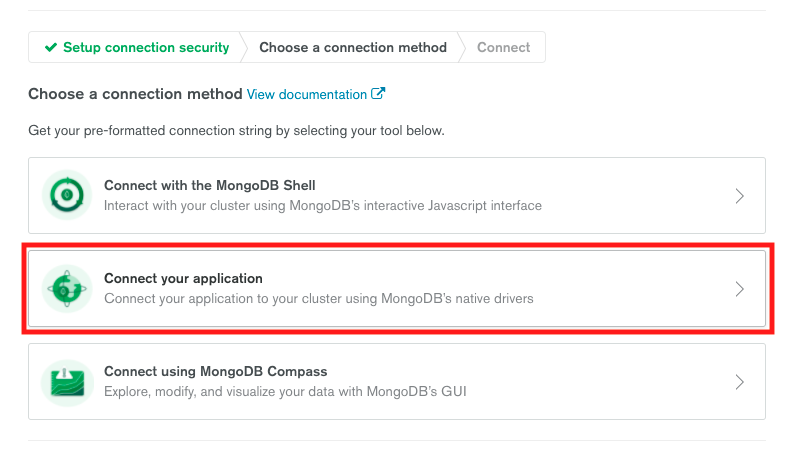
6. In the next window, click **Connect your application**.
<details style="font-size: 14px; cursor: pointer; outline: none; color: #575d70;">
<summary>Check the visual</summary>
<br>
</details>
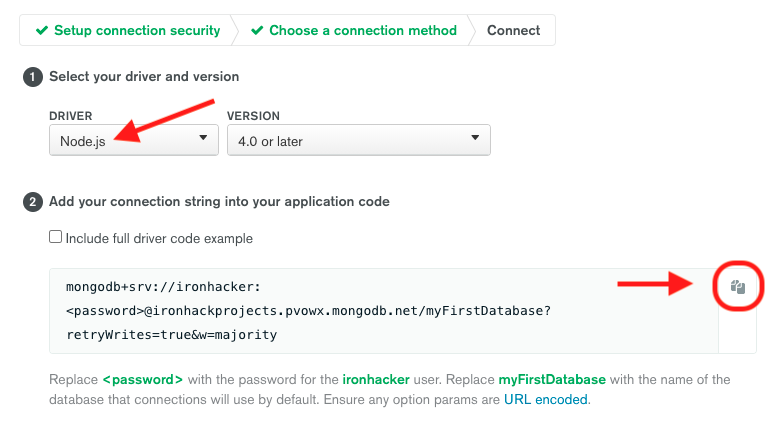
7. From the **Driver** dropdown, select *Node.js* and the latest version from the **Version** dropdown. Copy the provided *connection string*.
<details style="font-size: 14px; cursor: pointer; outline: none; color: #575d70;">
<summary>Check the visual</summary>
<br>
</details>
8. **IMPORTANT:** Save the copied connection string. You'll need it in the later step when deploying your Node.js application to Fly.io. You should also update the copied connection string in the following way:
- Replace **`<password>`** with the password for the created user.
- Replace **`myFirstDatabase`** with the name of the database that connections will use by default.
<br>
### Configuring Database Users
<br>
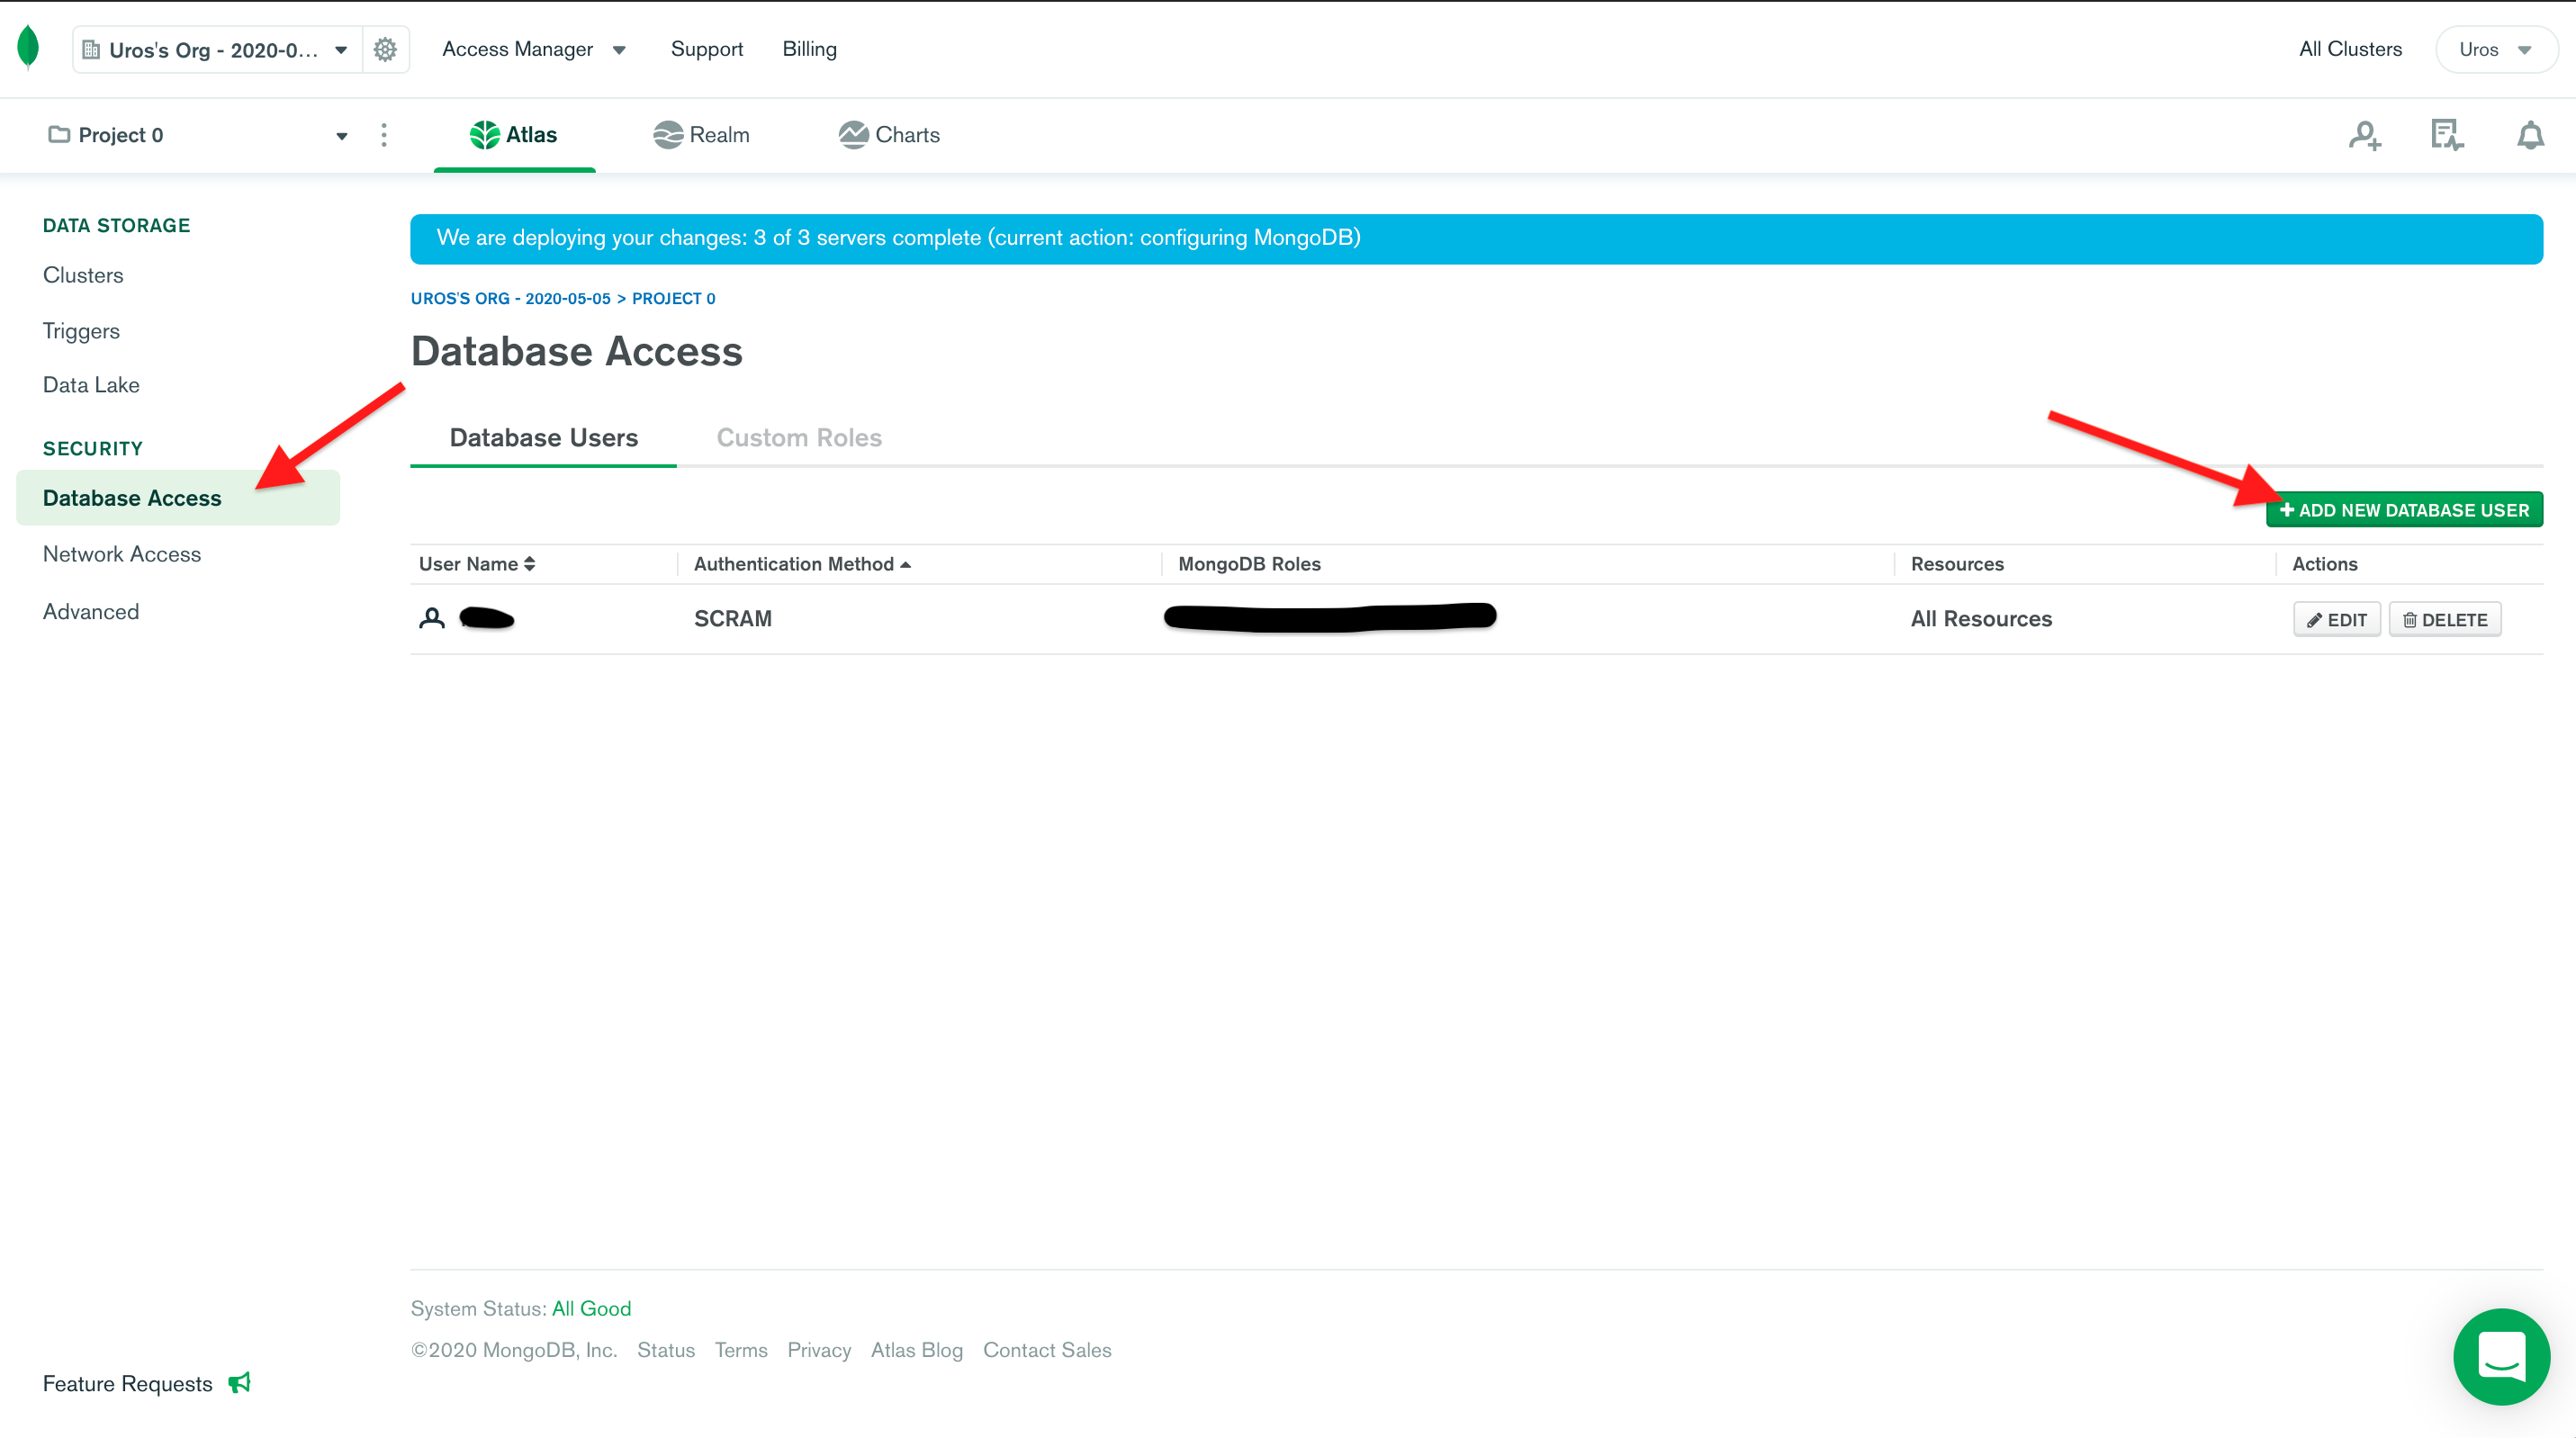
If you ever need to create a new database user or update the password for an existing user, go to the **Database Access** menu:
1. Navigate to the [main dashboard](https://cloud.mongodb.com/).
2. From the menu on the left side, select **Database Access**.
3. To create a new user, click **ADD NEW USER**
4. To update the password for an existing user, click on the **EDIT** button next to the user.
<details style="font-size: 14px; cursor: pointer; outline: none; color: #575d70;">
<summary>Check the visual</summary>
<br>
</details>
<br>
## Fly.io
<br>
[**Fly**](https://fly.io/) is a cloud hosting platform that enables developers to deploy and run full stack applications. Your application on Fly is launched using a Docker image that is run in a Virtual Machine (VM) in the cloud. Don't worry, you won't have to touch Docker! With some minimal setup, you can have Fly automatically scan your source, and build and deploy an image of your app.
Fly was initially launched in 2017, and as of right now, it offers complete support for the following languages and frameworks: Elixir, Rails, PHP, Go, Python, and Node.js.
<br>
<br>
We'll use Fly to deploy our Node.js server and make it available online.
<br>
### Step 1 | Get Started with Fly
<br>
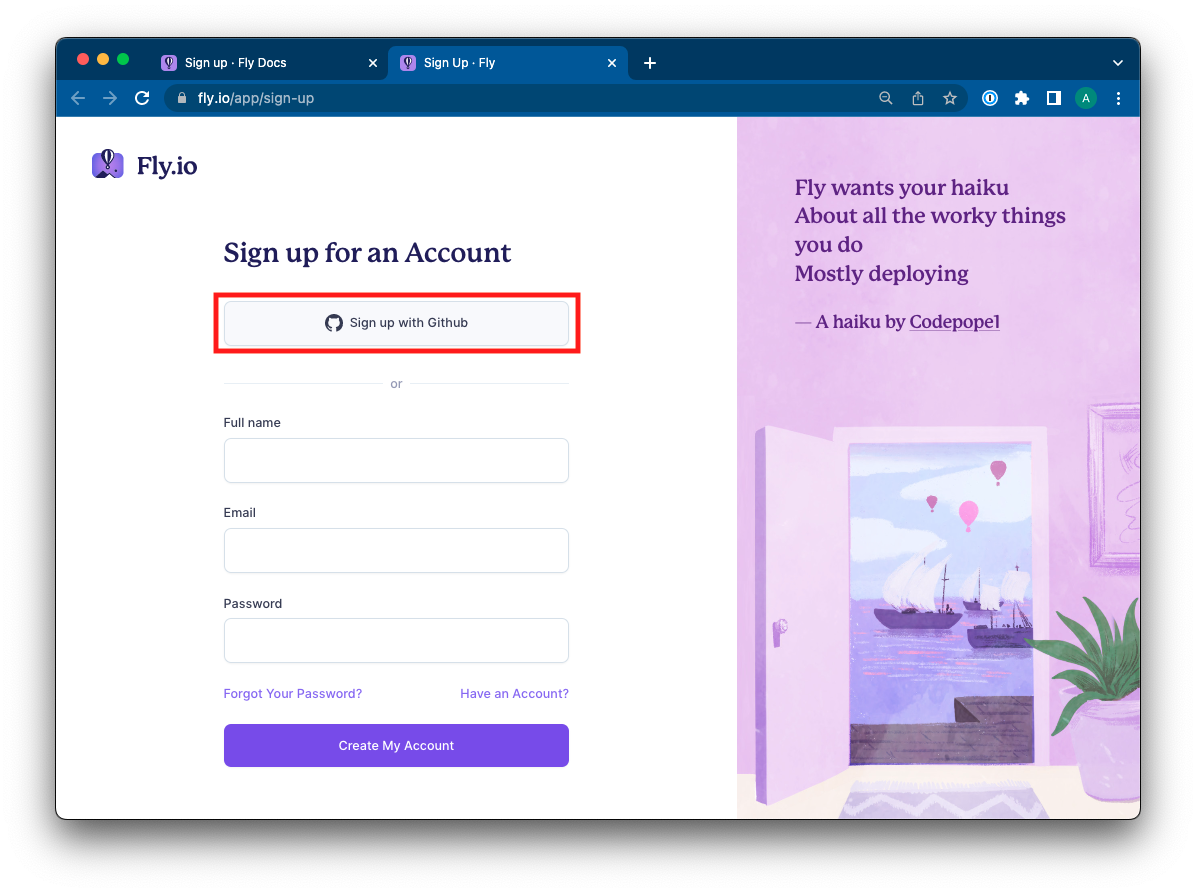
1. Open the following link and create a new Fly.io account: https://fly.io/app/sign-up
2. Once on the Sign Up page, click on the button **Sign up with GitHub**.
<details style="font-size: 14px; cursor: pointer; outline: none; color: #575d70;">
<summary>Check the visual</summary>
<br>
</details>
3. You will be redirected to GitHub to authorize the signup. To complete the sign-up process click on the button **Authorize Fly.io**.
<details style="font-size: 14px; cursor: pointer; outline: none; color: #575d70;">
<summary>Check the visual</summary>
<br>

</details>
4. Once you are done signing up, you'll receive an **email** asking you **to verify** your new Fly.io account. **Click on the verification link** inside the email to complete the sign-up process.
<details style="font-size: 14px; cursor: pointer; outline: none; color: #575d70;">
<summary>Check the visual</summary>
<br>

</details>
5. Next, install Fly CLI by following these instructions: [Install Flyctl](https://fly.io/docs/hands-on/install-flyctl/).
<br>
### Step 2 | Login to Fly
<br>
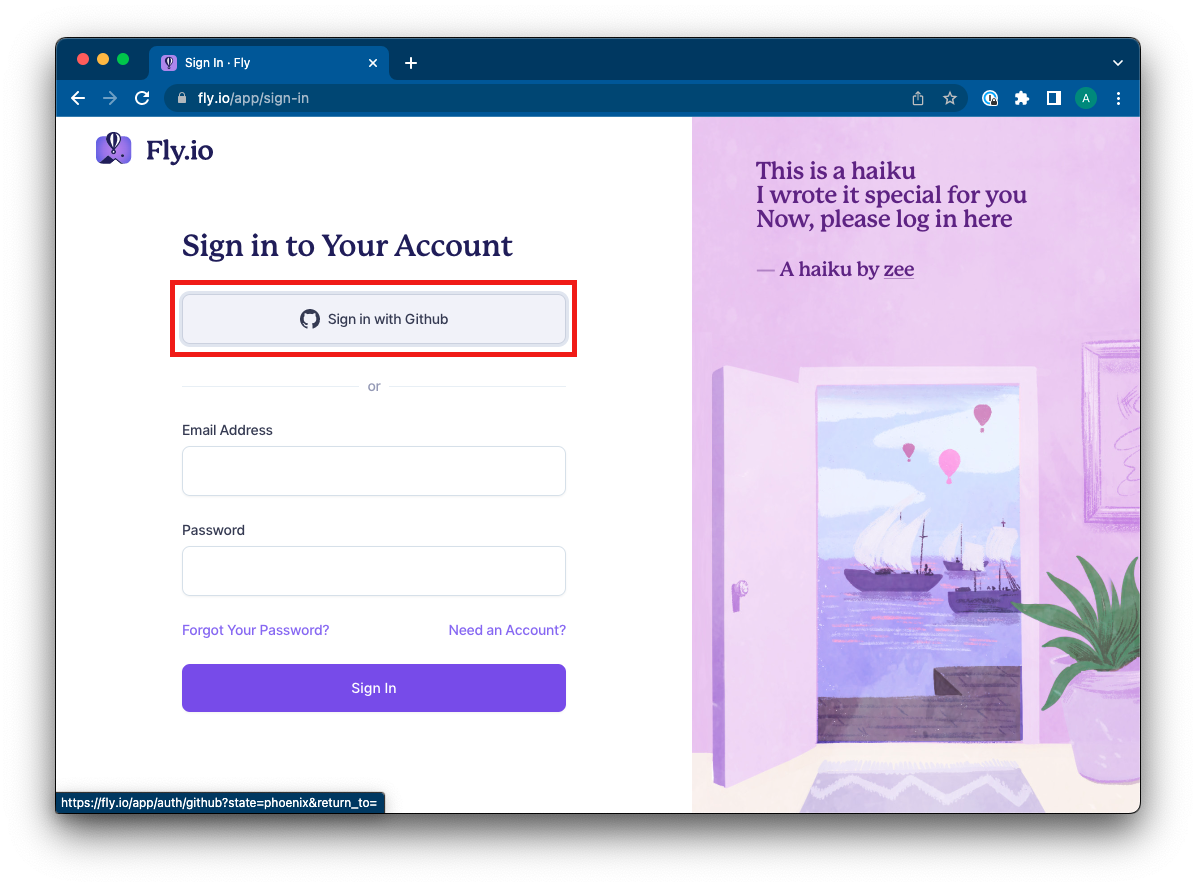
1. Once you have installed Flyctl, you should log in to Fly by running the following command in your terminal:
```bash
flyctl auth login
```
2. The Fly sign-in screen will open in your browser. Log in using the **Sign in with GitHub** button.
<details style="font-size: 14px; cursor: pointer; outline: none; color: #575d70;">
<summary>Check the visual</summary>
<br>
</details>
3. You'll be redirected to GitHub to log in. To complete the log-in process provide your credentials and click on the button **Sign in**.
<details style="font-size: 14px; cursor: pointer; outline: none; color: #575d70;">
<summary>Check the visual</summary>
<br>

</details>
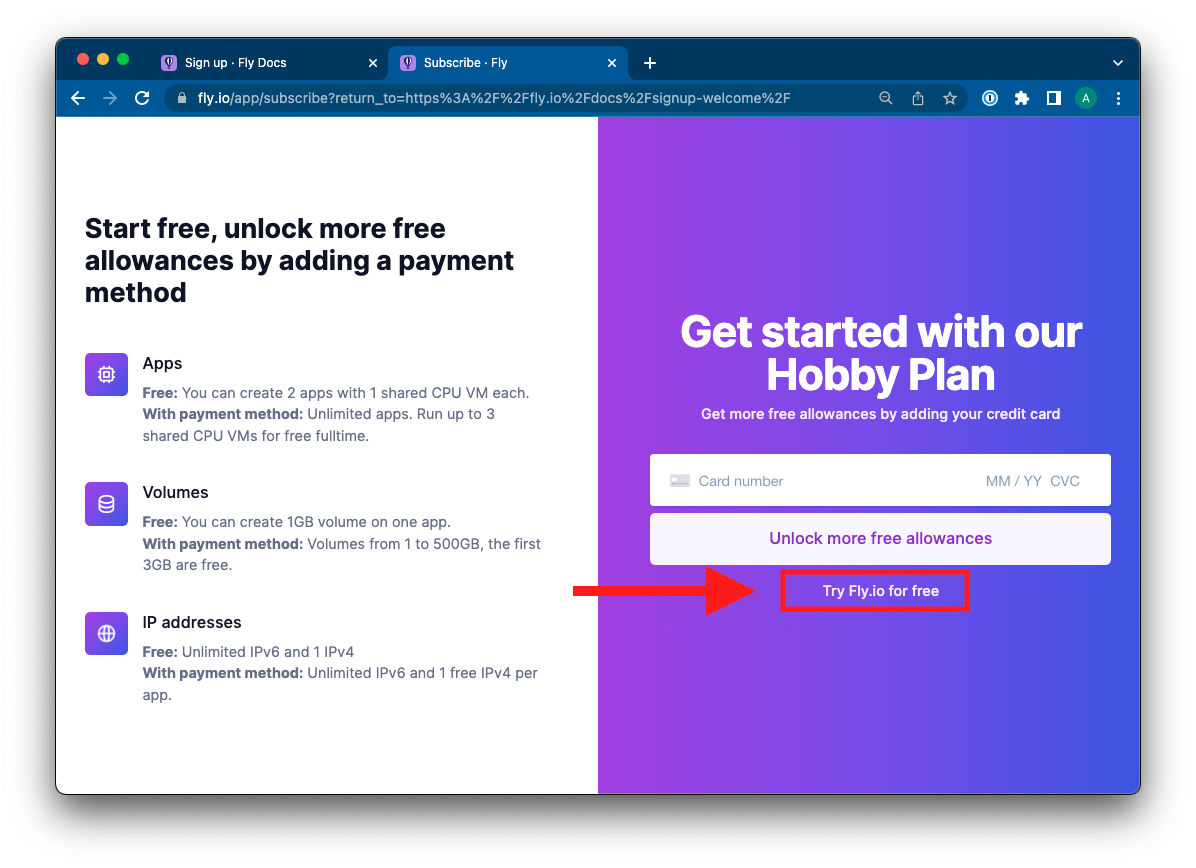
4. On the next page, you'll be prompted to enter a payment method in order to unlock additional free allowances as part of the free Hobby Tier.
You can bypass this by clicking the **Try Fly.io for free** link.
<details style="font-size: 14px; cursor: pointer; outline: none; color: #575d70;">
<summary>Check the visual</summary>
<br>
</details>
<br>
### Step 3 | Prepare your app for Deployment
<br>
1. Once you have logged in, **open the terminal** and **navigate to your project's (server) root folder**.
2. Next, you'll need to prepare your app for deployment. From the root folder, run the following command:
```bash
flyctl launch --no-deploy
```
This command first scans your source code to determine how to build a deployment image as well as any other configuration your app requires, such as environment variables.
3. Next, you'll be prompted to choose a name for the app and select a region to deploy to. Complete the blanks as follows:
- `? App Name`: **App name of your choice**
- `? Select region`: **Select a region closest to you**
4. Flyctl will generate a `fly.toml` file in the root directory of your app.
The `fly.toml` file contains a default configuration for deploying your app.
<br>
### Step 4 | Set Environmental Variables Locally
<br>
1. If not yet done so, create a new `.env` file in the root folder of the server, and add the following code containing the database URI variable:
```bash
# If your database is named differently, change the name
MONGODB_URI=mongodb://localhost:27017/your-project-name
```
2. From the root folder of the server, run the following command to install the `dotenv` npm package:
```bash
npm install dotenv
```
3. Import the `dotenv` package in the file with the Mongoose connection:
```js
require('dotenv').config();
```
4. Update the Mongoose connection string:
```js
// ...
mongoose
.connect(process.env.MONGODB_URI)
.then(x => console.log(`Connected the Database: "${x.connections[0].name}"`))
.catch(err => console.error('Error connecting to mongo', err));
// ...
```
5. Repeat the process and add any additional environment variables you may need (e.g., `SESSION_SECRET`, `TOKEN_SECRET`, etc) and API keys or API configuration strings.
<br>
### Step 5 | Deploy Your App on Fly
<br>
1. Open the terminal and navigate to the root folder of the project (server).
2. From the server root folder run the command:
```js
flyctl deploy
```
The command `flyctl deploy` will create a build of your project (server), and deploy it to Fly.
<br>
### Step 6 | Set Environment Variables on Fly
<br>
The next step is to set the environment variables for the app that will be deployed on Fly:
1. To set the environmental variable `MONGODB_URI`, run the below command from the root folder of the project (server).
Replace the **`PROVIDE_VALUE`** part between the quotes with your Mongo Atlas connection string obtained earlier:
```bash
flyctl secrets set MONGODB_URI="PROVIDE_VALUE"
```
2. Repeat the process and add any remaining environment variables that you have in your `.env` file such as: `SESSION_SECRET`, `TOKEN_SECRET`, API keys or API configuration strings.
<details style="font-size: 14px; cursor: pointer; outline: none; color: #575d70;">
<summary>Check examples</summary>
<br>
To set the environment variable `SESSION_SECRET` run:
```bash
flyctl secrets set SESSION_SECRET="PROVIDE_VALUE"
```
<hr>
To set the environment variable `TOKEN_SECRET` run:
```bash
flyctl secrets set TOKEN_SECRET="PROVIDE_VALUE"
```
<hr>
To set the environment variables for Cloudinary run:
```bash
flyctl secrets set CLOUDINARY_NAME="PROVIDE_VALUE"
```
```bash
flyctl secrets set CLOUDINARY_KEY="PROVIDE_VALUE"
```
```bash
flyctl secrets set CLOUDINARY_SECRET="PROVIDE_VALUE"
```
<hr>
</details>
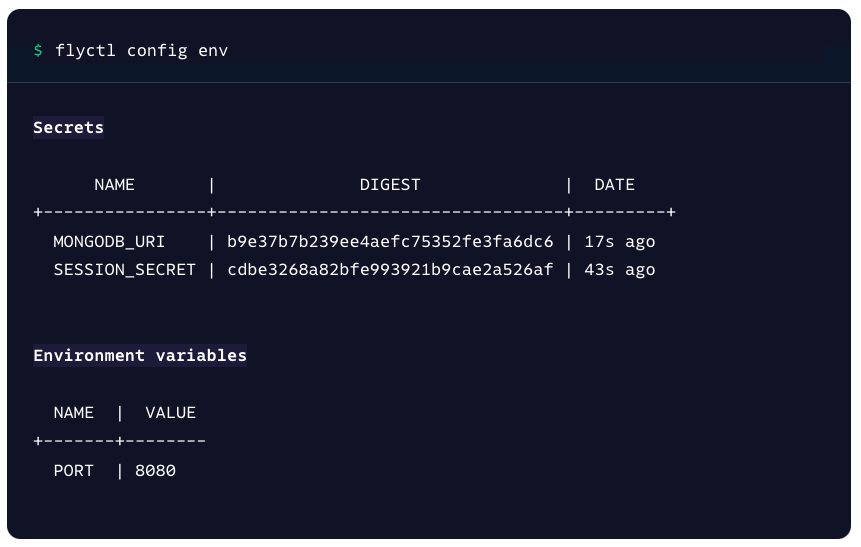
3. You can see a list of set environment variables at any time by running the command:
```bash
flyctl config env
```
**Note:** For security reasons, secret values (*Secrets*) are never displayed as plain-text values. They will be displayed as encrypted strings.
<details style="font-size: 14px; cursor: pointer; outline: none; color: #575d70;">
<summary>Check the visual</summary>
<br>
</details>
3. **IMPORTANT:** There is one additional step **if deploying a full-stack application with separate frontend and backend apps**. You must **configure CORS on the server** to allow requests coming from the frontend app.
First, verify that the CORS options on the server are configured as follows:
```js
app.use(
cors({
origin: ["http://localhost:3000", process.env.ORIGIN],
})
);
```
<br>
Second, set the environment variable `ORIGIN` for the app deployed on Fly:
```bash
flyctl secrets set ORIGIN="FRONTEND_APP_URL"
```
<br>
**Note:** For more information and help with troubleshooting, check: [Secrets and Fly Apps](https://fly.io/docs/reference/secrets/).
<br>
### Step 7 | Viewing Your App
<br>
Once you have successfully deployed your app you can then open it in the browser.
1. Open the terminal and navigate to the root folder of the project (server).
2. From the server root folder run the command:
```bash
flyctl open
```
The URL of the deployed app will be opened in your browser.
<details style="font-size: 14px; cursor: pointer; outline: none; color: #575d70;">
<summary>Check the visual</summary>
<br>

</details>
<br>
### Step 8 | Fly.io Dashboard
Another way for getting the URL of the deployed application is via the Fly.io dashboard.
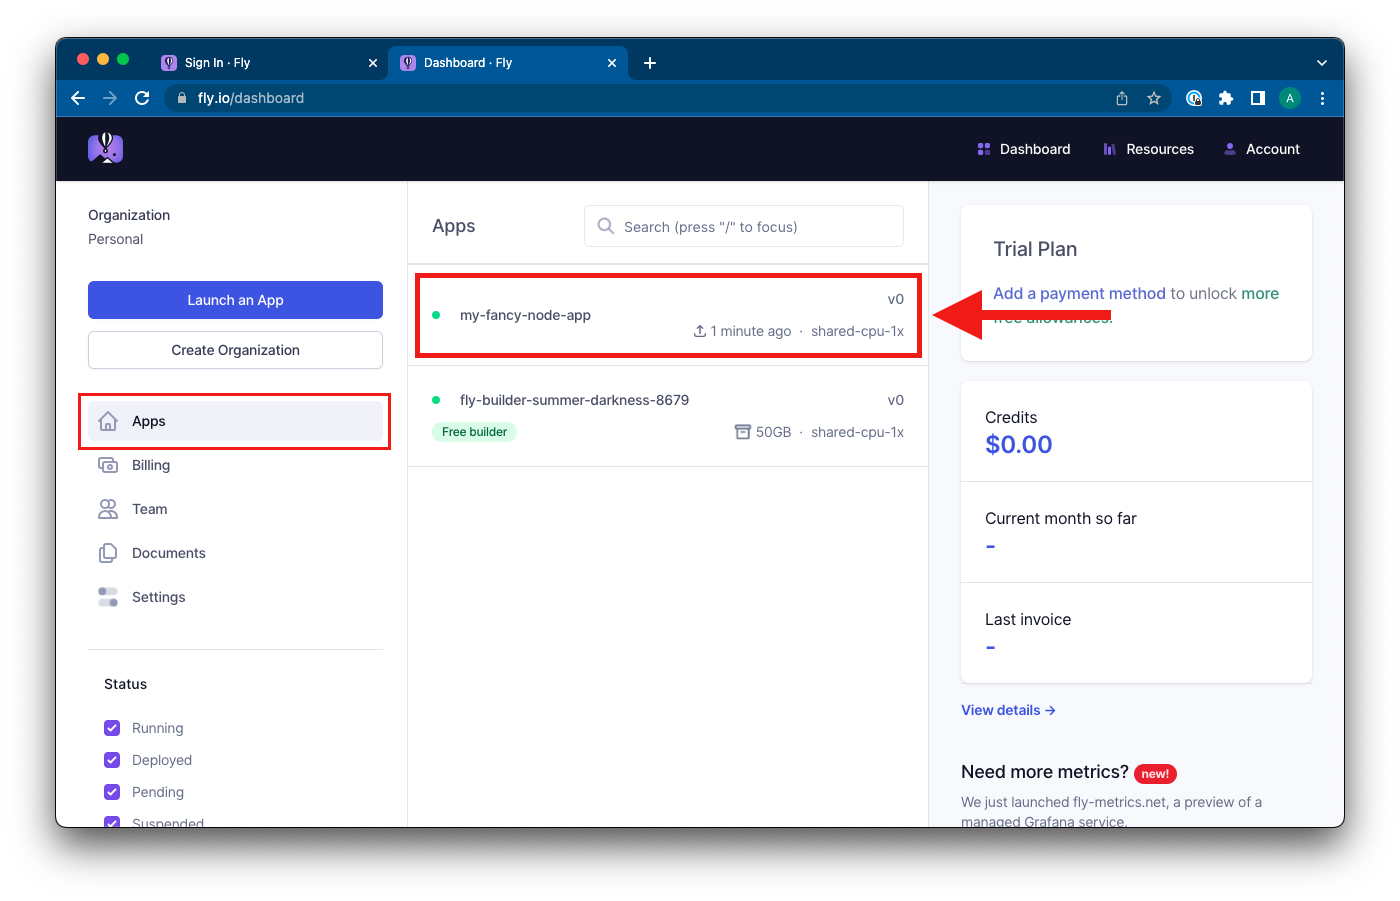
1. Open your Fly.io dashboard by visiting the following link: https://fly.io/dashboard
2. Locate and click on the newly deployed app from the **Apps** section. This will open the application Overview panel.
<details style="font-size: 14px; cursor: pointer; outline: none; color: #575d70;">
<summary>Check the visual</summary>
<br>
</details>
3. In the application **Overview** panel, go to the section **Application Information** and locate the **Hostname** link. This is the URL to your deployed application.
<details style="font-size: 14px; cursor: pointer; outline: none; color: #575d70;">
<summary>Check the visual</summary>
<br>

</details>
<br>
## Troubleshooting Deployment
If there is an error during the deployment, Fly will interrupt the deployment and show an error message in the console. When a deployment fails, Fly will roll back to the last working release of your app.
<br>
### Logs
To troubleshoot deployment errors or when the deployed app is not working as expected, use the `flyctl logs` command. It displays recent logs and leaves the session open for real-time logs to stream in:
```shell
flyctl logs
```
<br>
**Note:** For more details on troubleshooting a failed deployment, check: [Troubleshooting your Deployment](https://fly.io/docs/getting-started/troubleshooting/).
<br>
### Inspect the running instance on Fly
Another useful Fly CLI command is [`flyctl ssh console`](https://fly.io/docs/getting-started/troubleshooting/#inspecting-with-ssh). This command lets you connect to a running instance of your application from the terminal, allowing you to see and access the files deployed in the container. It is particularly useful when debugging deployment errors or running a seeding script.
```bash
# Connect to a running instance of your application on Fly
flyctl ssh console
# List the files
ls
# Open the application folder
cd app
# Close the session
exit
```
<br>
## Summary
In this learning unit, we covered the deployment process of a Node.js backend application with MongoDB Atlas and Fly.io. MongoDB Atlas is a cloud database provider which we used to deploy a database for our backend application. Fly.io is a cloud-based hosting platform that we used to deploy and run our Node.js application.
<br>
## Extra Resources
- [Get Started with Atlas](https://docs.atlas.mongodb.com/getting-started/) - MongoDB Documentation
- [Hands-on with Fly.io](https://fly.io/docs/hands-on/) - Fly.io Documentation
- [Node Quickstart - Fly.io](https://fly.io/docs/languages-and-frameworks/node/) - Fly.io Documentation