---
id: localization
title: Add Multi Language (Localization)
---
## LR Method
- To access the localization, you need to create a key and type the localization of this key.
- Then, you can use this key anywhere in the page with **LR** method.
This method returns the language equivalent of the given key parameter with the current language of the system.
```js
quick.LR(key: string)
```
<img src="https://stechq.github.io/cdn/documentation/studio/Localization1.gif" width="800px" height="auto" />
## Parametric Localization
- Specify the parametric key in the localization definition **in {} characters.**
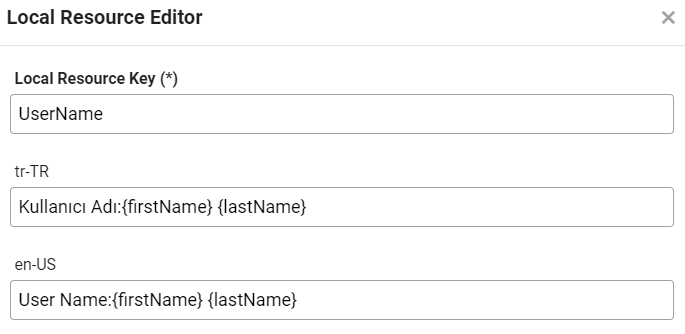
- The values of the parametric keys are specified in the **LR method**.
```js
quick.LR('UserName', { firstName: 'Ahmet', lastName: 'Yıldız' });
```
## Set Language
You can set the system language to given parameter if you add it beforehand in the localization file.
```js
quick.Quick.setLanguage(LRType: string);
```
## Get Language
You can get your default system language value by using the code below.
Your default system language value is **tr-TR**.
```js
quick.Quick.getLanguage();
```
## Localization Types
There are 3 different localization structures:
* **Page Localization** : Localization information that is valid only on the page where it is defined.
* **Global Localization** : Localization information that is valid throughout the entire application.
* **External Localization** : Localization information obtained from an external service or database. External Localization information is added to the Global Localization information.
### Page Localization
You can access it by navigating to the **Localization**, then **Local Resources** menu in the top menu in editor.
You can add, modify and delete new localization. You can also **Export** the Localization information you defined to Excel file and **Import** it from Excel file to Localization.
<img src="https://stechq.github.io/cdn/documentation/studio/Localization1.gif" width="650" height="500" />
<img src="https://stechq.github.io/cdn/documentation/studio/Localization2.gif" width="650" height="500" />
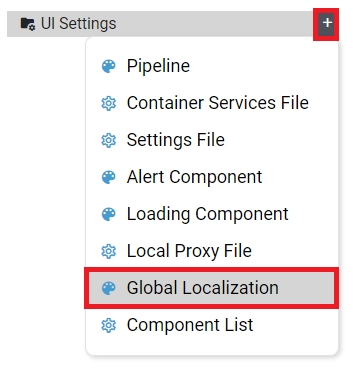
### Global Localization
You can access the **Global Localization** by clicking the **+ button** on the right side of the **UI Settings** module in the **Explorer** tab in **Plateau Studio** and selecting **Global Localization** in the menu that opens.
It is also possible for you to use the localization information you defined in the **Global Localization** page on other pages in your app.
You can also **Export** the Localization information you defined to excel file and **Import** it from excel file to Global Localization.
<img src="https://stechq.github.io/cdn/documentation/studio/Localization3.gif" width="650" height="500" />
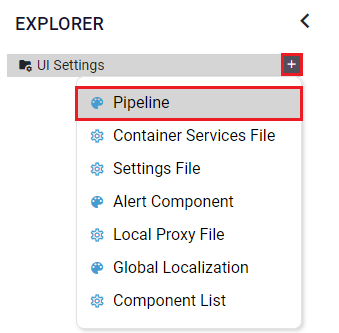
### External Localization
You can access the **Pipeline File** by clicking the **+ button** on the right side of the **UI Settings** module in the **Explorer** tab in **Plateau Studio** and selecting **Pipeline File** in the menu that opens.
:::info
:information_source: **Info**
To interact with Pipeline, you can see **[Pipeline Management](https://docs.onplateau.com/UI-Screens/UI-Settings/pipeline)**
:::
A service call should be made in the **PreRender event of the PageComponent on the Pipeline** to get localization information.
In the **onSuccess event** that will run when your service call is successful, the localization information from the service is added to the Global Localization information with the **quick.importLocalization()** method.
If the language is changed in the application, there is no need to do anything extra. **quick.setLanguage("en-US")** is enough to do.
**overrite = true**: If Global Localization has same key, then overrite it and take external localization value.
**overrite = false**: If Global Localization has same key, then don't take external localization value, ignore it.
**Import Localization parameters as follows:**
```js
quick.importLocalization(langCode:string, localization :Record<string, string>, options: { overrite?:boolean } = {})
```
**Usage Example:**
```js
let langCode = "en-US";
let localization = {
pageTitle: "Page Title:",
pageNumber: "Page Number:",
totalPageCount : "Total Page Count:"
};
let options = { overrite: true };
quick.importLocalization(langCode, localization, options);
```
:::info
:information_source: **Info**
External Localization usege example in **<a href="https://studio.onplateau.com/standAlone/docsEditor/pipeline" target="_blank">Pipeline</a>**
:::
<img src="https://stechq.github.io/cdn/documentation/studio/Localization4.gif" width="650" height="500" />
## Multi Language And ( LTR / RTL )
### Add New Language With ( LTR / RTL )
There are 2 default languages: **tr-TR** and **en-US**. Apart from these languages, you can add new language to your application. You can add and delete the new language from the **Localization**, and then **Add Language** screen in the menu. When adding a new language, you can specify the language's 'Right To Left' or 'Left to Right' property depending on the language.
**You can add languages in 2 ways:**
* You can do it on a page basis. In this case, it will only be valid for the relevant page.
* You can add the **Global Localization** page to the b located in the Explorer window and add, modify and delete new localization here. You can use the localization information you defined in the **Global Localization** page on other pages in your app.
* You can also define the **rootLangCode** value in the **Settings File** like this **( rootLangCode : ar-XA )**. For projects with webSdk integration, you can specify the application rootLangCode in the config definition passed in containerServices **( config.LRType = lang; )** . This value will be the opening language code of the application.
<img src="https://stechq.github.io/cdn/documentation/studio/Localization6.gif" width="650" height="500" />
<br/>
## Samples Qjson
<a href="https://studio.onplateau.com/standAlone/docsEditor/localization_AddLanguageRTL_Sample" target="_blank">localization_AddLanguageRTL_Sample</a>
 Sign in with Wallet
Connect another wallet
Sign in with Wallet
Connect another wallet