---
tags: ML
---
機器學習 入門(X 認識(O 02
===
### 補充
之前講的只有佔一小部分
還有很多演算法是很強大的
然後我發現上一篇的'weight'好像都拼錯,GG
# 複習
### training data
### model
### loss
### feature
### label
# NN
## deep learning
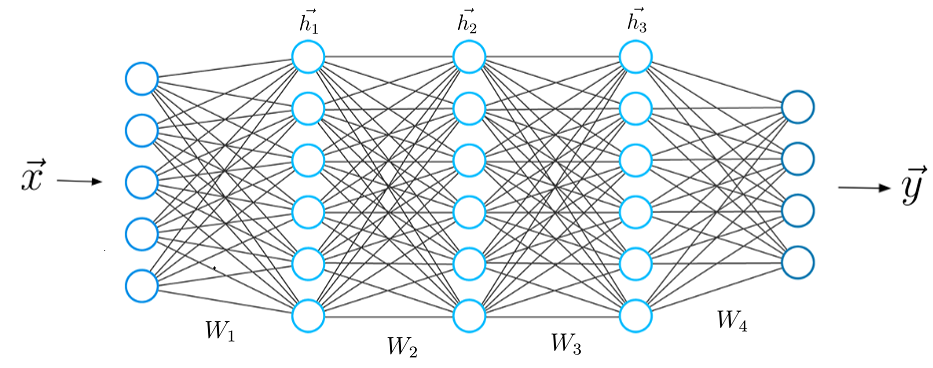
模組化輸出
## node
一個 node 由上一層的輸出作為輸入,然後經由activation function輸出


## activation
想想如果沒有activation
就變成全部相加了,最後的結果會跟一個neural一樣
>hint:線性
簡而言之,Activation Function,就是把計算好了的輸入值standardize 好,規範它的「輸出數值之範圍」,「輸出數值的相互關係」。

### ReLU 如何 fit 出 function?
請看白板->
## back propagation
你可能會想問,這樣是怎麼更新weight
詳細原理我們不解釋,不過你可以想成在最後一層把前面輸入當常數輸入,然後原理就跟之前教的一樣,最後在依據chain rule算前面那層的,依此類推
# classification
概念跟之前差不多
step 0
蒐集資料
step 1
設定model
step 2
設定loss
step 3
更新wight(training)
step 4
評估(testing)
## model
NN
>注意:輸入層必須與x的shape相同(node數和輸入的數字量相同)
>而輸出層也必須注意與lable的shape相同
當然還有別的可以用,不過我們這邊先用NN
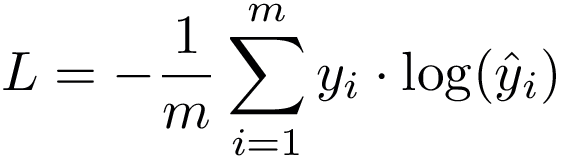
## loss
在這種輸出一種分類的狀況我們常用
cross entropy loss
## cross entropy loss
白板->
# keras
https://keras.io/zh/
keras有點像tensorflow的整合介面,先把他當一個機器學習的模組就好
>注意:輸入值的格式必須要是numpy的array,不能直接用python的list
## 實戰
step 0:import 模組
```python=
import numbers as np
import tensorflow as tf
import matplotlib.pyplot as plt
import keras as kr
from keras.utils import np_utils, plot_model
from keras.layers import Dense, Dropout, Flatten, Conv2D, MaxPool2D
#需要的模組,不過有些沒用到,有可能下節課才會用
```
step 1:載入訓練與測試資料
```python=
def load_data():#
(x_train, y_train), (x_test, y_test) = kr.datasets.mnist.load_data()
y_train = np_utils.to_categorical(y_train)
y_test = np_utils.to_categorical(y_test)
print('feature shape:',x_test.shape,'lable shape:',y_test.shape)
return (x_train, y_train), (x_test, y_test)
(x_train, y_train), (x_test, y_test) =load_data()
```
step 2:輸入層
```python=
model=kr.models.Sequential()
model.add(kr.layers.Reshape((784,),input_shape=(28,28)))#28*28 to 784
```
step 3:隱藏層
```python=
# vvvvv=hidden=vvvvvv
model.add(kr.layers.Dense(30,activation="relu"))
model.add(kr.layers.Dense(30,activation="relu"))
# ^^^^^hidden^^^^^^
```
>Dense:全連接
step 4:輸出層
```python=
model.add(kr.layers.Dense(10,activation="softmax"))
model.compile(optimizer="adam", loss="categorical_crossentropy",metrics=['accuracy'])
```
>softmax:輸出各自的機率,總和為1
>optimizer:先隨便選一個,想認真挑的話我google到[這篇](https://kknews.cc/zh-tw/tech/5ajljgl.html)
step 5:開始訓練
```python=
print('START!')
history=model.fit(x_train,y_train,batch_size=512,epochs=5)
```
>batch_size:更新一次weight所使用的樣本數
>epochs:所有batch被用來訓練的次數
step 6:印出你model的形狀與testing的結果
```python=
model.summary()
print(history.history)
los=model.evaluate(x_test,y_test)
```
step 7:have fun
```python=
from google.colab.patches import cv2_imshow
for i in range(5):
cv2_imshow(x_test[i])
print(model.predict_classes(x_test)[i])
```
# 本日目標
請讓testing set 的正確率越高越好
**加油!**
ps:禁止在訓練時加入testing set
# 問題思考
試著上傳一張28*28的數字圖片讓機器辨識
以下程式碼為將圖片轉換為 符合格式的輸入
```python=
from google.colab import files #匯入套件
import cv2
def get_img(file_name):
img=cv2.imread(file_name,cv2.IMREAD_GRAYSCALE)
dst = 255-img
cv2_imshow(dst)
cv2.waitKey(0)
return (dst.reshape(1,1,28,28))
```
更換圖片就重複執行下面這塊
```python=
upload = files.upload() #開啟上傳介面並載入
aimg=get_img('上船的檔名.png')
print(type(aimg))
print(aimg.shape)
k=model.predict(aimg)
print(k)
k2=model.predict_classes(aimg)
print(k2)
```
準不準?如果不准,可能的原因為何?
ps:其實我也不確定
# 參考
提醒我記得擦白板
還有拍照
https://mropengate.blogspot.com/2017/02/deep-learning-role-of-activation.html
https://chih-sheng-huang821.medium.com/%E6%A9%9F%E5%99%A8-%E6%B7%B1%E5%BA%A6%E5%AD%B8%E7%BF%92-%E5%9F%BA%E7%A4%8E%E4%BB%8B%E7%B4%B9-%E6%90%8D%E5%A4%B1%E5%87%BD%E6%95%B8-loss-function-2dcac5ebb6cb
 Sign in with Wallet
Connect another wallet
Sign in with Wallet
Connect another wallet