---
tags: Linux Kernel
---
# vcam: Linux 虛擬攝影機驅動裝置
contributed by < `kevinshieh0225` >
> [2020 年開發紀錄](https://hackmd.io/@eecheng/B16rQ3GjU) / [GitHub](https://github.com/eecheng87/vcam)
> [2021 年開發紀錄](https://hackmd.io/@WayneLin1992/HkDBmLUDO) / [GitHub](https://github.com/WayneLin1992/vcam)
> [vcam 測試記錄](https://hackmd.io/@bentu/SkUFns9XI?fbclid=IwAR0dip-LYX8zLmaOWMcCdEu5w8fCWPtjBLh9TV7vH0FRQG1jmfNboDlIvI4#%E6%B8%AC%E8%A9%A6-vcam)
> [GitHub](https://github.com/kevinshieh0225/vcam)
## 簡介 Video for Linux 2 (V4L2)
> 分享一下我的學習路徑:以下簡介我會以 [Video for Linux API](https://www.kernel.org/doc/html/v4.9/media/uapi/v4l/v4l2.html#part-i-video-for-linux-api), [The Video4Linux2 API: an introduction](https://lwn.net/Articles/203924/) 兩份文件的脈落為主。
>
> 這兩份文件是以**使用者**(Hardware Abstraction Layer)的角度來介紹 V4L2 的使用,這協助我們掌握 V4L2 的基本特性,但離 driver 開發還有段距離。於是簡介中我會補充 driver 開發的提示。
>
> 在理解 vcam driver 程式碼過程,可以搭配閱讀 [第一章 V4L2 簡介](https://work-blog.readthedocs.io/en/latest/v4l2%20intro.html), [第二章 v4l2 開發框架簡介](https://work-blog.readthedocs.io/en/latest/v4l2%20framework%20intro.html),這兩篇提供在 driver 實作層面上的整體視野。
Video4Linux 是一個視訊擷取及裝置輸出的 Linux 驅動程式框架。隨著影音媒介的演變,從類比電視到數位影音,V4L2 實作的 device 包山包海:video, radio, codec, VBI ,需要處理的技術包含:audio, tuner, moduler, color format, I/O 等等,這些都囊括在 V4L2 當中。V4L2 API 功能繁多而強大,在深入撰寫 vcam 以前必須先了解我們使用的工具。
從使用者角度操作 V4L2 device 的流程為以下:
- Opening the device
- Changing device properties, selecting a video and audio input, video standard, picture brightness a. o.
- Negotiating a data format
- Negotiating an input/output method
- The actual input/output loop
- Closing the device
程式流程不一定照順序,會因 [device interface](https://www.kernel.org/doc/html/v4.9/media/uapi/v4l/devices.html#devices) 而異。
> 為何使用 [negotiate](https://lwn.net/Articles/227533/) 這個詞?因為 I/O 格式可能因為格式協定間的差異而繁多,一個裝置通常無法支援所有格式協定,而需要尋找相容性
>
> [1.11.1. Data Format Negotiation](https://www.kernel.org/doc/html/v4.9/media/uapi/v4l/format.html): Negotiation means the application asks for a particular format and the driver selects and reports the best the hardware can do to satisfy the request.
:::warning
V4L2 在 Linux 系统中的架構如下:

:::
### 1. Registration, Open and Close Devices
`struct video_device` 是我們要使用的 device,必須先註冊才能使用。註冊前需要設定 struct field 詳細文件可見 [1.4. Video device’ s internal representation](https://www.kernel.org/doc/html/v4.13/media/kapi/v4l2-dev.html#video-device-s-internal-representation)。
其中初始化時要設定兩種類型的 field flag。第一種 flag 敘述這是哪一種 device?一個 device 可以從這四個選擇其中之一:
- `VFL_TYPE_GRABBER` indicates a frame grabber device - including cameras, tuners, and such.
- `VFL_TYPE_VBI` is for devices which pull information transmitted during the video blanking interval.
- `VFL_TYPE_RADIO` for radio devices.
- `VFL_TYPE_VTX` for videotext devices.
第二個是敘述這個 device 能做什麼 (capabilities)?一個裝置可以擁有多於一項 capabilities。以下舉例:
- `VID_TYPE_CAPTURE`: the device can capture video data.
- `VID_TYPE_TUNER`: it can tune to different frequencies.
- `VID_TYPE_TELETEXT`: it can grab teletext data.
- `VID_TYPE_OVERLAY`: it can overlay video data directly into the frame buffer.
利用 `video_register_device` 註冊 `video_device *vfd`,`type` 為裝置的類型、功能,`nr` 為註冊的節點號。另外可用 `video_unregister_device` 解除註冊。
```c
int video_register_device(struct video_device *vfd, int type, int nr);
void video_unregister_device(struct video_device *vfd);
```
完成註冊後使用 `open` 開始啟用裝置,用 `release` 釋放裝置。務必使用 `open`、`release` ,如果沒有釋放的話,恐導致其他執行單元錯誤操作了本該釋放的 NULL reference。
裝置可在多處 `open` 進行操作。
:::warning
注意:`open` 與 `release` 是 char device driver 定義的 callback function。driver 在開發時需要滿足 `struct file_operations` 中 `.open`, `.release` 的 struct field。
可參考 [vcam device.c create_vcam_device](https://github.com/kevinshieh0225/vcam/blob/master/device.c#L830) 。
:::
### 2. [`ioctl`](https://lwn.net/Articles/206765/)
在硬體上有許多可以調動的參數,因為複雜的硬體操作,再加上硬體之間各異的運作原理,有一部分的處理硬體會協助完成,如果執意調動硬體參數,可能調用到不支援的模式,恐使的表現低落、或無法運作。故而沒有必要揭露太多底層細節到終端應用程式裡。
透過抽象化,裝置驅動程式實作部份的函式功能,並提供抽象化的介面,讓使用者利用 `ioctl` 與裝置驅動程式進行溝通與使用。
:::warning
注意:`ioctl` 是 char 裝置驅動程式定義的 callback。裝置驅動程式在開發時,需要提供 `struct file_operations` 中 `.unlocked_ioctl` 的 struct field。
:::
以前裝置驅動程式在實作 `ioctl` 的時候功能都集中寫在同一個函式裡,使的函式就像 [Neal Stephenson](https://en.wikipedia.org/wiki/Neal_Stephenson) 的小說一樣長。於是在 [V4L2 2.6.18](https://elixir.bootlin.com/linux/v2.6.25.8/source/drivers/media/video/videodev.c) 版本將 `ioctl` 的功能抽取出來,改為 `ioctl` 成為中介,傳入 [callback function](https://en.wikipedia.org/wiki/Callback_(computer_programming)) 的形式。現在 driver 只需要實作部份的 callback 即可,`ioctl` 會協助在使用者層級和核心之間的溝通。
以 `VIDIOC_QUERYCAP` 為例,這個功能詢問此裝置的 capabilities。終端使用者透過 `ioctl` 向裝置驅動程式詢問:
```c
int ret = ioctl(fd, VIDIOC_QUERYCAP, &cap)
```
在裝置驅動程式端需要定義對應的 callback:
```c
int (*vidioc_querycap)(struct file *file, void *priv,
struct v4l2_capability *cap);
```
- `file` 是描述裝置的 fd,`priv` 是 `file->private_data`,`cap` 是由使用者傳入的指標物件。
- driver 需要將裝置的 capability flags 填入 `cap` 裡,`ioctl` 會協助將內容傳遞給使用者端的 `cap`。
在 [1.9. User Controls](https://www.kernel.org/doc/html/v4.9/media/uapi/v4l/control.html) 可見各種可以調整的 Control IDs 與操作範例。比如 `V4L2_CID_BRIGHTNESS`, `V4L2_CID_CONTRAST`, `V4L2_CID_SATURATION`, `V4L2_CID_HUE`, `V4L2_CID_AUDIO_VOLUME` .etc。
在 [1.13.](https://www.kernel.org/doc/html/v4.9/media/uapi/v4l/crop.html#image-cropping-insertion-and-scaling) [1.14.](https://www.kernel.org/doc/html/v4.9/media/uapi/v4l/selection-api.html#api-for-cropping-composing-and-scaling) 提及如何進行影格 (frame) 上的擷取、內插、縮放等操作。
:::warning
注意:以下將介紹的 callback 包括 `vidioc_querycap` 都是與 `struct video_device` 關聯的 callback。裝置驅動程式在開發時需要定義 `struct v4l2_ioctl_ops` 中對應的 struct field。
可以參考 [`vcam/device.c`](https://github.com/kevinshieh0225/vcam/blob/master/device.c) 的實作
[v4l2 control](https://www.kernel.org/doc/html/v4.9/media/kapi/v4l2-controls.html) 的實作則抽離於 `v4l2_device` 成為獨立的框架。在 vcam 中並未實作 v4l2 control ,可參考 [`akvcam/control.c`](https://github.com/webcamoid/akvcam/blob/master/src/controls.c)
:::
### 3. [Inputs and Outputs](https://lwn.net/Articles/213798/)
不同裝置驅動程式有不同的 inputs 與 outputs 的介面,比如一個 camera 裝置可能主要以 camera 介面為主,然而 TV card 可能提供數個不同規格與服務的介面。為了能正確的對應 inputs 與 outputs,V4L2 提供 inputs/outputs 各三種函式讓使用者用。
#### Video standards
在連結前需要先確保裝置是否提供能與我們 I/O 相容的規格與服務。
* `VIDIOC_ENUMSTD` 詢問裝置使用的規格標準。
* `VIDIOC_G_STD` 詢問目前可用的規格有哪些。
* `VIDIOC_S_STD` 用以選擇特定的規格。
如果想進一步知道裝置在 inputs 上看到的是或正在套用什麼規格?可以用 `VIDIOC_QUERYSTD` 來確認。
#### Inputs/Outputs
這裡以 Input 的部份來說明:
使用 `VIDIOC_ENUMINPUT` 來取得可用的輸入介面資訊。
```c
int (*vidioc_enum_input)(struct file *file, void *private_data,
struct v4l2_input *input);
```
`file` 是裝置、`private_data` 是 driver 設定的內容、我們有興趣的資訊會從 `input` 傳出。這邊我們來看一下 `v4l2_input` 的 field:
- `__u32 index`: 我們有興趣的 index number inputs。使用者需要自己填入此欄,device 會從這個 index 開始列舉可用的輸入介面。
- `__u8 name[32]` 裝置名稱
- `__u32 type` 如 `V4L2_INPUT_TYPE_CAMERA` `V4L2_INPUT_TYPE_TUNER`
- `__u32 audioset` 此輸入介面對應的 audio 裝置
- `__u32 tuner` 如果這個 input 是 tuner,回傳在 tuner device 上的 index。
- `v4l2_std_id` 支援的標準
- `__u32 status` no power, no signal, no synchronization lock 等
`VIDIOC_G_INPUT` 詢問目前可用的 input index。
`VIDIOC_S_INPUT` 使用者主動更換 input index 介面。
使用範例可見 [1.4. Video Inputs and Outputs](https://www.kernel.org/doc/html/v4.9/media/uapi/v4l/video.html#video-inputs-and-outputs)
### 4. [Colors and Formats](https://lwn.net/Articles/218798/)
colorspace 是表達色彩的座標空間。V4L2 定義許多不同[色彩空間](https://www.kernel.org/doc/html/v4.9/media/uapi/v4l/pixfmt-006.html),其中最廣泛使用的為:
- `V4L2_COLORSPACE_SRGB`: RGB tuples,也可以與 [YUV](https://zh.m.wikipedia.org/zh-tw/YUV) 座標系做轉換。
- `V4L2_COLORSPACE_SMPTE170M` 在 NTSC / PAL 電視訊號的類比色彩表達
以下我們針對 sRGB 進一步討論。
#### Packed and planar
我們常見以兩種 tuple 方式來儲存與表達色彩資訊:
- packed:將 pixel 的資訊存放在一起。比如以 RGB pixel 組成最基本維度資訊。
- planar:將色彩空間分成不同的矩陣存儲。比如 YUV 通常會將頻道個別儲存。
#### [Single- and multi-planar](https://www.kernel.org/doc/html/v4.13/media/uapi/v4l/planar-apis.html#single-and-multi-planar-apis)
影格儲存方式也影響了 memory buffer 的使用。single-planar 意思是只使用一個 memory address 、一個連續的空間來表達一張影格。而 multi-planar 使用多個不連續的 memory buffer 來表達一張影格。(a memory address point per "plane")
[single-planar format](https://www.kernel.org/doc/html/v4.13/media/uapi/v4l/pixfmt-002.html#single-planar-format-structure) 和 [multi-planar format](https://www.kernel.org/doc/html/v4.13/media/uapi/v4l/pixfmt-003.html#multi-planar-format-structures) 可見文件。其中 multi-planar API 可相容於 single-planar format,但 single-planar API 不可使用 multi-planar format。
在 V4L2 中 multi planar format 會以 [fourCC](https://en.wikipedia.org/wiki/FourCC) 的格式表達,這個格式使用四個 ASCII codes 組成,方便人們理解閱讀。
#### RGB / YUV Format
越多位元能夠表達越豐富的色彩資訊,卻更佔用存取上的資源。因應這樣的取捨而產生許多不同的色彩格式。
其中可以注意到在 RGB 格式中,G 時常會用更多的位元來表達,因為人眼對綠色的敏感度較高,這件事也可以在[光傳感元件](https://zh.m.wikipedia.org/zh-tw/%E6%8B%9C%E7%88%BE%E6%BF%BE%E8%89%B2%E9%8F%A1)發現。
另外 YUV 的 Y 頻道也通常使用較多位元做表達,因為人眼對於亮度的敏感度是高於彩度的。
##### packed:


##### planar:
`V4L2_PIX_FMT_YUV422`, fourcc 422P

另外也可見 `V4L2_PIX_FMT_YUV420`, `V4L2_PIX_FMT_YUV410`。
### 5. frame I/O and streaming I/O
> [Video4Linux2 part 6a: Basic frame I/O](https://lwn.net/Articles/235023/)
> [Video4Linux2 part 6b: Streaming I/O](https://lwn.net/Articles/240667/)
> [3. Input/Output - The Linux Kernel Document](https://www.kernel.org/doc/html/v4.9/media/uapi/v4l/io.html#input-output)
在一切就緒,終於要開始傳輸影格資訊了。
最簡單的 frame I/O 即是使用 `read()` 和 `write()` 系統呼叫。但這種用法並非 V4L2 的規範用法,端看裝置驅動程式在實作上是否支援。另外有些 driver 實作的 `read()` `write()` 支援 DMA mapping ,否則會需要複製的方式搬運影格資料。
:::warning
注意:`read` 與 `write` 是 char 裝置驅動程式定義的 callback。driver 在開發時可滿足 `struct file_operations` 中 `.read`, `.write` 的 struct field。
:::
如果硬體支援 streaming I/O,則不需要複製資料,而是會以指標映射的方式傳遞資料訊息。
以下介紹三種 streaming I/O buffer:
- [Memory-mapped buffers](https://www.kernel.org/doc/html/v4.9/media/uapi/v4l/mmap.html#streaming-i-o-memory-mapping) `V4L2_MEMORY_MMAP`:are allocated in kernel space; the application maps them into its address space with the mmap() system call. The buffers can be large, contiguous DMA buffers, virtual buffers created with vmalloc(), or, if the hardware supports it, they can be located directly in the video device's I/O memory.
- [User-space buffers](https://www.kernel.org/doc/html/v4.9/media/uapi/v4l/userp.html#streaming-i-o-user-pointers) `V4L2_MEMORY_USERPTR`:are allocated by the application in user space. Clearly, in this situation, no mmap() call is required, but the driver may have to work harder to support efficient I/O to user-space buffers.
- [DMA buffer importing](https://www.kernel.org/doc/html/v4.9/media/uapi/v4l/dmabuf.html#streaming-i-o-dma-buffer-importing) `V4L2_MEMORY_DMABUF`:The DMABUF framework provides a generic method for sharing buffers between multiple devices. Device drivers that support DMABUF can export a DMA buffer to userspace as a file descriptor (known as the exporter role), import a DMA buffer from userspace using a file descriptor previously exported for a different or the same device (known as the importer role), or both.
關於 [framebuffer](https://hackmd.io/m0smYNXRSO2z6xTg1BG4bA?both#%E7%B0%A1%E4%BB%8B-framebuffer) 的介紹可以看下一章節。
可以利用 `VIDIOC_QUERYCAP` 來詢問是否支援 streaming I/O `V4L2_CAP_STREAMING`。
利用 `VIDIOC_REQBUFS` 來設定 streaming I/O 的方式:`V4L2_MEMORY_MMAP` 、 `V4L2_MEMORY_USERPTR` 或是 `V4L2_MEMORY_DMABUF`。
兩種 streaming I/O 的實作可以參考
- [3.2. Streaming I/O (Memory Mapping)](https://www.kernel.org/doc/html/v4.9/media/uapi/v4l/mmap.html#streaming-i-o-memory-mapping)
- [3.3. Streaming I/O (User Pointers)](https://www.kernel.org/doc/html/v4.9/media/uapi/v4l/userp.html#streaming-i-o-user-pointers)
- [3.4. Streaming I/O (DMA buffer importing)](https://www.kernel.org/doc/html/v4.9/media/uapi/v4l/dmabuf.html#streaming-i-o-dma-buffer-importing)
## 簡介 framebuffer
> [Frame Buffer - Linux Kernel Documentation](https://www.kernel.org/doc/html/latest/fb/index.html)
> [What is Frame Buffer](https://ecomputernotes.com/computer-graphics/basic-of-computer-graphics/what-is-frame-buffer)
> [Platform Integration Aspects: Framebuffer Concepts](https://doc.embedded-wizard.de/framebuffer-concepts?v=11.00)
framebuffer 是 video RAM 當中的一個部份,作為記憶體到裝置顯示的中間緩衝區,從實體記憶體將影格色彩像素資訊虛擬映射到 buffer,藉由硬體顯示控制器,成像在顯示裝置上。
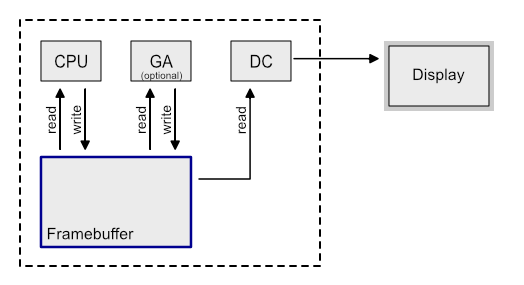
在 Linux Kernel 透過 API 讓使用者不用知道底層實體記憶體操作的細節,而可以透過操作 framebuffer 來讀寫顯示資訊。(不過 vcam driver 有自己註冊與實作 fb device。)
linux frame buffer device 可以在 `/dev/fb*` 中查看:
```
0 = /dev/fb0 First frame buffer
1 = /dev/fb1 Second frame buffer
...
31 = /dev/fb31 32nd frame buffer
```
軟體預設使用 `/dev/fb0`,如果電腦上偵測到顯示裝置,那麼裝置上便可額外偵測到對應的 fb 裝置。(在 vcam 中 有自己註冊 fb device)
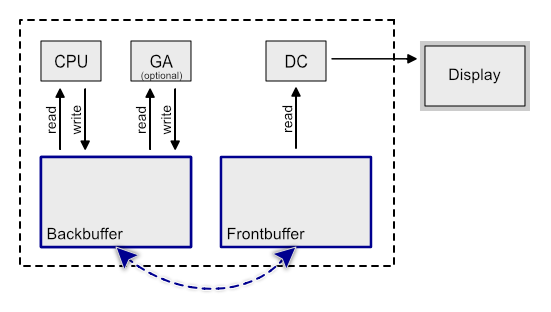
### Double-buffered Framebuffer
使用 single framebuffer 會出現一個問題:當我們在玩動作遊戲、或是播放一部電影時,如果 framebuffer 還沒填充完全時就被顯示,那麼可能導致 tearing effect 。

許多與顯示處理相關的專案包含 vcam 的實作裡使用了 double buffering 的技巧:先在 back buffer 準備資料填充,完成時和 front buffer 做 [page flipping](https://en.wikipedia.org/wiki/Multiple_buffering#Double_buffering_in_computer_graphics),讓 display 總是使用已經準備完全的 frontbuffer 的資料。透過 [VSync](https://www.digitaltrends.com/computing/what-is-vsync/) 限制並確保操作與顯示之間的同步率。
## 相關專案 [akvcam](https://github.com/webcamoid/akvcam)

圖中示意了 akvcam 核心模組做了什麼:我們可以透過多媒體框架將影片或串流傳入 output device 以進行輸出,capture device 接收另一端輸出的資訊,然後我們可以透過播放器觀看 capture device 擷取的影音串流。
### Streaming Example
從專案的 [wiki](https://github.com/webcamoid/akvcam/wiki) 文件有使用的教學:
```shell
$ git clone https://github.com/webcamoid/akvcam.git
$ cd akvcam/src
$ make
$ sudo make dkms_install # 利用 "動態核心模組支援" 的進行管理,非必要
```
在掛載模組前準備需要的 config file,從 module.c 可見預設存址為 `/etc/akvcam/config.ini`,我們在對應位址新增檔案(config [參考文件](https://github.com/webcamoid/akvcam/wiki/Configure-the-cameras#defining-the-devices))。
隨後我們掛載模組,即可在 `/dev/` 看到掛載的 output device 和 capture device。
> [insmod / rmmod](https://eng.libretexts.org/Bookshelves/Computer_Science/Operating_Systems/Linux_-_The_Penguin_Marches_On_(McClanahan)/06%3A_Kernel_Module_Management/2.05%3A_Kernel_Module_Management_-_lsmod_Command/2.05.01%3A_Kernel_Module_Management_-_insmod_Command) and [modprobe / depmod](https://eng.libretexts.org/Bookshelves/Computer_Science/Operating_Systems/Linux_-_The_Penguin_Marches_On_(McClanahan)/06%3A_Kernel_Module_Management/2.05%3A_Kernel_Module_Management_-_lsmod_Command/2.05.02%3A_Kernel_Module_Management_-_modprobe_Command)
```bash
$ sudo modprobe videodev
$ sudo insmod akvcam.ko
$ ls /dev/ | grep video
videoX
videoY
```
這裡我使用了 [sample_640x360.webm](https://filesamples.com/samples/video/webm/sample_640x360.webm) 的影音為例:
```shell
$ ffmpeg -i {video path} -s 640x360 -r 30 -f v4l2 -vcodec rawvideo -pix_fmt rgb24 /dev/videoX
```
在同一時間開啟另一個終端機執行:
```shell
$ ffplay /dev/videoY
```
> (X,Y 請根據 config file 設定的 `cameras/1/videonr` 數字而定)
### [Device attributes](https://github.com/webcamoid/akvcam/wiki/Device-attributes)
文件中有提到可以改變 ouput/capture device 的屬性,關於屬性可以在 `/sys/devices/virtual/video4linux/videoX/controls` 看到:
```shell
$ ls /sys/devices/virtual/video4linux/videoX/controls
brightness colorfx contrast hflip modes vflip
broadcasters connected_devices gamma hue saturation
```
我們可以用 `cat` 觀看屬性數值;如果要改變裝置屬性,可以首先修改存取權限後,透過 `echo` 傳入數值:
```shell
$ sudo chmod 777 /sys/devices/virtual/video4linux/videoX/controls/brightness
$ sudo echo 10 > /sys/devices/virtual/video4linux/video9/controls/brightness
```
## vcam driver 理解
由於專案相對複雜,這邊以 UML 畫出檔案與函式之間的關係:
> [vcam UML](https://drive.google.com/file/d/1nrHRLEDjxzj0A-2FXsejBtKd89Ouy7-I/view?usp=sharing)

- `module.c` 掛載與卸載核心模組。
- `control.h/c` 宣告 `struct control_device *ctldev` 來管理 `vcam_device`。註冊 [Character device drivers](https://linux-kernel-labs.github.io/refs/heads/master/labs/device_drivers.html) 並將 `cdev` 關聯進 `ctldev` 結構體中。執行期間建立 kthread 來處理各自的 `vcam_device`。
- `device.h/c` 註冊 `video_device` 和 `fb_info`。在註冊 `video_device` 時也須一同定義 `struct v4l2_file_operations` 和 `struct v4l2_ioctl_ops`
- `fb.h/c` 為 framebuffer 的實作。
- `videobuf.h/c` 為 video input/output buffer/queue 的實作。
- `vcam.h` 定義 `struct vcam_device_spec` 的規格,比如長寬、videodev 節點編號、fb 節點編號、使用的 `pixfmt_t` 等。
- 一旦核心裝置掛載,使用者可以透過 `vcam-util.c` 來與 driver 其下的 vcam_device 進行溝通。
專案中許多核心模組([cdev](https://linux-kernel-labs.github.io/refs/heads/master/labs/device_drivers.html), [v4l2](https://www.kernel.org/doc/html/v4.9/media/uapi/v4l/v4l2.html), [fb](https://www.kernel.org/doc/html/latest/fb/index.html)) 要求滿足特定 struct field 中的 member, flag 與 callback。這是一種抽象化的技巧,核心模組包裝底層實作細節,由上層負責對應部份的函式實作。
在深入探討 vcam driver 時,可以對應參考 v4l2 的架構圖:

### `module.c`
核心模組掛載的程式碼。`module_param` 來傳入模組的初始設定:
- `devices_max` 裝置量上限
- `create_devices` 初始建立的裝置數(`vcam_device` 數量)
- `allow_pix_conversion`, `allow_scaling`, `allow_cropping`
### `control.h/c`
#### `struct control_device`
vcam 提供使用者建立一個以上的 `vcam_device`。透過 `struct control_device` 來管理這些裝置。可見結構體中使用間接指標 `vcam_device`,即是紀錄多個 `vcam_devices`,`size_t vcam_device_count` 是裝置數量。
```c
struct control_device {
int major;
dev_t dev_number;
struct class *dev_class;
struct device *device;
struct cdev cdev;
struct vcam_device **vcam_devices;
size_t vcam_device_count;
spinlock_t vcam_devices_lock;
};
static struct control_device *ctldev = NULL;
```
- `device` 和 `class` 分別為註冊核心裝置與核心裝置的類別。可見 [Linux Device Model](https://linux-kernel-labs.github.io/refs/heads/master/labs/device_model.html#) 的介紹。
- `struct cdev cdev` 是 char device。透過 `cdev_init` 關聯 `file_operations` 以建立。
- 在 vcam 多處可見 `spinlock_t` 的使用,如 `control_device`, `vcam_device` 結構體中,而多處程式碼也可見 `spin_lock_irqsave` 與 `spin_unlock_irqrestore` 的使用。spinlock 提供鎖擁有者不被中斷的保證,詳細介紹可見 [Linux 核心設計: 多核處理器和 spinlock](https://hackmd.io/@sysprog/multicore-locks?type=view#%E6%A0%B8%E5%BF%83%E5%90%8C%E6%AD%A5%E6%A9%9F%E5%88%B6%E5%BE%9E-spinlock-%E9%96%8B%E5%A7%8B)。
### `device.h/c`
註冊 `video_device` 也須定義 `.fops`, `.ioctl_ops`。當中可以看到部份的 callback function 可從其他模組中引入,而一些函式則需要自己定義:
```c
static const struct video_device vcam_video_device_template = {
.fops = &vcam_fops,
.ioctl_ops = &vcam_ioctl_ops,
// #include <media/v4l2-device.h>
.release = video_device_release_empty,
};
static const struct v4l2_file_operations vcam_fops = {
.owner = THIS_MODULE,
// #include <media/v4l2-fh.h>
.open = v4l2_fh_open,
// #include <media/videobuf2-v4l2.h>
.release = vb2_fop_release,
.read = vb2_fop_read,
.poll = vb2_fop_poll,
.mmap = vb2_fop_mmap,
// #include <media/v4l2-ioctl.h>
.unlocked_ioctl = video_ioctl2,
};
static const struct v4l2_ioctl_ops vcam_ioctl_ops = {
// driver specify callback function
.vidioc_querycap = vcam_querycap,
...
.vidioc_enum_framesizes = vcam_enum_framesizes,
// #include <media/videobuf2-v4l2.h>
.vidioc_reqbufs = vb2_ioctl_reqbufs,
...
.vidioc_streamoff = vb2_ioctl_streamoff
};
```
最後 `device.c` 定義了以下主要的功能函式:
- `submitter_thread` 持續顯示 video capture device 的接收幀資訊直到 kthread 終止。
- 色彩空間轉換:`rgb24_to_yuyv`, `yuyv_to_rgb24`, `yuyv_to_rgb24_one_pix`
- 預設顯示黑白漸層:`submit_noinput_buffer`
- 縮放功能:`copy_scale`, `copy_scale_rgb24_to_yuyv`, `copy_scale_yuyv_to_rgb24`, `convert_rgb24_buf_to_yuyv`, `convert_yuyv_buf_to_rgb24`,
- IOstream 輸出 buffer 資訊:`submit_copy_buffer`
- `create_vcam_device` 註冊與建立裝置、透過 `fill_v4l2pixfmt` 設定 input/output fmt、一切就緒後執行 `submitter_thread`。
- `destroy_vcam_device` 註銷裝置。
### `fb`, `videobuf`
> [The videobuf2 API - LWN.net](https://lwn.net/Articles/447435/)
> [The videobuf2 API - 立你斯學習記錄](https://b8807053.pixnet.net/blog/post/9856492)
> [V4L2框架-videobuf2](https://www.twblogs.net/a/5b8e11b52b7177188342a873)
`fb.h/c` 將 framebuffer device 註冊在 `/proc/vcamfbX`;`videobuf.h/c` 實作 1. vcam input buffer/queue 的實作 2. vcam output videobuffer2 的註冊。這兩個專案緊密關聯。
- 以使用者的視角:將待顯示的影格資訊傳入 `/proc/vcamfbX`,而後透過播放器檢視 `/dev/videoX`,可以看到預期的影像。
- 從 vcamfb device 的視角:
> 資訊傳入 vcamfb 裝置時,將執行 `vcam_fb_write`: vcamfb 使用 `copy_from_user` 從 userspace 將資料複製到 kernelspace,並填補 `vcam_in_buffer` 的資料。`vcam_in_queue` 採 doublebuffer 的策略,填補完成時執行 `swap_in_queue_buffers`,互換 pending 與 ready 的 `vcam_in_buffer`。
- 從 vcam device 的視角:
> `vcamfb` 填補了 `vcam_in_buffer`。當 vcam 在核心執行緒發起 `submitter_thread` 任務期間,`submit_copy_buffer` 將 `vcam_in_buffer` 的資訊傳入 `vcam_out_buffer`(其中會確保 scaling, pix_fmt 格式),最後播放器從 `vb2_queue`(對應為 vcam 中的 output buffer)確認擷取 streaming 的資訊並播放影格資訊。
## 使用 `vcam`
參考 [vcam 測試記錄](https://hackmd.io/@bentu/SkUFns9XI) 寫一段持續變化的單色畫面輸出(目前 `vcam` 版本已不支援 proc 了,改成 `open`, `write` `/dev/fb1`,另外增加 signal interupt 的回呼函式來順利 `close` fd):
```c
#include <fcntl.h>
#include <stdlib.h>
#include <signal.h>
#include <sys/ioctl.h>
#include <unistd.h>
static char fb_path[128] = "/dev/fb1";
static int fd;
void signal_exit_handler(int sig)
{
close(fd);
exit(0);
}
int main()
{
signal(SIGINT, signal_exit_handler);
fd = open(fb_path, O_RDWR);
unsigned char rgb[3] = {10, 60, 128};
while (1) {
for (int i = 0; i < 480; i++) {
for (int j = 0; j < 640; j++) {
write(fd, rgb, sizeof(rgb));
}
}
for (int i = 0; i < 3; i++) {
rgb[i]++;
}
}
return 0;
}
```
另外亦可參考 `eecheng` [撰寫能在 video 開啟指定圖片的功能](https://hackmd.io/@eecheng/B16rQ3GjU#%E6%92%B0%E5%AF%AB%E8%83%BD%E5%9C%A8-video-%E9%96%8B%E5%95%9F%E6%8C%87%E5%AE%9A%E5%9C%96%E7%89%87%E7%9A%84%E5%8A%9F%E8%83%BD)。
目前 vcam 裝置預期的行為如下:
#### normal mode
建立 `fb->video` 的裝置組合。可透過 `vcam-util -m` 來調整 input format,然而不會變更 output format,於是在 input/output 間進行變形以符合對接。
#### allow_scaling=1
可透過 `vcam-util -m` 來調整 input format,而 vlc 在開啟時會從 `VIDEOC_G_FMT` 和 `VIDEOC_ENUM_FRAMESIZES` 取得 input fmt,使用 `VIDEOC_S_FMT` 來變更 ouput format,並透過 videobuf 使用輸出的資訊。
行為上透過 `-m` 改變 input format(注意此時的 output fmt/vcamfb info 並未更改),在開啟 vlc 播放器時因應 input format 做變更,讓我們得以改變輸出影像的解析度。
#### allow_cropping=1
影像輸出擷取的上左半部畫面(原圖的 0.75)。此模式不提供更變輸出解析度的大小。
## 開發紀錄 `1`: 通過 [`v4l2-compliance`](http://manpages.ubuntu.com/manpages/focal/man1/v4l2-compliance.1.html) 相容性測試
[v4l2-compliance](http://manpages.ubuntu.com/manpages/focal/man1/v4l2-compliance.1.html) 是測試 v4l2 裝置的測試工具。包括 video, radio, vbi 等介面都可以使用此工具來測試其 I/O 是否符合 v4l2 規範。
確認 vcam 專案是否通過測試:
```shell
$ sudo v4l2-compliance -d /dev/videoX -f
```
參數說明:
> `-f`, `--stream-all-formats` [<`count`>]
> Test streaming all available formats.
> This attempts to stream using MMAP mode or read/write for one second for all formats, at all sizes, at all intervals and with all field values. If <`count`> is given, then stream for that many frames instead of one second.
在 vcam 的測試結果如下:
```
Driver Info:
Driver name : vcam
Card type : vcam
Bus info : platform: virtual
Driver version : 5.13.19
Capabilities : 0x85200001
Video Capture
Read/Write
Streaming
Extended Pix Format
Device Capabilities
Device Caps : 0x05200001
Video Capture
Read/Write
Streaming
Extended Pix Format
...
Format ioctls (Input 0):
test VIDIOC_ENUM_FMT/FRAMESIZES/FRAMEINTERVALS: OK
fail: v4l2-test-formats.cpp(1229): node->has_frmintervals && !cap->capability
test VIDIOC_G/S_PARM: FAIL
...
Buffer ioctls (Input 0):
fail: v4l2-test-buffers.cpp(715): q.create_bufs(node, 1, &fmt) != EINVAL
test VIDIOC_REQBUFS/CREATE_BUFS/QUERYBUF: FAIL
...
Stream using all formats:
test MMAP for Format RGB3, Frame Size 640x480@59.94 Hz:
Stride 1920, Field None: OK
test MMAP for Format RGB3, Frame Size 640x480@1.00 Hz:
Stride 1920, Field None: OK
Total for vcam device /dev/video2: 46, Succeeded: 44, Failed: 2, Warnings: 0
```
有兩項測試並未通過。由於測試工具的版本不斷更新,通常發行版本和最新版本不同,可以從 [git.linuxtv.org](https://git.linuxtv.org/v4l-utils.git/about/) 去追溯使用版本的原始碼。
比如我的 `v4l2-utils` 的版本是 1.18.0-2build1,到對應測試版本尋找原始碼 [utils/v4l2-compliance](https://git.linuxtv.org/v4l-utils.git/tree/utils/v4l2-compliance?h=v4l-utils-1.18.1)。
### test `VIDIOC_G/S_PARM`: FAIL
```
Format ioctls (Input 0):
fail: v4l2-test-formats.cpp(1229): node->has_frmintervals && !cap->capability
test VIDIOC_G/S_PARM: FAIL
```
在 [`utils/v4l2-compliance/v4l2-test-formats.cpp`](https://git.linuxtv.org/v4l-utils.git/tree/utils/v4l2-compliance/v4l2-test-formats.cpp?h=v4l-utils-1.18.1#n1229) 可見我們測試錯誤的程式。
```c
fail_on_test(node->has_frmintervals && !cap->capability);
```
v4l2-compliance 中使用 `fail_on_test` 測試是否符合預期輸出,該巨集定義於 [`utils/v4l2-compliance/v4l2-compliance.h`](https://git.linuxtv.org/v4l-utils.git/tree/utils/v4l2-compliance/v4l2-compliance.h?h=v4l-utils-1.18.1#n236):
```c
#define fail_on_test(test) \
do { \
if (test) \
return fail("%s\n", #test); \
} while (0)
```
回到判斷式:`node->has_frmintervals` 和 `!cap->capability` 不可同時為 1。`node->has_frmintervals` 可從 [testEnumFrameIntervals](https://git.linuxtv.org/v4l-utils.git/tree/utils/v4l2-compliance/v4l2-test-formats.cpp?h=v4l-utils-1.18.1#n53) 的測試函式觀察到預期結果為 `True` 。而我們在 vcam 的 [`VIDIOC_G/S_PARM`](https://www.kernel.org/doc/html/v4.13/media/uapi/v4l/vidioc-g-parm.html#ioctl-vidioc-g-parm-vidioc-s-parm) 設定 `cap->capability = V4L2_CAP_TIMEPERFRAME` ,於是 `!cap->capability` 預期為 0,但在測試中卻出現相反的結果。
:::info
[`VIDIOC_ENUM_FRAMEINTERVALS`](https://www.kernel.org/doc/html/v4.9/media/uapi/v4l/vidioc-enum-frameintervals.html#ioctl-vidioc-enum-frameintervals)。這個回呼函式定義支援的 [frame intervals](https://securitycamcenter.com/i-frame-interval-security-camera-systems/) 類型:常見的壓縮後影片不會存儲每一幀資訊,而以 I-frame 和 I-frame interval (P,B frame) 來存儲。interval frame 比較 I-frame 的資訊,只紀錄動態變化的像素與方向。
文件中定義:
> Discrete: The function returns success if the given index value (zero-based) is valid. The application should increase the index by one for each call until EINVAL is returned. The v4l2_frmivalenum.type field is set to `V4L2_FRMIVAL_TYPE_DISCRETE` by the driver.
>
> Step-wise: The function returns success if the given index value is zero and EINVAL for any other index value. The v4l2_frmivalenum.type field is set to `V4L2_FRMIVAL_TYPE_STEPWISE` by the driver.
在 vcam 中使用 `V4L2_FRMIVAL_TYPE_STEPWISE` 的類型。
:::
提交紀錄: [sysprog21#19](https://github.com/sysprog21/vcam/pull/19)
### test `VIDIOC_REQBUFS/CREATE_BUFS/QUERYBUF`: FAIL
```
Buffer ioctls (Input 0):
fail: v4l2-test-buffers.cpp(715): q.create_bufs(node, 1, &fmt) != EINVAL
test VIDIOC_REQBUFS/CREATE_BUFS/QUERYBUF: FAIL
```
是來自 [ioctl VIDIOC_CREATE_BUFS](https://www.kernel.org/doc/html/v4.17/media/uapi/v4l/vidioc-create-bufs.html#ioctl-vidioc-create-bufs) 的錯誤。測試程式可見於 [utils/v4l2-compliance/v4l2-test-buffers.cpp](https://git.linuxtv.org/v4l-utils.git/tree/utils/v4l2-compliance/v4l2-test-buffers.cpp?h=v4l-utils-1.18.1#n715)。可以注意到的是,`vidioc_create_buf` 的錯誤是在某一次執行測試才出錯的,於是須特別注意是在什麼情形下導致失敗:
```c
fmt.s_height(fmt.g_height() / 2);
for (unsigned p = 0; p < fmt.g_num_planes(); p++)
fmt.s_sizeimage(fmt.g_sizeimage(p) / 2, p);
fail_on_test(q.create_bufs(node, 1, &fmt) != EINVAL);
```
這裡的意思是:如果輸入的 `v4l2_format` 有誤,`CREATE_BUFS` 應該回傳錯誤 `EINVAL`,但在我們的程式碼中並未回傳錯誤。
在我們的 `v4l2_ioctl_ops.vidioc_create_bufs` 是使用 `media/v4l2-core/videobuf2-v4l2.c` 定義的 [`vb2_ioctl_create_bufs`](https://elixir.bootlin.com/linux/v4.6/source/drivers/media/v4l2-core/videobuf2-v4l2.c#L866)。在追溯函式實作時可以了解:
- 在 `video_device` 中關聯了 `vb2_queue`,而使用者可以透過預先定義的 `v4l2_ioctl_ops` 回呼函式(`vb2_ioctl_reqbufs`, `vb2_ioctl_create_bufs`, `vb2_ioctl_prepare_buf`......),操作關聯的 `vb2_queue`。
- 該函式經過一層一層格式檢查,最後會使用到 [`vb2_ops.queue_setup`](https://elixir.bootlin.com/linux/v4.6/source/drivers/media/v4l2-core/videobuf2-core.c#L863) 的回呼函式。
- 在原先的 `vcam_out_queue_setup` 並沒有輸入大小的偵錯,才導致這個測試失敗。
提交紀錄: [sysprog21#22](https://github.com/sysprog21/vcam/pull/22)
## 開發紀錄 `2`: 確保格式轉換時 `vcamfb` 與 `vcam` 的正確性
### 1. modify through `vcam-util`
使用者可以透過 `vcam-util` 來變更解析度與色彩格式:`-m` 調整指定裝置的設定、`-s` 設定解析度、`-p` 設定色彩格式。
回到專案實作。在操作或變更 vcam/fb 必須確保此時只有一個操作者以避免資訊接收或設定變更時的衝突。在 `vcam_device` 結構體中的 `fb_isopen` 確保了執行的正確性。
```c
// If fb not in use than acquire, else return EBUSY
spin_lock_irqsave(&dev->in_fh_slock, flags);
if (dev->fb_isopen) {
spin_unlock_irqrestore(&dev->in_fh_slock, flags);
return -EBUSY;
}
dev->fb_isopen = true;
spin_unlock_irqrestore(&dev->in_fh_slock, flags);
// Return flag after using
spin_lock_irqsave(&dev->in_fh_slock, flags);
dev->fb_isopen = false;
spin_unlock_irqrestore(&dev->in_fh_slock, flags);
```
當我們嘗試變更設定時 vcam 運作如下:
1. 接收 `-m`, `-p`, `-s` 等參數後,執行 `vcam-util` 的 `modify_device`。
2. 呼叫 `control.h/c` `ioctl` 定義的 `VCAM_IOCTL_GET_DEVICE` 以取得裝置資訊,`VCAM_IOCTL_MODIFY_SETTING` 變更裝置設定。
3. `/dev/vcamctl*` 接收指令執行 `control_iocontrol_modify_input_setting`。函式中鎖定 spinlock,變更 `vcam_device` 中的 `input_format`,刪除原本的 `in_queue` 以建立新設定版本。隨後釋放鎖。
:::warning
注意:原先實作只變更 input buffer,但卻沒有更動 output buffer。因為使用者只會使用到輸入的面向,而 ouput 是由播放器操作 `videobuf`。於是 vcam 在設計上只提供輸入端的調整。
:::
在使用者調整 input buffer 時將導致與 ouput buffer 格式的不一致,於是在 `submit_copy_buffer` 複製 inputbuffer 到 outputbuffer 時會檢查兩者格式做對應的轉換。
後來經 `WayneLin1992` 的說明:`control_iocontrol_modify_input_setting` 內使用的是舊的 API ,在 [#11](https://github.com/sysprog21/vcam/commit/a5e228585ff8d2ddbef27467f73639e74dd30060) 中有更新對於 framebuffer 重新操作的程式碼,如 `vcamfb_update` 與 `vcamfb_destroy`。
### 2. modify through `VIDIOC_S_FMT`
從 [8.31. ioctl VIDIOC_G_FMT, VIDIOC_S_FMT, VIDIOC_TRY_FMT](https://www.kernel.org/doc/html/v4.13/media/uapi/v4l/vidioc-g-fmt.html#ioctl-vidioc-g-fmt-vidioc-s-fmt-vidioc-try-fmt) 先了解回呼函式的用法:
```c
int ioctl(int fd, VIDIOC_G_FMT, struct v4l2_format *argp)
int ioctl(int fd, VIDIOC_S_FMT, struct v4l2_format *argp)
int ioctl(int fd, VIDIOC_TRY_FMT, struct v4l2_format *argp)
```
1. `VIDIOC_G_FMT` 詢問支援格式,使用者填入 `v4l2_format.type`,裝置填入所有支援的格式。
2. `VIDIOC_S_FMT` 要求特定格式。使用者填入指定格式,裝置填入 negotiate 的格式,並變更裝置狀態以符合回傳的格式。
3. `VIDIOC_TRY_FMT` 與 `VIDIOC_S_FMT` 相同,只是不會變更裝置目前的狀態。
在 `vcam` 的原始實作如下:
1. 如果 `dev->conv_res_on` 和 `dev->conv_crop_on` 沒有開啟(允許縮放跟擷取),一律回傳創建時 `dev->output_format` 的格式。
2. 如果允許 `dev->conv_res_on`,`VIDIOC_G_FMT` 依舊回傳創建時的格式,但 `VIDIOC_TRY_FMT` 會向 `struct v4l2_frmsize_discrete vcam_sizes[]` 尋找最接近相容的格式,並變更裝置狀態。
```c
static const struct v4l2_frmsize_discrete vcam_sizes[] = {
{480, 360},
{VGA_WIDTH, VGA_HEIGHT}, // 600, 400
{HD_720_WIDTH, HD_720_HEIGHT}, // 1280, 720
};
```
3. 如果允許 `dev->conv_crop_on` 待研究。
:::warning
這裡出現兩個問題:
1. 在允許縮放時,`VIDIOC_G_FMT` 回傳創建的長寬,然而 `VIDIOC_TRY_FMT` 中支援的格式不一定有這個長寬比例。這導致了 [v4l2-compliance/v4l2-test-formats.cpp(710)](https://git.linuxtv.org/v4l-utils.git/tree/utils/v4l2-compliance/v4l2-test-formats.cpp?h=v4l-utils-1.18.1#n710) 失敗:
```c
/* 1. 初始化一個無意義的 fmt
* 2. VIDIOC_G_FMT 取得現在裝置的 fmt
* 3. VIDIOC_TRY_FMT 傳入 G_FMT 的 fmt
* 4. 期待回傳的 fmt_try 和 fmt 相同
*/
createInvalidFmt(fmt, clip, type);
doioctl(node, VIDIOC_G_FMT, &fmt);
fmt_try = fmt;
ret = doioctl(node, VIDIOC_TRY_FMT, &fmt_try);
...
if (!matchFormats(fmt, fmt_try))
result = fail("%s: TRY_FMT(G_FMT) != G_FMT\n",
buftype2s(type).c_str());
```
2. 在允許縮放時,`VIDIOC_TRY_FMT` 會變更裝置狀態,這不符合函式的預期。
> The VIDIOC_TRY_FMT ioctl is equivalent to VIDIOC_S_FMT with one exception: it does not change driver state. It can also be called at any time, never returning EBUSY. This function is provided to negotiate parameters, to learn about hardware limitations, without disabling I/O or possibly time consuming hardware preparations. Although strongly recommended drivers are not required to implement this ioctl.
3. 如果允許 inputbuffer 與 outputbuffer 格式不一致,為何需要 `vcamfb_update`?
:::
提交紀錄:[sysprog21 #23](https://github.com/sysprog21/vcam/issues/23)
提交紀錄:[sysprog21 #24](https://github.com/sysprog21/vcam/issues/24)
### Unifying modification between `vcamfb`, `input`, `output`
目前 `vcam` 專案在 `vcamfb`, `input`, `output` 的格式調整上十分的不一致,雖然存在不一致仍讓 `vcam` 得以在 `vlc` 播放器上順利執行,但唯有統一才能讓後續的開發順利。
在這裡我們主要針對 `allow_scaling=1` 的模式進行探討。
在原本 `vcam` 實作,各函式互動行為如下:
- `vcam-util -m`:變更 `input_format` 並重新配置 `in_queue`(並不變更 `vcamfb info` 與 `output_format`/`videobuf`)。
- `VIDEOC_G_FMT`:回傳 `output_format`。
- `VIDEOC_S_FMT`:根據輸入 fmt 更新 `output_format` 與 `vcamfb info`。
- `VIDEOC_ENUM_FRAMESIZE`:填入 `input_format` 的 width, height。
這些微妙的互動方式讓 vlc 剛好符合我們使用者使用上預期。在參考 vlc 實作 [`modules/access/v4l2/video.c#SetupFormat`](https://github.com/videolan/vlc/blob/0c4a68b1e2b2eb28ec895aa4d54d48374ed4d47f/modules/access/v4l2/video.c#L417) 我們得知 vcam 在開啟播放器時做了什麼:
1. 使用者透過 `vcam-util -m` 設定 input。
2. 使用者開啟 vlc,vlc 透過 [`SetupFormat`](https://github.com/videolan/vlc/blob/0c4a68b1e2b2eb28ec895aa4d54d48374ed4d47f/modules/access/v4l2/video.c#L417) 設定 `v4l2_format`,以此配置 `struct vb2_queue vb_out_vidq`:
- `VIDIOC_G_FMT` 設定 `fourcc`
- `VIDIOC_ENUM_FRAMESIZES` 設定 width, height
- `VIDIOC_S_FMT` 設定 `output_format`
3. 開啟 vlc 的行為讓 output device 意外的變更成了 input format,順應變更了 `vcamfb info`。
相比於另一款媒體播放器 [ffplay](https://www.ffmpeg.org/ffplay.html) 是透過 `VIDIOC_G_FMT` 來確認 width, height 的,這就和 vlc 的作法不同。
整理一下原本的實作不合理的地方:
1. 實用時是 `input_format` 影響 `output_format` 和 `vcamfb info`,但在 `VIDIOC_S_FMT` 和 `vcamfb_update` 的行為反而看起來是 output_format 在影響 `vcamfb info`, `input_format`。
2. 在 `vcam-util -m` 和 `vcamfb_update` 都會針對 `in_queue` 做記憶體重新分配。
3. `vcamfb_update` 更新的不只有 `vcamfb info` 但還有 `in_queue` ,函式行為不符合函式名。
提交紀錄:[sysprog21#28](https://github.com/sysprog21/vcam/pull/28)
## 開發紀錄 `3`: vcam github actions
老師希望我參考 [vwifi](https://github.com/sysprog21/vwifi/blob/main/.github/workflows/main.yaml) 開發 github actions。
[deleting commits does not trigger pipeline](https://github.com/gocd/gocd/issues/5179)
> If you're doing a simple reset to previous commit, and gocd has already seen that previous commit, a build will not be kicked off. In GoCD's view it's already seen that commit and built it.
>
> If you'd really want to kick off a build from a git commit, you can trigger it again, or make a dummy commit and push it.
>
> `git commit --allow-empty -m "Trigger notification" && git push`.
提交紀錄:[sysprog21 #27](https://github.com/sysprog21/vcam/pull/27)
目前 vcam 的 actions 只支援程式碼格式檢查與編譯檢查。在 github 的環境還無法載入核心模組,於是無法從 github 部署中驗證核心模組執行的正確性。
## 開發紀錄 `4`:支援 FFmpeg
比較相關專案,akvcam 支援許多串流程式將傳入影格至 output device,並使用許多支援的媒體播放器播放 capture device 接收到的影格。
目前我們在使用 vcam 都須自己處理 raw data 然後傳入 vcam ,在 vlc 播放。vcam 對支援的串流程式和播放程式有限,我希望起碼可以支援 ffmpeg 輸入影片資訊,然後 ffplay 做播放。
### ffmpeg muxer/demuxer
首先了解 `FFmpeg` 如何定義 I/O 裝置與格式,以提供各種不同裝置做使用:
在 [`FFmpeg/alldevices.c`](https://github.com/FFmpeg/FFmpeg/blob/25c8507818d8559a6654a5b30a0f8aae11a48181/libavdevice/alldevices.c) 可見許多種類的 `AVInput/OutputFormat` ,這些格式對應到不同的裝置框架,包括 `v4l2`, `framebuffer`。其中我們是透過 framebuffer 來寫入影格,v4l2 device 來擷取影像,於是我們分別關注:
```c
extern const AVOutputFormat ff_fbdev_muxer;
extern const AVInputFormat ff_v4l2_demuxer;
```
透過 [adapter pattern](https://zh.wikipedia.org/zh-tw/%E9%80%82%E9%85%8D%E5%99%A8%E6%A8%A1%E5%BC%8F) 的抽象化在統一內部實作下,可以適應不同的裝置框架的操作。
```
_______ ______________
| | | |
| input | demuxer | encoded data | decoder
| file | ---------> | packets | -----+
|_______| |______________| |
v
_________
| |
| decoded |
| frames |
|_________|
________ ______________ |
| | | | |
| output | <-------- | encoded data | <----+
| file | muxer | packets | encoder
|________| |______________|
```
### ffmpeg : `AVOutputFormat` `ff_fbdev_muxer`
利用 ffmpeg 將影片解碼為像素級原始資料,傳入我們的 fb。
```sh
ffmpeg -i {video path} -s 640x480 -r 30 -f fbdev -vcodec rawvideo -pix_fmt rgb24 /dev/fbX
```
在目前實作會出現以下錯誤訊息:
```
[fbdev @ 0x55ce3c290cc0] Error in mmap(): Invalid argument
Could not write header for output file #0 (incorrect codec parameters ?): Invalid argument
Error initializing output stream 0:0 --
```
導致錯誤訊息可見於 [`FFmpeg/fbdev_enc.c#fbdev_write_header`](https://github.com/FFmpeg/FFmpeg/blob/25c8507818d8559a6654a5b30a0f8aae11a48181/libavdevice/fbdev_enc.c#L87):
```c
fbdev->data = mmap(NULL, fbdev->fixinfo.smem_len, PROT_WRITE, MAP_SHARED, fbdev->fd, 0);
if (fbdev->data == MAP_FAILED) {
ret = AVERROR(errno);
av_log(h, AV_LOG_ERROR, "Error in mmap(): %s\n", av_err2str(ret));
goto fail;
}
```
這裡遇到一個蠻嚴重的問題:我們 vcam 的實作仰賴透過 `fb write` 讓 `fb` 主動寫入 fb 並確認何時應該 `swap double buffer`,以此我們並未認真的實作 `mmap` 的版本,也因為 `mmap` 等於是我們提供映射的空間讓使用者自行操作,這讓我們無法實現自己控制兩個 buffer 的交換。
在 ffmpeg 的 `muxing.c` 定義了如何把串流資訊寫入輸出裝置:
```c
/* Write the stream header, if any. */
ret = avformat_write_header(oc, &opt);
if (ret < 0) {
fprintf(stderr, "Error occurred when opening output file: %s\n",
av_err2str(ret));
return 1;
}
while (encode_video || encode_audio) {
/* select the stream to encode */
if (encode_video &&
(!encode_audio || av_compare_ts(video_st.next_pts, video_st.enc->time_base,
audio_st.next_pts, audio_st.enc->time_base) <= 0)) {
encode_video = !write_video_frame(oc, &video_st);
} else {
encode_audio = !write_audio_frame(oc, &audio_st);
}
}
av_write_trailer(oc);
```
`avformat_write_header` 定義 output format,隨後逐影格寫入 `write_video_frame`,寫完後 `av_write_trailer` 關閉 output。
結論是 ffmpeg 在傳入資訊時就確定了要讀寫的記憶體區段,我們只能被動的提供區段,這讓我們的 buffer swapping 無法與 ffmpeg 搭配。
### ffplay : `AVInputFormat` `ff_v4l2_demuxer`
```sh
ffplay /dev/videoY
```
ffplay 在播放 640x480 時會發生 segmentation fault,而 1280x720 時能正常播放。
解決這個問題的方法是將輸入改成以行為單位寫入 fb 當中,不要那麼頻繁的做 system call 即可。(以前的範例都是逐 pixel 寫入 fb)。
另外需要注意的是,在 [`FFmpeg/v4l2.c`](https://github.com/FFmpeg/FFmpeg/blob/master/libavdevice/v4l2.c) 定義了 ffplay 使用的 `ff_v4l2_demuxer`。[`v4l2_read_header`](https://github.com/FFmpeg/FFmpeg/blob/master/libavdevice/v4l2.c#L837) 來確認 v4l2 device 的格式,其中可見:
```c
if (!s->width && !s->height) {
struct v4l2_format fmt = { .type = V4L2_BUF_TYPE_VIDEO_CAPTURE };
av_log(ctx, AV_LOG_VERBOSE,
"Querying the device for the current frame size\n");
if (v4l2_ioctl(s->fd, VIDIOC_G_FMT, &fmt) < 0) {
res = AVERROR(errno);
av_log(ctx, AV_LOG_ERROR, "ioctl(VIDIOC_G_FMT): %s\n",
av_err2str(res));
goto fail;
}
s->width = fmt.fmt.pix.width;
s->height = fmt.fmt.pix.height;
av_log(ctx, AV_LOG_VERBOSE,
"Setting frame size to %dx%d\n", s->width, s->height);
}
```
FFmpeg 是透過 `VIDIOC_G_FMT` 來確認 width, height 的,這就和 vlc 的作法不同(`VIDEOC_ENUM_FRAMESIZES`),在 [sysprog21#30](https://github.com/sysprog21/vcam/pull/30) 我會一併將 `VIDIOC_G_FMT` 和 `VIDEOC_ENUM_FRAMESIZES` 回傳的解析度變成 `ouput_format`。
最後 ffplay 和 vlc 寫入 rgb 的順序剛好是相反的,於是在使用上 r-channel 和 b-channel 要調換一下。
## 開發紀錄 `5`:改進 cropping