---
tags: Linux Kernel
---
# kecho
contributed by < `kevinshieh0225` >
> [作業需求](https://hackmd.io/@sysprog/linux2022-ktcp)
> [GitHub: kecho](https://github.com/kevinshieh0225/kecho)
## :penguin: 自我檢查清單與作業需求
- [x] 給定的 `kecho` 已使用 CMWQ,請陳述其優勢和用法
- [ ] 核心文件 [Concurrency Managed Workqueue (cmwq)](https://www.kernel.org/doc/html/latest/core-api/workqueue.html) 提到 "The original create_`*`workqueue() functions are deprecated and scheduled for removal",請參閱 Linux 核心的 git log (不要用 Google 搜尋!),揣摩 Linux 核心開發者的考量
- [x] 解釋 `user-echo-server` 運作原理,特別是 [epoll](http://man7.org/linux/man-pages/man7/epoll.7.html) 系統呼叫的使用
- [x] 是否理解 `bench` 原理,能否比較 `kecho` 和 `user-echo-server` 表現?佐以製圖
- [ ] 解釋 `drop-tcp-socket` 核心模組運作原理。`TIME-WAIT` sockets 又是什麼?
* 在 GitHub 上 fork [kecho](https://github.com/sysprog21/kecho),目標是修正 `kecho` 的執行時期的缺失,提升效能和穩健度 (robustness)
- [x] 若使用者層級的程式頻繁傳遞過長的字串給 `kecho` 核心模組,會發生什麼事?
- [x] 參照 [kecho pull request #1](https://github.com/sysprog21/kecho/pull/1),嘗試比較 kthread 為基礎的實作和 CMWQ,指出兩者效能的落差並解釋
- [ ] 如果使用者層級的程式建立與 `kecho` 核心模組的連線後,就長期等待,會導致什麼問題?
- [ ] 研讀 [Linux Applications Performance: Introduction](https://unixism.net/2019/04/linux-applications-performance-introduction/),嘗試將上述實作列入考量,比較多種 TCP 伺服器實作手法的效能表現
## [Concurrency Managed Workqueue (cmwq)](https://www.kernel.org/doc/html/latest/core-api/workqueue.html)
> [workqueue introduction](https://hackmd.io/AI3pIRE3TlCwSroXYWauPQ#workqueue-introduction)
cmwq 提供一個非同步行程執行(asynchronous process execution)的方案。我們將待執行的 work item (一個結構體 `work_struct` 並指向待執行 function)放入到 workqueue,透過 worker thread 來執行 workqueue 當中的 work item。
worker thread 透過 worker-pools 的結構體來管理運算任務,每個 CPU 有兩個 worker-pools,一個負責普通任務(normal),一個負責高優先級任務(high-priority)。
另外也有 dynamic unbound worker-pools,有些 workqueue 如果建立時沒有設定 CPU affinity, locality,那麼就會被交給 unbound worker-pools 來分配執行。`WQ_UNBOUND` 的屬性交給 schelduler 有更大的彈性做並行化的執行資源分配,參考文件所述:
> Unbound wq sacrifices locality but is useful for the following cases.
> - Wide fluctuation in the concurrency level requirement is expected and using bound wq may end up creating large number of mostly unused workers across different CPUs as the issuer hops through different CPUs.
> - Long running CPU intensive workloads which can be better managed by the system scheduler.

### [Why cmwq?](https://www.kernel.org/doc/html/latest/core-api/workqueue.html#why-cmwq)
從原本的文件可以知悉 cmwq 的優勢所在。
舊的 workqueue 實作有兩種型式:
- multi threaded (MT) wq 在每個 CPU 上會對應一個 worker thread,讓 wq 能分配 work item 到每個 CPU 上部屬的 worker thread 做執行。
- single threaded (ST) wq 則是建立一個整個系統皆可切換執行的 worker thread。
先來看 MT wq 的問題:有幾個 CPUs,MT wq 就需要建立幾個 workers。近年在 kernel MT wq 的使用需求增加,且硬體設備的 CPU cores 增多下,有些系統光是開機初始化這些 MT wq,就佔滿了預設的 32k PID space。
在佔滿了這麼多資源,然而舊的 workqueue (尤其 ST) 在 the level of concurrency 卻不盡人意。在舊的實作中,workqueue 必須自行維護 worker-pool,MT wq 可以分配一個 exec 給一個 CPU,而 ST 則是在整個系統中尋找可以執行 exec 的資源。work item 需要在有限的執行資源間競爭,導致執行資源分配不均或是 deadlock 的問題。
API 使用者必須在兩種 wq 間抉擇:使用 ST wq 犧牲 concurrency level 但節省 resource usage,或是使用 MT wq 提高不是很佳的 concurrency level 但更沈重的 resource usage。到頭來這些開發者可能退而避之,自己去寫一個 concurrency level 更佳的 thread-pooling 。
Concurrency Managed Workqueue (cmwq) 重新設計為了達到以下目標:
- 維持原本實作 workqueue 的 API 相容性。
- 使用 per-CPU unified worker pools。worker-pools 的運算資源能夠被所有 wq 分享,提供更有彈性的 level of concurrency on demand 而不需要浪費多餘的資源。
- 這些 worker pool 和 level of concurrency 的操作是交由系統自己做調節分配,讓 API 使用者不需要擔心實作上的細節。
### 比較 kthread-based 和 CMWQ-based `kecho_mod`
在 [kecho pull request #1](https://github.com/sysprog21/kecho/pull/1) 當中比較了 kthread-based 和 CMWQ-based 在 echo request thread 增加時,完成時間的差別。可以見到在 1000 個執行緒內, CMWQ-based 完成時間維持在 100~300 us 之間,然而 kthread-based 卻隨著執行緒增多而需求時間成長,一度到了 20000 us 的量級。
在 commit 紀錄 [`e5cbab`](https://github.com/sysprog21/kecho/commit/e5cbabff39b2d82e1b4adae7272561b9770fb792) 中可以比對兩個實作間的差別,和原作者的說明:
> The CMWQ impl has merely the same behavior compare with kthread-ver
daemon, except that when a connection is still alive at removal of
the module, kthread based daemon will simply proceed with the module
removal, but crash the machine once that any of existing connection
being closed, whereas CMWQ based one will simply closes all
connections.
>
> The benefit of using the CMWQ is, we're no longer need to create
kthread each time a request arrived, we just simply queue the task
into it. this saves us bunch of time on kthread creation. Moreover,
one kthread of the CMWQ may processes multiple tasks we queued into,
which means we can get better performance due to cache locality.
關於影響兩者實作效能最大的差異寫在第二段: kernel-based 在 `echo_server_daemon` 每次收到 request 必須 `kthread_run` 建立一個新的核心執行緒,但是 CMWQ-based 只需要將 work item 置入 workqueue 內交給核心內的 worker 執行,大大減少了額外建立執行緒的成本。另外文裡也提到由於是交給同一個 kthread 去處理 CMWQ,保持了 cache locality 也是提昇效能的關鍵。
## `kecho_mod`
### cmwq API, Network API in kecho
在 `kecho_mod.c` 我們使用 [`alloc_workqueue`](https://www.kernel.org/doc/html/latest/core-api/workqueue.html#c.alloc_workqueue) 來建立 cmwq,並設定這個任務佇列的屬性:
```c
struct workqueue_struct * alloc_workqueue(const char *fmt,
unsigned int flags,
int max_active, ...)
/* 初始化 workqueue
* @name 佇列 wq 的名字
* @flags wq 分配給 CPU 的標籤,比如:
* WQ_UNBOUND: wq 不指定特定 cpu worker-pool
* WQ_HIGHPRI: wq 指定給高優先級的 worker_pool
* @max_active
* 每個 CPU 可以一次執行幾個佇列的 work item。
* 比如 16 的話代表一個 CPU 可以一次執行 16 個 work item。
* 文件建議使用 0 代表使用預設值,BOUND 的 default=256
*/
```
[`kthread_run`](https://www.kernel.org/doc/html/v5.6/driver-api/basics.html?highlight=kthread_should_stop#c.kthread_run) 建立一個核心執行緒,執行我們的 `echo_server_daemon` function。
```c
struct workqueue_struct *kecho_wq;
static int kecho_init_module(void)
{
int error = open_listen(&listen_sock);
if (error < 0) {
printk(KERN_ERR MODULE_NAME ": listen socket open error\n");
return error;
}
param.listen_sock = listen_sock;
kecho_wq = alloc_workqueue(MODULE_NAME, bench ? 0 : WQ_UNBOUND, 0);
echo_server = kthread_run(echo_server_daemon, ¶m, MODULE_NAME);
if (IS_ERR(echo_server)) {
printk(KERN_ERR MODULE_NAME ": cannot start server daemon\n");
close_listen(listen_sock);
}
return 0;
}
```
在 `echo_server.c` 的 `echo_server_daemon` 是我們主要的 function。在 [`kthread_should_stop`](https://www.kernel.org/doc/html/v5.6/driver-api/basics.html?highlight=kthread_should_stop#c.kthread_should_stop) 並未中止期間,使用 Linux Network Devices [`kernel_accept`](https://www.kernel.org/doc/html/v5.6/networking/kapi.html#c.kernel_accept) API 監聽是否有新的 user request。
```c
int kernel_accept(struct socket * sock,
struct socket ** newsock,
int flags)
/* accept a connection (kernel space)
* @sock: listening socket
* @newsock: new connected socket
* @flags: flags must be SOCK_CLOEXEC, SOCK_NONBLOCK or 0.
* If it fails, newsock is guaranteed to be NULL.
* Returns 0 or an error.
*/
```
如果收到需求透過 `create_work` 的函式,建立 `kecho` 的結構體,使用 [`INIT_WORK`](https://github.com/torvalds/linux/blob/33fb42636a938be01d951b4cee68127a59a1e7e4/include/linux/workqueue.h) 來初始化 `work_struct` 的成員(`work_struct` 即是前述的 work item),`work_struct` 指向 `echo_server_worker` 的函式。
使用 cmwq API 的 [`queue_work`](https://www.kernel.org/doc/html/latest/core-api/workqueue.html#c.queue_work) 把 `work_struct` 納入到 `workqueue` 當中。
```c
bool queue_work(struct workqueue_struct *wq,
struct work_struct *work)
/* Pointer to the allocated workqueue on success, NULL on failure.
* @wq: workqueue to use
* @work: work to queue
*/
```
```c
static struct work_struct *create_work(struct socket *sk)
{
struct kecho *work;
...
work->sock = sk;
INIT_WORK(&work->kecho_work, echo_server_worker);
list_add(&work->list, &daemon.worker);
return &work->kecho_work;
}
int echo_server_daemon(void *arg)
{
...
while (!kthread_should_stop()) {
/* using blocking I/O */
int error = kernel_accept(param->listen_sock, &sock, 0);
...
/* start server worker */
queue_work(kecho_wq, work);
}
...
}
```
:::warning
`echo_server_daemon` 說這是 [`blocking I/O`](https://hackmd.io/@sysprog/linux-io-model/https%3A%2F%2Fhackmd.io%2F%40sysprog%2Fevent-driven-server#Blocking-IO) ,待研究。
:::
### `echo_server_worker`
1. 取得 `kecho worker` 結構體,`worker->sock` 是 client socket。
2. 使用 `get_request` 的函式將接收字串放入 `buf` 裡,再用 `send_request` 的函式將 `buf` 寄給 client socket。
3. 完成任務即釋放資源。
```c
static void echo_server_worker(struct work_struct *work)
{
struct kecho *worker = container_of(work, struct kecho, kecho_work);
unsigned char *buf;
buf = kzalloc(BUF_SIZE, GFP_KERNEL);
...
while (!daemon.is_stopped) {
int res = get_request(worker->sock, buf, BUF_SIZE - 1);
...
res = send_request(worker->sock, buf, res);
...
memset(buf, 0, res);
}
kernel_sock_shutdown(worker->sock, SHUT_RDWR);
kfree(buf);
}
```
#### `get_request` / `send_request`
利用 [`kernel_recvmsg`](https://www.kernel.org/doc/html/v5.6/networking/kapi.html#c.kernel_recvmsg) 和 [`kernel_sendmsg`](https://www.kernel.org/doc/html/v5.6/networking/kapi.html#c.kernel_sendmsg) 來和 client socket 做溝通。
```c
/* On return the msg structure contains the scatter/gather array
* passed in the @vec argument. The array is modified so that it
* consists of the unfilled portion of the original array.
*
* The returned value is the total number of bytes received,
* or an error.
*/
int kernel_recvmsg(struct socket * sock,
struct msghdr * msg,
struct kvec * vec,
size_t num,
size_t size,
int flags)
/* Builds the message data with @vec and sends it through @sock.
* Returns the number of bytes sent, or an error code.
*/
int kernel_sendmsg(struct socket * sock,
struct msghdr * msg,
struct kvec * vec,
size_t num,
size_t size)
```
## `user-echo-server`
我們用 `kecho` 建立一個 echo kernel module,而 `user-echo-server` 就是在 user space 實作的版本。
### server listener
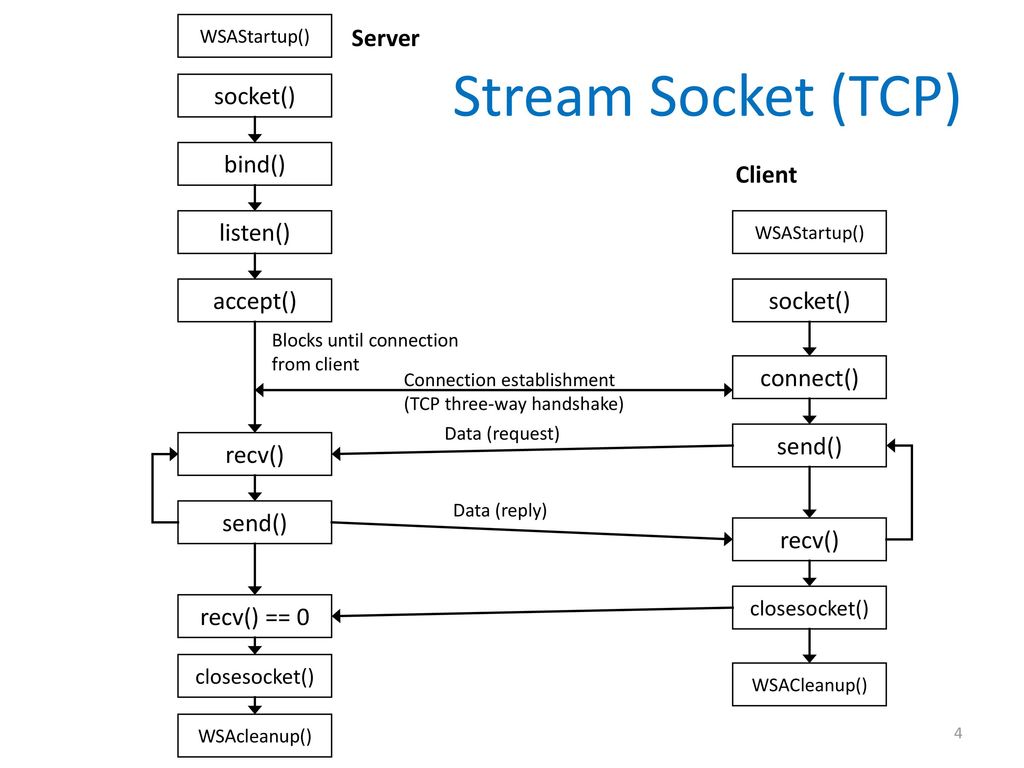
使用 socket(), bind(), listen() 先初始化一個 nonblocking 的 server listener [file discriptor](https://www.computerhope.com/jargon/f/file-descriptor.htm),得以接聽來自 client 的 request。
> [socket(2) — Linux manual page](https://man7.org/linux/man-pages/man2/socket.2.html)
```c
sockfd = socket(int socket_family, int socket_type, int protocol);
/* create an endpoint for communication
*
* @domain: specifies a communication domain
* @type: specifies the communication semantics
* @protocol: specifies a particular protocol to be used with the socket.
*/
int listener;
if ((listener = socket(PF_INET, SOCK_STREAM, 0)) < 0)
server_err("Fail to create socket", &list);
printf("Main listener (fd=%d) was created.\n", listener);
```
> [bind(2) — Linux manual page](https://man7.org/linux/man-pages/man2/bind.2.html)
```c
int bind(int sockfd, const struct sockaddr *addr, socklen_t addrlen);
/* When a socket is created with socket(2), it exists in a name
* space (address family) but has no address assigned to it. bind()
* assigns the address specified by @addr to the socket referred to
* by the file descriptor @sockfd.
*
* @sockfd: target sockfd
* @addr: addr to be bind with sockfd
* @addrlen: specifies the size, in bytes, of the address structure
* pointed to by @addr
*/
if (bind(listener, (struct sockaddr *) &addr, sizeof(addr)) < 0)
server_err("Fail to bind", &list);
printf("Listener was binded to %s\n", inet_ntoa(addr.sin_addr));
```
> [listen(2) — Linux manual page](https://man7.org/linux/man-pages/man2/listen.2.html)
```c
int listen(int sockfd, int backlog);
/* listen() marks the socket referred to by sockfd as a passive
* socket, that is, as a socket that will be used to accept incoming
* connection requests using accept(2)
*
* @sockfd: target sockfd
* @backlog: defines the maximum length to which the
* queue of pending connections for sockfd may grow. If a
* connection request arrives when the queue is full, the client may
* receive an error
*/
if (listen(listener, 128) < 0)
server_err("Fail to listen", &list);
```
### epoll I/O monitor
> [epoll(7) — Linux manual page](https://man7.org/linux/man-pages/man7/epoll.7.html)
> [Linux 核心設計: 針對事件驅動的 I/O 模型演化:I/O multiplexing](https://hackmd.io/@sysprog/linux-io-model/https%3A%2F%2Fhackmd.io%2F%40sysprog%2Fevent-driven-server#IO-multiplexing)
> [淺談I/O Model](https://medium.com/@clu1022/%E6%B7%BA%E8%AB%87i-o-model-32da09c619e6)
> [The method to epoll’s madness](https://copyconstruct.medium.com/the-method-to-epolls-madness-d9d2d6378642)
使用 epoll() 來監聽 listener file descriptors 的 I/O。用 `epoll_create` 建立 epoll 物件並回傳對應 `epoll_fd`。
`epoll_ctl` 利用剛剛回傳的 `epoll_fd` 將我們要監聽的 fd(在這個實作是傳入 server listener)加入到 epoll 當中的 interest list。
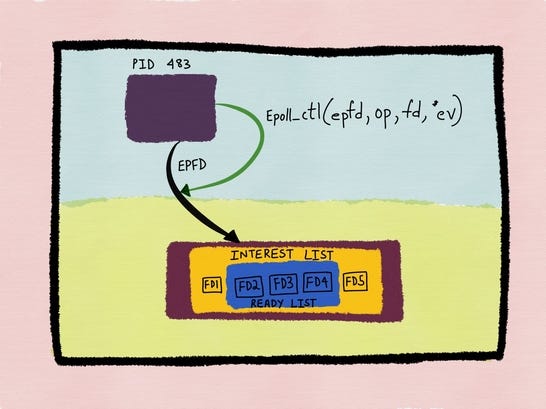
`epoll_wait` 讓 interest list 當中的 fd 等待(block)直到接收到喚醒的 I/O,讓 fd 進到 ready list 以回應事件。
```c
while (1) {
struct sockaddr_in client_addr;
int epoll_events_count;
if ((epoll_events_count = epoll_wait(epoll_fd, events, EPOLL_SIZE,
EPOLL_RUN_TIMEOUT)) < 0)
server_err("Fail to wait epoll", &list);
...
for (int i = 0; i < epoll_events_count; i++) {
/* EPOLLIN event for listener (new client connection) */
if (events[i].data.fd == listener) {
int client;
while (
(client = accept(listener, (struct sockaddr *) &client_addr,
&socklen)) > 0) {
...
setnonblock(client);
ev.data.fd = client;
if (epoll_ctl(epoll_fd, EPOLL_CTL_ADD, client, &ev) < 0)
server_err("Fail to control epoll", &list);
push_back_client(&list, client,
inet_ntoa(client_addr.sin_addr));
...
}
}
}
}
```
### `client_list_t`
最後我們的程式碼將 client request 的字串,使用 `client_list_t` 的 linkedlist 來紀錄起來 。
並有 `delete_list`, `delete_client`, `size_list`, `server_err`, `new_list`, `push_back_client` 的函式來操作串列。
```c
typedef struct client_list_s {
int client;
char *addr;
struct client_list_s *next;
} client_list_t;
static void delete_list(client_list_t **list)
static client_list_t *delete_client(client_list_t **list, int client)
static int size_list(client_list_t *list)
static void server_err(const char *str, client_list_t **list)
static client_list_t *new_list(int client, char *addr, client_list_t **list)
static void push_back_client(client_list_t **list, int client, char *addr)
```
## bench 效能分析
> [sysprog21/kecho#Usage](https://github.com/sysprog21/kecho#usage)
`bench.c` 測試 server 的方式如下:建立 `MAX_THREAD`(預設 1000) 個 client thread,確保 thread 都初始化完成後,同時向 server `send` echo request,直到收到 `recv`,並各自記錄這段收發時間的時間差。接著把這個時間差寫進記錄中。
先介紹此程式中靜態變數和函式的功用:
```c
// 每個 client thread request server 要 echo 的訊息
static const char *msg_dum = "dummy message";
// 測試執行的 client thread
static pthread_t pt[MAX_THREAD];
// condition:來確保所有 thread 都初始化完成
static bool ready;
static pthread_mutex_t res_lock = PTHREAD_MUTEX_INITIALIZER;
static pthread_mutex_t worker_lock = PTHREAD_MUTEX_INITIALIZER;
static pthread_cond_t worker_wait = PTHREAD_COND_INITIALIZER;
// 第幾個實驗的時間紀錄欄位
static long time_res[MAX_THREAD] = {0};
static int idx = 0; /* for indexing "time_res" */
// client thread 要做的函式任務
static void *bench_worker(__attribute__((unused)));
// 建立 client thread
static void create_worker(int thread_qty);
// 實驗 bench
static void bench(void);
```
### `bench`
1. 做 `BENCH_COUNT` 次實驗,最後再把實驗結果平均。
2. 建立 client thread 使用 `ready` 的 condition 阻擋,待所有 worker 建立完畢再讓大家一起開始向 server 發 request。
3. 每次實驗結束 thread 會自己釋放 thread,用 `pthread_join` 等大家完成任務且自我釋放,待一切歸零下次實驗重新開始。
```c
static void bench(void)
{
for (int i = 0; i < BENCH_COUNT; i++) {
ready = false;
create_worker(MAX_THREAD);
pthread_mutex_lock(&worker_lock);
ready = true;
/* all workers are ready, let's start bombing kecho */
pthread_cond_broadcast(&worker_wait);
pthread_mutex_unlock(&worker_lock);
/* waiting for all workers to finish the measurement */
for (int x = 0; x < MAX_THREAD; x++)
pthread_join(pt[x], NULL);
idx = 0;
}
for (int i = 0; i < MAX_THREAD; i++)
fprintf(bench_fd, "%d %ld\n", i, time_res[i] /= BENCH_COUNT);
}
```
### `bench_worker`
在 `create_worker` 時會指派每個執行緒執行 `bench_worker` 的 函式,以下分段講解 `bench_worker` 的程式碼:
1\.在執行前先用 lock 擋住,待確認每個執行續都建立就緒後再讓大家準備執行。在這裡使用了 thread barrier 的技巧,相關敘述可參考 [Synchronization, Part 6: Implementing a barrier](https://github.com/angrave/SystemProgramming/wiki/Synchronization%2C-Part-6%3A-Implementing-a-barrier)。
```c
/* wait until all workers created */
pthread_mutex_lock(&worker_lock);
while (!ready)
if (pthread_cond_wait(&worker_wait, &worker_lock)) {
puts("pthread_cond_wait failed");
exit(-1);
}
pthread_mutex_unlock(&worker_lock);
```
2\. 建立 [socket](https://man7.org/linux/man-pages/man2/socket.2.html) 並 [connect](https://man7.org/linux/man-pages/man2/connect.2.html) 到指定的 `sockaddr`。
`sockaddr_in` 的 `.sin_addr.s_addr` 指定為 `"127.0.0.1"`,`.sin_port` 指定為 `12345`
```c
sock_fd = socket(AF_INET, SOCK_STREAM, 0);
if (sock_fd == -1) {
perror("socket");
exit(-1);
}
struct sockaddr_in info = {
.sin_family = PF_INET,
.sin_addr.s_addr = inet_addr(TARGET_HOST),
.sin_port = htons(TARGET_PORT),
};
if (connect(sock_fd, (struct sockaddr *) &info, sizeof(info)) == -1) {
perror("connect");
exit(-1);
}
```
3\. 向 server [send](https://man7.org/linux/man-pages/man2/send.2.html) 和 [recv](https://man7.org/linux/man-pages/man2/recv.2.html) echo 訊息,記錄訊息發收時間,關閉 `socket`,並確認發收的訊息是否相同無誤。
```c
gettimeofday(&start, NULL);
send(sock_fd, msg_dum, strlen(msg_dum), 0);
recv(sock_fd, dummy, MAX_MSG_LEN, 0);
gettimeofday(&end, NULL);
shutdown(sock_fd, SHUT_RDWR);
close(sock_fd);
if (strncmp(msg_dum, dummy, strlen(msg_dum))) {
puts("echo message validation failed");
exit(-1);
}
```
4\. 把結果記錄到 `time_res`,並關閉執行緒。
:::warning
注意,這裡的記錄寫入的順序不一定是按照完成的先後順序,或是執行時間的長短。記錄的程式碼如下:
```c
pthread_mutex_lock(&res_lock);
time_res[idx++] += time_diff_us(&start, &end);
pthread_mutex_unlock(&res_lock);
```
thread 只要收到 `recv` 後,就會到這裡等 `mutex_lock`。確實先做完就可以先來等,也可能先拿到持有權,但是取得 locking 並不攸關於完成的先後順序。所以如果同時很多 thread 完成任務進來這裡等 lock 持有權時,記錄寫入的結果就不會是遞增。
:::
## 開發紀錄
### 產生隨機字串訊息
為了更符合真實的使用者情境,將輸入字串改為長度範圍內的隨機字串。
```c
#define MAX_MSG_LEN 32
#define MIN_MSG_LEN 16
#if MAX_MSG_LEN == MIN_MSG_LEN
#define MASK(num) ((MAX_MSG_LEN - 1))
#elif MIN_MSG_LEN == 0
#if (MAX_MSG_LEN & (MAX_MSG_LEN - 1)) == 0
#define MASK(num) ((num & (MAX_MSG_LEN - 1)))
#else
#define MASK(num) (num % MAX_MSG_LEN)
#endif
#else
#define MASK(num) ((num % (MAX_MSG_LEN - MIN_MSG_LEN) + MIN_MSG_LEN))
#endif
static char *rand_string()
{
int r = MASK(rand());
char *str = malloc(r+1);
str[r] = '\0';
for (int i = 0; i < r; i++) {
char c = 97 + rand()%26;
str[i] = c;
}
return str;
}
static void create_worker(int thread_qty)
{
srand(time(NULL));
for (int i = 0; i < thread_qty; i++) {
char *str = rand_string();
if (pthread_create(&pt[i], NULL, bench_worker, str)) {
puts("thread creation failed");
exit(-1);
}
}
}
```
### `RUNTIME_STAT` flags
原本的程式碼在 server 任務時會有大量的 [`printk`](https://www.kernel.org/doc/html/latest/core-api/printk-basics.html) 訊息,除了無助於執行分析外,可能影響執行時的效能。參考 [`concurrent-programs/hp_list/main.c`](https://github.com/kevinshieh0225/concurrent-programs/blob/master/hp_list/main.c) 改成用 `struct runtime_statistics` 來記錄執行時的狀況。在結束程式碼時再一次把執行記錄顯示在 log 中。
為了 thread-safe 的記錄資訊,使用 `linux/atomic.h` 的 `atomic_fetch_add_relaxed` 做累加。
```c
/* echo_server.h */
#ifndef RUNTIME_STAT
#define RUNTIME_STAT
#include <linux/atomic.h>
enum {
TRACE_nop = 0,
TRACE_send_msg,
TRACE_recv_msg,
TRACE_kmal_err,
TRACE_recv_err,
TRACE_send_err,
TRACE_work_err,
TRACE_acpt_err,
};
struct runtime_statistics {
atomic_t send_msg, recv_msg;
atomic_t kmal_err, recv_err, send_err;
atomic_t work_err, acpt_err;
};
extern struct runtime_statistics stats;
#define TRACE(ops) \
do { \
if (TRACE_##ops) \
atomic_fetch_add_relaxed(1, &stats.ops); \
} while (0)
#define TRACE_PRINT(flags, ops) printk(flags MODULE_NAME \
": %-10s: %d\n", #ops, stats.ops.counter);
#endif /* RUNTIME_STAT */
/* echo_server.c */
void do_analysis(void)
{
smp_mb();
TRACE_PRINT(KERN_ERR, recv_msg);
TRACE_PRINT(KERN_ERR, send_msg);
TRACE_PRINT(KERN_ERR, recv_err);
TRACE_PRINT(KERN_ERR, send_err);
TRACE_PRINT(KERN_ERR, kmal_err);
TRACE_PRINT(KERN_ERR, work_err);
TRACE_PRINT(KERN_ERR, acpt_err);
}
```
在 `dmesg` 查看 logfile:
```
[22365.244612] kecho: daemon shutdown in progress...
[22365.244617] kecho: recv_msg : 100000
[22365.244622] kecho: send_msg : 50000
[22365.244624] kecho: recv_err : 0
[22365.244626] kecho: send_err : 0
[22365.244628] kecho: kmal_err : 0
[22365.244630] kecho: work_err : 0
[22365.244632] kecho: acpt_err : 0
[22365.343804] kecho: module successfully removed
```
發現 recv 的封包數竟然是 send 的兩倍,將 `get_request` 的 `printk` 加回去觀察:
```
[ 658.673705] kecho: Start recv msg
[ 658.673722] kecho: receive msg shhlwenrcxhuinmwessixwpfoery
[ 658.673722] kecho: Start recv msg
[ 658.673737] kecho: receive msg vbininxfbbmheutghipntpxatwko
[ 658.673797] kecho: Start recv msg
[ 658.673809] kecho: Start recv msg
[ 658.673873] kecho: receive msg
[ 658.673885] kecho: receive msg
```
發現系統會重複收到空的訊息。再使用 telnet 連線做實驗:
```
[ 1755.049439] kecho: Start recv msg
[ 1756.692066] kecho: receive msg eijfiiif
[ 1756.692139] kecho: Start recv msg
[ 1762.191541] kecho: receive msg ca.raiiiaw
[ 1762.191622] kecho: Start recv msg
[ 1763.648086] kecho: receive msg
[ 1773.613389] kecho: daemon shutdown in progress...
[ 1773.613400] kecho: send_msg : 2
[ 1773.613413] kecho: recv_msg : 3
```
發現在 client [shutdown](https://man7.org/linux/man-pages/man2/shutdown.2.html) 的時候 server 會收到訊息,故而導致 recv 會多出 shutdown 的空訊息。於是這裡新增 `shdn_msg` 的記錄。
```
[ 2511.011732] kecho: recv_msg : 50000
[ 2511.011746] kecho: send_msg : 50000
[ 2511.011752] kecho: shdn_msg : 50000
[ 2511.011757] kecho: recv_err : 0
[ 2511.011762] kecho: send_err : 0
[ 2511.011767] kecho: kmal_err : 0
[ 2511.011772] kecho: work_err : 0
[ 2511.011776] kecho: acpt_err : 0
```
### 確認 pthread barrier 正確性
在 `bench` 中透過 pthread barrier 的技巧,待所有執行緒建立就緒再一同喚醒。然而我好奇程式碼中:
```c
ready = false;
create_worker(MAX_THREAD);
pthread_mutex_lock(&worker_lock);
ready = true;
/* all workers are ready, let's start bombing kecho */
pthread_cond_broadcast(&worker_wait);
pthread_mutex_unlock(&worker_lock);
```
如果 `create_worker` 還在建立執行緒時主執行緒便一同去爭取 mutex lock 所有權,那是有可能出現主程式在其他執行緒還沒全部建立成功前就爭取到 mutex lock,使的 `ready` 提早受到更改,這將導致執行緒開始時間的不統一。
實驗程式碼可見 [thread-safe-random-string.c](https://github.com/kevinshieh0225/kecho/blob/master/thread-safe-random-string.c),以我的實驗發現最後幾條執行緒總是在還沒準備好前,`ready` 就被修改並提早發出 `pthread_cond_broadcast`。(大部分是一條,有時是兩到三條,也可能到一成左右的執行緒尚未完成)
提交紀錄:[Fix bug in bench thread barrier #11](https://github.com/sysprog21/kecho/pull/11)。
### kecho robustness: long message test
1\. 傳送大量的 buf 臨界長度 (4096) 訊息封包:

```
[15047.449769] kecho: daemon shutdown in progress...
[15047.449772] kecho: recv_msg : 400000
[15047.449777] kecho: send_msg : 400000
[15047.449779] kecho: shdn_msg : 400000
[15047.449781] kecho: recv_err : 0
[15047.449783] kecho: send_err : 0
[15047.449784] kecho: kmal_err : 0
[15047.449786] kecho: work_err : 0
[15047.449787] kecho: acpt_err : 0
[15048.249490] kecho: module successfully removed
```
2\. 傳送超過 buf 臨界長度 (4100) 的訊息封包。出現錯誤訊息 `echo message validation failed` ,會出現這個問題是因為 client thread 在比對收發的字串時發現內容不符合,而提早中止行程。
```c
static void *bench_worker(void *str)
{
...
if (strncmp(reqstr, recstr, strlen(reqstr))) {
puts("echo message validation failed");
exit(-1);
}
...
}
```
```
[15778.849774] kecho: recv_msg : 1042
[15778.849779] kecho: send_msg : 1032
[15778.849781] kecho: shdn_msg : 1008
[15778.849783] kecho: recv_err : 10
[15778.849785] kecho: send_err : 0
[15778.849786] kecho: kmal_err : 0
[15778.849788] kecho: work_err : 0
[15778.849789] kecho: acpt_err : 0
```
#### 觀察封包表現
將 buf size 設為 8,從 telnet 傳入長度超過 8 的字串:
```
telnet 127.0.0.1 12345
Connected to 127.0.0.1.
123456789
123456789
// dmseg
[20785.457181] kecho: recv_msg : 2
[20785.457188] kecho: send_msg : 2
```
輸出看似是一次性封包發送結果,但其實在記錄中是分成兩次封包收發的。回到程式碼中理解:
```c
while (!daemon.is_stopped) {
int res = get_request(worker->sock, buf, BUF_SIZE - 1);
if (res <= 0) {
if (res) {
TRACE(recv_err);
}
break;
}
res = send_request(worker->sock, buf, res);
if (res < 0) {
TRACE(send_err);
break;
}
memset(buf, 0, res);
}
```
讓我們先來了解 [`recvmsg`](https://www.kernel.org/doc/Documentation/networking/rds.rst) 的行為:
> Receives a message that was queued to this socket. The sockets recv queue accounting is adjusted, and if the queue length drops below SO_SNDSIZE, the port is marked uncongested, and a congestion update is sent to all peers.
client 傳來的訊息會保留在 msg queue 當中,在我們使用 `kernel_recvmsg` 會將 size 長度的訊息從 msg queue 推出並存入 buffer 中,並將此段訊息以 `kernel_sendmsg` 推出。這邊注意到如果 msg queue 內還有存值,迴圈便會重新做一次收發訊息的行為,直到 msg queue 被標記為 uncongested 才停止。
從這裡可以理解到為何 `bench_worker` 會失敗:如果 client 傳入大於預設 buffersize 的字串長度,那麼 server 這邊會分段成兩次以上來收發封包訊息,但是 client 端只做了一次 `recv`,於是只能接收到第一次傳來的封包。
將 `echo_server_worker` 的程式碼做改進:一次將訊息接收完,再把訊息傳回(須考量到 shutdown msg 不要把封包混淆了)。
#### 版本 `1` : Multiple `recvmsg` Single `sendmsg`
第一次收封包特別用以判斷這是不是 shutdown 訊息。第一次收完封包如果發現訊息大小到達預設 `bufsize` 臨界值,代表原始封包訊息可能超過 `bufsize` 了,則將 `buf` 更改為兩倍大小再收一次封包,直到完整收完訊息再寄出封包。
```c
void *rezalloc(void* old_ptr, size_t old_size,
size_t new_size, unsigned int mode)
{
void *buf = kzalloc(new_size, mode);
if (buf) {
memmove(buf, old_ptr, (likely(old_size < new_size) ? old_size : new_size));
kfree(old_ptr);
}
return buf;
}
static void echo_server_worker(struct work_struct *work)
{
...
int res = get_request(worker->sock, buf, bufsize);
if (res < 0) {
TRACE(recv_err); // get request error
} else if (res == 0) {
break; // get shutdown
} else if (res == bufsize) {
do {
int newsize = (bufsize << 1) + 1;
buf = rezalloc(buf, bufsize, newsize + 1, GFP_KERNEL);
res += get_request(worker->sock, buf + bufsize, newsize);
bufsize = newsize;
} while (res == bufsize);
}
TRACE(recv_msg);
...
}
```
這個實作有一個問題:假如訊息長度剛好為 bufsize 的倍數時,則在最後一次 buffer 剛好收完所有訊息了,但由於收入的長度剛好介於臨界大小,於是迴圈又再次去 `get_request` 試圖從 msg queue 中取得訊息,但因為 msg queue 早已空了,導致 socket 不斷乾等訊息,導致錯誤。
另外這個作法也違背了 [`recvmsg`](http://manpages.ubuntu.com/manpages/bionic/man2/recv.2.html) 設計的[目的](https://stackoverflow.com/questions/28105375/what-is-the-advantages-of-using-sendmsg-recvmsg):在有限的 buffer size 下允許分段接收封包訊息。
#### 版本 `2` : `recv(..., MSG_PEEK | MSG_TRUNC)`
利用 `recv` 的 flags [`MSG_PEEK | MSG_TRUNC`](https://stackoverflow.com/questions/2862071/how-large-should-my-recv-buffer-be-when-calling-recv-in-the-socket-library):使用 `MSG_PEEK` 先偷看 msg queue 訊息內容,使用 `MSG_TRUNC` 讓我們知道這個封包完整的訊息長度,如果 `bufsize` 太小,重新配置 `buf` 大小,再接收一次完整訊息。
但是 linux kernel module 沒有 `recv` 用法的函式,而 `recvmsg` 並不支援 `MSG_TRUNC` 的 flag。目前沒有從 kernel server 端解決問題的想法了,只好更改 `bench` 的實作。
#### 版本 `3` : 修正 `bench_worker`
1. `send reqstr`
2. 接收 `recv` 封包並確認訊息長度 `msglen` 不為零(空訊息代表收到 server shutdown msg)
3. 累記共收到的 `recvlen` 長度確認訊息是否接收完畢,如果還沒收完則回到步驟二。
```c
static void *bench_worker(void *str)
{
...
int recvlen = 0, msglen, reqlen = strlen(reqstr);
gettimeofday(&start, NULL);
send(sock_fd, reqstr, reqlen, 0);
while ((msglen = recv(sock_fd, recstr + recvlen, MAX_MSG_LEN, 0))
&& (recvlen += msglen) < reqlen);
gettimeofday(&end, NULL);
...
}
```
設定 server buffer size = 1024,傳送訊息大小為 4090 ,1000 個執行緒執行 50 次的結果:server 理應分成 4 段接發訊息,結果符合預期且並無錯誤訊息。
```
[50515.377028] kecho: recv_msg : 200000
[50515.377032] kecho: send_msg : 200000
[50515.377034] kecho: shdn_msg : 50000
```
## 實驗結果與討論
:::warning
TODO:
- [ ] 如何有效的配置實驗環境?
- [ ] cpu isolate? locality?
:::
### 實驗配置
1. `./bench` 封包傳入固定長度為 16 的隨機字串,`BENCH_COUNT = 50`
2. 註解正常封包傳接下的 `printf`/`printk` 指令
3. 除了 kecho `WQ_UNBOUND` 外,其他 local server 都設定在隔離的 `CPU=7`。以下為例:
```bash
sudo bash -c "echo 0 > /proc/sys/kernel/randomize_va_space"
sudo bash -c "echo performance > /sys/devices/system/cpu/cpu$(CPUID)/cpufreq/scaling_governor"
sudo bash -c "echo 1 > /sys/devices/system/cpu/intel_pstate/no_turbo"
sudo taskset -c $(CPUID) ./user-echo-server
./bench
```
### kecho cmwq `UNBOUND` / `BOUND`
使用 kecho 預設 `flags=WQ_UNBOUND` ,因為放在 unbound worker-pool 讓 cpu 可以有高度並行化的規劃 work item 到空閒的 CPU worker 中,使的在有許多 client request 時仍能即時回覆:
```shell
$ sudo insmod kecho.ko
$ ./bench
$ make plot
```

設定 kecho cmwq `flags=0` 的結果,將 flags 設定為 0 ,讓 workqueue local 在一個 CPU 的 normal worker-pool 。雖然綁定單一 worker-pool 提高了 locality ,然而也被限定只可使用綁定的 CPU 資源。
在 kecho 的情境裡,執行任務只是接收到封包字串回傳,沒有使用到 share memory 或沈重的運算需求,任務的負擔為回覆大量封包的能力,這使的 `BOUND` cmwq 相對 `UNBOUND` 不利,從實驗可見回應時間約座落在 2000~5000,但回應時間的離群值很大,整體回應時間分步也不穩定:
```c
$ sudo insmod kecho.ko bench=1
// kecho_mod.c 程式碼
kecho_wq = alloc_workqueue(MODULE_NAME, bench ? 0 : WQ_UNBOUND, 0);
```

### kecho cmwq `WQ_HIGHPRI` / `WQ_CPU_INTENSIVE`
更改 `flags=WQ_HIGHPRI` 可以讓 workqueue 綁定在 high priority worker-pool ,可讓執行單元不受 cpu scheduling 受到其他執行任務搶佔執行。然而基於 kecho 的任務性質, BOUND high priority 並未展現其優勢。
```c
$ sudo insmod kecho.ko bench=1
// kecho_mod.c 程式碼
kecho_wq = alloc_workqueue(MODULE_NAME, bench ? WQ_HIGHPRI : WQ_UNBOUND, 0);
```

`flags=WQ_CPU_INTENSIVE` 告訴 CPU 這個任務是很吃執行資源的任務,影響 CPU scheduling 的決策。再觀察一次結果,和 normal wq 的差別不大:
```c
$ sudo insmod kecho.ko bench=1
// kecho_mod.c 程式碼
kecho_wq = alloc_workqueue(MODULE_NAME, bench ? WQ_CPU_INTENSIVE : WQ_UNBOUND, 0);
```

搭配使用 `flags=WQ_HIGHPRI|WQ_CPU_INTENSIVE` ,結果和單使用 `WQ_HIGHPRI` 結果差不多。

:::warning
BOUND cmwq, `WQ_HIGHPRI` `WQ_CPU_INTENSIVE` 在 kecho 的情境下不利,而 UNBOUND 能夠活用裝置間的 CPU 資源安排,在 kecho 可以發揮最大效益。
:::
### user echo server
:::spoiler 沒有做實驗設置時的 user echo server 的結果:

:::
參考 [`huang-me`](https://hackmd.io/@huang-me/linux_kernel_ktcp#kecho%E3%80%81user-echo-server-%E6%95%88%E8%83%BD%E6%AF%94%E8%BC%83) 把所有 `printf` 刪除,並將 user-echo-server 執行在隔離的 CPU=7 上,再次比較結果:

:::warning
我發現當我留下 `handle_message_from_client` 裡的 `printf` ,回應時間雖不穩定,但平均回應時間反而更快...待理解。
:::spoiler 有 printf msg 的實驗圖

:::
## `drop-tcp-socket.c`