# Nvidia V100 installation on Ubuntu 18.04
###### tags: `2022/06` `nvidia` `v100` `ubuntu18.04`
:::info
<ins>(2022/6/14)</ins> I spent couples of days trying to install NVidia drivers, CUDA, CuNN using a server with V100 on Ubuntu 18.04, by following web article. Not able to get GPU working properly, nor figuring out the root cause yet. So document it in debugging section, with all the errors encountered.:cry:
>
> Eventually, I re-install Ubuntu OS again with a fresh start and follow NVIDIA official installation guides to complete the installation and working perfectly.
:::
---
**Table of Contents**
[TOC]
### 1. Ubuntu OS Installation
- Check the following link for [Installation of Ubuntu 18.04 and remote desktop](https://hackmd.io/@MarconiJiang/ubuntu1804installation)
---
### 2. NVIDIA V100 Installation
2.1 Official NVIDIA installation guides
- [NVIDIA Document Center](https://docs.nvidia.com/)
- [NVIDIA DATACENTER Documentation - Overview](https://docs.nvidia.com/datacenter/tesla/index.html)
- [NVIDIA Driver Installation Quickstart Guide](https://docs.nvidia.com/datacenter/tesla/tesla-installation-notes/index.html)
- [NVIDIA Driver Download v515.48.07 for CUDA Toolkit 11.7](https://www.nvidia.com.tw/Download/index.aspx)
- [NVIDIA CUDA Installation Guide for Linux(CUDA Toolkit v11.7.0)](https://docs.nvidia.com/cuda/cuda-installation-guide-linux/index.html)
- [NVIDIA CUDA Download v11.7](https://developer.nvidia.com/cuda-downloads)
- [NVIDIA CUDNN Documentation (cuDNN v8.4.1)](https://docs.nvidia.com/deeplearning/cudnn/install-guide/index.html)
- [NVIDIA CUDNN Downloads (cuDNN v8.4.1)](https://developer.nvidia.com/cudnn)
The CUDA software environment consists of three parts: (CuDNN is needed only to support Deep Neural Network for AI/ML applications.)
- CUDA Toolkit (libraries, runtime and tools) - User-mode SDK used to build CUDA applications
- CUDA driver - User-mode driver component used to run CUDA applications (e.g. libcuda.so on Linux systems)
- NVIDIA GPU device driver - Kernel-mode driver component for NVIDIA GPUs
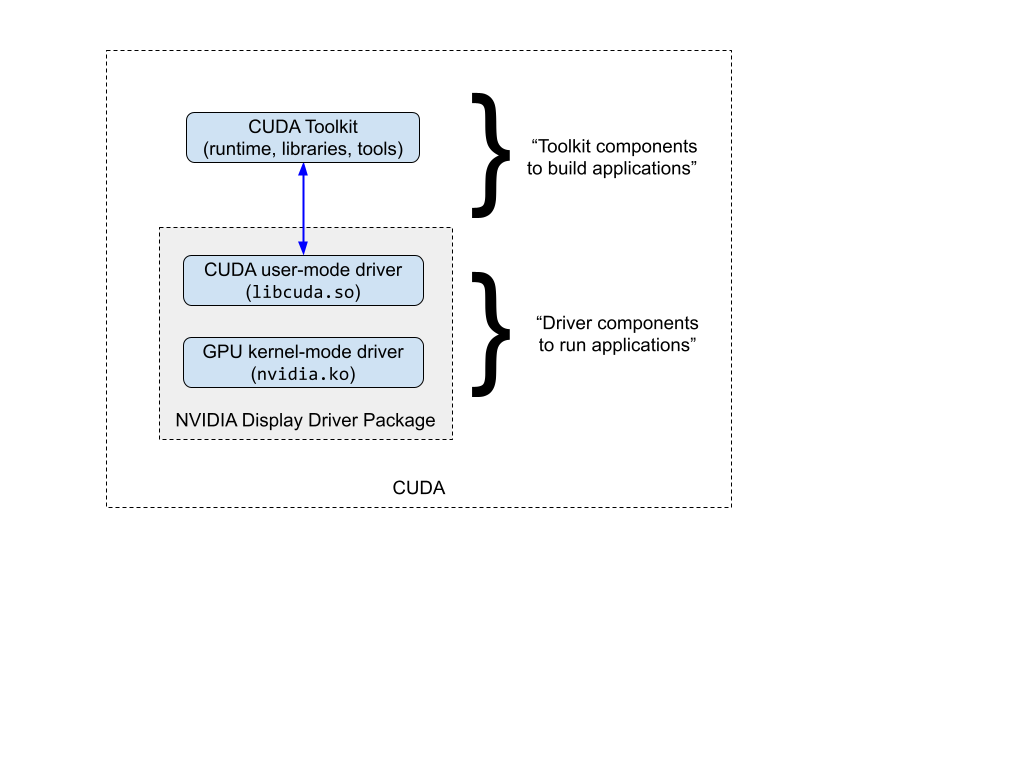
Table - CUDA and Drivers
| | R418 | R450 | R470 | R510 | R515 |
| ----------------- |:----------------------- |:----------------------- |:----------------------- |:----------------------- |:----------------------- |
|Branch Designation|Long Term Support Branch| Long Term Support Branch|Long Term Support Branch|Production Branch|Production Branch|
|End of Life|March 2022|July 2023|July 2024|January 2023|May 2023|
|Maximum CUDA Version Supported| CUDA 10.1.<br /><br />This driver branch supports CUDA 10.2, CUDA 11.0 and CUDA 11.x (through CUDA forward compatible upgrade).| CUDA 11.0+<br /><br />This driver branch supports CUDA 11.x (through CUDA enhanced compatibility).|CUDA 11.0+<br /><br />This driver branch supports CUDA 11.x (through CUDA enhanced compatibility).|CUDA 11.0+<br /><br />This driver branch supports CUDA 11.x (through CUDA enhanced compatibility).|CUDA 11.0+<br /><br />This driver branch supports CUDA 11.x (through CUDA enhanced compatibility). |
So, my strategy is the following:
1. Create a snapshot of current Ubuntu image, to avoid system crash during NVIDIA driver installation.
```
sudo apt-add-repository -y ppa:teejee2008/ppa
sudo apt update
sudo apt install timeshift
```
2. Install NVIDIA Driver (v515.48.07)
3. Install NVIDIA CUDA Toolkit (v11.7.0)
4. Install NVIDIA CUDNN (v8.4.1)
I did some search over internet, and found majority of them are covering only individual subject. Below article is one which can cover all, which I use it as reference only since it was a little bit outdated. And I will follow NVIDIA official document for implementation.
---
<font color="#0100FF">a. Installation guide from web article</font>
This [article - Installing the NVIDIA driver, CUDA and cuDNN on Linux (Ubuntu 20.04)](https://gist.github.com/kmhofmann/cee7c0053da8cc09d62d74a6a4c1c5e4) sounds good. Only uses it as reference. Instead, I will follow NVIDIA official document below for installation.
---
<font color="#0100FF">b. Follow NVIDIA official document - It is not difficult to follow this installation guide.</font>
Document in dash line, and action in solid.
```sequence
NVIDIA-->Ubuntu: https://docs.nvidia.com/
Note Left of NVIDIA: NVIDIA Documentation
NVIDIA-->Ubuntu: https://docs.nvidia.com/#data-center_nvidia-data-center-gpu-drivers
Note Left of NVIDIA: NVIDIA Datacenter GPU Driver
NVIDIA-->Ubuntu: https://docs.nvidia.com/datacenter/tesla/index.html
Note Left of NVIDIA: NVIDIA Driver Documentation
NVIDIA-->Ubuntu: https://docs.nvidia.com/datacenter/tesla/tesla-installation-notes/index.html
Note Left of NVIDIA: NVIDIA Driver Installation Quickstart Guide
```
#### ++2.1 - Pre-installation actions++
```sequence
NVIDIA-->Ubuntu: https://docs.nvidia.com/
Note Left of NVIDIA: NVIDIA Documentation
NVIDIA-->Ubuntu: https://docs.nvidia.com/#nvidia-cuda-toolkit
Note Left of NVIDIA: NVIDIA CUDA Toolkit
NVIDIA-->Ubuntu: https://docs.nvidia.com/cuda/index.html
Note Left of NVIDIA: NVIDIA CUDA Toolkit Documentation
NVIDIA-->Ubuntu: https://docs.nvidia.com/cuda/cuda-installation-guide-linux/index.html#pre-installation-actions
Note Left of NVIDIA: Pre-installation Actions
```
Before installing the NVIDIA driver on Linux, some pre-installation steps are recommended to:
- Verify the system has a CUDA-capable GPU
- Verify the system is running a supported version of Linux
- Verify the system has build tools such as make, gcc installed
- Verify the system has correct Linux kernel headers
For more detailed steps on completing each of these pre-installation steps, refer to the [pre-installation actions](https://docs.nvidia.com/cuda/cuda-installation-guide-linux/index.html#pre-installation-actions) in the CUDA Installation Guide for Linux.
++Pre-Installation-1. Verify You Have a CUDA-Capable GPU++
To verify that your GPU is CUDA-capable, go to your distribution's equivalent of System Properties, or, from the command line, enter:
```
$ lspci | grep -i nvidia
58:00.0 3D controller: NVIDIA Corporation GV100GL [Tesla V100 PCIe 32GB] (rev a1)
d8:00.0 3D controller: NVIDIA Corporation GV100GL [Tesla V100 PCIe 32GB] (rev a1)
```
++Pre-Installation-2. Verify You Have a Supported Version of Linux++
The CUDA Development Tools are only supported on some specific distributions of Linux. These are listed in the CUDA Toolkit release notes. (See below table extracted from release notes)
To determine which distribution and release number you're running, type the following at the command line:
```
$ uname -m && cat /etc/*release
x86_64
DISTRIB_ID=Ubuntu
DISTRIB_RELEASE=18.04
DISTRIB_CODENAME=bionic
DISTRIB_DESCRIPTION="Ubuntu 18.04.6 LTS"
NAME="Ubuntu"
VERSION="18.04.6 LTS (Bionic Beaver)"
ID=ubuntu
ID_LIKE=debian
PRETTY_NAME="Ubuntu 18.04.6 LTS"
VERSION_ID="18.04"
HOME_URL="https://www.ubuntu.com/"
SUPPORT_URL="https://help.ubuntu.com/"
BUG_REPORT_URL="https://bugs.launchpad.net/ubuntu/"
PRIVACY_POLICY_URL="https://www.ubuntu.com/legal/terms-and-policies/privacy-policy"
VERSION_CODENAME=bionic
UBUNTU_CODENAME=bionic
```
Table 1. Native Linux Distribution Support in CUDA 11.7
|Distribution |Kernel1 |Default GCC |GLIBC |GCC2,3 |ICC3 |NVHPC3 |XLC3 |CLANG |Arm C/C++|
| ------ |:--------:|:--------:|:--------:|:--------:|:--------:|:--------:|:--------:|:--------:|:--------:|
|Ubuntu 18.04.z (z <= 6) |5.4.0-89 |7.5.0 |2.27 |11 |2021 |22.02 |NO |13 |NO|
++Pre-Installation-3. Verify the System Has gcc Installed++
The gcc compiler is required for development using the CUDA Toolkit. It is not required for running CUDA applications. It is generally installed as part of the Linux installation, and in most cases the version of gcc installed with a supported version of Linux will work correctly.
To verify the version of gcc installed on your system, type the following on the command line:
```
$ gcc --version
Command 'gcc' not found, but can be installed with:
sudo apt install gcc
$ sudo apt install build-essential
$ gcc --version
gcc (Ubuntu 7.5.0-3ubuntu1~18.04) 7.5.0
Copyright (C) 2017 Free Software Foundation, Inc.
This is free software; see the source for copying conditions. There is NO
warranty; not even for MERCHANTABILITY or FITNESS FOR A PARTICULAR PURPOSE.
```
++Pre-Installation-4. Verify the System has the Correct Kernel Headers and Development Packages Installed++
The CUDA Driver requires that the kernel headers and development packages for the running version of the kernel be installed at the time of the driver installation, as well whenever the driver is rebuilt. For example, if your system is running kernel version 3.17.4-301, the 3.17.4-301 kernel headers and development packages must also be installed.
While the Runfile installation performs no package validation, the RPM and Deb installations of the driver will make an attempt to install the kernel header and development packages if no version of these packages is currently installed. However, it will install the latest version of these packages, which may or may not match the version of the kernel your system is using. Therefore, it is best to manually ensure the correct version of the kernel headers and development packages are installed prior to installing the CUDA Drivers, as well as whenever you change the kernel version.
The version of the kernel your system is running can be found by running the following command:
```
$ uname -r
5.4.0-117-generic
```
This is the version of the kernel headers and development packages that must be installed prior to installing the CUDA Drivers. This command will be used multiple times below to specify the version of the packages to install. Note that below are the common-case scenarios for kernel usage. More advanced cases, such as custom kernel branches, should ensure that their kernel headers and sources match the kernel build they are running.
Note: If you perform a system update which changes the version of the linux kernel being used, make sure to rerun the commands below to ensure you have the correct kernel headers and kernel development packages installed. Otherwise, the CUDA Driver will fail to work with the new kernel.
Ubuntu
The kernel headers and development packages for the currently running kernel can be installed with:
```
$ sudo apt-get install linux-headers-$(uname -r)
Reading package lists... Done
Building dependency tree
Reading state information... Done
linux-headers-5.4.0-117-generic is already the newest version (5.4.0-117.132~18.04.1).
linux-headers-5.4.0-117-generic set to manually installed.
The following packages were automatically installed and are no longer required:
libxatracker2 libxss1 libxvmc1
Use 'sudo apt autoremove' to remove them.
0 upgraded, 0 newly installed, 0 to remove and 30 not upgraded.
```
---
#### ++2.2 - NVIDIA Driver installation (v515.48.07)++
```sequence
NVIDIA-->Ubuntu: https://docs.nvidia.com/
Note Left of NVIDIA: NVIDIA Documentation
NVIDIA-->Ubuntu: https://docs.nvidia.com/#data-center_nvidia-data-center-gpu-drivers
Note Left of NVIDIA: NVIDIA Datacenter GPU Driver
NVIDIA-->Ubuntu: https://docs.nvidia.com/datacenter/tesla/index.html
Note Left of NVIDIA: NVIDIA Driver Documentation
NVIDIA-->Ubuntu: https://docs.nvidia.com/datacenter/tesla/tesla-installation-notes/index.html
Note Left of NVIDIA: NVIDIA Driver Installation Quickstart Guide
```
++NVIDIA Driver Installer Formats++
NVIDIA drivers are available in three formats for use with Linux distributions:
- Runfile installers
- Package managers
- Containerized drivers
Normally, I preferred to use package managers for tool installation as it will check dependency. According to NVIDIA CUDA Installation Guide for Linux, it also recommends to use distribution-specific packages. That also means recommending to use the package manager for NVIDIA Driver/CUDA installation. So I will use the Package Manager for rest of NVIDIA related installation.
```
2.6 Choose an Installation Method
The CUDA Toolkit can be installed using either of two different installation mechanisms: distribution-specific packages (RPM and Deb packages), or a distribution-independent package (runfile packages).
The distribution-independent package has the advantage of working across a wider set of Linux distributions, but does not update the distribution's native package management system. The distribution-specific packages interface with the distribution's native package management system. It is recommended to use the distribution-specific packages, where possible. Choose an Installation Method
The CUDA Toolkit can be installed using either of two different installation mechanisms: distribution-specific packages (RPM and Deb packages), or a distribution-independent package (runfile packages).
The distribution-independent package has the advantage of working across a wider set of Linux distributions, but does not update the distribution's native package management system. The distribution-specific packages interface with the distribution's native package management system. It is recommended to use the distribution-specific packages, where possible.
```
++Install-Driver-2. Install CUDA repository publick GPG key++
Install the CUDA repository public GPG key. (This can be done via the cuda-keyring package or a manual installation of the key.)
```
$ distribution=$(. /etc/os-release;echo $ID$VERSION_ID | sed -e 's/\.//g')
$ wget https://developer.download.nvidia.com/compute/cuda/repos/$distribution/x86_64/cuda-keyring_1.0-1_all.deb
$ sudo dpkg -i cuda-keyring_1.0-1_all.deb
```
++Install-Driver-3. Install NVIDIA Driver++
Update the APT repository cache and install the driver using the cuda-drivers meta-package. (Use the --no-install-recommends option for a lean driver install without any dependencies on X packages. This is particularly useful for headless installations on cloud instances.)
```
$ sudo apt-get update
$ sudo apt-get -y install cuda-drivers
```
++Install-Driver-4. Post-installation++
It requires a reboot to enable the driver to work. After reboot, use nvidia-smi to check if the driver works.
```
$ sudo reboot
$ nvidia-smi
```
---
#### ++2.3 - NVIDIA CUDA Toolkit installation (v11.7.0)++
```sequence
NVIDIA-->Ubuntu: https://docs.nvidia.com/
Note Left of NVIDIA: NVIDIA Documentation
NVIDIA-->Ubuntu: https://docs.nvidia.com/#nvidia-cuda-toolkit
Note Left of NVIDIA: NVIDIA CUDA Toolkit
NVIDIA-->Ubuntu: https://docs.nvidia.com/cuda/index.html
Note Left of NVIDIA: NVIDIA CUDA Toolkit Documentation
NVIDIA-->Ubuntu: https://docs.nvidia.com/cuda/cuda-installation-guide-linux/index.html
Note Left of NVIDIA: NVIDIA CUDA Installation Guide for Linux
```
https://docs.nvidia.com/#nvidia-cuda-toolkit
++Install-CUDA-1. Introduction of CUDA®++
- CUDA® is a parallel computing platform and programming model invented by NVIDIA®. It enables dramatic increases in computing performance by harnessing the power of the graphics processing unit (GPU).
- CUDA was developed with several design goals in mind:
- Provide a small set of extensions to standard programming languages, like C, that enable a straightforward implementation of parallel algorithms. With CUDA C/C++, programmers can focus on the task of parallelization of the algorithms rather than spending time on their implementation.
- Support heterogeneous computation where applications use both the CPU and GPU. Serial portions of applications are run on the CPU, and parallel portions are offloaded to the GPU. As such, CUDA can be incrementally applied to existing applications. The CPU and GPU are treated as separate devices that have their own memory spaces. This configuration also allows simultaneous computation on the CPU and GPU without contention for memory resources.
- CUDA-capable GPUs have hundreds of cores that can collectively run thousands of computing threads. These cores have shared resources including a register file and a shared memory. The on-chip shared memory allows parallel tasks running on these cores to share data without sending it over the system memory bus.
++Install_CUDA-2. System Requirements++
Assume it was completed with ++2.b.1 - Pre-installation actions++
++Intall_CUDA-3. Install CUDA SDK++
++Intall_CUDA-3.1.++ Remove Outdated Signing Key:
```
$ sudo apt-key del 7fa2af80
```
++Intall_CUDA-3.2.++ Install the new cuda-keyring package with Network Repo Installation for Ubuntu
The new GPG public key for the CUDA repository is 3bf863cc. This must be enrolled on the system, either using the cuda-keyring package or manually; the apt-key command is deprecated and not recommended.
Install the new cuda-keyring package:
```
# wget https://developer.download.nvidia.com/compute/cuda/repos/$distro/$arch/cuda-keyring_1.0-1_all.deb
# where $distro/$arch should be replaced by one of the following:
ubuntu1604/x86_64
ubuntu1804/cross-linux-sbsa
ubuntu1804/ppc64el
ubuntu1804/sbsa
ubuntu1804/x86_64
ubuntu2004/cross-linux-sbsa
ubuntu2004/sbsa
ubuntu2004/x86_64
ubuntu2204/sbsa
ubuntu2204/x86_64
$ wget https://developer.download.nvidia.com/compute/cuda/repos/ubuntu1804/x86_64/cuda-keyring_1.0-1_all.deb
$ sudo dpkg -i cuda-keyring_1.0-1_all.deb
```
++Intall_CUDA-3.3.++ Install CUDA SDK
```
# Update the Apt repository cache:
$ sudo apt-get update
# Install CUDA SDK:
# Note: These two commands must be executed separately.
$ sudo apt-get install cuda
# To include all GDS packages:
$ sudo apt-get install nvidia-gds
# Reboot the system
$ sudo reboot
```
++Intall_CUDA-4. Perform the Post-installation Actions++
++Post-Install-4.1++ Environment Setup
The PATH variable needs to be updated. Or, permanently add it to a file, like `my-add-nvidia-path.sh` under directory of `/etc/profile.d/`. Check [this Ubuntu article](https://help.ubuntu.com/community/EnvironmentVariables#Persistent_environment_variables) for details.
```
export PATH=/usr/local/cuda-11.7/bin${PATH:+:${PATH}}
```
In addition, when using the runfile installation method, the LD_LIBRARY_PATH variable needs to contain /usr/local/cuda-11.7/lib64 on a 64-bit system, or /usr/local/cuda-11.7/lib on a 32-bit system
To change the environment variables for 64-bit operating systems:
```
$ export LD_LIBRARY_PATH=/usr/local/cuda-11.7/lib64\
${LD_LIBRARY_PATH:+:${LD_LIBRARY_PATH}}
```
++Post-Install-4.2++ Verify the Driver Version
If you installed the driver, verify that the correct version of it is loaded. If you did not install the driver, or are using an operating system where the driver is not loaded via a kernel module, such as L4T, skip this step.
When the driver is loaded, the driver version can be found by executing the command
```
$ cat /proc/driver/nvidia/version
NVRM version: NVIDIA UNIX x86_64 Kernel Module 515.48.07 Fri May 27 03:26:43 UTC 2022
GCC version: gcc version 7.5.0 (Ubuntu 7.5.0-3ubuntu1~18.04)
$ nvcc --version
nvcc: NVIDIA (R) Cuda compiler driver
Copyright (c) 2005-2022 NVIDIA Corporation
Built on Tue_May__3_18:49:52_PDT_2022
Cuda compilation tools, release 11.7, V11.7.64
Build cuda_11.7.r11.7/compiler.31294372_0
```
++Post-Install-4.3++ CUDA Samples and Running Binary
CUDA Samples are now located in https://github.com/nvidia/cuda-samples, which includes instructions for obtaining, building, and running the samples.
After compilation, find and run deviceQuery under ~/cuda-samples/Samples/1_Utilities/deviceQuery. If the CUDA software is installed and configured correctly, the output for deviceQuery should look similar to what shows below.
```
$ git clone https://github.com/nvidia/cuda-samples
$ cd cuda-samples/Samples/1_Utilities/deviceQuery
$ make
$ ./deviceQuery
./deviceQuery Starting...
CUDA Device Query (Runtime API) version (CUDART static linking)
Detected 2 CUDA Capable device(s)
Device 0: "Tesla V100-PCIE-32GB"
CUDA Driver Version / Runtime Version 11.7 / 11.7
CUDA Capability Major/Minor version number: 7.0
Total amount of global memory: 32510 MBytes (34089664512 bytes)
(080) Multiprocessors, (064) CUDA Cores/MP: 5120 CUDA Cores
GPU Max Clock rate: 1380 MHz (1.38 GHz)
Memory Clock rate: 877 Mhz
Memory Bus Width: 4096-bit
L2 Cache Size: 6291456 bytes
Maximum Texture Dimension Size (x,y,z) 1D=(131072), 2D=(131072, 65536), 3D=(16384, 16384, 16384)
Maximum Layered 1D Texture Size, (num) layers 1D=(32768), 2048 layers
Maximum Layered 2D Texture Size, (num) layers 2D=(32768, 32768), 2048 layers
Total amount of constant memory: 65536 bytes
Total amount of shared memory per block: 49152 bytes
Total shared memory per multiprocessor: 98304 bytes
Total number of registers available per block: 65536
Warp size: 32
Maximum number of threads per multiprocessor: 2048
Maximum number of threads per block: 1024
Max dimension size of a thread block (x,y,z): (1024, 1024, 64)
Max dimension size of a grid size (x,y,z): (2147483647, 65535, 65535)
Maximum memory pitch: 2147483647 bytes
Texture alignment: 512 bytes
Concurrent copy and kernel execution: Yes with 7 copy engine(s)
Run time limit on kernels: No
Integrated GPU sharing Host Memory: No
Support host page-locked memory mapping: Yes
Alignment requirement for Surfaces: Yes
Device has ECC support: Enabled
Device supports Unified Addressing (UVA): Yes
Device supports Managed Memory: Yes
Device supports Compute Preemption: Yes
Supports Cooperative Kernel Launch: Yes
Supports MultiDevice Co-op Kernel Launch: Yes
Device PCI Domain ID / Bus ID / location ID: 0 / 88 / 0
Compute Mode:
< Default (multiple host threads can use ::cudaSetDevice() with device simultaneously) >
Device 1: "Tesla V100-PCIE-32GB"
CUDA Driver Version / Runtime Version 11.7 / 11.7
CUDA Capability Major/Minor version number: 7.0
Total amount of global memory: 32510 MBytes (34089664512 bytes)
(080) Multiprocessors, (064) CUDA Cores/MP: 5120 CUDA Cores
GPU Max Clock rate: 1380 MHz (1.38 GHz)
Memory Clock rate: 877 Mhz
Memory Bus Width: 4096-bit
L2 Cache Size: 6291456 bytes
Maximum Texture Dimension Size (x,y,z) 1D=(131072), 2D=(131072, 65536), 3D=(16384, 16384, 16384)
Maximum Layered 1D Texture Size, (num) layers 1D=(32768), 2048 layers
Maximum Layered 2D Texture Size, (num) layers 2D=(32768, 32768), 2048 layers
Total amount of constant memory: 65536 bytes
Total amount of shared memory per block: 49152 bytes
Total shared memory per multiprocessor: 98304 bytes
Total number of registers available per block: 65536
Warp size: 32
Maximum number of threads per multiprocessor: 2048
Maximum number of threads per block: 1024
Max dimension size of a thread block (x,y,z): (1024, 1024, 64)
Max dimension size of a grid size (x,y,z): (2147483647, 65535, 65535)
Maximum memory pitch: 2147483647 bytes
Texture alignment: 512 bytes
Concurrent copy and kernel execution: Yes with 7 copy engine(s)
Run time limit on kernels: No
Integrated GPU sharing Host Memory: No
Support host page-locked memory mapping: Yes
Alignment requirement for Surfaces: Yes
Device has ECC support: Enabled
Device supports Unified Addressing (UVA): Yes
Device supports Managed Memory: Yes
Device supports Compute Preemption: Yes
Supports Cooperative Kernel Launch: Yes
Supports MultiDevice Co-op Kernel Launch: Yes
Device PCI Domain ID / Bus ID / location ID: 0 / 216 / 0
Compute Mode:
< Default (multiple host threads can use ::cudaSetDevice() with device simultaneously) >
> Peer access from Tesla V100-PCIE-32GB (GPU0) -> Tesla V100-PCIE-32GB (GPU1) : Yes
> Peer access from Tesla V100-PCIE-32GB (GPU1) -> Tesla V100-PCIE-32GB (GPU0) : Yes
deviceQuery, CUDA Driver = CUDART, CUDA Driver Version = 11.7, CUDA Runtime Version = 11.7, NumDevs = 2
Result = PASS
```
++Post-Install-4.4++ Install Third-party Libraries (optional)
```
sudo apt-get install g++ freeglut3-dev build-essential libx11-dev \
libxmu-dev libxi-dev libglu1-mesa libglu1-mesa-dev libfreeimage-dev
```
++Post-Install-4.5++ Install Persistence Daemon (Recommended, but I got error in this.)
NVIDIA is providing a user-space daemon on Linux to support persistence of driver state across CUDA job runs. The daemon approach provides a more elegant and robust solution to this problem than persistence mode. For more details on the NVIDIA Persistence Daemon, see the documentation here.
The NVIDIA Persistence Daemon can be started as the root user by running:
```
$ sudo /usr/bin/nvidia-persistenced --verbose
nvidia-persistenced failed to initialize. Check syslog for more details.
```
This command should be run on boot. Consult your Linux distribution's init documentation for details on how to automate this.
---
#### ++2.4 - NVIDIA cuDNN installation (8.4.1)++
```sequence
NVIDIA-->Ubuntu: https://docs.nvidia.com/
Note Left of NVIDIA: NVIDIA Documentation
NVIDIA-->Ubuntu: https://docs.nvidia.com/#nvidia-cudnn
Note Left of NVIDIA: NVIDIA cuDNN Documentation
NVIDIA-->Ubuntu: https://docs.nvidia.com/deeplearning/cudnn/index.html
Note Left of NVIDIA: NVIDIA cuDNN Documentation
NVIDIA-->Ubuntu: https://docs.nvidia.com/deeplearning/cudnn/install-guide/index.html
Note Left of NVIDIA: NVIDIA cuDNN Installation Guide
```
The NVIDIA® CUDA® Deep Neural Network library (cuDNN) is a GPU-accelerated library of primitives for deep neural networks. cuDNN provides highly tuned implementations for standard routines such as forward and backward convolution, pooling, normalization, and activation layers. cuDNN is part of the NVIDIA Deep Learning SDK.
++Install-cuDNN-1++ Prerequisites
++Install-cuDNN-1.1++ Support Matrix
For the latest compatibility software versions of the OS, NVIDIA CUDA, the CUDA driver, and the NVIDIA hardware, see the NVIDIA cuDNN [Support Matrix](https://docs.nvidia.com/deeplearning/cudnn/support-matrix/index.html).
Table. Supported NVIDIA Hardware and CUDA Version
|cuDNN Package |Supported NVIDIA Hardware |CUDA Toolkit Version |CUDA Compute Capability |Supports static linking?|
|---|:---|:---:|:---:|:---:|
|cuDNN 8.4.1 for CUDA 11.x2|NVIDIA Ampere Architecture</br>NVIDIA Turing™</br>NVIDIA Volta™</br>NVIDIA Pascal™</br>NVIDIA Maxwell®</br>NVIDIA Kepler™|11.7 |SM 3.5 and later |Yes|
|||11.6|||
|||11.5|||
|||11.4|||
|||11.3|||
|||11.2||No|
|||11.1|||
|||11.0|||
|cuDNN 8.4.1 for CUDA 10.2|NVIDIA Turing</br>NVIDIA Volta</br>Xavier™</br>NVIDIA Pascal</br>NVIDIA Maxwell</br>NVIDIA Kepler|10.2 |SM 3.0 and later |Yes|
We had checked that before CUDA installation, though not sure what "SM 3.5" means. May figure out later.
++Install-cuDNN-1.2++ CPU Architecture and OS Requirements
The following tables highlight the compatibility of cuDNN versions with the various supported OS versions.
Table. Linux Versions for cuDNN
|Architecture |OS Name |OS Version |Distro Information|||
|----|:---|:---|:---:|:---:|:---:|
||||Kernel |GCC |Glibc|
|x86_64 |RHEL |7.x |3.10.0 |4.8.53 |2.19|
|||8.x |4.18 |8.3.1 |2.28|
||Ubuntu |20.04 |5.4.0 |9.3.0 |2.31|
|||18.04 |4.15.0 |8.2.0 |2.27|
|ppc64le |RHEL |8.x |4.18 |8.3.1 |2.28|
|AArch64 incorporates ARM® based CPU cores for Server Base System Architecture (SBSA). |RHEL |8.x |4.18 |8.3.1 |2.28|
||Ubuntu |20.04 |5.4.0 |9.3.0 |2.27|
|AArch64 |Ubuntu |18.04 |4.15 |7.3.1 |2.31|
I am not so sure anout GCC version, but it should be checked earlier, too.
++Install-cuDNN-1.3++ Installing NVIDIA Graphics Drivers
This was done and completed earlier.
++Install-cuDNN-1.3++ Installing the CUDA Toolkit for Linux
This was done and completed earlier.
++Install-cuDNN-1.4++ Installing Zlib
About this task
For Ubuntu users, to install the zlib package, run:
```
$ sudo apt-get install zlib1g
```
++Install-cuDNN-1.4++ Downloading cuDNN for Linux
In order to download cuDNN, ensure you are registered for the [NVIDIA Developer Program](https://developer.nvidia.com/accelerated-computing-developer). (Can be easy, can log in via gmail account)
Procedure
- Go to: [NVIDIA cuDNN home page](https://developer.nvidia.com/cudnn).
- Click Download.
- Complete the short survey and click Submit.
- Accept the Terms and Conditions. A list of available download versions of cuDNN displays.
- Select the cuDNN version that you want to install. A list of available resources displays.
++Install-cuDNN-3++ Installing on Linux
The following steps describe how to build a cuDNN dependent program.
In the following sections, the assumption of directory path is based on
```
# your CUDA directory path is referred to as /usr/local/cuda/
# your cuDNN download path is referred to as <cudnnpath>
```
The above directory path does not mean too much to me when I use package manager for installation. The CUDA directory eventually points to `/user/loca/cuda-11.7`, where the directory of CUDA installed.
```
ls -l /usr/local/
lrwxrwxrwx 1 root root 22 六 15 22:30 cuda -> /etc/alternatives/cuda
lrwxrwxrwx 1 root root 25 六 15 22:30 cuda-11 -> /etc/alternatives/cuda-11
ls -l /etc/alternatives/cuda
lrwxrwxrwx 1 root root 20 六 15 22:30 /etc/alternatives/cuda -> /usr/local/cuda-11.7
ls -l /etc/alternatives/cuda-11
lrwxrwxrwx 1 root root 20 六 15 22:30 /etc/alternatives/cuda-11 -> /usr/local/cuda-11.7
```
++Install-cuDNN-3.1++ Choose the installation method
The following steps describe how to build a cuDNN dependent program. Choose the installation method that meets your environment needs.
- Tar File Installation applies to all Linux platforms
- Debian Local Installation
- RPM Local Installation
- Package Manager Installation (Network Installation)
Same as the package manager I chose for CUDA installation, I also chose package installation for Ubuntu 18.04.
++Install-cuDNN-3.2++ Ubuntu Network Installation
These are the installation instructions for Ubuntu 18.04 and 20.04 users.
Procedure
```
# Enable the repository. The following commands enable the repository containing information about the appropriate cuDNN libraries online for Ubuntu 18.04 and 20.04.
$ wget https://developer.download.nvidia.com/compute/cuda/repos/${OS}/x86_64/cuda-${OS}.pin
$ sudo mv cuda-${OS}.pin /etc/apt/preferences.d/cuda-repository-pin-600
$ sudo apt-key adv --fetch-keys https://developer.download.nvidia.com/compute/cuda/repos/${OS}/x86_64/7fa2af80.pub
$ sudo add-apt-repository "deb https://developer.download.nvidia.com/compute/cuda/repos/${OS}/x86_64/ /"
$ sudo apt-get update
# Install the cuDNN library:
$ sudo apt-get install libcudnn8=${cudnn_version}-1+${cuda_version}
$ sudo apt-get install libcudnn8-dev=${cudnn_version}-1+${cuda_version}
$ sudo apt-get install libcudnn8-samples={cudnn_version}-1+{cuda_version}
# Where:
# ${OS} is ubuntu1804
# ${cudnn_version} is 8.4.1.*
# ${cuda_version} is cuda11.7
```
However, it reported error as follows:
E: Version '8.4.1.50-1+cuda11.7' for 'libcudnn8' was not found
So, I modified the commands as below. And it installed ""
```
$ sudo apt-get install libcudnn8
$ sudo apt-get install libcudnn8-dev
```
And it installed `libcudnn8 (8.4.1.50-1+cuda11.6)`version.
```
$ sudo apt-get install libcudnn8
......
Get:1 https://developer.download.nvidia.com/compute/cuda/repos/ubuntu1804/x86_64 libcudnn8 8.4.1.50-1+cuda11.6 [420 MB]
Fetched 295 MB in 2min 19s (2122 kB/s)
Selecting previously unselected package libcudnn8.
(Reading database ... 223413 files and directories currently installed.)
Preparing to unpack .../libcudnn8_8.4.1.50-1+cuda11.6_amd64.deb ...
Unpacking libcudnn8 (8.4.1.50-1+cuda11.6) ...
Setting up libcudnn8 (8.4.1.50-1+cuda11.6) ...
```
And I checked the NVIDIA directory `https://developer.download.nvidia.com/compute/cuda/repos/ubuntu1804/x86_64/` and found the latest `libcudnn8_8.4.1.50` can only support `cuda 11.6`.
```
https://developer.download.nvidia.com/compute/cuda/repos/ubuntu1804/x86_64/
|
- libcudnn8_8.4.0.27-1+cuda10.2_amd64.deb 224MB 2022-04-01 02:25
|
- libcudnn8_8.4.0.27-1+cuda11.6_amd64.deb 402MB 2022-04-01 02:21
|
- libcudnn8_8.4.1.50-1+cuda10.2_amd64.deb 225MB 2022-05-22 20:26
|
- libcudnn8_8.4.1.50-1+cuda11.6_amd64.deb 401MB 2022-05-20 22:34
```
Same version `libcudnn8 (8.4.1.50-1+cuda11.6)`for libcudnn8-dev.
```
$ sudo apt-get install libcudnn8-dev
......
Get:1 https://developer.download.nvidia.com/compute/cuda/repos/ubuntu1804/x86_64 libcudnn8-dev 8.4.1.50-1+cuda11.6 [447 MB]
Fetched 447 MB in 5min 43s (1304 kB/s)
Selecting previously unselected package libcudnn8-dev.
(Reading database ... 223430 files and directories currently installed.)
Preparing to unpack .../libcudnn8-dev_8.4.1.50-1+cuda11.6_amd64.deb ...
Unpacking libcudnn8-dev (8.4.1.50-1+cuda11.6) ...
Setting up libcudnn8-dev (8.4.1.50-1+cuda11.6) ...
update-alternatives: using /usr/include/x86_64-linux-gnu/cudnn_v8.h to provide /usr/include/cudnn.h (libcudnn) in auto mode
```
++Install-cuDNN-3.3++ Post Installation Verification
[CUDNN Installation Guide - 2.4 Verifying the Install on Linux](https://docs.nvidia.com/deeplearning/cudnn/install-guide/index.html#verify)
To verify that cuDNN is installed and is running properly, compile the mnistCUDNN sample located in the /usr/src/cudnn_samples_v8 directory in the Debian file.
Procedure
```
# Copy the cuDNN samples to a writable path.
$ cp -r /usr/src/cudnn_samples_v8/ $HOME
# Go to the writable path.
$ cd $HOME/cudnn_samples_v8/mnistCUDNN
# Compile the mnistCUDNN sample.
$make clean && make
# Run the mnistCUDNN sample.
$ ./mnistCUDNN
# If cuDNN is properly installed and running on your Linux system, you will see a message similar to the following:
Test passed!
```
Sometime, it might report the files missing, though `cudnn_samples` directory was created. I found there are two ways to install, first one using git is simple and works fine.
++Install-cuDNN-3.3.1++ Use git to Download cudnn-samples program.
```
$ sudo git clone https://github.com/NVIDIA/cuda-samples.git
```
++Install-cuDNN-3.3.2++ Use package manager to Download cudnn-samples program.
```
$ sudo apt-get install libcudnn8-samples
```
::: success
Congratulations to reach this far, and complete the NVIDIA GPU installation for CUDA and cuDNN. You can enojoy the coding CUDA now. Below articles are just some experiences sharing of bug and debug during installation, can be skipped.
:::
---
### 3. Debugging
:::info
Below articles are just some experiences sharing of bug and debug during installation, can be skipped.
:::
Below is just for references, when I did do some trial-and-errors when I started first with internet articles. And it becomes a mess in the end. That is the reason I had to start to scratch by re-installing Ubuntu again. Those are only for reference.
++3.0. GCC version?++
According to this [article](https://clay-atlas.com/us/blog/2021/05/12/linux-en-install-cuda-cudnn-unbuntu/), it suggests gcc 6.x. The reason why it is recommended to install the gcc 6.x version instead of the default gcc 7.x of Ubuntu 18.04 is because gcc 6.x is relatively smooth when compiling some CUDA packages later, I have encountered gcc 7.x error problem.
```
sudo apt-get update && \
sudo apt-get install build-essential software-properties-common -y && \
sudo add-apt-repository ppa:ubuntu-toolchain-r/test -y && \
sudo apt-get update && \
sudo apt-get install gcc-6 g++-6 -y && \
sudo update-alternatives --install /usr/bin/gcc gcc /usr/bin/gcc-6 60 --slave /usr/bin/g++ g++ /usr/bin/g++-6 && \
gcc -v
```
++3.1. Found CUDA version is old, version 7. But failed to install newer version of 11.++
```
$ sudo apt-get -y install cuda
The following packages have unmet dependencies:
cuda : Depends: cuda-11-1 (>= 11.1.0) but it is not going to be installed
E: Unable to correct problems, you have held broken packages.
```
++3.2. Find resolution to upgrade to version 11 from [link](https://askubuntu.com/questions/1280205/problem-while-installing-cuda-toolkit-in-ubuntu-18-04)++
```
$ sudo apt clean
$ sudo apt update
$ sudo apt purge nvidia-*
$ sudo apt autoremove
$ sudo apt install -y cuda
```
++3.3. Then, faced another issue.++
```
marconi@harold-stark:~$ nvidia-smi
NVIDIA-SMI has failed because it couldn't communicate with the NVIDIA driver.
Make sure that the latest NVIDIA driver is installed and running.
```
++3.4. 编译mnistCUDNN时出错:fatal error: FreeImage.h: No such file or directory++
进入/usr/src/cudnn_samples_v8/mnistCUDNN/ 中
```
$ make clean
$ make
...
test.c:1:10: fatal error: FreeImage.h: No such file or directory
```
Follow this [link](https://blog.csdn.net/xhw205/article/details/116297555), and find the resolution of following
```
$ sudo apt install libfreeimage3 libfreeimage-dev
```
++3.5. Unable to find cuDNN sample files to verify installation++
Find the [article](https://askubuntu.com/questions/1026295/unable-to-find-cudnn-sample-files-to-verify-installation), and follow the [NVIDIA CUDNN documentation](#NVIDIA_V100_Installation) Section 2.3.2. Step 7 to install cuDNN sample files
```
$ sudo apt-get install libcudnn8-samples
```
Extract of NVIDIA CUDNN document
```
2.3.2. Debian Local Installation
Download the Debian local repository installation package. Before issuing the following commands, you must replace X.Y and 8.x.x.x with your specific CUDA and cuDNN versions.
Procedure
Navigate to your <cudnnpath> directory containing the cuDNN Debian local installer file.
# Enable the local repository.
$ sudo dpkg -i cudnn-local-repo-${OS}-8.x.x.x_1.0-1_amd64.deb
# Or
$ sudo dpkg -i cudnn-local-repo-${OS}-8.x.x.x_1.0-1_arm64.deb
# Import the CUDA GPG key.
$ sudo cp /var/cudnn-local-repo-*/cudnn-local-*-keyring.gpg /usr/share/keyrings/
# Refresh the repository metadata.
$ sudo apt-get update
# Install the runtime library.
$ sudo apt-get install libcudnn8=8.x.x.x-1+cudaX.Y
# Install the developer library.
$ sudo apt-get install libcudnn8-dev=8.x.x.x-1+cudaX.Y
# Install the code samples and the cuDNN library documentation.
$ sudo apt-get install libcudnn8-samples=8.x.x.x-1+cudaX.Y
```
### 4. Remove NVIDIA V100 Drivers
NVIDIA official guide to remove driver and CUDA kit - [NVIDIA CUDA Installation Guide for Linux - 17. Removing CUDA Toolkit and Driver](https://docs.nvidia.com/cuda/cuda-installation-guide-linux/index.html#removing-cuda-tk-and-driver)
[:arrow_left:Previous article - Install Ubuntu OS](https://hackmd.io/@MarconiJiang/ubuntu1804installation)
[:arrow_right:Next article - Install Jupyter](https://hackmd.io/@MarconiJiang/install_jupyter)
[:arrow_up:back to marconi's blog](https://marconi1964.github.io/)